
DN-A100P - Power amplifier MARANTZ - Free user manual and instructions
Find the device manual for free DN-A100P MARANTZ in PDF.
| Product type | Stereo power amplifier |
| Brand | MARANTZ |
| Model | DN-A100P |
| Output power | 100 W per channel at 8 Ω |
| Speaker impedance | 4 to 16 Ω |
| Number of channels | 2 |
| Dimensions (W x H x D) | 482 x 88 x 345 mm |
| Weight | 12.5 kg |
| Power supply | 230 V AC, 50/60 Hz |
| Power consumption | 500 W max |
| Audio inputs | 1 x XLR, 1 x stereo RCA |
| Speaker outputs | Screw terminals (2 pairs) |
| Frequency response | 20 Hz - 20 kHz (±0.5 dB) |
| Total harmonic distortion | < 0.05% |
| Signal-to-noise ratio | > 105 dB |
| Protection | Short circuit, overload, thermal |
| Ventilation | Natural convection, do not obstruct |
| Operating temperature | 0 °C to 40 °C |
| Chassis materials | Steel, aluminum front panel |
| Color | Black |
| Included accessories | Power cord, user manual |
| Maintenance and cleaning | Unplug before cleaning, use a dry cloth |
| Safety | Unplug for complete isolation, do not expose to moisture |
| Spare parts and repairability | Contact an authorized MARANTZ service center |
| General information | Compliant with standards EN60065, EN55013, EN55020 |
Frequently Asked Questions - DN-A100P MARANTZ
User questions about DN-A100P MARANTZ
0 question about this device. Answer the ones you know or ask your own.
Ask a new question about this device
Download the instructions for your Power amplifier in PDF format for free! Find your manual DN-A100P - MARANTZ and take your electronic device back in hand. On this page are published all the documents necessary for the use of your device. DN-A100P by MARANTZ.
USER MANUAL DN-A100P MARANTZ
INTEGRATED AMPLIFIER
DN-A100
OPERATING INSTRUCTIONS
The lightning flash with arrowhead symbol, within an equilateral triangle, is intended to alert the user to the presence of uninsulated "dangerous voltage" within the product's enclosure that may be of sufficient magnitude to constitute a risk of electric shock to persons.

The exclamation point within an equilateral triangle is intended to alert the user to the presence of important operating and maintenance (servicing) instructions in the literature accompanying the appliance.
WARNING:
TO REDUCE THE RISK OF FIRE OR ELECTRIC SHOCK, DO NOT EXPOSE THIS APPLIANCE TO RAIN OR MOISTURE.
- DECLARATION OF CONFORMITY
We declare under our sole responsibility that this product, to which this declaration relates, is in conformity with the following standards: EN60065, EN55013, EN55020, EN61000-3-2 and EN61000-3-3. Following the provisions of 73/23/EEC, 89/336/EEC and 93/68/EEC Directive.
To completely disconnect this product from the mains, disconnect the plug from the wall socket outlet.
The mains plug is used to completely interrupt the power supply to the unit and must be within easy access by the user.
VORSICHT:
Allow for sufficient heat dispersion when installed in a rack
- Handle the power cord carefully.
Hold the plug when unplugging the cord.
* (For apparatuses with ventilation holes)
- Do not obstruct the ventilation holes.
Die Beluftungsöffnungen)durenichtverdecktwerden. - Ne pas obstruer les trouss d'airation.
Non coprite i fori di ventilazione. - No obtruya los orificios de ventilación.
- De ventilatieopeningen mogen nicht worden beblokkeerd.
- Täppinte till ventilationsöppningarna.

- Do not let foreign objects into the apparatus.
- Keine fremden Gegenstände in das Gerätkommenlassen.
- Ne pas laisser des objets étrangers dans l'appareil.
E' importante che Nessun oggetto e inserto all'interno dell'unita. - Nodeojectosextraosdentrodelequipo.
- Laat geen vreemde voorwerpen in dit apparaat vallen.
- Se till att främande foremål inte tränger in i apparaten.

- Do not let insecticides, benzene, and thinner come in contact with the apparatus.
- Lassen Sie das Gerät nicht mit Insektiziden, Benzin oder Verdunnungsmitteln in Berührung kommt.
- Ne pasmettre en contact des insecticides,du benzene et un diluant avec l'appraiel.
- Assicuratevvi che l'unità non venga in contatto con insetticidi, benzolo o solventi.
- No permita el contacte de insecticidas, gasolina y diluyentes con el equipo.
- Laat geen insetkenverdelende middelen, benzine of verfederdneter met dit apparaat in Kontaktkommen.
- Se till att inte insektsmedel på spraybruk, bensen och thinner kommt其间 kontakt med apparatens höje.
- Never disassemble or modify the apparatus in any way.
- Versuchen Sie nemals das Gerät auseinander zu behnem oder auf jegliche Art zu verändern.
- Ne jamais démonter ou modifier l'apparéil d'une manière ou d'une autre.
- Non smontate mai, né modifies l'unité in dessn modo.
- Nunca desarme o modifie el equipo de ninguna manera.
- Nooit dit apparaat demonteren of op andere wijze modifiernen.
- Tainte isär apparaten och försök inte byygga om den.
CAUTION:
- The ventilation should not be impeded by covering the ventilation openings with items, such as newspapers, tablecloths, curtains, etc.
- No naked flame sources, such as lighted candles, should be placed on the apparatus.
- Attention should be drawn to the environmental aspects of battery disposal.
- Do not expose the set to dripping or splashing fluids.
- No objects filled with liquids, such as vases, shall be placed on the apparatus.
ACHTUNG:
A NOTE ABOUT RECYCLING:
This product's packaging materials are recyclable and can be reused. Please dispose of any materials in accordance with the local recycling regulations.
When discarding the unit, comply with local rules or regulations.
Batteries should never be thrown away or incinerated but disposed of in accordance with the local regulations concerning chemical waste.
This product and the accessories packed together constitute the applicable product according to the WEEE directive except batteries.

HINWEIS ZUM RECYCLING:
Thank you for choosing the DENON PROFESSIONAL DN-A100 Premain Amplifier. This remarkable component has been engineered to provide superb sound, as well as providing outstanding high fidelity reproduction of your favorite music sources.
As this product is provided with an immense array of features, we recommend that before you begin hookup and operation that you review the contents of this manual before proceeding.
Contents
Getting Started
Accessories 1
Cautions on installation 1
Cautions on using mobile phones
Before using 1
About the remote control unit 1
Inserting the batteries 2
Operating range of the remote control unit 2
Part names and functions
Front panel 2,3
Rear panel 3
Remote control unit 3
Connections
Connecting the speakers 4
Connecting the Audio Equipment 4
Cable indications 4
Connecting Players and Speakers 5
Connecting Recorders 5
Connecting the power supply cord 5
Operation
Preparations prior to playing 6
Starting playback 6
Starting recording 6
Copying cassette tapes 6
Troubleshooting 7
Specifications 7
Accessories
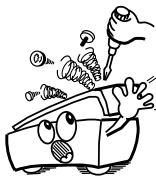
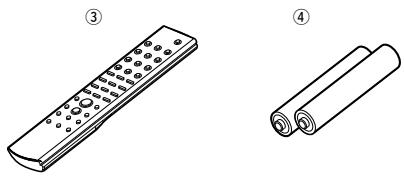
Check that the following parts are attached in addition to the main unit:
① Operating instructions
② Service station list
③ Remote control unit (RC-1022)
④ Batteries (R03/AAA). 2
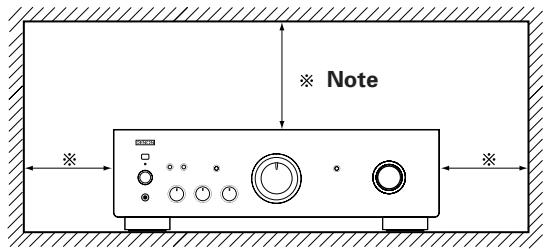
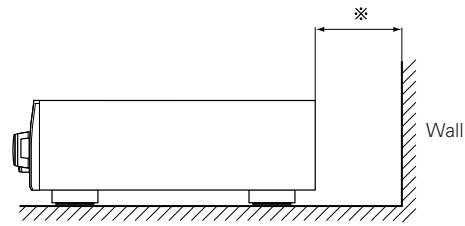
Cautions on installation
Note:
For heat dispersal, do not install this unit in a confined space such as a bookcase or similar enclosure.
Cautions on using mobile phones
Using a mobile phone near this unit may result in noise. If so, move the mobile phone away from this unit when it is in use.
Before using
Pay attention to the following before using this unit:
- Moving the set.
To prevent short-circuits or damaged wires in the connection cables, always unplug the power supply cord and disconnect the connection cables between all other audio components when moving the unit.
- Before turning the power switch on.
Check once again that all connections are correct and that there are not problems with the connection cables. Always set the power switch to the standby position before connecting and disconnecting connection cables.
- Store the operating instructions in a safe place.
After reading the operating instructions, store them in a safe place as they could come in handy in the future.
- Whenever the power switch is in the STANDBY state, the unit is still connected to AC line voltage.
Please be sure to turn off the power switch or unplug the cord when you leave home for, say, a vacation.
- Note that the illustrations in these instructions may differ from the actual unit for explanation purposes.
About the remote control unit
The included remote control unit can be used to control DENON PROFESSIONAL CD players, tape decks and tuners.
※ Some products may not be operable.
Inserting the batteries
① Remove the remote control unit's rear cover.
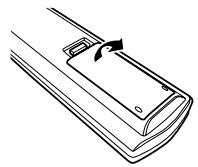
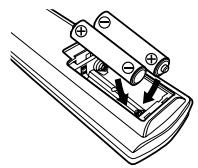
② Set two R03/AAA batteries in the battery compartment in the indicated direction.
③ Put the rear cover back on.
Notes on batteries:
- Replace the batteries with new ones if the set does not operate even when the remote control unit is operated nearby the unit. (The attached batteries are only for verifying operation.)
- When inserting the batteries, be sure to do so in the proper direction, following the "⊕" and "Θ" marks in the battery compartment.
-
To prevent damage or leakage of battery fluid:
-
Do not use a new battery together with an old one.
- Do not use two different types of batteries.
- Do not short-circuit, disassemble, heat or dispose of batteries in flames.
- If the battery fluid should leak, carefully wipe the fluid off the inside of the battery compartment and insert new batteries.
- Remove the batteries from the remote if it will not be in use for long periods.
Operating range of the remote control unit
- Point the remote control unit at the remote sensor when operating it.
- The remote control unit can be used from a distance of up to about 8 meters, at a horizontal angle of up to 30^ with respect to the sensor.
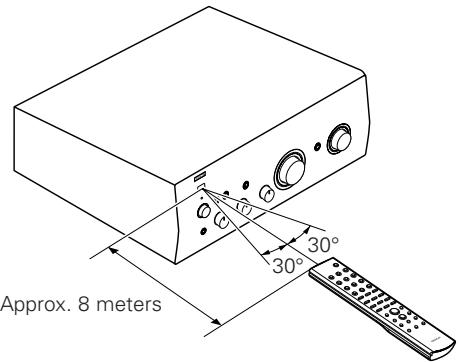
NOTE:
- It may be difficult to operate the remote control unit if the remote sensor is exposed to direct sunlight or strong artificial light.
Part names and functions
Front panel
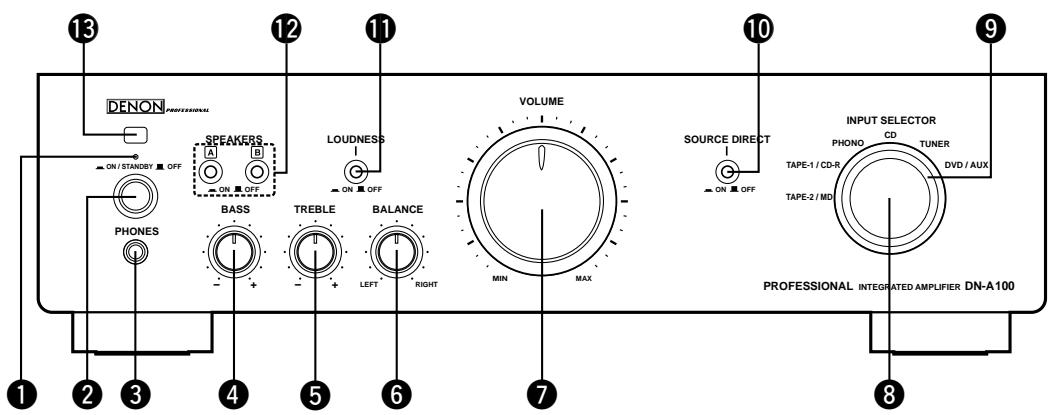
1 Power indicator
Changes as shown below according to this unit's status.
- For several seconds after the power is turned on: Red (blinking)
- When the power is on: Green
- When in standby: Red
- When the power is off: Off
2 Power switch (ON/STANDBY OFF)
When set to "ON/STANDBY", the power turns on, and when set to "OFF", the power turns off.
3 Headphone jack (PHONES)
BASS control knob
TREBLE control knob
BALANCE control knob
7 VOLUME control knob
INPUT SELECTOR knob
Use this to select the source that you wish to listen to.
9 Input indicator
The selected input is shown with an orange indicator.
10 SOURCE DIRECT switch
When set to "ON", the signals do not pass through the tone adjustment circuitry (bass, treble, balance and loudness), resulting in playback with higher sound quality.
When set to "■OFF", the sound can be adjusted to your tastes.
1 LOUDNESS switch
When listening with the volume turned low, set this to "ON" to amplify the bass and treble sound that is hard to hear when the volume is low and achieve a more natural sound.
12 SPEAKERS A/B switches
- When A (or B) is set to "ON", sound is produced from the speakers connected to the A (or B) speaker output terminals.
- When both A and B are set to "ON", sound is produced from the speakers connected to both the A and B speaker output terminals.
- When both A and B are set to "■OFF", no sound is produced from the speakers. Use this when listening over headphones.
Remote control sensor
Getting Started

- When the VOLUME control knob is set just beyond the "12 o'clock" position (over halfway), the adjustments that can be made with the BASS and TREBLE controls is decreased.
- When the VOLUME control knob is set to maximum or turned fully clockwise, the base and treble can no longer be adjusted.
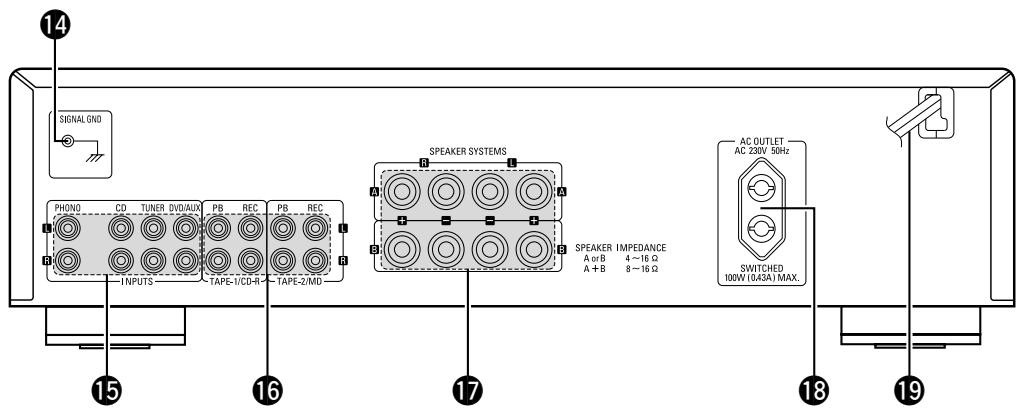
Rear panel
14 SIGNAL GND (ground) terminal
Connect the ground wire from your turntable here.
NOTE:
- This terminal is not a safety ground.
15 Input terminals (INPUTS)
Connect your source equipment here.
16 Recording input/output terminals
(TAPE-1/CD-R and TAPE-2/MD)
Connect your recording equipment here.
Speaker system terminals
(SPEAKER SYSTEMS)
Connect your speakers here.
18 AC OUTLET
Use this as the power outlet for other audio devices. Check equipment power requirement ratings before use (see the ratings as marked on the rear panel). If in doubt consult with your dealer or DENON PROFESSIONAL distributor.
Power supply cord
NOTE:

- Functions 4, 5, 6 and 11 are only available when the SOURCE DIRECT switch is set to "■OFF".
- Short-circuiting plugs are inserted into the PHONO input terminals. Remove these when connecting a turntable. Be sure to keep it for future use.
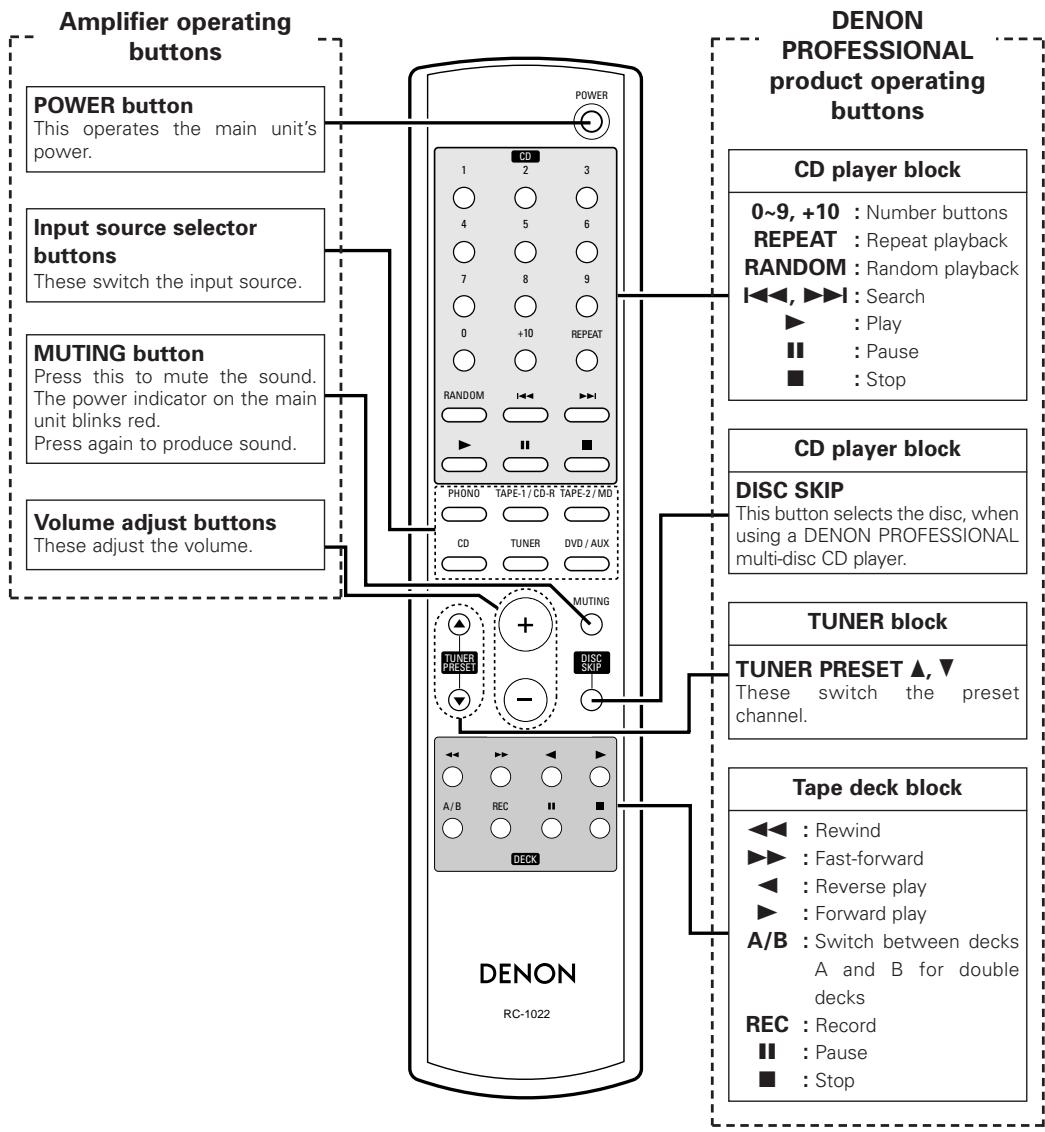
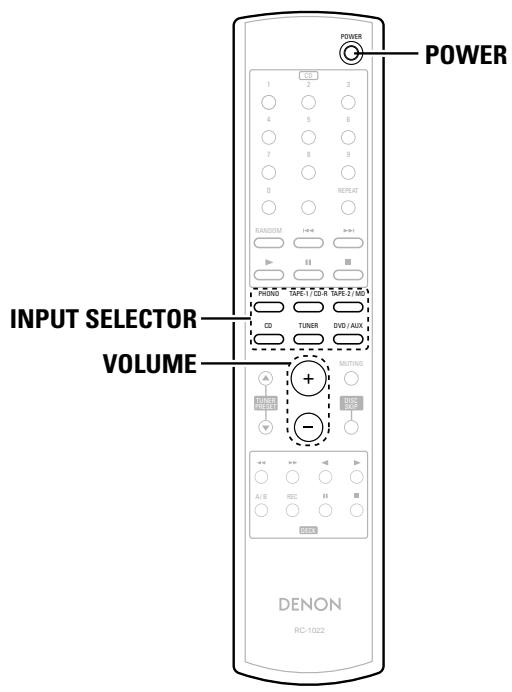
Remote control unit

- The included remote control unit can be used to operate DENON PROFESSIONAL CD players, tape decks and tuners.
- When using it, also refer to the operating instructions of the other devices.
- Some products may not be operable.
Connections
Connecting the speakers
Connect the speaker terminals with the speakers making sure that like polarities are matched ( with , with
Connecting the speaker cables
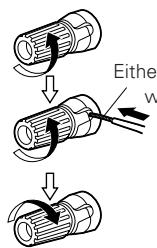
- Loosen by turning counterclockwise.
Either tightly twist or terminate the core wires.
- Insert the cable.
- Tighten by turning clockwise.
NOTE:
When making connections, take care that none of the individual conductors of the speaker cable come in contact with adjacent terminals, with other speaker cable conductors, or with the rear panel and screws.
NEVER touch the speaker terminals when the power is on. Doing so could result in electric shocks.
Speaker impedance
Use speakers with impedances within the ranges shown below according to their usage conditions.
| Speakers used | Impedance |
| A or B | 4 ~ 16 Ω/ohms |
| A and B | 8 ~ 16 Ω/ohms |
Note on speaker impedance
When using speakers with an impedance below the designated value (for example 4 Ω/ohms), playing for long periods of time with the volume high could cause the temperature to rise, activating the protection circuit.
When the protection circuit is activated, the output to the speakers is cut off and the power indicator blinks. If this happens, unplug the power cord, wait for the set to cool off and improve ventilation around the unit. Also check the wiring of the input cables and the speaker cables. After doing this, plug the power cord back in and turn the unit's power back on.
If the protection circuit is activated again even though there are no problems with the wiring or the ventilation around the unit, switch off the power and contact a DENON PROFESSIONAL service center.
Connecting the Audio Equipment
NOTE:
- Do not plug in the power supply cord until all connections have been completed.
- When making connections, also refer to the operating instructions of the other components.
- Be sure to connect the left and right channels properly (left with left, right with right).
- Do not bundle power cords together with speaker cables. Doing so could result in humming or noise.
- Do not turn up the volume when no turntable is connected to the PHONO input terminals. Doing so will cause humming or noise.
When not connecting a turntable, leave the included short-circuiting pin plug plugged in.
Cautions on playing SA sources:
When regular speakers not compatible with SA sources (DVD Audio discs, Super Audio CDs and other sources including treble components above the audible range), set the properties of the player (DVD Audio player, Super Audio CD player, etc.) for use with regular speakers (or amplifiers).
The speakers may be damaged if the volume is set too high when playing SA sources.
For instructions on setting the player, refer to the operating instructions included with the player.
Cable indications
The hookup diagrams on the subsequent pages assume the use of the following optional connection cables (not supplied).
| Audio cable | Signal direction |
| Analog connections (Stereo) (White) (Red) Pin-plug cable | Audio signal IN OUT OUT IN |
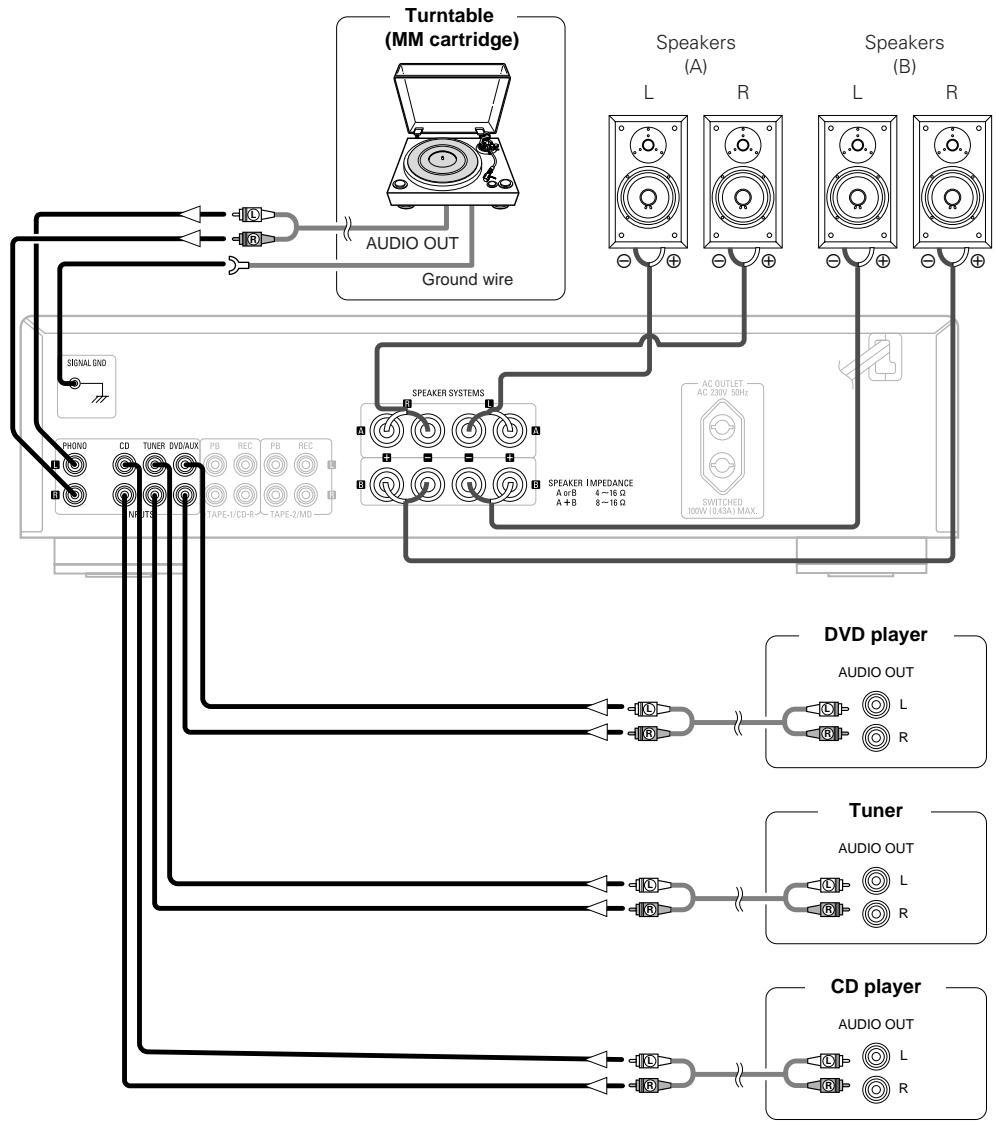
Connecting Players and Speakers
- Only Turntables fitted with a MM (Moving Magnet) cartridge can be used with this unit. If you have an MC (Moving Coil) cartridge you will need to use a commercially available head amplifier or step-up transformer.
- If humming or other noise is generated when the ground wire is connected, disconnect it.
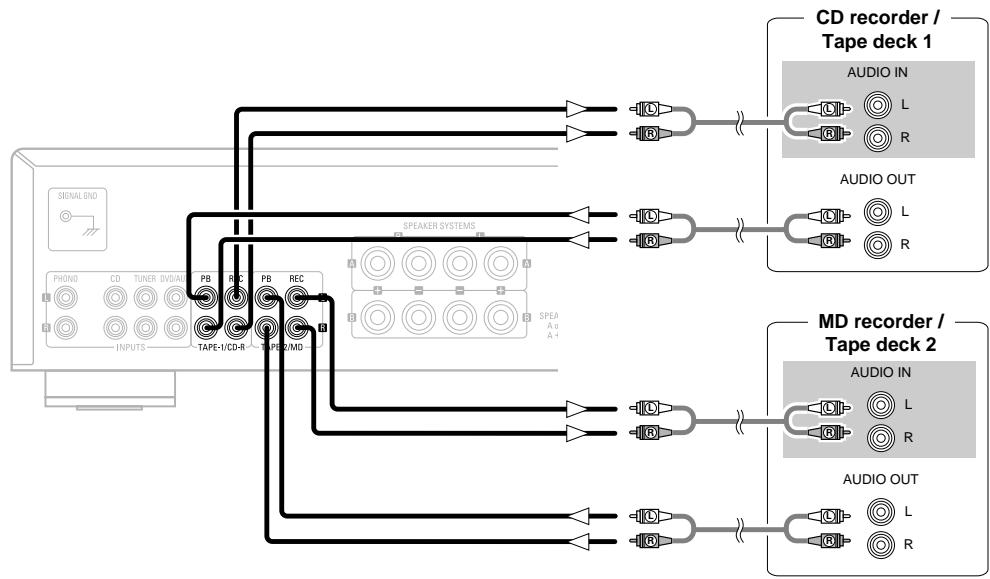
Connecting Recorders
Connecting the power supply cord
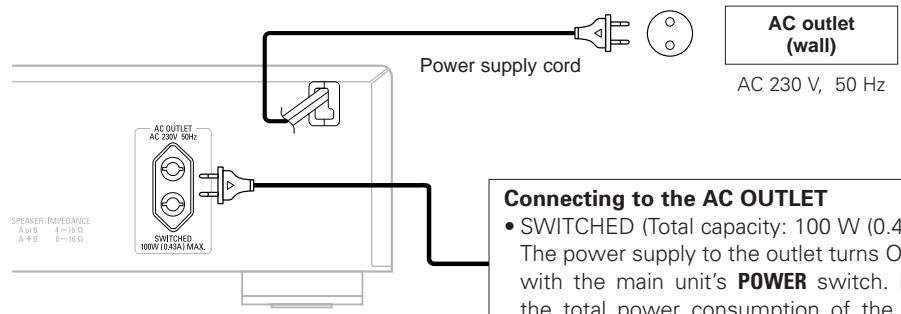
Connecting to the AC OUTLET
- SWITCHED (Total capacity: 100 W (0.43 A): The power supply to the outlet turns ON and OFF with the main unit's POWER switch. Make sure the total power consumption of the connected devices does not exceed 100W (0.43 A).
NOTE:
- Only use the AC OUTLET for audio equipment. Never use it for hair driers, TVs or other electrical appliances.
- Insert the plugs securely. Incomplete connections will result in the generation of noise.

About the button names in this explanation
< > : Buttons on the main unit
[ ] : Buttons on the remote control unit
Button name only :
Buttons on the main unit and remote control unit
Operation
Preparations prior to playing
1 Set the volume to the minimum by using VOLUME.
2 Set
3 Set
4 Press
5 Turn on the power by pressing POWER.
- The power indicator blinks red for several seconds, then lights green.
Starting playback
1 Use INPUT SELECTOR to select the source to be played.
- Select one of the sources among the following: TAPE-2/MD, TAPE-1/CD-R, PHONO, CD, TUNER and DVD/AUX.
- The input indicator for the selected source lights.
2 Play the selected source.
3 Adjust the volume by using VOLUME.
4 Adjust the tone with
※ If there is no need to adjust the tone, press
Starting recording
1 Turn to select the source to be recorded.
PHONO, CD, TUNER, DVD/AUX:
Select the device connected to the recording terminals to record.
2 Set the recorder to the record mode.
3 Start playing the source to be recorded.
Copying cassette tapes
1 Turn and select "TAPE-1/CD-R" (or "TAPE-2/MD").
TAPE-1/CD-R, TAPE-2/MD:
Select this to record from tape deck 1 onto tape deck 2 (or from tape deck 2 onto tape deck 1).
2 Set the device connected to the TAPE-1/CD-R (or TAPE-2/MD) terminal to the record mode.
3 Start playback on the device connected to the TAPE-2/MD (or TAPE-1/CD-R) terminal.

- When performing these operations, also refer to the operating instructions of the other devices.
Troubleshooting
Check the following before assuming there is a problem with the set
- Are all connections proper?
- Is the set being operated as described in the operating instructions?
- Are the speakers and input components being operated properly?
If the set does not seem to be operating properly, check the points listed below. If these points do not apply, the set may be damaged. Turn off the power immediately and contact your store of purchase.
| Symptom | Cause | Measures | Page |
| When the power is turned on, the power indicator does not light and no sound is produced. | ·The power supply cord's plug is not fully plugged in. | ·Make sure the unit is correctly plugged in and switched on at the mains socket. | 5 |
| The power indicator lights but no sound is produced. | ·The speaker cables are not fully connected. ·The device you want to listen to has not been selected. ·The volume control is set to minimum. ·The input cable is not fully connected. ·The speaker selector button is set to “OFF”. | ·Connect securely. ·Insure the correct input is selected. ·Set to an appropriate level. ·Connect securely. ·Ensure the SPEAKER A or B buttons are set to “ON” as appropriate. | 4, 5 2, 6 2, 6 5 2, 6 |
| Sound is only produced from the left or right speaker(s). | ·The speaker cables are not fully connected. ·The input cable is not fully connected. ·The left/right balance is off. | ·Connect securely. ·Connect securely. ·Adjust to a proper balance using the balance control knob. | 4, 5 5 2 |
| For stereo sound, the positions of the instruments are inverted left/right. | ·The connections of the speakers or input cables are inverted. | ·Check the connections to be sure that left is connected to left, right to right. | 4, 5 |
| Humming sound is heard in the music when playing records. | ·The player's ground wire is not connected. ·The cables are not fully connected to the PHONO terminals. ·Influence from a TV or VCR near the player. | ·Connect securely. ·Connect securely. ·Try changing the positions in which the devices are installed. | 3, 5 3, 5 - |
| Howling is produced along with the music if the volume is too high when playing records. | ·The player and speakers are too close together. ·The vibrations from the speakers are being transmitted to the player through the floor. | ·Install the player and speakers as far from each other as possible. ·Use cushions, etc., to absorb the speakers' vibrations. | - - |
| When playing a record, the sound is distorted. | ·The needle pressure is not proper. ·There is dirt on the tip of the needle. ·The cartridge is defective. | ·Adjust to a proper needle pressure. ·Check the tip of the needle. ·Replace the cartridge. | - - - |
Specifications
Power amplifier section
Rated Output Power:
2-channel driving (CD SP OUT)
45 W + 45 W (8 Ω/ohms, 20 Hz ~ 20 kHz, T.H.D. 0.07 %)
Dynamic power:
70 W + 70 W (4 Ω/ohms, DIN, 1 kHz, T.H.D. 0.7 %)
High frequency distortion:
0.02 % (Rated output: -3 dB), 8 Ω/ohms, 1 kHz
Output terminals:
Speaker A or B: 4 ~ 16 Ω/ohms
A + B: 8 ~ 16 Ω/ohms
Suited for headphones/stereo headphones
Pre amplifier section
Equalizer amplifier output:
150mV
(REC OUT terminals)
PHONO (MM): 2.5 mV/47 kΩ/kohms
Input Sensitivity/Input Impedance:
CD, TUNER, DVD/AUX, TAPE-1/CD-R, TAPE-2/MD:
100 mV/47 kΩ/kohms (SOURCE DIRECT OFF)
100 mV/16 kΩ/kohms (SOURCE DIRECT ON)
RIAA Deviation:
PHONO (MM): 20Hz 20kHz± 0.5 dB
Overall performance
SN Ratio (A network):
PHONO (MM): 84 dB
(With input terminals short-circuited, 5mV input signal)
CD, TUNER, DVD/AUX, TAPE-1/CD-R, TAPE-2/MD:
105 dB (input terminals short-circuited)
Tone control (bass):
BASS: 100 Hz±8 dB
TREBLE: 10 kHz±8 dB
LOUDNESS:
100 Hz: +6 dB, 10 kHz: +6 dB
General
Power outlet:
1 switched outlet, total capacity 100 W (0.43 A)
Power Supply:
AC 230 V, 50 Hz
Power Consumption:
185 W (IEC)
Dimensions:
434 (W) x 121 (H) x 307 (D) mm (including protruding parts)
6.5 kg
Remote control unit (RC-1022)
Remote control type:
Infrared pulse
Power supply:
R03/AAA Type (2 batteries)
External dimensions:
120 g (including batteries)
- For improvement purposes, specifications and functions are subject to change without advanced notice.
D&M Holdings Inc.
PROFESSIONAL BUSINESS COMPANY
TOKYO, JAPAN
http://www.dm-pro.jp