USER MANUAL EQUATEUR 2 THERMOR
SOFT HEAT INERTIA RADIATOR
ELEKTRISCHER SOFT HEAT RADIATOR
INERTI RADIATOR
PILOTAGE INTELLIGENT

JUSO
45%
D'ECONOMIES
D'ENERGIE
Équateur 2
SOFT HEAT INERTIA RADIATOR
ELEKTRISCHER SOFT HEAT RADIATOR
INERTI RADIATOR

1.1 - Radiator composition 49
1.2 - Installing your radiator 49
1.3 - Fix the wall-mounting frame to the wall 51
1.4 - Connect the radiator 53
1.5 - Lock the radiator on its wall-mounting frame 54
2 - Getting used 55
2.1 – The control box 55
2.2 - Switching your radiator on/off 56
2.3 - Temperature setting 57
2.4 - Set the day and time 58
2.5 - Set the language 59
2.6 - Practical functions 60
3 - Using the Smart Control 61
3.1 - Advantages of the Smart Control 61
3.2 - Operation of the Smart Control 61
3.3 - Activation of the Smart Control 61
3.3 - Smart control settings 62
4 - Use without smart control 64
5 - Load shedding 70
6 - Maintenance 70
7-If a problem occurs 71
8 - Appendix 72
Take time to read the instructions for your radiator and discover usage recommendations to improve your well-being. Keep the instructions, even after you have installed your radiator.
(Type R4GBD2-Mk22)
9 - Installation 73
9.1 - Radiator composition 73
9.2 - Installing your radiator 73
9.3 - Fix the wall-mounting frame to the wall 75
9.4 - Connect the radiator 76
9.5 - Lock the radiator on its wall-mounting frame 77
10-Getting used 77
10.1 - The control box 77
10.2 - Switching your radiator on/off 78
10.3 - Switch the screen on 78
10.4 - Temperature setting 78
10.5 - Set the day and time 79
10.6 - Set the language 80
10.7 - Practical functions 81
11 - The heating modes - When do you use them? 83
11.1 - Comfort mode 83
11.2 - ECO mode 85
11.3 - The Frost Free mode 85
12 - Programming your radiator 87
12.1 -Prog mode 87
13 - If you have a consumption reducer 89
14 - Maintenance 89
15 - If a problem occurs 89
16 - Appendix 91
16.1 - Warning 91
16.2 - Identification of the radiator 91
Thank you for having chosen this equipment and having shown confidence in our products. The radiator that you have just purchased has passed many tests and inspections to optimise its quality and provide you with full satisfaction.
Some recommendations:
Read the instructions before starting the installation of your radiator to satisfy standard requirements.
Check the power supply voltage and switch the power supply off before connecting your radiator.
Keep the instructions, even after you have installed your radiator.
Radiator characteristics:
CAT C : Equipment satisfying the NF Electricity performance standard according to the criteria of the stated category.
IP24 : Equipment protected against water splashes
Classe II : Double insulation (no connection to earth).
IK08 : Resistance to mechanical shocks

: Equipment conforming with European Directive 2002/96/CE (DEEE).
1 - INSTALLING THE RADIATOR
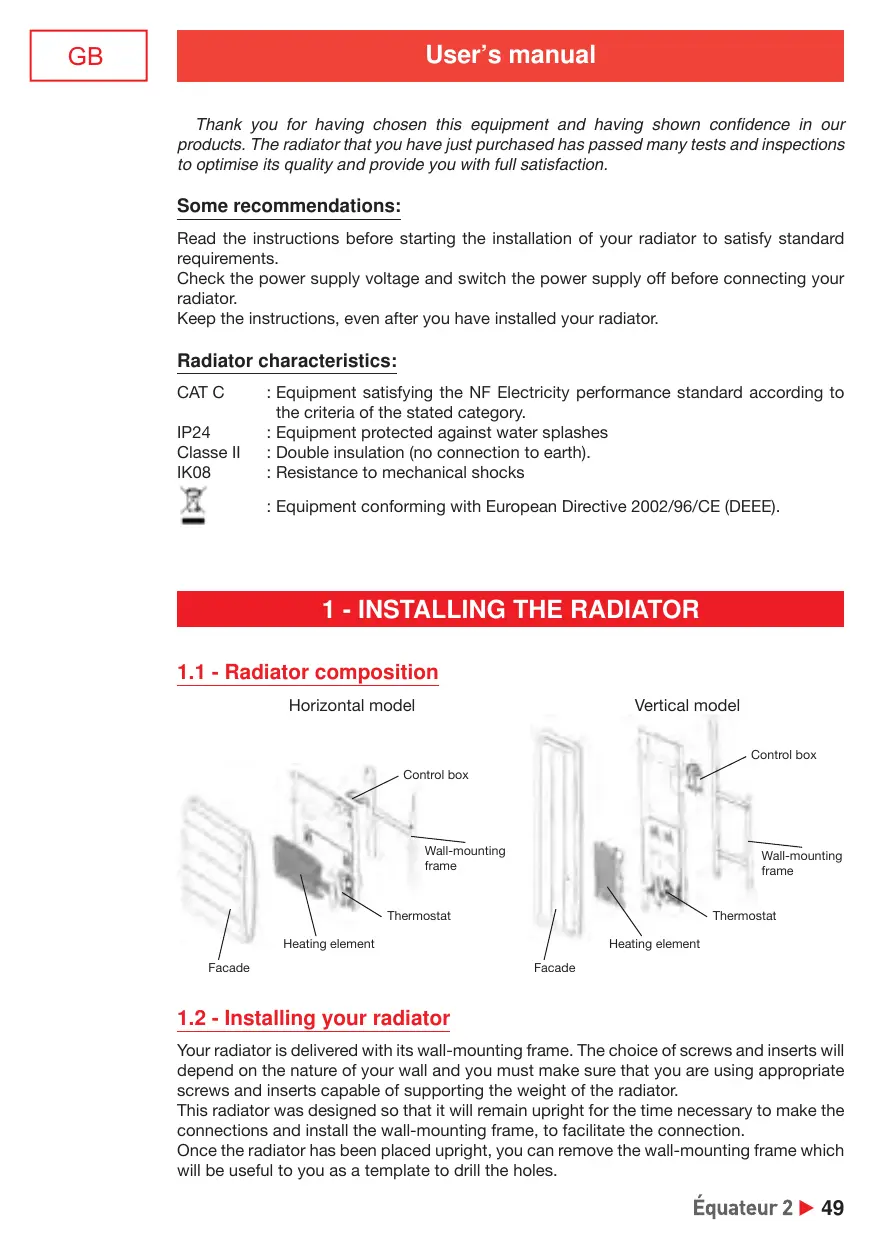
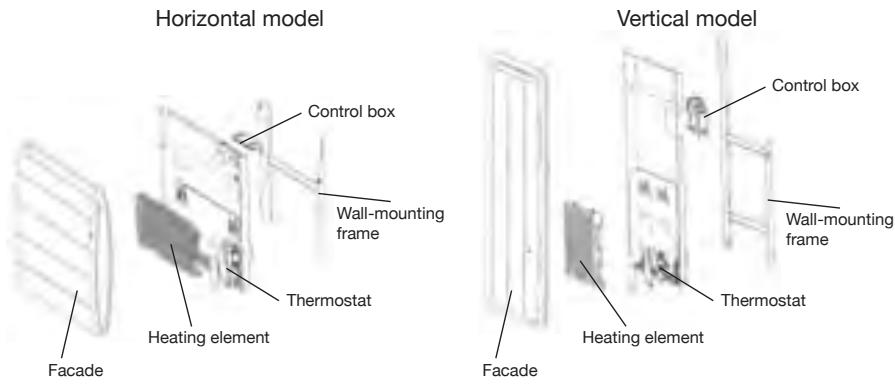
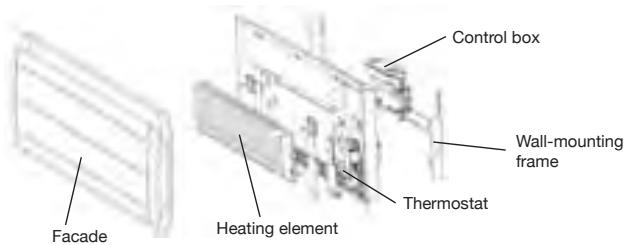
1.1 - Radiator composition
1.2 - Installing your radiator
Your radiator is delivered with its wall-mounting frame. The choice of screws and inserts will depend on the nature of your wall and you must make sure that you are using appropriate screws and inserts capable of supporting the weight of the radiator.
This radiator was designed so that it will remain upright for the time necessary to make the connections and install the wall-mounting frame, to facilitate the connection.
Once the radiator has been placed upright, you can remove the wall-mounting frame which will be useful to you as a template to drill the holes.
1.2.1 - Installation rules
This radiator was designed to be installed in a home.
The installation shall be made according to standard practice satisfying standards in force in the installation country (NFC 15100 for France).
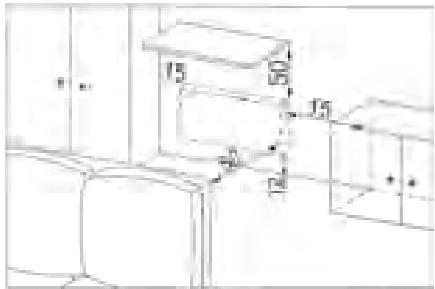
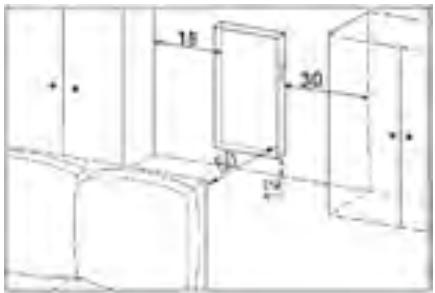
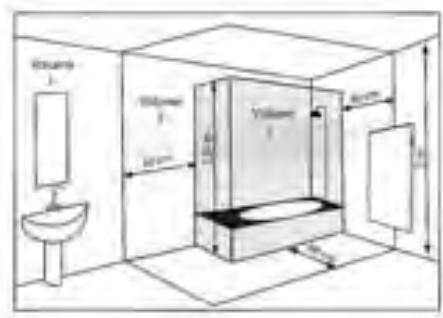
Respect minimum distances from the furniture to the location of the radiator (see diagram). If you have a wall lining applied on foam, you will need to place packing behind the radiator mounting frame with the same thickness as the foam to maintain a clear space behind the radiator so that its regulation is not disturbed.
Do not install the radiator:
- In a draft that could disturb its regulation
(for example under a Controlled Mechanical Ventilation system, etc)
- Under a fixed power outlet.
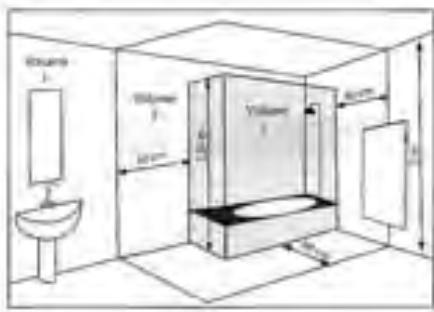
- Within volume 1 in bathrooms.
Radiators used in bathrooms must be installed such that switches and other control devices of the radiator cannot be touched by anyone in the bath or the shower.
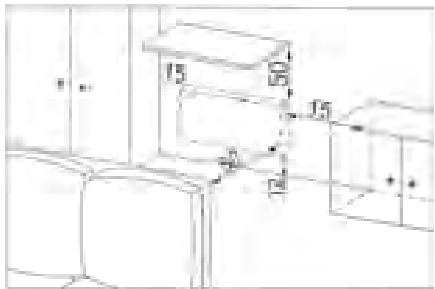
1.3 - Fix the wall-mounting frame to the wall
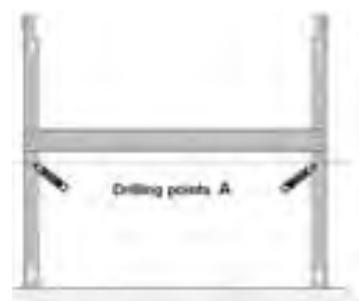
Horizontal model
| 1 | 2 | 3 |
| Place the wall-mounting frame on the floor. Mark drilling points A. These points give the position of the lower attachments. | Lift the wall-mounting frame making the previously marked points coincide with drilling holes A.
Mark the 2 drilling points B using a pen. You will then have marked the 4 drilling points. |
| 3 | Drill the 4 holes and insert the appropriate inserts for your wall (for example plasterboard, concrete).
Put the wall-mounting frame into place and screw it into position. |
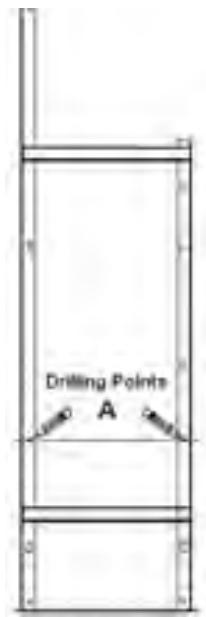
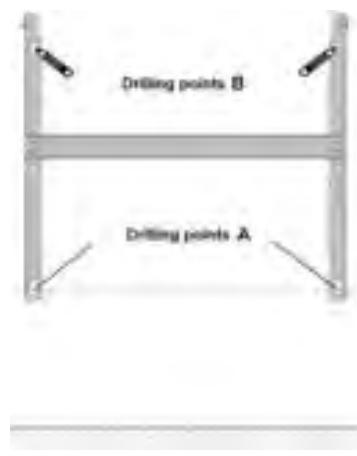
Vertical model
1
2
3
A
Place the wall-mounting frame on the floor. Mark the drilling points A. These points give the position of the lower attachments.
Lift the wall-mounting frame making the previously marked points coincide with drilling holes A.
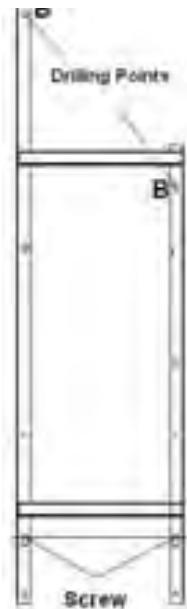
Mark the 2 drilling points B using a pen. You will then have marked the 4 drilling points.
Drill the 4 holes and insert the appropriate inserts for your wall (for example plasterboard, concrete).
Put the wall-mounting frame into place and screw it into position.
NOTE: For a vertical radiator, remember to leave packing under the radiator until it has been put into position on the wall-mounting frame.
Dimensions and weights of radiators
| Horizontal model | Vertical model |
| Power(W) | 750 | 1000 | 1250 | 1500 | 2000 | 1000 | 1500 | 2000 |
| Width (mm) | 487 | 635 | 783 | 931 | 1153 | 458 |
| Thickness (mm) | 145 | 150 |
| Height (mm) | 607 | 1161 | 1383 | 1605 |
| Weight (kg) | 15 | 21 | 27 | 30 | 40 | 26,2 | 28,4 | 38 |
1.4 - Connect the radiator
The radiator must be powered at 230V50Hz
The radiator power supply must be connected directly to the network behind the omni-pole breaking device with a contact opening distance of at least 3mm without an intermediate switch (clock, mechanical and static relay, ambience thermostat, etc).
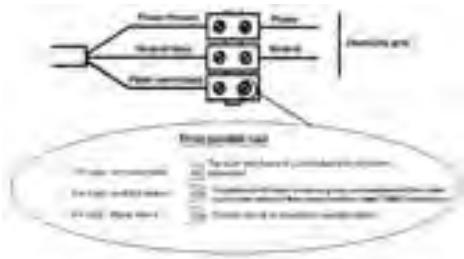
The connection to the mains power supply will be made using a 3-wire cable (Brown = Phase, Blue = Neutral, Black = Pilot wire) through a connection box. The connection box must be installed at least 25cm above the floor in wet rooms like kitchens, the bathrooms. The installation must be provided with a circuit breaker type protection device.
Connection to the earth is prohibited. Do not connect the pilot wire (black) to the earth.
The manufacturer, his after sales service or a similar qualified person must replace the power supply cable if it is damaged, so that the work can be done safely.
The power supply cable must be put back into position and fixed with the plastic flange to hold the thermostat in position. There is a risk of electrical danger if this operation is not respected.
If the pilot or piloted radiator is protected by a 30mA differential protection device (e.g. bathroom), then the power supply to the pilot wire connected onto this differential switch will have to be protected.
Pilot wire connection test
You can connect the pilot wire if your house is fitted with a programming unit, or a power manager.
In this case, make the following checks to verify that programming orders are transmitted correctly:
| Orders Received | No current | 230V for 3s | 230V for 7s | 230V | -115V négative | +115V positive |
| Signal to be transmitted | | 5' 3" | 5' 7" | | | |
| Mode Obtained | COMFORT | COMFORT -1°C | COMFORT -2°C | ECO | FROST FREE | SWITCH HEATING OF / LOAD SHEDDING |
Frost free and load shedding orders take priority when programming is done through pilot wire or power line.
The time to changeover from Comfort mode to Eco mode is of the order of 12 seconds.
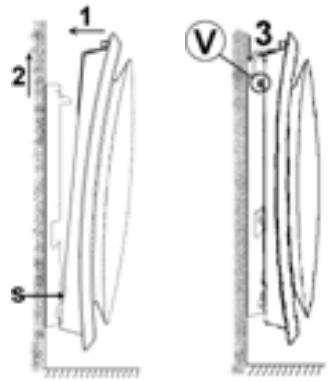
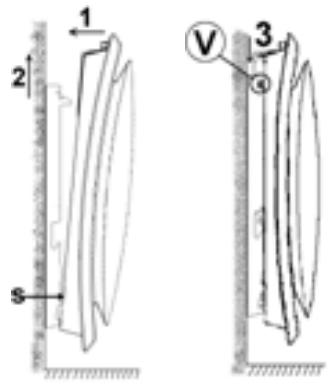
1.5 - Lock the radiator on its wall-mounting frame
- Place the radiator on wall-mounting frame S as shown on the diagram.
- Bring the radiator to the wall-mounting frame and then lift it (arrows 1 and 2).
- Insert the wall-mounting frame tabs in the radiator holes and then lower the radiator (arrow 3).
- Lock by turning the 2V screws by half a turn and your radiator is fixed.
2 - GETTING USED
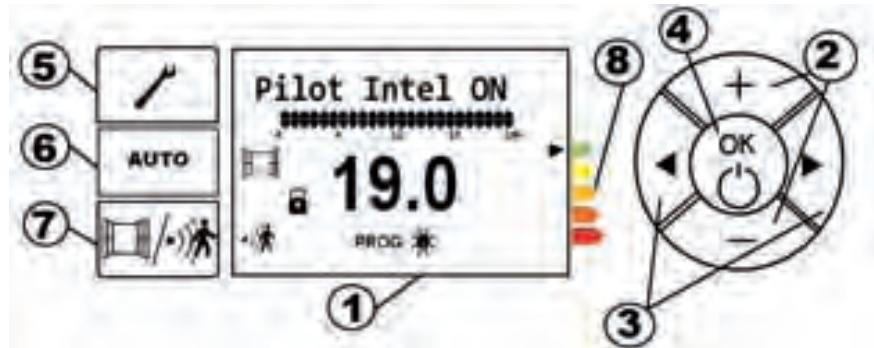
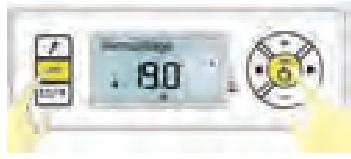
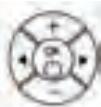
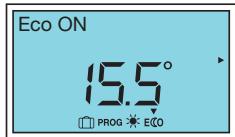
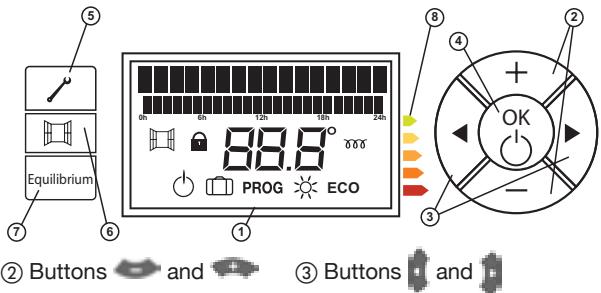
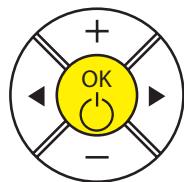
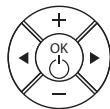
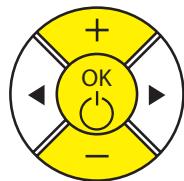
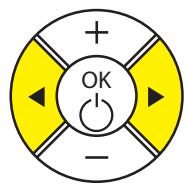
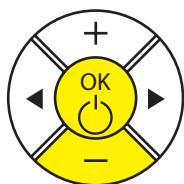
2.1 - The Control box
① Screen
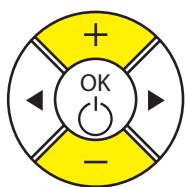
② Buttons
and
(3) Buttons

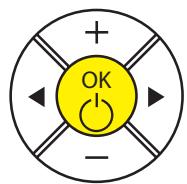
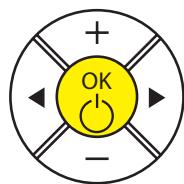
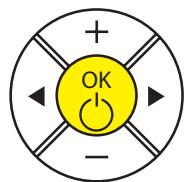
④ OK -
Heating On/off
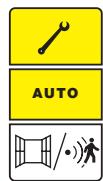
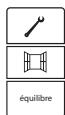
(5) Settings

⑥ Smart Control function
⑦ Automat
ic ventilation/presence detection
⑧ Consum


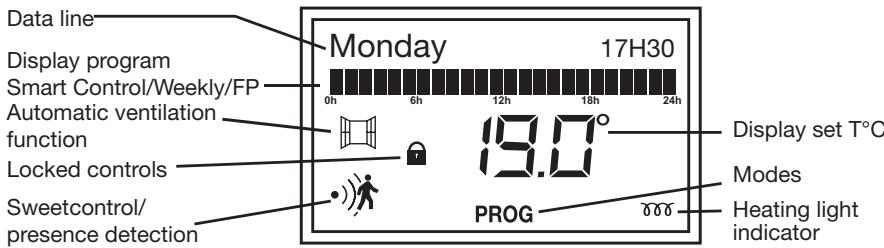
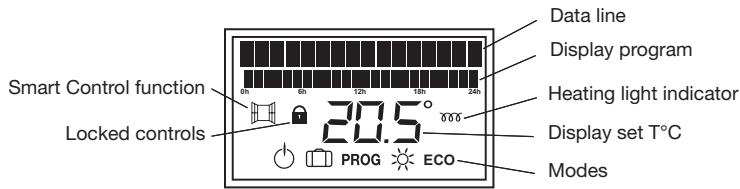
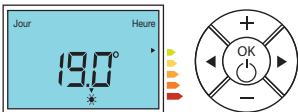
2.1.1 - Description of the box screen
2.2 - Switching your radiator on/off
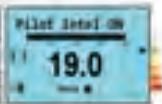
| At the first powered, the screen lights up. | 19.0
19.0
19.0
19.0
19.0
19.0
19.0
19.0
19.0
19.0
19.0
19.0
19.0
19.0
19.0
19.0
19.0
19.0
19.0
19.0
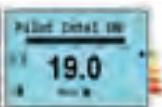
19.0 | Pilot Intel ON, the open window and Sweet Control (detection of presence / absence) are displayed.
The intelligent control is enabled (see page 11) |
| To disable the intelligent control, press AUTO. | 19.0
19.0
19.0
19.0
19.0
19.0
19.0
19.0
19.0
19.0
19.0
19.0
19.0
19.0
19.0
19.0
19.0
19.0
19.0
19
OK
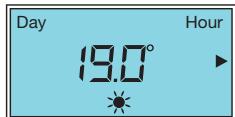
display «OFF» | Day
19.0°
After a few moments, the date, time and temperature comfort default to 19 °C appears. |
| To pause the radiator support (long) key to OK display «OFF» | + OK
- | OFF
The radiator displays OFF «then turn off. |
2.2.1 - Switch the screen on
| If the screen is not backlit, press any button to switch the screen on. | | The screen lights up |
2.2.2 - Choose the heating mode
A slight smell may occur the first time that the radiator is heated. This is caused by the elimination of traces left during manufacturing of the radiator and will disappear after a few moments of operation.
| Pictogram | Description | When to use this mode |
| Comfort | When you are at home. |
| ECO | Eco | When you are out for 2 to 48h or asleep. |
| Frost free | If you are away for more than 48h or in the summer. The Frost free temperature is fixed to about 7°±3 C and you cannot modify it. |
| Comfort -1 | These comfort modes are accessible only with the using of the detector if your installation is provided with a power manager. |
| Comfort -2 |
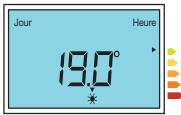
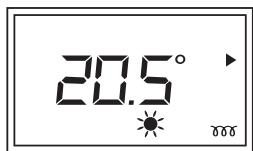
2.3 - Temperature setting
The default temperature is 19^ .
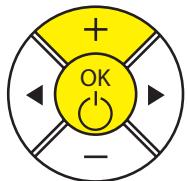
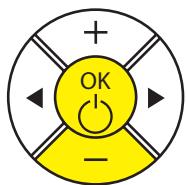
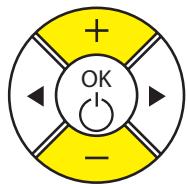
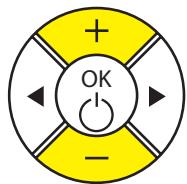
You can vary it by pressing the or buttons.
Press the OK button to confirm
The heating light indicator is displayed on the screen if the ambient temperature is lower than the displayed temperature (set temperature).
Wait for at least 6 hours until the temperature stabilises.

The black arrow moves along the consumption indicator between the green and the red depending on the level set temperature required. The Comfort temperature recommended by Ademe (French Agency for the Environment & Energy control) is 19^ , and this arrow informs you if your behaviour is within or outside the recommendation.
2.4 - Set the day and time
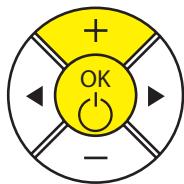
| To reach the “set day of the week” menu, press | | (Set: D/H/Min
«Set D/H/Min» is displayed on the text line. |
| Press OK to access the “set day of the week” submenu. | + OK - | The first two letters of the day of the week blink. |
| Select the day of the week by pressing the + and - buttons and then confirm by pressing OK. | + OK - | Once the day has been confirmed, the hours blink. |
| Select the current hour by pressing the + and - buttons and confirm by pressing OK. | + OK - | Once the hour has been confirmed, the minutes blink. |
| Select the current minutes by pressing the + et - buttons and confirm by pressing OK. | + OK - | (Set: D/H/Min
Once the minutes have been confirmed, the settings menu is displayed again. |
| To quit the settings menu, press | AUTO | Day Hour
190°
Return to the standby screen. |
2.5 - Set the language
| To access the “set language” menu, press | AUTO | 《Set : D/H/Min
«Set D/H/Min» is displayed on the text line |
| Browse through the menu using the scroll left or right buttons until you reach the “set language” menu | + OK - | 《Set : Language
The «set language» submenu is displayed |
| Press OK to enter the «set language » submenu | + OK - | English
The language blinks. |
| Select the required language by pressing the + and - buttons and confirm by pressing OK button. | + OK - | 《Set : Language
The language is confirmed and the main menu is displayed again. |
| To quit the settings menu, press | AUTO | Day Hour
190°
Return to the standby screen. |
2.6 - Practical functions
2.6.1 - Lock/Unlock controls
You can lock the controls by pressing the AUTO and

buttons for a
few moments, to prevent accidental manipulations.
Locking and a padlock displayed on the screen
Do the same manipulation to unlock.
2.6.2 - Limit the set temperature
You can limit the maximum comfort set temperature that is set to 28^ .
To limit the maximum Comfort temperature, press the OK and + buttons until "Set Max Temp" is displayed.
Max temp setting

The maximum Comfort temperature is displayed.
To modify the displayed temperature, press the - button until the required temperature, then confirm by pressing the OK button
Max temp setting

Note: you cannot set the comfort temperature higher than the maximum recorded Comfort temperature. The « ⋆ » pictogram and the maximum comfort set temperature are displayed.
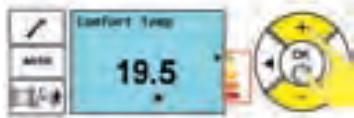
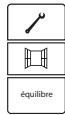
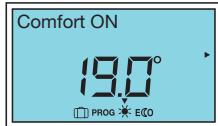
2.6.3 - The Equilibrium function
Use the Equilibrium function to set your radiator to the optimum temperature, which will give you a good compromise between your comfort and your savings.
If you want to immediately display the recommended settings, use the Equilibrium function.
To use the Equilibrium function, press the + and - buttons simultaneously.
Comfort ON

PROG ECO
The displayed temperature is 19^ in Comfort mode and 15.5^ in ECO mode.
2.6.4 - Return to the basic factory settings
You can return your radiator to the basic settings (recommended temperature, initial programming).
Press any button to activate screen lighting.
Keep the AUTO + OK buttons pressed simultaneously for a few seconds until all display appear on the screen. Energy saving and programming functions deactivated.

After some time, all the symbols of the screen are displayed.

3 - USING THE SMART CONTROL
3.1 - Advantage of smart control
With the Smart Control function, the radiator memorises the lifestyle of the occupants and learns the thermal properties of the room in which it is installed. It is thus capable of anticipating and adapting the heating level of the radiator to optimise comfort when you are present and to make measurable savings when you are out. As a result, your radiator also reacts to different unexpected events (opening/closing windows, unusual presence, etc.) to be always comfortable and to achieve savings of up to 45% .
3.2 - Operation of the Smart Control
The radiator start in Comfort Mode during the first week while adapting to the absences and potential ventilation.
It updates your rhythm of life at the end of each day of the week. This will serve for the following week.
The radiator adjust the level of heat according your rhythm of life of the previous weeks. If you have been absent for 72 hours, the radiator will activate the Frost Free Mode. In case of forced stop, the radiator will keep in memory your recorded rhythm of life.
3.3 - Activation of the Smart Control
Press the Auto. Button to use Smart Control
Smart control ON is displayed at the top of the screen.
Press the Auto button to disable the Smart Control
Smart Control OFF is displayed at the top of the screen.
3.4 - Smart control settings
You can customise the different Smart Control parameters.
3.4.1 - Automatic ventilation settings
Automatic ventilation will detect opening and closing of your windows. The radiator will automatically change to Frost Free mode (7^ ± 3) when it detects a window open, and will return to the set temperature when it detects that it has been closed.
| Press the button | | Ventil. auto ON
19.0
* Auto ventilation ON and the open window is displayed on the screen |
| Press the button to deactivate automatic ventilation | | Ventil. auto OFF
19.0
* Auto ventilation OFF is displayed on the screen |
3.4.2 - Sweet Control settings: presence/absence detection
With Sweet Control, the radiator will detect when you are present and absent and will automatically adjust its heating level to optimise your comfort and your savings.
| Press the button | AUTO | Presence Det ON and the detector is displayed on the screen. |
| To deactivate automatic ventilation, press the button | AUTO | Presence Det OFF is displayed on the screen. |
3.4.3 - Display the lifestyle
The Smart Control will follow your recorded lifestyle.
| Press the button | AUTO
/· | Setting is displayed on the screen. |
| Press the button three times | + OK - | User pattern
Lifestyle is displayed on the screen. |
| Press OK to confirm. | + OK - | Monday
0 6 12 18 24
The first day of the week is displayed on the screen. |
| Once the days of the week have finished scrolling, the «Quit menu» screen is displayed. | + OK - | Exit menu |
| To quit the menu, press the button | AUTO
/· | Day Hour
190°
Return to the standby screen. |
4 - USE WITHOUT SMART CONTROL
4.1- Choice of the heating mode
| MODE NAME | DESCRIPTION | SCREEN |
| COMFORT | You are at home. By default, the Comfort mode temperature is 19°C. You can vary this temperature between 12.5°C and 28°C (in steps of 0.5°C). You can vary it by pressing the buttons Then confirm using the OK button | Comfort ON
190°
Auto
[PHO] ± ECD -3.5°
[PHO] ± ECD -3.5°
[PHO] ± ECD -3.5°
[PHO] ± ECD -3.5°
[PHO] ± ECD -3.5°
[PHO] ± ECD -3.5°
[PHO] ± ECD -3.5°
[PHO] ± ECD -3.5°
[PHO] ± ECD-3.5°
[PHO] ± ECD-3.5°
[PHO] ± ECD-3.5°
[PHO] ± ECD-3.5°
[PHO] ± ECD-3.5°
[PHO] ± ECD-3.5°
[PHO] ± ECD-3.5°
[PHO] ± ECD-3.5°
[PHO]
[PHO] ± ECD-3.5°
[PHO] ± ECD-3.5°
[PHO] ± ECD-3.5°
[PHO] ± ECD-3.5°
[PHO] ± ECD-3.5°
[PHO] ± ECD-3.5°
[PHO] ± ECD-3.5°
[PHO] ± ECD-0.5°
[PHO] ± ECD-0.5°
[PHO] ± ECD-0.5°
[PHO] ± ECD-0.5°
[PHO] ± ECD-0.5°
[PHO] ± ECD-0.5°
[PHO] ± ECD-0.5°
[PHO] ± ECD-0.5°
[PHO] + FrostFree (FF) ON
70°
[PHO] ± ECD -3.5°
[PHO] ± ECD -3.5°
[PHO] ± ECD -3.5°
[PHO] ± ECD -3.5°
[PHO] ± ECD -3.5°
[PHO] ± ECD -3.5°
[PHO] ± ECD -3.5°
[PHO] ± ECP -3.5°
[PHO] ± ECP -3.5°
[PHO] ± ECP -3.5°
[PHO] ± ECP -3.5°
[PHO] ± ECP -3.5°
[PHO] ± ECP -3.5°
[PHO] ± ECP -3.5°
[PHO] ± ECP -3.5°
[PHQ] ± ECP -3.5°
[PHQ] ± ECP -3.5°
[PHQ] ± ECP -3.5°
[PHQ] ± ECP -3.5°
[PHQ] ± ECP -3.5°
[PHQ] ± ECP -3.5°
[PHQ] ± ECP -3.5°
[PHQ] ± ECP -3.5" |
| ECO | You are out (between 2 hours and 48 hours) or you are sleeping. The Eco temperature is fixed at 3.5°C below the Comfort temperature. You can vary it using the buttons Then confirm using the OK button | Eco ON
155°
Auto
[PHO] ± ECD -3.5°
[PHO] ± ECD -3.5°
[PHO] ± ECD -3.5°
[PHO] ± ECD -3.5°
[PHO] ± ECD -3.5°
[PHO] ± ECD -3.5°
[PHO] ± ECD -3.5°
[PHO] + FrostFree (FF) ON
70°
[PHO] ± ECD -3.5°
[PHO] ± ECD -3.5°
[PHO] ± ECD -3.5°
[PHO] ± ECP -3.5°
[PHO] ± ECP -3.5°
[PHO] ± ECP -3.5°
[PHO] ± ECP -3.5°
[PHO] ± ECD -3.5°
[PHO] ± ECP -3.5°
[PHO] ± ECP -3.5°
[PHO] ± ECP -3.5°
[PHO] ± ECP -3.5°
[PHO] ± ECP -3.5°
[PHO] ± ECP -3.5°
[PHQ] ± ECP -3.5°
[PHO] ± ECP -3.5°
[PHQ] ± ECP -3.5°
[PHQ] ± ECP -3.5°
[PHQ] ± ECP -3.5°
[PHQ] ± ECP -3.5°
[PHQ] ± ECP -3.5°
[PHQ] ± ECP -3.5" |
| FROST FREE | You are out for more than 48 hours. The Frost Free temperature is fixed at 7°±3C. You cannot modify it. | FrostFree (FF) ON
70°
Auto
[PHO] ± ECD -3.5°
[PHO] ± ECD -3.5°
[PHO] ± ECD -3.5°
[PHO] ± ECP -3.5°
[PHO] ± ECP -3.5°
[PHO] ± ECP -3.5°
[PHO] ± ECP -3.5°
[PHO] ± ECP-3.5" |
| If you want to change from one mode to another, press the button and then confirm by pressing the OK button. |
4.1.1 - Comfort mode
4.1.1.1 - Using Comfort mode
With this mode you can have the required ambient temperature when you are in the room. The Eco Indicating lights will help you to optimise your settings (see page 27).
| If you want to activate Comfort mode, press the left or right scroll buttons several times until the selection arrow is on Comfort mode | +OK- | Comfort ON
190°
[PROG:EICO]
The▼mode selection arrow blinks above the currently selected mode |
| Confirm by pressing the OK button. | +OK- | Day Hour
190°
Only the pictogram remains on: the setting is confirmed. |
The recommended Comfort temperature is 19^
Comfort mode varies from 12.5^ to 28^ . If you lower the Comfort temperature below the Eco temperature, the Eco temperature drops to -0.5^ below the Comfort temperature. On the other hand, the Eco temperature will not change if you increase the Comfort temperature.
4.1.1.2 - How to modify the Comfort temperature
| Press the + and - buttons to modify the displayed temperature. | +OK
- | Comfort Temp
195
The temperature changes in steps of 0.5°C and blinks. |
| Press the OK button to confirm. | +OK
- | Day Hour
19.0
The new chosen temperature is displayed. |
The heating light indicator is displayed on the screen if the ambient temperature is lower than the displayed temperature

Wait for at least 6 hours until the temperature stabilises.


The black arrow moves along the consumption indicator between the green and the red levels. The temperature recommended by Ademe (French Agency for the Environment & Energy control) is 19^ , and this arrow informs you if your behaviour is within or outside the recommendation.
4.1.2 -ECCO mode
4.1.2.1 - Using Ecco mode
This reduces the temperature below the Comfort temperature
It is recommended that this mode should be used for periods of between 2 and 24 hours during which you are out, or during the night and particularly in bedrooms.
Activate ECO mode by pressing the left or right scroll button several times until the selection arrow is on ECO mode.
The mode selection arrow flashes above the currently selected mode.
Confirm by pressing the OK button
Only the ECO pictogram remains on: the setting is confirmed.
The recommended ECO temperature is 3.5^ below the Comfort temperature. In particular, it can be set directly by pressing the OK and buttons.
If you lower the Comfort temperature below the Eco temperature, the Eco temperature will drop by -0.5^ below the Comfort temperature. On the other hand, the Eco temperature will not change if you increase the Comfort temperature.
4.1.2.2 - How to modify the ECO temperature
| Press the + and - buttons to modify the displayed temperature. | +OK- | Eco temp
150°
Eko |
| The temperature varies in steps of 0.5°C and blinks. |
| Press the OK button to confirm. | +OK- | Day Hour
150°
Eko |
| The new chosen temperature is displayed. |
4.1.3 - Frost Free mode
The temperature of Frost Free mode is preset to 7^± 3C and it cannot be modified.
4.1.3.1 - Using Frost Free mode
| Activate mode by pressing the left or right scroll buttons several times until the selection is on Frost Free mode. | + OK - | FrostFree (FF) ON
70°
PROG: EICO
The▼ mode selection arrow blinks above the currently selected mode. |
| Press the OK button to confirm. | + OK - | Day Hour
70°
Only the pictogram remains on; the setting is confirmed. |
4.1.4 -Prog mode
4.1.4.1 - WEEKLY programming
The Weekly PROG will follow the programming recorded in this menu.
| Press the button | AUTO
/· | (Set: D/H/Min
Setting: D/H/Min is displayed on the screen. |
| Press once on the button | +OK
- | (Set: Prog
Prog setting is displayed.
Press OK to confirm. |
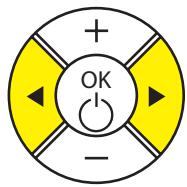
| Press the or button | +OK
- | PROG: Local.
PROG: Weekly is displayed on the screen; press OK to confirm. |
| Press to display programs for each day of the week | +OK
- | PROG: Monday
* 6 12 18 24
* 0 0 0 0 0 0 |
| Press OK to modify the program for one day of the week
The and buttons are used to select COMFORT mode (two small bars) or ECO mode (no bars at all).
The and buttons are used to browse hour by hour.
Press OK to confirm to go on to the next day.
Once you reach Sunday, the “return to menu” screen is displayed, press OK to return to the “Settings: Prog” menu |
Pres the left or right scroll button several times until the selection arrow is on Prog mode, to activate Prog mode
The mode selection arrow blinks above the currently selected mode.
4.1.4.2 - PILOT WIRE programming
By default, the external program is installed on all days of the week, returned by the central programming. Thus, if your radiator is connected to a central programming installation, you will not need to do anything other than to go into Prog mode.
| Press the button | AUTO
/· | Setting is displayed on the screen. |
| Press the once | +OK
- | Set:Prog
Prog setting is displayed.
Press OK to confirm. |
| Press the or button | +OK
- | PROG:Central.
EP
PROG:FP is displayed on the screen. Press OK to confirm. |
| To quit the menu, press the button | AUTO
/· | Day Hour
190°
Je returne à l'écran de repos. |
Press the or right scroll buttons several times to activate Prog mode, until the selection arrow is on Prog mode.
The mode selection arrow blinks above the currently selected mode.
4.1.5 - Automatic ventilation / Presence detection (Sweetcontrol)
The automatic ventilation and presence detection functions may be activated or deactivated regardless of the chosen heating mode (Comfort, Eco, Weekly Prog or Prog FP); see page 61 for the action.
5 - LOAD SHEDDING
A load shedding system by a power supply cut is incompatible with our radiators because it damages the thermostat. During load shedding periods, your radiator will display « Load shedding ». It then returns to its initial operating mode.
6 - MAINTENANCE
Do not perform any maintenance action before switching your equipment off by doing a long press on the OK button.
If you want to maintain the performances of your radiator, you will need to use a vacuum cleaner or a brush to remove dust from the lower and upper radiator grills about twice every year.
You can clean the radiator with a damp cloth; never use abrasive products or solvents.
Dirt can accumulate on the radiator grill in a polluted environment. This phenomenon is related to the poor quality of ambient air. It is recommended that correct aeration of the room (ventilation, air intake, etc.), and cleanliness of the air should be verified if this arises. Such dirt will invalidate the radiator replacement guarantee.
7 - IF A PROBLEM OCCURS
| Problem encountered | Check to be made |
| The radiator does not heat | If you are in programming, make sure that the program is in COMFORT mode.
Make sure that the circuit breakers of the installation are closed or that the load shedder (if you have one) has not switched the heating off (see part X).
Check the air temperature in the room; if it is higher than the set temperature, the heating pictogram will not come on and the radiator will not heat. |
| The radiator heats all the time | Check that the radiator is not located in a draft, and that the temperature setting has not been modified. |
| The radiator does not heat enough | Increase the Comfort set temperature.
If the setting is at the maximum, make the following checks:
- Check if there is another heating source in the room
- Make sure that your radiator is only heating the room (door closed).
- Have the radiator power supply voltage checked.
- Check if the power of your radiator is appropriate for the size of your room (we recommend about 100W/m2for a ceiling height of 2.50 m). |
| Traces of dirt collect on the wall around the radiator | Dirt is caused by poor quality of ambient air. In this case, it is recommended that good aeration of the room (ventilation, air inlet, etc.), and cleanliness of the air should be checked, and do not smoke indoors. This dirt does not justify replacement of the radiator under guarantee. |
| The heating pictogram is displayed on the screen when the radiator is in ECO mode | This operation is normal. The radiator can warm up so as to maintain an Eco temperature. |
| For radiators equipped with a programming system or controlled through the pilot wire. |
| The radiator does not follow external programming controls | Make sure that the programming control unit is used correctly (see user's instructions), that the programming unit is properly engaged in its housing and that it is functioning normally (check the condition of the batteries, fuse, etc.).
Make sure that your radiator is in Program mode and that the external « centralised » program is assigned to the required day of the week. |
| The radiator surface is very hot | It is normal that the radiator should be hot when it is in operation, but the maximum surface temperature is limited in accordance with the NF Electricity performance standard. However, if you think that your radiator is still too hot, make sure that the power is appropriate for the surface area of your room (we recommend 100W / m² for a ceiling height of 2.50 m) and that the radiator is not placed in a draft that would disturb its regulation. |
| There is a significant difference between the ambient temperature in the room and the equipment set temperature | After 6h stabilisation, you can recalibrate your radiator by doing a long press (3 sec) on OK and wait until « OFFSET » is displayed. Set the observed temperature difference by pressing the + or - button and then confirm by pressing the OK button. Example: If the ambient temperature is 20°C and the set temperature is 18°C, add +2° to the «OFFSET » value. |
8 - APPENDIX
8.1 Warning
- Do not cover the radiator, to avoid overheating and for security reasons

- Make sure that children are not leaning on the radiator surface and are not playing nearby when it is in operation, since under some circumstances the surface of the radiator could cause skin burns, particularly because their reflexes are not fully developed or they are slower than for adults. If there is any risk, install a protection grill in front of the radiator.
- This radiator is not designed for use by persons (including children) whose physical, sensorial or mental capabilities are limited, or persons without any experience or knowledge, unless they are supervised or given prior instructions about use of the equipment by a person responsible for their safety.
- Children should be monitored to make sure that they do not play with the radiator.
- Make sure that you do not insert objects or paper into the radiator.
- Whenever doing any work on the radiator, the radiator itself and the external power manager (if there is one) should be switched off.
8.2 Identification of the radiator
Before calling our Before and After Sales Department, remember to identify the radiator references. This informations are written on the name plate located on the right side of the radiator.
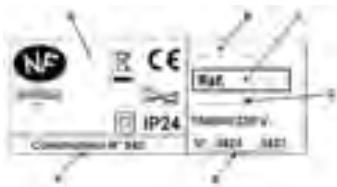
A Standards, quality labels
B Trade name
C Commercial code
D Manufacturing reference
E Serial number
F Manufacturer's number
Thank you for having chosen this equipment and to having shown your confidence in us. The radiator you have just purchased has passed many tests and inspections to optimise its quality and provide you with full satisfaction.
Some advice:
Read the instructions before starting the installation of your radiator to satisfy standard requirements.
Check the power supply voltage and switch the power supply off before connecting your radiator.
Keep the instructions, even after you have installed your radiator.
Radiator characteristics:
CAT C : Equipment satisfying the NF Electricity performance standard according to the criteria of the stated category.
IP24 : Radiator protected against splashes of water
Classe II : Double insulation (no connection to earth).
IK08 : Resistance to mechanical shocks

: Equipment conforming with European Directive 2002/96/CE (DEEE).
9 - INSTALLING THE RADIATOR
9.1 - Radiator composition
9.2 - Installing your radiator
Your radiator is delivered with its wall-mounting frame. The choice of screws and inserts will depend on the nature of your wall and you must make sure that you are using appropriate screws and inserts capable of supporting the weight of the radiator.
This radiator was designed so that it will remain upright for the time necessary to make the connections and install the wall-mounting frame, to facilitate the connection.
Once the radiator has been placed upright, you can remove the wall-mounting frame which will be useful to you as a template to drill the holes.
9.2.1 - Installation rules
This radiator was designed to be installed in a home.
The installation shall be made according to standard practice satisfying standards in force in the installation country (NFC 15100 for France).
Respect minimum distances from the furniture to the location of the radiator (see diagram).
If you have a wall lining applied on foam, you will need to place packing behind the radiator mounting frame with the same thickness as the foam to maintain a clear space behind the radiator so that its regulation is not disturbed.
Do not install the radiator:
- In a draft that could disturb its regulation
(for example under a Controlled Mechanical Ventilation system, etc)
Radiators used in bathrooms must be installed such that switches and other control devices of the radiator cannot be touched by anyone in the bath or the shower.
9.3 - Fix the wall-mounting frame to the wall
1
2
3
Place the wall-mounting frame on the floor. Mark drilling points A. These points give the position of the lower attachments.
Lift the wall-mounting frame making the previously marked points coincide with drilling holes A.
Mark the 2 drilling points B using a pen.
You will then have marked the 4 drilling points.
Drill the 4 holes and insert the appropriate inserts for your wall (for example plasterboard, concrete).
Put the wall-mounting frame into place and screw it into position.
Dimensions and weights of radiators
| Power | 750W | 1000W | 1500W |
| Width (mm) | 718 | 866 | 1162 |
| Thickness (mm) | 380 | 380 | 380 |
| Height (mm) | 146 | 146 | 146 |
| Weight (kg) | 14,86 | 18,36 | 25,86 |
9.4 - Connect the radiator
The radiator must be powered at 230V 50Hz
The radiator power supply must be connected directly to the network behind the omni-pole breaking device with a contact opening distance of at least 3mm without an intermediate switch (clock, mechanical and static relay, ambience thermostat, etc).
The connection to the mains power supply will be made using a 3-wire cable (Brown = Phase, Blue = Neutral, Black = Pilot wire) through a connection box. The connection box must be installed at least 25cm above the floor in wet rooms like kitchens, the bathrooms. The installation must be provided with a circuit breaker type protection device.
Connection to the earth is prohibited. Do not connect the pilot wire (black) to the earth.
The manufacturer, his after sales service or a similar qualified person must replace the power supply cable if it is damaged, so that the work can be done safely.
The power supply cable must be put back into position and fixed with the plastic flange to hold the thermostat in position. There is a risk of electrical danger if this operation is not respected.
If the pilot or piloted radiator is protected by a 30mA differential protection device (e.g. bathroom), then the power supply to the pilot wire connected onto this differential switch will have to be protected.
Pilot wire connection test
You can connect the pilot wire if your house is fitted with a programming unit, or a power manager.
In this case, make the following checks to verify that programming orders are transmitted correctly:
| Orders Received | No current | 230V for 3s | 230V for 7s | 230V | -115V négative | +115V positive |
| Signal to be transmitted | | 5' 3" | 5' 7" | | | |
| Mode Obtained | COMFORT | COMFORT -1°C | COMFORT -2°C | ECO | FROST FREE | SWITCH HEATING OF / LOAD SHEDDING |
As regards the programming by pilot wire or current carrier, the frost-free or relief orders take priority.
The time for switching from the comfort mode to the Eco mode takes about 12 seconds.
9.5 - Lock the radiator on its wall-mounting frame
- Place the radiator on wall-mounting frame S as shown on the diagram.
- Bring the radiator to the wall-mounting frame and then lift it (arrows 1 and 2).
- Insert the wall-mounting frame tabs in the radiator holes and then lower the radiator (arrow 3).
- Lock by turning the 2V screws by half a turn and your radiator is fixed.
10 - GETTING USED
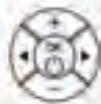
10.1 - The Control box
① Screen
② Buttons
and
③ Buttons

④ OK - Heating On/off
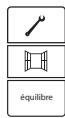
(5) Settings

⑥ Smart Control function

⑦ Equilibrium
Equilibrium
⑧ Consumption indicator

10.1.1 - Description of the box screen
10.2 - Switching your radiator on/off
Press the OK button for a few moments
The screen lights up and indicates the default temperature
To put your radiator on stand-by, press an hold OK (long press) until OFF" is displayed.
The radiator displays «OFF» and then goes off.
10.3 - Switch the screen on
If the screen is not backlit, press any button to switch the screen on.
The screen lights up.
10.4 - Temperature setting
To activate the screen, press on any key.
The temperature by default is 19^ You can vary this by pressing on the keys and
Press the OK button to confirm
The heating light indicator 000 is displayed on the screen if the ambient temperature is lower than the displayed temperature (set temperature).

Wait for at least 6 hours until the temperature stabilises.

The black arrow moves along the consumption indicator between the green and the red levels. The temperature recommended by Ademe (French Agency for the Environment & Energy control) is 19^ , and this arrow informs you if your behaviour is within or outside the recommendation.
10.5 - Set the day and time
| To reach the “set day of the week” menu, press. | Equilibrium | (Set: D/H/Min
«Set D/H/Min» is displayed on the text line. |
| Press OK to access the “set day of the week” submenu. | + OK - | (Set: Day
LU
The first two letters of the day of the week blink. |
| Select the day of the week by pressing the + or - buttons and then confirm by pressing OK. | + OK - | (Set: Hour
000
Once the day has been confirmed, the hours blink. |
| Select the current hour by pressing the + or - buttons and confirm by pressing OK. | + OK - | (Set: Minute
2000
Once the hour has been confirmed, the minutes blink. |
| Select the current minutes by pressing the + or - buttons and confirm by pressing OK. | + OK - | (Set: D/H/Min
Once the minutes have been confirmed, the settings menu is displayed again. |
| To quit the settings menu, press. | Equilibrium | Day Hour
190°
Return to the standby screen. |
10.6 - Set the language
| To access the “set language” menu, press | Equilibrium | «Set : D/H/Min»
«Set D/H/Min» is displayed on the text line |
| Browse through the menu using the scroll left or right buttons until you reach the “set language” menu | + OK - | «Set : Language»
The «set language» submenu is displayed |
| Press OK to enter the «set language » submenu | + OK - | English
The language blinks. |
| Select the required language by pressing the + and - buttons and confirm by pressing the OK button. | + OK - | «Set : Language»
The language is confirmed and the main menu is displayed again. |
| To quit the settings menu, press | Equilibrium | Day Hour
190°
Return to the standby screen. |
10.7 - Practical functions
10.7.1 - The automatic aeration function
| To activate the automatic ventilation function, press on key | | Aérat. auto On
19.0°
Equilibrium
Auto vent ON displays a few moments and the icon displayed on screen
is |
| To deactivate the automatic ventilation function, close the window and press on the key | | Aérat. auto Off
19.0°
Equilibrium
Auto vent OFF is displayed a few moments and the icon disappears from the screen |
10.7.2 - The Equilibrium function
To position everything immediately on the recommended settings, use the Equilibrium function. It is a good compromise between your comfort and your savings.
The Comfort temperature is then at 19^ and the Eco temperature is at 15.5^ (comfort -3.5^ ).
| Press on key Equilibrium | Equilibrium | “Citizen Eco” is displayed a few moments on the screen. |
10.7.3 - Consumption gauge
The consumption of an electric heating radiator depends, among others, on the temperature required.
The recommended temperature for public powers is 19^ .
The consumption gauge enables you to position compared to that recommended temperature.
So, depending on the required temperature:
- If the black arrow of the screen is positioned in front of the red or dark orange sign, you will have a more Eco citizen behaviour by significantly lowering your required temperature.
- If the black arrow on the screen is positioned in front of the yellow sign, you will have a behaviour which is more Eco Citizen, by lowering slightly your required temperature.
- If the black arrow is in front of the green sign, you are at the recommended temperature and you have as from then a Eco citizen behaviour.

10.7.4 - Locking the controls
In order to avoid any unexpected handling of the control box, we advise you to lock it.
| Press for a long time (+3s) on keys OK and Locking
equilibrium | Locking
190°
+OK
- | "Locking" and a padlock is displayed on the screen. |
Do the same thing to unlock.
10.7.5 - Return to basic settings
| Press simultaneously for some seconds the keys
+ OK until all the displays appear on the screen. The energy economy and programming functions are deactivated. | + Equilibrium | After a few moments, all the pictograms are displayed on the screen. |
It is then necessary to enter the date and time in the unit and to remake his own programming internesi it is used.
11 - HEATING MODES
When it is still switched on for heating, a slight odour can appear. It corresponds to the evacuation of any traces connected with the manufacture of the radiator and will disappear after a few moments operating.
| Pictogram | Description | When to use this mode |
| Comfort | You are in the house. |
| ECCO | Eco | Your are absent for 2 to 48 hours or you are sleeping. |
| Frost free | You are absent more than 48h or it is summer. The Frost free temperature is fixed at 7°C±3°C approximately and cannot be modified. |
| Comfort -1 | These heating methods are accessible only in the presence of an energy manager on your system. |
| Comfort -2 |
11.1 - Comfort mode
11.1.1 - Use the Comfort mode t

This mode enables you to have the required ambient temperature when you are in the room. The consumption gauge lights will enable you to optimise your setting
To activate the Comfort mode, press several times on the movement arrows left or right Until the selection arrow is on the Comfort mode
The selection arrow of mode flashes above the mode during selection.
Validate by pressing on the key OK
Only the pictogram remains lighted: the setting is validated.
The recommended Comfort temperature is 19^
The Comfort mode goes from 12.5^ to 28^ . If you lower the Comfort temperature below the Eco temperature, the Eco temperature falls by -0.5^ compared to the Comfort temperature. On the other hand, if you increase the Comfort temperature, the Eco temperature does not change.
11.1.2 - How do you modify the Comfort temperature?
To modify the displayed temperature, press on the keys + or -
The temperature changes in steps of 0.5^ and flashes.
Validate by pressing on key OK

The new chosen temperature is displayed.
The heating indicator M is displayed on the screen if the ambient temperature is lower than the displayed temperature

Wait for at least 6 hours until the temperature stabilises.

The black arrow moves along the consumption gauge, between the green level and the red in accordance with the instruction required. The Comfort temperature recommended by Ademe is 19^ , this arrow indicates to you if your behaviour is within those recommendations or far from it.
11.1.3 - Limit the set Comfort temperature
You can limit the maximum comfort set temperature that is set to 28^ .
To limit the maximum Comfort temperature, press the OK and + buttons until "Set Max Temp" is displayed.
Max temp setting
28:00
The maximum Comfort temperature is displayed.
To modify the displayed temperature, press the - button until the required temperature, then confirm by pressing the OK button
Max temp setting
2200
Note: you cannot set the comfort temperature higher than the maximum recorded Comfort temperature. The « ⋅ » pictogram and the maximum comfort set temperature are displayed.
11.2 - ECO mode
11.2.1 - Using ECO mode
This concerns reducing the temperature compared to the Comfort temperature. It is recommended to use this mode for periods of absence between 2 and 48 hours, or during the night, notably in bedrooms.
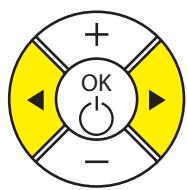
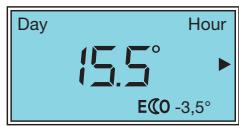
| To activate the ECO mode, press several times on the Left or right hand keys the selection arrow is on ECO mode. | + OK - | Eco ON
15.5°
PROG ECO
The mode selection flashes above the mode during the selection. |
| Validate by pressing on the key OK. | + OK - | Day Hour
15.5°
ECO -3.5°
On the ECO pictogram remains lit up. The setting is validated |
The recommended Eco temperature is -3.5^ compared to the Comfort temperature. If you lower the Comfort temperature below the Eco temperature, the Eco temperature will reduce by -0.5^ compared to the Comfort temperature. On the other hand, if you increase the Comfort temperature, the Eco temperature will not change.
11.2.2 - How to modify the ECO temperature?
| To modify the displayed temperature, press on keys + and -. | + OK - | Eco temp
150°
EKO
The temperature changes by steps of 0.5°C and flashes. |
| Validate by pressing on key OK. | + OK - | Day Hour
16.0°
EKO
The new chosen temperature is displayed. |
Note : the maximum temperature in the ECO mode is 19^ C .
11.3 - The Frost Free mode
The Frost free mode temperature is preset at 7^ ± 3^ and cannot be modified.
11.3.1 - Use the Frost free mode I
| Activate mode by pressing the left or right scroll buttons several times until the selection is on Frost Free mode. | + OK - | FrostFree (FF) ON
70°
PROG EICO |
| The▼ mode selection arrow blinks above the currently selected mode. |
| Press the OK button to confirm. | + OK - | Day Hour
70°
Only the pictogram remains on; the setting is confirmed. |
12 - PROGRAMMING YOUR RADIATOR
12.1 - Prog mode
12.1.1 - The WEEKLY programming
The Weekly PROG will follow the programming recorded in this menu.
| Press on key | Equilibrium | Setting: D/H/Min
screen |
| Press once on key | +OK- | (Set: Prog)
Prog Setting appears. Validate by OK |
| Press on keys or | +OK- | PROG: Local.
PROG: Weekly flashes on the screen. Validate by OK |
| To display the programmes for each of the days of the week, press on or | +OK- | PROG: Monday
*6 12 18 24
*0 6 12 18 24 |
| To modify the programming of one day in the week, press on OK.
The keys and enable the comfort mode or ECO to be selected.
The keys and enable you to navigate hour by hour.
Validate by OK then press on key to pass on to the next day.
Once arriving at Sunday, the “Return to menu” screen will appear, press on OK to come back to the “Setting: Prog” menu
Press twice on key until “menu exit” is displayed then validate by Ok. |
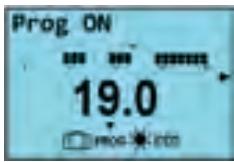
| To activate the Prog. mode, press several times on the left or right movement keys until the selection arrow is over the PROG mode and then validate by the key | +OK- | Prog ON
19.0
The mode selection▼ flashes above the mode during selection. |
12.1.2 - The WIRE PILOT programme
By default, the programme mode on every day of the week is the external programme, the one responding to the "pilot wire" order (FP) sent by the centralised external programming. Using this, if your device is connected to a centralised programming installing, you have no manipulation to be made other than to put yourself in Prog mode.
| Press on key | Equilibrium | Setting appears on the screen. |
| Press once on key | +OK- | (Set:Prog)Prog Setting appearsValidate by OK. |
| Press on keys or | +OK- | PROG:Central.FPPROG:FP displayed on screen Validate by OK. |
| To leave menu, press on key | +Equilibrium | Day Hour190°Return to rest screen. |
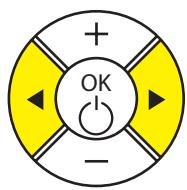
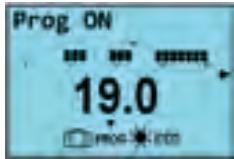
| To activate the Prog mode, press several times on the right or left hand movement keys until the selection arrow is on Prog mode. | +OK- | Prog ON19.0The mode selection▼ flashes above the mode during selection. |
13 - IF YOU HAVE A LOAD SHEDDING
If your installing includes a consumption reducer, this can alternatively cut the heating radiators (depending on your contract with your energy supplier).
Caution, A load shedding system by a power supply cut is incompatible with our radiators because it damages the thermostat. During load shedding periods, your radiator will display « Load shedding ». It then returns to its initial operating mode.
During consumption reduction periods, your radiator will display "Consumption reduction". It then goes back to its initial operating mode.
14 - MAINTENANCE
Do not perform any maintenance action before switching your equipment off by doing a long press on the OK button.
If you want to maintain the performances of your radiator, you will need to use a vacuum cleaner or a brush to remove dust from the lower and upper radiator grills about twice every year.
You can clean the radiator with a damp cloth; never use abrasive products or solvents. Dirt can accumulate on the radiator grill in a polluted environment. This phenomenon is related to the poor quality of ambient air. It is recommended that correct aeration of the room (ventilation, air intake, etc.), and cleanliness of the air should be verified if this arises. Such dirt will invalidate the radiator replacement guarantee.
15 - IF A PROBLEM OCCURS
| Problem encountered | Check to be made |
| The radiator does not heat | If you are in programming, make sure that the program is in COMFORT mode.
Make sure that the circuit breakers of the installation are closed or that the load shedder (if you have one) has not switched the heating off (see part 13 "If you have a load shedding").
Check the air temperature in the room; if it is higher than the set temperature, the heating pictogram will not come on and the radiator will not heat. |
| The radiator heats all the time | Check that the radiator is not located in a draft, and that the temperature setting has not been modified. |
| The radiator does not heat enough | Increase the Comfort set temperature.
If the setting is at the maximum, make the following checks:
-Check if there is another heating source in the room
-Make sure that your radiator is only heating the room (door closed).
-Have the radiator power supply voltage checked.
-Check if the power of your radiator is appropriate for the size of your room (we recommend about 100W/m2for a ceiling height of 2.50 m). |
| Traces of dirt collect on the wall around the radiator | Dirt is caused by poor quality of ambient air. In this case, it is recommended that good aeration of the room (ventilation, air inlet, etc.), and cleanliness of the air should be checked, and do not smoke indoors. This dirt does not justify replacement of the radiator under guarantee. |
| The heating pictogram is displayed on the screen when the radiator is in ECO mode | This operation is normal. The radiator can warm up so as to maintain an Eco temperature. |
| For radiators equipped with a programming system or controlled through the pilot wire. |
| The radiator does not follow external programming controls | Make sure that the programming control unit is used correctly (see user's instructions), that the programming unit is properly engaged in its housing and that it is functioning normally (check the condition of the batteries, fuse, etc.). Make sure that your radiator is in Program mode and that the external « centralised » program is assigned to the required day of the week. |
| The radiator surface is very hot | It is normal that the radiator should be hot when it is in operation, but the maximum surface temperature is limited in accordance with the NF Electricity performance standard. However, if you think that your radiator is still too hot, make sure that the power is appropriate for the surface area of your room (we recommend 100W / m2for a ceiling height of 2.50 m) and that the radiator is not placed in a draft that would disturb its regulation. |
| There is a significant difference between the ambient temperature in the room and the equipment set temperature | After 6h stabilisation, you can recalibrate your radiator by doing a long press (3 sec) on and wait until « OFFSET » is displayed.
Set the observed temperature difference by pressing the + or - button and then confirm by pressing the button. Example: If the ambient temperature is 20°C and the set temperature is 18°C, add +2° to the «OFFSET » value. |
16 - APPENDIX
16.1 - Warning
- Do not cover the radiator, to avoid overheating and for security reasons

-
Make sure that children are not leaning on the radiator surface and are not playing nearby when it is in operation, since under some circumstances the surface of the radiator could cause skin burns, particularly because their reflexes are not fully developed or they are slower than for adults. If there is any risk, install a protection grill in front of the radiator.
-
This radiator is not designed for use by persons (including children) whose physical, sensorial or mental capabilities are limited, or persons without any experience or knowledge, unless they are supervised or given prior instructions about use of the equipment by a person responsible for their safety.
-
Children should be monitored to make sure that they do not play with the radiator.
- Make sure that you do not insert objects or paper into the radiator.
- Whenever doing any work on the radiator, the radiator itself and the external power manager (if there is one) should be switched off.
16.2 - Identification of the radiator
Before calling our Before and After Sales Department, remember to identify the radiator references. This informations are written on the name plate located on the right side of the radiator.

A Standards, quality labels
B Trade name
C Commercial code
D Manufacturing reference
E Serial number
F Manufacturer's number
SOFT HEAT INERTIA RADIATOR
ELEKTRISCHER SOFT HEAT RADIATOR
INERTI E RADIATOR