
EG1150 C - Microtome LEICA - Free user manual and instructions
Find the device manual for free EG1150 C LEICA in PDF.

| Product type | Cold plate for blocking and cooling histological samples |
| Brand | Leica |
| Model | EG1150 C |
| Dimensions (L x D x H) | 360 x 650 x 360 mm |
| Weight | 23 kg |
| Power supply | 100 V / 50-60 Hz, 120 V / 60 Hz, 230 V / 50 Hz or 240 V / 50 Hz depending on model |
| Maximum power | 350 VA |
| Starting current | 25 A maximum for 5 s |
| Working temperature | -5 °C (up to ambient temperature +28 °C) |
| Cooling capacity | 110 W (according to CECOMAF) |
| Refrigerant | R134a, 80 g ± 5 g |
| Cooling surface | Approximately 70 paraffin blocks |
| Removable hood | Optional (acrylic) |
| Secondary fuse | T 1.0 A, 6.3 x 32 mm |
| Circuit breaker | ETA type 3120-F421-P7T1W19DB4-10A (100/120 V) or 4A (230/240 V) |
| Protection class | II (according to IEC-1010) |
| Ambient temperature | +18 °C to +40 °C |
| Relative humidity | Maximum 80%, non-condensing |
| Care and cleaning | Mild laboratory cleaners; avoid xylene and acetone on painted surfaces |
| Maintenance | Annual inspection by an authorized Leica technician |
Frequently Asked Questions - EG1150 C LEICA
User questions about EG1150 C LEICA
0 question about this device. Answer the ones you know or ask your own.
Ask a new question about this device
Download the instructions for your Microtome in PDF format for free! Find your manual EG1150 C - LEICA and take your electronic device back in hand. On this page are published all the documents necessary for the use of your device. EG1150 C by LEICA.
USER MANUAL EG1150 C LEICA
natural_image
Exterior view of a laboratory instrument labeled 'Jelica 2016' with control panel and display screen (no readable text beyond branding)Leica EG1150C
Cold Plate
CE
Instruction Manual
Leica EG1150C
V2.1 Rev B, English – 01/2010
Always keep this manual near the instrument.
Read carefully prior to operating the instrument.

MICROSYSTEMS
The information, numerical data, notes and value judgments contained in this manual represent the current state of scientific knowledge and state-of-the-art technology as we understand it following thorough investigation in this field.
We are under no obligation to update the present manual periodically and on an ongoing basis according to the latest technical developments, nor to provide our customers with additional copies, updates etc. of this manual.
For erroneous statements, drawings, technical illustrations etc. contained in this manual we exclude liability as far as permissible according to the national legal system applicable in each individual case. In particular, no liability whatsoever is accepted for any financial loss or consequential damage caused by or related to compliance with statements or other information in this manual.
Statements, drawings, illustrations and other information as regards contents or technical details of the present manual are not to be considered as warranted characteristics of our products.
These are determined only by the contract provisions agreed between ourselves and our customers.
Leica reserves the right to change technical specifications as well as manufacturing processes without prior notice. Only in this way is it possible to continuously improve the technology and manufacturing techniques used in our products.
This document is protected under copyright laws. Any copyrights of this document are retained by Leica Biosystems Nussloch GmbH.
Any reproduction of text and illustrations (or of any parts thereof) by means of print, photocopy, microfiche, web cam or other methods – including any electronic systems and media – requires express prior permission in writing by Leica Biosystems Nussloch GmbH.
For the instrument serial number and year of manufacture, please refer to the name plate at the back of the instrument.
1.1 Symbols used in the text and their meanings 5
1.2 User group 5
1.3 Specified use and application 5
1.4 Instrument type 5
2. Safety 6
2.1 Safety regulations....6
2.2 Safety instructions 6
2.3 Built-in safety devices 7
3. Instrument components and specifications 8
3.1 Overview – instrument parts 8
3.2 Technical data 9
4. Commissioning 10
4.1 Location conditions 10
4.2 Delivery range 10
4.3 Unpacking and installing 11
4.4 Power supply 12
5. Operation 13
5.1 Switch on the instrument 13
5.2 Replacing the secondary fuse 13
5.3 Malfunctions 14
6. Cleaning and maintenance 15
6.1 Cleaning the instrument.... 15
6.2 Maintenance instructions 15
7. Warranty and service 16
1.1 Symbols used in the text and their meanings

Warnings and cautions appear in a gray box and are marked by a warning triangle ⚠️.

Notes, i.e. important information for the user, appear in a gray box and are marked with the symbol i.
(5)
Figures in brackets refer to item numbers in figures.
1.2 User group
- The Leica EG1150C may only be operated by qualified personnel.
- The user must read the operating instructions supplied and be familiar with all the instrument's technical details before any work on the instrument can be carried out.
1.3 Specified use and application
The Leica EG1150C is a cold plate for chilling and blocking out histological tissue samples in paraffin blocks.
Any other use of the instrument will be considered as improper use!
1.4 Instrument type
All information in this instruction manual applies only to the instrument type indicated on the title page.
A name plate with the serial number is attached to the back of the instrument.

Please pay particular attention to the safety regulations and safety instructions in this section.
Please also read this information, even if you are familiar with handling and using a Leica instrument.
2.1 Safety regulations
This instruction manual contains important instructions and information regarding the operational safety and maintenance of the instrument.
The instruction manual is an important part of the product. It must be read carefully before using the instrument for the first time and always kept near the instrument.

It may be necessary to add appropriate instructions to this instruction manual, if required by existing national regulations on accident prevention or environmental protection in the country of the operating authority.
This instrument has been built and tested in accordance with the following safety regulations on electrical measuring, control, regulating and laboratory devices.
In order to maintain this condition and to ensure safe operation, the operator must observe the instructions and warnings contained in this instruction manual.
For current information about applicable standards, please refer to the CE declaration of conformity on our Internet site:
www.leica-microsystems.com

The protective devices on the instrument and its accessories must not be removed or modified. The instrument may only be opened and repaired by authorized Leica servicing technicians.
2.2 Safety instructions
The safety devices provided on this instrument by the manufacturer only constitute the basis for protection against accidents. The main responsibility for accident prevention while using the instrument rests with the employer where the instrument is operated, and with the persons he appoints for operating, servicing or cleaning the instrument.
To ensure a safe operation of the instrument at all times, the following instructions and warnings should be observed.
Safety instructions – safety regulations on the instrument itself

- This device may only be used by trained laboratory technicians. It may only be used according to its intended use and the instructions in this instruction manual.
- Safety regulations marked with a warning triangle on the instrument itself mean that when operating or exchanging respective parts of the instrument, the correct operating steps as described in the instruction manual supplied, must be adhered to. Nonobservance can cause accidents, injuries and/or damage to the instrument/accessories.
Safety instructions – transport, installation and operation

• After unpacking the instrument it may only be transported in an upright position.
- Before connecting the device to a power source, ensure that the voltage indicated on the type plate matches the voltage available at the place of installation.
The unit must be connected only with the supplied power cable and only to a grounded power receptacle. Do not use an extension cord.
- The minimum voltage (see specifications) must be maintained while starting the refrigeration unit.
The compressor needs a starting current of approx. 25 A. For correct operation, a consistent power supply conforming to the instrument's specifications is required. Please ensure that your electrical installation fulfills these preconditions prior to installing the unit.
Nonobservance causes damage to the instrument.
- Switch off the instrument each time before servicing, repairing or cleaning, and pull out the power plug.
2.3 Built-in safety devices
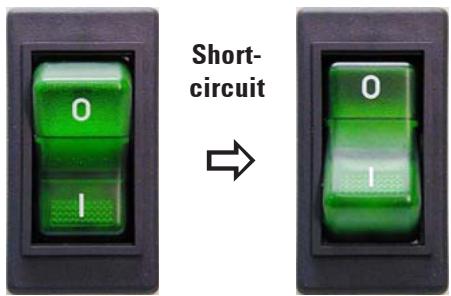
Fig. 2
Automatic circuit breaker in the main switch
- An automatic circuit breaker with a lit switch is located in the main switch. This circuit breaker separates the unit from the mains power supply in the event of a short-circuit.
- In this case, the main switch jumps to the position "0" = 0ff.
3.1 Overview – instrument parts
- The instrument is distinguished by a simple, modular design and a powerful refrigeration unit with precisely controlled cooling performance.
- High temperature consistency ensures homogeneous blocking out and prevents tearing of the paraffin blocks.
- High cooling performance ensures that the instrument's working temperature is reached quickly.
- Optimized temperature distribution in the cold plate prevents dripping condensation.
- The generously-dimensioned cooling surface has room for around 70 blocks.
- Designed for use with the Leica EG1150H paraffin embedding station.

3.2 Technical data
General specifications
Approvals:
The approval symbols relating to this instrument are located on the rear of the instrument next to the nameplate.
Voltage of power supply:
The device requires a specific AC voltage, see table at right. Instrument type acc. to identification label.
AC ±10 %
Instrument type | Voltage of power supply
| EG1150 C-1 | 230 V / 50 Hz |
| EG1150 C-3 | 120 V / 60 Hz |
| EG1150 C-8 | 240 V / 50 Hz |
| EG1150 C-11 | 100 V / 50 - 60 Hz |
Maximum input:
Maximum starting current (5 s):
Class of protection ^1 :
Mains power fuse 100/120 V:
Mains power fuse 230/240 V:
Miniature fuse 6.3 x 32 mm:
Degree of pollution ^1 :
Overvoltage category:
Operating temperature range:
Working temperature range:
Relative air humidity:
^1) according to IEC-1010, UL 3101, EN 61010
350 VA
25 A
|
ETA circuit breaker type 3120-F421-P7T1W19DB4-10A
ETA circuit breaker type 3120-F421-P7T1W19DB4-4A T 1.0 A, Schurter: type Fst
2
||
+18°C to +40°C
- 5 °C, up to a room temperature of approx. +28 °C
maximum 80 %, non-condensing
Refrigeration unit
Refrigeration performance*:
Safety factor:
Refrigerant:
Compressor oil:
*as per CECOMAF
Liquid temperature: 55°C
Evaporation temperature: -25 °C
110 W
3
80 g ± 5 g R 134a
180 cm ^3 Emkarate RL 15 s, ICI
Dimensions and weight
Width:
Depth:
Height:
Weight:
360 mm
650 mm
360 mm
23 kg
4.1 Location conditions
- Stable, vibration-free laboratory table with horizontal, flat table top, as far as possible vibration-free ground.
- No direct sunlight or strong temperature fluctuations. Room temperature throughout between +15 °C and +28 °C.

At a room temperature of > +28^ the working temperature of the cold plate of -5^ may not be reached at all points.
- Relative air humidity maximum 80%, non-condensing.
- The instrument should be set up in such a way that the air circulation is not affected.

To ensure proper function, there must be gap of at least 15 cm behind the instrument. Failure to observe this distance may result in serious damage to the refrigeration unit of the device. The instrument should not be operated in hazardous locations.
4.2 Delivery range
The basic equipment for the Leica EG1150C cold plate contains the following components:
Order No.
• 1 basic instrument, Leica EG 1150C
• 1 power cable see p. 12 only for Australia:
• 1 power cable EU 14 0411 13558
• 1 mains transformer, 230/240 V 14 0469 31998
• 1 replacement fuse T 1.0 A, 6,3x32 mm 14 6943 01001
• 1 operating manual 14 0388 80002
• optionally: protective hood (acrylic)

Please compare the delivered components against the packing list and your order.
Should there be any discrepancy, please contact the Leica distributor handling your order.
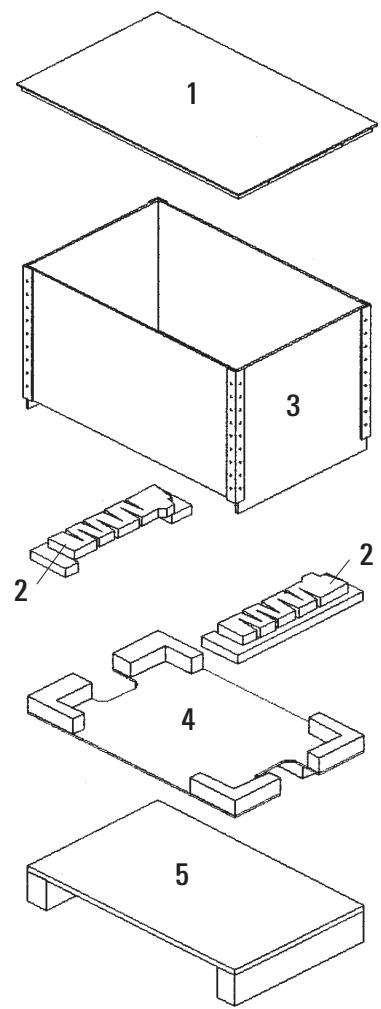
4.3 Unpacking and installing
The unpacking instructions are attached to the outside of the transport crate. Fig. 4 shows the design of the original packaging.
The numbers indicate the sequence of disassembling and reassembling.

Please check the transport packaging for external damage.
If you detect obvious damage, please report it to your shipping agent immediately.
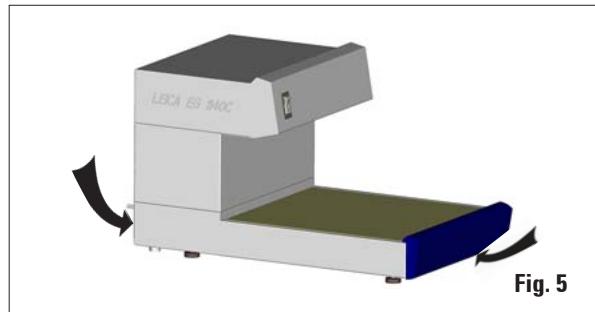
To lift device, grasp at the front on the base plate and at the rear at the base of the housing (arrows in Fig. 5), lift out of the shaped pad (4) and place on a sturdy laboratory table.

The Leica EG1150C must be transported in an upright, horizontal position at all times. It must not be inverted under any circumstances, even for short periods, or stored on one of its sides.
A waiting period of 4 hours must be observed between transporting the instrument and switching it on. The compressor oil agitated while moving the instrument must return fully to its original position.
natural_image
3D rendering of a beige LBCA ES INOC device with a blue base and green tray, labeled Fig. 5 (no text or symbols on the device itself)4.4 Power supply
The refrigeration unit of the Leica EG1150C requires a specific voltage and frequency (see "Technical data" chapter) and is therefore supplied with an AC power cable suitable to the instrument.
Please observe the following notes to prevent damage to the unit:

Before connecting the device to a power source, ensure that the voltage indicated on the type plate (rear) matches the actual voltage available at the place of installation.
If this is not the case, do not plug the instrument in!
The unit must be connected only with the supplied power cable and only to a grounded power receptacle.
Do not use an extension cord!
- Connect the plug (7) of the power cord to the connecting port (6).
- Plug the power cord into the wall outlet.
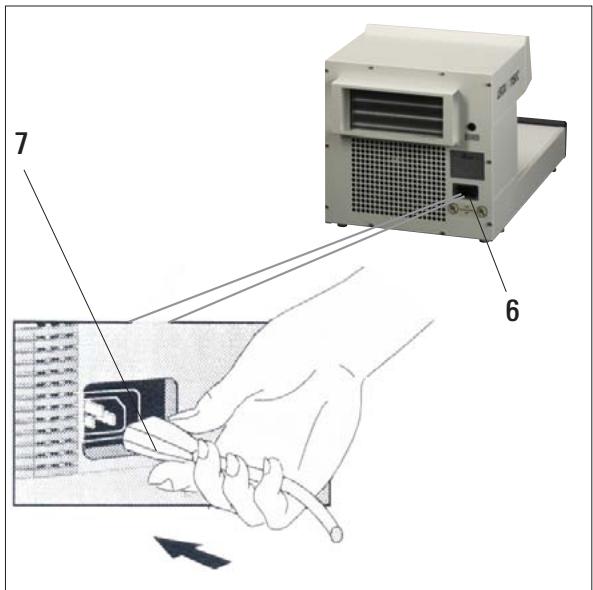
Fig. 6
To connect the instrument, use one of the power cords listed below:
Location Order No.
| Australia: | 14 0411 32565 |
| Europe: | 14 0411 13558 |
| Italy: | 14 0411 13561 |
| Switzerland: | 14 0411 13560 |
| United Kingdom: | 14 0411 27822 |
| USA, Canada, Japan: | 14 0411 13559 |
5.1 Switch on the instrument

natural_image
Green toggle switch with '0' and '1' labels (no additional text or symbols)After the installation as described in Chapter 4 is complete, the Leica EG1150C is ready for use. Switch the instrument on with the on-off switch at the front left-hand side ("I" = ON). A lamp lights up in the switch to indicate that the unit is operational and the refrigeration unit will start working.
Depending on the room temperature, the working temperature of the cooling surface (-5 °C) will be reached in around 25 minutes (see also Ch. 4.1, p. 10).

The cooling surface may not be loaded with molds until the cooling time has elapsed. Otherwise, the working temperature of -5 ^ may not be reached.
5.2 Replacing the secondary fuse
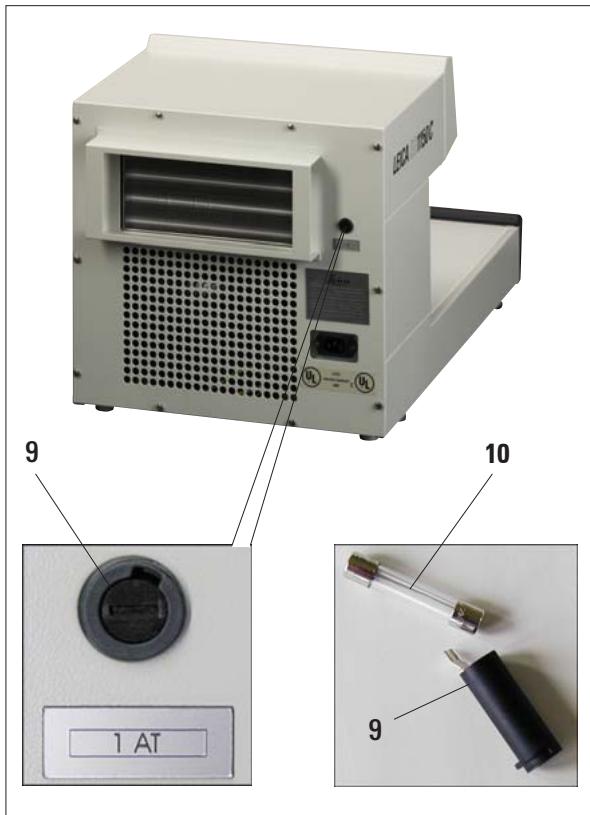
Fig. 7
A miniature fuse to protect the electronic components is located on the rear of the instrument.

Before replacing the fuse, always switch the instrument off and pull the power plug from the wall socket. Use only miniature fuses of the type specified in the 'Technical data' chapter.
To replace the fuse, please proceed as follows:
- Using a screwdriver, lightly press the fuse holder (9) and turn counterclockwise about 14 turn.
- Remove the fuse holder and take out the fuse (10).
- Replace it with a new fuse of the same type.
- Replace the fuse holder (9).
- Using a screwdriver, gently press the fuse holder and turn it clockwise about 1 / 4 turn.
- Reconnect the instrument to an AC power outlet and switch it on.
5.3 Malfunctions

If you cannot solve your problem using the help in the following table, please contact your Leica customer service organization or the Leica dealer from whom you purchased the instrument.
| Malfunction | Possible causes | Corrective action |
| Instrument doesn’t work. | Power switch not turned on or the cut-out function of the power switch activated. | Check instrument is connected, then turn main power switch on. Only for Great Britain: Check the fuse in the mains plug. |
| Cooling unsatisfactory, formation of condensation. | Room temperature too high or exposure to direct sunlight. | Check the cooling again at a lower room temperature. |
| Inadequate air supply to ventilation unit. | Check distance of instrument to wall; it must be at least 15 cm. | |
| Refrigeration system leak. | The instrument must be serviced or repaired by a service technician. Please contact customer service. | |
| Compressor switches off after a brief period of operation and switches back on shortly thereafter. | AC power does not match specifications or compressor defective. | Check the voltage of power supply. |
| Compressor does not start. | Compressor defective. | The instrument must be serviced or repaired by a service technician. |
| Compressor switches off after a short period of operation. | Compressor defective. | Please contact customer service. |
6.1 Cleaning the instrument

Switch off the instrument each time before cleaning and pull out the mains plug.
While handling cleaning materials, observe the safety regulations of the manufacturer and the lab regulations valid in the country of use.
During cleaning, do not allow any liquid to penetrate inside the instrument!
To prevent scratching the surface of the instrument, do not use metallic tools with sharp edges under any circumstances.
Work surface
- All common laboratory cleaning products suitable for the removal of paraffin (e.g. Paraguard or xylene substitutes) can be used to clean the work area.
Instrument and exterior surfaces
- If necessary, clean the painted exterior surfaces with a mild household cleaner or soapy water and wipe with a damp cloth.
- Avoid prolonged contact of organic solvents on the surface of the instrument. Do not use xylol or acetone on the painted surfaces!
6.2 Maintenance instructions

Only Leica service technicians are authorized to open the instrument for maintenance and repair work.
Please observe the following points to ensure the instrument's reliable function over extended periods:
- Clean the instrument with care daily.
- Regularly remove dust from the ventilation slots on the back of the instrument with a brush or vacuum cleaner.
- Have the instrument inspected at least once a year by an authorized Leica customer service technician.
- Enter into a service contract at the end of the warranty period. For more information, contact the relevant Leica customer service organization.
Warranty
Leica Biosystems Nussloch GmbH guarantees that the contractual product delivered has been subjected to a comprehensive quality control procedure based on the Leica in-house testing standards, and that the product is faultless and complies with all technical specifications and/or agreed characteristics warranted.
The scope of the warranty is based on the content of the concluded agreement. The warranty terms of your Leica sales organization or the organization from which you have purchased the contractual product shall apply exclusively.
Service information
If you require technical service or replacement parts, please contact your Leica sales representative or dealer who sold the product.
Please provide the following information:
- Model name and serial number of the instrument.
- Location of the instrument and name of the person to contact.
- Reason for the service call.
- Date of delivery.
Decommissioning and disposal
The instrument or parts of the instrument must be disposed of in compliance with the local laws.
- Leica EG1150C
- Cold Plate
- CE
- Instruction Manual
- Safety 6
- Instrument components and specifications 8
- Commissioning 10
- Operation 13
- Cleaning and maintenance 15
- Warranty and service 16
- Symbols used in the text and their meanings
- User group
- Specified use and application
- Instrument type
- Safety regulations
- Safety instructions
- Safety instructions – safety regulations on the instrument itself
- Safety instructions – transport, installation and operation
- Built-in safety devices
- Automatic circuit breaker in the main switch
- Overview – instrument parts
- Technical data
- General specifications
- Refrigeration unit
- Dimensions and weight
- Location conditions
- Delivery range
- Unpacking and installing
- Power supply
- Switch on the instrument
- Replacing the secondary fuse
- Malfunctions
- Cleaning the instrument
- Work surface
- Instrument and exterior surfaces
- Maintenance instructions
- Warranty
- Service information
- Decommissioning and disposal
Brand : LEICA
Model : EG1150 C
Category : Microtome