
BA5510 - Electric mixer SOLAC - Free user manual and instructions
Find the device manual for free BA5510 SOLAC in PDF.
| Product type | Electric hand mixer |
| Brand | SOLAC |
| Model | BA5510 |
| Power supply | Mains, voltage according to rating plate |
| Power | 500 W (estimated) |
| Speeds | 5 speeds + Turbo function (30 seconds max) |
| Included accessories | 2 mixing whisks, 2 dough hooks, beater arm, rotating bowl (13), mixing container with lid (11), stand (12) |
| Use without stand | Handheld mixer, max 10 min (positions 1-5), Turbo 30 s |
| Use with stand | Stand with rotating bowl, max 10 min, automatic bowl rotation |
| Using the beater arm | Max 2 minutes, do not use in Turbo |
| Functions | Mix, beat, whisk, knead, emulsify (immersion blender) |
| Dimensions (L x W x H) | Approx 20 x 15 x 25 cm (estimated) |
| Weight | Approx 1.5 kg (estimated) |
| Bowl material | Plastic or metal (not specified, estimated stainless steel) |
| Bowl capacity | Approx 1.5 L (estimated) |
| Safety | Accessory ejection, main unit not immersible, intermittent use with cooling |
| Care and cleaning | Main unit: damp cloth. Accessories and bowl: warm soapy water or dishwasher (bowl). Do not immerse the unit. |
| Spare parts and repairability | Contact an authorized dealer for repair; special tools required for the cord |
| Warranty | Not specified, refer to the sales contract |
Frequently Asked Questions - BA5510 SOLAC
User questions about BA5510 SOLAC
0 question about this device. Answer the ones you know or ask your own.
Ask a new question about this device
Download the instructions for your Electric mixer in PDF format for free! Find your manual BA5510 - SOLAC and take your electronic device back in hand. On this page are published all the documents necessary for the use of your device. BA5510 by SOLAC.
USER MANUAL BA5510 SOLAC
natural_image
Modern kitchen mixer with SOlac branding and a bowl of liquid (no visible text or symbols on the device itself)Solac is a registered Trade Mark
02/04
6- 9 • ESPAÑOL
10-13 • ENGLISH
14-17 • FRANÇAIS
18-21 • DEUTSCH
22-25 • PORTUGUÊS
26-29 • ITALIANO
30-33 • NEDERLANDS
34-37 • ČESKY
38-41 • POLSKA
42-45 • SLOVENSKY
46-50 • MAGYAR
51-54 • българск
55-57 • HRVATSKA
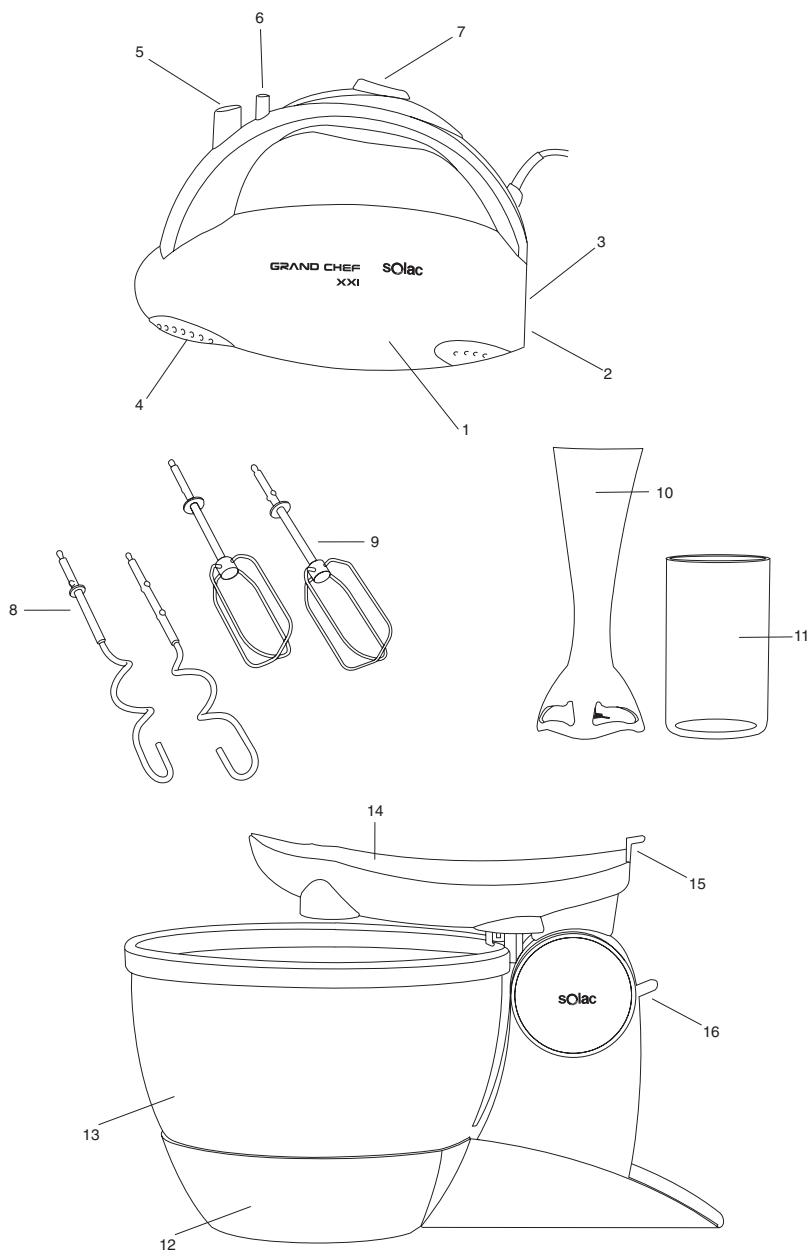
Fig. 1
natural_image
Illustration of a hand holding a pen and measuring a surface with arrows indicating direction (no text or symbols)Fig. 2
natural_image
Illustration of a hand holding a hook with a tool, no text or symbols presentFig. 3
natural_image
Diagram of a hand pressing down on a curved mechanical component, showing alignment arrows (no text or symbols)Fig. 4
natural_image
Illustration of a hand gripping a curved object, enclosed in a circular frame (no text or symbols)Fig. 5

natural_image
Diagram of a hook with a curved arrow indicating motion or force, enclosed in a circle (no text or symbols)
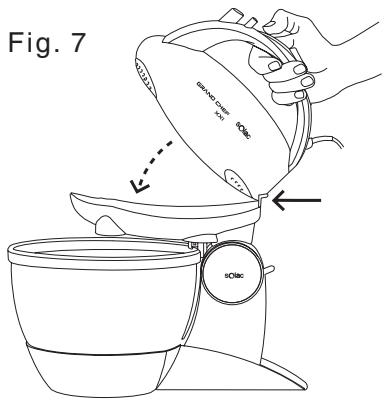
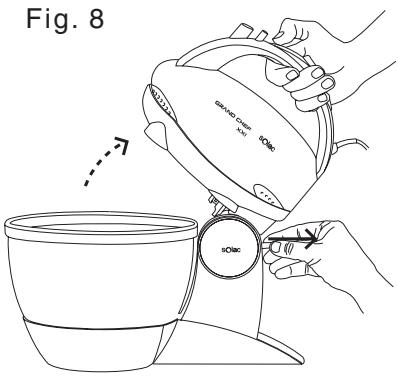

Fig. 10

Fig. 11
natural_image
Simple line drawing of a hand pouring liquid into a beaker (no text or symbols)Fig. 12
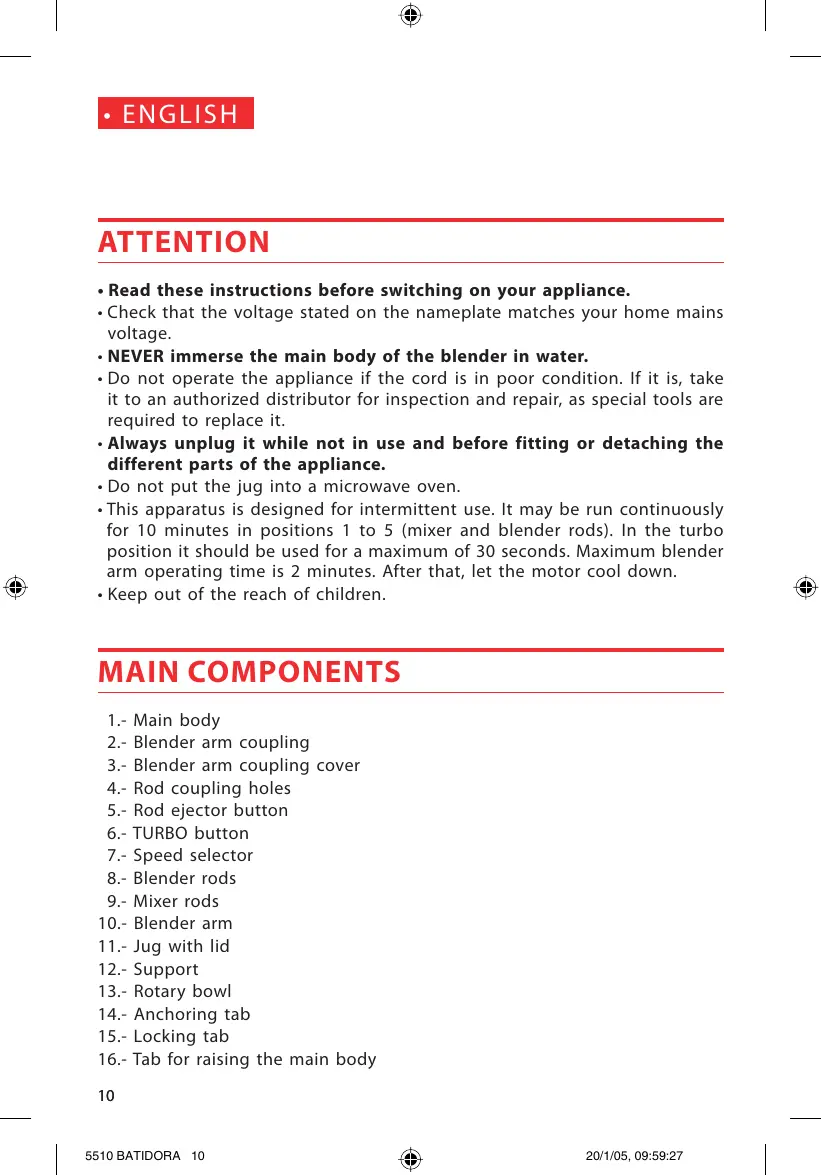
ATENCIÓN
- Read these instructions before switching on your appliance.
- Check that the voltage stated on the nameplate matches your home mains voltage.
-
NEVER immerse the main body of the blender in water.
-
Do not operate the appliance if the cord is in poor condition. If it is, take it to an authorized distributor for inspection and repair, as special tools are required to replace it.
- Always unplug it while not in use and before fitting or detaching the different parts of the appliance.
- Do not put the jug into a microwave oven.
- This apparatus is designed for intermittent use. It may be run continuously for 10 minutes in positions 1 to 5 (mixer and blender rods). In the turbo position it should be used for a maximum of 30 seconds. Maximum blender arm operating time is 2 minutes. After that, let the motor cool down.
- Keep out of the reach of children.
MAIN COMPONENTS
- Before plugging the appliance into the mains, you should fit the appropriate attachments depending on what kind of mixing you want to do:
- Mixer rods (9): For liquid mixes such as creams, egg whites, pastry mixes, etc.
Fit 1 or 2 rods (9) in the coupling holes (4) by pushing them gently up until they are fully engaged (fig.1).
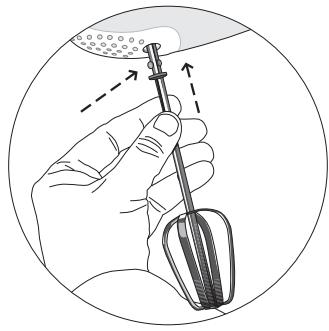
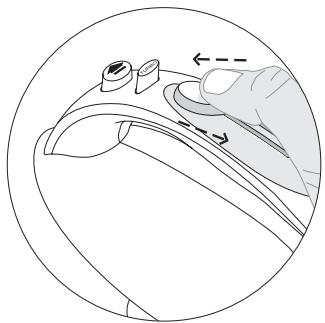
- Blender rods (8): They are used for mixing light doughs.
- IMPORTANT: The blender rod with the metal washer should be inserted in the wide hole (fig.2).
- When the attachments you are going to use have been set in place, plug the appliance into the mains.
B.- OPERATION
- Pick up the mixer and use your thumb to slide the selector (7) to the desired position (fig.3):
- Position 0: Off
- Position 1-2: Low speed
- Position 3-4: Medium speed
- Position 5: High speed
- We recommend starting off at low speed and gradually increasing. For heavy or thick mixes you should use high speed (n° 5) right from the start to prevent the motor from locking.
- Make sure that the rods can turn perfectly inside the receptacle.
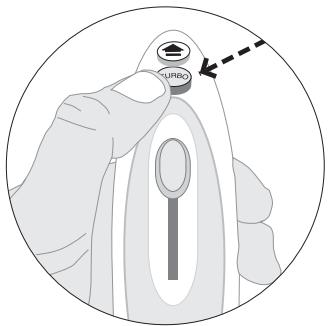
- The TURBO button (6) enables you to use the mixer at the highest speed possible for a few seconds. For this purpose, with the speed selector (7) at the desired position, keep the button (6) pressed for as long as you want it to operate (maximum 30 seconds) (fig.4).
- When you finish mixing or want to interrupt the process, set the selector (6) at position 0.
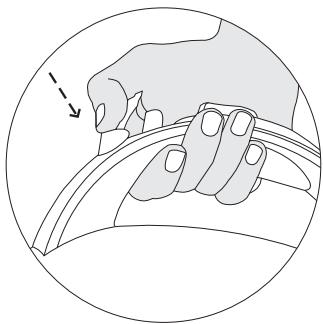
- To remove the rods (8 or 9) from the main body (1), press the release button (5) (fig.5).
- Do not press the button (5) while the appliance is working, as the rods would drop out.
- When the process is concluded, unplug the appliance from the mains.
- The turbo cannot be switched on in position 0 for safety reasons.

USE OF THE SUPPORT WITH THE BOWL (12)
- For doughs that need a long mixing time, use the support (12) and the bowl (13). In this way, you will save having to hold the appliance in your hand and you will achieve a uniform mix, as the bowl rotates automatically.
- Place the bowl with the rods (13) on the support base (12) (fig.6).
- To fit the main body (1) on the support (12): engage the slot at the back of the main body on the locking tab (15), then press down until the anchoring tab (14) engages in its seat (fig.7).
- To fit the rods, slide the tab (16) out and turn the top part (fig.8).
- IMPORTANT: The blender rod with the metal washer must be inserted in the wide hole.
- Move the main body forwards again until engaging the tab (16), so that the rods are in the bowl (fig.9).
- To start the appliance, follow the same steps as in section B.- Operation. In this case, the appliance may be operated for a maximum of 10 minutes.
- The bowl will rotate automatically during the process so as to achieve a uniform mix.
- To remove the bowl, turn the top so that the rods are out.
USING THE BLENDER ARM (10)
- Before attaching the blender arm (10) to the body of the appliance, make sure that it is switched off and unplugged.
A.- FITTING THE BLENDER ARM (10)
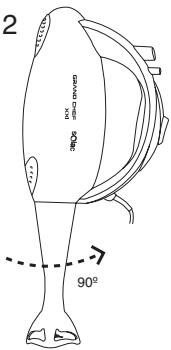
- Slide the coupling cover (3), insert the arm in the coupling (2) by lining up the mark on the arm (▲) with the mark on the coupling side (▼) and turn the arm 90^ in a clockwise direction (fig.10).
- Make sure that the arm is attached properly.
- Plug in the appliance.
- Select "speed 3" when you want to use the blender arm.
- Never use the blender arm in the "TURBO" position.
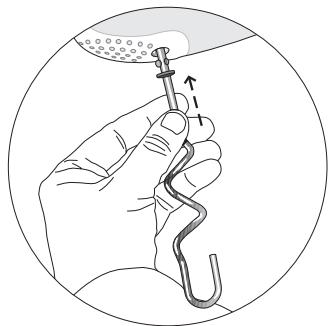
B.- OPERATION
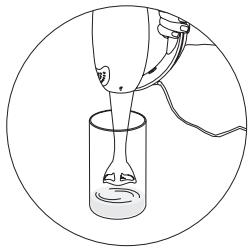
- Insert the blender arm in the food to be mixed and slide the speed selector (7) to the desired position (fig.11). Never use the blender arm for more than 2 minutes running.
- Do not insert the blender arm into boiling or very hot foods.
- If you want, you can use the jug (11) attached or any other container. If you want to use the bowl (13), it is best to remove it from the support.
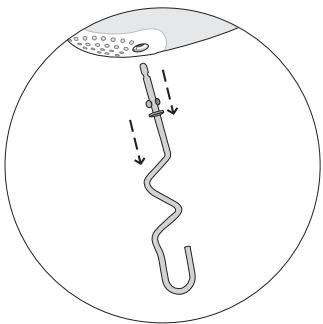
- To remove the blender arm, unplug it and turn it 90^ in a clockwise direction (fig.12).


CLEANING AND MAINTENANCE
- Before cleaning the appliance, make sure that it is switched off and unplugged.
- Wash the rods (8 or 9), the blender arm (10), the support (12) and the bowl (13) with soapy water. The bowl may be put into the dishwasher.
- Use a damp cloth to wipe the main body clean.
- NEVER immerse the appliance in water.
- Should the appliance fall into water, do not try and pick it up, unplug it from the mains.
• FRANÇAISE
ATTENTION


Brand : SOLAC
Model : BA5510
Category : Electric mixer