
GPS 3229 - Gps PALM - Free user manual and instructions
Find the device manual for free GPS 3229 PALM in PDF.



| Product Type | Bluetooth GPS Receiver |
| Brand | PALM |
| Model | GPS 3229 |
| Compatibility | Palm Treo 650 and Treo 700w Smartphones |
| Navigation Software | TomTom NAVIGATOR 5 |
| Wireless Technology | Bluetooth |
| Included Maps | Default map of continental United States, additional maps available |
| Main Functions | GPS navigation, routing, voice navigation, map customization |
| Power Source | Rechargeable internal battery, car adapter (4-5 hours battery life) |
| Maintenance and Cleaning | Clean with a dry cloth only. Do not open, pierce, or disassemble. |
| Safety | Do not obstruct driver's view or airbags. Use voice prompts while driving. |
| Spare Parts and Repairability | GPS receiver, expansion card, card reader, car adapter. Repair by a professional only. |
| General Information | Complies with Class B (FCC, ICES-003). Use with a clear view of the sky. |
Frequently Asked Questions - GPS 3229 PALM
User questions about GPS 3229 PALM
0 question about this device. Answer the ones you know or ask your own.
Ask a new question about this device
Download the instructions for your Gps in PDF format for free! Find your manual GPS 3229 - PALM and take your electronic device back in hand. On this page are published all the documents necessary for the use of your device. GPS 3229 by PALM.
USER MANUAL GPS 3229 PALM
The Palm® GPS Navigator provides detailed maps, route planning, and voice navigation.
The GPS Navigator uses TomTom NAVIGATOR 5 software and maps on your device. To use Navigator, your device makes a wireless connection to the included GPS receiver using Bluetooth® wireless technology. The receiver then transmits information to the NAVIGATOR 5 software that is displayed on your device screen.
This guide explains how to set up the TomTom NAVIGATOR 5 software on your device and how to customize maps. The procedure for setting up the NAVIGATOR 5 software is different depending on whether you have a Palm® Treo™ 650 smartphone or a Palm® Treo™ 700w smartphone (not available in all markets).
For information on setting up the GPS receiver, see the GPS Navigator Setup poster included in this package. For more detailed instructions on using TomTom NAVIGATOR 5, refer to the included TomTom Quick Start Guide.
Installation requirements
- A Treo 650 smartphone or a Treo 700w smartphone (not available in all markets). For information on other supported devices, visit the Palm website at www.palm.com.
- GPS receiver (included).
To add or remove maps from an expansion card:
-
Expansion card reader (included).
-
Computer with Windows 2000/XP or Mac OS X 10.3, Internet access, powered USB port, and DVD-ROM drive.
Setting up NAVIGATOR 5 software on a Treo 650 smartphone
If you have a Treo 700w smartphone, see "Setting up NAVIGATOR 5 software on a Treo 700w smartphone" on page 9.
1 Turn the GPS receiver on and position it in a location with an unobstructed view of the sky.
2 Create a partnership between the receiver and your device:
a. Press Applications and select Bluetooth

b. Select On if it is not already selected.
c. Select Setup Devices, and then select Trusted Devices.
d. Select Add Device, and then select Palm GPS. Select OK.
e. Enter the passkey that appears on the bottom of the receiver, and then check Add Palm GPS to trusted device list. Select OK.
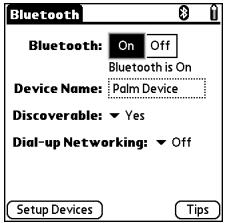
After your device and the receiver create a partnership, the blue light on the receiver blinks.
f. Select OK twice.
3 Insert the TomTom NAVIGATOR 5 expansion card included in this package into your device's expansion card slot. The NAVIGATOR 5 software application opens automatically.
4 Select your basic NAVIGATOR 5 settings:
a. Tap the language you want, and then tap Yes.
b. When prompted, tap the screen to begin preference selection.
c. Select right- or left-handed operation, and then tap Done.
d. Select how distances are displayed, and then tap Done.
| Čeština | Latviski |
| Dansk | Lietuviškai |
| Deutsch | Nederland |
| Eesti | Norsk |
| English UK | Polski |
| English US | Portuguese |
| Espanol | Suomi |
| François | Svenska |
| Italiano | Türkce |
| Magyar | Vlaams |
Tap to scroll voice options
| Distance units | 4:21pm |
| Please specify the units you prefer distances to be expressed in: • Miles • Kilometers | |
| Done | |
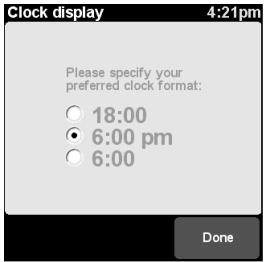
e. Select how time is displayed, and then tap Done.
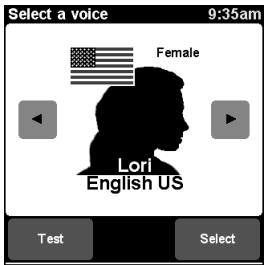
f. Tap the left and right arrows to select a voice, and then tap Select.
g. If prompted to select a map, tap the map you want.
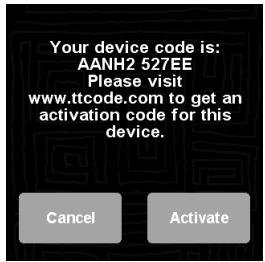
5 Activate the NAVIGATOR 5 software:
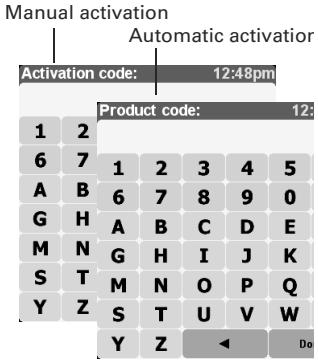
a. If you have a data plan with your wireless carrier, tap Automatic. If you do not have a plan or aren't sure, tap Manual.
b. If you selected Automatic, tap Activate and then enter the 15-character product code written on the back of the TomTom NAVIGATOR 5 DVD sleeve. The software is activated through your device's wireless connection.
c. If you selected Manual, do the following:
-
On your computer, go to www.ttcode.com and select the Product Activation option for your country. Enter the 15-character product code written on the label on the back of the TomTom NAVIGATOR 5 DVD sleeve, and then enter the device code displayed on your device screen.
-
On your device, tap Activate.
- Enter the activation code displayed on your computer screen.
d. Tap Done.
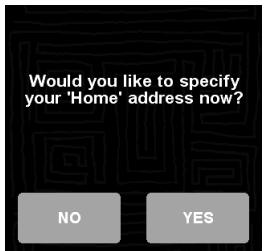
6 Enter your home address:
a. Tap Continue, and then tap Yes.
b. Enter or scroll to your zip code or city, and then tap it when it is displayed.
c. Enter or scroll to your street name, and then tap it when it is displayed.
d. Enter your house number, and then tap Done.
7 On the Specify your GPS hardware screen, tap the left or right arrow until Other Bluetooth GPS is displayed, and then tap Select.
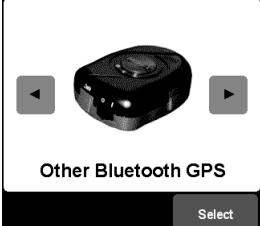
Specify your GPS hardware
8 Repeatedly tap the screen to take a tour of NAVIGATOR 5.
9 On the Legal notice screen, read the information and then tap I agree if you agree.
[ *] NOTE You must tap I agree to use the software.
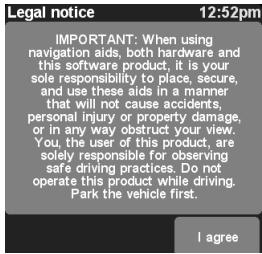
NAVIGATOR 5 is now ready for use on your device.
Setting up NAVIGATOR 5 software on a Treo 700w smartphone
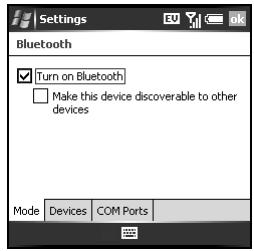
1 Make sure your device's Bluetooth functionality is turned on:
a. Go to the Today screen, and then tap Bluetooth
b. Select Turn on Bluetooth if it is not already selected.
2 Turn the GPS receiver on and position it in a location with an unobstructed view of the sky.
3 Start the software:
a. Insert the TomTom NAVIGATOR 5 expansion card into your device's expansion card slot.
b. When asked if you want to continue, select Yes, and then select Yes again.
c. After the installation is complete, select OK.
4
Select your basic NAVIGATOR 5 settings:
a. Tap the language you want, and then tap Yes.
b. When prompted, tap the screen to begin preference selection.
c. Select right- or left-handed operation, and then tap Done.
d. Select how distances are displayed, and then tap Done.
| Čeština | Latviski |
| Dansk | Lietuviškai |
| Deutsch | Nederlands |
| Eesti | Norsk |
| English UK | Polski |
| English US | Português |
| Espanol | Suomi |
| François | Svenska |
| Italiano | Türkce |
| Magyar | Vlaams |
Tap to scroll voice options
| Distance units | 4:21pm |
| Please specify the units you prefer distances to be expressed in: • Miles ○ Kilometers | |
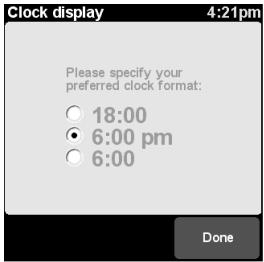
e. Select how time is displayed, and then tap Done.
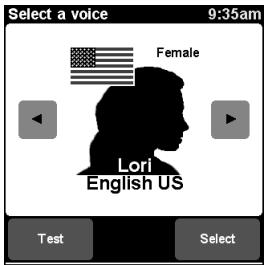
f. Tap the left and right arrows to select a voice, and then tap Select.
g. If prompted to select a map, tap the map you want.
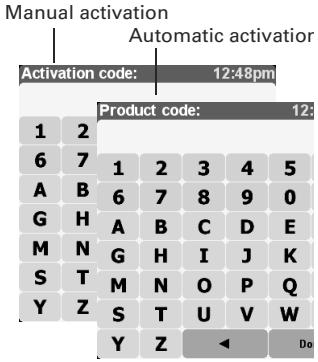
5 Activate the NAVIGATOR 5 software:
a. If you have a data plan with your wireless carrier, tap Automatic. If you do not have a plan or aren't sure, tap Manual.
b. If you selected Automatic, tap Activate and then enter the 15-character product code written on the back of the TomTom NAVIGATOR 5 DVD sleeve. The software is activated through your device's wireless connection.
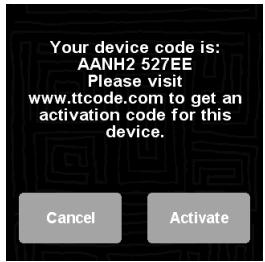
c. If you selected Manual, do the following:
-
On your computer, go to www.ttcode.com and select the Product Activation option for your country. Enter the 15-character product code written on the label on the back of the TomTom NAVIGATOR 5 DVD sleeve, and then enter the device code displayed on your device screen.
-
On your device, tap Activate.
- Enter the activation code displayed on your computer screen.
d. Tap Done.
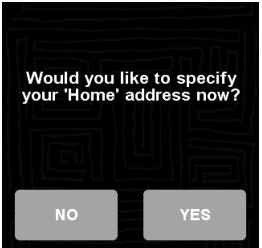
6 Enter your home address:
a. Tap Continue, and then tap Yes.
b. Enter or scroll to your zip code or city, and then tap it when it is displayed.
c. Enter or scroll to your street name, and then tap it when it is displayed.
d. Enter your house number, and then tap Done.
7 On the Specify your GPS hardware screen, select TomTom/Palm GPS, and then tap Select. Once you make this selection, your device creates a partnership with the receiver automatically.

8 Repeatedly tap the screen to take a tour of NAVIGATOR 5.
9
On the Legal notice screen, read the information and then tap I agree if you agree.
[ *] NOTE You must tap I agree to use the software.
Legal notice
12:52pm
IMPORTANT: When using navigation aids, both hardware and this software product, it is your sole responsibility to place, secure, and use these aids in a manner that will not cause accidents, personal injury or property damage, or otherwise. If you, the user of this product, are solely responsible for observing safe driving practices, Do not operate this product while driving. Park the vehicle first.
I agree
NAVIGATOR 5 is now ready for use on your device.
Exiting NAVIGATOR 5
On a Treo 700w smartphone, you should exit the NAVIGATOR 5 application when you are finished using it. On a Treo 650 smartphone, NAVIGATOR 5 automatically closes when you switch to another application, so you do not need to exit.
1 On the NAVIGATOR 5 navigation screen, tap the top portion of the screen to open the Main Menu.
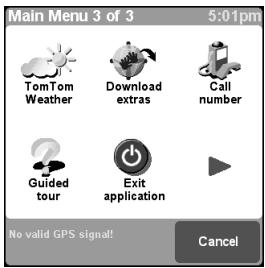
2 Exit NAVIGATOR 5:
a. Tap the blue arrow until the Main Menu 3 of 3 screen is displayed.
b. Tap Exit application.
Customizing Maps
The TomTom NAVIGATOR 5 expansion card includes a continental U.S.A. map by default. You can customize which maps you use in the following ways:
- Add one or more additional maps to the TomTom NAVIGATOR 5 expansion card, up to the available memory on the card.
- Replace the continental U.S.A. map with a different map.
- Put multiple maps on a blank expansion card. If you choose this option, you need to purchase a separate, high-capacity expansion card.
[ * ] NOTE You must have at least one map on the expansion card to use the NAVIGATOR 5 software.
Adding a map to the TomTom NAVIGATOR 5 expansion card
1 Connect the card to your computer:
a. Insert the card reader included in this package into a powered USB port on your computer.
b. Insert the TomTom NAVIGATOR 5 expansion card included in this package into the card reader.
2 Add a map:
a. Insert the TomTom NAVIGATOR 5 DVD into your computer's DVD drive. On a Mac computer, click the icon to run the DVD software.
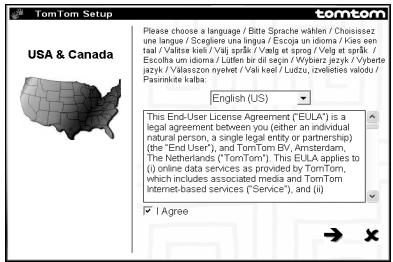
b. Select your language and check the I Agree box if you agree. Click the arrow.
[] NOTE You must check the I Agree box to add a map.
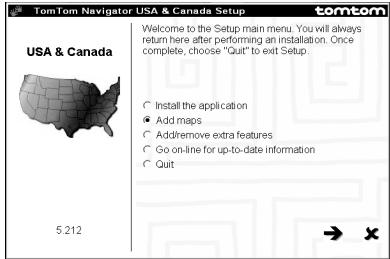
c. Select Add maps and click the arrow.
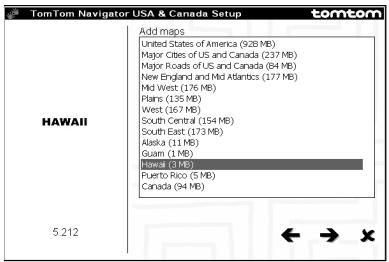
d. Select the map you want to add, and click the forward arrow.
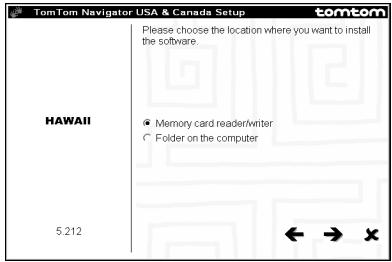
e. Select Memory card reader/writer and click the forward arrow.
f. When the Installation complete message appears, click the arrow.
3 Do one of the following:
- To add another map, select Add maps, click the arrow, and repeat steps 2d through 2f.
- When you have finished adding maps, select Quit and click the arrow.
Deleting a map from the TomTom NAVIGATOR 5 expansion card
1 Connect the card to your computer:
a. Insert the card reader included in this package into a powered USB port on your computer.
b. Insert the TomTom NAVIGATOR 5 expansion card into the card reader.
2 Delete a map:
a. Insert the TomTom NAVIGATOR 5 DVD into your computer's DVD drive. On a Mac computer, click the icon to run the DVD software.
b. Select your language and check the I Agree box if you agree. Click the arrow.
[ * ] NOTE You must check the I Agree box to delete a map.
c. Select Add/remove extra features and click the arrow.
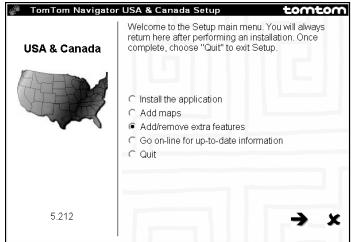
d. Select Remove maps and click the forward arrow.
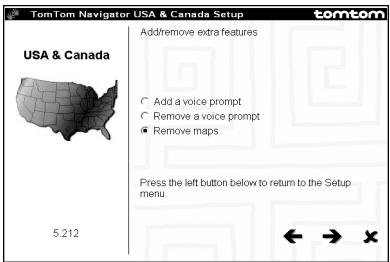
e. Select the drive containing the card reader and click the forward arrow. If only one option appears, simply click the arrow.
f. Select the map you want to remove, and click the forward arrow.
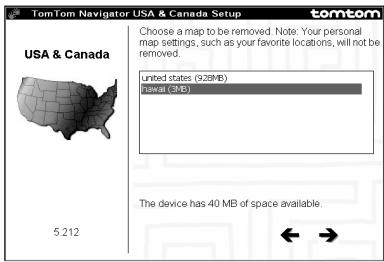
g. When the
3 Do one of the following:
- To remove another map, select Remove maps, click the forward arrow, and repeat steps 2e through 2g.
- When you have finished removing maps, click the back arrow to return to the setup screen, select Quit, and click the arrow.
Putting maps on a blank expansion card
If you want to install maps on a separately purchased high-capacity card, you must first install the NAVIGATOR 5 software onto the card.
1 Connect the card to your computer:
a. Insert the card reader included in this package into a powered USB port on your computer.
b. Insert the blank expansion card into the card reader.
2 Install the software:
a. Insert the TomTom NAVIGATOR 5 DVD into your computer's DVD drive. On a Mac computer, click the icon to run the DVD software.
b. Select your language and check the I Agree box if you agree. Click the arrow.
[ * ] NOTE You must check the I Agree box to install the software.
c. Select Install the application and click the arrow.
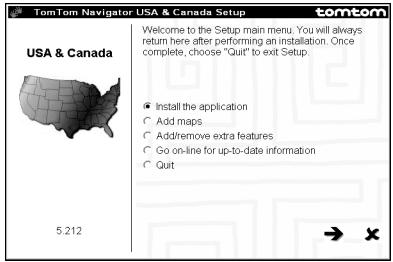
d. Select Memory card reader/writer and click the forward arrow.
e. When the Installation complete message appears, click the arrow.
3 To add maps to the card, see "Adding a map to the TomTom NAVIGATOR 5 expansion card" on page 16. You can install multiple maps one at a time as described in that procedure.
Common Questions
What is the passkey I'm asked to enter when creating a partnership between my device and the Bluetooth® GPS receiver?
Like a password, the passkey is a security measure. Connections can happen only between your Treo™ device and a Bluetooth device that has the same passkey.
The passkey for the receiver is noted on the bottom of the receiver. You should need to enter the passkey only the first time you establish a Bluetooth connection between your Treo device and the receiver.
Should I keep my device and the receiver connected to the vehicle power adapter while they are in use?
If your device is fully charged, it can run for about four to five hours in the car. For longer trips, it is a good idea to keep the vehicle power adapter connected to keep both your device and the receiver charged. This prevents the batteries from getting too low for the Bluetooth connection to function.
Where can I get customer support if I need it?
See the TomTom Quick Start Guide included in this package for detailed information about NAVIGATOR 5 features. If you still need help, refer to the support section of the TomTom website at www.tomtom.com/support/.
If you have problems with the Bluetooth GPS receiver hardware, refer to the Holux website at www.holux.com.
Safety Information
Please read the following information to ensure safe use of the GPS Navigator.
Global Positioning System
The Global Positioning System (GPS) is a satellite-based system that provides location and timing information around the globe. GPS is operated and controlled under the sole responsibility of the Government of the United States of America, which is responsible for its availability and accuracy. Any changes in GPS availability and accuracy may impact the operation of your GPS receiver. Environmental conditions will affect the operation of your GPS receiver. TomTom B.V. and Palm cannot accept any liability for the availability and accuracy of GPS.
Use With Care
Use of a GPS receiver for navigation does not by any means substitute for the need to drive with due care and attention.
WARNING!
Do not mount the GPS Navigator where the driver's field of vision is obscured or where airbags may deploy, and do not place it on the dashboard without securing it reliably. Do not mount the unit or route the cables in such a way as to interfere with control of the vehicle. Failure to follow these guidelines could result in an accident or collision resulting in serious injury or death.
Drive safely using information from street signs and landmarks in addition to the GPS Navigator. Do not become distracted by the GPS Navigator while operating the vehicle. Use voice prompts to minimize the need to look at the display. Do not input destinations or access other functions that take time to complete unless the
vehicle is safely stopped. Make all settings before departing or pull off the road in a safe and legal manner if changes need to be made.
CAUTION
Use GPS Navigator only as an aid to navigation. It is not designed for any use requiring precise measurements. The Global Positioning System (GPS) is operated by the government of the United States of America and is subject to changes which could affect the accuracy and performance of this GPS equipment.
NOTICE TO DRIVERS
When using this product you must obey your local vehicle codes. Some vehicle codes restrict any object or material from being placed, displayed, installed, affixed, or applied upon the windshield or side or rear windows. Where such codes exist, when using this product, the suction cup mount pad should be used instead of attaching the mount directly to the vehicle windshield or side or rear windows. Palm is not responsible for any damages, fines, or penalties that may result from disregarding this notice.
Aircraft and Hospitals
Use of devices with an antenna is prohibited on most aircraft, in many hospitals, and in many other locations. The GPS receiver must not be used in these environments.
Heat-Reflective Shields
Some newer-model vehicles may have a heat-reflective shield embedded in the windshield, which may prevent proper GPS signal reception if the receiver is placed behind the windshield. To enable proper reception:
- Place the receiver in a different position, or
- Place the receiver behind the rearview mirror, where many vehicles have an opening in the heat reflective shield, as indicated by a black outline.
Installation, Use, and Maintenance
[!] IMPORTANT Do not attempt to service this product yourself. Do not open, puncture, or disassemble the product.
In order for the GPS receiver to work properly, make sure that the receiver has an unobstructed view of the sky. Protect the receiver from excessive heat, extreme cold, dust, liquids, and direct sunlight. Do not use in a humid environment or on an unstable surface. Make sure the receiver is always securely mounted to prevent accidental movement. Handle all parts, cables, and connectors with care. Use only supplied and recommended accessories and power supplies. Ensure that any power supply is cooled by placing it in a ventilated area. The power supply and the receiver unit may become warm or hot during operation. Unplug the product from any external power source before cleaning. Only clean the product with a dry cloth. Follow the instructions in this manual carefully.
Product Regulatory Information
FCC statement
This device complies with part 15 of the FCC rules. Operation is subject to the following two conditions: (1) This device may not cause harmful interference, and (2) this device must accept any interference received, including interference that may cause undesired operation.
This equipment has been tested and found to comply with the limits for a Class B digital device, pursuant to Part 15 of the FCC rules. These limits are designed to provide reasonable protection against harmful interference in a residential installation. This equipment generates, uses, and can radiate radio frequency energy and, if not installed and used in accordance with the instructions, may cause harmful interference to radio communications. However, there is no guarantee that interference will not occur in a particular installation. If this equipment does cause harmful interference to radio or television reception, which can be determined by turning the equipment off and on, the user is encouraged to try to correct the interference by one or more of the following measures:
- Reorient or relocate the receiving antenna.
- Increase the separation between the equipment and receiver.
- Connect the equipment into an outlet on a circuit different from that to which the receiver is connected.
- Consult the dealer or an experienced radio/TV technician for help.
The use of shielded I/O cables is required when connecting this equipment to any and all optional peripheral or host devices. Failure to do so may violate FCC rules.
[!] IMPORTANT Changes or modifications not covered in this manual must be approved in writing by the manufacturer's Regulatory Engineering Department.
Changes or modifications made without written approval may void the user's authority to operate this equipment.
Responsible Party:
HOLUX Technology, Inc.
1F, No.30, R&D Rd. II,
Hsinchu City 300,
Taiwan (R.O.C)
+886-3-6687000

Product Family
Tested to Comply
With FCC Standard
FOR HOME OR OFFICE
USE
Canadian ICES-003 Statement
This Class B digital apparatus meets all requirements of the Canadian Interference-Causing Equipment Regulations.
CE Compliance Statement
This product was tested by Palm, Inc. and found to comply with all the requirements of the EMC Directive 89/336/EEC as amended.

This is a Class B product based on the standard of the Voluntary Control Council for Interference from Information Technology Equipment (VCCI). If this is used near a radio or television receiver in a domestic environment, it may cause radio interference. Install and use the equipment according to the instruction manual.
Static Electricity, ESD, and your Palm® device
Electrostatic discharge (ESD) can cause damage to electronic devices if discharged into the device, so you should take steps to avoid such an occurrence.
Description of ESD
Static electricity is an electrical charge caused by the buildup of excess electrons on the surface of a material. To most people, static electricity and ESD are nothing more than annoyance. For example, after walking over a carpet while scuffing your feet, building up electrons on your body, you may get a shock -- the discharge event -- when you touch a metal doorknob. This little shock discharges the built-up static electricity.
ESD-susceptible equipment
Even a small amount of ESD can harm circuitry, so when working with electronic devices, take measures to help protect your electronic devices, including your Palm™ device, from ESD harm. While Palm has built protections against ESD into its products, ESD unfortunately exists and, unless neutralized, could build up to levels that could harm your equipment. Any electronic device that contains an external entry point for plugging in anything from cables to docking stations is susceptible to entry of ESD. Devices that you carry with you, such as your device, build up ESD in a unique way because the static electricity that may have built up on your body is automatically passed to the device. Then, when the device is connected to another device such as a docking station, a discharge event can occur.
Precautions against ESD
Make sure to discharge any built-up static electricity from yourself and your electronic devices before touching an electronic device or connecting one device to another. The recommendation from Palm is that you take this precaution before connecting your device to your computer, placing the device in a cradle, or connecting it to any other device. You can do this in many ways, including the following:
- Ground yourself when you're holding your mobile device by simultaneously touching a metal surface that is at earth ground.
- For example, if your computer has a metal case and is plugged into a standard three-prong grounded outlet, touching the case should discharge the ESD on your body.
- Increase the relative humidity of your environment.
- Install ESD-specific prevention items, such as grounding mats.
Conditions that enhance ESD occurrences
Conditions that can contribute to the buildup of static electricity in the environment include the following:
- Low relative humidity.
- Material type (The type of material gathering the charge. For example, synthetics are more prone to static buildup than natural fibers like cotton.)
- The rapidity with which you touch, connect or disconnect electronic devices.
While you should always take appropriate precautions to discharge static electricity, if you are in an environment where you notice ESD events you may want to take extra precautions to protect your electronic equipment against ESD.
For information on environmental programs, visit www.palm.com/environment.
Copyright and Trademark
© 2006 Palm, Inc. All rights reserved.
Palm, Treo, and the Palm logo are among the trademarks or registered trademarks owned by or licensed to Palm, Inc. All other brand and product names are or may be trademarks of, and are used to identify products or services of, their respective owners.
Disclaimer and Limitation of Liability
Palm, Inc. assumes no responsibility for any damage or loss resulting from the use of this guide.
Palm, Inc. assumes no responsibility for any loss or claims by third parties which may arise through the use of this device and any accompanying or associated software provided by Palm, Inc.
Palm, Inc. assumes no responsibility for any damage or loss caused by deletion of data as a result of malfunction, dead battery, or repairs. Be sure to make backup copies of all important data on other media to protect against data loss.
[!] IMPORTANT Please read the End User Software License Agreement included with this product before using the accompanying software program(s). Using any part of the software indicates that you accept the terms of the End User Software License Agreement.
Guide de démarrage
Partie responsible :
HOLUX Technology, Inc.
1F, No.30, R&D Rd. II,
Hsinchu City 300,
Taiwan (République de Chine)
+886-3-6687000

This Class B digital apparatus meets all requirements of the Canadian Interference-Causing Equipment Regulations.
United States of America
PN: 406-10543-00
AN: 185-10333-00
v. 1.0
- Installation requirements
- Setting up NAVIGATOR 5 software on a Treo 650 smartphone
- Create a partnership between the receiver and your device:
- Select your basic NAVIGATOR 5 settings:
- Activate the NAVIGATOR 5 software:
- Enter your home address:
- On the Specify your GPS hardware screen, tap the left or right arrow until Other Bluetooth GPS is displayed, and then tap Select.
- Repeatedly tap the screen to take a tour of NAVIGATOR 5.
- Setting up NAVIGATOR 5 software on a Treo 700w smartphone
- 4
- On the Specify your GPS hardware screen, select TomTom/Palm GPS, and then tap Select. Once you make this selection, your device creates a partnership with the receiver automatically.
- 9
- Legal notice
- Exiting NAVIGATOR 5
- Customizing Maps
- Adding a map to the TomTom NAVIGATOR 5 expansion card
- Add a map:
- Do one of the following:
- Deleting a map from the TomTom NAVIGATOR 5 expansion card
- Connect the card to your computer:
- Delete a map:
- Putting maps on a blank expansion card
- Install the software:
- Common Questions
- What is the passkey I'm asked to enter when creating a partnership between my device and the Bluetooth® GPS receiver?
- Should I keep my device and the receiver connected to the vehicle power adapter while they are in use?
- Where can I get customer support if I need it?
- Safety Information
- Global Positioning System
- Use With Care
- WARNING!
- CAUTION
- NOTICE TO DRIVERS
- Aircraft and Hospitals
- Heat-Reflective Shields
- Installation, Use, and Maintenance
- Product Regulatory Information
- FCC statement
- Responsible Party:
- Canadian ICES-003 Statement
- CE Compliance Statement
- Static Electricity, ESD, and your Palm® device
- Description of ESD
- ESD-susceptible equipment
- Precautions against ESD
- Conditions that enhance ESD occurrences
- Copyright and Trademark
- Disclaimer and Limitation of Liability
- Guide de démarrage
- Partie responsible :
Brand : PALM
Model : GPS 3229
Category : Gps