
VA-5200 - Satellite receiver HUMAX - Free user manual and instructions
Find the device manual for free VA-5200 HUMAX in PDF.
| Product type | Digital satellite receiver |
| Brand | HUMAX |
| Model | VA-5200 |
| Antenna input | F-type, IEC 169-24, female, 75 Ω, range 950 – 2150 MHz |
| Demodulation | QPSK, symbol rate 2 – 31 Ms/s, FEC 1/2, 2/3, 3/4, 5/6, 7/8 |
| Video decoding | MPEG-2 MP@ML, resolution 720 × 576, formats 4:3 and 16:9 |
| Audio decoding | MPEG/MusiCam layer I and II, stereo, mono, dual channel |
| Video outputs | SCART TV (CVBS, S-Video, RGB), SCART VCR (CVBS, input), RCA/Cinch video (CVBS) |
| Audio outputs | RCA/Cinch L/R (2 Vrms max.), optical S/PDIF (20 bits) |
| Control interface | RS-232C (9 pins, 115200 bps), DiSEqC 1.0/1.2 |
| RF modulator | PAL I/G/B/D/K, channels 21 – 69 (depending on standard), output 470 – 860 MHz |
| LNB power supply | Vertical 13.5 V, horizontal 18 V, 500 mA max., overload protection |
| Conditional Access | Viaccess, CryptoWorks, Nagravision embedded; 2 smart card readers |
| Memory | Flash 2 MB (3 MB with CAS), DRAM 4 MB (4 MB with CAS) |
| Mains power | 190 – 250 V AC, 50/60 Hz, max. consumption 35 W, standby ≤ 11 W |
| Dimensions (W × H × D) | 370 × 60 × 280 mm (excluding feet, foot height 8 mm) |
| Net weight | Approximately 2.8 kg |
| Operating temperature | 0 °C to +45 °C |
| Storage temperature | -10 °C to +70 °C |
| Storage humidity | 5 % to 95 % RH (non-condensing) |
| Maintenance and cleaning | Unplug before cleaning; use a slightly damp cloth (no solvent) |
| Safety | Do not expose to liquids, do not block ventilation slots, do not open the casing |
| Included accessories | Remote control RS-101P, user manual |
Frequently Asked Questions - VA-5200 HUMAX
User questions about VA-5200 HUMAX
0 question about this device. Answer the ones you know or ask your own.
Ask a new question about this device
Download the instructions for your Satellite receiver in PDF format for free! Find your manual VA-5200 - HUMAX and take your electronic device back in hand. On this page are published all the documents necessary for the use of your device. VA-5200 by HUMAX.
USER MANUAL VA-5200 HUMAX
natural_image
Exterior view of a HUMAX satellite TV box with a remote control (no visible text or symbols on the device body)Safety..... E2
Copyright ...... E3
Glossary..... E4
Reference ...... E5 \~ E6
STB Connections.... E7 \~ E10
Remote Control Unit.... E11 \~ E12
Guide of Functions ...... E13 \~ E14
Guide of Main Menu.... E15 \~ E41
Motorised System.... E42 \~ E45
Troubleshooting Guide ...... E46
Menu Map.... E47 \~ E48
Specification ...... E49 \~ E50
This STB has been manufactured to satisfy the international safety standards.
Please read the following safety precautions carefully.
MAINS SUPPLY : 190 - 250 V AC 50/60 Hz
OVERLOADING : Do not overload a wall outlet, extension cord or adapter as this may result in fire electric shock.
LIQUIDS : The STB shall not be exposed to dripping or splashing and that no objects filled with liquids, such as base, shall be placed on the apparatus.
CLEANING : Disconnect the STB from the wall outlet before cleaning. Use a light damp cloth(no solvents) to dust the STB.
VENTILATION : The slots on top of the STB must be left uncovered to allow proper airflow to the unit. Do not stand the STB on soft furnishings or carpets. Do not expose the STB to direct sunlight or do not place it near a heater. Do not stack electronic equipments on top of the STB.
ATTACHMENTS : Do not use any unrecommended attachments as these may cause hazard or damage the STB.
CONNECTION TO THE SATELLITE DISH LNB
:Disconnect the STB from the mains before connecting or disconnecting the cable from the satellite dish. FAILURE TO DO SO CAN DAMAGE THE LNB.
CONNECTION TO THE TV
: Disconnect the STB from the mains before connecting or disconnecting the cable from the satellite dish. FAILURE TO DO SO CAN DAMAGE THE TV.
EARTHING : The LNB cable MUST BE EARTHED. The earthing system must comply with SABS 061.
LOCATION : Place the STB indoor in order not to expose to lightening, rain or sunlight.

TO REDUCE THE RISK OF ELECTRIC SHOCK, DO NOT REMOVE COVER (OR BACK). NO USER SERVICEABLE PARTS INSIDE. REFER SERVICING TO QUALIFIED SERVICE PERSONNEL.

This symbol indicates "dangerous voltage" inside the product that presents a risk of electric shock or personal injury.

This symbol indicates important instructions accompanying the product.
Warning!
Please do not insert metal or alien substance into the slots for the Modules and Smart Cards. In doing so can cause damage to the STB and reduce its life span.
Copyright
• VIACCESS™ is a trademark of France Telecom.
- CryptoWorks(TM) is a trademark of Philips Electronics N.V.
- Irdeto is a trademark of Mindport BV.
- Nagravision is a registered trademark of Kudelski S.A.
- Conax is a trademark of Telenor Conax AS.
- “Dolby” and the double-D symbol are trademarks of Dolby Laboratories.
Warning
HUMAX cannot be held responsible for any kind of problems caused by the use of unofficial software. The use of software versions other than HUMAX official software will void the manufacturer's warranty.
It is advised that only the formal software released from HUMAX should be used in all HUMAX product range.
Caution
To watch Pay Per View programmes, be sure to inform your STB dealer of the STB's and Smart card's serial numbers. So that they can pair your STB with your Smart card. Otherwise, you cannot watch the programmes because they are scrambled.
Note
When the changed Network Information is sent, Nagravision realizes that the appropriate satellite/cable service information has been changed. And it will re-organize the service information based on the sent Network Information. The message “Network Information updated...” appears on the screen. It is automatically done when changing NIT.
The manufacturer can't change it because it is provided by Nagravision.
When the user watches it, the message may suddenly appear during AV playback and simultaneously updating will proceed. (This happens about once a year.)
Since this is not an error in operating, do not turn off the power.
• Information for TV-Cabo subscriber
When user searches channels, the channel numbers from 001 to 100 are defined automatically for Nagravision by service provider.
Other channels have the number from 101 in sequence as the receiver searches the signal.
- Specifications are for NACI-5700 models.
Glossary
- Antenna
A device that collects and radiates electromagnetic waves. Includes a satellite dish and abroadband antenna.
- Forward Error Correction(FEC)
A system of error control for data transmission.
- Frequency
The number of cycles or events per one second, which is expressed in the unit of Hertz(Hz).
• Intermediate Frequency(IF)
A frequency to which a carrier frequency is shifted as an intermediate step in transmission or reception.
- Low Noise Block(LNB) Downconverter
A low noise microwave amplifier and converter which downconverts a range of frequencies to IF range.
- Packet Identifier(PID)
A set of numbers that identifies transport stream packets containing data from a single data stream.
- Polarisation
Characteristic of an electromagnetic wave determined by the orientation of the electricfield vector.
• Quaternary Phase Shift Keying(QPSK)
Phase-shift keying in which four different phase angles are used.
• Service
A channel to which a decoder or TV is tuned.
- Transponder
An automatic device that receives, amplifies and retransmits a signal on a different frequency.
1. Connect DiSEqC 1.0
All our receivers are designed to be DiSEqC 1.0 compatible. This allows multiple antennas to be connected to the STB simultaneously.
If you have two or more fixed antennas or LNBs, you can use a DiSEqC 1.0 switch.
- Connect the coaxial cable from the first LNB to the LNB 1 or LNB A input connector of the DiSEqC switch.
- Connect the coaxial cable from the second LNB to the LNB 2 or LNB B input connector of the DiSEqC switch.
- Do the same for other LNBs.
- Connect one end of a Coaxial cable to the RF output connector of the DiSEqC switch and the other end to the LNB IN socket on the STB.
2. Connect DiSEqC 1.2
Please refer to page GB42.
The Locking Time might take longer than expected during the initial boot if the motorised system is set “enable” mode.
3. Connect a Satellite antenna
To the digital receiver, you can connect either a single satellite antenna directly or through converter box several antennas or LNB of multi-feed equipment.
You can connect a further Sat-receiver(for example analogue), with the receiver of common antenna equipment that has satellite signals.
- Connect an antenna cable through converter boxes
- When you assemble several antenna or a multi-feed equipment that has several LNB (or LNB with several exits), connect each cable from the antenna to a converter box.
- Connect the output of converter box to "LNB IN", as in example displayed.
- When you use a converter box of 0/12V-steerage, connect it to the output "0/12V" additionally.
For converter boxes of 22KHz- or DiSEqC-steerage, you can skip this point because the steerage signal occurs through the antenna cable.
4. Loop Through
If you have another analogue or digital STB and you wish to use the same LNB then you can connect it via the loop through. Connect one end of a Coaxial cable to the LNB OUT on the STB and connect the other end to the LNB IN on your second STB.
5. Connect a S/PDIF Fiber-Optic cable
If you are watching a programme with a Dolby Digital soundtrack(see page E14) you can enjoy the higher quality sound of the Dolby Digital audio by connecting the STB to an external Dolby Digital television or amplifier. Do this by connecting the optical S/PDIF output of the STB to the optical S/PDIF input of the external Dolby Digital product (television, amplifier,.....).
6. Software Upgrade
HUMAX digital set-top box is a highly sophisticated product - incorporating one of the best software applications.
Whenever a problem is found with this software or, in fact, extra functions or enhanced applications are added, the software in the equipment has to be upgraded.
In order to maintain proper performance of the product, it is essential to have the most up to date software. The latest news and release of software versions may be found at HUMAX website - http://www.humaxdigital.com.
It is recommended that users register to HCSA(HUMAX Customer Service Area) and periodically check for the availability of software upgrade.
There are three methods to upgrade the software:
(a) set-top box to set-top box download(copies the software of the main unit into slave unit);
(b) pc to set-top box download (downloads the software directly from pc to the model requiring upgrade);
(c) OTA over-the-air(downloads the software where the manufacturer reserves the right to decide when and where to release through satellite system).
Over The Air(OTA) is simply another alternative for downloading software versions.
However, the manufacturer reserves the right to decide when and where this software upgrade can take place by "beaming" latest software versions over the air via satellite systems. Note that OTA is only limited to certain geographical regions mainly due to different satellites having different footprints(area where the signal can be received).
SUSS(TM) is an official trademark and logo for HUMAX loader software to perform OTA.
The software upgrade via satellite system will only occur under the following circumstances:
1) the equipment should have appropriate loader software;
2) the manufacturer decides to release software downloading via a designated satellite system;
3) the equipment must be "tuned" properly to the same satellite that the manufacturer uses.
- Note : CRCI-5500 complies with the OTA type of CryptoWorks.
Front Panel
■ F1-5000 Free-To-Air

text_image
DV3 MPEG 2 DIGITAL 20 STANDBY TV/RADIO F1-5000 HUMAX Free To Air■ CI-5100 2 Slot Common Interface

text_image
DV3 MPEG 2 DIGITAL 20 STANDBY TWIPRADIO ▼■ VA-5200 2 Smart card

text_image
DV3 MPEG 2 DIGITAL 20 STANDBY TW/RADIO ▼- Warning
To install the unauthorized CAM into CI slot can cause the wrong operation. Do not reinstall the CAM of the already embedded CAS to prevent the wrong operation.
Front Panel
■ VACI-5300, CRCI-5500, NACI-5700
2 Slot Common Interface, 1 Smart card
text_image
DV3 MPEG 2 DIGITAL 20 STANDSY TURADO ① ② ③ ④ ⑤ ⑥ ⑦ ⑧ ⑨1 TV LED(AMBER)
The LED lights on in TV mode.
2 RADIO LED(GREEN)
The LED lights on in RADIO mode.
3 DISPLAY
Shows service number, error messages, RCU commands and time in Standby mode.
4 STANDBY LED(RED)
Indicates that the STB is under standby.
5 STANDBY
Press to switch between Operation and Standby modes.
6 TV/RADIO
Press to switch between TV and Radio modes.
7 ▼, ▲
Use to change services down/up.
8 SLOT
For a two CA Module with a smart card.
9 SMART CARD
For a Smart cards.
Rear Panel
text_image
CAUTION REK OF ELECTRIC SHOCK SO NOT OPEN LNB IN 1318 Vdc 500 mA max. LNB OUT RS-232C TV SCART VCR SCART 1 2 3 4 5 6 7 8 9 10 TUV SOMOT TV SCART AUDIO 0/12V OUT 50mA RF IN RF OUT S/PDF Max. power consumption : 35 W Power supply : 190 - 290V ~ 500kHz 'Dolby' and the double-D symbol are trademarks of Dolby Laboratories.1 LNB IN
Use to connect an antenna.
2 LNB OUT
Use it when connecting to another STB.
3 RS-232C
Use it when connecting to your PC.
4 TV SCART
For the audio/video input of the TV.
5 VCR SCART
For the VCR.
6 AUDIO/VIDEO OUTPUT
Audio/video signal from your STB to VCR or TV.
7 0/12V OUT
For an external LNB switch.
8 RF OUTPUT
Use to connect a RF signal from your STB to RF(ANT) input jack on your TV.
9 RF INPUT
Use to connect a general Aerial Antenna and CABLE jacks to a RF input jack on the STB.
10 S/PDIF
Output for connection to a digital amplifier.
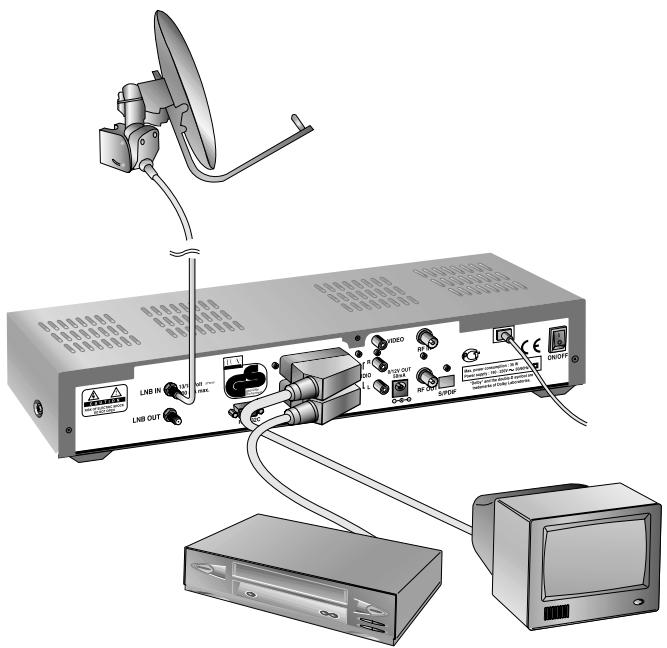
There are several ways of connecting the STB to your existing Audio/TV system. We recommend using one of the following set-up for best results:
text_image
Diagram of a TV setup showing audio equipment, cable connections, and speaker units with labels like 'LNR', 'LNR OUT', and '10000'.TV only
- Connect one end of a 21-pin SCART cable to the TV SCART connector on the STB and the other end to a SCART socket on your TV.
- Connect one end of a RF lead to the RF OUT connector on the STB and the other end to the RF IN connector on your TV.
- Connect your TV antenna to the RF IN connector on the STB for receiving terrestrial channels.
- Connect the coaxial cable from the LNB to the LNB IN socket on the STB.
TV with VCR
- Connect one end of a 21-pin SCART cable to the TV SCART connector on the STB and the other end to a SCART socket on your TV.
- Connect one end of a 21-pin SCART cable to the VCR SCART connector on the STB and the other end to a SCART socket on your VCR.
- Connect one end of a RF lead to the RF OUT connector on the STB and the other end to the RF IN connector on your VCR.
- Connect one end of a RF lead to the RF OUT connector on your VCR and the other end to the RF IN connector on your TV.
- Connect your TV antenna to the RF IN connector on the STB for receiving terrestrial channels.
- Connect the coaxial cable from the LNB to the LNB IN socket on the STB.
With Hi-Fi System
- Connect an RCA/Cinch stereo cable from the AUDIO L, R sockets on the back of the STB to the LINE, AUX, SPARE OR EXTRA input sockets on your Hi-Fi system.
text_image
Diagram of a satellite dish antenna connected to a computer via cable, showing ports like LNB IN, LNB OUT, and CD/DVD indicators.TV with VCR and Motorised System(DiSEqC 1.2)
- Connect one end of a 21-pin SCART cable to the TV SCART connector on the STB and the other end to a SCART socket on your TV.
- Connect one end of a 21-pin SCART cable to the VCR SCART connector on the STB and the other end to a SCART socket on your VCR.
- Connect one end of a RF lead to the RF OUT connector on your VCR and the other end to the RF IN connector on your TV.
- Connect one end of a RF lead to the RF IN connector on your VCR and the other end to the RF OUT connector on the STB.
- Connect the coaxial cable from the LNB of your motorised system to the LNB IN socket on the STB.
- Connect your TV antenna to the RF IN connector on the STB for receiving terrestrial channels.
- Connect the coaxial cable from the LNB to the LNB connector on the DiSEqC 1.2 motor.

text_image
NUMERIC BUTTONS 1 2 3 4 5 6 7 8 9 STANDBY TV/SAT TV/RADIO MUTE INFORMATION(RED) 2 0 1 SOUNDTRACK(GREEN) 3 R? SUBTITLE(YELLOW) 4 UHF(BLUE) 5 UHF TIME(WHITE) 6 EXIT 7 EXIT V+/V- 8 V+ V- P+ P- ? EPG RCL MENU 13 MENU 14 CURSOR 15 OK 16 P+/P- 17 HELP 18 EPG 19 RCL(Recall) HUMAX RS-101P1 NUMERIC BUTTONS
Press to select a service, enter your PIN code or numeric on the menu.
2 INFORMATION(RED)
Press to display the programme information box on the screen. And this button functions same as the RED button on the menus.
3 SOUNDTRACK(GREEN)
Press to display the soundtrack list for the current service. And this button functions same as the GREEN button on the menus.
4 SUBTITLE(YELLOW)
Press to display the subtitle language list for the current service. And this button functions same as the YELLOW button on the menus.
5 UHF(BLUE)
Press to set the UHF menu. This button functions same as the BLUE button on the menus.
6 TIME(WHITE)
Press to display the current time on the screen. Press to reserve services on the Information box or EPG. And this button functions same as the WHITE button on the menus.
7 EXIT
Press to return to the previous menu and screen.
8 V+/V-
Volume up/down buttons. Press to increase or decrease the volume.
9 STANDBY
Press to switch between Operation and Standby modes.
10 TV/SAT
Press to select the TV/SAT mode.
11 TV/RADIO
Press to switch between TV and Radio modes.
12 MUTE
Press to temporarily cut off the sound.
13 MENU
Press to display the Main Menu on the screen or return to the screen from a sub menu screen.
14 CURSOR
Press to move the highlight bar for selecting options on the menus. And this button is used to change services (up/down) and increase or decrease the audio volume.
15 OK
Press to display the service list. This button is used to select the item on the menus.
16 P+/P-
Programme up/down buttons. Press to tune to the next or previous service. Press to move up or down pages on the menus.
17 HELP
Press to display the help box on the screen.
18 EPG
Electronic Programme Guide button displays the TV/Radio programme guide.
19 RCL(Recall)
Press to select the service that was previously viewed.
- Please note: The design of Remote Control Unit may be changed without notice in advance.

text_image
HALA 20:30 Search Engine 6:00 - 15:00 Backpage Perin engels de Mio v. sols.Information Box(I-Plate)
The details of service part and event part are automatically displayed on the I-Plate when pressing the i button(☐) or changing services.
I-Plate is divided into service part and event part.
SERVICE-PART(Left side of the box)
SERVICE PART consists of the following items:
- I-Plate icon, Current time and Dolby Digital symbol
• Service name, Service number, ◆ icons - Subtitle, Teletext, Scrambling service symbol (These are automatically displayed when the broadcasting station provides appropriate information.)
• Signal level and Signal quality bar
EVENT-PART(Right side of the box)
EVENT PART consists of the following items:
• Event name, Event duration time
• Description text of event, State of reserved event
Event Part shows the current and next event information.
▶ button : Use to move from the current event information to the next event information.
◀ button : Use to move from the next event information to the current event information.
text_image
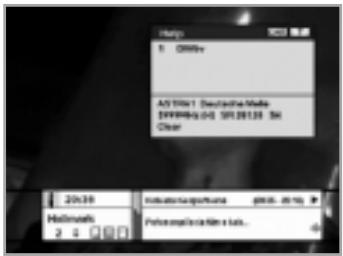
Help 1. Offer ASTVirt1 Deutsche-Mittel ZEPBME-04 5RJ8138 5R Clear 20x39 Industrie/Importe (pre- 2019) Halmells 2 5 6 7 8 9 10 11 12 13 14 15 16 17 18 19 20 21 22 23 24 25 26 27 28 29 30 31 32 33 34 35 36 37 38 39 40 41 42 43 44 45 46 47 48 49 50 51 52 53 54 55 56 57 58 59 60 61 62 63 64 65 66 67 68 69 70 Pertespezio/Artikel e Tab.When the HELP( ? )button is pressed under I-Plate display and there are no detailed event informations in the I-Plate, the Help window will appear on the screen.
The Help window shows the current Network information, including: Satellite Name, Frequency, Polarisation, Symbol Rate, FEC... The detailed information for the event can be displayed by pressing the HELP( ? )button in the I-Plate with event data displaying mode. You can reserve the programme in the event data display mode by using the WHITE( @ )button.
You can reset timer programme Once, Daily or Weekly mode. When you release the timer programme mode, then you will be asked to confirm the action.
Changing Services
To change services, do in the following sequence;
- Press the NUMERIC buttons(0\~9) on the remote control unit.
- Press the P^+/P^- buttons or ▲/▼ buttons.
Or press the RECALL( RCL ), Service-list(OK), EPG( EPS )mode button. To switch between TV and Radio services, press the TV/Radio ( B ) button.
To select the previous viewed Service, press the RECALL( RCL ) button.

natural_image
Side view of a white car with a handle, partially obscured by a window (no visible text or symbols)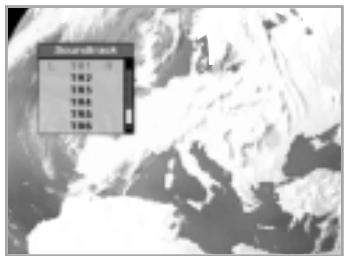
text_image
Soundbox L 101 11 T82 T85 T88 T93 T96
text_image
-Vad sa da? -Att jag shalle tama pa saker. Till er t:anst...Volume Control
To adjust the volume level, use the v+/v- buttons or ◀/▶ buttons. To temporarily stop the volume, press the MUTE(®)button. To cancel mute, press the MUTE(®)button again or press the v+/v- buttons or ◀/▶ buttons.
Soundtrack
When you want to change the audio language of current service, press the GREEN( 🔔?)button firstly.
The on-screen menu is displayed on the top to left side of the screen.
To change the audio language:
- ◀/▶ buttons : Use to select the audio on the left, right or both.
- ▲/▼ buttons : Use to select the audio language you want.
- OK, EXIT button : When this button is pressed, the Soundtrack OSD will disappear keeping the selected Soundtrack language constant.
When the current service is switched, the audio language returns to the audio language that was selected in previous service. If the returned audio language is invalid, the audio language that you selected from the audio language menu has the priority of playback. Soundtracks broadcast in Dolby Digital are indicated by Dolby Digital symbols either side of the respective language selection in the menu. By selecting such a soundtrack the Dolby Digital audio will be output by the optical S/PDIF on the STB. This can be decoded by an external Dolby Digital television or amplifier, for example.
Subtitle
When the current broadcasting programme provides subtitle, press the SUBTITLE(☐) button to see the current subtitle language list.
To change the subtitle language:
- Use the ▲/▼ buttons to select a Subtitle language you want.
- Press the OK button and the selected language is highlighted and then the Subtitle Language you want is displayed on the screen.
Press the EXIT button to cancel the Subtitle mode.
Teletext
Use your TV Remote Control Unit to control the Teletext service. The teletext button doesn't exist on the STB Remote Control Unit. When the service supports Teletext, the Teletext icon(☐) is displayed on the I-plate.
text_image
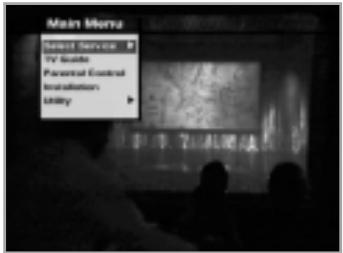
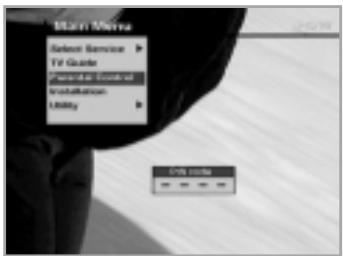
Main Menu Select Service TV Guide Parental Control Installation Entry1. Select Service
The select service displays the required service list which can be viewed in Simple or Advanced mode.
2. TV Guide
Your STB has an Electronic Programme Guide(EPG) to help you navigate through all the possible viewing options.
The TV Guide supplies information such as programme listings and start and end times for all available services.
In addition, detailed information about the programme listings and start and end times for all available services.
In addition, detailed information about the programme is often available in the EPG (the availability and amount of these programme details will vary, depending on the particular broadcaster).
3. Parental Control
Access to services and programmes is controlled by a PIN code (i.e., a 4-digit secret code that is defined by the user).
The very first time you attempt to lock all services(or lock programmes by ratings), the on-screen menu will instruct you to assign a PIN code(Later on, if necessary, you can change it).
4. Installation
The Installation mode allows you to have the information of setting services and newly set services(language, time, organise, search,...) Furthermore, you can recognize the states of hardware and software versions and signals from your STB.
5. Utility
This menu provides Calendar and Biorhythm.
1. Select Service
To select the desired in the service list, you should firstly display the service list using OK button. Use ▲/▼/◄/► buttons to select a service and press OK button. Also use Ⓓ/P- buttons to select a service directly in the service list.
The contents of service list are as follows:
text_image
Add Add Add International Type Type-Mix A.0015Simple Service List
- Use the ▲/▼ buttons to select "Select Service" from the Main Menu and press the OK button.
- Use the ▲/▼ buttons to select "Simple" from the Main Menu and press the OK button.
- Then the simple service list will appear on the screen.
text_image
All Favourite Networks Games Alphabet 1. Game 2. PC 3. Web International 4. TDS 5. PC Asia 6. BSP 1. EntityAdvanced Service List
The advanced service list shows twenty services. This list is similar to the Simple service list except that it shows twenty services.
The full name of the service on the current cursor is displayed on the bottom of screen.
For Scrambled Service, an icon(☐) appears on the right service.
Use the following colour buttons to list various service lists:
The colour button corresponds the following Service List.
- RED ( ⓘ )button - service list All
- GREEN ( 🔵 )button - Favourite
- YELLOW( □ )button - Network
- BLUE ( UHF )button - Genre
- WHITE ( ⏻ )button - service list by Alphabetical order
text_image
AR BMW 2 MB 5 BMW International 6 FB 8 Tech-Asia 6 BTR Service Configuration BMW Paradise (H2O) A座无条 Lands Help Deutsche Welle SOMES (B) 08/19/05 04Service Configuration
To change the attributes of a service
- Use the ▲/▼/◄/► buttons to move a service you want to change in the Service List.
- Press the MENU(MENU)button.
- Use the ▲/▼ buttons to move to an item(such as genre, favourite, lock, skip, delete) you want on the Service Configuration screen.
- Use the ◀/▶ buttons to select. Press the OK button to complete.
text_image
2 Mb 4 Mb International 4 TVB 8 TVB tracks 6 DTR 1. DWir doService All
- To display the Service All, press the OK button
Use RED( ⓘ )button to select the All service list. - Select the desired service by using the ▲/▼/◄/► buttons.
- Press the OK button to view the selected service.
The service list provides you the Simple mode and Advanced mode. The right side scroll-bar of the screen displays the location of the selected service in relation to All services.
Press the RED(☐)button to toggle between Simple mode and Advanced mode.
text_image
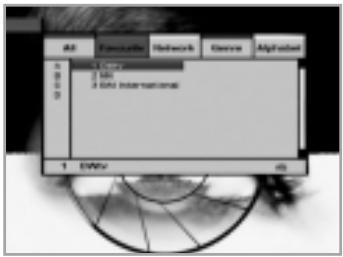
All Famous Networks Genes Alphabet 1 2 3 4 5 6 7 8 9 10 11 12 13 14 15 16 17 18 19 20 21 22 23 24 25 26 27 28 29 30 31 32 33 34 35 36 37 38 39 40 41 42 43 44 45 46 47 48 49 50 51 52 53 54 55 56 57 58 59 60 61 62 63 64 65 66 67 68 69 70 71 72 73 74 75 76 77 78 79 80 81 82 83 84 85 86 87 88 89 90 91 92 93 94 95 96 97 98 99 100Service Favourite
- Press the GREEN( Ⓞ?)button on the remote control unit to select the Favourite service list.
Note : The groups are labeled in four different alphabet characters (A, B, C, D).
-
Use the ▲/▼ buttons to select a favourite group that you want.
-
Press the GREEN( 🔺 )button to toggle group and service list.
text_image
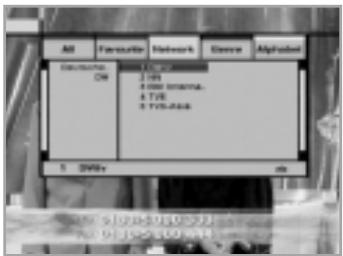
All Favourite Network Diverse Alphabet Networks: ON 2 TH 4 000 bytes. 4 TUE 4 TUE-000 5 DIVE nsService Network
- Press the YELLOW(☐)button on the remote control unit to select the Network service list.
- Use the ▲/▼/◄/► buttons to select a service.
- Press the YELLOW(☐)button to toggle provider and service list.
Note : 1. The provider name is displayed on the left window and the provider's services are displayed on the right window.
- The scroll bar on left of the screen shows the location of the cursor in the Network. The scroll bar on right of the screen shows the location of the service from the selected Network.
text_image
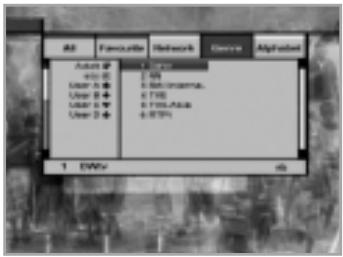
All Favourite Network Device Alphabet Auto # 400 User A + User B + User C + 1 200 6.8M 6.7M 6.7M/Asia 6.8M 1 200 dbService Genre
- Press the BLUE(UHF)button on the remote control unit to select the Genre service list.
- Use the ▲/▼/◄/► buttons to select a service.
- Press the BLUE( UHF )button to toggle Genre and service list.
Note : The scroll bar on left of the screen shows the location of the cursor in the selected Genre. The scroll bar on right of the screen shows the location of the service.

text_image
A# Favourite Network Genre Alpha 1 CM 2 M 3 N or International 4 KTR 5 TVL movie 6 TVL 1 DNV 4Service Alphabet Order
- Press the WHITE( Ⓤ )button on the remote control unit to select the Alphabet service list.
- Use the ▲/▼/◄/► buttons to select a service.
- Press the WHITE( ⏻ )button to toggle Alphabet and service list.
Note : The scroll bar on left of the screen shows the location of the cursor in the Alphabet. The scroll bar on right side of the screen shows the location of the selected Alphabet service.
• NACI-5700 models are not applicable.
text_image
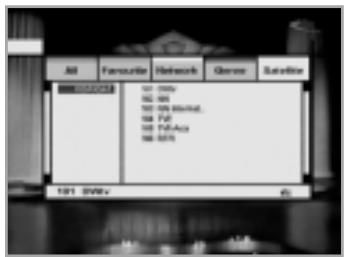
All Favorites Homelink Genre Satellite 101.0000 102.000 103.000 104.000 105.000 106.000 107.000 108.000 109.000 110.000 111.000 112.000 113.000 114.000 115.000 116.000 117.000 118.000 119.000 120.000 121.000 122.000 123.000 124.000 125.000 126.000 127.000 128.000 129.000 130.000 131.000 132.000 133.000 134.000 135.000 136.000 137.000 138.000 139.000 140.000 141.000 142.000 143.000 144.000 145.000 146.000 147.000 148.000 149.000 150.000 151.000 152.000 153.000 154.000 155.000 156.000 157.000 158.000 159.000 160.000 161.000Service Satellite
- Press the WHITE( Ⓤ )button on the remote control unit to select the Satellite service list.
- Use the ▲/▼/◄/► buttons to select a service.
- Press the WHITE( Ⓤ )button to toggle Satellite and service list.
Note : The scroll bar on left of the screen shows the location of the cursor in the Satellite. The scroll bar on right side of the screen shows the location of the selected Satellite service.
- Specifications are for NACI-5700 models.
2. TV Guide
You can watch a programme being shown and reserve it in the TV Guide mode.
To enter the TV Guide mode
Press the EPG(EPG)button on the remote control unit or select the TV Guide on the Main Menu.
To select the TV/Radio Guide
Press the TV/Radio(月)button on the remote control unit and TV Guide will be switched to the Radio Guide.
TV Guide mode includes four different modes.
To select each mode, use the following buttons:
- RED (☐)button : Use to display the current and next programme list.
- GREEN (☐?)button : Use to display the programme list for one-week.
- YELLOW(☐)button : Use to display the reserved programme list.
- BLUE (UHF) button : Use to display the simple TV Guide list. (Quick mode)
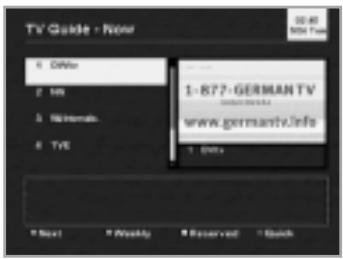
text_image
TV Guide - Now 1:00 2:00 3:00 4:00 5:00 6:00 7:00 8:00 9:00 10:00 11:00 12:00 13:00 14:00 15:00 16:00 17:00 18:00 19:00 20:00 21:00 22:00 23:00 24:00 25:00 26:00 27:00 28:00 29:00 30:00 31:00 32:00 33:00 34:00 35:00 36:00 37:00 38:00 39:00 40:00 41:00 42:00 43:00 44:00 45:00 46:00 47:00 48:00 49:00 50:00 51:00 52:00 53:00 54:00 55:00 56:00 57:00 58:00 59:00 60:00 61:00 62:00 63:00 64:00 65:00 66:00 67:00 68:00 69:00 70:00 71:00 72:00 73:00 74:00 75:00 76:00 77:00 78:00 79:00 80:00 81:00 82:00 83:00 84:00 85:00 86:00 87:00 88:00 89:00 90:00 91:00 92:00 93:00 94:00 95:00 96:00 97:00 98:00 99:00 1. 877-GERMAN TV www.germantv.infoNow/Next mode
Show the informations of the programmes that are played now or will be played next time.
This mode consists of the service name, event name, event duration time, current time and on-screen-display window.
To watch a programme you want through the display window:
- Use the P+ / P- buttons to select a programme you want.
The selected service will appear on the right display window. - Use the ▲/▼ buttons to select a programme you want.
And then press the OK button on the remote control unit.
The selected service will appear on the right display window.
The selected OSD will be highlighted every time the cursor moves.
To reserve a programme you want:
- Select a programme you want by using the P+ / P- buttons or
▲/▼ buttons. And then press the WHITE( ⏻ )button.
Press the ◀/▶ buttons to watch the programme of previous page or the programme of next page. Press the YELLOW(☐)button to watch the Reserved programme list.
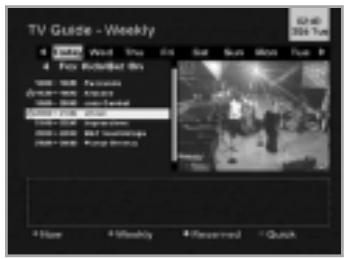
text_image
TV Guide - Weekly 4 Weekly 1 Week 2 Sat Sun Block Top P 4 For Broadcast Bits 1000 - 1000 Current TV 2000 - 2000 Current TV 3000 - 3000 Current TV 4000 - 4000 Current TV 5000 - 5000 Current TV 6000 - 6000 Current TV 7000 - 7000 Current TV 8000 - 8000 Current TV 9000 - 9000 Current TV 1000 - 1000 Current TV 1100 - 1100 Current TV 1200 - 1200 Current TV 1300 - 1300 Current TV 1400 - 1400 Current TV 1500 - 1500 Current TV 1600 - 1600 Current TV 1700 - 1700 Current TV 1800 - 1800 Current TV 1900 - 1900 Current TV 2000 - 2000 Current TV 2100 - 2100 Current TV 2200 - 2200 Current TV 2300 - 2300 Current TV 2400 - 2400 Current TV 2500 - 2500 Current TV 2600 - 2600 Current TV 2700 - 2700 Current TV 2800 - 2800 Current TV 2900 - 2900 Current TV 3000 - 3000 Current TV 3100 - 3100 Current TV 3200 - 3200 Current TV 3300 - 3300 Current TV 3400 - 3400 Current TV 3500 - 3500 Current TV 3600 - 3600 Current TV 3700 - 3700 Current TV 3800 - 3800 Current TV 3900 - 3900 Current TV 4000 - 4000 Current TV 4100 - 4100 Current TV 4200 - 4200 Current TV 4300 - 4300 Current TV 4400 - 4400 Current TV 4500 - 4500 Current TV 4600 - 4600 Current TV 4700 - 4700 Current TV 4800 - 4800 Current TV 4900 - 4900 Current TV 5000 - 500Weekly mode
Shows the information of programmes that will be played for a week.
To watch a programme you want through the display window:
- Press the OK button and then press the ▲/▼ buttons to select a programme you want. Press the OK button again.
To reserve or cancel programme reservation:
- Select a day you want using the ▲/▼ buttons. Press the ◀/▶ buttons to select a programme you want and then press the WHITE( ⏻ )button.
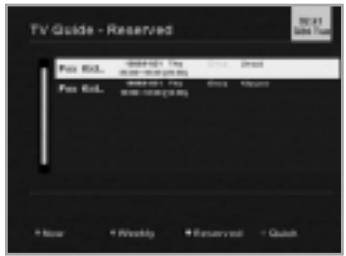
text_image
TV Guide - Reserved Fee Kit. Fee Kit. Fee Kit. + Hour + Weekly + Reserved + QuickReserved mode
Shows the programme lists that you have already reserved on the TV Guide or Information box.
Maximum eight programmes can be reserved.
This programme list includes service name, date, duration time, reservation mode and event name.
To cancel the Reserved service, select a programme you want to cancel using the ▲/▼ buttons and then press the WHITE( ⏻ )button.
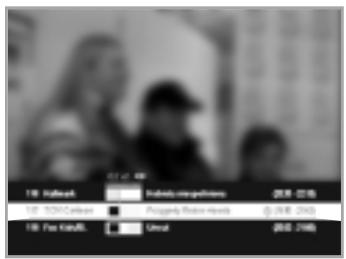
text_image
100 Kallouk 100 72/01/2023 100 Fox Kallouk 100 Kallouk 100 Kallouk 100 Kallouk 100 Kallouk 100 Kallouk 100 Kallouk 100 Kallouk 100 Kallouk 100 Kallouk 100 Kallouk 100 Kallouk 100 Kallouk 100 KallouK 100 KallouK 100 KallouK 100 KallouK 100 KallouK 100 KallouK 100 KallouK 100 KallouK 100 KallouK 100 KallouK 100 KallouK 100 KallouK 100 KallouK 10Quick mode
Shows a simple TV Guide like an Information box. This mode shows in the A/V playback mode.
- Red vertical line : Indicates the current time.
- Black/white bar : Shows the proceeding state of programme.
- Time range of bar : This consists of three blocks by 30 minutes per block.
text_image
MART Media Select Services ▶ TV Guide Shareholder Control Installation Utility ▶ OK code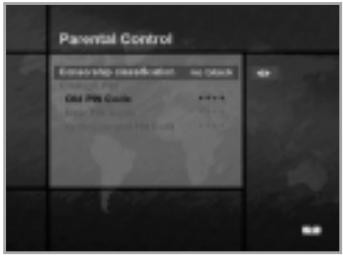
text_image
Parental Control Edit Pres Classification no Click Old Pres Codes ****** New Pres Codes New Pres Codes New Pres Codes3. Parental Control
You can set a parental guidance rating to each programme in this mode.
- When the OK button is pressed after selecting the highlighted parental control on the initial menu screen, a display window for entering the PIN code will appear on the centre of screen. ** The default PIN code is 0000.
- Enter the PIN code on the display window. (If any problem occurs when entering a PIN code, you cannot switch to the next mode.)
- Set the parental guidance rating of highlighted censorship classification. The parental level is given as age-based numbers: no block, 6, 10, 14, 18 and total block. Enter the PIN code to unlock or lock programmes.
-
To change your PIN code:
-
Select the highlighted Old PIN code using the ▲/▼ buttons and then enter your Old PIN code.
- Enter a New PIN code in the highlighted New PIN code using the ▲/▼ buttons.
-
To verify the New PIN code, re-enter a New PIN code in the highlighted Verify Changed PIN code.
-
When the entered PIN code is correct, then all settings are completed.
(If the PIN code is wrong, the message "PIN code mismatch" will be displayed on the display window. When the OK button is pressed at this time, the Old PIN code is valid and the cursor is located in the first position of this menu.)
text_image
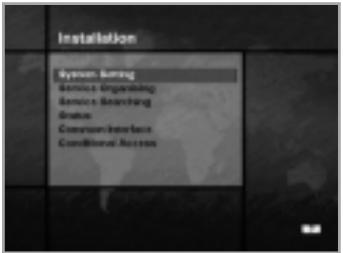
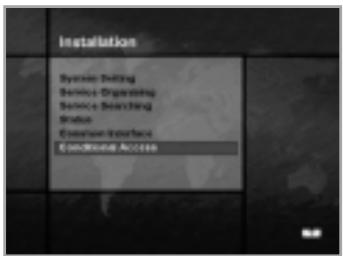
Installation System Settings Service Urgenting Service Matching Status Consum Interlace Conditional Access4. Installation
This mode allows you to customise, add a new service and displays the state of the STB. Enter the submenus after selecting the Installation mode in the Main Menu.
4-1. System Setting
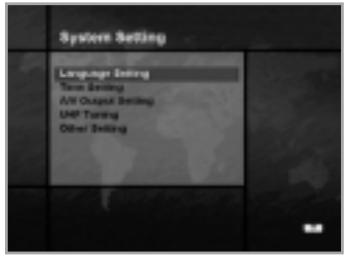
The System Setting mode supports the STB internal settings according to the connection of the receiver and external units. This mode includes Language Setting, Time Setting, A/V Output Setting, UHF Tuning and Other Settings.
text_image
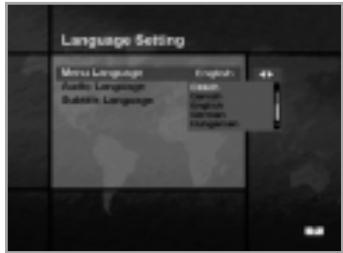
System Setting Language Setting Term Setting AVI Output Setting LMP Setting Other SettingLanguage Setting
Select the language for menu, audio or subtitle.
- Select the highlighted language setting using the ▲/▼ buttons in the system setting mode and then press the OK button.
- Select the highlighted Menu(or Audio, Subtitle) Language and press the ◀/▶ buttons and the language list will be displayed.
- Use the ▲/▼ buttons to move to a language you want and then press the OK button to finish setting.
text_image
Language Setting Menu Language English Austic Language English Subtitle Language English English HengenanMenu Language
We support the various menu languages of Europe & Middle East areas. For Europe areas, there are Czech, Danish, English, French, German, Hungarian, Italian, Portuguese, Russian, Spanish, Swedish, Turkish and more.
Also, it includes Arabic, English, French, German, Italian, Persian, Russian, Turkish for Middle East areas.
- The kind of languages can be changed depending on the country. Languages are subject to change without prior notice.
text_image
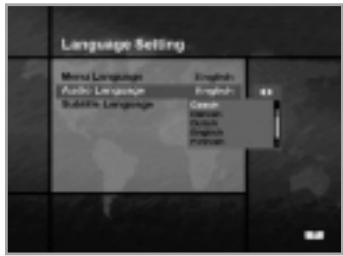
Language Setting Meme Language English Audio Language English Subtitle Language Case English English English EnglishAudio Language
Select the default language for audio when changing services. If you change the current service, your STB will initially select the previously memorised Audio Language. If the Audio Language of current service is not provided, at this time, you should reselect a language on the Audio Language menu.
Languages provided:
Czech, Danish, Dutch, English, Finnish, French, German, Greek, Hungarian, Italian, Norwegian, Portuguese, Rumanian, Russian, Spanish, Swedish, Turkish and more.
If no language is provided, then the default language of current service will be automatically selected.
Subtitle Language
Select the default language for subtitle when changing services. Language provided: Danish, English, Finnish, French, German, Greek, Hungarian, Italian, Norwegian, Portuguese, Spanish, Swedish and more.
text_image
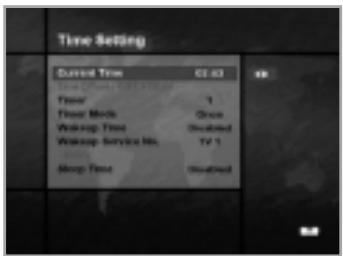
Time Setting Current Time 01:03 Floor Floor Mode 1 Wakeup Time Once Wakeup Service No. Disabled Sleep Time DisabledTime Setting
You can set the Current Time and Wakeup Time in this mode. Furthermore, the Service Number in the Wakeup mode and Sleep Time(standby mode) can be set. When a VCR is connected, recording can be automatically done according to Wakeup/Sleep Time Setting.
Current Time
To set the Current Time, enter the Offset value using the standardised information of current service area. The time setting will be used as the standardised time for the I-Plate, TV Guide, Wakeup and Sleep Timer.
Time Offset
Current Time is based on TDT(Time and Data Table) at the stream of the current service.
Timer
You can select nine kinds of Timer like 1, 2.....8 and Disabled. If you select “Disabled”, then the other timers will not work. Press the OK button at timer option to display the Timer table. The Timer determines the on/off time and can also be used for VCR recording.
Timer Mode
Wakeup/Sleep timer determines the Timer Mode.
- Once : The timer programming is applied only once.
• Daily : The timer recording is applied everyday repeatedly. - Weekly : The timer recording is applied weekly. (Set one day in a week).
Use the ◀/▶ buttons to select the type of timer programming.
Wakeup Time
Select the time when STB is turned on.
Use the NUMERIC buttons(0\~9) on the remote control unit to enter your Wakeup Time.
Wakeup Service No.
Use the ◀/▶ buttons to set the service number provided for the set Wakeup Time.
Use the TV/Radio( ) button on the remote control unit to toggle TV/Radio service.
Service Name
The Service Name that has been determined by the Wakeup Service No. will be shown.
Sleep Time
Depending on Time Setting, select the time when STB is turned off.
text_image
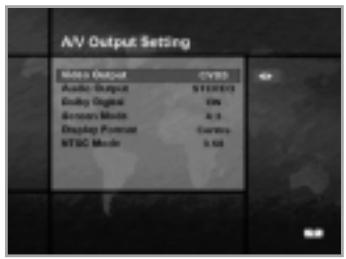
A/V Output Setting Media Output CVBD Audio Output STOCKD Audio Outputs CN Screen Music 4.3 Display Format Covers MTSC Mode 3.50A/V Output Setting
Video Output(CVBS/S-Video/RGB)
Set the video mode for the TV SCART output.
Audio Output
Set the audio mode which is output from the TV SCART and RCA/Cinch Jack. (Stereo/Mono)
Dolby Digital
If Dolby Digital option is ON and the broadcaster provides the Dolby Digital stream, the Dolby Digital audio language is firstly selected when changing the service.
Screen Mode
Select the aspect ratio of TV which is connected to STB(4:3 or 16:9).
Display Format
Select the format which the video is to be displayed on screen. When your TV set is 4:3 and video source is 16:9, STB will display in Letter-box or Centre mode as selected. When your TV set is 16:9 and video source is 4:3, STB will display in the Pillar-box or Full mode as selected.
NTSC Mode
Adjust this value between 3.58 and 4.43 if your TV displays the video only in black and white color. Normally NTSC 3.58 mode is used worldwide, but some TV sets can support only NTSC 4.43 mode.
text_image
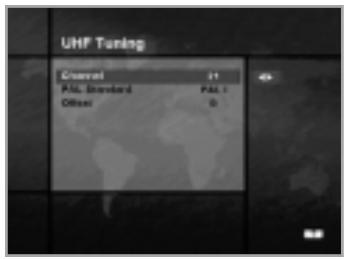
UHF Tuning Channel 11 P&L Standard P&L 1 Offset 0UHF Tuning
You select the STB output by using the UHF channel.
Channel
Select an UHF channel. The range of channels and frequency value are different for each PAL Standard:
| PAL I/G for Europe | : CH21 ~ CH69 |
| PAL B for Europe/Australia | : CH28 ~ CH69 |
| PAL D for China | : CH13 ~ CH62 |
| PAL K for Russia | : CH21 ~ CH69 |
PAL Standard
Select a PAL Standard according to the above range of channels.
Offset
Adjust the fine tuning value. The Offset ranges from -4 to +4 and each Offset represents 1MHz.
text_image
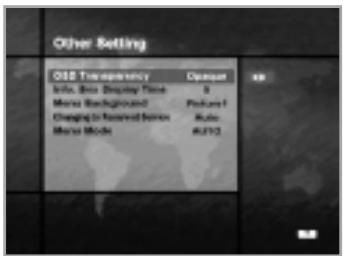
Other Setting OIS Transparency Display Time: 8 Menu Background: Preview1 Change to Received Service: Rule Menu Mode: A2F23Other Setting
Select the OSD Transparency, Information Box Display Time and so on.
OSD Transparency
Select the OSD Transparent type. It affects Information box, Soundtrack, Subtitle, Service list, Time and Quick mode of TV Guide. Use the ◀/▶ buttons to toggle transparent, opaque, 20%, 40%, 60% and 80%.
Info. Box Display Time
Set the display duration of Information box displayed on the screen after changing services. The time ranges from 0 to 20 seconds.
Menu Background
Set the type of background for the menu to be displayed on.
Changing to Reserved Service
When the reserved time has come during the view of services:
- Manual Mode
This mode shows the message “A reserved event has started on another service. Press OK to view the reserved service.
Press EXIT to ignore reserved service. (will automatically change after 10 seconds.)” And ask the presence of change and then makes a change.
- Auto Mode
The current service will be automatically changed to the time-reserved service.
Menu Mode
Select NTSC, PAL, AUTO according to your TV type.
In AUTO mode, the menu is automatically selected as NTSC or PAL according to the service played before the Menu mode is entered.
text_image
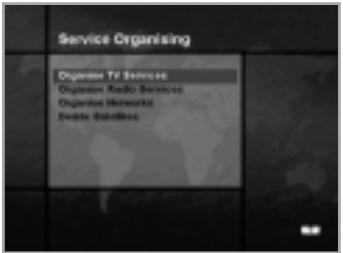
Service Organising Organism TV Services Organism Radio Services Organism Networks Delete Satellites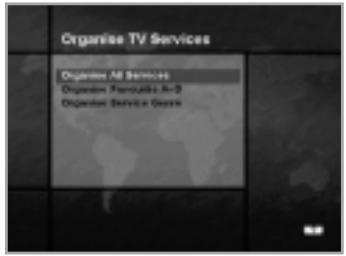
text_image
Organise TV Services Organise All Services Organise Fan Outlets A-0 Organise Service Groups4-2. Service Organising
This menu gives users access to options that allow them to organise their TV Services, Radio Services and Networks.
** The default PIN code is 0000.
Organise TV Services
Organise All Services
This mode allows users to Delete, Move, Lock, Skip and Rename TV Services.
- Delete
- Press the RED( ⓘ )button to delete unwanted services.
- Highlight the services that you want to delete in grey.
- Press the OK button to confirm.
- Press the EXIT button to cancel the deletion.
- Move
- Press the GREEN( 🔊?)button to move the service to where you want to locate.
Then, the icon(♦) will be displayed in front of the service number. - Use the ▲/▼/◄/► buttons to select a new location.
- Press the OK button to fix the location.
- Press the EXIT button to return to the original location.
- Lock
-
Press the YELLOW(☐)button to lock services.
Then, the symbol “💡” will be displayed at the right side of the service name. -
Enter the PIN code to view the locked services.
- Skip
- Press the BLUE( UHF )button to skip services.
Then, the symbol “☐” will be displayed at the right side of the service name. - Use NUMERIC buttons(0\~9), service list or EPG(EPG)button to view the skipped services when selecting channels.
Note : You can't view the skipped services by using Ⓓ+/P- buttons.
- Rename
- Press the WHITE( Ⓤ )button to change the service name.
Then, the keyboard image will be displayed on the screen. - Key in the new service name.
You can use the four direction keys to move or select the services.
▲ : to move the previous service
▼ : to move the next service
◀ : to move back by services
▶ : to move forwards by services
Note : The box between service list and the description of the colour buttons offers the brief information of a service where the cursor is located.
text_image
Organise Favourite TV Services OK Favorites A Services A 1 Date 4 THF B 2 Sep 8 THF-Active C 3 May 2015 4 SEP D 1 Daily Deutsche Index Clear Service(s) 19:38:00:00 Delete Move Lock Skip RecycleOrganise Favourite A\~D
Each of TV and Radio has four Favourite groups.
Each Favourite group contains up to 100 services.
Delete, Move, Lock, Skip or Rename each TV service in a Favourite TV group and re-group them into your Favourite TV group.
This mode has the same operating methods as “organise all services”.
- When you delete a service in the Favourite group, it will be available again on the All TV service list. This allows the service to be removed from the Favourite group.
- You can move the service only within the Favourite group.
- Coloured keys are available when the cursor is located in the middle window.
(Except when the middle window is disabled(grey).)
To select the Favourite group;
- Use the ◀ button to move the cursor to "Gr."-plate(left).
- Select the wanted favourite group.
To group the services into Favourites;
- Use the ▶ button to move the cursor to "services"-plate(right).
- Select the service you want to group into Favourites.
- Press the OK button.
- Use the ◀ button to move the cursor to "Favourites"-plate(left).
- Press the OK button to save the selected group.
Note : 1. Use the ◀/▶ buttons to move the cursor.
- Use the Ⓓ+/P- buttons to select the previous or next page.
text_image
Organise Genre of TV Services Movie Developers 1 Date 2 Day 3 Week 4 Day 5 Day 6 Day 7 Day 8 Day 9 Day 10 Day 11 Day Clear Deutsche Note 2009/04/21 24:20:31 5m Delete Lock Stop RenameOrganise Service Genre
The Organise Service Genre feature allows the user to
Delete/Lock/Skip/Rename a service in the selected Genre.
Available genre : Movie, News, Show, Sports, Children, Music,
Art, Education, etc.
The colour buttons function same as ones for Organise All services except the following differences:
- When you delete a service in the selected genre, it will be available again on the All TV services list at the right side.
At that time, the genre for the deleted service becomes “etc”. - You can move the service only in the selected genre.
- Coloured buttons are available when the cursor is located in the middle window.
To select the Genre;
-
Use the ◀ button to move the cursor to "Gr."-plate(left).
-
Select the wanted genre.
To group the services into a Genre;
- Use the ▶ button to move the cursor to
"services"- plate(right). - Select the service you want to group into Genre.
- Press the OK button.
- Use the ◀ button to move the cursor to "Genre"-plate(left).
- Press the OK button to save the selected group.
Note : 1. Use the ◀/▶ buttons to move the cursor.
- Use the +/- buttons to select the previous or next page.
text_image
Organise Radio Services Organise All Services Organise Favourite A-9 Organise Service GenreOrganise Radio Services
The Organise Radio Services functions same as TV Services except that it uses Radio Services.
You can delete or move Radio Services and change the attributes of them.
Organise All Services
The Organise All Services lets the user Delete, Move, Lock, Skip or Rename Radio services on the All Radio services list.
text_image
Organise Radio Services Services 1.00 GB 2.00 GB 3.00 GB 4.00 GB 5.00 GB 6.00 GB 7.00 GB 8.00 GB 9.00 GB 10.00 GB 11.00 GB 12.00 GB 13.00 GB 14.00 GB 15.00 GB 16.00 GB 17.00 GB 18.00 GB 19.00 GB 20.00 GB 1.00 GB OK/Cancel OK/Cancel OK/Cancel OK/Cancel OK/Cancel OK/Cancel OK/Cancel OK/Cancel OK/Cancel OK/Cancel OK/Cancel OK/Cancel OK/Cancel OK/Cancel OK/Cancel OK/Cancel OK/Cancel OK/Cancel OK/Cancel OK/Cancel OK/Cancel OK/Cancel OK/Cancel OK/Cancel OK/Cancel OK/ANCEL OK/ANCEL OK/ANCEL OK/ANCEL OK/ANCEL OK/ANCEL OK/ANCEL OK/ANCEL OK/ANCEL OK/ANCEL OK/ANCEL OK/ANCEL OK/ANCEL OK/ANCEL OK/ANCEL OK/ANCEL OK/ANCEL OK/ANCEL OK/ANCEL OK/ANCEL OK/ANCEL OK/ANCEL OK/ANCEL OK/ANCEL OK/ANCEL OK/CANCEL OK/CANCEL OK/CANCEL OK/CANCEL OK/CANCEL OK/CANCEL OK/CANCEL OK/CANCEL OK/CANCEL OK/CANCEL OK/CANCEL OK/CANCEL OK/CANCEL OK/CANCEL OK/CANCEL OK/CANCEL OK/CANCEL OK/CANCEL OK/CANCEL OK/CANCEL OK/CANCEL OK/CANCEL OK/CANCEL OK/CANCEL OK/CANCEL OK/ANCELOrganise Favourite A\~D
The Organise Favourite A\~D lets the user Delete, Move, Lock, Skip or Rename Radio Services from the Favourite Radio Services and group into a new Favourite Radio Services.
The Radio Services are grouped into a Favourite in the same way as the TV Services(refer to page E27).
text_image
Organise Favourite Radio Services A B C D Radio Service A 1:00 P 2:00 P 3:00 P 4:00 P 5:00 P 6:00 P 7:00 P 8:00 P 9:00 P 10:00 P 11:00 P 12:00 P 13:00 P 14:00 P 15:00 P 16:00 P 17:00 P 18:00 P 19:00 P Radio Service B Radio Service C Radio Service D Radio Service E Radio Service F Radio Service G Radio Service H Radio Service I Radio Service J Radio Service K Radio Service L Radio Service M Radio Service N Radio Service O Radio Service P Radio Service Q Radio Service R Radio Service S Radio Service T Radio Service U Radio Service V Radio Service W Radio Service X Radio Service Y Radio Service Z Radio Service AA Radio Service AB Radio Service AC Radio Service AD Radio Service AE Radio Service AF Radio Service AG Radio Service AH Radio Service AI Radio Service AJ Radio Service AK Radio Service AL Radio Service AM Radio Service AN Radio Service AO Radio Service AP Radio Service AQ Radio Service AR Radio Service AS Radio Service AT Radio Service AU Radio Service AV Radio Service AW Radio Service AX Radio Service AY Radio Service AZ Radio Service BA Radio Service BC Radio Service BD Radio Service BE Radio Service BF Radio Service BG Radio Service BH Radio Service BI Radio Service BJ Radio Service BK Radio Service BL Radio Service BM Radio Service BN Radio Service BO Radio Service BP Radio Service BPB Radio Service BPBZ Radio Service BPBZY Radio Service BPBZYY Radio Service BPBZYYY Radio Service BPBZYYYY Radio Service BPBZYYYYY Radio Service BPBZYYYYYY Radio Service BPBZYYYYYY Radio Service BPBZYYYYYY Radio Service BPBZYYYYYY Radio Service BPBZYYYYYY Radio Service BPBZYYYYYY Radio Service BPBZYYYYYY Radio Service BPBZYYYYYY Radio Service BPBZYYYY/Y- Radio Service BPBZYY/Y- Radio Service BPBZY/Y- Radio Service BPBZY/Y- Radio Service BPBZY/Y- Radio Service BPBZY/Y- Radio Service BPBZY/Y- Radio Service BPBZY/Y- Radio Service BPBZY/Y- Radio Service BPBZY/Y- Radio Service BPBZY/Y- Radio Service BPBZY/Y- Radio Service BPBZY/Y- Radio Service BPBZY/Y- Radio Service BPBZY/Y- radio 1.00 P radio 2.00 P radio 3.00 P radio 4.00 P radio 5.00 P radio 6.00 P radio 7.00 P radio 8.00 P radio 9.00 P radio 10.00 P radio 11.00 P radio 12.00 P radio 13.00 P radio 14.00 P radio 15.00 P radio 16.00 P radio 17.00 P radio 18.00 P radio 19.00 P radio 20.00 P radio 21.00 P radio 22.00 P radio 23.00 P radio 24.00 P radio 25.00 P radio 26.00 P radio 27.00 P radio 28.00 P radio 29.00 P radio 30.00 P radio 31.00 P radio 32.00 P radio 33.00 P radio 34.00 P radio 35.00 P radio 36.00 P radio 37.00 P radio 38.00 P radio 39.00 P radio 40.00 P radio 41.00 P radio 42.00 P radio 43.00 P radio 44.00 P radio 45.00 P radio 46.00 P radio 47.00 P radio 48.00 P radio 49.00 P radio 50.00 POrganise Service Genre
The Organise Service Genre lets the user Delete, Lock, Skip or Rename Radio Services and group into Radio Service Genres. Radio Genres include : Pop, Rock, Country, Classic, Jazz, Folk, News, Show, Sports, Education, User A-D, etc.
The Radio Services are grouped into a Genre in the same way as the TV Services(refer to page E28).
text_image
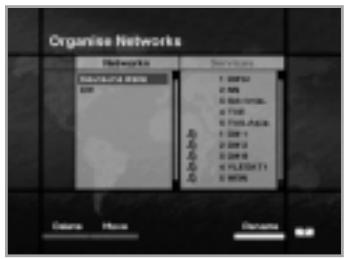
Organise Networks Networks Configuration Name 000 Services 1: 0000 2: 000 3: 00000000000000000000000000000000000000000000000000000000000000000 1: 1: 1: 1: 1: 1: 1: 1: 1: 1: 1: 1: 1: 1: 1: 1: 1: 1: 1: 1: 1: 1: 1: 1: 1: 1: 1: 1: 1: 1: 1: 1: 1 2: 2: 2: 2: 2: 2: 2: 2: 2: 2: 2: 2: 2: 2: 2: 2: 2: 2: 2: 2 3: 3: 3: 3: 3: 3: 3: 3: 3: 3: 3: 3: 3: 3: 3: 3 4: 4: 4: 4: 4: 4: 4: 4: 4: 4: 4: 4: 4: 4: 4 5: 5: 5: 5: 5: 5: 5: 5: 5: 5: 5: 5: 5 6: 7: PLEKTI 7: PLEKTIOrganise Networks
You can edit services using the network unit.
- The provider names are displayed on the left side of screen, and the TV/Radio Services included in the highlighted Network are displayed on the right side of screen.
Only the Delete, Move, Rename Function can be used in this mode. - When TV/Radio Services are too many to be displayed, use the ▶ button to move the cursor to the right window and use the ▲/▼ and Ⓓ/® buttons to move the cursor to the next list.
When the number of services is under 10(NTSC: 8), the scroll bar is not displayed. In Radio Service icon( ♪ ) is marked in front of service number.
text_image
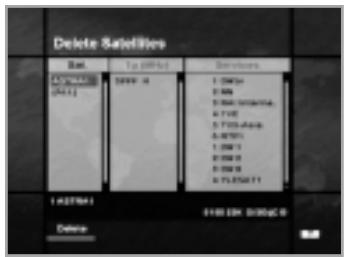
Delete Satellites Sat: 100% 4 Servicer 1 CMN 2 NM 3 NM 10000000 4 F10E 5 F10S-4000 6 MTN 7 NM 8 NM 9 NM 10 PLSXG11 1:00PM $100.00 PM200C 0 DeleteDelete Satellites
- Press the ▲/▼/◄/► buttons to move to the satellite, Tp, or ALL you want to delete.
- Press the RED( ⓘ ) button to select the item you want to delete.
- Press the OK button to delete. Press the EXIT button to cancel.
text_image
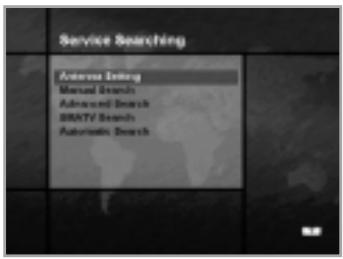
Service Searching Address Ordering Manual Search Advanced Search SMARTV Search Automatic Search4-3. Service Searching
Enter the PIN code to access the Service Searching menu as you access the Parental Control or Service Organising menu. Press the OK button to start Service Search after setting the parameters.
** The default PIN code is 0000.
Antenna Setting
Selects the antenna and LNB settings for Service search. As you can change the settings for 22KHz Tone, 0/12V and DiSEqC switch, there are 32 possible Antenna Setting for use. The values that are set in this menu will be available for selection in other service searching menus.
Antenna Alternative
There are 32 antenna alternatives, each one can have different combinations of settings for 22KHz Tone, 0/12V and DiSEqC switch.
text_image
Antenna Setting Antenna Alternatives Sensible Home AS10A1 USB Frequency 0150 20Hz Tone Enabled 8.1UVbit Switch Enabled D886C Input OS4001 B Measured System EnabledSatellite Name
Selects the Satellite Name that corresponds to the value of the Antenna Alternative.
- Press the ◀/▶ buttons to display the satellite list box.
- Select the wanted Satellite Name.
- If the desired Satellite Name is not listed then select User Defined.
- The keyboard will appear and you can type the Satellite Name directly. The selected Satellite Name can help you select the Antenna Alternative in the searching menu, but it is possible to change or select the Satellite Name only in the Antenna Setting menu.
Note : In case the selected satellite is used as OTA target satellite, automatic detection of the OTA target satellite might not work properly if you change or edit the name of the satellite.
- Satellite Name is listed in alphabetical order and the order can be changed according to Menu Language.
- When inputting the Satellite Name, there is a 14 character limit.
text_image
Antenna Setting Antenna Alternatives Sensible Home AS10A1 USB Frequency 0150 20Hz Tone Enabled 8.1UVbit Switch Enabled D886C Input OS4001 B Measured System Enabled
text_image
Antenna Setting Antenna Abnormal 1 Line Frequency AS10A1 20Hz Time AS10A1 31V/4bit Batch AS10A1 DillipG Impact AS10A1 Magnetoid System Broadcast
text_image
Antenna Setting Antenna Retender 1 Satellite Name AST/NAI USB Frequency 6VDD 21MHz Tube Enabled 612MHz Bandwidth Enabled D888pC Input D888pC B Motorized System EnabledLNB Frequency
- Select the L.O. Frequency that is set to antenna.
- Use the ◀/▶ buttons to select the LNB frequency(Universal, 5150, 9750, 10600, 10750, 11475MHz or 0, 1, ......, 9).
- If the required LNB Frequency is not available, then select "0" and enter the frequency manually using the NUMERIC buttons(0\~9).
- When you select Universal, both 9750 and 10600MHz are supported at the same time.
The 22KHz Tone setting is unnecessary. (Disabled)
22KHz Tone
When you use a dual LNB or two antennas connected to a 22KHz Tone switch box, make 22KHz Tone switch enable or disable to select LNB or antenna.
0/12Volt Switch
When you use two LNBs or antennas is switched to 0/12V, select what LNB and antenna are used enable or disable. 0/12V terminal is located on the rear of STB.
DiSEqC Input
According to the option and position of DiSEqC switch, select Disabled, Tone Burst A to B and DiSEqC A to D. After setting the above mentioned value, press the OK button to move to the Manual Search menu.
Motorised System
The Motorised System is used to set the DiSEqC 1.2 motor by Eutelsat specification.
If you wish to use this system, please refer to page E42.

text_image
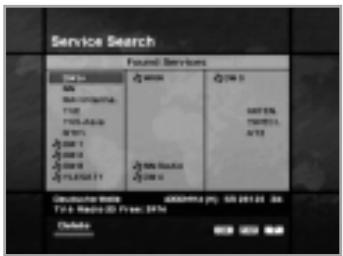
Service Search Found Services Data MOS MAX MAX MAX 1 - MAX MAX 2 - MAX MAX 3 - MAX MAX 4 - MAX MAX 5 - MAX MAX 6 - MAX MAX 7 - MAX MAX 8 - MAX MAX 9 - MAX MAX 10 - MAX MAX 11 - MAX MAX 12 - MAX MAX 13 - MAX MAX 14 - MAX MAX 15 - MAX MAX 16 - MAX MAX 17 - MAX MAX 18 - MAX MAX 19 - MAX MAX 20 - MAX MAX 21 - MAX MAX 22 - MAX MAX 23 - MAX MAX 24 - MAX MAX 25 - MAX MAX 26 - MAX MAX 27 - MAX MAX 28 - MAX MAX 29 - MAX MAX 30 - MAX MAX 31 - MAX MAX 32 - MAX MAX 33 - MAX MAX 34 - MAX MAX 35 - MAX MAX 36 - MAX MAX 37 - MAX MAX 38 - MAX MAX 39 - MAX MAX 40 - MAX MAX 41 - MAX MAX 42 - MAX MAX 43 - MAX MAX 44 - MAX MAX 45 - MAX MAX 46 - MAX MAX 47 - MAX MAX 48 - MAX MAX 49 - MAX MAX 50 - MAX MAX 51 - MAX MAX 52 - MAX MAX 53 - MAX MAX 54 - MAX MAX 55 - MAX MAX 56 - MAX MAX 57 - MAX MAX 58 - MAX MAX 59 - MAX MAX 60 - MAX MAX 61 - MAX MAX 62 - MAX MAX 63 - MAX MAX 64 - MAX MAX 65 - MAX MAX 66 - MAX MAX 67 - MAX MAX 68 - MAX MAX 69 - MAX MAX 70 - MAX MAX 71 - MAX MAX 72 - MAX MAX 73 - MAX MAX 74 - MAX MAX 75 - MAX MAX 76 - MAX MAX 77 - MAX MAX 78 - MAX MAX 79 - MAX MAX 80 - MAX MAX 81 - MAX MAX 82 - MAX MAX 83 - MAX MAX 84 - MAX MAX 85 - MAX MAX 86 - MAX MAX 87 - MAX MAX 88 - MAX MAX 89 - MAX MAX 90 - MAX MAX 91 - MAX MAX 92 - MAX MAX 93 - MAX MAX 94 - MAX MAX 95 - MAX MAX 96 - MAX MAX 97 - MAX MAX 98 - MAX MAX 99 - MAX MAX 100 - MAXService Search OSD
- If you press the EXIT button during the search, then
Service Search stops and the searching menu will appear. - When you find all the services, the following picture appears.
- Before saving it, you can select the services you want to delete.
Found services OSD
- The picture above shows services that are found after Manual Search.
- Use the RED( ⓘ )button to mark the services that you want to delete.
To unmark a service, select the service and press the RED( ⓘ )button again. - Press the OK button to save, or press the EXIT button to exit without saving.
- Then Service Search menu appears again. When you exit from all menus, the first service of the found service list is played.
In the bottom of found service picture, network, the information of transponder and the number of found service that the services belong to are displayed.
The deleted service by the RED( ⓘ )button is excepted from counting of the number of services.
The deleted service is not included in this number.
"Free" applies to the empty space of the memory.
It will be used to store future services.
text_image
Manual Search Antenna Array 10/141 Frequency 10000 Polarization Remitted Signal Rate 28135 FBJ 54 Network Search No. Automatic Drop No.Manual Search
Set the search parameters(Frequency, Symbol Rate, etc.) to manually find the services that you have selected in the transponder.
The bar on bottom of the submenu shows the signal level and the signal quality(BER) of the entered parameters.
Antenna Alternative
Select the target antenna for Manual Search.
The Satellite Name helps you select Antenna Alternatives.
This is only for reference and cannot be changed on this menu.
Frequency
Use the NUMERIC buttons(0\~9) on the remote control unit.
Polarisation
Use the ◀/▶ buttons to select the Polarisation of the transponder. (Auto, Horizontal, Vertical)
• Horizontal : 18 V is output through LNB line
• Vertical : 13.5 V is output through LNB line
Symbol Rate
Inputs the Symbol Rate of the transponder you want to find.
Use the ◀/▶ buttons or Numeric buttons on the remote control unit.
FEC(Forward Error Correction)
Use the ◀/▶ buttons to select the Forward Error Correction of the transponder. You can select the value of Auto, 1/2, 2/3, 3/4, 5/6 and 7/8.
Network Search
- You can select Yes or No. When you select "Yes", you can find more transponders using the home network.
- As it refers to NIT during searching, if there is the frequency information of other transponder, it searches the other transponder besides the transponder that the user inputs.
Automatic Skip
- You can select Yes or No. When you select "Yes", the search will skip all scrambled services.
- When the found services are scrambled during searching, they are not listed up.
Refer to descriptor of PMT whether it is scrambled or not.
text_image
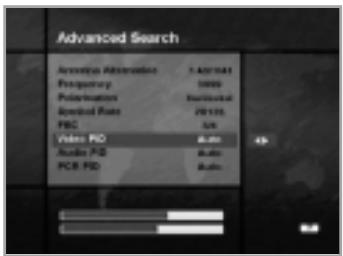
Advanced Search Analog Video Frequency Polarization Speed Rate FBC Video FID Audio FID PCB FID 1.42V/164 1000 Instructed 29135 5ms Audio Audio AudioAdvanced Search
Performs a manual search with the ability to enter PID(Video/Audio/PCR) values. This mode is necessary when you search for the signal that has abnormal service Information tables.
The setting of the sub items is the same as Manual Search.
Video PID/Audio PID/PCR PID
You can set PID to search for services.
- Use the ◀/▶ buttons to select PID input mode.
- Use the NUMERIC buttons(0\~9) on the remote control unit to enter a decimal PID value.
- In the hexadecimal input mode, press one of the NUMERIC buttons(0\~9) to display a hexadecimal keyboard.
- Enter a hexadecimal PID value.
Note : If no PID is input(Auto is displayed), the Advanced Search functions same as Manual Search.
- After the above mentioned value is set, press the OK button to start Service Search.
Note : The picture and the found service list during Advanced Search are identical with the ones during Manual Search.
text_image
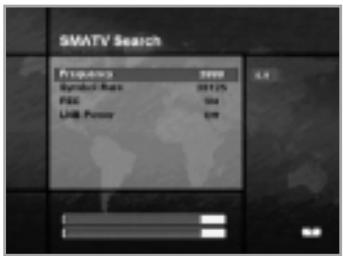
SMATV Search Frequency 1000 Symbol Size 24125 FSS 104 USB Power 647SMATV Search
In case that several generations use Antenna and LNB in common, as the frequency range of signal is input to STB is down as much as LNB L.O.(Local Oscillator) frequency, search the service from 950 - 2150MHz.
Frequency
Inputs not RF frequency but the frequency that is down converted through LNB in common. The unit is MHz and the range of input is 950 - 2150MHz.
Symbol Rate
Inputs the Symbol Rate of the signal you want to find.
FEC
You can select the value of 1/2, 2/3, 3/4, 5/6, 7/8 or Auto.
LNB Power
As there is whether the LNB Power of STB is necessary or not according to the sort of IF-IF converters, select a suitable option for situation.

text_image
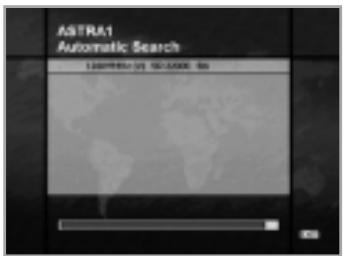
Automatic Search Automotive Search 1 Search Type Quick Network Search No. 2000.21888Automatic Search
When you enter the Satellite Name that is set in Antenna Setting menu, search all of the selected satellite without inputting the extra frequency.
Antenna Alternative
Select the target antenna for Automatic Service Search.
The attribute of this antenna alternative number is already set in Antenna Setting menu and the Satellite Name is helpful in the selection of the antenna, but in this menu you cannot change the Satellite Name.
Search Type
- You can select one of two modes(Quick or Detail).
- When you select Quick mode, it searches the service by search
- parameters that is preset.
- When you select Detail mode, it searches the service through all field of tuner(950-2150MHz).
Network Search
- You can select Yes or No. When you select "Yes", you can find more transponders using the home network.
- As it refers to NIT during searching, if there is the frequency information of other transponder, it searches the other transponder besides the transponder that the user inputs.
text_image
ASTRA1 Automatic Search 1.00000000 50.0000 86Detail Mode
The pre-fixed symbol rate list is changed according to Antenna Alternative and Satellite Name. If you want to add or change it, press the RED( ⓘ )button.
** The value of Pre-fixed symbol rates can not be editable. (22000, 27500)
The picture of the Symbol Rate Add/Change mode is as follows:
- When you press the RED(☐)button after entered to detail mode from search type, yellow box will be trimmed with red edges meaning edit is possible.
- You can easily put optional value with using NUMERIC buttons(0\~9).
- Press the RED(☐)button for confirmation, and you will successfully exit from input mode.
If press the OK button at symbol rate value input mode, the value will be confirmed, and if you moves left or right column use the ◀/▶ buttons, you can differ values of symbol rate to input. Then press the EXIT and the RED( ⓘ )button to exit from input mode.
To delete a Symbol Rate in the above list, press the 0(NUMERIC button) in the selected position and then the symbol rate disappears.
The range of Symbol Rate that is input additionally is 16-30Ms/s.
Note : The user should select the Satellite name in Antenna Setting menu. When the user types the Satellite Name separately, the search type is fixed to the Detail mode.
text_image
Service Search Found Services See to: ##s Sub-Service T102 T103-ASR #101 #00 1 #00 2 #00 3 #15/05/17 #00 4 #00 5 #00 6 #00 7 #00 8 #00 9 #00 10 #00 11 #00 12 #00 13 #00 14 #00 15 #00 16 #00 17 #00 18 #00 19 #00 20 #00 21 #00 22 #00 23 #00 24 #00 25 #00 26 #00 27 #00 28 #00 29 #00 30 #00 31 #00 32 #00 33 #00 34 #00 35 #00 36 #00 37 #00 38 #00 39 #00 40 #00 41 #00 42 #00 43 #00 44 #00 45 #00 46 #00 47 #00 48 #00 49 #00 50 #00 51 #00 52 #00 53 #00 54 #00 55 #00 56 #00 57 #00 58 #00 59 #00 60 #00 61 #00 62 #00 63 #00 64 #00 65 #00 66 #00 67 #00 68 #00 69 #00 70 #00 71 #00 72 #00 73 #00 74 #00 75 #00 76 #00 77 #00 78 #00 79 #00 80 #00 81 #00 82 #00 83 #00 84 #00 85 #00 86 #00 87 #00 88 #00 89 #00 90 #00 91 #00 92 #00 93 #00 94 #00 95 #00 96 #00 97 #00 98 #00 99 #15/16/17Press the OK button anywhere to start Automatic Search. The picture during searching is as follows.
The picture searches with varying frequency, Symbol Rate and FEC etc. Satellite Name is the name that the user selects to correspond with Antenna Alternative of Antenna Setting.
The progress bar(%) appears on bottom of the picture.
During the search, services that are found are displayed as follows:
- Press the EXIT button during Automatic Search to stop search.
- After the search is finished, the appearite message appears.
- Press the OK button to return Service Search menu.
text_image
STB Status I/O Version O&F: I/O 3.0 I/O Version I/O, multi, mono2 Ecoise Group Version I/O, multi, mono2 I/O Last Update H: 8681-2002 Loader Version H: 2.88 System-8 0047.8800 Current Service D/Win CI BLDF 1 Connection port installed CI BLDF 2 Connection port installed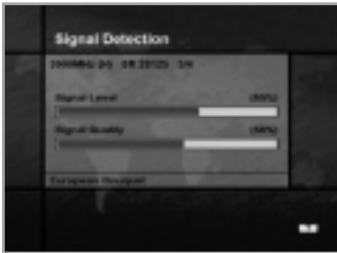
text_image
Signal Detection 1000MHz (4A) 8R 28123 3A Signal Level (50%) Signal Quality (50%) European Output4-4. Status
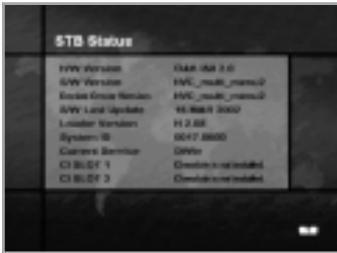
STB Status
Displays the information of H/W Version, S/W Version, Loader Version and CI CAM of STB and so on.
- F1-5000 doesn't support CI CAM.
Signal Detection
Shows the Signal Level(AGC level) and Signal Quality(BER) of the current service and is help to the initial antenna setting.
STB Upgrade
You can download and upgrade the software of this STB via a satellite when the software of new version is released.
Do not turn off the STB during downloading.
When the power is switched OFF, turn on the STB and the process will be continued.
- CRCI-5500 models are not applicable.
text_image
Common Interface Size 1. 64 module is not installed Size 2. 64 module is not installed4-5. Common Interface
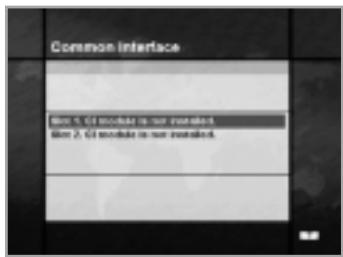
You can enjoy not only scrambled services using the Conditional Access Modules(CAM), but also Free-To-Air services. This STB currently supports six kinds of CAM(VIACCESS™, Nagravision, CONAX, CryptoWorks(TM), Irdeto or Mediaguard). Common Interface module and Smart Card depend on the service provider. If you need CAM, contact your service provider or distributor.
Note : If CAM is not used, then only Free-To-Air services are available.
• F1-5000, VA-5200 models are not applicable.
text_image
Installation System Setting Service Ordering Service Searching Status External Interface Condition Access
text_image
Conditional Access ACCESS General Asset Card Information Service List Change Maturity Rating Change PMI code
text_image
Conditional Access Smart Card Information Unique Address : 330-08 97 T77 90 User Address : 16120F89d Earned Minority Rating : up [ 95 ]
text_image
Conditional Access Excel/Marker General Sheet Card Information Available Edit-in-ments Security Rating Post-Code Post Box4-6. Conditional Access
For Viaccess Embedded
This menu allows the user to view the information on the Smart Card and Viaccess conditional access system such as general Smart Card Information, Service List, Change Maturity Rating and Change PIN code.
General Smart Card Information
You can see the Unique Address, so user Address, Current Maturity Rating of the Smart Card.
Service List
Services or Bouquets are encrypted by Viaccess and operators name, like TPS or ABsat, are displayed on the TV screen.
To get more detailed information of viewing rights of services or Bouquets, press OK button.
Change Maturity Rating
The STB is required by Viaccess to include a parental control facility for the viewing of restricted services.
This can be set to "No block" or for ages ranging from 4 to 18. The correct PIN code is required to change this option.
Change PIN code
When you buy a new Smart Card, the initial PIN code is set to "NULL". Therefore, it is recommended that this PIN code should be changed. This PIN code is available only on Conditional Access Menu. Enter this PIN code to see the blocked Viacces Service.
- Specifications are for VA-5200, VACI-5300 models.
For CryptoWorks Embedded
This menu allows the user to view and change information on the Smart Cards such as available entitlements, Maturity Rating and PIN code. Besides, you can view the mails from programm providers.
General Smart Card Information
Card label will be displayed as issuer's name on the TV screen. Programmes or Bouquets which are encrypted by only CryptoWorks(TM) and distributor labels displayed on the TV screen such as Wizja TV or MTV Europe and more.
To get more detailed information of viewing rights of channels or bouquets, press the OK button.
- Smart Card details
You can see smart card address, the validity date and current maturity rating.
Available Entitlements
The user will select a single programme provider by selecting its distributor label and you can get the information of available entitlements.
- Subscription
You can see the vaild period of each service.
- PPV(Pay Per View)
If you purchased events in advance, the entitlements of Pay Per View events will be displayed.
- IPPV(Impulse Pay Per View)
You can purchase an event during the active broadcast of the event without pre-ordering. The entitlements of Impulse Pay Per View events will be displayed. In this menu you need PIN code.
Maturity Rating
The STB is required by CryptoWorks(TM) to include a parental control facility for the viewing of restricted programmes.
This can be set to "Disable MR" or PG(Parental Guide) to over 18. The correct PIN code is required to change this option.
PIN Code
In this menu you can make PIN code enabled, disabled or changed.
- Enable PIN code
You can enable the PIN code.
- Disable PIN code
You can disable the PIN code.
- Modify PIN code
You can change the PIN code by using the NUMERIC buttons(0\~9) on the RCU. You will need to enter the old PIN code before you can enter new PIN code.
Mail box
The STB can receive maximum 10 mails from programme providers. To check and see the mails press the OK button.
In the Mail list you can view or delete the mails.
If you store 10 mails and a new mail arrives, the oldest mail will be erased and the new mail will be stored.
- Specifications are for CRCI-5500 models.
text_image
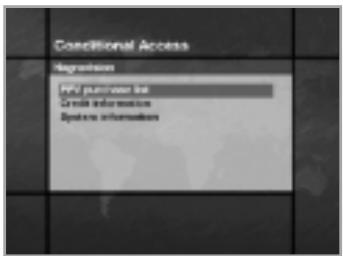
Conditional Access Registration RNA purchase list Credit Information System informationFor Nagravision Embedded
This menu allows the user to view the information on the Smart card and Nagravision Conditional Access system such as version and serial number of Smart card.
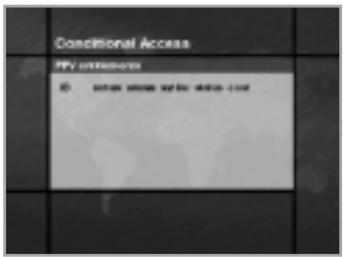
PPV purchase list
If you purchased events in advance, the entitlements of Pay Per View events will be displayed. (ID, event name, service name, start time, status and cost)
text_image
Conditional Access PV insurance © other access only data cardCredit information
Displays the Credit information. (ID, credit and status)
System information
Displays the System information.
(Smart card serial number, IRD serial number, Smart card version, Smart card revision, Conditional Access software version, Conditional Access software revision.)
- Specifications are for NACI-5700 models.
text_image
2023 SUN 19:00 TUE MED THU FAY SAT 1 2 3 4 5 6 7 8 9 10 11 12 13 14 15 16 17 18 19 20 21 22 23 24 25 26 27 28 29 30 315. Utility
STB supports additional functions such as Calendar and Biorhythm.
At the Biorhythm use the ▲/▼/◄/► buttons to adjust your birth year and date to see your current biorhythm status.
text_image
Scanned document page with a financial chart and a partial circular diagram, likely from a financial or statistical report.DiSEqC 1.2 User Instructions
If you have a DiSEqC 1.2 motorised system, then you can use the DiSEqC 1.2 functions available. The following instruction describes how to use the DiSEqC 1.2 functions to store the positions of the satellites and to search for the services(STAB Rotor Sat motor recommended).
1. Satellite Setting Menu Options
When DiSEqC Motorised System is Enabled in the Antenna Setting, a new menu is available for configuring the motor. This menu is called Satellite Setting and is accessed by pressing the OK button while the option Antenna Alternative is highlighted in the Manual Search menu. The following options are available on the Satellite Setting menu.
Satellite Name
A selection of satellite names that can be used to identify a motor position. If the satellite name you require is not available, please use other. In installer mode the Satellite Name Reference refers to the 0 position of the motor.
Movement
In user mode this is used to fine-tune the position of the motor for better reception. In Installer mode this is used to search for the position of a satellite manually.
Motor Control
Search : Searches for services on the chosen transponder.
Goto : Moves the motor to the stored position of the selected satellite name.
Store : Stores the current position of the motor for the selected satellite name.
Reset : Resets all stored positions of the motor relative to the 0 position. (Installer mode only)
DiSEqC Command Mode
Changes the current mode between Installer and User.
2. Setting your Receiver for DiSEqC 1.2
You must set your receiver up so that it is ready to use DiSEqC 1.2. To do so, do as follows
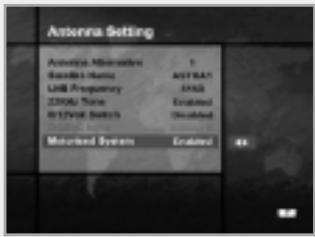
text_image
Antenna Setting Antenna, Attitudes Standard Name: USB Frequency: 2300Hz Trans RESET Select: Maximized System Enabled AST RAN SPAD Enabled Maximized System Enabled- Press the MENU( MENU )button, to display the Main Menu.
- Select Service Searching option and press OK button, to display the Service Searching menu.
- Select Antenna Setting option and press OK button, to display the Antenna Setting menu.
- You must set up a separate antenna alternative for each satellite position required.
- Select the name of the satellite you wish to use.
- Select the correct LNB frequency for the LNB you are using.
-
Set the Motorised System to Enable using the ▲/▼/◄/► buttons.
-
The option DiSEqC Input Selection should now be disabled.
This option is used for DiSEqC 1.0 and cannot be used in conjunction with DiSEqC 1.2.
Your receiver is now ready to use DiSEqC 1.2. To return to the Main Menu, use the EXIT button until you are at the Main Menu.
3. Initial Satellite Position Search
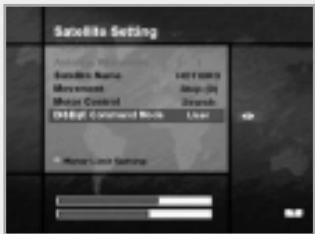
text_image
Satellite Setting Satellite Name 1471 0003 Microsoft Skip (N) Motor Control Drive Debug Command Block User * Human Lock SystemThis is required when you first set your receiver up to use DiSEqC 1.2 and sets the positions of all pre-programmed satellites.
- Make sure your motor is installed correctly with the calibrations adjusted for the region you are situated. (Please consult the user manual for your motor.)
- Make sure your receiver is set up to use DiSEqC 1.2. (see section 2 above).
-
On the Main Menu, select Service Searching option and press the OK button, you should now see the Service Searching menu.
-
Highlight the option Antenna Alternative and press the OK button to display the Satellite Setting menu.
- Highlight the DiSEqC Command Mode option and use the ◀/▶ buttons to change the value to Installer and press the OK button.
- Highlight the Motor Control option and use the ◀/▶ buttons to change the value to reset and press the OK button.
- You will now see a warning message, press the OK button to continue. All motor positions of the pre-programmed satellites should now be correct. If you have any other make or model of DiSEqC 1.2 motor then you may need to store the satellite positions in yourself(Please refer to the user manual for your motor).
- Highlight the DiSEqC Command Mode option and use the ◀/▶ buttons to change the value to User and press the OK button.
- You should now be ready to start storing services for the various satellites(see 5 onwards).
4. Motor Limit Setting
Use this option to set the East and West limits of the motor. This should be used to prevent your dish from hitting anything that may be obstructing the path of the dish.
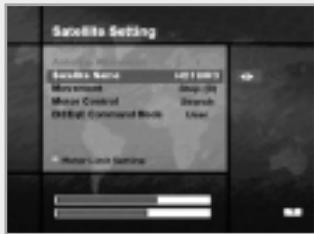
text_image
Satellite Setting Satellite Send 1011 0000 Microwave Step (3) Mount Control Search Default Command Mode Use • Mouse Lock Gamma- On the Main menu, select Service Searching option and press the OK button. You should now see the Service Searching menu.
- Select Manual Search option and press the OK button, you should now see the Manual Search menu.
- Highlight the Antenna Alternative option and press the OK button. You should now be in the Satellite Settings menu.
- Press the ⓘ button to access the Motor Limit Setting menu.
-
Highlight the Limit Setting option and use the ◀/▶ buttons to disable this. (Warning: When this option is disabled your motor will be able to move beyond any limits that have been stored - please take care in case there are anything obstructing the path of your dish.)
-
To set the East Limit:
a) Select Movement and use the ◀/▶ buttons to move your motor East or West until the motor is at the position you wish to use as your East Limit. Use the ◀/▶ buttons to stop the motor at the correct position.
b) Highlight the Store East Limit option and press the OK button to store the current position as your East Limit.
To set the West Limit:
a) Select Movement and use the ◀/▶ buttons to move your motor East or West until the motor is at the position you wish to use as your West Limit. Use the ◀/▶ buttons to stop the motor at the correct position.
b) Highlight the Store West Limit option and press the OK button to store the current position as your West Limit.
5. Manual Satellite Search
The purpose of this is to set the motor position for each satellite manually. This is useful if the satellite you require is not available from the pre-programmed list(see 3 above).
To do this, you must access the Satellite Settings menu. Do as follows;
- Select Service Searching from the main menu and press the OK button, to display the Service Searching menu.
- Select the Manual Search option and press the OK button, to display the Manual Search menu. Select the relevant Antenna Alternative that you are using for this satellite.
- Enter the Frequency, Polarisation, Symbol Rate and FEC of a transponder on the satellite you wish to find. This transponder information should be unique to this satellite.
- Select the Antenna Alternative option and press the OK button, to display the Satellite Settings menu.
- Highlight the option DiSEqC Command Mode and using the ◀/▶ buttons change this to Installer.
- Highlight the option Satellite name and use the ◀/▶ buttons to select the satellite you want to find, use others if the name of the satellite you want does not appear.
- When you have selected the satellite you wish to find, go down to the Movement option and again using the ◀/▶ buttons to start the motor moving.
- You should move the motor as far west as possible and the move it east so that you cover the complete movement range of the motor.
- During the move from west to east the Signal Quality bar should register a signal once. This is the position of the satellite. If there are two or more different positions which registers a signal, then you must choose another frequency that is unique to the satellite you want.
- Use the Signal and Strength Quality bar at the bottom of the screen to judge the best position of the dish.
- Use the ◀/▶ buttons to stop the motor when required.
- When you have the best position of the dish go to the Motor Control option and using the ◀/▶ buttons select store and press the OK button. The position of the satellite should now be stored.
- If you do not store this position, it will be lost when you exit the menu.
- Repeat the process for each satellite if required, remembering to use a different antenna alternative for each satellite.
6. Moving to a pre-set Satellite
Once you have stored the positions of the satellites you want(see left below) you can now search for the services transmitted from them. Before you can do this, you must move the motor to the position of the satellite you wish to search. To do this, you must access the Satellite Settings menu. Do as follows;
- Select Service Searching from the Main Menu and press the OK button, to display the Service Searching menu.
- Select the Manual Search option and press the OK button, to display the Manual Search menu.
- Select the Antenna Alternative option and press the OK button, to display the Satellite Settings menu.
- In the Satellite Settings menu ensure that you have DiSEqC Command Mode option set to User.
- Highlight the option Satellite Name and use the ▲/▼/◄/► buttons to select the satellite you want to view.
- When you have selected the satellite you wish to view, go down to the Motor Control option and again using the ◀/▶ buttons select go to and press the OK button.
- The motor will now move to the position of the selected satellite.
- The Movement option is used to fine-tune the position of the motor.
- When using the Movement option for fine-tuning, you must remember to store the changes you have made or else these will be lost.
7. Searching for services on your selected satellite
Once you have moved the motor into position, you can search for the channels transmitted from the relevant satellite. To search for services on your new selected satellite, Do as follows;
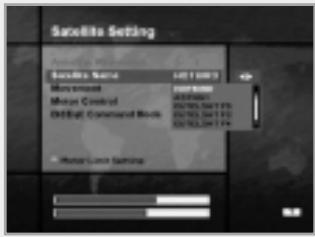
text_image
Satellite Setting Satellite Name Satellite Movie Control Measure Control Default Command Book Movie Control Satellite Name- Move the motor to the position of the satellite you wish to search. (see section 6 above)
- Select the service searching from the Main Menu and press the OK button. To display the Service Searching menu.
- Select the manual search option and press the OK button to display the Manual Search menu.
- Now enter the Frequency and Symbol Rate using the NUMERIC buttons(0\~9). Next enter the Polarisation and FEC values using the ◀/▶ buttons.
- When you have entered all these details in, press the OK button and the search will begin.
- When the search has finished, press the OK button to view.
- Repeat the process for all the transponders you want from this satellite.
8. Automatic Search
It is possible to use automatic search using the DiSEqC 1.2 motorised system.
- Ensure that the positions for the satellite you want to search is correct. (see Section 3 and 5 above)
- In the Main Menu, select the option channel searching and press the OK button.
- In the Service Searching menu, select the Antenna Alternative that you have set for this satellite.
- When you search new services, please refer to Automatic Search of page E36.
- When the search has finished, press the OK button to store and view the services.
Now that you have stored all the positions of the satellites and searched for all the services you want, you can now use your receiver as normal. When you change to a service that is being transmitted from a different satellite, you will have to wait a few seconds to allow the motor to move into position to receive the new service.
| Problem | Solution |
| About STB | |
| Does not display any message on the front panel or STB has no power. | Check the main power cable and check that it is plugged into a suitable power outlet.Check you have switch the STB main power switch ON at the rear of the STB.Check whether STB is in Standby mode. |
| No Picture | Ensure that the STB is switched on (see above).Check the video output port (SCART & RCA Jack) is firmly connected to the TV or VCR.If you are using the RF Output, check that the RF Lead is connected firmly to the STB and TV/VCR.Check that you have selected the correct channel or Video Output on your TV.If you are using the RF Output, check that you have correctly tuned the UHF channel of the STB or TV.Check the brightness level of the TV. |
| Poor picture quality | See “No Picture” above.Check the signal level, if this is low then try adjusting the alignment of your dish. |
| No Sound | See “No Picture” above.Check the volume level of the TV and STB.Check the Mute status of the TV and STB. |
| Remote Control does not operate | Point remote control directly towards the STB.Check and replace batteries. |
| On-Screen Error Messages | |
| No or Bad Signal | Check the LNB - replace LNB if necessary.Check the cable from the LNB.Check the position of the dish - realign dish if necessary.If you are using a DiSEqC 1.0 switch, check that you have connected the LNBs to the correct connections on the switch.Check the “Signal Level” and the “Signal Quality” in the Signal Status menu. |
| Service is not running or scrambled / No access to the service slot. | Check whether the Common Interface module and Smart card are correctly inserted.Check whether the Common Interface module and Smart card is appropriate for the selected service. |
| Please check the card / No right for this service / No smart card in slot and please insert your card (when using the CAM) | Check that the Smart card is inserted correctly.Check the Smart card is appropriate for the selected service.Check the subscription rights of the Smart card. |
| Time Display | |
| The front panel does not display the time. | Make sure you have switched on the STB.Switch the STB on and tune to a service to allow the STB to receive the time sent with the signal by the service provider.Front panel will only display the time in Standby mode. |
| Time displayed on the front panel is incorrect. | Adjust the time in the Time Settings menu. |
| Service Search | |
| “No Signal” in Manual Search | Check the “Signal Level” and the “Signal Quality” in the Signal Status menu.Check the LNB - replace LNB if necessary.Check the cable from the LNB.Check the position of the dish - realign dish if necessary.DiSEqC 1.0Check that you have connected the LNBs to the correct connections on the switch.Check that you have set the correct settings in the Antenna Setting menu.DiSEqC 1.2Check that you have selected this in the Antenna Setting menu.Check that the dish is aimed at the correct satellite. |
| Front Panel Error Messages | |
| E-dE: Incorrect data block(CRC-16) | Try switching STB power Off and On. |
| E-id E-nd: Invalid system ID | Check whether the system ID is different for Software and STB. |
| E-UE: UART RX/TX time out | Try switching STB power Off and On. |
- If you can't solve the problem even referring this Troubleshooting Guide, contact us via our homepage.
flowchart
graph TD
    A["MAIN MENU"] --> B["Select Service"]
    A --> C["TV Guide"]
    A --> D["Parental"]
    B --> E["Simple"]
    B --> F["Advanced"]
    F --> G["System Setting"]
    F --> H["Service Organising"]
    G --> I["Language Setting"]
    I --> J["Menu Language"]
    I --> K["Audio Language"]
    I --> L["Subtitle Language"]
    G --> M["Time Setting"]
    M --> N["Current Time"]
    M --> O["Timer"]
    M --> P["Timer Mode"]
    M --> Q["Wakeup Time"]
    M --> R["Wakeup Service No."]
    M --> S["Sleep Time"]
    H --> T["Organise TV Services"]
    H --> U["Organise Radio Services"]
    H --> V["Organise Networks"]
    H --> W["Delete Satellites"]
    G --> X["A/V Output Setting"]
    X --> Y["Video Output"]
    X --> Z["Audio Output"]
    X --> AA["Dolby Digital"]
    X --> AB["Screen Mode"]
    X --> AC["Display Format"]
    X --> AD["NTSC Mode"]
    G --> AE["UHF Tuning"]
    AE --> AF["Channel"]
    AE --> AG["PAL Standard"]
    AE --> AH["Offset"]
    G --> AI["Other Setting"]
    AI --> AJ["OSD Transparency"]
    AI --> AK["Info. Box Display Time"]
    AI --> AL["Menu Background"]
    AI --> AM["Changing to Reserved Service"]
    AI --> AN["Menu Mode"]
flowchart
graph TD
    A["Control"] --> B["Service Searching"]
    A --> C["Installation"]
    A --> D["Utility"]
    B --> E["Antenna Setting"]
    B --> F["Manual Search"]
    B --> G["Advanced Search"]
    B --> H["SMATV Search"]
    B --> I["Automatic Search"]

    C --> J["Antenna Alternative"]
    C --> K["Satellite Name"]
    C --> L["LNB Frequency"]
    C --> M["22KHz Tone"]
    C --> N["0/12Volt Switch"]
    C --> O["DiSEqC Input"]
    C --> P["Motorised System"]

    D --> Q["Status"]
    D --> R["Common Interface"]
    D --> S["Conditional Access"]

    Q --> T["STB Status"]
    Q --> U["Signal Detection"]
    Q --> V["STB Upgrade"]
    Q --> W["Note 1"]

    X["Standard Error"] --> Y["Frequency"]
    X --> Z["Polarisation"]
    X --> AA["Symbol Rate"]
    X --> AB["FEC"]
    X --> AC["Network Search"]
    X --> AD["Automatic Skip"]

    Y --> AE["Antenna Alternative"]
    Y --> AF["Frequency"]
    Y --> AG["Polarisation"]
    Y --> AH["Symbol Rate"]
    Y --> AI["FEC"]
    Y --> AJ["Video PID"]
    Y --> AK["Audio PID"]
    Y --> AL["PCR PID"]

    H --> AM["Automatic Search"]

    AN["Note 1 : Refer to the instructions on the appropriate menu."]
    AO["Note 2 : F1-5000, VA-5200 models are not applicable."]
    AP["Note 3 : Refer to the instructions on the appropriate menu."]
Tuner & Channel
| Input Connector | F-type, IEC 169-24, Female |
| Frequency Range | 950 - 2150 MHz |
| Input Impedance | 75Ω unbalanced |
| Signal Level | -25 to -65dBm |
| IF | 480 MHz |
| IF Band width | 36 MHz |
| LNB Power & Polarisation | Vertical : +13.5VHorizontal : +18VCurrent : 500mA Max. Overload Protection |
| 22 KHz Tone | Frequency : 22 ± 4KHz Amplitude : 0.6 ± 0.2V |
| 0/12V DC Output | Current Max. 50mA |
| DiSEqC Control | Version 1.0/1.2 Compatible |
| Demodulation | QPSK |
| Input Symbol Rate | 2-31 Ms/s |
| FEC Decode | Convolutional Code Rate 1/2, 2/3, 3/4, 5/6 and 7/8 with Constraint Length K=7 |
MPEG Transport Stream A/V Decoding
| Transport Stream | MPEG-2 ISO/IEC 13818Transport stream Specification |
| Profile Level | MPEG-2 MP@ML |
| Input Rate | 60 Mbit/s Max |
| Aspect Ratio | 4:3, 16:9 |
| Video Resolution | 720 x 576 |
| Audio Decoding | MPEG/MusiCam Layer I & II |
| Audio Mode | Single channel/Dual channel/Joint stereo/Stereo |
| Sampling | 32, 44.1 and 48KHz |
Memory
| Main Processor | TMIPS R3930(81MHz) | |
| Flash Memory | 2Mbyte | 3Mbyte(CAS Embedded) |
| Graphic(MPEG) & System DRAM | 4Mbyte | 4Mbyte(CAS Embedded) |
You can use a special antenna switch with DiSEqC commands.
When changing ASTRA1 to EUTELSAT for example, a DiSEqC command is sent with the 22KHz tone through the antenna cable. The antenna switch will change ASTRA1 to EUTELSAT. The concept of DiSEqC is a protective trademark of EUTELSAT.
Data rate decides the picture quality of digital TV programmes.
Data rate of about 5-6 Mbit/s coincides with the picture quality of a analog TV programme.
A/V & Data In/Out
| TV SCART | Video Output(CVBS, S-Video, RGB)Audio Output(Resolution : 20 bits DAC, Max. 2 Vrms) |
| VCR SCART | Video Output(CVBS)Video Input(CVBS, S-Video, RGB)Audio Output(Resolution : 20 bits DAC, Max. 2 Vrms(fixed)) |
| VIDEO | RCA/Cinch, Video Output(CVBS) |
| AUDIO R/L | RCA/Cinch Volume and Mute Control(Resolution : 20 bits DAC, Max. 2 Vrms) |
| S/PDIF | Digital Audio Output, Fiber-Optic(Resolution : 20 bits) |
| RS-232C | Transfer rate 115,200 bps, 9pin D-sub Type |
RF-Modulator
| RF-Connector | 75Ω, IEC 169-2, Male / Female |
| Frequency | 470 - 860 MHz |
| Output Channel | CH21-69, CH28-69 or CH13-62 for the Remodulator |
| TV Standard | PAL I/G/B/D/K selectable by Menu setting |
| Preset Channel | CH36(or TBD). Software changable by Menu |
Power Supply
| Input Voltage | 190 - 250V AC, 50/60 Hz |
| Type | SMPS |
| Power Consumption | Max. 35W |
| Standby Power | ≤ 11W |
| Protection | Separate internal fuse. The input shall have lightening Protection |
Physical Specification
| Size(W x H x D) | 370 x 60 x 280 mm(Excluding the Foot)Foot height is 8 mm |
| Weight(Net) | Around 2.8 kg |
| Operating Temp | 0°C to + 45°C |
| Storage Temp | -10°C to + 70°C |
| Storage Humidity | 5% ~ 95% RH(Non-Condensing) |
- Please note: The specification of the STB may be changed without notice in advance.