TL TNT S855 - TV EMTEC - Free user manual and instructions
Find the device manual for free TL TNT S855 EMTEC in PDF.
User questions about TL TNT S855 EMTEC
0 question about this device. Answer the ones you know or ask your own.
Ask a new question about this device
Download the instructions for your TV in PDF format for free! Find your manual TL TNT S855 - EMTEC and take your electronic device back in hand. On this page are published all the documents necessary for the use of your device. TL TNT S855 by EMTEC.
USER MANUAL TL TNT S855 EMTEC
natural_image
Black portable radio device with a large screen displaying a cloudy sky and speaker grille (no visible text or symbols on the device body)
user guide

(and other countries)
www.intuix.net

Service Hot line 0820 825 333*
Parts of the Handheld TV 11
Remote Control Operations 13
Remote Control Battery Installation 14
General Operating Instructions 14
Preparing the battery pack for use (Lithium battery) 15
Charging the lithium battery 17
Preparing the battery pack for use (Alkaline battery) 18
First Time to Setup 20
Basic Operation 21
Automatic Channel Searching Steps 25
Connection to TV Set 28
Trouble Shooting Q&A 29
Specification 29
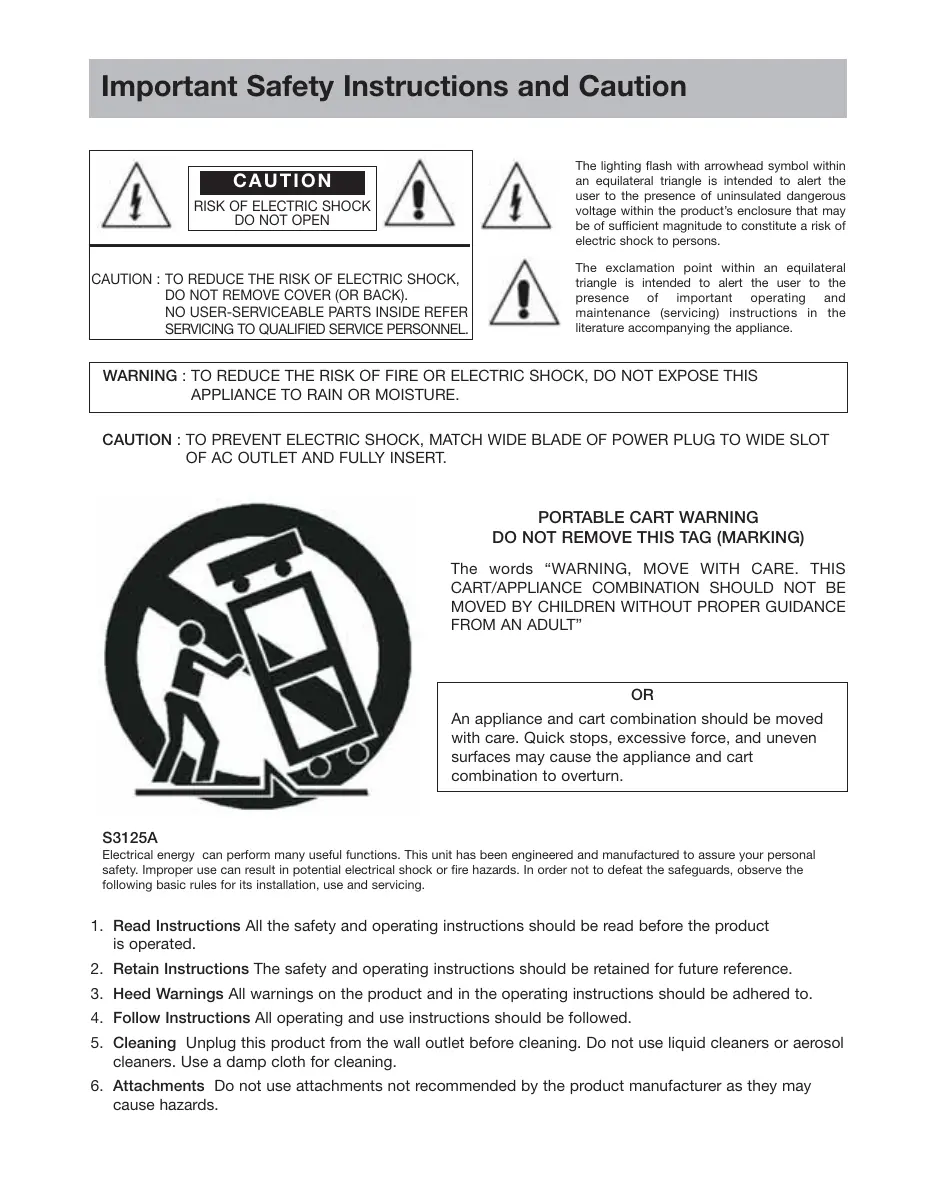
Important Safety Instructions and Caution

CAUTION
RISK OF ELECTRIC SHOCK DO NOT OPEN

CAUTION : TO REDUCE THE RISK OF ELECTRIC SHOCK, DO NOT REMOVE COVER (OR BACK). NO USER-SERVICEABLE PARTS INSIDE REFER SERVICING TO QUALIFIED SERVICE PERSONNEL.

The lighting flash with arrowhead symbol within an equilateral triangle is intended to alert the user to the presence of uninsulated dangerous voltage within the product's enclosure that may be of sufficient magnitude to constitute a risk of electric shock to persons.

The exclamation point within an equilateral triangle is intended to alert the user to the presence of important operating and maintenance (servicing) instructions in the literature accompanying the appliance.
WARNING : TO REDUCE THE RISK OF FIRE OR ELECTRIC SHOCK, DO NOT EXPOSE THIS APPLIANCE TO RAIN OR MOISTURE.
CAUTION : TO PREVENT ELECTRIC SHOCK, MATCH WIDE BLADE OF POWER PLUG TO WIDE SLOT OF AC OUTLET AND FULLY INSERT.

natural_image
Symbolic illustration of a person pushing a large cart with a ramp, enclosed in a circular frame (no text or symbols)PORTABLE CART WARNING DO NOT REMOVE THIS TAG (MARKING)
The words “WARNING, MOVE WITH CARE. THIS CART/APPLIANCE COMBINATION SHOULD NOT BE MOVED BY CHILDREN WITHOUT PROPER GUIDANCE FROM AN ADULT”
OR
An appliance and cart combination should be moved with care. Quick stops, excessive force, and uneven surfaces may cause the appliance and cart combination to overturn.
S3125A
Electrical energy can perform many useful functions. This unit has been engineered and manufactured to assure your personal safety. Improper use can result in potential electrical shock or fire hazards. In order not to defeat the safeguards, observe the following basic rules for its installation, use and servicing.
- Read Instructions All the safety and operating instructions should be read before the product is operated.
- Retain Instructions The safety and operating instructions should be retained for future reference.
- Heed Warnings All warnings on the product and in the operating instructions should be adhered to.
- Follow Instructions All operating and use instructions should be followed.
- Cleaning Unplug this product from the wall outlet before cleaning. Do not use liquid cleaners or aerosol cleaners. Use a damp cloth for cleaning.
-
Attachments Do not use attachments not recommended by the product manufacturer as they may cause hazards.
-
Water and Moisture Do not use this product near water-for example, near a bath tub, wash bowl, kitchen sink, or laundry tub, in a wet basement, or near a swimming pool, and the like.
- Accessories Do not place this product on an unstable cart, stand, tripod, bracket, or table. The product may fall, causing serious injury to a child or adult, and serious damage to the product. Use only with a cart, stand, tripod, bracket, or table recommended by the manufacturer, or sold with the product. Any mounting of the product should follow the manufacturer's instructions, and should use a mounting accessory recommended by the manufacturer.
- Carts and Stands The product should be used only with a cart or stand that is recommended by the manufacturer.
9A. A product and cart combination should be moved with care. Quick stops, excessive force, and uneven surfaces may cause the product and cart combination to overturn. - Ventilation Slots and openings in the cabinet are provided for ventilation and to ensure reliable operation of the product and to protect it from overheating, and these openings must not be blocked or covered. The openings should never be blocked by placing the product on a bed, sofa, rug, or other similar surface. This product should not be placed in a built-in installation such as a bookcase or rack unless proper ventilation is provided or the manufacturer's instructions have been adhered to.
- Power Sources This product should be operated only from the type of power source indicated on the marking label. If you are not sure of the type of power supply to your home, consult your product dealer or local power company. For products intended to operate from battery power, or other sources, refer to the operating instructions.
- Grounding or Polarization This product may be equipped with a polarized alternating-current line plug (a plug having one blade wider than the other). This plug will fit into the power outlet only one way. This is a safety feature. If you are unable to insert the plug fully into the outlet, try reversing the plug. If the plug should still fail to fit, contact your electrician to replace your obsolete outlet. Do not defeat the safety purpose of the polarized plug.
Alternate Warnings This product is equipped with a three-wire grounding-type plug, a plug having a third (grounding) pin. This plug will only fit into a grounding-type power outlet. This is a safety feature. If you are unable to insert the plug into the outlet, contact your electrician to replace your obsolete outlet. Do not defeat the safety purpose of the grounding-type plug.
- Power-Cord Protection Power-supply cords should be routed so that they are not likely to be walked on or pinched by items placed upon or against them, paying particular attention to cords at plugs, convenience receptacles, and the point where they exit from the product.
- Protective Attachment Plug The product is equipped with an attachment plug having overload protection. This is a safety feature. See Instruction Manual for replacement or resetting of protective device. If replacement of the plug is required, be sure the service technician has used a replacement plug specified by the manufacturer that has the same overload protection as the original plug.
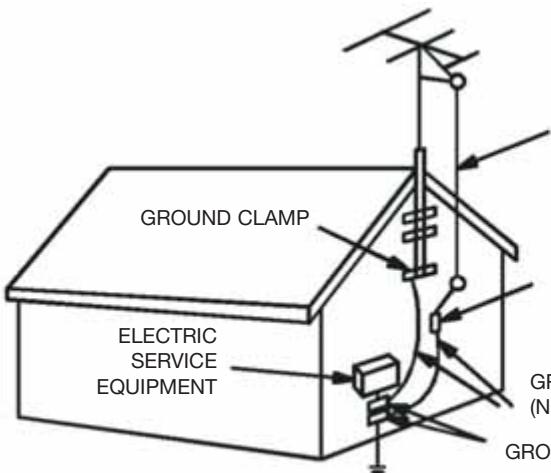
- Outdoor Antenna Grounding If an outside antenna or cable system is connected to the product, be sure the antenna or cable system is grounded so as to provide some protection against voltage surges and built up static charges. Article 810 of the National Electrical Code, ANSI/NFPA 70, provides information with regard to proper grounding of the mast and supporting structure, grounding of the lead-in wire to an antenna discharge unit, size of grounding conductors, location of antenna-discharge unit, connection to grounding electrodes, and requirements for the grounding electrode.
See Figure 131.1.
- Lightning For added protection for this product during a lightning storm, or when it is left unattended and unused for long periods of time, unplug it from the wall outlet and disconnect the antenna or cable system. This will prevent damage to the product due to lightning and power-line surges.
- Power Lines An outside antenna system should not be located in the vicinity of overhead power lines or other electric light or power circuits, or where it can fall into such power lines or circuits. When installing an outside antenna system, extreme care should be taken to keep from touching such power lines or circuits as contact with them might be fatal.
- Overloading Do not overload wall outlets, extension cords, or integral convenience receptacles as this can result in a risk of fire or electric shock.
-
Object and Liquid Entry Never push objects of any kind into this product through openings as they may touch dangerous voltage points or short-out parts that could result in a fire or electric shock. Never spill liquid of any kind on the product.
-
Servicing Do not attempt to service this product yourself as opening or removing covers may expose you to dangerous voltage or other hazards. Refer all servicing to qualified service personnel.
- Damage Requiring Service Unplug this product from the wall outlet and refer servicing to qualified service personnel under the following conditions:
a) When the power-supply cord or plug is damaged,
b) If liquid has been spilled, or objects have fallen into the product,
c) If the product has been exposed to rain or water,
d) If the product does not operate normally by following the operating instructions. Adjust only those controls that are covered by the operating instructions as an improper adjustment of other controls may result in damage and will often require extensive work by a qualified technician to restore the product to its normal operation,
e) If the product has been dropped or damaged in any way, and
f) When the product exhibits a distinct change in performance this indicates a need for service.
- Replacement Parts When replacement parts are required, be sure the service technician has used replacement parts specified by the manufacturer or have the same characteristics as the original part. Unauthorized substitutions may result in fire, electric shock, or other hazards.
- Safety Check Upon completion of any service or repairs to this product, ask the service technician to perform safety checks to determine that the product is in proper operating condition.
- Wall or Ceiling Mounting The product should be mounted to a wall or ceiling only as recommended by the manufacturer.
- Heat The product should be situated away from heat sources such as radiators, heat registers, stoves, or other products (including amplifiers) that produce heat.
Figure 131.1
Example of antenna grounding as per National Electrical Code, ANSI/NFPA 70
text_image
GROUND CLAMP ELECTRIC SERVICE EQUIPMENT GF (N) GROANTENNA LEAD
IN WIRE
ANTENNA
DISCHARGE UNIT
(NEC SECTION 810-20)
GROUNDING CONDUCTORS (NEC SECTION 810-21)
GROUND CLAMPS
NEC - NATIONAL ELECTRICAL CODE
S2898A
POWER SERVICE GROUNDING
ELECTRODE SYSTEM
(NEC ART 250, PART H)
Precautions
On Safety
- Do not use wet hands to pull out the plug. It may cause electrical shock.
- If the player does not work, please pull out the plug for safety. Contact us for further technical support.
- Before moving the player, please make sure the power adapter is disconnected from the wall outlet.
- Do not move the player when playing. It may cause a fire or electrical shock.
- Should any solid object or liquid fall into the cabinet, unplug the player and have it checked by qualified personnel before operating it any further.
- If you are not going to use the player for a long while, be sure to disconnect the player from the wall outlet. To disconnect the power adapter, grasp the plug itself; never pull the cord.
On Placement
- Please keep a sufficient distance between the player and a radio set. A sufficient distance is also needed between the player and any other devices with electromagnetic field.
- Please place the player in a location with adequate ventilation to prevent heat build-up in the player.
- Do not place the player on a soft surface such as a rug that might block the ventilation holes on the bottom.
- Do not place the player in a location near heat sources, or in places subject to direct sunlight, excessive dust, or mechanical shock.
- Do not place the player in a location exposed to cool air. Condensation may occur and cause the player work incorrectly.
On Operation
- The player may not work because of improper operation. The limited warranty does not cover consequent losses that rise from improper usage.
- Turn off the player when you are watching regular TV program. It may cause a picture distortion.
- The player will not work correctly when affected by exterior elements such as static electricity. In such cases, pull out the power adapter and plug it back to the outlet again.
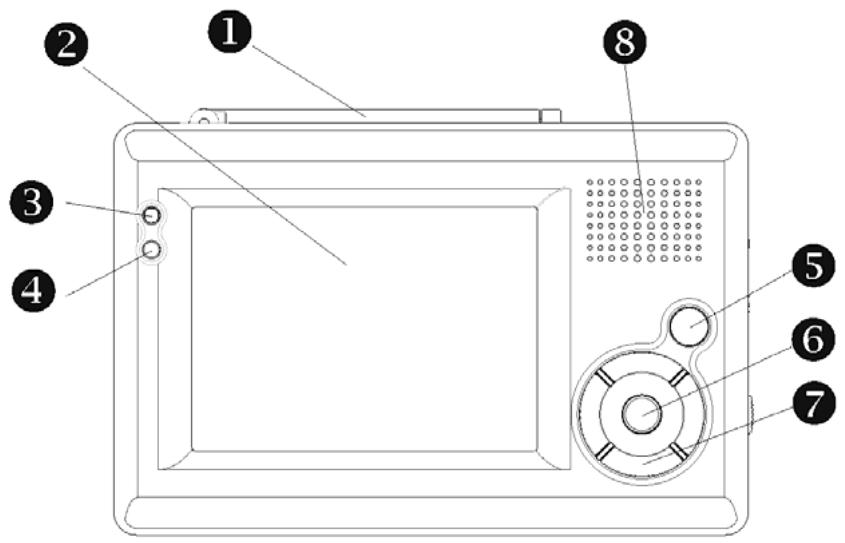
Parts of the Handheld TV
text_image
Labeled diagram of a digital microwave oven with numbered components for identification1 Antenna
2 LCD panel
3 Power LED
When the unit operates, the LED will glow green.
4 Infrared remote sensor
Allow remote controller to navigate this unit.
5 Menu/Exit button
6 OK/Mute button
7 Multi selector (CH+(▲)/CH-(▼)/VOL+(▶)/VOL-(◀)
8 Speaker
5 6 7 : Please refer to the page 19 for more detailed description.
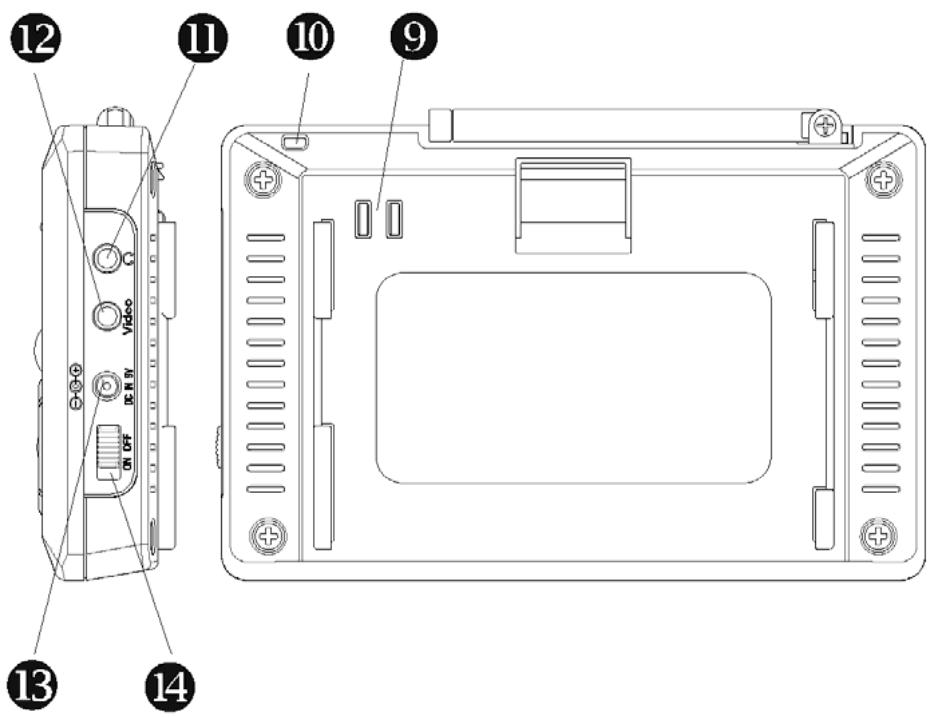
Parts of the Handheld TV
text_image
12 11 10 9 13 149 Battery connector
10 Eyelet for TV strap
11 Earphone/Audio out connector
Output the stereo audio signal
12 Video out connector
Output the stereo video signal
13 DC power connector
Connect with the AC/DC power adapter or the car cigarette lighter power adapter
14 Power on/off switch
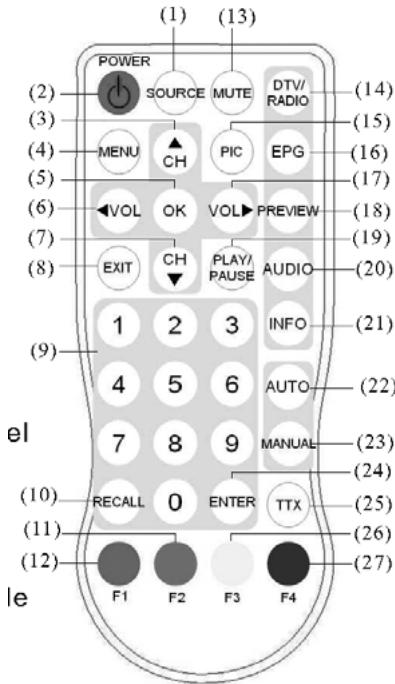
Remote Control Operations
(1) SOURCE: no function
(2) POWER: power-on/stand-by selection
(3) Channel selection up or move the cursor up
(4) MENU: enter the setup menu
(5) OK: select the highlight item
(6) Volume down or move the cursor left
(7) Channel selection down or move the cursor down
(8) EXIT: exit the current setup
(9) Digital keys
(10) RECALL: return to the last selected channel
(11) Red button : sub-title key in the normal operation mode or a hot key to go to the browsed Teletextpages in teletext mode
(12) Green button : a hot key to go to the browsed Teletext pages in the teletext mode
(13) MUTE: mute control
(14) DTV/Radio selection
(15) PIC: no function
(16) EPG: electronic program guide
(17) Volume up or move the cursor right
(18) PREVIEW: preview selected programs
(19) PLAY/PAUSE selection
(20) AUDIO: second language, and stereo selection
(21) INFO: DTV system information
(22) AUTO: automatic channel scanning
(23) MANUAL: manually select channels
(24) ENTER: enter the selected channel no.
(25) TTX: Teletext key to display Teletext (has to be supported by broadcaster)
(26) Yellow button : page up in the EPG mode or a hot key to go to the browsed Teletext pages in the teletext mode
(27) Blue button: page down in the EPG mode or a hot key to go to the browsed Teletext pages in the teletext mode
text_image
(1) (13) POWER SOURCE MUTE DTV/ RADIO (2) (3) MENU CH PIC EPG (4) (5) VOL OK VOL PREVIEW (6) (7) EXIT CH PLAY/ PAUSE AUDIO (8) (9) 1 2 3 INFO 4 5 6 AUTO 7 8 9 MANUAL (10) RECALL 0 ENTER TTX (11) (12) F1 F2 F3 F4 el (27)Remote Control Battery Installation
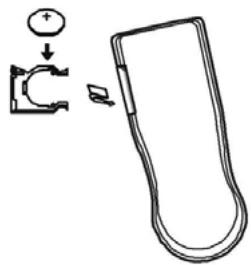
Before attempting to operate your remote control, install the battery as described below.
(1) Turn the remote control face down
(2) Press down on the ridged area of the battery cover and slide it off.
(3) Slide another battery in.
text_image
Diagram showing a mechanical or electrical component with an arrow indicating direction and polarity, alongside a schematic view of the component.General Operating Instructions
Turning the unit ON or OFF

text_image
Diagram showing a hand pressing a button on a device panel with directional arrows indicating movement or force.- To turn on the system, slide the Power switch on the top side of the unit to the position labeled "ON".
- To turn off the system, slide the Power switch on the top side of the unit to the position labeled "OFF".
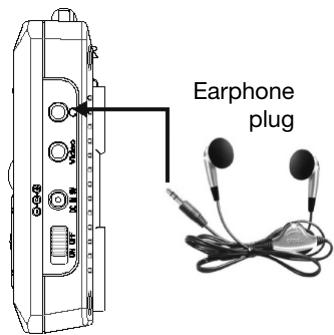
Connecting the earphone
text_image
Earphone plug- Insert the earphone plug into the “jack on the side of the unit.
Preparing the battery pack for use (Lithium battery)
- The handheld DTV with a battery pack to allow play back without any AC power adapter.
- Make sure the lithium battery pack is properly attached to the unit and fully charged when use.
Attaching the battery pack :
(1) Matching the battery pack into the back of thr handheld DTV.
(2) Press the battery pack downward until the battery pack locks onto the handheld DTV.
Detaching the battery pack :
- Detach the battery pack from the unit if you will be storing the unit for an extended period of time.
- Ensure the unit is turned off before detaching the battery pack
- Detaching the battery pack from the unit as below steps.
(1) Press the battery locker on the back of the unit.
(2) Push out the battery pack upward until the battery pack unlock onto the unit.
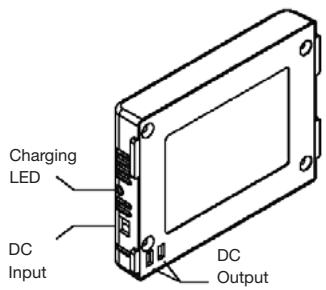
text_image
Charging LED DC Input DC Output
natural_image
Hand inserting a component into an electronic device (no text or symbols visible)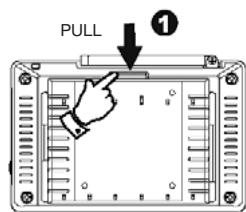
text_image
PULL ①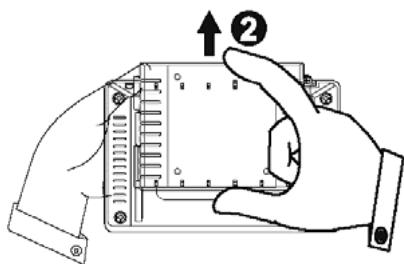
natural_image
Illustration of a hand holding a device with an arrow and numbered label (no text or symbols on the device itself)IMPORTANT
The Handheld DTV will turn off automatically when the battery is getting low. In this time, according to the correct method to recharge your battery pack.
- Charge your battery pack for a minimum of 4 hours to get fully charged.
- When the battery pack is being charged, the LED will glow red.
- After successfully charging the battery pack, the LED will glow green.
- Please un-pack the battery when the battery is not working.
- The average lifetime of the lithium rechargeable battery is about 300 recharging cycles. After this many recharges, please consider replacing the battery.
WARNING
- Do not disassemble, crush, puncture, or short external connectors contact.
- Use only with specified charger and players.
- Do not expose to high temperature above 50^(122^) !Stove between 20^(4^) and 35^(95^)
Charging the lithium battery
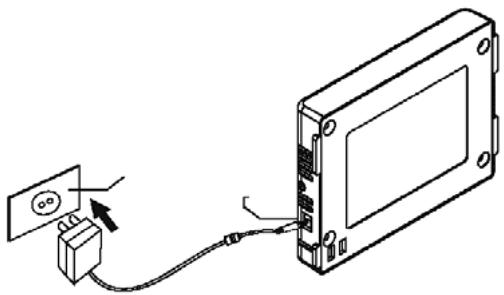
Charge the battery pack alone :
(1) Connect the large power adaptor head firmly into wall AC Outlet and firmly into charging Input socket of the side of battery pack with the smaller plug of the adaptor.
(2) Leave the battery pack alone to charge 4 hour
natural_image
Diagram of a device showing an electrical outlet connected to a rectangular panel with cable (no text or symbols present)Use Handheld TV and charges Battery pack simultaneously :
(1) Attach the battery pack of the back of the unit and connect the large power adaptor head firmly into wall AC Outlet and firmly into charging Input socket on the side of battery pack with the smaller plug of the adaptor.
(2) Turn power switch of the unit To “ON”, to use handheld TV and charge battery pack simultaneously.
(3) For faster charge, turn handheld TV power switch of the unit ‘OFF’

text_image
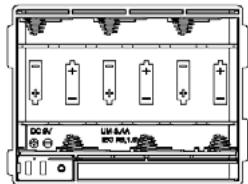
Diagram showing connection between a device and an electrical outlet with labeled components and wiringPreparing the battery pack for use (Alkaline battery)
- The handheld DTV with a battery pack to allow-play back without any AC power adapter.
- Make sure the alkaline battery pack is properly attached to the unit and fully charged when use.
Attaching the battery pack :
(1) According to the diagram, notice the battery concerning the plus and minus sign.
(2)According to the following diagram, insert the alkaline battery (AAx6 PCS) in the battery pack.
(3) Matching the battery pack downward until the battery pack locks onto the Handheld DTV.
(4)Press the battery pack downward until the battery pack locks onto the Handheld DTV.
text_image
DC/DC LM 6.5A IECs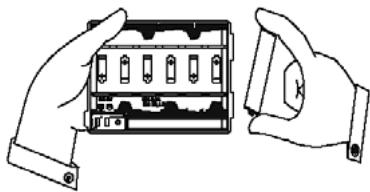
natural_image
Illustration of two hands holding a device with multiple ports and a close-up view (no text or symbols)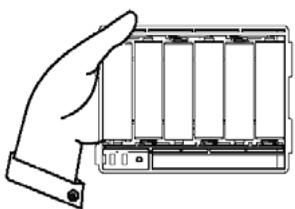
natural_image
Line drawing of a hand holding a battery pack (no text or symbols)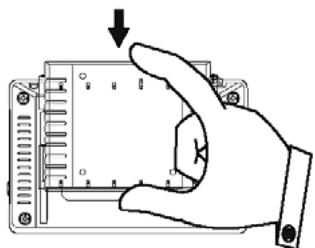
natural_image
Hand inserting a component into an electronic device (no text or symbols visible)Basic Operations
This section details the basic TV operations.
KEY FUNCTION
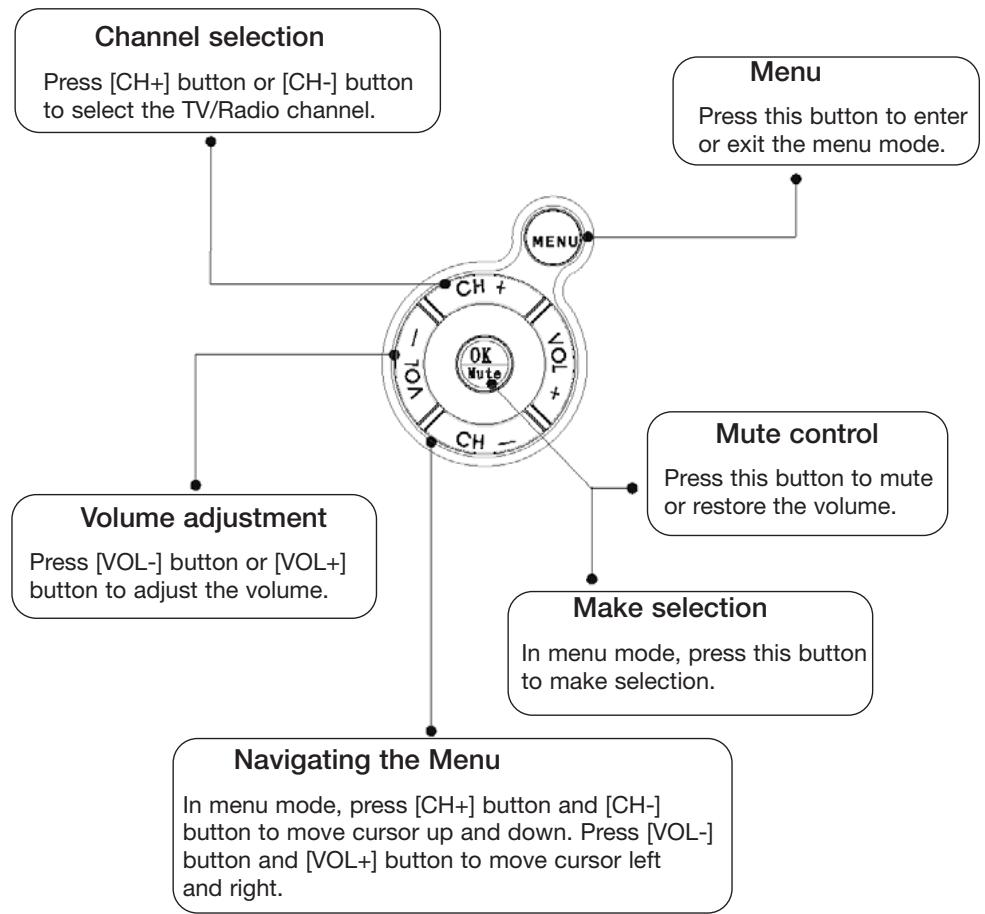
flowchart
graph TD
    A["Channel selection\nPress [CH+"] button_or["CH-"] button to select the TV/Radio channel.] --> B["Menu\nPress this button to enter or exit the menu mode."]
    A --> C["Volume adjustment\nPress [VOL-"] button_or["VOL+"] button to adjust the volume.]
    A --> D["Make selection\nIn menu mode, press this button to make selection."]
    A --> E["Navigating the Menu\nIn menu mode, press [CH+"] button_and["CH-"] button to move cursor up and down. Press["VOL-"] button_and["VOL+"] button to move cursor left and right.]
    B --> F["Ch + VOL + Mute"]
    C --> G["CH - VOL + Mute"]
    D --> H["CH - VOL + Mute"]
MENU
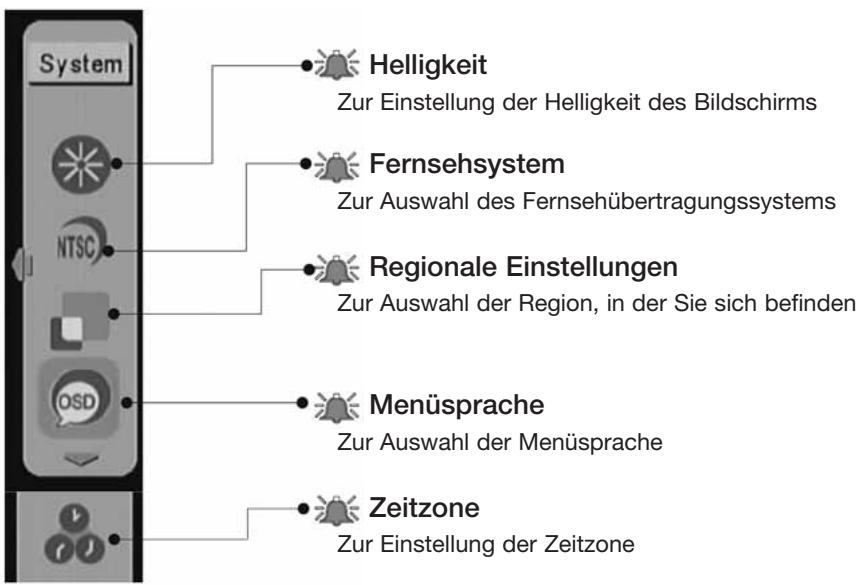
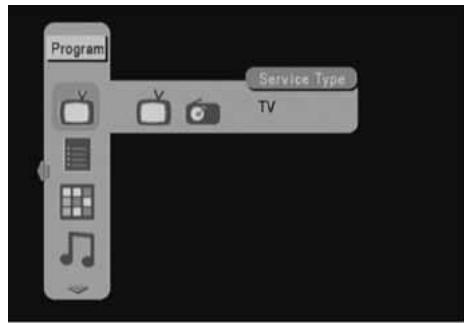
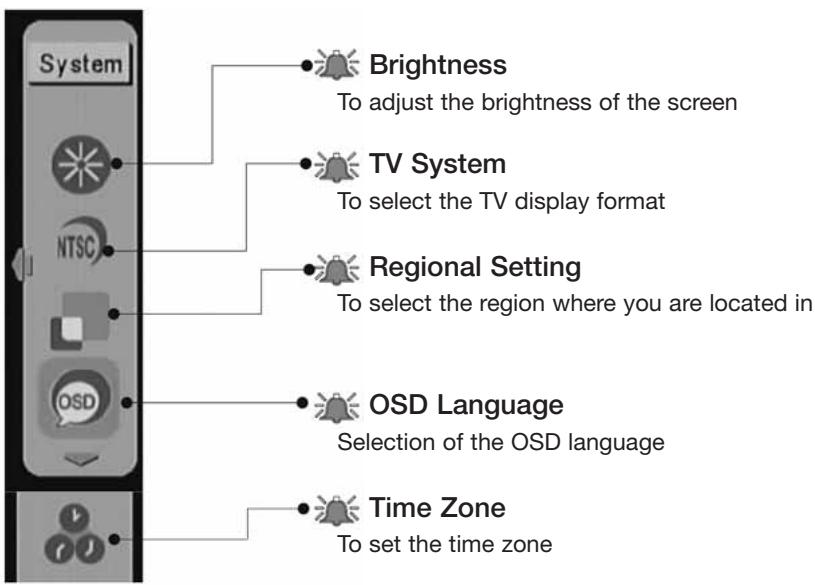
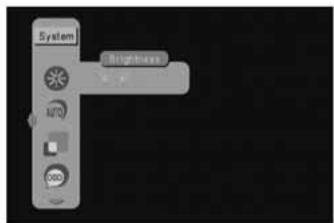
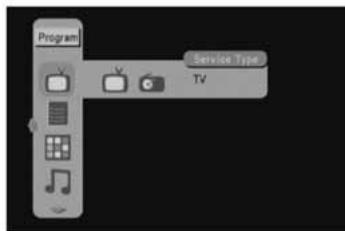
There are two pages of the menu, including program and system. You can use [VOL-] button to select each page. In the program page of the menu, you can highlight the service type, program list, preview, audio channel, subtitle language, program info, automatic search, or manual search to perform TV program related operation. And in the system page of the menu, you can highlight the brightness, TV system, regional setting, osd language, time zone to adjust the system setting. You can use [CH+] button and [CH-] button to highlight the item and press [VOL+] button and [VOL-] button to select your choice and then press [OK] button to set the setting.
text_image
Program Service Type TV
text_image
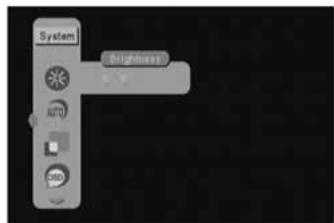
System Brightness AUTO OBOSYSTEM PAGE
text_image
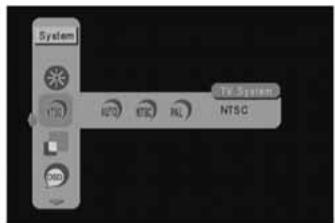
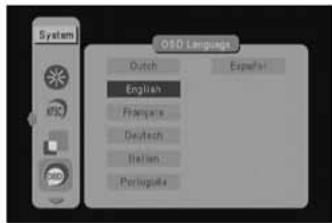
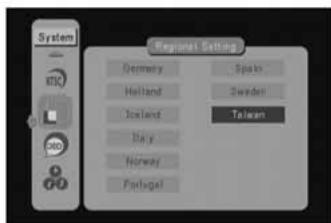
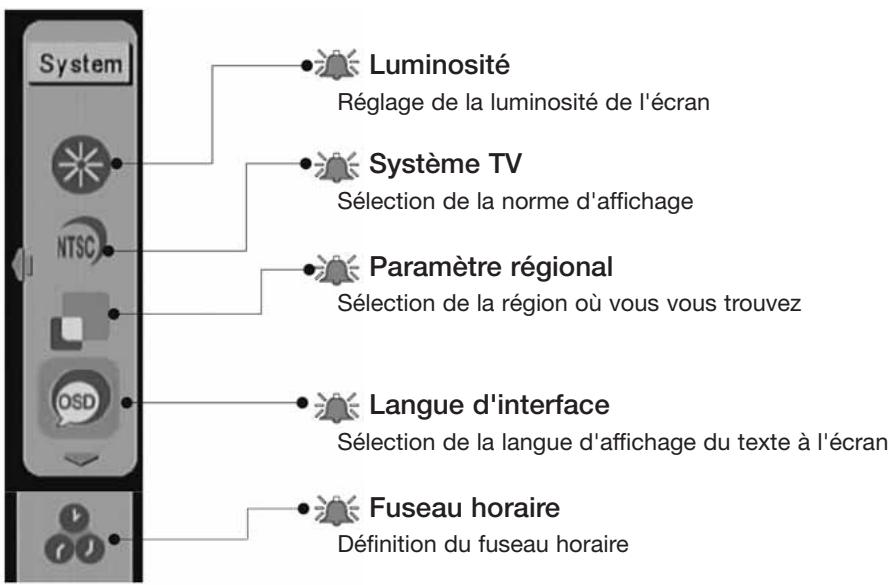
System Brightness To adjust the brightness of the screen TV System To select the TV display format Regional Setting To select the region where you are located in OSD Language Selection of the OSD language Time Zone To set the time zonePROGRAM PAGE
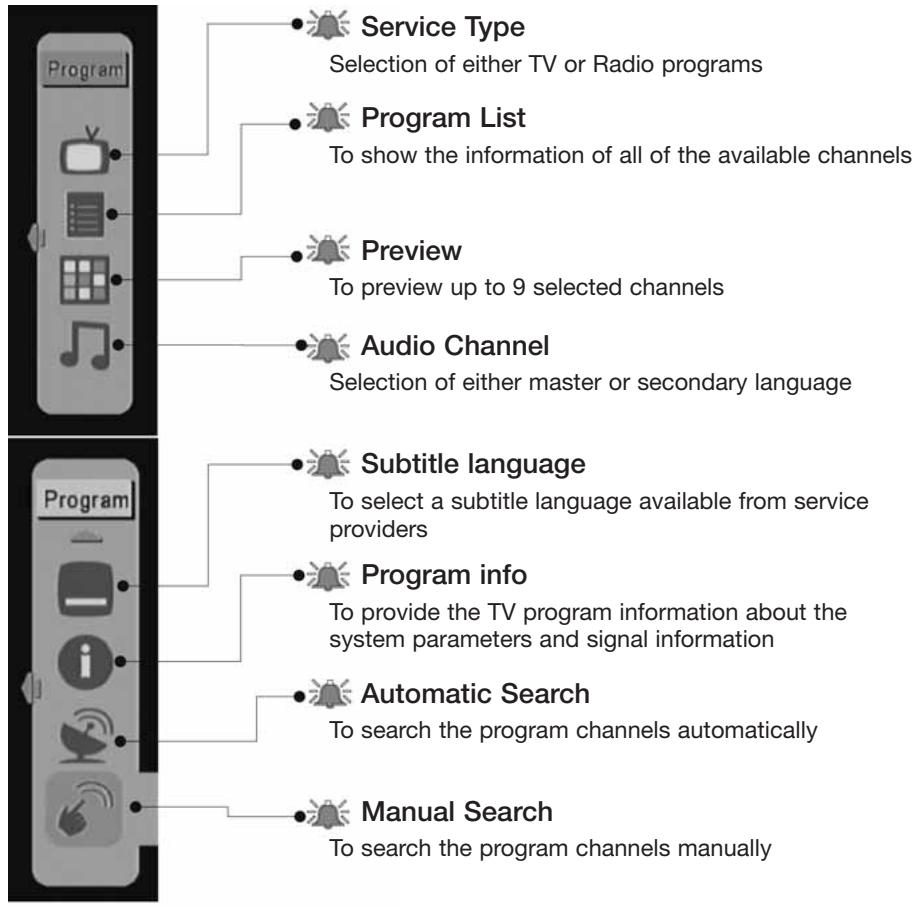
flowchart
graph TD
    A["Program"] --> B["Service Type"]
    A --> C["Program List"]
    A --> D["Preview"]
    A --> E["Audio Channel"]
    A --> F["Subtitle language"]
    A --> G["Program info"]
    A --> H["Automatic Search"]
    A --> I["Manual Search"]
    B --> J["Selection of either TV or Radio programs"]
    C --> K["To show the information of all of the available channels"]
    D --> L["To preview up to 9 selected channels"]
    E --> M["Selection of either master or secondary language"]
    F --> N["To select a subtitle language available from service providers"]
    G --> O["To provide the TV program information about the system parameters and signal information"]
    H --> P["To search the program channels automatically"]
    I --> Q["To search the program channels manually"]
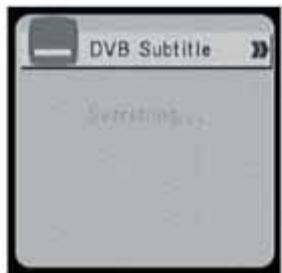
DVD SUBTITLE
If the system operator provides multi-language subtitle. You can use [CH+] button and [CH-] button to select language and press [OK] button.
text_image
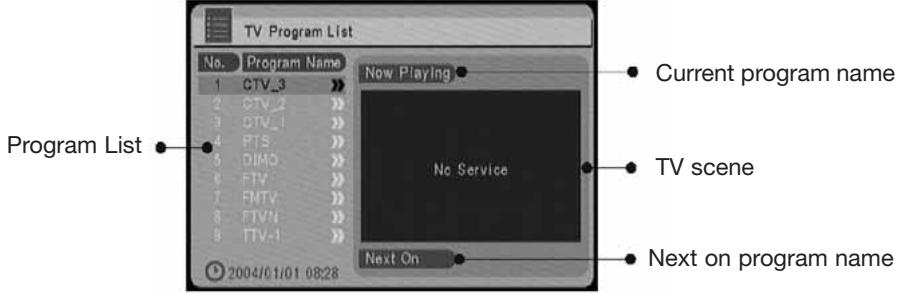
DVB Subtitle Svccr10000PROGRAM LIST (EPG, Electronic Program Guide)
It shows the information of all of the available channels. You can use [CH+] button and [CH-] button to choose any channel, while [VOL-] button and [VOL+] button are the keys to show the details of the channel.
text_image
TV Program List No. Program Name Now Playing 1 CTV_3 - 2 CTV_2 - 3 CTV_1 - 4 PTS - 5 DIMO - 6 FTV - 7 FMTV - 8 FTVN - 9 FTV-1 - 2004/01/01 08:28 Program List Current program name No Service TV scene Next on program namePREVIEW
Preview up to 9 selected channels.
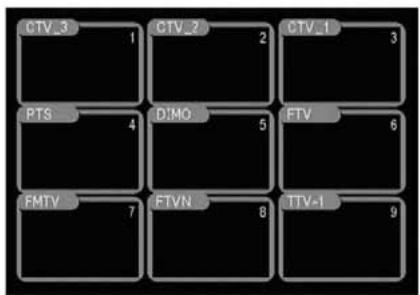
flowchart
graph TD
    A["CTV_3"] --> B["1"]
    C["CTV_2"] --> D["2"]
    E["CTV_1"] --> F["3"]
    G["PTS"] --> H["4"]
    I["D:MO"] --> J["5"]
    K["FTV"] --> L["6"]
    M["FMTV"] --> N["7"]
    O["FTVN"] --> P["8"]
    Q["TTV-1"] --> R["9"]
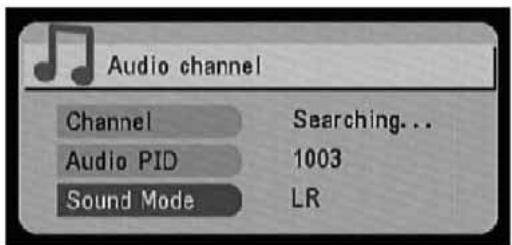
AUDIO
Master/secondary language selection. You can use [VOL-] button and [VOL+] button to select the language you like to listen.
text_image
Audio channel Channel Searching... Audio PID 1003 Sound Mode LRMANUAL SEARCH
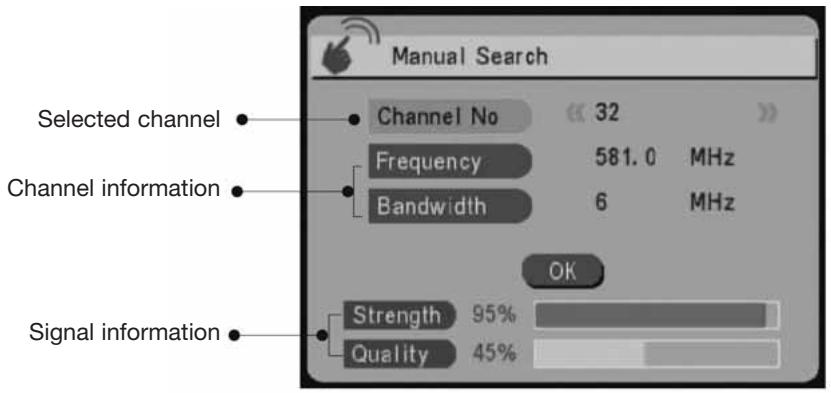
You can use [VOL-] button and [VOL+] button to select the desired channel and press [OK] button to perform program searching. The found programs will be appended to the program list.
text_image
Manual Search Selected channel Channel No 32 Frequency 581.0 MHz Bandwidth 6 MHz OK Channel information Signal information Strength 95% Quality 45%PROGRAM INFORMATION
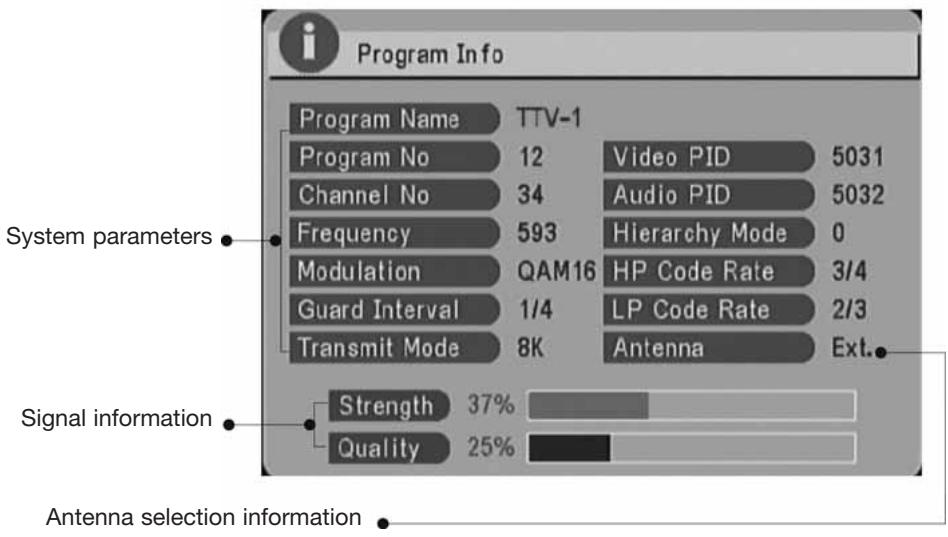
It provides you the TV program information about the system parameters and signal information. Press [MENU] button to exit the screen.
text_image
Program Info Program Name TTV-1 Program No 12 Video PID 5031 Channel No 34 Audio PID 5032 Frequency 593 Hierarchy Mode 0 Modulation QAM16 HP Code Rate 3/4 Guard Interval 1/4 LP Code Rate 2/3 Transmit Mode 8K Antenna Ext. System parameters Signal information Strength 37% Quality 25% Antenna selection informationAutomatic Channel Searching Steps
When you move to a new region that the system provider is different from the one before, you need to re-search the program channel. Please follow the following steps to do the channel searching.

text_image
1 MENU CH OK Muto / 10 L VOL + CH - Press the "MENU" button to enter the menu screen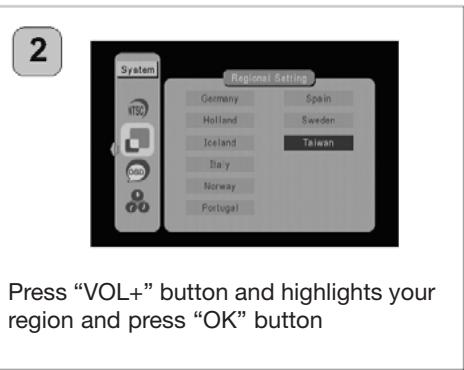
text_image
2 System NTSC Regional Setting Germany Holland Iceland Italy Norway Portugal Spain Sweden Taiwan Press "VOL+" button and highlights your region and press "OK" button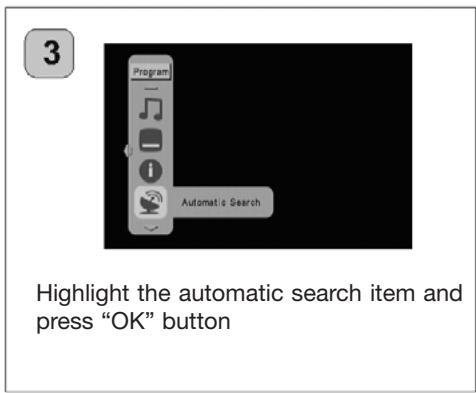
text_image
3 Program Automatic Search Highlight the automatic search item and press "OK" button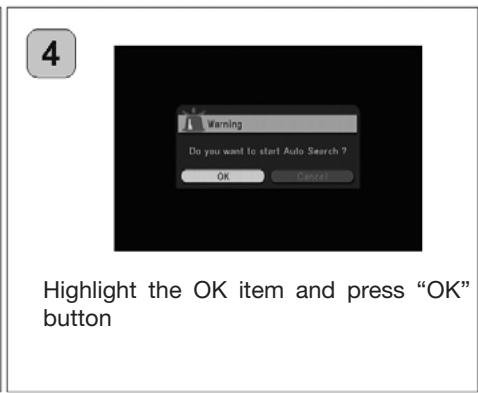
text_image
4 Warning Do you want to start Auto Search ? OK Cancel Highlight the OK item and press "OK" button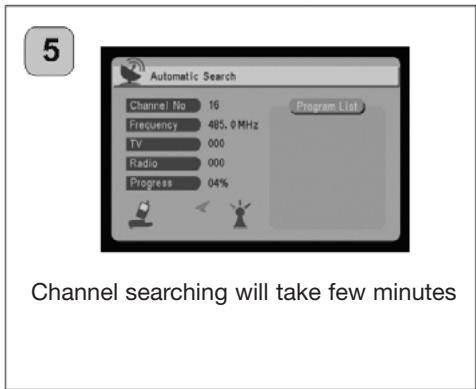
text_image
Automatic Search Channel No 16 Frequency 485.0 MHz TV 000 Radio 000 Progress 04% Program List Channel searching will take few minutes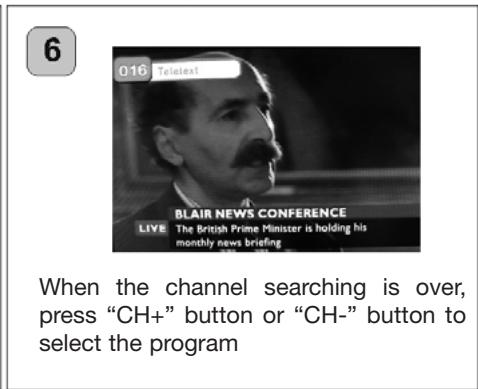
text_image
6 016 Telelext BLAIR NEWS CONFERENCE LIVE The British Prime Minister is holding his monthly news briefing When the channel searching is over, press "CH+" button or "CH-" button to select the programFirst Time to Setup
When the first time this unit is turned on, please follow the following steps to finish the initialization.

text_image
System Auto Audio ControlPress [MENU] button firts and then press [VOL-] button to enter the menu for system configuration selection

text_image
System 自动诊断仪 M20 1000Press [VOL+] button to adjust the brightness level of the display and press [OK] button

text_image
System NTSC ESC RL NTSC TV SystemPress [VOL+] button and highlight your TV system output and press [OK]button

text_image
System OTC Language Outch English French German Italian Portugal SpanishPress [VOL+] button and highlight your OSD language and press [OK] button

text_image
Regional Settings Germany Holland Iceland Italy Norway Portugal Slovakia Sweden TaiwanPress [VOL+] button and highlight your region and press [OK] button


text_image
System NTC 0.00 Time Zone GMT + 08:00Time will automatically set by your region. If you need to correct it, press [CH+] button or [CH-] button to adjust the time.
7
text_image
Program Service Type TVBack to the top of the menu and press [VOL-] button to enter program menu screen.
8

text_image
Program Automatic SearchHighlight the automatic search item ans press [OK] button.
9
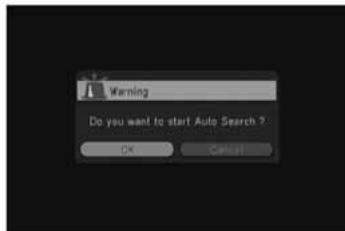
text_image
Warning Do you want to start Auto Search ? OK CancelChannel searching will take a few minutes.
11

text_image
016 Tel:Text BLAIR NEWS CONFERENCE LIVE The British Prime Minister is holding his monthly news briefingWhen the channel seraching is over, press [CH+] button or [CH-] button to select the program.
12
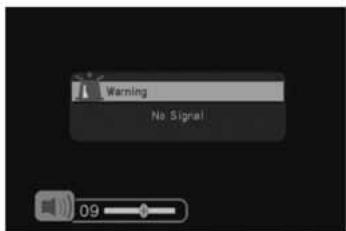
text_image
Warning No Signal 09You could press [VOL+] button or [VOL-] button to adjust the volume.
Connection to TV Set
When you want to connect the unit to a television, please refer to the manual of the equipment to be connected as well. Before connecting the Handheld DTV to other equipments, please turn power off and unplug all equipments from the wall outlet.
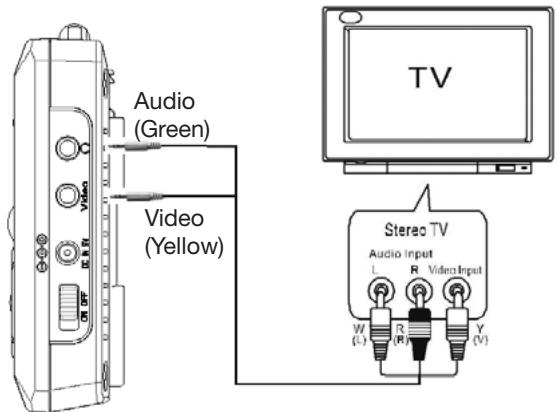
text_image
Audio (Green) Video (Yellow) TV Stereo TV Audio Input L R Video Input W R Y (L) (R) (V)Trouble shooting Q&A
Before requesting service for this unit, check the table for a possible cause of the problem. You are may eliminate problems and restore the proper operation after you check out the following table and do some minor adjustment on your part.
Trouble shooting Q&A
| ProblemNo picture, no audio | Possible ReasonThe battery power is too low.Power cord is not properly hooked up.The unit is not powered on. | SolutionRecharge the battery power.Check the power cord connection.Slide the “ POWER SWITCH” to “ON” position. |
| The number of channelsis not as manyas we expected | Signal Quality Level of certain TVchannels is too low.Certain TV channels are notprovided locally. | Please perform “Auto search” or “Manual DVB-search” function to re-scan all of the channels.Please use external antenna instead of thebuilt-in antenna to increase the sensitivity.No way to watch these channels. |
| All of the channels show“No Signal” ormosaic tiles appearon the display | Signal Quality Level of certainTV channels is too low.Wrong antenna is used.No DVB-T service is provided in the area. | Please use external antenna instead of thebuilt-in antenna to increase the sensitivity.Please use the antenna in the product package.No way to watch these channels. |
| Video is good, but no audio | The voice volume is turned too low.The audio is muted. | Click the “ VOL + “ button to raise the volume.Click the “ MUTE “ button to disable the mutefunction. |
| Remote control does not work | No power. | Check the battery of the remote controller. |
Specifications
| Display | 3.5” COLOR TFT-LCD with 480(W)x234(H) resolution Brightness: 230 nits; Contrast ratio: 250:1. View angle: 90 _i (Horizontal) / 50 _i (Vertical) |
| Antenna | Built-in telescopic antenna for UHF band reception |
| Speaker | Built-in 0.5W/8? speaker |
| Output Interfaces | 3.5mmAudio/Video connector 3.5mm Earphone connector |
| LED indicators | Power LED (Operation: green) |
| Controls | Infrared Remote Control 6 Keys: CH+(▲), CH-(▼), Vol+(▶), Vol-(◀), Menu (Exit), OK (Mute) Power on/off slide switch |
| OSD Languages | English, German, French, Portuguese, Spanish, Italian, Dutch, Traditional Chinese, Simplified Chinese |
| Features | DVB-T TV/Radio, auto channel search, EPG, channel preview, teletext, subtitle |
| Power supply | 100/240V AC power adapter with 9V/1.66A DC output |
| Battery | External battery pack (6 AA batteries) for extended operations External 7.4V/1800mA rechargeable lithium battery (Optional ) |
| Operating time | Typical 2.5hr (when powered by external rechargeable lithium battery or external battery pack) |
| Dimensions | 134 x 87 x 22 (mm) |
| Weight | 190g (not including rechargeable lithium battery) |
S855
TV TNT/DVB-T PORTABLE ET RADIO

natural_image
Symbolic illustration of a person pushing a cart with a large block, enclosed in a circle (no text or symbols)AVERTISSEMENT POUR CHARIOT PORTATIF N'ENLEVEZ PAS CETTE ÉTIQUETTE
Les mots “WARNING, DÉPLACER AVEC PRÉCAUTION. CE CHARIOT NE DOIT PAS ÊTRE DÉPLACÉ PAR DES ENFANTS SANS L'AIDE D'UN ADULTE”.
OU
text_image
Diagram of a digital microwave oven with numbered parts labeled for identification.text_image
Diagram showing a mechanical or electrical component with an arrow indicating direction and polarity, alongside a schematic view of the component.natural_image
Hand inserting a button into a device panel (no text or symbols visible)natural_image
Hand inserting a component into an electronic device (no text or symbols visible)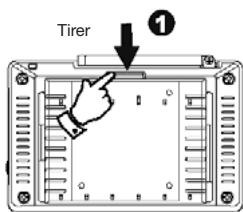
text_image
Tirer ①
natural_image
Illustration of hands holding a device with an arrow and numbered label (no text or symbols on the device itself)IMPORTANT
natural_image
Diagram of an electrical outlet connected to a device via cable (no text or symbols present)natural_image
Diagram of a cable connection to an electrical outlet with a wall-mounted socket (no text or symbols)natural_image
Illustration of two hands holding a device with ports and buttons (no text or symbols visible)
natural_image
Line drawing of a hand inserting into a battery pack (no text or symbols)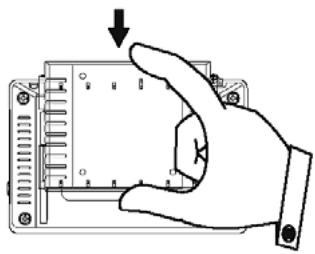
natural_image
Hand inserting a component into a housing panel, showing pin layout and mounting holes (no text or symbols)text_image
Program Service Type TV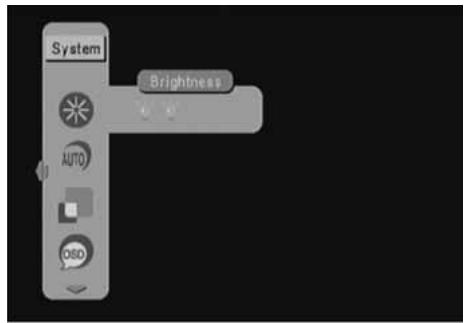
text_image
System Brightness AUTO OSDPAGE SYSTÈME
text_image
Audio channel Channel Searching... Audio PID 1003 Sound Mode LRRECHERCHE MANUELLE
text_image
System Auto Controltext_image
System TV System RPTC RPM RRL NTSCtext_image
System O&O Language Outch English French Deutsch Italian Portugaltext_image
Regional Settings Germany Holland Iceland Italy Norway Portugal Spain Sweden Taiwantext_image
Program Service Type TVtext_image
Warning Do you want to start Auto Search ? OK Canceltext_image
016 Tel:Text BLAIR NEWS CONFERENCE LIVE The British Prime Minister is holding his monthly news briefingtext_image
Warning No Signal 09The lighting flash with arrowhead symbol within an equilateral triangle is intended to alert the user to the presence of uninsulated dangerous voltage within the product's enclosure that may be of sufficient magnitude to constitute a risk of electric shock to persons.

The exclamation point within an equilateral triangle is intended to alert the user to the presence of important operating and maintenance (servicing) instructions in the literature accompanying the appliance.
natural_image
Symbolic illustration of a person pushing a large cart with a ramp, enclosed in a circular frame (no text or symbols)PORTABLE CART WARNING DO NOT REMOVE THIS TAG (MARKING)
The words “WARNING, MOVE WITH CARE. THIS CART/APPLIANCE COMBINATION SHOULD NOT BE MOVED BY CHILDREN WITHOUT PROPER GUIDANCE FROM AN ADULT”
OR
An appliance and cart combination should be moved with care. Quick stops, excessive force, and uneven surfaces may cause the appliance and cart combination to overturn.
S3125A
Electrical energy can perform many useful functions. This unit has been engineered and manufactured to assure your personal safety. Improper use can result in potential electrical shock or fire hazards. In order not to defeat the safeguards, observe the following basic rules for its installation, use and servicing.
text_image
Diagram of a digital microwave oven with numbered parts labeled for identification.1 Antenne
2 LCD
3 Strom-LED
text_image
Diagram showing a mechanical or electrical component with an arrow indicating direction and polarity, alongside a schematic view of the component.natural_image
Hand inserting a button into a device panel (no text or symbols visible)text_image
Lade-LED DC Input DC Output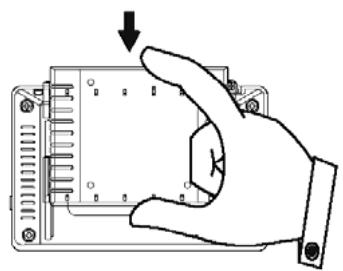
natural_image
Hand inserting a component into an electronic device (no text or symbols visible)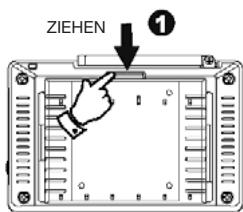
text_image
ZIEHEN ①
text_image
Diagram showing hands installing a component with numbered callouts and directional arrows indicating assembly or positioning.WICHTIG
natural_image
Diagram of a device showing an electrical outlet connected to a rectangular panel with cable (no text or symbols present)natural_image
Diagram of a cable connection to an electrical outlet with a wall-mounted socket (no text or symbols)natural_image
Illustration of two hands holding a device with multiple ports and a close-up view of the handle (no text or symbols)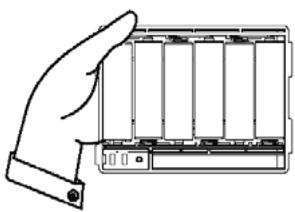
natural_image
Line drawing of a hand holding a battery pack (no text or symbols)
natural_image
Hand inserting a component into a housing panel, showing pin layout and mounting holes (no text or symbols)Grundfunktionen
text_image
Program Service Type TV
text_image
System Brightness AUTO OSDSYSTEMMENÜ