WTC 519, WTC 525, WTC 673 - Talkie Walkie SWITEL - Free user manual and instructions
Find the device manual for free WTC 519, WTC 525, WTC 673 SWITEL in PDF.
| Product type | Walkie-talkie (transceiver) PMR446 |
| Brand | SWITEL |
| Compatible models | WTC 519, WTC 525, WTC 673 |
| Frequency range | 446 MHz (PMR446 band) |
| Number of channels | 8 channels (446.00625 – 446.09375 MHz) |
| Output power | 0.5 W |
| Maximum range | About 3 km in direct line of sight |
| Power supply | Rechargeable NiMH battery pack 3.6 V / 600 mAh |
| Charger included | Yes, mains adapter |
| Battery life | Varies by use, with power saving mode |
| Hands-free function (VOX) | Yes, 3 sensitivity levels |
| Call signal | Yes |
| Roger Beep | Yes (end-of-transmission tone) |
| Automatic channel scan | Yes (SCAN function) |
| Keypad lock | Yes |
| Display | LCD with backlight |
| Earphone kit included | Yes (2 kits) |
| Belt clip included | Yes (2 clips) |
| Maintenance | Clean with a soft, lint-free cloth, no solvent |
| Safety | Do not use near medical devices; avoid humidity, excessive heat |
| Repairability | Not user-serviceable; contact customer service |
| Warranty | 2 years (24 months) from date of purchase |
| Country of origin | Switzerland (TELGO AG) |
| Certification | CE (compliant with European directives) |
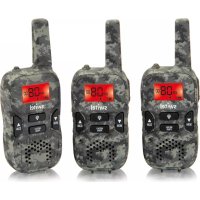
| Box contents | 2 walkie-talkies, 2 battery packs, 2 earphone kits, 1 mains charger, 1 manual |
Frequently Asked Questions - WTC 519, WTC 525, WTC 673 SWITEL
User questions about WTC 519, WTC 525, WTC 673 SWITEL
0 question about this device. Answer the ones you know or ask your own.
Ask a new question about this device
Download the instructions for your Talkie Walkie in PDF format for free! Find your manual WTC 519, WTC 525, WTC 673 - SWITEL and take your electronic device back in hand. On this page are published all the documents necessary for the use of your device. WTC 519, WTC 525, WTC 673 by SWITEL.
USER MANUAL WTC 519, WTC 525, WTC 673 SWITEL
COMMUNICATIONPRODUCTS
WTC519


Bedienungsanleitung
Mode d'emploi
Operating Instructions
SWITEL
Bedienungsanleitung 3
Mode d'emploi 17
Istruzioni per l'uso 31
Operating Instructions 45
Declaration of Conformity 60
D
F
1
GB
1 Safety Information 46
2 Putting the Walkie-Talkies into Operation 48
3 Operating Elements 50
4 Operating the Walkie-Talkies 51
5 In Case of Problems 55
6 Technical Properties 56
7 Maintenance/Guarantee 57
8 Index 58
1 Safety Information
Please read this operating instruction manual thoroughly.
Intended use
These walkie-talkies have been conceived for communication with other walkie-talkies complying to the same standards. Any other use is considered unintended use. Unauthorised modification or reconstruction is not permitted. Under no circumstances open the devices or complete any repair work yourself.
Ambient conditions
Prevent excessive exposure to smoke, dust, vibration, chemicals, moisture, heat and direct sunlight.
Do not use the walkie-talkies in potentially explosive areas.
Power supply

Caution: Only use the power adapter plug supplied because other power supplies could damage the walkietalkie equipment. Ensure access to the power adapter plug is not obstructed by furniture or such.
Rechargeable battery pack

Caution: Never throw batteries into a fire. Only use batteries of the same type! Pay attention to correct polarity. Incorrect polarity of the batteries represents a risk of explosion during charging.
Medical equipment

Caution: Never use the walkie-talkies in the vicinity of medical equipment. Effects on such equipment cannot be fully ruled out. Walkie-talkies can cause an unpleasant humming sound in hearing aids.
Disposal
You are obliged to dispose of consumable goods according to legal requirements. The adjacent symbol indicates that electrical and electronic apparatus and batteries no longer required must be disposed of separate from domestic waste.
Electrical and electronic devices must be disposed of at suitable collection points provided by the public waste authorities.
Batteries must be disposed of at the point of sale or at appropriate collection points provided by the public waste authorities.
Packaging materials must be disposed of according to local regulations.


Putting the Walkie-Talkies into Operation
2 Putting the Walkie-Talkies into Operation
Safety information

Caution: It is essential to read the Safety Information in Chapter 1 before starting up.
Checking the package contents
The package contains:
-
two walkie-talkies with belt clip
-
two rechargeable battery packs
-
two headsets
-
a power adapter plug (charging cable)
-
an operating manual
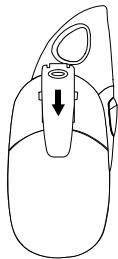
Inserting the battery pack
Open the battery compartment cover. Insert the battery pack supplied. Pay attention to correct polarity. Close the battery compartment.
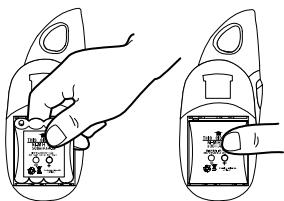

Caution: Standard battery packs or batteries are not charged. Only use the battery packs supplied or ones of the same type.
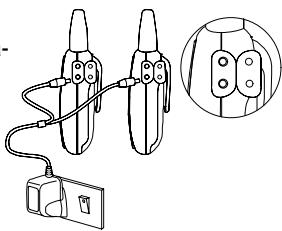
Charging the batteries
Connect the walkie-talkies as illustrated in the diagram. For safety reasons, only use the power adapter plug supplied.
Putting the Walkie-Talkies into Operation
Before using the walkie-talkies for the first time, charge them for at least 12 hours. When the walkie-talkies are connected correctly, the -icon flashes in the display.

Do not charge the walkie-talkies with charging units from other manufacturers.
The current battery charge status is indicated in the display:
Full
Empty


The battery pack needs to be recharged as soon as the indicator flashes in the display and acoustic warning signals are issued.
Energy-saving mode
Your walkie-talkies are provided with an energy-saving mode to increase the service life of the batteries. If no buttons on the walkietalkies are pressed for a period of 4 seconds, energy-saving mode is activated. Energy-saving mode is deactivated as soon as you press a button or a signal is received.
Attaching the belt clip
Slide the belt clip in the guide from the top until it audibly snaps into place. To detach the belt clip, prize the fastening tab up a little with your fingernail and slide the belt clip upwards.

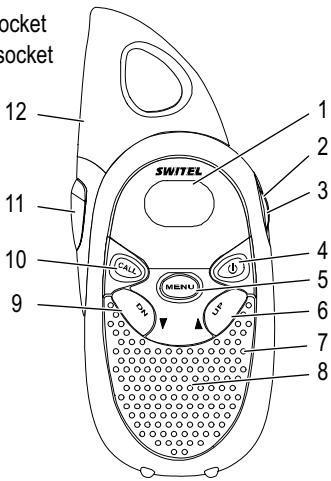
3 Operating Elements
The buttons in this operating manual are subsequently depicted with a uniform contour. Therefore, slight deviations in the appearance of the symbols on the walkie-talkie buttons compared to those depicted here are possible.
Handset
1 Display
2 Headset connection socket
3 Power adapter cable socket
4 On/Off
5 Menu
6 Increase setting
7 Microphone
8 Loudspeaker
9 Decrease setting
10 Transmit ringing tones
11 PTT - Talk button
12 Antenna
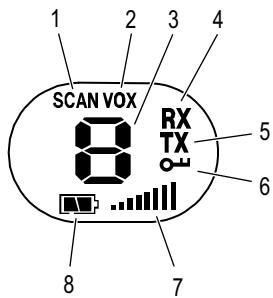
Display
1 Channel search
2 VOX mode
3 Channel
4 Receiving
5 Transmitting
6 Key lock
7 Volume control
8 Battery capacity
4 Operating the Walkie-Talkies
Display and notation of operating sequences
| PTT | Press the button displayed |
| 2 sec MENU | Press the button depicted for 2 seconds |
| 2 x MENU | Press the button displayed twice |
| , PTT | Press and hold the button displayed |
| , PTT | Release the button displayed |
| ON | Text in the display |
| Speak into the microphone |
Display illumination
The display lights up for 4 seconds after pressing any button, except the PTT button.
Switching the walkie-talkie on/off
| Switch the walkie-talkie on | |
| An acoustic signal is issued. The current channel setting appears in the display. | |
| Switch the walkie-talkie off | |
| e control | |
| or | Raise or lower the volume |
Transmitting and receiving
Transmitting
| PTT | Transmit |
| Hold the walkie-talkie approx. 5 to 7 cm from your mouth and speak at a normal volume. In order to talk to other subscribers, the respective walkie-talkies must be set to the same channel. | |
Receiving
| PTT | Receive |
| Radio signals cannot be received when the PTT button is being pressed. |
Confirmation signal (Roger beep)
The confirmation signal is issued on releasing the PTT button. This signals to the caller that you have ended transmission.
Selecting a channel
MENU
Activate Settings mode

or
PTT
Select the channel and confirm it
| Chan- nel | Frequency (MHz) | Chan- nel | Frequency (MHz) |
| 1 | 446.00625 | 5 | 446.05625 |
| 2 | 446.01875 | 6 | 446.06875 |
| 3 | 446.03125 | 7 | 446.08125 |
| 4 | 446.04375 | 8 | 446.09375 |
Searching for a channel
Signals are searched for in the eight channels in a continuous cycle. SCAN appears in the display. If an active channel is detected, the channel search stops. Press the PTT button to enable radio communication.
Starting channel search
3 sec

Start the channel search
Resuming search for a channel

Resume the channel search
Stopping channel search
PTT
End the channel search
Transmit ringing tone
The ringing tones indicate to other subscribers that you want to talk to them. A condition for this is that the other subscribers are using the same channel.
CALL
Send the ringing tone
Monitor function
The Monitor function enables the search for weak signals on the channel currently set. If you receive an external signal, switch to a free channel. Always communicate with other subscribers on a free channel to prevent interference.
MENU
and

Start monitoring the channel
MENU
End the monitoring function
Key lock
The key lock function prevents inadvertent modification of settings. When the key lock function is activated, the - - icon appears in the display.
Activating
MENU
and

Activate the key lock function
Deactivating
MENU
and

Deactivate the key lock function
Operating the Walkie-Talkies
VOX mode (handsfree)
When this function is active, the walkie-talkie automatically starts to transmit when the unit detects a voice or a sound.

When you start to speak, there is a slight delay before the walkie-talkie starts to transmit.
Activating VOX mode
When using the handsfree function in VOX1mode, the PTT -button on the walkie-talkie must not be pressed to transmit.
2x MENU
Activate Setting mode

ON
PTT
Activate VOX mode
Deactivating VOX mode
2x MENU
Activate Setting mode

OF,
PTT
Deactivate VOX mode
Headset
Connect the headset on the right-hand side of the walkie-talkie. Activate VOX mode. Clip the walkie-talkie on your belt and fix the headset cable to a piece of your clothing so that the microphone is positioned near your mouth. You can now transmit and receive without needing to use your hands.

5 In Case of Problems
Service hotline
Should problems arise with the walkie-talkies, please refer to the following information first. In the case of technical problems, please contact our hotline within Switzerland under tel. 0900 00 1675 (cost with Swisscom at time of going to print: CHF 2.60/min). In the case of claims under the terms of guarantee, contact your sales outlet. There is a 2 year period of guarantee.
Problems and solutions
| Problems | Solutions |
| Equipment does not function | - The battery pack is not inserted correctly - The battery pack is not charged - The battery pack is defect |
| Transmission not possible | - Press the PTT button in fully in order to transmit - The channel is being used by other subscribers |
| No reception | - Release the PTT button in order to receive - The volume is set too low - You are outside the range of reception, change your position - Obstructions such as trees and buildings impair the range - Use the “Monitor” function to search for weak signals |
6 Technical Properties
Technical data
| Feature | Value |
| Output power | 0.5 W |
| Range | Approx. 3 km in open space |
| Battery pack | NiMh 3.6 V, 600 mAh |
Range
Obstructions such as trees and buildings impair the range. The following diagram indicates the range which can be expected under different conditions.

Declaration of Conformity
This device fulfils the requirements stipulated in the EU directive:
1999/5/EU directive on radio equipment and telecommunications terminal equipment and the mutual recognition of their conformity. Conformity with the above mentioned directive is confirmed by the CE symbol on the device.
The Declaration of Conformity is provided on the back cover of this operating manual.
CE
7 Maintenance / Guarantee
Maintenance
Clean the housing surfaces with a soft, fluff-free cloth.
- Never use cleaning agents or solvents.
Guarantee
SWITEL equipment is produced and tested according to the latest production methods. Carefully selected materials and highly developed technology ensure perfect functioning and a long service life. The terms of guarantee do not apply to the batteries or power packs used in the products. The period of guarantee is 24 months from the date of purchase.
All deficiencies related to material or manufacturing errors within the period of guarantee will be redressed free of charge. Rights to claims under the terms of guarantee are annulled following tampering by the purchaser or third parties. Damage caused as the result of improper handling or operation, normal wear and tear, incorrect positioning or storage, improper connection or installation or Acts of God and other external influences are excluded from the terms of guarantee. In the case of complaints, we reserve the right to repair defect parts, replace them or replace the entire device. Replaced parts or devices become our property. Claims for damages are excluded except in cases of intent or gross negligence on the part of the manufacturer.
If your device does show signs of a defect within the period of guarantee, please contact the sales outlet where you purchased the SWITEL device, producing the purchase receipt as evidence. All claims under the terms of guarantee in accordance with this agreement can only be asserted at the sales outlet. No claims under the terms of guarantee can be asserted after a period of two years from the date of purchase and hand-over of the product.
8 Index
B
Belt clip, 49
C
Charging, 48
Charging the batteries, 48
Confirmation signal, 52
D
Declaration of Conformity, 56
Display, 50
Display illumination, 51
E
Energy-saving mode, 49
G
Guarantee, 57
H
Handsfree, 54
Headset, 54
1
Inserting the battery pack, 48
K
Key lock, 53
M
Maintenance, 57
Monitor function, 53
N
Notation, 51
0
Operating elements, 50
Operation, 51
P
Package contents, 48
Problems, 55
Problems and solutions, 55
R
Range, 56
Receiving, 51
Ringing tone, 53
Roger Beep, 52
s
Safety information, 46
Searching for a channel, 52
Selecting a channel, 52
Service hotline, 55
Starting up, 48
Switching off, 51
Switching on, 51
T
Technical data, 56
Transmitting, 51
Troubleshooting, 55
V
Volume control, 51
VOXmode,54
SWITEL
Declaration of conformity
WE TELGO AG
Declare under our own responsibility that the product
MODEL: WTC 519
DESCRIPTION: Portable Mobile Radio
frequency 446 MHz
Is in conformity with directives: R&TTE Directive (1999/5/EC)
COMPLIANCE IS ACHIEVED BY CONFORMITY TO THE FOLLOWING:
EN 300 296-2 V1.1.1 (2001-03), EN 301 489-5 V1.3.1 (2002-08),
EN60065:2002
AUTHORISED BY:
Signed:

Name (printed): Selim Dusi
Position in company: Managing Director
Date of issue: 28.06.2005
Copies of this document will be held on file for a period of 10 years after the last production.
This product transmits in a non-EU-harmonised frequency band (446MHz) and may thus only be used within those countries that permit usage of such equipment.