
Steakhouse Pro 233 - Klarstein - Free user manual and instructions
Find the device manual for free Steakhouse Pro 233 Klarstein in PDF.


User questions about Steakhouse Pro 233 Klarstein
0 question about this device. Answer the ones you know or ask your own.
Ask a new question about this device
Download the instructions for your in PDF format for free! Find your manual Steakhouse Pro 233 - Klarstein and take your electronic device back in hand. On this page are published all the documents necessary for the use of your device. Steakhouse Pro 233 by Klarstein.
USER MANUAL Steakhouse Pro 233 Klarstein
INHALTSVERZEICHNIS
REGALE ENTFERNEN
BEDIENUNG
Member of Berlin Brands Group
Handwerkerstr. 11
15366 Dahlwitz-Hoppegarten
Deutschland
Berlin Brands Group UK Ltd
PO Box 1145
Oxford, OX1 9UW
United Kingdom
Dear Customer,
Congratulations on purchasing this device. Please read the following instructions carefully and follow them to prevent possible damages. We assume no liability for damage caused by disregard of the instructions and improper use. Scan the QR code to get access to the latest user manual and more product information.

CONTENTS
Safety Instructions 26
Installation 28
Removing the Shelves 32
Operation 32
Tips for Starting 34
Commissioning and Operation 35
Temperature Setting 36
Air Humidification System 37
Cleaning and Care 40
Troubleshooting 41
Product Data Sheet 42
Disposal Considerations 44
Manufacturer & Importer (UK) 44
TECHNICAL DATA
| Item number | 10039935, 10039936 |
| Power supply | 220-240 V ~ 50/60 Hz |
SAFETY INSTRUCTIONS
- Check the voltage on the rating plate before use. Only connect the steak dry ager to sockets that correspond to the voltage of the device.
- Children over the age of 8 and persons with reduced physical, sensory or mental capabilities or those with a lack of experience and knowledge may only use the steak dry ager if they are instructed on how to do so by a person responsible for their safety, or if they are supervised and understand the associated risks.
• Make sure that the ventilation openings are open and clean them regularly.
- Do not place any electrical devices in the steak dry ager.
- Be careful not to damage the coolant circuit.
- If the power cord or plug is damaged, it must be replaced by the manufacturer, an authorised specialist, or a similarly qualified person.
- Check the power cord regularly for damage. Do not use the steak dry ager with a damaged power cord.
- Do not handle the steak dry ager, the plug or the power cord with wet hands.
- If possible, do not use an extension cord. If you are using one, make sure that the ampere value of the connected device does not exceed the maximum ampere value of the power cord.
- Leave at least 5 cm of space to the sides and 10 cm of space behind the steak dry ager so that the air can circulate sufficiently.
- Close the door as quickly as possible after adding food so that the cold does not escape.
- Place the steak dry ager on a firm, level surface. Do not place it on a soft surface such as a carpet.
- Do not place any objects on the steak dry ager.
- Do not store any flammable or explosive substances in the device.
- Do not use the steak dry ager outdoors.
- Do not pull the plug out of the socket with the cable, but rather hold it by hand when pulling it out.
• Make sure that the power cord does not touch any hot surfaces.
- Only connect the steak dry ager to earthed sockets.
- Do not connect the steak dry ager to sockets with which other kitchen appliances are already connected.
- If the steak dry ager goes out, fails or is switched off, wait 5 minutes before switching it on again, otherwise the compressor could be damaged.
This device contains the refrigerant isobutane (R600a), a natural gas which is high in environmental sustainability, but is flammable. Although it is flammable, it will not damage the ozone layer and will not increase the greenhouse effect. The use of this refrigerant leads to a somewhat higher noise level from the device. In addition to the compressor noise, you can hear the flow of the refrigerant. This is unavoidable and has no negative impact on the performance of the device. Be careful during transportation to ensure that the refrigerant circuit is not damaged. Leaking refrigerants can irritate the eyes.
Special instructions
- Children aged 3 to 8 years may fill the steak dry ager with food and take food out of the steak dry ager.
- When positioning the steak dry ager, make sure that the power cord is not pinched or damaged.
- Make sure that there are not multiple sockets or power supplies on the back of the device.
To avoid food contamination, please follow the instructions below:
- Prolonged opening of the door can lead to a significant rise in temperature in the compartments of the steak dry ager.
- Regularly clean surfaces that can come into contact with food. Clean the water drain regularly.

WARNING
When using, servicing and disposing of the unit, pay attention to the left symbol on the rear of the unit or on the compressor. This symbol warns of possible fires. There are flammable substances in the refrigerant lines and in the compressor. Keep the appliance away from sources of fire during use, maintenance and disposal.
INSTALLATION
Before first use
Let the device stand for 24 hours before the first use so that the coolant can spread.
During this time, leave the door open so that production-related odours can evaporate.
Note: All models without front ventilation or ventilation slots on the front are not built-in devices and must be free-standing.
Location
The location where you place the device should:
• be sturdy and well ventilated.
• be far away from direct sunlight or other heat sources.
• not be too wet, such as a bathroom or washroom.
• have a level floor.
• have a standardised electrical connection.
• have a socket with surge protection.
- be far away from microwaves, as their interference could have a negative impact on the device.
Furthermore, the ambient temperature in the room should not be very cold or very warm. Cold and warmth may have a negative effect on the function, so that the desired internal temperature will not be reached.
Setup
- Remove all packaging material from and around the steak dry ager.
- Set up the steak dry ager so that the plug is accessible at all times. Unplug the power cord and put the device in its final location. Set it up so that the compressor is free and has no contact with other objects or walls.
- Compensate for any slight floor unevenness before filling the device. Use the adjustable feet for this. To do this, turn the rear feet completely inwards and compensate for the incline with the two front feet.
Note on built-in devices
- All devices with ventilation slots on the front are suitable for installation, but must not be installed in completely closed housings.
- Built-in devices suck in air via the ventilation frame and let it out again via the ventilation frame at the front (some models have the ventilation frame on the back).
- Like many electrical devices, the steak dry ager has many sensitive parts that can be damaged by a power failure or lightning. Your connections should therefore be equipped with surge protection.
- If you install the device in a frame with a door, there must be a ventilation opening in the bottom of the door. In hot climates, slots with a minimum dimension of 40 mm x 200 mm must also be provided at the top of the rear or at the top on both sides of the housing so that cool air can flow in. At least 30 mm of space must be left to the rear wall of the frame. The ventilation slot should not be placed on a side where another device, such as an oven, is already installed.
Cooling system

Note: This model has a side anti-thaw tube and an independent cooling system.
Installation of the ventilation grid
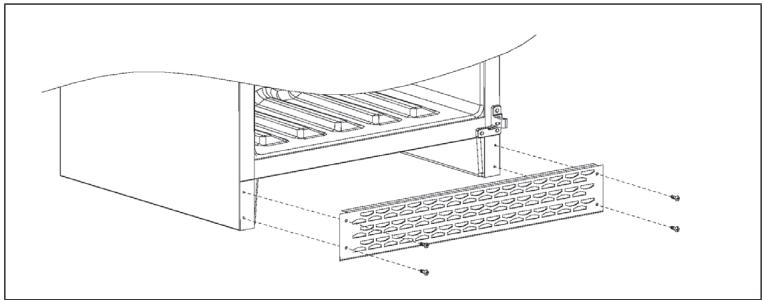
- Take the ventilation frame out of the cabinet and take four 4* 12 screws out of the accessory bag.
- Open the door, align the ventilation frame with the four screw holes in the cabinet floor and tighten the screws with a Phillips screwdriver.
Installation diagram


Fixing the door handle
• Take the handle out of the cabinet and take 2 screws out of the accessory bag.
- Pull open the door seal on the inside of the door and insert the screws into the two grip holes on the door. Place the handle on the screws from the outside and tighten the screws with a Phillips screwdriver.

REMOVING THE SHELVES
Press the left shelf pin (A) and release the shelf (B) from the bracket on the other side (1). Then remove the shelf in the direction of the arrow mark (2). The installation of the shelf is done in reverse.

OPERATION
Control panel and button functions

| 1 | Function change key |
| If you press this button once, you can switch between the temperature setting (4) and the humidity setting (5). You can increase / decrease the temperature and humidity by pressing the Increase (6) and Decrease (7) buttons. | |
| 2 | On /off |
| Press and hold this button for three seconds to turn off the device. All functions except for the light will be switched off. Press this button again (with a delay) to switch the | |
| 3 | UV system control |
| Automatic control: The device is switched on. The UV light will be automatically activated for one hour every 24 hours.Manual control: The device is switched on. If you press and hold this button for 3 seconds, the UV light will be permanently on. If you press and hold this button again for 3 seconds, the UV light will be switched off.The UV light will be automatically switched off when the door is opened and will be switched on again as soon as the door has been closed. | |
| 4 | Temperature display |
| The current temperature is displayed. | |
| 5 | Humidity indicator |
| 6 | Increase |
| If you press this button once, the temperature / humidity will be increased by 1 °C /1 %. | |
| 7 | Decrease |
| If you press this button once, the temperature / humidity will be reduced by 1 °C /1 %. | |
| 8 | Temperature unit |
| You can switch from °C to °F by pressing this button. Press this button again to change from °F to °C. |
TIPS FOR STARTING
- Clean the inside of the device with a mild disinfectant.
- The temperature is already set to 1 °C and the air humidity to 85 %. These are the perfect conditions for aging beef and pork.
- The meat must be fresh, a maximum of 5 days after slaughter. Vacuum-aged meat may also be used, but should be left in the device for a maximum of 14 days (remove the film).
• It is recommended to use cooked beef: use beef from a young animal that is streaky. - Hang up the whole piece of meat or place the cut meat on the shelf.
- Maximum filling quantity: 2 loin pieces on the bone with a length of 0.5 metres. Two hooks are required for this.
- Maximum filling quantity with shelf insert: a maximum of 20 kg of pieces or strips of meat will fit on the shelves.
- If you let several pieces of meat age on the shelves, you should make sure that a protective layer of fat is preserved and, if possible, let the meat age on the bone. The ideal size per piece is 2-4 kg.
- Wear protective gloves and never touch the meat with your bare hands.
- The perfect aging period for the meat is 25-28 days. An aging period longer than 4 weeks is also possible.
Quality requirements for meat
- The best meat recognised for dry aging is rib eye steak on the bone. It is always best to buy from a butcher who sources their meat from a good quality slaughterhouse.
- The younger the animal, the better the result. It is always recommended to buy a piece of meat that has a good fat content and a high proportion of internal marbling. It is advisable to let the meat ripen either by hanging or in large pieces on the bone. This is because the meat exposed to the air is minimised, which reduces loss of weight.
- The dry aging period is recommended to last at least 21 days, during which the taste will become more intense. Please note: an aging period of up to 6 weeks is possible. The hygienic handling of food should always be considered for best results.
- When the process is complete, the thin crust must be cut off to remove the bone or cut into steaks.
COMMISSIONING AND OPERATION
Before first operation
- Before using the device for the first time, you should clean the interior of the device (steak dry ager) with water and leave the door open for at least 24 hours so that odour residues can escape.
- Set the temperature to 1 °C and the humidity to 82 %. 1 °C is the best temperature for cooked beef and pork.
• The meat must be fresh, a maximum of 5 days after slaughter. - It is recommended to use cooked beef: use meat from a young animal that is streaky.
- Hang up the whole piece of meat or place the cut meat on the shelf.
Turn on
Insert the mains plug into the socket and press the On/Off button and hold for a few seconds. When you use the device for the first time (or use it again after a very long time), there will be a difference of a few degrees between the temperature you have selected and the temperature displayed on the screen. This is normal and occurs because the device needs to cool down first. As soon as the device has been running for several hours, the temperature will adjust.
Note: If the device is unplugged, if there is a power failure or if the device has been switched off, you should wait 3 to 5 minutes before restarting the device. The device cannot be switched on beforehand.
Safety lock
The device has a security lock (not all models feature a security lock). As shown in the illustration, turn the key 90° clockwise (1) to open the lock and 90° counterclockwise (2) to lock it.

TEMPERATURE SETTING
Note: The display shows the actual temperature and humidity inside the device.
The temperature setting is factory set and can be adjusted individually. In the event of a power failure, all of the temperature settings you have made will be deleted and the factory settings will be restored. The control panel of each model has a reminder function.
Note: There is a difference between the temperature inside the device and the temperature that is displayed on the screen: It will take about 12 hours before you notice the effects of the temperature adjustment when the device is full.
Once the temperature has been set, you should not change it if possible. The thermostat keeps the temperature constant with deviations of +/- 2°C . However, the thermal inertia of the steak dry ager and the glass is so great that within this temperature range the actual temperature of the steak dry ager only fluctuates by 0.5°C to 1°C .
Defrost function
The device features an integrated defrost function. When the compressor is stopped, the device will defrost automatically. The defrost water is automatically drained from the storage area of the device. The water that condenses in the container is converted into heat or steam by the compressor in order to maintain the humidity in the storage area. All devices are equipped with a double-layered E-glass door, which has a third inner acrylic layer to minimise condensation on the glass door.
The device is not completely sealed. Fresh air can get in through the drain pipe.
Note: During the cooling cycle, heat will be given off which escapes through the outer surfaces of the device. Avoid touching these surfaces during the cooling cycle.
This unit has an automatic humidification system. The humidification system is located inside the fan cover. When there is no maintenance work to be done, it is forbidden to open the cover and pull out the humidifier.
Note: Since the unit has an automatic water addition function, it must be placed near a water supply from which clean drinking water comes.
Before using the meat ripening oven, first connect the water supply line (3) and then open the inlet valve (1) to ensure that water enters the water tank.
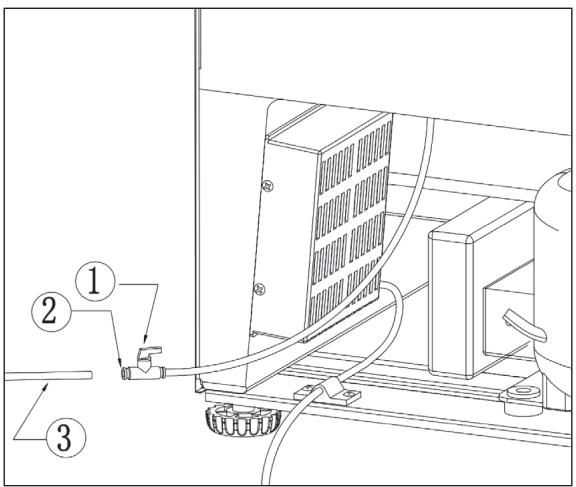
1 Water inlet valve
2 Water inlet
3 Water supply line
This product has a reminder function for refilling water. If the water tank contains too little water, an acoustic signal sounds. At the same time, „E5“ is displayed in the display window to indicate a water shortage fault. When this fault occurs, the illumination lamp flashes.
At this point, it is necessary to manually refill water. The „E5“ display disappears automatically within 10 seconds after the water addition is completed, and the illumination lamp stops flashing.
Note: The addition of water usually requires pure water, mineral water, distilled water or other water with low impurities. Do not add polluted water with impurities and impurities to optimize the quality and taste of the meat in the meat ripening cabinet.
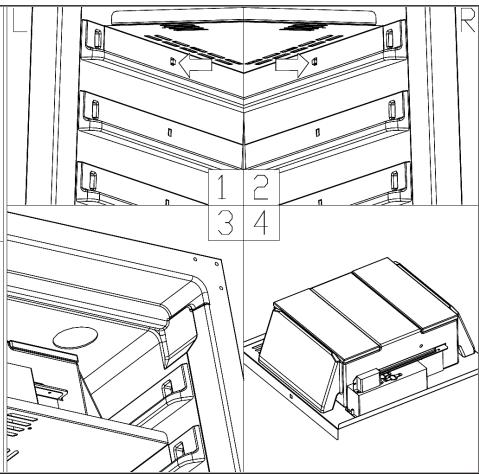
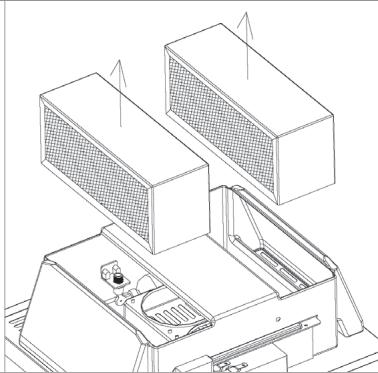
Automatic water exchange and replacement of the suction wadding.
Note: The inlet valve must be closed before replacement!

Place a 2-liter water container under the drain, then unscrew the drain cover to drain the drain as shown in Figure 2.


Disconnect the connecting cables and plugs connected to the fan, water inlet pipe, etc. on the water tank.
3


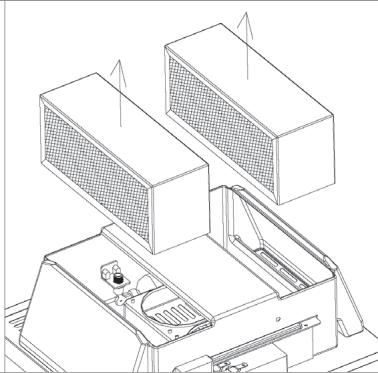
To remove the absorbent cotton, remove the water tank unit and replace the absorbent cotton according to the illustration.
CLEANING AND CARE
Cleaning the device
- First switch off the steak dry ager and pull the mains plug out of the socket.
- Remove all contents.
- Wipe the inside with a damp cloth that has been dipped in lukewarm water with a little washing-up liquid.
- Make sure the rubber seal on the door is clean so that the steak dry ager remains efficient.
• The outside of the steak dry ager should be cleaned with a mild detergent.
• Dry the inside and outside with a soft cloth. - Dust and everything else that is clogging the exhaust openings and reducing the cooling capacity of the steak dry ager. If necessary, vacuum the exhaust air opening.
Decommissioning while absent
- Switch off the steak dry ager first. Then pull out the mains plug.
- Remove all of the contents.
- Clean the steak dry ager.
- Open the lid slightly to prevent the formation of condensation, mould or odours.
Relocation to another location
- Switch off the steak dry ager first. Unplug the power cord.
- Remove all of the contents.
- Secure all loose objects with adhesive tape.
- Glue the doors shut.
Energy saving tips
The steak dry ager should be placed in the coolest place in the room, away from devices that generate heat, heating pipes or direct sunlight. Make sure that the door is closed properly when the steak dry ager is switched on.
TROUBLESHOOTING
| Problem | Possible cause and solution approach |
| The steak dry ager isn't running. | The steak dry ager is not plugged in. |
| The steak dry ager is switched off. | |
| The fuse is out or broken. | |
| The steak dry ager is not cold enough. | Check the temperature settings. |
| The environment requires a lower setting. | |
| The door has been opened too often. | |
| The door is not closed properly. | |
| The door seal does not seal properly. | |
| The light is not working. | The steak dry ager is not plugged in. |
| The fuse is out or broken. | |
| The bulb is broken. | |
| The light switch is set to 'off'. | |
| The steak dry ager often goes on and off. | The room temperature is higher than usual. |
| There is too much food in the device. | |
| The door has been opened too often. | |
| The door is not closed properly. | |
| The temperature is not set correctly. | |
| The door seal is not sealing properly. | |
| Vibrations | Check whether the steak dry ager is level. |
| The steak dry ager is very loud. | The coolant is in circulation. Noises resulting from this are not a sign of malfunction, but are normal. |
| You may hear a gurgle after each cooling cycle because there is still coolant in circulation. | |
| The contraction and expansion of the inner walls can lead to a crack. | |
| The steak dry ager is not level. | |
| The door isn't closing properly. | The steak dry ager is not level. |
| The door has been turned over and not attached properly. | |
| The seal or the magnet are damaged. | |
| The shelves are protruding too far. |
PRODUCT DATA SHEET
Commission Delegated Regulation (EU) 2019/2018
| Supplier's name or trademark: Klarstein | |||
| Supplier's address: Wallstraße 16, 10179 Berlin, Germany. | |||
| Model identifier: 10039935, 10039936 | |||
| Use: | Display and sale | ||
| Type of refrigerating appliance with a direct sales function: supermarket cabinet | |||
| Cabinet family code, according to the harmonised standards or other reliable, accurate and reproducible methods in accordance with Annex IV. | VC1 | ||
| Product specific parameters | |||
| 4. Integral horizontal supermarket cabinet, roll-in: | |||
| Total display area (m2) | Temperature class (according to Table 4(a)) | ||
| 0,5 | refrigerator: H1 | ||
| General product parameters: | |||
| Parameter | Value | Parameter | Value |
| Annual energy consumption (kWh/a) | 649,70 | Recommended temperature(s) for optimised food storage (°C) (These settings shall not contradict the temperature conditions set out in Annex IV, Table 4, 5 or 6, as applicable) | 1 |
| EEI | 14,5 | Energy efficiency class | B |
| Light source parameters: | |
| Type of light source | - |
| Energy efficiency class | - |
| Minimum duration of the guarantee offered by the supplier: 12 months | |
| Additional information: | |
| The weblink to the supplier's website, where the information in point 3 of Annex II of Commission Regulation (EU) 2019/2024 is found: www.klarstein.co.uk | |
DISPOSAL CONSIDERATIONS

If there is a legal regulation for the disposal of electrical and electronic devices in your country, this symbol on the product or on the packaging indicates that this product must not be disposed of with household waste. Instead, it must be taken to a collection point for the recycling of electrical and electronic equipment. By disposing of it in accordance with the rules, you are protecting the environment and the health of your fellow human beings from negative consequences. For information about the recycling and disposal of this product, please contact your local authority or your household waste disposal service.
MANUFACTURER & IMPORTER (UK)
Manufacturer:
Chal-Tec GmbH, Wallstrasse 16, 10179 Berlin, Germany.
Importer for Great Britain:
Berlin Brands Group UK Ltd
PO Box 1145
Oxford, OX1 9UW
United Kingdom
Estimado cliente:
ÍNDICE
RETIRAR LOS ESTANTES
FUNCIONAMIENTO

Berlin Brands Group UK Ltd
PO Box 1145
Oxford, OX1 9UW
United Kingdom
Chère cliente, cher client,
SOMMAIRE
POUR RETIRER LES CLAYETTES
UTILISATION


FICHE DE DONNÉES PRODUIT
Berlin Brands Group UK Ltd
PO Box 1145
Oxford, OX1 9UW
United Kingdom
Gentile cliente,
INDICE
UTILIZZO


PRODUTTORE E IMPORTATORE (UK)
Produttore:
Chal-Tec GmbH, Wallstraße 16, 10179 Berlino, Germania.
Berlin Brands Group UK Ltd
PO Box 1145
Oxford, OX1 9UW
United Kingdom

KLARSTEIN


- INHALTSVERZEICHNIS
- REGALE ENTFERNEN
- BEDIENUNG
- MEMBER OF BERLIN BRANDS GROUP
- HANDWERKERSTR. 11
- 15366 DAHLWITZ-HOPPEGARTEN
- DEUTSCHLAND
- DEAR CUSTOMER
- CONTENTS
- SAFETY INSTRUCTIONS
- SPECIAL INSTRUCTIONS
- WARNING
- INSTALLATION
- BEFORE FIRST USE
- LOCATION
- SETUP
- NOTE ON BUILT-IN DEVICES
- COOLING SYSTEM
- INSTALLATION OF THE VENTILATION GRID
- INSTALLATION DIAGRAM
- FIXING THE DOOR HANDLE
- REMOVING THE SHELVES
- OPERATION
- TIPS FOR STARTING
- QUALITY REQUIREMENTS FOR MEAT
- COMMISSIONING AND OPERATION
- BEFORE FIRST OPERATION
- TURN ON
- SAFETY LOCK
- TEMPERATURE SETTING
- DEFROST FUNCTION
- CLEANING AND CARE
- CLEANING THE DEVICE
- DECOMMISSIONING WHILE ABSENT
- RELOCATION TO ANOTHER LOCATION
- ENERGY SAVING TIPS
- TROUBLESHOOTING
- PRODUCT DATA SHEET
- DISPOSAL CONSIDERATIONS
- MANUFACTURER & IMPORTER (UK)
- MANUFACTURER
- IMPORTER FOR GREAT BRITAIN
- ESTIMADO CLIENTE
- ÍNDICE
- RETIRAR LOS ESTANTES
- FUNCIONAMIENTO
- CHÈRE CLIENTE, CHER CLIENT
- SOMMAIRE
- POUR RETIRER LES CLAYETTES
- UTILISATION
- FICHE DE DONNÉES PRODUIT
- GENTILE CLIENTE
- INDICE
- UTILIZZO
- PRODUTTORE E IMPORTATORE (UK)
- PRODUTTORE
- KLARSTEIN
Brand : Klarstein
Model : Steakhouse Pro 233