
AGON AG274QS - Monitor AOC - Free user manual and instructions
Find the device manual for free AGON AG274QS AOC in PDF.
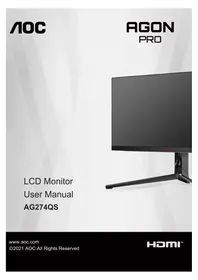


| Brand | AOC |
| Model | AGON AG274QS |
| Category | Monitor |
| Product Type | Gaming Monitor |
| Screen Size | 27 inches |
| Panel Type | IPS (In-Plane Switching) |
| Resolution | 2560 x 1440 (QHD) |
| Refresh Rate | 165 Hz |
| Response Time | 1 ms (MPRT) |
| Brightness | 400 cd/m² (typical) |
| Contrast Ratio | 1000:1 (typical) |
| Viewing Angle | 178° / 178° (horizontal/vertical) |
| Connectivity | 2x HDMI 2.0, 1x DisplayPort 1.4, 2x USB 3.0 (downstream), 1x USB 3.0 (upstream) |
| Stand Features | Tilt (-5° to 23°), Swivel (-30° to 30°), Pivot (90°), Height adjustment (150 mm) |
| VESA Mount | 100 mm x 100 mm |
| Power Consumption | 32 W (typical), <0.5 W (standby) |
| Dimensions (with stand) | 613.5 x 407.2 x 246.8 mm |
| Weight | 6.5 kg (with stand) |
| Safety Features | Kensington lock slot, power management (Energy Star certified) |
| Maintenance and Cleaning | Unplug before cleaning; use soft dry microfiber cloth; avoid exposing to moisture |
| Repairability and Spare Parts | Replacement parts available via AOC service centers; professional repair recommended |
Frequently Asked Questions - AGON AG274QS AOC
User questions about AGON AG274QS AOC
0 question about this device. Answer the ones you know or ask your own.
Ask a new question about this device
Download the instructions for your Monitor in PDF format for free! Find your manual AGON AG274QS - AOC and take your electronic device back in hand. On this page are published all the documents necessary for the use of your device. AGON AG274QS by AOC.
USER MANUAL AGON AG274QS AOC
Safety 1
National Conventions....1
Power 2
Installation....3
Cleaning 4
Other 5
Setup 6
Contents in Box....6
Setup Stand & Base....7
Adjusting the monitor 8
Connecting the Monitor 9
Wall Mounting....10
G-SYNC function (Available for selective models)....11
AMD FreeSync Premium function (Available for selective models)....11
Adaptive-Sync function (Available for selective models)....11
HDR 12
Adjusting....13
Hotkeys 13
Quick Switch 14
OSD Key Guide (Menu) 15
OSD Setting 17
Game Setting....18
Luminance 19
Image Setup 20
Color Setup....21
Audio....22
Light FX 23
Extra 24
OSD Setup....25
LED Indicator 26
Troubleshoot....27
Specification 28
General Specification....28
Preset Display Modes 29
Pin Assignments....30
Plug and Play 31
Safety
National Conventions
The following subsections describe notational conventions used in this document.
Notes, Cautions, and Warnings
Throughout this guide, blocks of text may be accompanied by an icon and printed in bold type or in italic type. These blocks are notes, cautions, and warnings, and they are used as follows:

NOTE: A NOTE indicates important information that helps you make better use of your computer system.

CAUTION: A CAUTION indicates either potential damage to hardware or loss of data and tells you how to avoid the problem.

WARNING: A WARNING indicates the potential for bodily harm and tells you how to avoid the problem. Some warnings may appear in alternate formats and may be unaccompanied by an icon. In such cases, the specific presentation of the warning is mandated by regulatory authority.
Power
The monitor should be operated only from the type of power source indicated on the label. If you are not sure of the type of power supplied to your home, consult your dealer or local power company.
The monitor is equipped with a three-pronged grounded plug, a plug with a third (grounding) pin. This plug will fit only into a grounded power outlet as a safety feature. If your outlet does not accommodate the three-wire plug, have an electrician install the correct outlet, or use an adapter to ground the appliance safely. Do not defeat the safety purpose of the grounded plug.
Unplug the unit during a lightning storm or when it will not be used for long periods of time. This will protect the monitor from damage due to power surges.
Do not overload power strips and extension cords. Overloading can result in fire or electric shock.
To ensure satisfactory operation, use the monitor only with UL listed computers which have appropriate configured receptacles marked between 100-240V AC, Min. 5A.
The wall socket shall be installed near the equipment and shall be easily accessible.
For use only with the attached power adapter Manufacturers: TPV ELECTRONICS (FUJIAN) CO.,LTD. Model: ADPC20120
Installation
Do not place the monitor on an unstable cart, stand, tripod, bracket, or table. If the monitor falls, it can injure a person and cause serious damage to this product. Use only a cart, stand, tripod, bracket, or table recommended by the manufacturer or sold with this product. Follow the manufacturer's instructions when installing the product and use mounting accessories recommended by the manufacturer. A product and cart combination should be moved with care.
Never push any object into the slot on the monitor cabinet. It could damage circuit parts causing a fire or electric shock. Never spill liquids on the monitor.
Do not place the front of the product on the floor.
If you mount the monitor on a wall or shelf, use a mounting kit approved by the manufacturer and follow the kit instructions.
Leave some space around the monitor as shown below. Otherwise, air-circulation may be inadequate hence overheating may cause a fire or damage to the monitor.
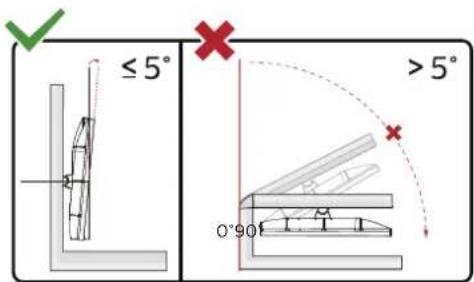
To avoid potential damage, for example the panel peeling from the bezel, ensure that the monitor does not tilt downward by more than -5 degrees. If the -5 degree downward tilt angle maximum is exceeded, the monitor damage will not be covered under warranty.
See below the recommended ventilation areas around the monitor when the monitor is installed on the wall or on the stand:
Installed with stand

Cleaning
Clean the cabinet regularly with cloth. You can use soft-detergent to wipe out the stain, instead of strong-detergent which will cauterize the product cabinet.
When cleaning, make sure no detergent is leaked into the product. The cleaning cloth should not be too rough as it will scratch the screen surface.
Please disconnect the power cord before cleaning the product.

Other
If the product is emitting a strange smell, sound or smoke, disconnect the power plug IMMEDIATELY and contact a Service Center.
Make sure that the ventilating openings are not blocked by a table or curtain.
Do not engage the LCD monitor in severe vibration or high impact conditions during operation.
Do not knock or drop the monitor during operation or transportation.
Setup
Contents in Box


CD Manual Stand Screwdriver BaseWarranty card

* Not all signal cables will be provided for all countries and regions. Please check with the local dealer or AOC branch office for confirmation.
Setup Stand & Base
Please setup or remove the base following the steps as below.
Setup:

Remove:

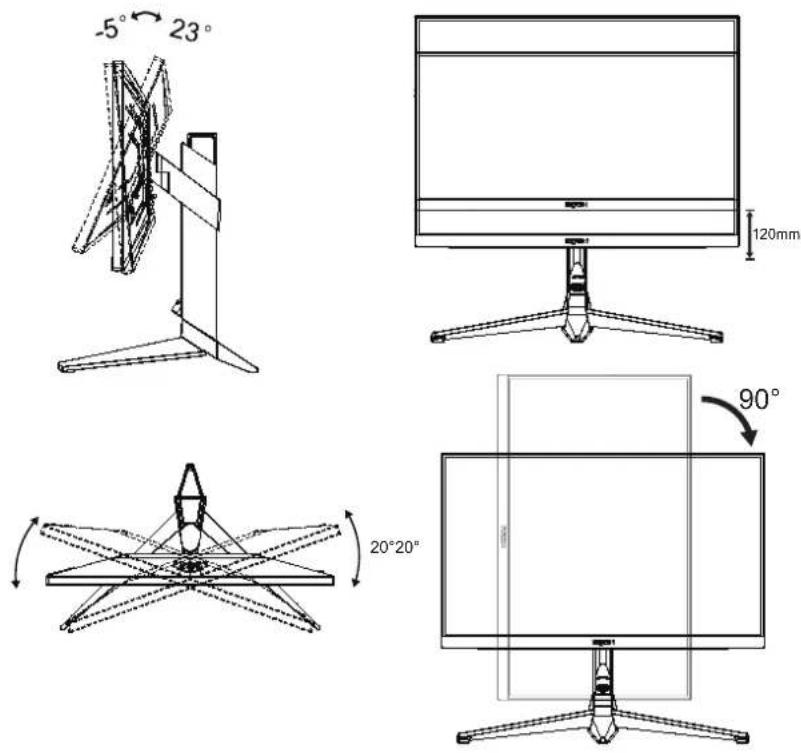
Adjusting the monitor
For optimal viewing it is recommended to look at the full face of the monitor, then adjust the monitor's angle to your own preference.
Hold the stand so you will not topple the monitor when you change the monitor's angle.
You are able to adjust the monitor as below:

NOTE:
Do not touch the LCD screen when you change the angle. It may cause damage or break the LCD screen.
Warning:
-
To avoid potential screen damage, such as panel peeling, ensure that the monitor does not tilt downward by more than -5 degrees.
-
Do not press the screen while adjusting the angle of the monitor. Grasp only the bezel.
Connecting the Monitor
Cable Connections In Back of Monitor and Computer:

- Microphone in
- Earphone (Combined with Microphone)
- USB3.2 Gen1 downstream + fast charging
- USB3.2 Gen1 downstream
- USB3.2 Gen1 upstream
- Power
- HDMI1
- HDMI2
- DP1
- DP2
- Microphone out (Connect to PC)
- Quick Switch port
Connect to PC
- Connect the power cord to the back of the display firmly.
- Turn off your computer and unplug its power cable.
- Connect the display signal cable to the video connector on the back of your computer.
- Plug the power cord of your computer and your display into a nearby outlet.
- Turn on your computer and display.
If your monitor displays an image, installation is complete. If it does not display an image, please refer Troubleshooting.
To protect equipment, always turn off the PC and LCD monitor before connecting.
Wall Mounting
Preparing to Install An Optional Wall Mounting Arm.

This monitor can be attached to a wall mounting arm you purchase separately. Disconnect power before this procedure. Follow these steps:
- Remove the base.
- Follow the manufacturer's instructions to assemble the wall mounting arm.
- Place the wall mounting arm onto the back of the monitor. Line up the holes of the arm with the holes in the back of the monitor.
- Reconnect the cables. Refer to the user's manual that came with the optional wall mounting arm for instructions on attaching it to the wall.
Noted: VESA mounting screw holes are not available for all models, please check with the dealer or official department of AOC.
* Display design may differ from those illustrated.
Warning:
- To avoid potential screen damage, such as panel peeling, ensure that the monitor does not tilt downward by more than -5 degrees.
- Do not press the screen while adjusting the angle of the monitor. Grasp only the bezel.
G-SYNC function (Available for selective models)
Compatible Graphics Card: GeForce GTX 650 Ti Boost or higher (for a list of compatible graphics cards, please visit https://www.nvidia.com/en-in/geforce/products/g-sync-monitors/g-sync-hdr-requirements/)
Driver: GeForce 331.58 or higher OS: Windows 7/8/8.1
AMD FreeSync Premium function (Available for selective models)
- AMD Freesync premium function is working with DP/HDMI
-
Compatible Graphics Card: Recommend list is as the below, also could be checked by visiting www.AMD.com
-
Radeon™ RX Vega series
- Radeon™ RX 500 series
- Radeon™ RX 400 series
- Radeon™ R9/R7 300 series (R9 370/X, R7 370/X, R7 265 except)
- Radeon™ Pro Duo (2016)
- Radeon™ R9 Nano series
- Radeon™ R9 Fury series
- Radeon™ R9/R7 200 series (R9 270/X, R9 280/X except)
Adaptive-Sync function (Available for selective models)
- Adaptive-Sync function is working with DP/HDMI
-
Compatible Graphics Card: Recommend list is as the below, also could be checked by visiting www.AMD.com
-
Radeon™ RX Vega series
- Radeon™ RX 500 series
- Radeon™ RX 400 series
- Radeon™ R9/R7 300 series (R9 370/X, R7 370/X, R7 265 except)
- Radeon™ Pro Duo (2016)
- Radeon™ R9 Nano series
- Radeon™ R9 Fury series
- Radeon™ R9/R7 200 series (R9 270/X, R9 280/X except)
HDR
It is compatible with input signals in HDR10 format.
The display may automatically activate the HDR function if the player and content are compatible. Please contact the device manufacturer and the content provider for information on the compatibility of your device and content. Please select "OFF" for the HDR function when you have no need for automatic activation function.
Note:
- No special setting is needed for the DisplayPort/HDMI interface in WIN10 versions lower (older) than V1703.
- Only the HDMI interface is available and the DisplayPort interface cannot function in WIN10 version V1703.
- 3840x2160 @50Hz /60Hz not suggestion used in PC device only for UHD player or Xbox-ones / PS4-Pro.
a. The display resolution is set to 3840*2160, and HDR is preset to ON. Under these conditions, the screen may slightly dim, indicating HDR has been activated.
b. After entering an application, the best HDR effect can be achieved when the resolution is changed to 3840*2160 (if available).


Adjusting
Hotkeys

| 1 Source/Up |
| 2 Dial Point/Down |
| 3 Game Mode/Left |
| 4 Light FX /Right |
| 5 Power/ Menu/Enter |
Power/Menu/Enter
Press the Power button to turn on the monitor.
When there is no OSD, Press to display the OSD or confirm the selection. Press about 2 seconds to turn off the monitor.
Dial Point/Down
When there is no OSD, press Dial Point button to show / hide Dial Point.
Game Mode/Left
When there is no OSD, press "Left" key to open game mode function, then press "Left" or "Right" key to select game mode (FPS, RTS, Racing, Gamer 1, Gamer 2 or Gamer 3) basing on the different game types.
Light FX/Right
When there is no OSD, press "Right" key to active Light FX function.
Source/Up
When the OSD is closed, press Source/Auto/Up button will be Source hot key function.
Quick Switch


When there is no OSD, press the ◀ button to open game mode function, then press ◀ or ▶ key to select game mode (FPS, RTS, Racing, Gamer 1, Gamer 2 or Gamer 3) basing on the different game types.

When there is no OSD, press "Right" key to active Light FX function.
Menu/OK:
When there is no OSD, Press to display the OSD or confirm the selection.

When the OSD is closed, press ▲ button will be Source hot key function.

When there is no OSD, press Dial Point button to show / hide Dial Point.
1:
Press the 1 button to select Gamer 1 mode
2:
Press the 2 button to select Gamer 2 mode
3:
Press the 3 button to select Gamer 3 mode

Press to exit OSD.
OSD Key Guide (Menu)

Enter : Use Enter key to enter the next OSD level
Move : Use Left / Up / Down key to move OSD selection
Exit : Use Right key to exit OSD

Enter : Use Enter key to enter the next OSD level
Move : Use Right / Up / Down key to move OSD selection
Exit : Use Left key to exit OSD

Enter : Use Enter key to enter the next OSD level
Move : Use Up / Down key to move OSD selection
Exit : Use Left key to exit OSD

Move : Use Left / Right / Up / Down Key to move OSD selection

Exit : Use Left key to exit OSD to previous OSD level
Enter : Use Right key to enter next OSD level
Select : Use Up / Down key to move OSD selection

Enter : Use Enter key to apply the OSD setting and back to previous OSD level
Select : Use Down key to adjust OSD setting

Select : Use Up / Down key to adjust OSD setting

Enter : Use Enter key to exit OSD to previous OSD level
Select : Use Left / Right key to adjust OSD setting
OSD Setting
Basic and simple instruction on the control keys.
![graph LR A["AGON"] --> B["Game Setting"] A --> C["Luminance"] A --> D["Image Setup"] A --> E["Color Setup"] A --> F["Light FXAudio"] G["AGON"] --> H["Image Setup"] G --> I["Color Setup"] G --> J["Light FXAudio"] G --> K["OSD SetupExtras"] L["EnterMoveExit"] --> M["EnterMoveExt"] N["Video"] --> O["Vi…](/content/2026/08/1632822/images/fec757257e85d084508ac29e5db73177740ea6c670d9dfaeb921e61a0cbe75f3.jpg)
1). Press the MENU-button to activate the OSD window.
2). Follow Key Guide to move or select (adjust) OSD settings
3). OSD Lock/Unlock Function: To lock or unlock the OSD, press and hold the Down-button for 10s while OSD function is not active.
Notes:
1). If the product has only one signal input, the item of "Input Select" is disable to adjust.
2). ECO modes (except Standard mode), DCR and DCB mode, for these three states that only one state can exist.
Game Setting

 | Game Mode | FPS | For playing FPS (first Person Shooters) games. Improves dark theme black level details. |
| RTS | For playing RTS (Real Time Strategy). Improves the image quality. | ||
| Racing | For playing Racing games, Provides fastest response time and high color saturation. | ||
| Gamer 1 User's preference settings saved as Gamer 1. | |||
| Gamer 2 User's preference settings saved as Gamer 2. | |||
| Gamer 3 User's preference settings saved as Gamer 3. | |||
| off | No optimization by Smart image game | ||
| Shadow Control | 0-100 | Shadow Control Default is 50, then end-user can adjust from 50 to 100 or 0 to increase contrast for clear picture.1. If picture is too dark to be saw the detail clearly, adjusting from 50 to 100 for clear picture.2. If picture is too white to be saw the detail clearly, adjusting from 50 to 0 for clear picture | |
| Game Color | 0-20 | Game Color will provide 0-20 level for adjusting saturation to get better picture. | |
| MBR | 0-20 | Adjust the Motion Blur Reduction. | |
| Adaptive-Sync/G-SYNC/AMD FreeSync(Available for selective models) | On / Off | Disable or Enable Adaptive-Sync/G-SYNC/AMD FreeSync Premium. | |
| Overdrive | Weak/Medium/Strong/Boost/Off | Adjust the response time. | |
| Low Input lag | On / Off Turn off frame buffer to decrease input lag | ||
| QuickSwitch LED | On / Off Disable or Enable QuickSwitch LED | ||
| Frame Counter | Off / Right-Up /Right-Down / Left-Down / Left-Up | Display V frequency on the corner selected(Frame counter feature only works with AMD graphic card.) | |
Note:
- When "HDR Mode" under "Image Setup" is set to non-off, "Game Mode", "Shadow Control" and "Game Color" can't be adjusted.
- When "HDR" under "Image Setup" is set to non-off, "Game Mode", "Shadow Control", "Game Color", "MBR" and "Boost" under "Overdrive" can't be adjusted or selected.
Luminance

 | Contrast 0-100 Contrast from Digital-register. | |
| Brightness 0-100 | Backlight Adjustment | |
| Eco mode | Standard Standard Mode | |
| Text Text Mode | ||
| Internet Internet Mode | ||
| Game Game Mode | ||
| Movie Movie Mode | ||
| Sports Sports Mode | ||
| Reading Reading Mode | ||
| Gamma | Gamma1 Adjust to Gamma 1 | |
| Gamma2 Adjust to Gamma 2 | ||
| Gamma3 Adjust to Gamma 3 | ||
| DCR Off/On | Disable/ Enable dynamic contrast ratio | |
Note:
- When "HDR Mode" under "Image Setup" is set to non-off, "Contrast", "Eco Mode" and "Gamma" can't be adjusted.
- When "HDR" under "Image Setup" is set to non-off, all items under "Luminance" can't be adjusted.
Image Setup

 | HDR | Off / DisplayHDR / HDR Picture / HDR Movie / HDR Game | Set the HDR profile according to your usage requirements.Note:When HDR content is detected, the HDR option will be displayed for adjustment. |
| HDR Mode | Off / HDR Picture / HDR Movie / HDR Game | Optimized for the color and contrast of the picture, which simulates HDR effect.Note:When HDR content is not detected, the HDR mode option will be displayed for adjustment. |
Note:
When HDR is detected, the HDR option is displayed for adjustment; when HDR is not detected, the HDR Mode option is displayed for adjustment.
Color Setup
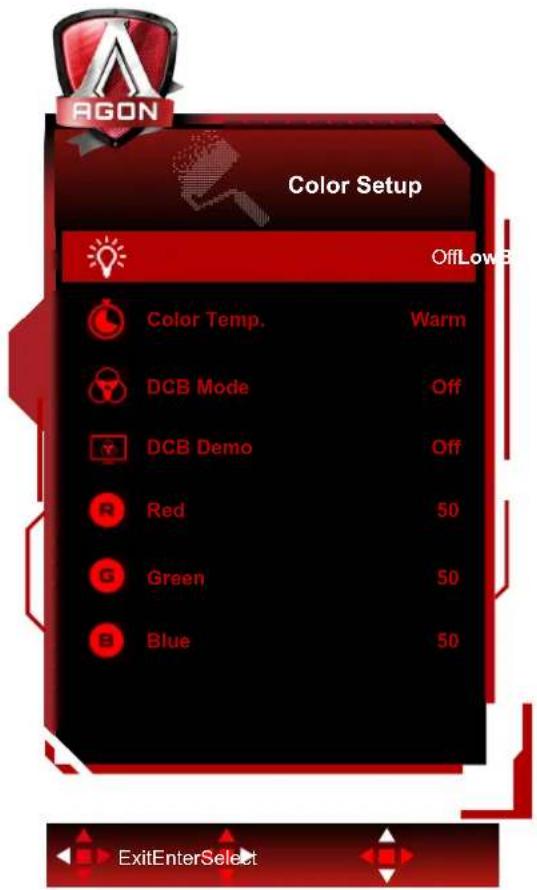
 | LowBlue Mode | Off / Multimedia / Internet / Office / Reading | Decrease blue light wave by controlling color temperature. | |
| Color Temp. | Warm Recall Warm Color Temperature from EEPROM. | |||
| Normal | Recall Normal Color Temperature from EEPROM. | |||
| Cool Recall Cool Color Temperature from EEPROM. | ||||
| sRGB Recall SRGB Color Temperature from EEPROM. | ||||
| User | Red Red Gain from Digital-register | |||
| Green Green Gain Digital-register. | ||||
| Blue Blue Gain from Digital-register | ||||
| DCB Mode | Off on or off Disable or Enable DCB Mode | |||
| Full Enhance on or off Disable or Enable Full Enhance Mode | ||||
| Nature Skin on or off Disable or Enable Nature Skin Mode | ||||
| Green Field on or off Disable or Enable Green Field Mode | ||||
| Sky-blue | on or off Disable or Enable Sky-blue Mode | |||
| AutoDetect | on or off Disable or Enable AutoDetect Mode | |||
| DCB Demo | on or off Disable or Enable Demo | |||
| Red | 0-100 | Red gain from Digital-register. | ||
| Green | 0-100 | Green gain from Digital-register. | ||
| Blue | 0-100 | Blue gain from Digital-register. | ||
Note:
When "HDR Mode" or "HDR" under "Image Setup" is set to non-off, all items under "Color Setup" can't be adjusted.
Audio
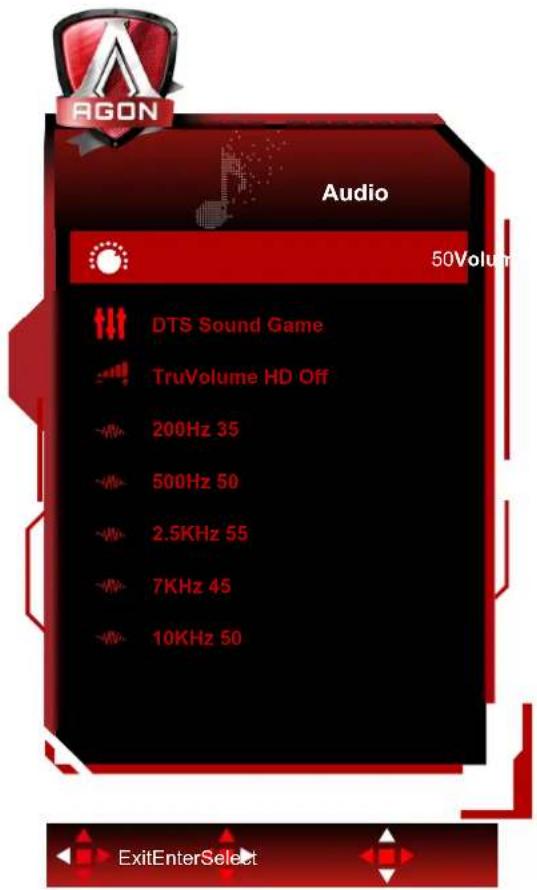
 | Volume 0-100 Adjust volume setting | ||
| DTS Sound | Game / Rock /Classical / Live /Theater / Off | Select DTS Sound mode.Note: It may take up to 2 seconds to switch modes. | |
| TruVolume HD On / Off Disable or Enable TruVolume HD. | |||
| 200Hz 0-100 | Low frequency base audio, also the root audio frequency of the chord in the tone. | ||
| 500Hz 0-100 | Mainly used to express vocals (eg. singing, reading), Strengthen the thickness and strength of vocals. | ||
| 2.5KHz 0-100 | This frequency has a strong penetrating power and can be improved to improve the brightness and clarity of the sound. | ||
| 7KHz | 0-100 Enhance the | clarity of vocals. | |
| 10KHz | 0-100 | The high-pitched area of music is most sensitive to the high-frequency performance of the sound. | |
Light FX

 | Light FX | Off / Low / Medium / Strong | Select the intensity of Light FX. |
| Light FX Mode | Audio1 / Audio2 / Static / Dark Point Sweep / Gradient Shift / Spread Fill / Drip Fill / Spreading Drip Fill / Breathing / Light Point Sweep / Zoom / Rainbow / Wave / Flashing / Demo | Select Light FX Mode | |
| Pattern | Red / Green / Blue / Rainbow / User Define | Select Light FX Pattern | |
| Foreground R | 0-100 | User can adjust Light FX foreground color, when Pattern setting to user define | |
| Foreground G | |||
| Foreground B | |||
| Background R | 0-100 | User can adjust Light FX background color, when Pattern setting to user define | |
| Background G | |||
| Background B |
Extra

 | Input Select | AUTO/HDMI1/HDMI2/DP1/DP2 | Select Input Signal Source |
| USB On or Off | For model need to turn on/off USB power during power saving | ||
| Logo Projector Off/Low/Medium/Strong It's projection logo function. | |||
| Red 0 ~ 100 Red gain from Digital-register. | |||
| Green 0 ~ 100 Green gain from Digital-register. | |||
| Blue 0 ~ 100 Blue gain from Digital-register. | |||
| Off timer 0-24hrs | Select DC off time | ||
| Image Ratio | Wide / 4:3 / 1:1 / 17"(4:3) / 19"(4:3) / 19"(5:4) / 19"W(16:10) / 21.5"W(16:9) / 22"W(16:10) / 23"W(16:9) / 23.6"W(16:9) / 24"W(16:9) | Select image ratio for display. | |
| DDC/CI | Yes or No | Turn ON/OFF DDC/CI Support | |
| Reset | Yes or No | Reset the menu to default | |
OSD Setup

 | Language Select the OSD language | ||
| Timeout 5-120 Adjust the OSD Timeout | |||
| DP Capability 1.1/1.2/1.4 | please be noted that only DP1.2/DP1.4 support Adaptive-Sync/G-SYNC/AMD FreeSync Premium function | ||
| H. Position 0-100 Adjust the horizontal position of OSD | |||
| V. Position 0-100 Adjust the vertical position of OSD | |||
| Transparence 0-100 Adjust the transparence of OSD | |||
| Break Reminder on /off Break reminder if the user continuously work for more than 1hrs | |||
Note:
If the DP video content supports DP1.2/DP1.4, please select DP1.2/DP1.4 for DP Capability; otherwise, please select DP1.1
LED Indicator
| Status LED Color | |
| Full Power Mode White | |
| Active-off Mode Orange |
Troubleshoot
| Problem & Question | Possible Solutions |
| Power LED Is Not ON | Make sure the power button is ON and the Power Cord is properly connected to a grounded power outlet and to the monitor. |
| No images on the screen | Is the power cord connected properly?Check the power cord connection and power supply.Is the cable connected correctly?(Connected using the D-SUB cable)Check the D-SUB cable connection.(Connected using the HDMI cable)Check the HDMI cable connection.(Connected using the DP cable)Check the DP cable connection.*D-SUB/HDMI/DP input is not available on every model.If the power is on, reboot the computer to see the initial screen (the login screen), which can be seen.If the initial screen (the login screen) appears, boot the computer in the applicable mode (the safe mode for Windows 7/8/10) and then change the frequency of the video card.(Refer to the Setting the Optimal Resolution)If the initial screen (the login screen) does not appear, contact the Service Center or your dealer.Can you see "Input Not Supported" on the screen?You can see this message when the signal from the video card exceeds the maximum resolution and frequency that the monitor can handle properly.Adjust the maximum resolution and frequency that the monitor can handle properly.Make sure the AOC Monitor Drivers are installed. |
| Picture Is Fuzzy & Has Ghosting Shadowing Problem | Adjust the Contrast and Brightness Controls.Press to auto adjust.Make sure you are not using an extension cable or switch box. We recommend plugging the monitor directly to the video card output connector on the back. |
| Picture Bounces, Flickers Or Wave Pattern Appears In The Picture | Move electrical devices that may cause electrical interference as far away from the monitor as possible.Use the maximum refresh rate your monitor is capable of at the resolution you are using. |
| Monitor Is Stuck In Active Off-Mode" | The Computer Power Switch should be in the ON position.The Computer Video Card should be snugly fitted in its slot.Make sure the monitor's video cable is properly connected to the computer.Inspect the monitor's video cable and make sure no pin is bent.Make sure your computer is operational by hitting the CAPS LOCK key on the keyboard while observing the CAPS LOCK LED. The LED should either turn ON or OFF after hitting the CAPS LOCK key. |
| Missing one of the primary colors (RED, GREEN, or BLUE) | Inspect the monitor's video cable and make sure that no pin is damaged.Make sure the monitor's video cable is properly connected to the computer. |
| Screen image is not centered or sized properly | Adjust H-Position and V-Position or press hot-key (AUTO). |
| Picture has color defects (white does not look white) | Adjust RGB color or select desired color temperature. |
| Horizontal or vertical disturbances on the screen | Use Windows 7/8/10 shut-down mode to adjust CLOCK and FOCUS.Press to auto-adjust. |
Specification
General Specification
| Panel | Model name AG274QS | ||
| Driving system TFT Color LCD | |||
| Viewable Image Size 68.5 cm diagonal | |||
| Pixel pitch | 0.2331mm(H) x 0.2331mm(V) | ||
| Display Color 16.7M | |||
| Others | Horizontal scan range | 30~230kHz (HDMI)30~255kHz (DP) | |
| Horizontal scan Size(Maximum) 596. | 736 mm | ||
| Vertical scan range | 48~144Hz (HDMI)48~300Hz (DP) | ||
| Vertical Scan Size(Maximum) 335.66 | 4 mm | ||
| Optimal preset resolution 2560 x 144 | 0@60Hz | ||
| Max resolution | 2560 x 1440@144Hz (HDMI)2560 x 1440@300Hz (DP) | ||
| Plug & Play VESA DDC2B/CI | |||
| Power Source 20Vdc, 6.0A | |||
| Power Consumption | Typical (default brightness and contrast) 40W | ||
| Max. (Brightness = 100, contrast =100) ≤120W | |||
| Standby mode ≤0.5W | |||
| Physical Characteristics | Connector Type HDMI/ DP/ USB/ Ea | phone out/ Microphone In | |
| Signal Cable Type | Detachable | ||
| Environmental | Temperature | Operating 0°~40° | |
| Non-Operating -25°~55° | |||
| Humidity | Operating 10% ~ 85% | (non-condensing) | |
| Non-Operating 5% ~ 93% (non-condensing) | |||
| Altitude | Operating 0~5000 m | (0~16404ft) | |
| Non-Operating 0~121 | 92m (0~40000ft) | ||

Preset Display Modes
| STANDARD RESOLUTION | HORIZONTAL FREQUENCY(kHz) | VERTICAL FREQUENCY(Hz) | |
| VGA 640x480@60Hz 31.469 59.94 | |||
| VGA 640x480@67Hz 35 66.667 | |||
| VGA 640x480@72Hz 37.861 72.809 | |||
| VGA 640x480@75Hz 37.5 75 | |||
| VGA 640x480@100Hz 51.08 99.769 | |||
| VGA 640x480@120Hz 61.91 119.518 | |||
| DOS MODE 720x400@70Hz 31.469 70.087 | |||
| DOS MODE 720x480@60Hz 29.855 59.710 | |||
| SD 720x576@50Hz 31.25 50 | |||
| SVGA | 800x600@56Hz 35.156 56.25 | ||
| SVGA | 800x600@60Hz 37.879 60.317 | ||
| SVGA | 800x600@72Hz 48.077 72.188 | ||
| SVGA | 800x600@75Hz 46.875 75 | ||
| SVGA | 800x600@100Hz | 63.684 99.662 | |
| SVGA | 800x600@120Hz | 76.302 119.97 | |
| SVGA | 832x624@75Hz 49.725 74.551 | ||
| XGA 1024x768@60Hz | 48.363 60.004 | ||
| XGA 1024x768@70Hz | 56.476 70.069 | ||
| XGA 1024x768@75Hz | 60.023 75.029 | ||
| XGA | 1024x768@100Hz | 81.577 99.972 | |
| XGA | 1024x768@120Hz | 97.551 | 119.989 |
| SXGA | 1280x1024@60Hz | 63.981 60.02 | |
| SXGA | 1280x1024@75Hz | 79.975 75.025 | |
| Full HD | 1920x1080@60Hz 67.5 60 | ||
| Full HD | 1920x1080@120Hz | 135 120 | |
| QHD | 2560x1440@60Hz | 88.787 59.951 | |
| QHD | 2560x1440@120Hz | 182.996 | 119.998 |
| QHD | 2560x1440@144Hz | 222.056 | 143.912 |
| QHD(for DP) | 2560x1440@200Hz | 294 | 200 |
| QHD(for DP) | 2560x1440@240Hz | 352.803 | 240.002 |
| QHD(for DP) | 2560x1440@270Hz | 396.9 270 | |
| QHD(for DP) | 2560x1440@300Hz | 441 | 300 |
Pin Assignments

19-Pin Color Display Signal Cable
| Pin No. | Signal Name Pin No. | Signal Name | Pin No. | Signal Name | ||
| 1. TMDS | Data 2+ 9. TMDS Data 0- 17. DDC/CEC Ground | |||||
| 2. TMDS | Data 2 Shield 10. TMDS Clock + 18. +5V Power | |||||
| 3. TMDS | Data 2- 11. TMDS Clock Shield 19. Hot Plug Detect | |||||
| 4. TMDS | Data 1+ 12. TMDS Clock- | |||||
| 5. TMDS | Data 1Shield 13. CEC | |||||
| 6. TMDS | Data 1- 14. Reserved (N.C. on device) | |||||
| 7. TMDS | Data 0+ 15. SCL | |||||
| 8. TMDS | Data 0 Shield 16. SDA | |||||

20-Pin Color Display Signal Cable
| Pin No. Signal Name Pin No. Signal Name | |||
| 1 ML_Lane 3 (n) 11 GND | |||
| 2 GND | 12 ML_Lane 0 (p) | ||
| 3 ML_Lane 3 (p) | 13 CONFIG1 | ||
| 4 ML_Lane 2 (n) | 14 CONFIG2 | ||
| 5 GND | 15 AUX_CH(p) | ||
| 6 ML_Lane 2 (p) | 16 GND | ||
| 7 ML_Lane 1 (n) | 17 AUX_CH(n) | ||
| 8 GND | 18 Hot Plug Detect | ||
| 9 ML_Lane 1 (p) | 19 Return DP_PWR | ||
| 10 ML_Lane 0 (n) | 20 DP_PWR | ||
Plug and Play
Plug & Play DDC2B Feature
This monitor is equipped with VESA DDC2B capabilities according to the VESA DDC STANDARD. It allows the monitor to inform the host system of its identity and, depending on the level of DDC used, communicate additional information about its display capabilities.
The DDC2B is a bi-directional data channel based on the I2C protocol. The host can request EDID information over the DDC2B channel.

For DTS patents, see http://patents.dts.com. Manufactured under license from DTS Licensing Limited. DTS, the Symbol, & DTS and the Symbol together are registered trademarks, and DTS Sound is a trademark of DTS, Inc. © DTS, Inc. All Rights Reserved.
- SAFETY
- SETUP
- ADJUSTING
- TROUBLESHOOT
- SPECIFICATION
- NATIONAL CONVENTIONS
- POWER
- INSTALLATION
- CLEANING
- OTHER
- SETUP STAND & BASE
- ADJUSTING THE MONITOR
- NOTE
- WARNING
- CONNECTING THE MONITOR
- CONNECT TO PC
- WALL MOUNTING
- G-SYNC FUNCTION (AVAILABLE FOR SELECTIVE MODELS)
- AMD FREESYNC PREMIUM FUNCTION (AVAILABLE FOR SELECTIVE MODELS)
- ADAPTIVE-SYNC FUNCTION (AVAILABLE FOR SELECTIVE MODELS)
- HDR
- POWER/MENU/ENTER
- DIAL POINT/DOWN
- GAME MODE/LEFT
- LIGHT FX/RIGHT
- SOURCE/UP
- QUICK SWITCH
- OSD KEY GUIDE (MENU)
- OSD SETTING
- NOTES
- LED INDICATOR
- PIN ASSIGNMENTS
- PLUG AND PLAY
Brand : AOC
Model : AGON AG274QS
Category : Monitor