
B411DN - Printer OKI - Free user manual and instructions
Find the device manual for free B411DN OKI in PDF.
| Brand | OKI |
| Model | B411DN |
| Product Type | Monochrome laser printer |
| Weight | Approximately 24 lb (10.9 kg) |
| Power Supply | 15 A power cord provided; plug into a suitable electrical outlet |
| Consumables | Toner cartridge and image drum cartridge |
| Supported paper sizes | A4, Legal, etc. (adjust guide for legal size) |
| Connectivity | USB 2.0, Ethernet (RJ-45), Parallel (IEEE 1284) |
| Supported operating systems | Windows (XP/Vista/7/8/10), Mac OS X 10.2.8 and later |
| Print drivers | PCL |
| Options | Optional lower tray, optional memory |
| Network configuration | Built-in web page accessible via the printer's IP address |
| Display languages | Changeable via the utility provided on CD |
| Safety | Safety, Warranty and Regulatory booklet included |
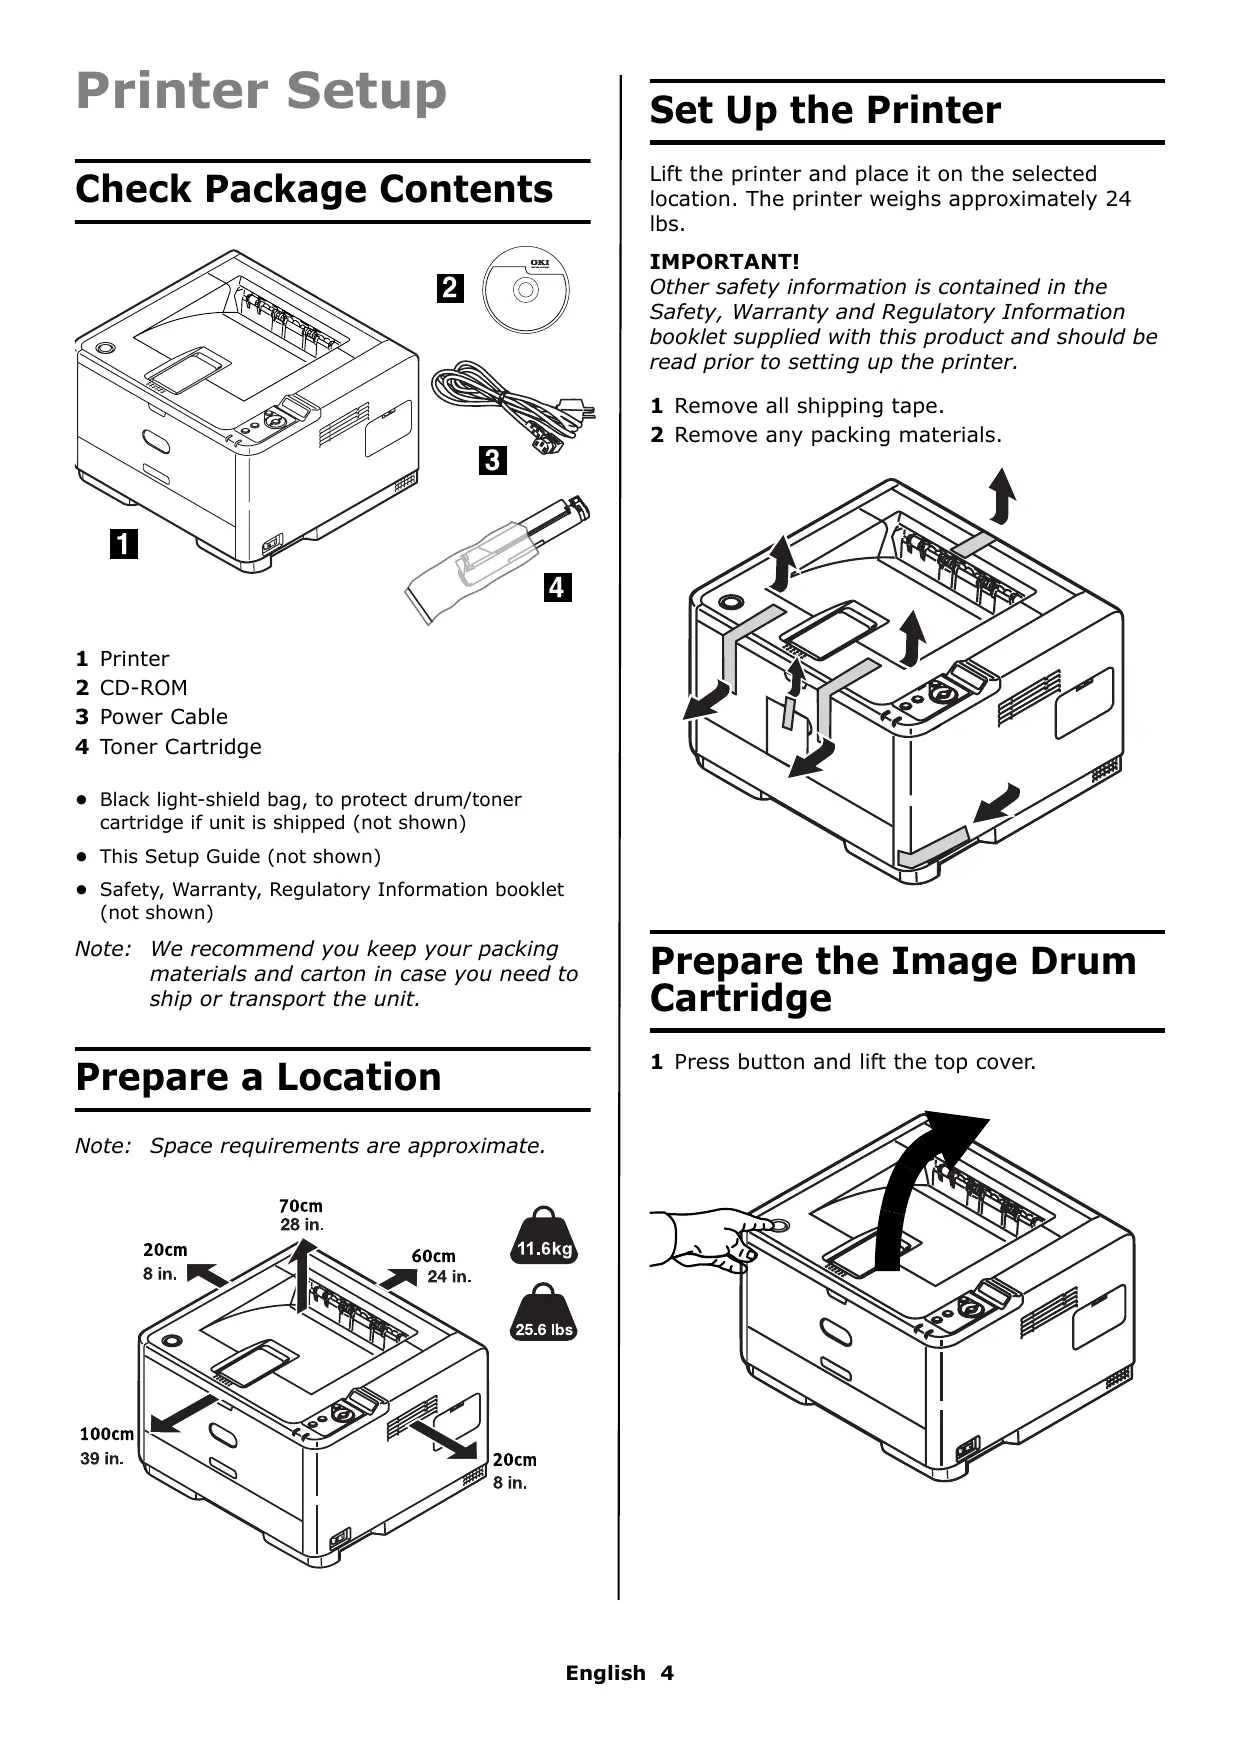
| Package contents | Printer, CD-ROM, power cord, toner cartridge, installation guide, safety booklet |
Frequently Asked Questions - B411DN OKI
User questions about B411DN OKI
0 question about this device. Answer the ones you know or ask your own.
Ask a new question about this device
Download the instructions for your Printer in PDF format for free! Find your manual B411DN - OKI and take your electronic device back in hand. On this page are published all the documents necessary for the use of your device. B411DN by OKI.
USER MANUAL B411DN OKI
CheckPackageContents 4
Prepare a Location 4
Set Up the Printer 4
Prepare the Image Drum Cartridge 4
Install the Toner Cartridge 6
Load Paper 7
Insert Power Cable. 8
Computer Connection. 8
Windows Setup 9
Macintosh Setup 10
Service and Support. 11
Contidente
- Black light-shield bag, to protect drum/toner cartridge if unit is shipped (not shown)
- This Setup Guide (not shown)
- Safety, Warranty, Regulatory Information booklet (not shown)
Note: We recommend you keep your packing materials and carton in case you need to ship or transport the unit.
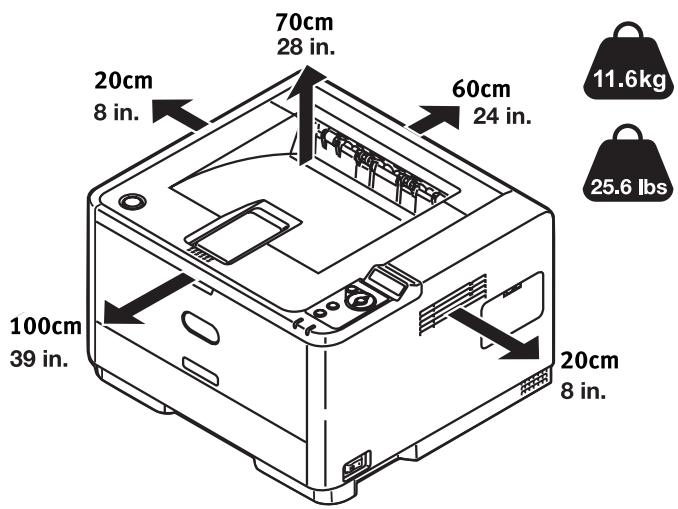
Prepare a Location
Note: Space requirements are approximate.
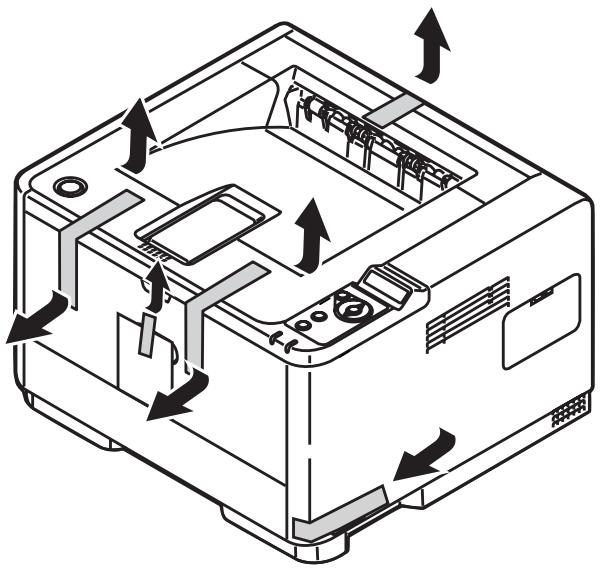
Set Up the Printer
Lift the printer and place it on the selected location. The printer weighs approximately 24 lbs.
IMPORTANT!
Other safety information is contained in the Safety, Warranty and Regulatory Information booklet supplied with this product and should be read prior to setting up the printer.
1 Remove all shipping tape.
2 Remove any packing materials.
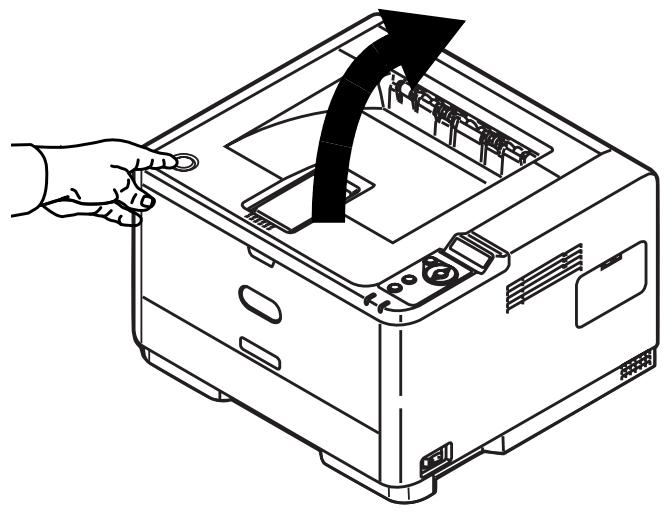
Prepare the Image Drum Cartridge
1 Press button and lift the top cover.
2 Lift the drum cartridge from printer.
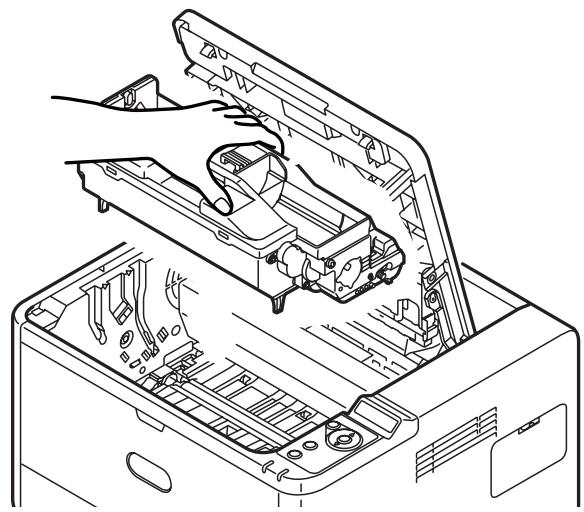
Note: Do not expose cartridge to light for more than 5 minutes.
Note: Do not touch shiny green surface at bottom of drum cartridge.
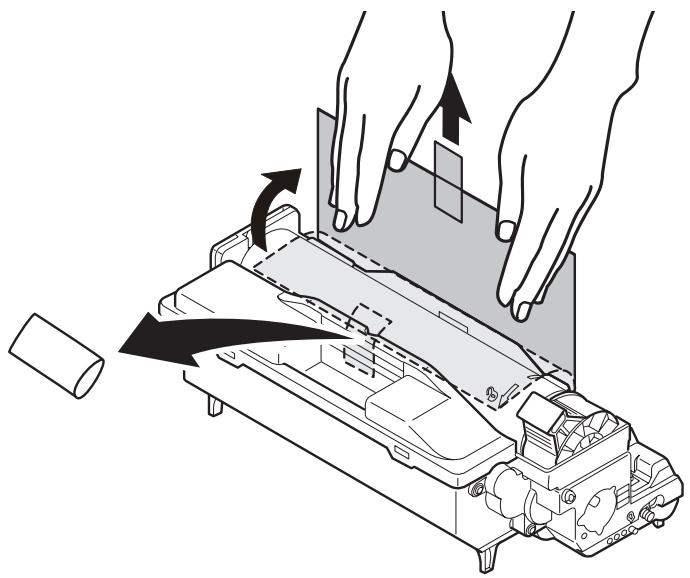
3 Lift tape, then pull out protective paper as shown below. Lift out and discard shipping restraints.
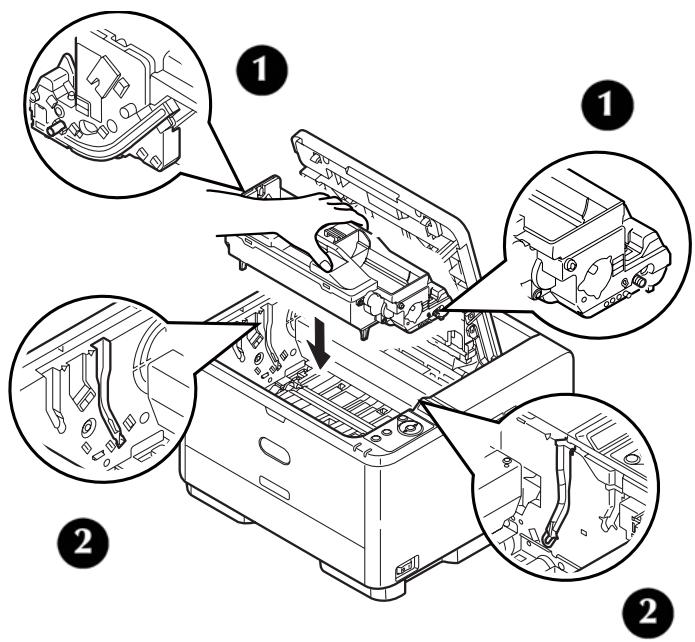
4 Reinstall drum cartridge in the printer:lower it into place in the printer locating the pegs (1) at each end into their slots in the sides of the printer cavity (2).
Install the Toner Cartridge
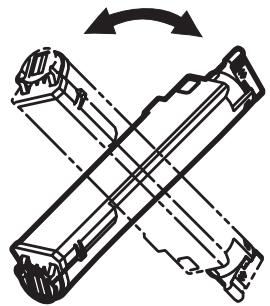
1 Unpack the toner cartridge.
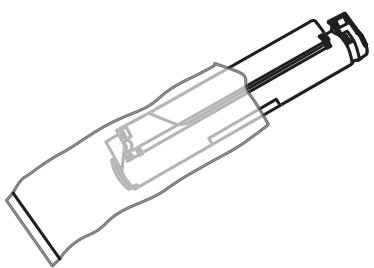
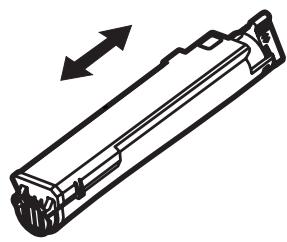
2 Shake the cartridge several times vertically and horizontally to distribute toner.
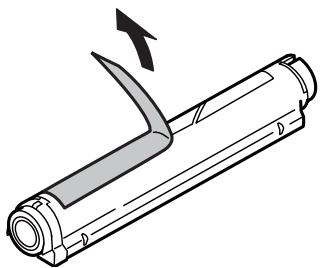
3 Holding the cartridge in a horizontal position, slowly peel off the tape.
4 Hold the cartridge with the (blue) knob (1) on the right. Tilt the cartridge slightly and insert
the left side under the protrusions (2) on the image drum cartridge.
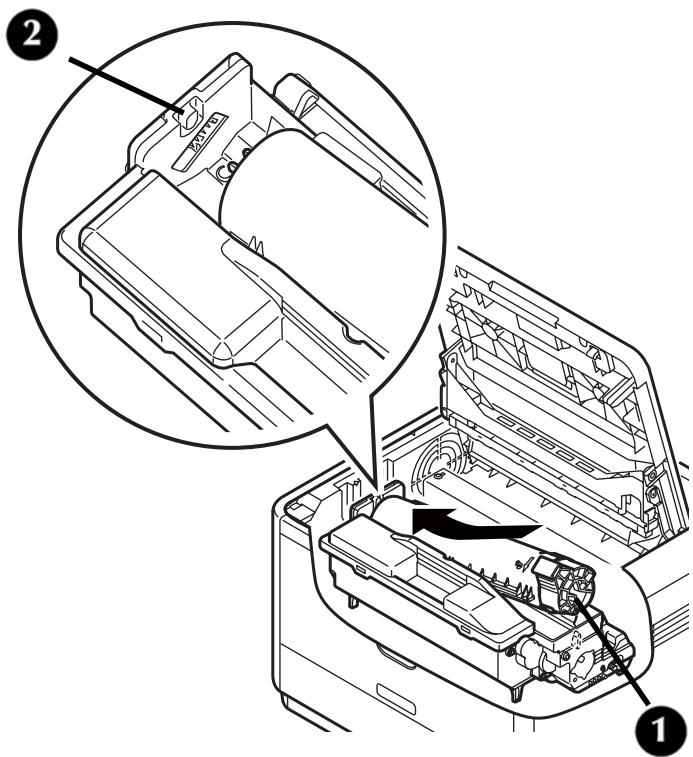
5 Lower the right side, aligning the slot in the toner cartridge with the guide post of the image drum. Push the toner cartridge down completely until it snaps into place.
6 Holding the toner cartridge down so it does not pop up, turn the knob in the direction show.
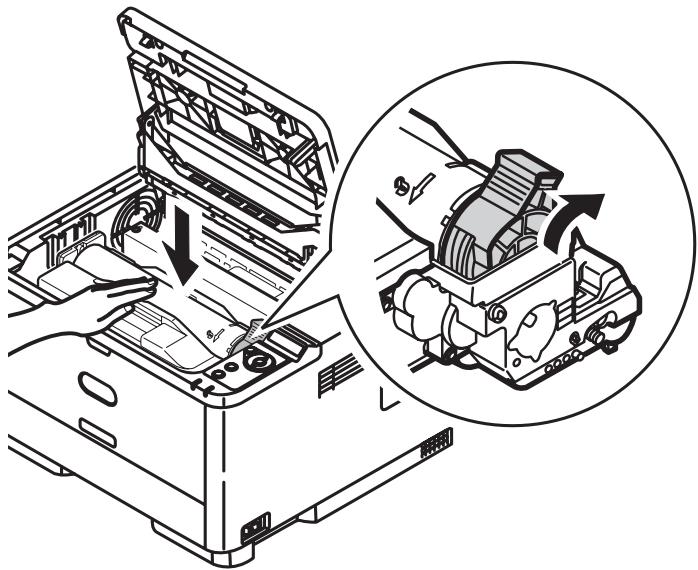
Note: The arrow on the knob should align with the arrow on the drum cartridge.
7 Close the top cover.
Load Paper
1 Pull out the paper tray.

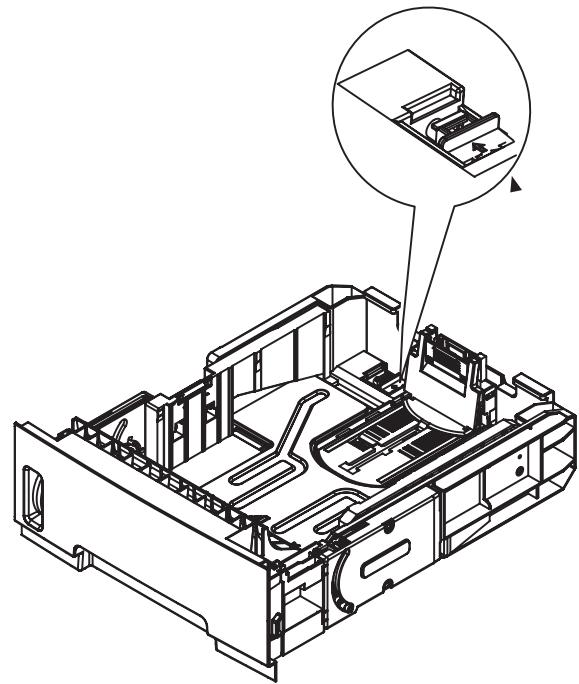
2 Set guides to paper width and paper length.
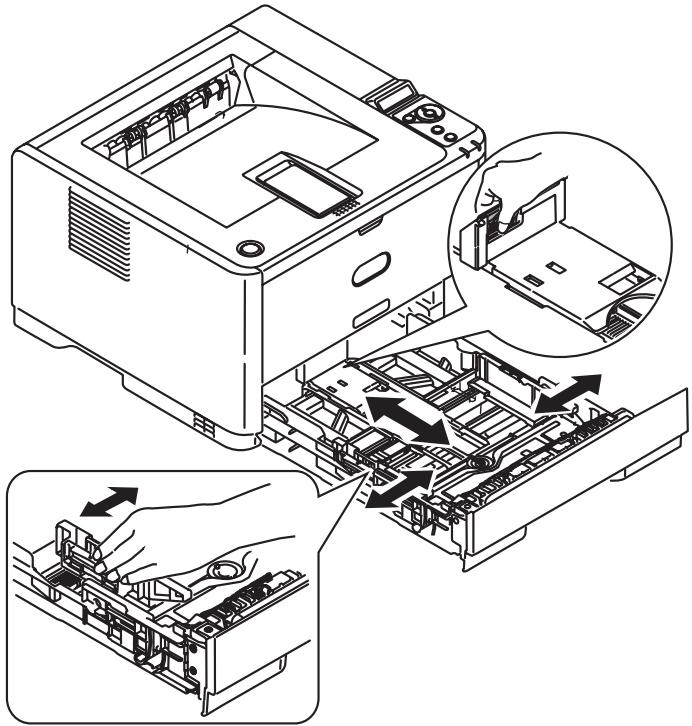
Note: For legal size paper, slide the release lever to the left while pulling out the paper guide to the LGL position.
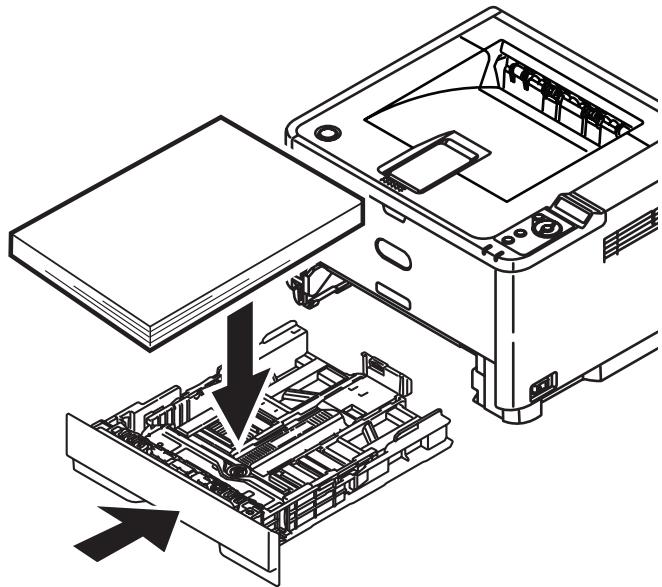
3 Load paper (face down and top edge towards the front for letterhead paper). Be sure guides are snug against the paper and are locked in place. Close the paper tray.
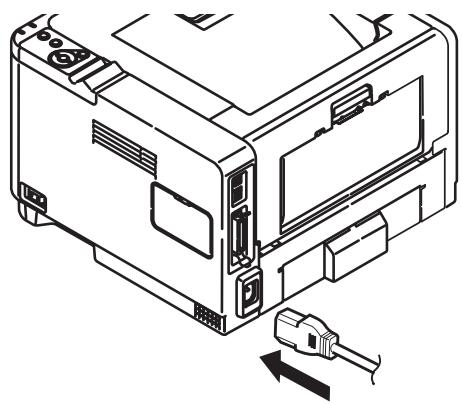
Insert Power Cable
Insert the power cable.
Note: Do NOT turn the printer on.
WARNING!
Be sure to use the 15A AC power cord supplied with the printer. Use of a power cord NOT supplied with this printer, or an extension cord, may result in overheating, and could be a safety hazard.
CAUTION!
To prevent fire or shock hazards, connect the power plug only to a properly rated power outlet.
Do not connect this product to an uninterrupted power supply (UPS). For further information please contact Oki Data at 1-800-OKIDATA or www.okidata.com.
Computer Connection
Note: Interface cables are not supplied.
Network Connection
Connect the network cable between the printer network port and the Ethernet hub or router.

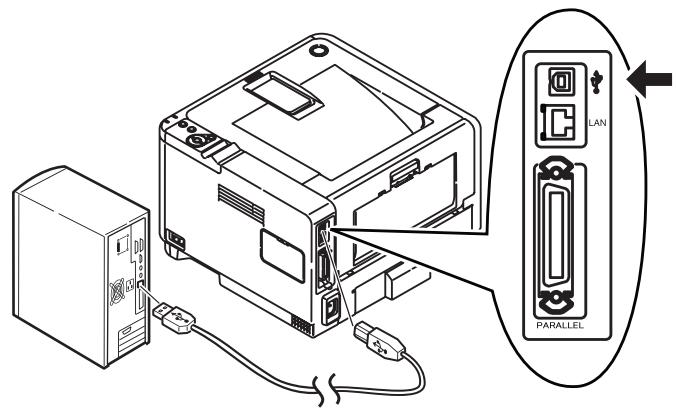
USB Connection
Note: If installing for Windows© with USB connection, install the software BEFORE installing the USB cable. See "Software Installation" on page 9.
Connect the USB cable between the printer USB port and the computer.
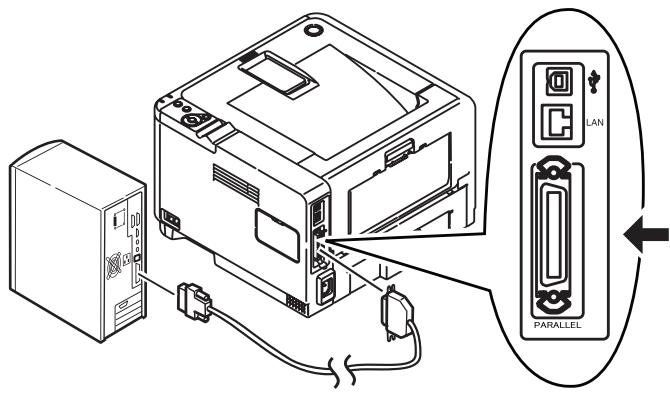
Parallel Connection
Note: Requires UL approved bi-directional (IEEE 1284 compliant) cable.
Connect the Parallel cable between the printer's Parallel port and the computer.
Software Installation
Windows Setup
Models B411dn and B431dn: Install the Driver on a Network
First, Print the Menu Map
Model B411dn
1 Click on Start > All Programs > Okidata > Configuration Tool and select Configuration Tool.
2 Click the B411 icon in the left panel.
3 Click the Device Setting tab.
4 Click the Menu Setting button.
5 Click USER MENU.
6 Click INFORMATION MENU.
7 Click the EXECUTE button beside PRINT MENU MAP.
The Menu Map prints.
Keep these sheets handy: they contain information you need to set up the printer on your network.
Model B431dn
1 Press Menu ▲ or ▼ on the control panel to select the Information Menu.
2 Press OK button.
3 Press the or button to select Network.
4 Press OK button to print the Menu Map.
Keep these sheets handy: they contain information you need to set up the printer on your network.
Second, Install the Driver
Models B411dn, B431dn
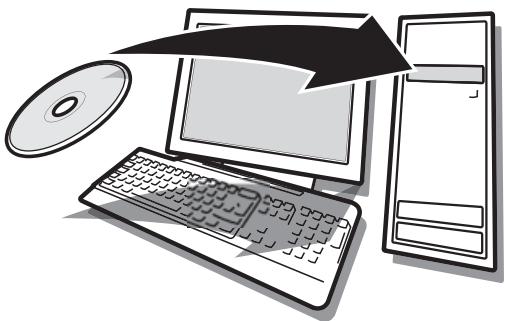
1 Insert the CD in the CD-ROM drive. The CD will autorun.
2 Select your language. Click Next.
3 If you accept the license agreement, select I Accept.
4 Select the Driver Setup tab then click Install Driver.
5 Select nNetwork printer.
6 Select Directly to the network using TCP/IP.
7 Enter the IP address (locate the address on the Print Menu Map in the Network Menu) or select Search Address to locate the printer on the network.
8 Follow the on-screen instructions.
Third, Test the Printer Driver Installation
Models B411dn, B431dn
To make sure the printer driver is correctly installed, print a test page:
1 On the Windows taskbar click Start/Settings/ Printers.
2 Right-click the printer model then click Properties.
3 Click the Print Test Page button. Reinstall the driver if the installation failed.
Configure Settings Using a Web Browser (optional)
Models B411dn, B431dn
If you are working in a TCP/IP-enabled environment, you can use a web browser to display the printer or job printing status, and to change settings on an embedded web page.
1 Activate your web browser (Microsoft Explorer®/TM, Netscape Navigator™ 4.4 or higher, Mozilla®, Firefox®).
2 Enter the IP Address for the printer. (Locate the address on the Print Menu Map in the Network Menu.
3 When the web page appears, select from the categories in the menu list.
Models B411d and B431d: Install the Driver on a USB or Parallel Setup
Install the Driver
1 Insert the CD in the CD-ROM drive. The CD will autorun.
2 Select your language. Click Next.
3 If you accept the license agreement, select I Agree.
4 Select the Driver Setup tab then click Install Driver.
5 Select Local Printer. Click Next.
6 Select the Port: USB or LPT1 (Parallel). Click Next.
7 Select printer model. Click Next.
8 If your model is a B431, select printer emulation type (PCL or PS).
9 Follow the on-screen instructions.
10 When done, click Finish.
Test the Printer Driver Installation
To make sure the printer driver is correctly installed, print a test page:
1 On the Windows taskbar click Start > Settings > Printers [Printers and faxes].
2 Right-click the printer model then click Properties.
3 Click the Print Test Page button. Reinstall the driver if the installation failed.
Model B411 only: Install the Configuration Tool
1 When the driver has been installed, the installer will go back to the menu screen.
2 Click Optional Utilities.
3 Click Install Configuration Tool.
4 With Configuration Tool highlighted, click Install.
5 When the inslattaion is complete, click Close.
All Models: Finish the Installation
Install Utilities and Downloads
Note: You must be connected to the internet to install Internet downloads.
1 Select Optional Utilities or Internet Downloads from the CD installer menu.
2 Click on the utilities and downloads you want to install and follow the instructions.
Change the Display Language
The default language used by your printer for display messages is English. To change it:
1 Select Optional Utilities > Change the Printer Display Language from the CD menu.
2 Follow the on-screen instructions.
Install the User Guide
1 Select the Driver Setup from the CD installer menu bar.
2 Click Install User's Guide.
3 Follow the on-screen instructions to install the manual on your computer.
4 To view the manuals, click Start > Programs > OkiData B411/B431 User Guide.
Note: To open the on-line user guide, you must have Adobe® Acrobat® Reader 5.0 or higher installed.
Activate Printer Options
If you have an optional paper tray installed, it must be activated in the printer driver.
1 Click Start > Settings > Printers on the Windows task bar.
2 Right click the printer icon and choose Properties.
3 Click on the Device Options tab.
4 Select Lower Cassette.
5 Click OK to activate the settings.
Note: If optional memory is installed, follow the installation instructions provided with the memory card.
Macintosh® Setup
The printer drivers support OS 10.2.8 and above.
Connect the cable
See "Computer Connection" on page 8.
Note: Printer operation is not assured if another USB compatible device is connected concurrently with it.
Install the Printer Driver
1 Turn on the printer, then turn on the computer.
2 Place CD in the CD-ROM drive.
3 Double-click the CD icon that appears on the desktop.
4 Open the MAC folder.
5 Open the OSX folder.
6 Open the Driver Installer folder.
7 Open the Multilingual folder. The installer will automatically install the language selected in the OS.
8 Select PCL, or select PS (B431 only).
9 Follow the on-screen instructions.
Add the Printer
1 Run the Print Center or Print Setup Utility or Print and Fax.
2 Click Add.
3 Click More Printers.
4 For USB, select OKI USB and quit.
5 For network models select OKI TCP/IP or Bonjour from the drop-down menu.
6 Enter the printer's IP address (network models).
7 Quit.
Install the Utilities
1 Insert the CD in the CD-ROM drive.
2 Double-click the CD icon that appears on the desktop.
3 open the Mac folder.
4 Double-click the OSX icon.
5 Double-click the Utility Installer.
6 Click Multilingual.
7 Click OSX B400 Series Utilities. Follow the on-screen instructions.
8 When the utilities list appears, check the utilities you want to install.
Install the Documentation
Note: Adobe® Acrobat® Reader 5.0 or higher is required to view the manuals.
1 Insert the CD into your CD-ROM drive.
2 Double-click the CD icon that appears on the desktop.
3 Install the manuals from the root directory.
To load: drag the .pdf file to the desktop
To view: double-click it.
Service and Support
Available 24 hours a day, 7 days a week.
- Visit our website: www.okiprintingsolutions.com
- Call 1-800-654-3282 (1-800-OKI-DATA)
Configuration de l'imprimante
USB.See "Instale o software" on page 35.
OKI, OkiLAN ® Oki Electric Industry Company, Ltd.
Microsoft, Windows, Windows Vista, Internet Explorer ®/™ Microsoft Corporation in the United States and other countries. Netscape, Netscape Navigator U.S. ™, Netscape Communications Corporation. Adobe, Acrobat, Acrobat Reader, PostScript ™ Adobe Systems, Inc. which may be registered in certain jurisdictions. Ethernet ® Digital Equipment Corporation. EtherTalk, LaserWriter, Mac, Macintosh ® Apple Computer, Inc., Velcro ® Velcro Industries, Mozilla and Firefox ®/™ Mozilla Foundation.
- Contidente
- Prepare a Location
- Set Up the Printer
- IMPORTANT!
- Prepare the Image Drum Cartridge
- Install the Toner Cartridge
- Load Paper
- Insert Power Cable
- WARNING!
- CAUTION!
- Computer Connection
- Network Connection
- USB Connection
- Parallel Connection
- Software Installation
- Windows Setup
- Models B411dn and B431dn: Install the Driver on a Network
- First, Print the Menu Map
- Model B411dn
- Model B431dn
- Second, Install the Driver
- Models B411dn, B431dn
- Third, Test the Printer Driver Installation
- Configure Settings Using a Web Browser (optional)
- Models B411d and B431d: Install the Driver on a USB or Parallel Setup
- Install the Driver
- Test the Printer Driver Installation
- Model B411 only: Install the Configuration Tool
- All Models: Finish the Installation
- Install Utilities and Downloads
- Change the Display Language
- Install the User Guide
- Activate Printer Options
- Macintosh® Setup
- Connect the cable
- Install the Printer Driver
- Add the Printer
- Install the Utilities
- Install the Documentation
- Service and Support
- Available 24 hours a day, 7 days a week.
- Configuration de l'imprimante
Brand : OKI
Model : B411DN
Category : Printer