USER MANUAL MAXI GRILL PRO LAGRANGE
text_image
Diagram of a grater with labeled parts including a handle, lid, and base, marked with numbers ③ and ⑥.
text_image
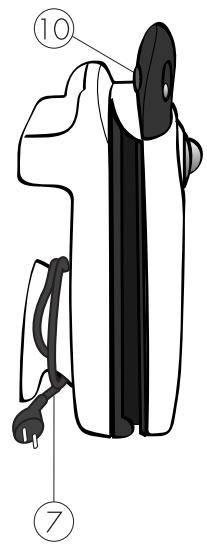
⑩
⑦
- Painted thermoset body
- Large thermoset handle
- Cast aluminium cooking plate with a non-stick layer and edges to prevent splashing
- Setting button for the adjustable thermostat

text_image
Diagram of a grater with labeled parts including a digital display and three numbered parts
- Programmable timer
- Removable thermoplastic tray
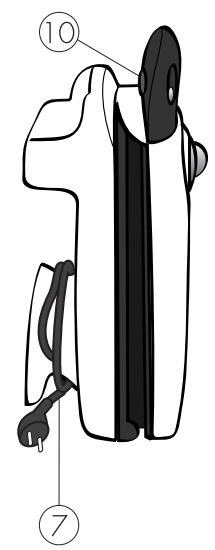
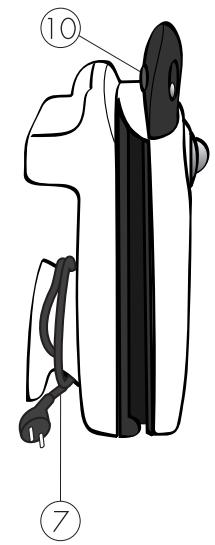
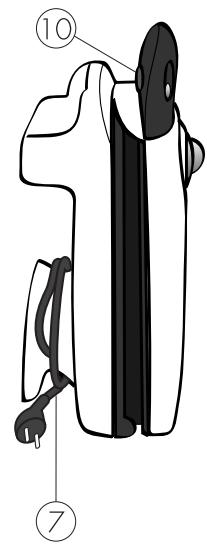
- Cord holder

text_image
⑩
⑦
- Red "On" indicator
- Green regulating indicator
- Timer battery housin
Description and technical characteristics
Model: Maxi Grill Pro® ref. 069301
- Painted thermoset body
- Large thermoset handle
- Cast aluminium cooking plate with a non-stick layer and edges to prevent splashing
- Setting button for the adjustable thermostat
- Programmable timer
- Removable thermoplastic tray
- Cord holder
- Red "On" indicator
- Green regulating indicator
- Timer battery housing
230 V 50 Hz 1700 W
Cord:
Before you use the unit each time, you must examine the power supply cable carefully. If it is damaged, you must not use the appliance.
In order to avoid any danger, the cord should only be replaced by the manufacturer, its after-sales service, or a qualified person approved by the manufacturer.
This appliance complies with Directives 73/23/EEC, 89/336/EEC and 93/68EEC.
Before using the appliance \_\_\_\_
Carefully read these user instructions and follow them. Keep them so you can consult them at a later date.
Safety
- Never leave your appliance running unattended, and do not leave it within reach of children or people who are not responsible.
- Never place your kettle on supports that are unstable, not level, flexible or fragile (oilcloth, glass, varnished wood, etc.) or near inflammable materials (curtains, blinds, etc.).
- In order to avoid any danger, do not use the appliance if it has fallen on the floor or if it shows visible signs of damage. Should this have happened, return it to the after-sales service.
• Always completely unwind the cord.
- Connect the cord's plug to a 10/16 A socket fitted with an earth contact.
- The cord must never touch the plates.
- If you have to use an extension cord, you must use a model fitted with an earthed socket and wiring with a section equal to or greater than 1mm1/2. Make sure it is in good condition.
- Take every precaution to ensure that no one will trip up on the cable or its extension cord.
-
Never submerge the appliance in water.
-
We recommend you connect the appliance to an installation that has a device with a residual differential current with a breaking current that does not exceed 30mA.
- Do not mount the appliance flush in a wall.
- Do not move your appliance while it is in operation.
- Only use the handle to open the product.
- Never use the appliance without making sure that the juice collection tray is in place.
- Before any cleaning operation, unplug the appliance and let it completely cool down.
- Do not use the grill in a vertical position.
- Never use the appliance as a supplementary heating unit.
- Do not touch the sides (other than the handle) when the unit is operating, as they are very hot (there is a risk of being burnt).
- If certain parts of the product accidentally catch fire, do not extinguish them by throwing water on them. Instead, unplug the appliance and use a damp cloth to extinguish the flames.
- This appliance is solely for domestic use.
Start-up and use
1 First use
- When unwrapping your appliance, make sure you carefully remove all the packing.
- We recommend that you clean the cooking plates by wiping them with a damp sponge before using them the first time.
When new, the appliance may release a small quantity of smoke the first time you use it. To limit this phenomenon, set your appliance to its heating setting for 10 minutes, and then leave it to cool down for half an hour.
2 Start-up
- Place your appliance on a flat surface (with the appliance closed)
- Completely unroll the cord and make sure it is not touching the cooking plates
- Plug your appliance in - the red indicator will light up.
Turn the button to the position selected and the green indicator will light up.
- Warm up your appliance. When the green indicator goes out, this means it has reached the right temperature.
- Slightly grease the cooking plates (you don't have to do this however, as they have a non-stick coating).
- Make sure that the juice tray is in position and has a bit of water in it.
- Open the appliance, place your food on the lower plate, and close the appliance by pressing slightly on the handle.
- Set the cooking time (by pressing the button - select 1 to 30 minutes)
- When the signal goes off, you can remove your food. If need be, or if you are in doubt, leave it to cook some more.
- You can switch off the signal by pressing the button once. Otherwise, it will switch off automatically once it has sounded 10 times.
NB: The timer does not switch the cooking off, it simply indicates to you that the set time is up. You can also set another time.
The green indicator may go out and light up during cooking. This is to indicate that the set temperature has been reached.
Do not use metal utensils to move the food on the cooking plate as you run the risk of damaging the non-stick coating.
Should you throw your apparatus out after many years of service, you should remember to remove the timer's battery, which should be left at a specialist collection centre.
Cleaning
Always unplug your appliance and leave it to completely cool down before cleaning it.
- Cooking plates: Wipe with a soft, damp sponge soaked in dishwashing liquid, rinse and then dry with absorbent paper. For the lower plate (leave the juice collection tray in place when cleaning the unit), you can dampen it a bit more as the dirty water will fall into the juice tray, and then rinse and dry it with absorbent paper. If, in spite of these precautions, you notice small bits still stuck on, or brown cooking stains, do not worry - these will not have any harmful effect when you use the unit subsequently.
-
Never use abrasive sponges, solvents, scouring or caustic oven powder, which could seriously damage the coating on the plates.
-
Juice collection tray: you can wash this in your dishwasher's upper tray.
- Body and external walls: do not wash these in water. Clean them solely with a sponge soaked in detergent, and dry with a dry cloth.
Be careful not to pour water on the electrical components. Never soak your kettle or its base and cord in water.
Storage
- You can store your Grill either flat or vertically, with the cord wrapped around the base.
General warranty conditions
The warranty covers any manufacturing fault or materials defect.
It does not cover:
- Breakage of the apparatus due to dropping it or impacts suffered by it.
- Damage caused by abnormal use of the appliance or incorrectly plugging it in.
This appliance is subject to a 2-year warranty (parts and labour).
Appliances that have been used (even once) will not be exchanged, but they will be restored to perfect operating condition.
In order to fully maintain your warranty rights, fill in section 2 of the warranty form and send it to our Warranty Service within 30 days of purchase.
Carriage costs: During the warranty period, you will only have to pay for carriage costs for returning the product to the factory. We will send the product back to you at our expense as soon as possible.
Please note that in the event of misuse, the warranty will be declared null and void.
Professional or semi-professional use: This appliance is not designed for such use and no warranty will be granted for it.
Recommendations
Chef's little secrets
To obtain the best results, cut the food uniformly and take it out of the refrigerator at least 1 hour before cooking so it will be tender and tasty.
Meat: Season meat before cooking it, but only sprinkle salt on it when serving.
Fish: Wipe the fish well and oil it slightly before placing it in the Grill. Do not scale fragile fish.
The cooking times given are only indicative. They may vary depending on the thickness and nature of the food and your personal tastes.
The pieces to be cooked must have a minimum thickness of 1.2cm, - otherwise the food will have to be turned over when cooking it.
text_image
Diagram of a food grater with labeled parts including a pan, grater, and drawer
text_image
⑩
⑦
text_image
Diagram of a grater with labeled parts including a pan, grater handle, and interior grating
text_image
⑩
⑦
text_image
Diagram of a toaster oven with labeled parts including a handle, grating, and tray
text_image
Diagram of a grater with labeled parts including a pan, grater interior, and base components
text_image
Diagram of a device with numbered parts labeled ⑦ and ⑩, likely illustrating a mechanical or electrical component.