
VISIONPRO IAQ - Thermostat HONEYWELL - Free user manual and instructions
Find the device manual for free VISIONPRO IAQ HONEYWELL in PDF.

User questions about VISIONPRO IAQ HONEYWELL
0 question about this device. Answer the ones you know or ask your own.
Ask a new question about this device
Download the instructions for your Thermostat in PDF format for free! Find your manual VISIONPRO IAQ - HONEYWELL and take your electronic device back in hand. On this page are published all the documents necessary for the use of your device. VISIONPRO IAQ by HONEYWELL.
USER MANUAL VISIONPRO IAQ HONEYWELL
Total Home Comfort System

Rating the Standards for Healthier Indoor Environment.


69-1815EFS-1
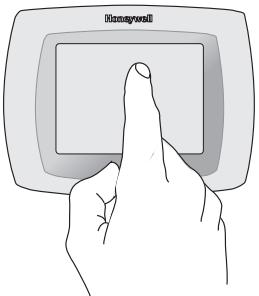

BE CAREFUL! Never use sharp instruments, such as a pencil or pen, to press touchscreen keys. To prevent damage to the thermostat, always press keys with your fingertip.
Need Help?
For assistance with this product please visit http://yourhome.honeywell.com or call Honeywell Customer Care toll-free at 1-800-468-1502
Read and save these instructions.
們 U.S. Registered Trademark.
US Patent No. 6,208,263; 6,373,376; 6,448,901; 6,926,076;
D509151; H25192; H25193 and other patents pending.
Copyright © 2006 Honeywell International Inc. All rights reserved.
Table of contents
About your new thermostat
Programming at a glance 2
Quick reference to controls 3
Quick reference to status display .... 4
Programming & Operation
Clock setting. 5
Fan setting 6
System setting. 7
Energy Star settings. 8
Using program schedules. 9
Program schedule overrides 10
Vacation hold. 12
Special features. 13
Screen lock. 14
Screen cleaning. 15
Optional remote sensors 16
Humidity control. 17
Ventilation control. 19
Appendices
Advanced functions 20
In case of difficulty 27
Limited warranty. 29
This thermostat is ready to go!
Your new thermostat is preprogrammed and ready to go.
See page 2 to check settings.

CAUTION: EQUIPMENT DAMAGE
HAZARD. To prevent possible
compressor damage, do not operate cooling system when outdoor temperature is below 50^ (10^)
About your new thermostat
Your new thermostat is pre-programmed and ready to go. Just set the time and day. Then check the settings below and change if needed:
- Set clock.. See page 5
- Select fan setting: Preset to Auto. See page 6
- Select system setting: Preset to Heat See page 7
- Program schedules: Preset to energy-saving levels while you're at work or asleep (assumes you wake at 6 am, leave at 8 am, return at 6 pm and go to bed at 10 pm). See pages 8-11
- Set humification, dehumidification & ventilation controls, if applicable.. See pages 17-19

ONE-TOUCH TEMP CONTROL: You can override the program schedule at any time, and manually adjust the temperature (see pages 10-11).
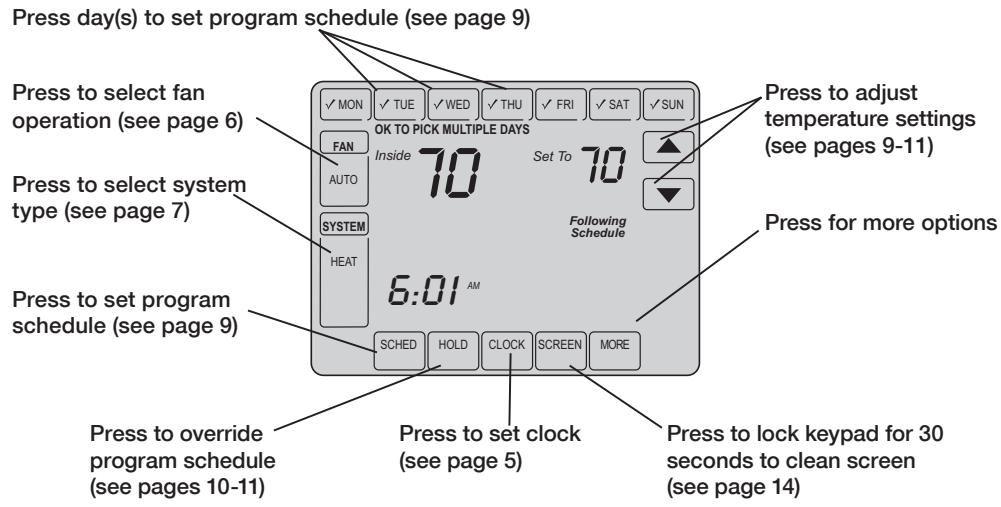
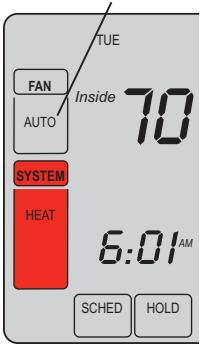
Quick reference to controls
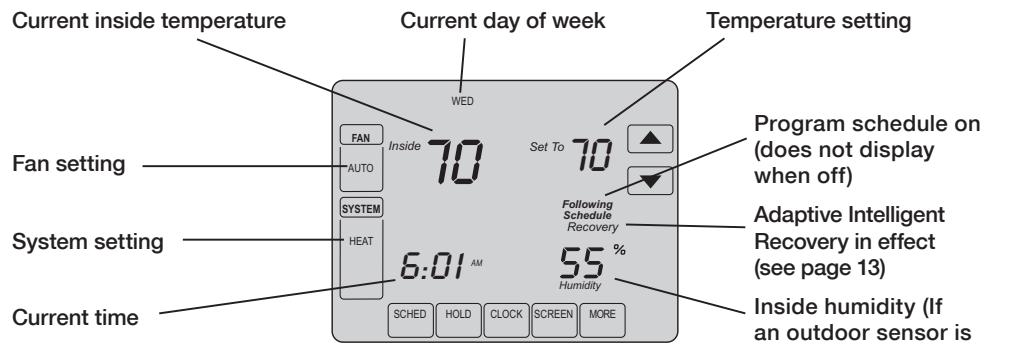
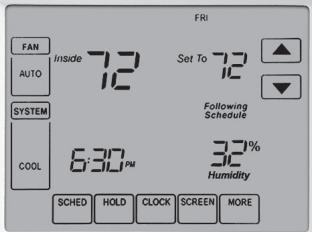
Quick reference to status display
Other display messages:
Cool On: Cooling system is activated
- Heat On: Heating system is activated
- Aux Heat On: Auxiliary heating system is activated
- Wait: Compressor protection activated (see page 13)
- Screen Locked: See page 26 to unlock
Inside humidity (If an outdoor sensor is installed, the outdoor temperature is shown instead of the humidity level. Press MORE to display the humidity level.)
Clock setting
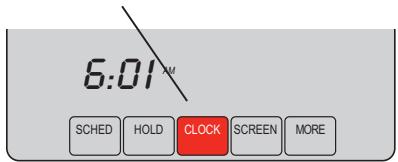
Press CLOCK
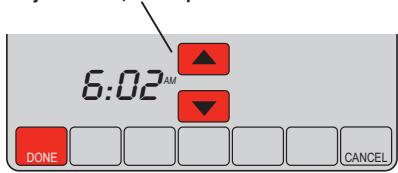
Adjust time, then press DONE
To set the current time display, press CLOCK, then press or to adjust the time. Press and hold or to advance the time more quickly.
Press DONE to save & exit (or press CANCEL to exit without changing the time).
Note: The real-time clock should never require adjustment since it automatically updates for daylight savings time, and stores all date/time information.
Note: To change the current week day display, see page 21.
Fan setting
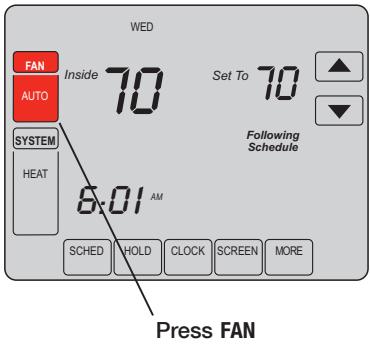
Note: If a fan schedule is programmed, "Auto" will run the fan schedule.
Press FAN to select fan operation:
- On: Fan is always on.
- Auto: Fan runs only when the heating or cooling system is on.
- Circ: Fan runs randomly, about 35% of the time. Use this setting for improved air circulation, or for more efficient air cleaning, if you do not want the fan to run all the time.
You can press FAN to override the fan settings you've programmed for different time periods (see page 9). If you select On or Circ, the setting you select will remain active until you press FAN again to select Auto, and return to the fan schedule.
System setting
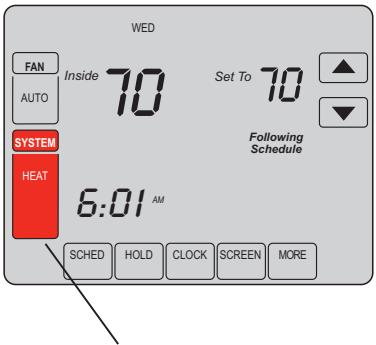
Press SYSTEM
Press the SYSTEM button to select:
- Heat: Thermostat controls only the heating system.
Cool: Thermostat controls only the cooling system. - Off: Heating and cooling systems are off.
- Auto: Thermostat automatically selects heating or cooling depending on the indoor temperature.
- Em Heat (only for heat pumps with auxiliary heat): Thermostat controls Auxiliary Heat. Compressor is not used.
EnergyStar® settings for maximum cost savings
It's easy to program your system for maximum energy savings. You can program four time periods each day, with different settings for each day.
This thermostat is pre-set to use EnergyStar® program settings. We recommend these settings, since they can reduce your heating/cooling expenses by as much as 33% . (See next page to adjust times and temperatures of each time period.)
| Heat (Mon-Fri) | Cool (Mon-Fri) | Heat (Sat-Sun) | Cool (Sat-Sun) | |
| Wake (6:00 am) | 70° | 78° | 70° | 78° |
| Leave (8:00 am) | 62° | 85° | [Or cancel period] | [Or cancel period] |
| Return (6:00 pm) | 70° | 78° | 70° | 78° |
| Sleep (10:00 pm) | 62° | 82° | 62° | 82° |
To adjust program schedules
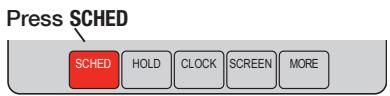
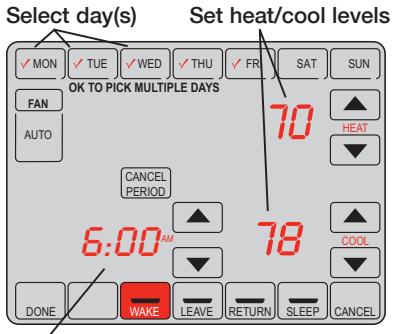
Set time for program period to start
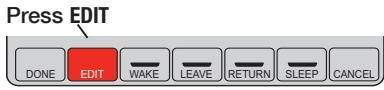
- Press SCHED, then EDIT.
- Press day buttons (MON-SUN) to select day(s).
- Press or to set your Wake time for selected day(s).
- Press or to set Heat and Cool temperature for this time period.
- Press other time periods (LEAVE, RETURN, SLEEP) to set time and temperatures for each.
- Press DONE to save & exit (or press CANCEL to exit without saving changes).
Note: You can press CANCEL PERIOD to eliminate any unwanted time period.
Note: Press FAN to customize fan settings for any time period (see page 6).
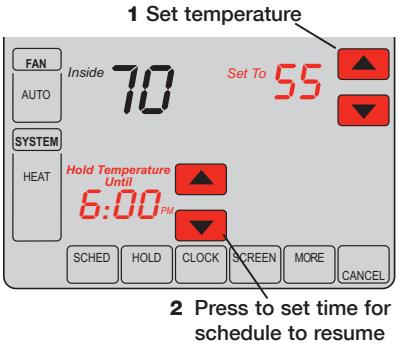
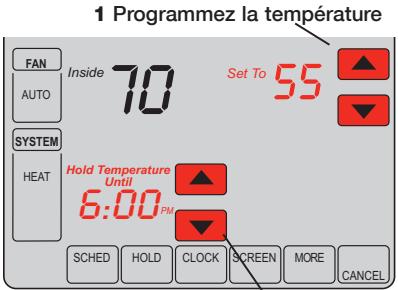
Program schedule override (temporary)
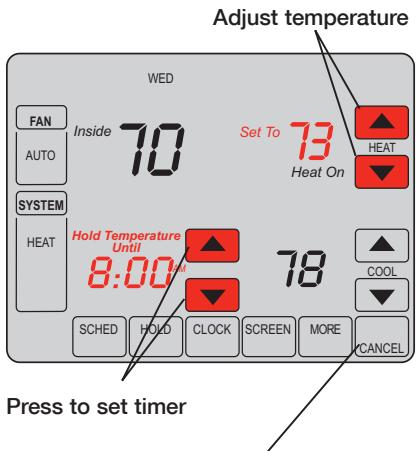
Press CANCEL (or SCHED) to resume program schedule
Press or to immediately adjust the temperature. This will temporarily override the temperature setting for the current time period.
The new temperature will be maintained only until the time you set. When the timer expires, the program schedule will resume and set the temperature to the level you've programmed for the current time period.
To cancel the temporary setting at any time, press CANCEL (or SCHED). The program schedule will resume.
Program schedule override (permanent)
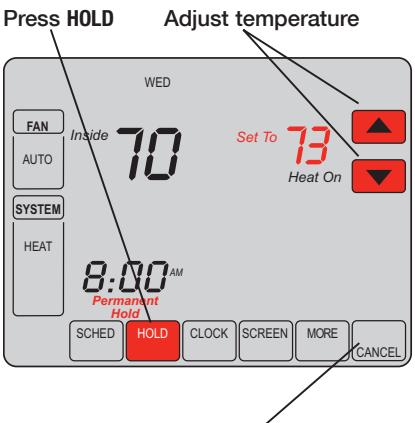
Press CANCEL (or SCHED) to resume program schedule
Press HOLD to permanently adjust the temperature. This will turn off the program schedule.
Whatever temperature you set will be maintained 24 hours a day until you manually change it or press CANCEL (or SCHED) to cancel "Hold" and resume the program schedule.
Vacation hold
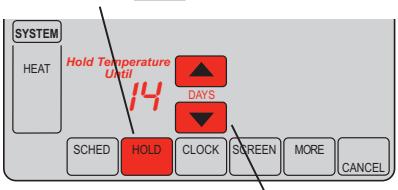
3 Press HOLD twice
4 Press to select number of days
This feature can suspend the program schedule for extended periods of time.
Press or to set the temperature you want, then press or to set the time of day you want the schedule to resume when you return. Press HOLD twice, then press or to select the number of days.
Whatever temperature you set will be maintained 24 hours a day for the number of days you select. After this number of days have elapsed, the previously programmed schedule will resume at the time you set.
If you return earlier than expected, press CANCEL (or SCHED) to cancel "Hold" and resume the program schedule.
Special features
Auto Changeover: When set to Auto, the thermostat automatically selects heating or cooling depending on the indoor temperature.
Adaptive Intelligent Recovery: This feature allows the thermostat to "learn" how long the furnace and air conditioner take to reach programmed temperature settings, so the temperature is reached at the time you set.
Compressor Protection: This feature forces the compressor to wait a few minutes before restarting, to prevent equipment damage. During the wait time, the message "Wait" is displayed on screen.
Flashing message: Reminder to replace filter or UV lamp. After replacement, press RESET to reactivate the alert timer.
Southern Away Dehumidification: Your system may be programmed to control humidity while your house is vacant during the humid season. Before you leave the house, press the HOLD button three times to activate this feature. This will control temperature and humidity to help protect your house and possessions while you are away. (If this feature does not work, contact your installer.)
Screen lock
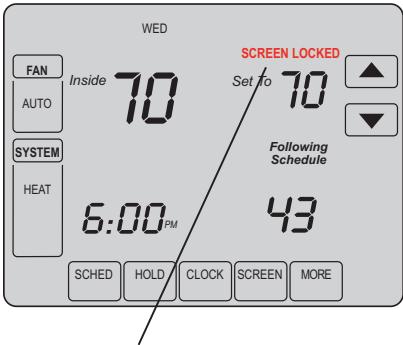
See advanced function 0670 (page 26) for screen lock options
To prevent tampering, the screen can be partially or fully locked.
When partially locked, the screen displays SCREEN LOCKED for several seconds if a locked key is pressed.
When the screen is fully locked, no keys function. To lock or unlock the screen, see advanced function 0670 on page 26.
Screen cleaning
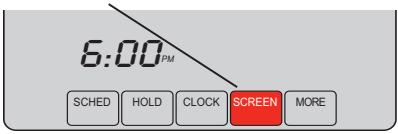
Press SCREEN
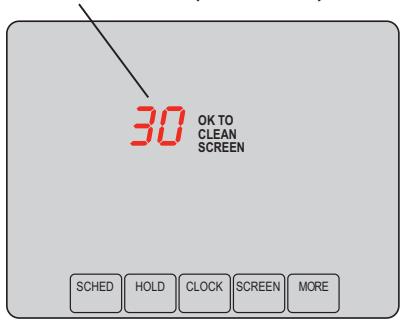
Screen lock timer (30 seconds)
Press SCREEN to lock the screen for cleaning. The screen will remain locked for 30 seconds so you can clean the screen without changing any settings.
After 30 seconds, press DONE to resume normal operation, or press SCREEN again if you require more time for cleaning.
Note: Do not spray any liquid directly on the thermostat. Spray liquids onto a cloth, then use the damp cloth to clean the screen. Use water or household glass cleaner. Avoid abrasive cleansers.
Optional remote sensors
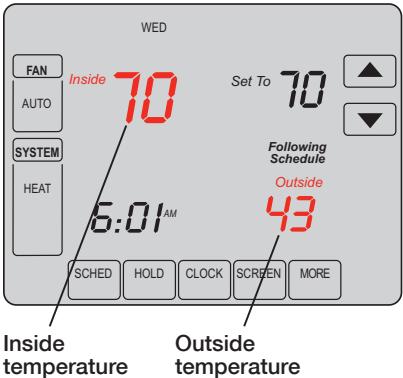
If an outdoor sensor is installed, the current outdoor temperature is displayed.
If an indoor remote sensor is installed, the display shows the indoor temperature at the location of the sensor.
If more than one indoor sensor is installed, the display shows an average of temperature readings from all sensors or an average between the thermostat and the sensor(s).
Humidification control
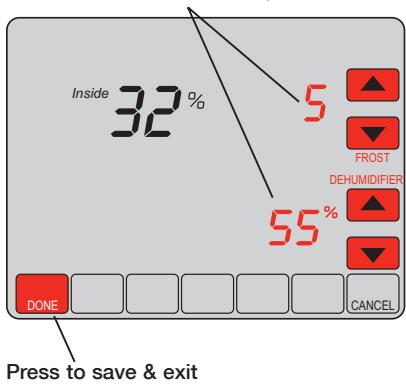
Set Frost Control & humidity level
Press MORE until the humidifier screen is displayed, then press or to set the humidity and Frost Control level.
When using Frost Protection, if frost/condensation appears on windows, lower the frost setting. Wait at least 1 day before adjusting the frost level again. Once frost no longer appears, the thermostat will control humidity to the maximum level without frosting or fogging windows and without further adjustment.
Press DONE to save and exit, or press CANCEL to exit without saving changes.
Note: If you do not have an outdoor temperature sensor, the Frost Control level will not be displayed.
Dehumidification control
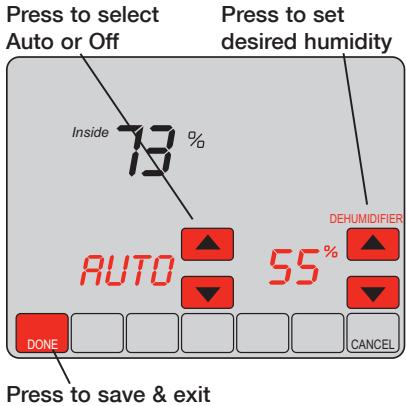
Note: Auto/Off only present when using a whole house dehumidifier (not present when dehumidifying with A/C).
Press MORE until the dehumidifier screen is displayed, then press or to set the desired humidity level and operation (Auto or Off).
If installed to control a dehumidifier, the thermostat can activate it as needed to reduce humidity.
If you don't have a dehumidifier, the thermostat activates the air conditioner to reduce humidity (may cool as much as 3^ lower than your temperature setting).
Press DONE to save and exit, or press CANCEL to exit without saving changes.
Ventilation control
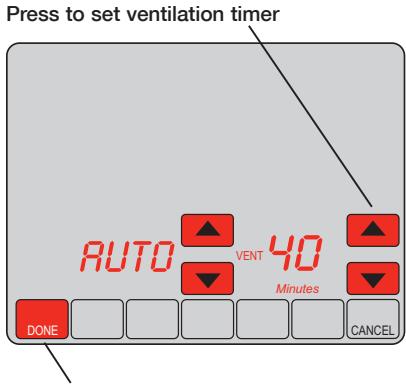
Press to save & exit
You can ventilate your home at any time:
Press MORE until the ventilation screen is displayed, then press or to set the ventilation timer. You can set the timer to ventilate from 20 to 180 minutes, in 20-minute increments. To turn off the ventilator, select 0.
Press DONE to save and exit, or press CANCEL to exit without saving changes.
If programmed for auto-ventilation by the installer, the thermostat will ventilate your home as needed.
Auto/Off will turn off/on the automatic ventilation only. Ventilation can still be requested by using the timer when set to Off.
Advanced functions
1 Press SYSTEM.
2 Press and hold blank center key until the display changes.
3 Change settings as required (see pages 21-26).
4 Press DONE to exit & save changes.
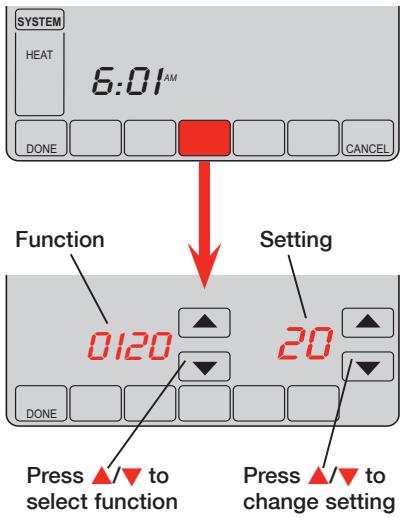
Advanced functions
Year setting (first two digits)
Function Press ▲/▼ to change the first two digits of the year: 0120
Options: 20 = Year 20xx 21 = Year 21xx
Year setting (second two digits)
Function Press / to change the last two digits of the year: 0130
Options: 01 - 99 (i.e., 2001 - 2099)
Month setting
Function Press ▲▼ to change the current month: 0140
Options: 01 - 12 (i.e., January - December)
Date setting
Function Press ▲/▼ to change the current date: 0150
Options: 01 - 31
Advanced functions
| Program schedule on/off | |
| Function 0160 | Press ▲/▼ to turn the program schedule on or off: |
| Options: | 0 Program schedule is off. Thermostat is non-programmable. 4 Program schedule is on (7-day programmable). |
| Restore Energy Star® schedule | |
| Function 0165 | Press ▲/▼ to restore default Energy Star settings: |
| Options: | 0 No change 1 Restore factory default Energy Star settings |
| Backlight | |
| Function 0280 | Press ▲/▼ to select how the screen is lighted: |
| Options: | 0 Light on for approx. 45 seconds after keypress 1 Light always on low intensity, full bright after keypress |
Advanced functions
Temperature format (^ / ^)
Function Press / to set the temperature display format: 0320
Daylight savings time on/off
Function The thermostat is pre-programmed to automatically adjust to daylight savings time. 0330 Press / to select an option:
Options: 0 Off: No adjustment for daylight savings time
1 On: Auto-change to daylight savings time (through 2006, and for areas that do not use the new 2007 DST calendar)
2 On: Auto-change to daylight savings time (2007 and beyond, for areas that use the new 2007 DST calendar)
Ventilation control
Function Press / to set ventilation control: 0400
Options: 0 No ventilation
1 Ventilation allowed at any time
2 Ventilation allowed at any time except during Sleep period
Advanced functions
| Furnace filter change reminder | ||
| Function 0500 | This feature displays an alert to remind you to change the furnace filter. Press ▲/▼ to set the desired reminder interval: | |
| Options: | 0 Off | Note: Press RESET to cancel the alert |
| 1 10-day run time | ||
| 2 30-day run time | ||
| 3 60-day run time | ||
| 4 90-day run time | ||
| 5 120-day run time | ||
| 6 180-day run time | ||
| 7 270-day run time | ||
| 8 365-day run time | ||
| 9 30 calender days | ||
| 10 60 calender days | ||
| 11 90 calender days | ||
| 12 120 calender days | ||
| 13 180 calender days | ||
| 14 365 calender days | ||
| E Auto Alert (requires optional equipment) | ||
Advanced functions
| Humidifier pad change reminder | ||
| Function 0510 | This feature displays an alert to remind you to change the humidifier pad. Press ▲▼ to set the desired interval: | |
| Options: | 0 Off (no reminder to change humidifier pad) | Note: Press RESET to cancel the alert |
| 1 30-day run time, 90 calendar days ** | ||
| 2 60-day run time, 180 calendar days ** | ||
| 3 90-day run time, 365 calendar days ** | **interval depends on humidifier | |
| E Auto Alert (requires optional equipment) | ||
| UV lamp change reminder | ||
| Function | This feature displays an alert to remind you to change the ultraviolet lamp. | |
| 0520 | Press ▲▼ to set the desired interval: | |
| Options: | 0 Off (no reminder to change UV lamp) | Note: Press RESET to cancel the alert |
| 1 Reminder after 1 year | ||
| 2 Reminder after 2 years | ||
| E Auto Alert (requires optional equipment) | ||
| Adaptive Intelligent Recovery | |
| Function | Press ▲/▼ to turn this feature on or off (see page 13): |
| 0530 | |
| Options: | 0 Off 1 On |
Advanced functions
Program schedule periods
Function Press / to set the number of program periods: 0540
Options: 2 Two program periods (Wake, Sleep)
4 Four program periods (Wake, Leave, Return, Sleep)
Clock format
Function Press / to set the clock display format: 0640
Options: 12 12-hour clock (i.e., "3:30 pm")
24 24-hour clock (i.e., "15:30")
Screen lock
Function Press / to choose a screen lock setting (see page 14): 0670
Options: 0 Screen is unlocked (fully functional)
1 All functions locked except temperature controls and CANCEL key
2 Screen is fully locked
In case of difficulty
If you have difficulty with your thermostat, please try the following suggestions. Most problems can be corrected quickly and easily.
Display is blank
- Check circuit breaker and reset if necessary.
- Make sure power switch at heating & cooling system is on.
Make sure furnace door is closed securely.
No response to key presses (or temperature will not change)
- Check to make sure the thermostat is not locked (see page 26).
Make sure heating and cooling temperatures are set to acceptable ranges:
- Heat: 40^ to 90^ F( 4.5^ to32^ C)
Cool: 50^ to 99^ (10^ to 37^)
Backlight is dim
- A dim display is normal. See Advanced function 0280 on page 22 for backlight options.
In case of difficulty
Heating or cooling system does not respond
- Press SYSTEM to set system to Heat. Make sure the temperature is set higher than the Inside temperature.
- Press SYSTEM to set system to Cool. Make sure the temperature is set lower than the Inside temperature.
- Check circuit breaker and reset if necessary.
- Make sure power switch at heating & cooling system is on.
- Make sure furnace door is closed securely.
- If "Wait" is displayed, the compressor protection timer is on. Wait 5 minutes for the system to restart safely, without damaging the compressor (see page 13).
"Err" appears on screen
- Contact your contractor. Your equipment may need service or repair.

CAUTION: EQUIPMENT DAMAGE HAZARD. To prevent possible compressor damage, do not operate cooling system when outdoor temperature is below 50^ (10^) .
5-year limited warranty
Honeywell warrants this product, excluding battery, to be free from defects in the workmanship or materials, under normal use and service, for a period of five (5) years from the date of purchase by the consumer. If at any time during the warranty period the product is determined to be defective or malfunctions, Honeywell shall repair or replace it (at Honeywell's option).
If the product is defective,
(i) return it, with a bill of sale or other dated proof of purchase, to the place from which you purchased it; or
(ii) call Honeywell Customer Care at 1-800-468-1502. Customer Care will make the determination whether the product should be returned to the following address: Honeywell Return Goods, Dock 4 MN10-3860, 1885 Douglas Dr. N., Golden Valley, MN 55422, or whether a replacement product can be sent to you.
This warranty does not cover removal or reinstallation costs. This warranty shall not apply if it is shown by Honeywell that the defect or malfunction was caused by damage which occurred while the product was in the possession of a consumer.
Honeywell's sole responsibility shall be to repair or replace the product within the terms stated above. HONEYWELL SHALL NOT BE LIABLE FOR ANY LOSS OR DAMAGE OF ANY KIND, INCLUDING ANY INCIDENTAL OR CONSEQUENTIAL DAMAGES RESULTING, DIRECTLY OR INDIRECTLY, FROM ANY BREACH OF ANY WARRANTY, EXPRESS OR IMPLIED, OR ANY OTHER FAILURE OF THIS PRODUCT. Some states do not allow the exclusion or limitation of incidental or consequential damages, so this limitation may not apply to you.
THIS WARRANTY IS THE ONLY EXPRESS WARRANTY HONEYWELL MAKES ON THIS PRODUCT. THE DURATION OF ANY IMPLIED WARRANTYIS, INCLUDING THE WARRANTYES OF MERCHANTABILITY AND FITNESS FOR A PARTICULAR PURPOSE, IS HEREBY LIMITED TO THE FIVE-YEAR DURATION OF THIS WARRANTY. Some states do not allow limitations on how long an implied warranty lasts, so the above limitation may not apply to you.
This warranty gives you specific legal rights, and you may have other rights which vary from state to state.
If you have any questions concerning this warranty, please write Honeywell Customer Relations, 1985 Douglas Dr, Golden Valley, MN 55422 or call 1-800-468-1502. In Canada, write Retail Products ON15-02H, Honeywell Limited/Honeywell Limitée, 35 Dynamic Drive, Toronto, Ontario M1V4Z9.
Automation and Control Systems
Honeywell International Inc.
1985 Douglas Drive North
Golden Valley, MN 55422
Toronto, Ontario M1V 4Z9
http://yourhome.honeywell.com

Printed in U.S.A. on recycled paper containing at least 10%
post-consumer paper fibers.
U.S. Registered Trademark.
© 2006 Honeywell International Inc.
US Patent No. 6,208,263; 6,373,376; 6,448,901; 6,926,076
7,044,397; D509151; H25192; H25193 and other patents pending
69-1815EFS-1 Rev. M.S. 10-06
Honeywell
toneywell
Honeywell
Mode d'emploi
VisionPRO® IAQ
Total Home Comfort System
Honeywell Proud Partner AMERICAN LUNG ASSOCIATION HEALTH HOUSE
Raising the Standards for Healthier Indoor Environments


69-1815EFS-1


Brevets US NO. 6,208,263; 6,373,376; 6,448,901; 6,926,076
Suspension vacancies 44
Suspension vacancies
Honeywell International Inc.
1985 Douglas Drive North
Golden Valley, MN 55422
Toronto, Ontario M1V 4Z9
http://yourhome.honeywell.com

© 2006 Honeywell International Inc.
Brevet américain nos 6,208,263; 6 373 376; 6 448 901; 6 926 076;
69-1815EFS-1 Rev. M.S. 10-06
Honeywell
toneywell

Honeywell
Manual de Uso
VisionPRO® IAQ
Total Home Comfort System
Honeywell Proved Partner AMERICAN LUNG ASSOCIATION HEALTH HOUSE
Raising the Standards for Healthier Indoor Environments


69-1815EFS-1

TENGACUIDADO! Nuncautiliceinstrumentsconpunta afilada,comounlapizoboligrafo paraoprimirlastechasde la pantallaactivadorapacto Paraevitardarneltermostato, siempreoprima lasteclas conla punateldedo.
Necesitaarya?
Copyright © 2006 Honeywell International Inc.