
6291490X54 - Snowplows MURRAY - Free user manual and instructions
Find the device manual for free 6291490X54 MURRAY in PDF.

User questions about 6291490X54 MURRAY
0 question about this device. Answer the ones you know or ask your own.
Ask a new question about this device
Download the instructions for your Snowplows in PDF format for free! Find your manual 6291490X54 - MURRAY and take your electronic device back in hand. On this page are published all the documents necessary for the use of your device. 6291490X54 by MURRAY.
USER MANUAL 6291490X54 MURRAY
HAZARD SYMBOLS AND THEIR MEANINGS 4
OPERATING SYMBOLS AND THEIR MEANINGS 4
ASSEMBLY 9
OPERATION 9
MAINTENANCE CHART 11
MAINTENANCE 12
TROUBLESHOOTING CHART 15
Figures (Example: Figure 1) are located on the inside front and back pages of this manual located before the parts list.
General Information
This instruction book is written for a person with some mechanical ability. Like most service books, not all the steps are described. Steps on how to loosen or tighten fasteners are steps anyone can follow with some mechanical ability. Read and follow these instructions before you use the unit.
Know your product: If you understand the unit and how the unit operates, you will get the best performance. As you read this manual, compare the illustrations to the unit. Learn the location and the function of the controls. To help prevent an accident, follow the operating instructions and the safety rules. Keep this manual for future reference.
IMPORTANT: Many units are not assembled and are sold in cartons. It is the responsibility of the owner to make sure the assembly instructions in this manual are exactly followed. Other units are purchased in an assembled condition. On assembled units, it is the responsibility of the owner to make sure the unit is correctly assembled. The owner must carefully check the unit according to the instructions in this manual before it is first used.
Need Assistance?
If you need additional information on assembling, operating, or servicing your equipment contact your local Dealer.


This manual contains safety information to make you aware of the hazards and risks associated with snow
throwers, and how to avoid them. The snow thrower is designed and intended for removal of snow, and should not be used for any other purpose. It is important that you read and understand these instructions, and anyone operating the equipment read and understand these instructions.

WARNING
The engine exhaust from this product contains chemicals known to the State of California to cause cancer, birth defects, or other reproductive harm.
A signal word (DANGER, WARNING, or CAUTION) is used with the alert symbol to indicate the likelihood and the potential severity of injury. In addition, a hazard symbol may be used to represent the type of hazard.

DANGER indicates a hazard which, if not avoided, will result in death or serious injury.

WARNING indicates a hazard which, if not avoided, could result in death or serious injury.

CAUTION indicates a hazard which, if not avoided, might result in minor or moderate injury.
CAUTION, when used without the alert symbol, indicates a situation that could result in damage to the equipment.
Controls & Equipment Features (see Figure 1)
Traction Drive Lever (1) - Select the forward or reverse direction of travel.
Crank Assembly (2) - Changes the direction of the discharge chute.
Chute Deflector (3) - Changes the distance the snow is thrown.
Discharge Chute (4) - Changes the direction the snow is thrown.
Auger Drive Lever (5) - Starts and stops the auger (snow gathering and throwing) which also propels the snowthrower.
Speed Shift Lever (6) - Selects the speed of the snow thrower.
Height Adjust Skid (7) - Adjusts the ground clearance of the auger housing.
Drift Cutters (18) - (if equipped) Cuts a path through snow higher than the auger housing.
Shear Bolts (19) - To protect the machine, special shear bolts are designed to break is an object becomes lodged in the auger housing. The use of a harder bolt will destroy the protection provided by the shear bolt.
Remote Chute Control Lever (20) - Controls the distance the snow is thrown.
Engine Features
Safety Key (8) - Must be inserted to start the engine.
Primer Button (9) - Injects fuel directly into the carburetor for fast starts in cold weather.
Electric Start Button (10) - On electric start models, used to start the engine.
Switch Box (11) - On electric start models, used to attach a 220 volt electric power cord.
Recoil Starter Handle (12) - Use to manually start the engine.
Throttle Control (13) - Controls the speed of the engine.
Choke Control (14) - Use to start a cold engine.
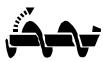
Hazard Symbols and their meanings
These symbols are used on your equipment and defined in your operating manual. Review and understand the meanings. The use of one of these symbols combined with a signal word will alert you to potential hazards and how to avoid them.

Safety Alert - Identifies safety information about hazards that can result in personal injury.

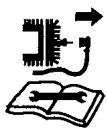
Operator's Manual - Read and understand before performing any activity or running equipment.

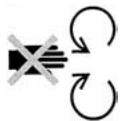
Rotating auger

Rotating impeller

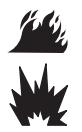
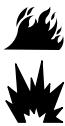
Fire

Explosion
Toxic fumes

Shock
Rotating gears
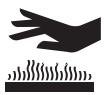
Hot Surface
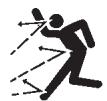
Thrown objects

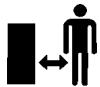
Keep a safe distance from the equipment.
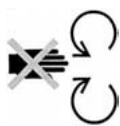
Never reach into rotating parts.
Shut off engine and remove spark plug connector before performing maintenance or repair work.
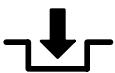
Operating Symbols and their meanings
These symbols are used on your equipment and defined in your operating manual. It is important that you review and understand the meanings. Failure to understand the symbols might result in harm to you.

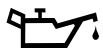
Oil

On Off


Forward
Neutral
Reverse

Primer bulb

Throttle

Choke off

Choke on

Stop

Slow

Fast

Engage

Traction

Auger Collector

Auger Clutch

Drive Clutch

Engage

Disengage

Discharge Chute
LEFT

RIGHT

Ignition On

Ignition Off

Ignition Key
Push to engage electric start

Electric Start

Engine Start

Engine Run

Engine Off

DOWN
Chute Deflector
UP


DANGER
Avoid death or serious injury from rotating auger.
Keep hands, feet and clothing away.
Unclogging discharge chute is a hazardous activity.
- Never attempt to clear auger of debris or clogged snow while equipment is engaged or engine is running.
- Stop engine and disconnect spark plug wire when performing maintenance on equipment.
- Never leave the equipment unattended while engine is running. Always disengage the auger and traction controls, stop engine, and remove keys.
- Keep children, pets, and others out of the area during operation. Children are often attracted to the equipment. Be mindful of all persons present.
- Keep all loose clothing far away from front of snow thrower and auger. Scarves, mittens, dangling drawstrings, loose clothes and pants can quickly become caught in the rotating device and dismemberment will occur. Tie up long hair and remove jewelry.
- The snow thrower is intended to remove snow only. Do not use for purposes other than what is intended.
- Do not clear snow across the face of slopes. Exercise extreme caution when changing direction on slopes. Do not attempt to clear steep slopes.
- Do not use the snow thrower on surfaces above ground level such as roofs of residences, garages, porches or other such structures or buildings.

DANGER
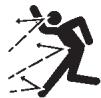
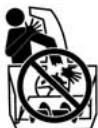
Objects can be picked up by auger and thrown from chute. Never throw snow toward people or cars, and never allow anyone in front of the snow thrower.
- Be aware of your environment while operating equipment. Running over items such as gravel, doormats, newspapers, toys, and rocks hidden under snow, can all be thrown from chute or jam in the auger.
- Always be aware of the direction the snow is being thrown. Nearby pedestrians, pets or property may be harmed by objects being thrown.
- Familiarize yourself with the area you plan to work. Mark off boundaries of walkways and driveways to prevent property damage from thrown objects.
- Take caution when snow throwing in unfamiliar areas. Stay alert for hidden hazards and traffic.
- After striking a foreign object, turn engine OFF, wait for moving parts to cease movement, and check immediately for damage. If damaged, repair before starting and operating snow thrower.
- With engine OFF, wait for moving parts to stop and always use a stick to clear discharge chute.
- If unit vibrates abnormally, turn engine OFF. Vibration is generally a warning of trouble. See an authorized dealer if necessary for repairs.


DANGER
Discharge chute contains rotating impeller to throw snow. Never clear or unclog discharge chute with your hands, or while engine is running.
Fingers can quickly become caught and traumatic amputation or severe laceration can result.
Unclogging the discharge chute is a hazardous activity.
- Never place hands in or near discharge chute.
- With engine OFF, wait for all moving parts to cease movement, then with a stick, clear the chute.
- Clogged snow can hide other obstructions in the chute and cause damage to the equipment, impeller or auger. Take precautions when restating the equipment after snow removal.

WARNING

Engines give off carbon monoxide, an odorless, colorless, poison gas.
Breathing carbon monoxide can cause nausea, fainting or death.
- Start and run engine outdoors.
- Do not start or run engine in enclosed area, even if doors or windows are open.

WARNING
Gasoline and its vapors are extremely flammable and explosive.
Fire or explosion can cause severe burns or death.
WHEN ADDING FUEL
- Turn engine OFF and let engine cool at least 2 minutes before removing gas cap.
- Fill fuel tank outdoors or in well-ventilated area.
- Do not overfill fuel tank.
- Keep gasoline away from sparks, open flames, pilot lights, heat, and other ignition sources.
- Check fuel lines, tank, cap, and fittings frequently for cracks or leaks. Replace if necessary.
WHEN STARTING ENGINE
- Make sure spark plug, muffler, fuel cap and air cleaner are in place.
- Do not crank engine with spark plug removed.
- If fuel spills, wait until it evaporates before starting engine.
- If engine floods, set choke to OPEN/RUN position, place throttle in FAST and crank until engine starts.
WHEN OPERATING EQUIPMENT
- Do not choke carburetor to stop engine.
WHEN TRANSPORTING EQUIPMENT
- Transport with fuel tank EMPTY.
WHEN STORING GASOLINE OR EQUIPMENT WITH FUEL IN TANK
- Store away from furnaces, stoves, water heaters or other appliances that have pilot light or other ignition source because they can ignite gasoline vapors.
WARNING: This machine is capable of amputating hands and feet and throwing objects. Read these safety rules and follow them closely. Failure to obey these rules could result in loss of control of unit, severe personal injury or death to you, or bystanders, or damage to property or equipment. The triangle in text signifies important cautions or warnings which must be followed.
Safe Operation Practices for Snowthrowers
IMPORTANT: Safety standards require operator presence controls to minimize the risk of injury. Your snowthrower is equipped with such controls. Do not attempt to defeat the function of the operator presence control under any circumstances.
Training
- Read, understand, and follow all instructions on the machine and in the manuals before operating this unit. Be thoroughly familiar with the controls and the proper use of the equipment. Know how to stop the unit and disengage the controls quickly.
- Never allow children to operate the equipment. Never allow adults to operate the equipment without proper instruction.
- Keep the area of operation clear of all persons, particularly small children and pets.
- Exercise caution to avoid slipping or falling especially when operating in reverse.
Preparation
- Thoroughly inspect the area where the equipment is to be used and remove all doormats, sleds, boards, wires, and other foreign objects.
- Disengage all clutches and shift into neutral before starting the engine (motor).
- Do not operate the equipment without wearing adequate winter outer garments. Wear footwear that will improve footing on slippery surfaces. Avoid loose fitting clothing that can get caught in moving parts.
- Handle fuel with care; it is highly flammable.
a. Use an approved fuel container.
b. Never add fuel to a running engine or hot engine.
c. Fill fuel tank outdoors with extreme care. Never fill fuel tank indoors. Replace fuel cap securely and wipe up spilled fuel.
d. Never fill containers inside a vehicle or on a truck or trailer bed with a plastic liner. Always place containers on the ground, away from your vehicle, before filling.
e. When practical, remove gas-powered equipment from the truck or trailer and refuel it on the ground. If this is not possible, then refuel such on a trailer with a portable container, rather than from a gasoline dispenser nozzle.
f. Keep nozzle in contact with the rim of the fuel tank or container opening at all times, until refueling is complete. Do not use a nozzle lock-open device.
g. Replace gasoline cap securely and wipe up spilled fuel.
h. If fuel is spilled on clothing, change clothing immediately.
- Use extension cords and receptacles as specified by the manufacturer for all units with electric drive motors or electric starting motors.
- Adjust the collector housing height to clear gravel or crushed rock surfaces.
-
Never attempt to make any adjustments while the engine (motor) is running (except when specifically recommended by manufacturer).
-
Let engine (motor) and snowthrower adjust to outdoor temperatures before starting to clear snow.
- Always wear safety glasses or eye shields during operation or while performing an adjustment or repair to protect eyes from foreign objects that may be thrown from the machine.
- Never operate the snowthrower without proper guards, plates or other safety protective devices in place.
Operation
- Do not put hands or feet near or under rotating parts. Keep clear of the discharge opening at all times.
- Exercise extreme caution when operating on or crossing gravel drives, walks or roads. Stay alert for hidden hazards or traffic.
- After striking a foreign object, stop the engine (motor), remove the wire from the spark plug, disconnect the cord on electric motors, thoroughly inspect snowthrower for any damage, and repair the damage before restarting and operating the snowthrower.
- If the unit should start to vibrate abnormally, stop the engine (motor) and check immediately for the cause. Vibration is generally a warning of trouble.
- Stop the engine (motor) whenever you leave the operating position, before unclogging the collector/impeller housing or discharge chute and when making any repairs, adjustments, or inspections.
- When cleaning, repairing, or inspecting, make certain the collector/impeller and all moving parts have stopped. Disconnect the spark plug wire and keep the wire away from the spark plug to prevent accidental starting.
- Do not run the engine indoors, except when starting the engine and for transporting the snowthrower in or out of the building. Open the outside doors; exhaust fumes are dangerous (containing CARBON MONOXIDE, an ODDORLESS and DEADLY GAS).
- Exercise extreme caution when operating on slopes. Do not attempt to clear steep slopes.
- Never operate the snowthrower without proper guards, plates, or other safety protective devices in place and working.
- Never direct the discharge toward people or areas where property damage can occur. Keep children and others away.
- Do not overload the machine capacity by attempting to clear snow at too fast a rate.
- Never operate the machine at high transport speeds on slippery surfaces. Look behind and use care when operating in reverse.
- Disengage power to the collector/impeller when snowthrower is transported or not in use.
- Use only attachments and accessories approved by the manufacturer of the snowthrower (such as cabs, tire chains, etc.).
- Never operate the snowthrower without good visibility or light. Always be sure of your footing and keep a firm hold on the handles. Walk, never run.
16.Never touch a hot engine or muffler. -
Never operate the snowthrower near glass enclosures, automobiles, window wells, drop-offs, and the like without proper adjustment of the snow discharge angle.
-
Never direct discharge at bystanders or allow anyone in front of the unit.
- Never leave a running unit unattended. Always disengage the auger and traction controls, stop engine, and remove keys.
- Do not operate the unit while under the influence of alcohol or drugs.
- Keep in mind the operator is responsible for accidents occurring to other people or property.
- Data indicates that operators, age 60 years and above, are involved in a large percentage of power equipment-related injuries. These operators should evaluate their ability to operate the unit safely enough to protect themselves and others from injury.
- DO NOT wear long scarves or loose clothing that could become entangled in moving parts.
- Snow can hide obstacles. Make sure to remove all obstacles from the area to be cleared.
Children
Tragic accidents can occur if the operator is not alert to the presence of children. Children are often attracted to the unit and the operating activity. Never assume that children will remain where you last saw them.
- Keep children out of the area and under the watchful care of another responsible adult.
- Be alert and turn off if children enter the area.
- Never allow children to operate the unit.
- Use extra care when approaching blind corners, shrubs, trees, or other objects that may obscure vision.
Clearing A Clogged Discharge Chute
Hand contact with the rotating impeller inside the discharge chute is the most common cause of injury associated with snowthrowers. Never use your hand to clean out the discharge chute.
To clear the chute:
- SHUT OFF THE ENGINE.
- Wait 10 seconds to be sure the impeller blades have stopped rotating.
- Always use a clean out tool, not your hands.
Service, Maintenance And Storage
-
Check shear bolts (pins) and other bolts at frequent intervals for proper tightness to be sure the equipment is in safe working condition.
-
Never store the machine with fuel in the tank inside a building where ignition sources are present such as hot water and space heaters, or clothes dryers. Allow the engine to cool before storing in any enclosure.
- Always refer to operator's manual for important details if the snowthrower is to be stored for an extended period.
- Maintain or replace safety and instruction labels as necessary.
- Run the machine a few minutes after throwing snow to prevent freeze-up of the collector/impeller.
- If fuel is spilled, do not attempt to start the engine but move the machine away from the area of spillage and avoid creating any source of ignition until fuel vapors have dissipated.
- Always observe safe refueling and fuel handling practices when refueling the unit after transportation or storage.
- Always follow the engine's manual instructions for storage preparations before storing the unit for both short and long term periods.
- Always follow the engine manual instructions for proper start-up procedures when returning the unit to service.
- Keep nuts and bolts tight and keep equipment in good condition.
- Never tamper with safety devices. Check their proper operation regularly and make necessary repairs if they are not functioning properly.
- Components are subject to wear, damage, and deterioration. Frequently check components and replace with manufacturer's recommended parts, when necessary.
- Check control operation frequently. Adjust and service as required.
- Use only factory authorized replacement parts when making repairs.
- Always comply with factory specifications on all settings and adjustments.
- Only authorized service locations should be utilized for major service and repair requirements.
- Never attempt to make major repairs on this unit unless you have been properly trained. Improper service procedures can result in hazardous operation, equipment damage and voiding of manufacturer's warranty.
Emissions
- Engine exhaust from this product contains chemicals known, in certain quantities, to cause cancer, birth defects, or reproductive harm.
- If available, look for the relevant Emissions Durability Period and Air Index information on the engine emissions label.
Ignition System
- This spark ignition system complies with Canadian ICES-002.
Read and follow the assembly and adjustment instructions for your snow thrower. All fasteners are in the parts bag. Do not discard any parts or material until the unit is assembled.

WARNING: Before doing any assembly or maintenance to the snow thrower, remove the wire
from the spark plug.
NOTE: In this instruction book, left and right describe the location of a part from the operator's position behind the unit.
NOTE: Torque is measured in foot pounds (metric N.m). This measurement describes how tight a nut or bolt must be. The torque is measured with a torque wrench.
NOTE: Fasteners and loose parts are shown at full size in Figure 2 on page 166.
NOTE: Illustrations are located on page 2 and on pages 167 through 171.
Tools Required
1 Knife
1 Pliers
2 1/2 inch open end wrenches
2 9/16 inch open end wrenches
2 3/4 inch open end wrenches
1 Measuring tape or ruler
1 Screwdriver
How To Remove The Snow Thrower From The Carton
- (Figure 3) The snow thrower is shown in the shipping position.
- Cut down all four corners of the carton and lay the side panels flat or use pull tab to remove box from base.
- Cut and discard the plastic ties that secure the crank assembly and the speed control rod assembly.
- Locate all parts that are packed separately and remove from the carton.
- Remove and discard the packing material from around the snow thrower.
- (Figure 1) For shipping purposes, the height adjust skids (7) are attached to the pallet. Remove the screw (17) that secures each height adjust skid (7) to the pallet.
- Hold onto the lower handle and pull the snow thrower off the pallet.
CAUTION: DO NOT back over cables.
- Remove the packing material from the handle assembly.
- Cut the ties that secure the clutch control cables (1) to the lower handle (2). Move the cables away from the motor frame.
How To Assemble The Handle And Crank Assembly
- Cut tie holding shift rod to lower handle and move shifter to the neutral position.
- (Figure 4) Loosen, but do not remove, the fasteners (1) in the upper holes of the lower handle.
- Remove the fasteners and the crank assembly eyebolt (11) from the lower holes of the lower handle.
-
(Figure 1) Put the shift lever (6) into first forward position.
-
(Figure 4) Raise the upper handle (2) to the operating position.
NOTE: Make sure the cables are not caught between the upper and lower handle.
- Install the fasteners and the crank assembly eyebolt (11) that were removed in step 3. DO NOT tighten until all fasteners are in place.
- (Figure 6) Attach the crank rod (15) to the universal joint assembly (16) with the hair pin (12).
- (Figure 4) Tighten nut on eye bolt (11). Make sure eye bolt (11) is properly aligned and the crank (18) can freely rotate.
- Tighten all handle fasteners.
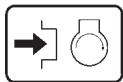
Remote Chute Knob (Figure 12)
- Assemble remote chute knob (1) onto lever (3) until snug against nut (2). On some models, the remote chute knob (1) is attached.
- Make sure lip (4) on the remote chute knob (1) is pointed toward the engine.
- Tighten the nut (2) against the bottom of the remote chute knob (1).
Speed Select Knob (Figure 12)
Install the speed select knob (5) to the speed select lever (6). On some models, the speed select knob (5) is attached.
How To Install The Speed Control Rod
- (Figure 12) Put the speed select lever (6) in the NEUTRAL position.
- (Figure 5) Attach the ball joint (1), located on the bottom end of the speed control rod (2), to the shift yoke assembly (3). The fasteners (4) are attached to the ball joint (1) at the factory.
- The length of the ball joint (1) and speed control rod (2) have been pre-adjusted at the factory. If an adjustment is required, loosen the nut (5). Remove the fasteners (4) to disconnect the ball joint (1) from the shift yoke assembly (3). To lengthen or shorten the speed control rod (2), turn the adapter (7) to obtain the correct length.
- (Figure 12) Make sure the speed select lever (6) functions correctly. Move the speed select lever (6) through all speeds.
How To Assemble The Chute Deflector
- (Figure 7) Remove carriage bolt (1).
- Raise the chute deflector (2) into operating position (3).
- Fasten chute deflector (2) to flange (4) with carriage bolts (1). Make sure to install with head of the carriage bolts (1) on the inside of the flange (2).
- Fasten with washers (5) and locknuts (6).
- Tighten locknuts (6) securely.
NOTE: Make sure all carriage bolts in flange are tight. DO NOT OVERTIGHTEN.
Check The Cables
- (Figure 8) Check the traction drive cable (1) and the auger drive cable (2). If the bottom of the cables have become disconnected, reinstall the cables.
- (Figure 10) If the top of the cables (5) have become disconnected from the drive levers (6), attach the cables (5) to the "Z" fitting (7).
How To Set The Skid Height (Figure 1)
The snow thrower is equipped with height adjustable skids (7) mounted on the outside of the auger housing (4). To adjust the height of the skids, see "How To Adjust The Height Of The Skids" in the Maintenance section.
How To Set The Length Of The Cables
The cables were adjusted at the factory and no adjustments should be necessary. However, after the handles are put in the operating position, the cables can be too tight or too loose. If an adjustment is necessary, see "How To Check And Adjust The Cables" in the Service And Adjustment section.
How To Assemble The Drift Cutter (if equipped)
Drift cutters are used to cut a path through snow deeper than the auger housing.
- (Figure 11) Loosen the fasteners (2) that secure the drift cutters (1) to the auger housing.
- Raise the drift cutters (1) to the desired height.
- Tighten the fasteners (2).
How To Prepare The Engine
NOTE: The engine was shipped from the factory filled with oil. Check the level of the oil. Add oil as needed.
WARNING: Follow the engine manufacturer's instructions for the type of fuel and oil to use. Always use a safety fuel container. Do not smoke when adding gasoline to the engine. When inside an enclosure, do not fill with gasoline. Before you add fuel, stop the engine. Let the engine cool for several minutes.
Check the oil. See the engine manufacturer's instructions for the type of fuel and oil to use. Before you use the unit, read the information on safety, operation, maintenance, and storage.
Important! Before You Start Operating
Check the fasteners. Make sure all fasteners are tight.
On electric start models, the unit was shipped with the starter cord plugged into the engine. Before operating, unplug the starter cord from the engine.
OPERATION
NOTE: Illustrations are located on page 2 and on pages 167 through 171.
CAUTION: Use only attachments and accessories approved by the manufacturer of the snow thrower (such as tire chains, electric start kits, etc.).
Know Your Snow Thrower (Figure 1)
Read this Instruction Book and safety rules before operation the snow thrower. Compare the illustration with your snow thrower to familiarize yourself with the location of various controls and adjustments.
How To Control The Discharge Of The Snow

WARNING: Never direct the discharge of snow toward bystanders.

WARNING: Always stop the engine before unclogging the discharge chute or the auger housing and leaving the snow thrower.
- (Figure 1) Turn the crank assembly (2) to change the discharge direction of the snow.
- (Figure 13) Push the remote chute lever (2) forward to discharge the snow high and far. Pull the remote chute lever (2) back to discharge the snow down.
How To Stop The Snow Thrower (Figure 1)
- To stop discharging snow, release the auger drive lever (5).
- To stop the wheels, release the traction drive lever (1).
- To stop the engine, push the throttle control lever (13) to off and remove the safety key (8).
CAUTION: To stop the engine, do not move the choke control to CHOKE position. Backfire or engine damage can occur.
How To Go Forward or Backward (Figure 13)
- To move the snow thrower forward, engage the traction drive lever (1). As the snow thrower starts to move forward, push the shift lever (3) to the desired speed. Maintain a firm hold on the handles and guide the snow thrower along the clearing path. Do not attempt to push the snow thrower.
- To move the snow thrower backward, pull the shift lever (3) to the reverse position.
How To Throw Snow (Figure 1)
- Engage the auger drive lever (5).
- To stop throwing snow, release the auger drive lever (5).
WARNING: The operation of any snow thrower can result in foreign objects being thrown into the eyes, which can result in severe eye damage. Always wear safety glasses or eye shields while operating the snow thrower. We recommend standard safety glasses or use a wide vision safety mask over your glasses.
How To Use The Wheel Lockouts (Figure 1)
Each wheel is secured to the axle with a lockout pin. The unit was shipped with the lockout pin in the locked position. For ease of maneuverability in light snow conditions, disconnect the lockout pin as follows.
- Pull the knob (21) out to disengage the lockout pin.
- To lock in the disengaged position, turn the knob (21) 1/4 turn (90 degrees).
Before Starting The Engine
-
Before you service or start the engine, familiarize yourself with the snow thrower. Be sure you understand the function and location of all controls.
-
Check the tension of the clutch cable before starting the engine. See "How To Adjust The Clutch Cable" in the Maintenance section of this manual.
- Make sure that all fasteners are tight.
- Make sure the height adjust skids are properly adjusted. See "How To Adjust The Height Of The Skids" in the Maintenance section of this manual.
- Check the air pressure in the tires. The correct air pressure is 14 PSI (1 BAR) to 17 PSI (1.25 BAR). Do not exceed the maximum amount of air pressure shown on the side of the tire.
How To Stop The Engine (Figure 1)
To stop the engine, move the throttle control (3) to the stop position and remove the safety key (8). Keep the safety key (8) in a safe place. The engine will not start without the safety key (8).
CAUTION: To stop the engine, do not move the choke control to CHOKE position. Backfire or engine damage can occur.
How To Start The Engine (Figure 1)
Models equipped with an Electric Starter
NOTE: An electric starter kit can be added to recoil start engines. Electric starter kits are available from your nearest authorized service center.
WARNING: The starter is equipped with a three-wire power cord and plug and is designed to operate on 220 volt A.C. household current. The power cord must be properly grounded at all times to avoid the possibility of electrical shock which can injure the operator. Carefully follow all instructions in the "How To Start The Engine" section. Make sure that your house wiring is a three-wire grounded system. If you are not sure, ask a licensed electrician. If your house wire system is not a three-wire grounded system, do not use this electric starter under any conditions. If your system is grounded but a three-hole grounded receptacle is not available to start the engine, have a three-hole grounded receptacle installed by a licensed electrician. To connect a 220 volt A.C. power cord, always connect the power cord to the switch box (11) on the engine first. Then, plug the other end into the three-hole grounded receptacle. When disconnecting the power cord, always unplug the end from the three-hole grounded receptacle first.
How To Start A Cold Engine (Figure 1)
- Check the engine oil.
- Fill the fuel tank with regular unleaded petrol. See "How To Prepare The Engine".
- Make sure the traction drive lever (1) and the auger drive lever (5) are in the disengaged (released) position.
- Move the throttle control (13) to the fast position.
-
Insert the safety key (8) into the ignition slot. Make sure the safety key (8) snaps into place. Do not turn the safety key (8). Remove the extra safety key and keep in a safe place.
-
Move the choke control (14) to the full choke position.
- (Electric Start) Connect the power cord to the switch box (11) located on the engine.
- (Electric Start) Plug the other end of the power cord into a three-hole, grounded 220 VOLT, A.C. receptacle. (See the WARNING in this section).
- Push the primer button (9). Every time you push the primer button (9), wait two seconds. For the number of times required to push the primer button (9), see the engine manufacturer's instructions.
- (Electric Start) Push on the electric start button (10) until the engine starts. Do not crank for more than 5 seconds at a time. Wait one minute between starts to allow the starter to cool.
- (Recoil Start) Slowly pull the recoil starter handle (12) until resistance is felt and then pull rapidly to start the engine. Do not allow the recoil starter handle (12) to snap back. Slowly return the recoil starter handle (12).
- If the engine does not start in 5 or 6 tries, See the "Trouble Shooting Chart" Instructions.
- Allow the engine to warm up for several minutes. As the engine warms up, adjust the choke control (14) toward the RUN position. Wait until the engine runs smoothly before each choke adjustment.
- (Electric Start) First disconnect the power cord from the three-hole receptacle. Then, disconnect the power cord from the switch box (11).
NOTE: In temperatures below 0^ (-18^) allow the engine to warm up for several minutes before blowing snow.
- When throwing snow, always run the engine with the throttle control (13) in the fast position.
WARNING: Never run the engine indoors or in enclosed, poorly ventilated areas. Engine exhaust contains carbon monoxide, an odorless and deadly gas. Keep hands, feet, hair and loose clothing away from any moving parts located on the engine or the snow thrower. The temperature of muffler and nearby areas may exceed 150^ (66^) . Avoid these areas.
How To Start A Warm Engine (Figure 1)
If an engine has been running and is still warm, leave the choke control (14) in the off position and do not push the primer button (9). If the engine fails to start, follow the instructions "How To Start A Cold Engine".
NOTE: Do not use the primer button (9) to start a warm engine.
How To Start An Engine With A Frozen Electric Starter (Figure 1)
If the electric starter is frozen and will not turn the engine, follow the instructions below.
- Pull as much starter rope as possible out of the starter.
- Release the starter handle and let it snap back against the starter. Repeat until the engine starts.
Warm engines will cause condensation in cold weather. To prevent possible freeze-up of recoil starter and engine controls, proceed as follows after each snow removal job.
- Run the snow thrower a few minutes after throwing snow to prevent freeze-up of the auger/impeller.
- With engine off, allow engine to cool for several minutes.
- Pull starter rope very slowly until resistance is felt, then stop. Allow the starter rope to recoil. Repeat three times.
- With the engine not running, wipe all snow and moisture from the carburetor cover in area of controls and levers. Also, move the choke control and starter handle several times.
How To Remove Snow or Debris From The Auger Housing

WARNING: Do not attempt to remove snow or debris that may become lodged in auger housing
with your hands. Use the clean-out tool or a pry bar to remove snow or debris.
(Figure 9) On some models, a clean-out tool (1) is attached to the top of the auger housing. Use the clean-out tool (1) to remove snow from the auger housing.
- (Figure 1) Release the auger drive lever (5).
- Move the throttle control (13) to the stop position.
- Pull out the safety key (8).
- Disconnect the spark plug wire.
- Do not place your hands in the auger housing (4) or the discharge chute (3).
- (Figure 9) Use the clean-out tool (1) or a pry bar to remove any snow or debris.
Snow Throwing Tips
- For maximum snow thrower efficiency in removing snow, adjust ground speed. Go slower in deep, freezing or wet snow. If the wheels slips, reduce forward speed.
- Most efficient snow throwing is accomplished when the snow is removed immediately after if falls.
CAUTION: Do not overload the machine capacity by attempting to clear snow at too fast a rate.
- For complete snow removal, slightly overlap each previous path.
- Whenever possible, discharge the snow down wind.
- For normal usage, set the skids so that the scraper bar is 1/8 (3 mm) above the skids. For extremely hard-packed snow surfaces, adjust the skids upward so that the scraper bar touches the ground.
- Rocks and gravel must not be picked up and thrown by the machine. On gravel or crushed rock surfaces, set the skids at 1-1/4 inch (32 mm) below the scraper bar. See "How To Adjust The Height Of The Skids" in the Maintenance section.
- After each snow throwing job, allow the engine to idle for a few minutes. The snow and accumulated ice will melt off the engine.
- Clean the snow thrower after each use.
- Remove ice, snow and debris from the entire snow thrower. Flush with water to remove all salt or other chemicals. Wipe snow thrower dry.
MAINTENANCE CHART
CUSTOMER RESPONSIBILITIES
| SERVICE RECORDS Fill in dates as you complete regular service. | Before Each Use | First 2 Hours | Every 5 Hours | Every 10 Hours | Every 25 Hours | Each Season | Before Storage | SERVICE DATES |
| Check Engine Oil Level | ✓ | ✓ | ✓ | |||||
| Change Engine Oil | ✓ | ✓ | ||||||
| Check And Tighten All Screws and Nuts | ✓ | ✓ | ||||||
| Check Spark Plug | ✓ | ✓ | ||||||
| Adjust Traction Drive Belt † | +✓ | +✓ | ✓ | |||||
| Check Fuel | ✓ | |||||||
| Drain Fuel | ✓ | |||||||
| Check Auger Clutch Cable Adjustment (See Cable Adjustment) | ✓ | ✓ | ||||||
| Lubricate All Pivot Points | ✓ | ✓ | ||||||
| Lubricate Auger Shaft (See Shear Bolt Replacement) | ✓ | ✓ |
† Adjust after First 10 hours and then Every 25 hours of use.
NOTE: Illustrations are located on page 2 and on pages 167 through 171.
Use the following maintenance section to keep your unit in good operating condition. All the maintenance information for the engine is in the engine manufacturer's instructions. Before you start the engine, read this book.

WARNING: Before you make an inspection, adjustment (except carburetor), or repair, disconnect
the wire from the spark plug.
General Recommendations
The warranty on this snow thrower does not cover items that have been subjected to operator abuse or negligence. To receive full value from the warranty, the operator must maintain the snow thrower as instructed in this manual.
Some adjustments must be made periodically to properly maintain the snow thrower.
After Each Use
Check for any loose or damaged parts.
- Tighten any loose fasteners.
Check and maintain the auger.
- Check controls to make sure they are functioning properly.
If any parts are worn or damaged, replace immediately.
- Check all safety and instruction decals and labels. Replace any decals or labels that are missing or cannot be clearly read.
All adjustments in the Maintenance section of this manual should be checked at least once each season.
As Required
The following adjustment should be preformed more than once each season.
- Adjust the auger drive belt after the first 2 to 4 hours, again at mid-season, and twice each season thereafter. See "How To Adjust The Auger Drive Belt" in the Maintenance section.
Lubrication
Every 10 Hours (Figure 18)
- Lubricate the Zerk fittings (1) every ten hours with a grease gun.
- Each time a shear bolt is replaced, the auger shaft must also be greased.
- Lubricate all pivot points.
Every 25 Hours
Chute Rotation Gear
(Figure 6) Lubricate the chute rotation gear (1) with automotive type oil.
Items Not To Lubricate
- All bearings and bushings are lifetime lubricated.
- The auger gear case is lubricated at the factory and does not require additional lubrication. If for some reason the lubricant leaks out, have the auger gear case checked by a factory authorized service center.
How To Adjust The Height Of The Skids (Figure 1)
This snow thrower is equipped with two height adjustable skids (7). These skids elevate the front of the snow thrower. For normal hard surfaces, such as a paved driveway or walk, adjust the skids as follows.
- Put the snow thrower on a level surface.
- Make sure both tires are equally inflated. The correct air pressure is 14 PSI (1 BAR) to 17 PSI (1.25 BAR). Do not exceed the maximum amount of air pressure shown on the side of the tire.
- Put the extra shear bolts (found in the parts bag) under each end of the scraper bar (15) next to the adjustable skids (7).
- Loosen the mounting nuts (16) that hold the adjustable skids (7). To bring the front of the snow thrower down, raise each adjustable skids (7). Tighten the mounting nuts (16).
NOTE: For rocky or uneven surfaces, raise the front of the snow thrower by moving the adjustable skids (7) down.

WARNING: Be certain to maintain proper ground clearance for the area to be cleared. Objects such as
gravel, rocks or other debris, if struck by the impeller, can be thrown with sufficient force to cause personal injury, property damage or damage to the snow thrower.
How To Adjust The Scaper Bar (Figure 1)
After considerable use, the scraper bar (15) will become worn. The scraper bar (15), in conjunction with the skids, must be adjusted to allow 1/8 inch (3 mm) clearance between the scraper bar (15) and the sidewalk or area to be cleared.
- Put the snow thrower on a level surface.
- Make sure both tires are equally inflated. The correct air pressure is 14 PSI (1 BAR) to 17 PSI (1.25 BAR). Do not exceed the maximum amount of air pressure shown on the side of the tire.
- Loosen the carriage bolts and nuts that hold the scraper bar (15) to the auger housing (4).
- Adjust the scraper bar (15) to allow 1/8 inch (3 mm) clearance between the scraper bar (15) and the sidewalk or area to be cleared.
- Tighten the carriage bolts and nuts. Make sure that the scraper bar (15) is parallel with the sidewalk or area to be cleared.
- To extended the life of the scraper bar (15), remove and reverse the mounting of the scraper bar (15).
How To Remove The Snow Hood
To access the spark plug, the snow hood must be removed as follows:
- (Figure 14) Remove the choke control knob (1).
- Remove the ON/OFF key (2).
- Remove the four mounting screws (3).
- (Figure 15) Slowly remove the snow hood (4). Make sure that the primer button hose and the ignition wire are not disconnected.
- To install the snow hood (4), first make sure that the primer button hose and the ignition wire are connected.
- (Figure 16) Mount the snow hood (4) to the engine and secure with the four mounting screws.
- (Figure 17) Align the tab (5) on the choke control knob (6) with the slot (7) in the snow hood.
- Connect the choke control knob (6) with the choke shaft (7). Make sure the choke control knob (6) is properly installed. If the choke control knob (6) is not installed correctly, the choke will not operate.
How To Check And Adjust The Cables
The traction drive cable and the auger drive cable are adjusted at the factory. During normal use, a cable can become stretched and must be checked and adjusted as follows.
How To Check The Cables (Figure 19)
- To check for correct adjustment, disconnect the "Z" fitting (1) from the drive lever (2).
- Move the drive lever (2) forward until the drive lever (2) is contacting the plastic bumper (3).
- The control cable is correctly adjusted if the center of the "Z" fitting (1) is aligned (4) with the hole in the drive lever (2) and there in no droop in the cable.
How To Adjust The Auger Drive Cable
- Remove the gas from the gas tank. Stand the snow thrower up on the front end of the auger housing.

WARNING: Drain the gasoline outdoors, away from fire or flame.
- (Figure 19) Disconnect the "Z" fitting (1) from the drive lever (2).
- (Figure 20) Pull the spring cover up to expose the spring (5). Push the cable (6) through the spring (5) to expose the square end (7) on the cable (6).
- Hold the square end (7) with pliers and adjust the locknut (8) in or out until the excess slack is removed.
- Pull the cable (6) back through the spring (5).
- (Figure 19) Connect the "Z" fitting (1) to the drive lever (2).
NOTE: When the auger drive belt is adjusted or replaced, check and adjust the cable.
How To Adjust The Belts
The belts will stretch during normal use. If you need to adjust the belts due to wear or stretch, proceed as follows.
How To Adjust The Auger Drive Belt
If the snow thrower will not discharge snow, check the adjustment of the auger drive cable. See "How To Check And Adjust The Cables" in the Maintenance section. If the adjustment is correct, then check the condition of the auger drive belt. If the auger drive belt is damaged, replace the auger drive belt. See "How To Replace The Belts" in the Maintenance section. If the auger drive belt is loose, adjust as follows.
- Disconnect the spark plug wire.
- (Figure 21) Remove screw (2) from belt cover (1). Remove the belt cover (1).
- (Figure 22) Loosen the nut (2) on the idler pulley (3). Move the idler pulley (3) 1/8 inch (3mm) toward the auger drive belt (4).
- Tighten the nut (2).
- (Figure 24) Depress the auger drive lever. Check the tension on the auger drive belt (4). In correct adjustment, the auger drive belt (4) will deflect 1/2 inch (12.5mm) (5) with moderate pressure. If the adjustment is not correct, repeat the adjustment.
- (Figure 21) Install the belt cover (1). Tighten screw (2).
- Check the adjustment of the auger drive cable. See "How To Check And Adjust The Cables" in the Maintenance section.
- Attach the spark plug wire.
How To Adjust The Traction Drive Belt
After approximately ten hours of operation, a new belt will stretch and require an adjustment of the belt tension. Also, if your snow thrower experiences a loss of power under heavy load, check the condition of the traction drive belt. If it is damaged or loose, replace it (see "How To Replace The Belts" in this section of the manual).
- Disconnect the spark plug wire.
- Unlock both left and right wheel locks. See "How To Use The Wheel Lockout" in the Operation section.
- (Figure 21) Remove screw (2) from belt cover (1). Remove the belt cover (1).
- (Figure 22) Loosen the nut on the traction idler pulley (12). Move the traction idler pulley (12) 1/8 inch (3mm) toward the traction drive belt (13).
- Tighten the nut (2).
- (Figure 24) Depress the traction drive lever. Check the tension on the traction drive belt (4). In correct adjustment, the traction drive belt (4) will deflect 1/2 inch (12.5mm) (5) with moderate pressure. If the adjustment is not correct, repeat the adjustment.

DO NOT over tighten belt. If the belt is too tight, the drive will not disengage. Before operating, check
the belt tension following the instructions in step 8.
- (Figure 21) Install the belt cover (1). Tighten screw (2).
- Attach the spark plug wire. Before operation, check the belt tension as follows:
a. Unlock both left and right wheel locks. See "How To Use The Wheel Lockouts" in the Operation section.
b. Move the shift lever to NEUTRAL position.
c. DO NOT engage the traction drive lever.
d. Start the engine.
e. Slowly move the shift lever forward. Watch the axles for rotation. If the axles rotate, the traction drive belt is too tight.
f. If the belt is too tight, again adjust the belt. After each adjustment, check the belt tension before operating.
- In correct adjustment, the snow thrower will not experience a loss of power under heavy load and the drive will automatically disengage when the traction drive lever is released.
How To Replace The Belts
The drive belts are of special construction and must be replaced with original factory replacement belts available from your nearest authorized service center.
Some steps require the assistance of a second person.
How To Remove the Auger Drive Belt
If the auger drive belt is damaged, the snow thrower will not discharge snow. Replace the damaged belt as follows.
- Disconnect the spark plug wire.
- (Figure 25) Remove the bolts (1) on each side of the bottom panel (2).
- Loosen the bolts (3) on each side of the bottom panel (2).
- Remove the bottom panel (2).
- (Figure 21) Remove screw (2) from belt cover (1). Remove the belt cover (1).
- (Figure 22) Loosen the belt guide (9). Pull the belt guide (9) away from the stack pulley (10).
- Pull the idler pulley (3) away from the auger drive belt (4) and slip the auger drive belt (4) off of the idler pulley (3).
- Remove the auger drive belt (4) from the engine pulley (11). To remove the auger drive belt (4), the engine pulley (11) may have to be partially rotated.
- (Figure 23) Remove the top four bolts (21) that hold together the auger housing (22) and the motor box (23). Loosen the bottom two bolts (24). The auger housing (22) and the motor box (23) can now be split apart for removal of the belt.
- (Figure 22) Remove the old auger drive belt (4) from the auger drive pulley (10). Replace the auger drive belt (4) with an original factory replacement belt available from an authorized service center.
- Install the new auger drive belt (4) onto the auger drive pulley (10).
- Assemble the auger housing (22) to the motor box (23) with the four bolts (21) that were removed in step 9. Tighten the bottom two bolts (24).
- Install the auger drive belt (4) onto the engine pulley (11).
- Slip the auger drive belt (4) under the idler pulley (3).
-
Adjust the auger drive belt (4). See "How To Adjust The Auger Drive Belt" in the Maintenance section.
-
Adjust the auger belt guide (9). See "How To Adjust The Belt Guide" in the Maintenance section.
- (Figure 21) Install the belt cover (1). Tighten screw (2).
18.(Figure 25) Install the bottom panel (2). - Install the bolts (1) on each side of the bottom panel (2).
- Tighten the bolts (1) and bolts (3) on each side of the bottom panel (2).
- Check the adjustment of the cables. See "How To Check And Adjust The Cables" in the Maintenance section.
- Connect the spark plug wire.
How To Remove the Traction Drive Belt
If the snow thrower will not move forward, check the traction drive belt for wear or damage. If the traction drive belt is worn or damaged, replace the belt as follows.
- Disconnect the spark plug wire.
- Remove the auger drive belt. See "How To Remove The Auger Drive Belt" in the Maintenance section.
- (Figure 22) Loosen the traction drive belt guide(s) (15). Pull the traction drive belt guide(s) (15) away from the traction drive belt (13).
- Loosen the nut on the traction drive idler pulley (12). Move the pulley (12) the maximum distance away from the traction drive belt (13) and then tighten the nut on the pulley (12).
- Remove the old traction drive belt (13) from the smaller stack pulley (10). Then, remove the stack pulley (10) and old traction drive belt (13). Replace the traction drive belt (13) with an original factory replacement belt available from an authorized service center.
- Install the new traction drive belt (13) onto the traction drive pulley (14) and onto the engine shaft.
- Install the stack pulley (10) onto the engine shaft. Then, mount the traction drive belt (13) onto the smaller stack pulley (10). Tighten the stack pulley (10) securely to the engine shaft.
- Adjust the traction drive belt guide(s) (9). See "How To Adjust The Belt Guide" in the Maintenance section.
- Install and adjust the auger drive belt (4). See "How To Remove The Auger Drive Belt" in the Service And Adjustment section.
- Adjust the auger belt guide (9). See "Auger Belt Guide Adjustment" in the Service And Adjustment section.
- (Figure 25) Install the bottom panel (2).
- Tighten the bolts (3) on each side of the bottom panel (2).
- (Figure 21) Install the belt cover (1). Tighten screw (2).
- Check the adjustment of the cables. See "How To Check And Adjust The Cables" in the Maintenance section.
- Connect the spark plug wire.
NOTE: After approximately ten hours of operation, a new belt will stretch and require an adjustment of the belt tension. See "How To Adjust The Traction Drive Belt" in the Service And Adjustment section.
How To Adjust The Auger Belt Guide
- Disconnect spark plug wire.
- (Figure 21) Remove screw (2). Remove the belt cover (1).
- (Figure 1) Engage the auger drive lever (5).
- (Figure 26) Measure the distance between the belt guide (2) and auger drive belt (3). The correct distance (4) is 1/8 inch (3mm) .
- If an adjustment is necessary, loosen the mounting bolt for the belt guide (2). Move the belt guide (2) to the correct position (4). Tighten the mounting bolt for the belt guide (2).
- (Figure 21) Install the belt cover (1). Tighten screw (2).
- Connect the spark plug wire.
How To Adjust The Traction Drive Belt Guides
- Disconnect spark plug wire.
- (Figure 1) Engage the auger drive lever (5).
- (Figure 21) Remove screw (2). Remove the belt cover (1).
- (Figure 27) Measure the distance (6) between belt guide (3) and traction drive belt (4). If an adjustment is necessary, loosen belt guide (3) and set the distance (6) for belt guide (3) to 1/16 inch (1.6 mm).
- Measure the distance (7) between belt guide (8) and traction drive belt (4). If an adjustment is necessary, loosen belt guide (8) and set the distance (7) for belt guide (8) to 3/16 inch (4.8 mm).
- (Figure 21) Install the belt cover (1). Tighten screw (2).
- Connect the spark plug wire.
How To Replace the Auger Shear Bolt
The augers are secured to the auger shaft with special shear bolts. These shear bolts are designed to break and protect the machine if an object becomes lodged in the auger housing. Do not use a harder bolt as the protection provided by the shear bolt will be lost.

WARNING: For safety and to protect the machine, use only original equipment shear bolts.
To replace a broken shear bolt, proceed as follows. Extra shear bolts were provided in the assembly parts bag.
- (Figure 1) Move the throttle control (13) to the stop position. Disengage all controls.
- Disconnect the spark plug wire. Make sure all moving parts have stopped.
- (Figure 18) Lubricate the auger shaft Zerk fitting (1), if equipped, with a grease gun.
- (Figure 28) Align the hole in the auger with the hole in the auger shaft. Install the new shear bolt (2), spacer (3), and locknut (4).
- Connect the spark plug wire.
How To Prepare The Snow Thrower For Storage

WARNING: Do not remove gasoline while inside a building, near a fire, or while you smoke. Gasoline
fumes can cause an explosion or a fire.
If the snow thrower is to be stored for an extended period, refer to the engine manufacturer's operating manual (included with some models) for important maintenance or storage details.
- Drain the fuel tank.
- Let the engine run until it is out of gasoline.
- Never store the snow thrower with fuel in the tank inside a building where ignition sources are present such as hot water and space heaters, clothes dryers, and the like. Allow the engine (motor) to cool before storing in any enclosure.
- Drain the oil from the warm engine. Fill the engine crankcase with new oil.
-
Remove the spark plug and pour about 15ml (1/2 oz) of engine oil into the cylinder. Replace the spark plug and crank slowly to distribute the oil.
-
Thoroughly clean the snow thrower.
- Lubricle all lubrication points. See the Maintenance section.
- Be sure that all nuts, bolts and screws are securely fastened. Inspect all visible moving parts for damage, breakage and wear. Replace if necessary.
- Cover the bare metal parts of the blower housing, auger, and the impeller with spray rust preventative lubricant.
- Put the unit in a building that has good ventilation. Store in a clean and dry area, but NOT near a stove, furnace or water heater which uses a pilot light or any device that can create a spark.
- If the machine must be stored outdoors, block up the snow thrower to be sure the entire machine is off the ground.
- Cover the snow thrower with a suitable protective cover that does not retain moisture. Do not use plastic.
How To Order Replacement Parts
The replacement parts are shown either on the back pages of this Instruction Book or in a separate Parts List Book.
Use only manufacturer's authorized or approved replacement parts. Do not use attachments or accessories not specifically recommended for this unit. In order to obtain proper replacement parts you must supply the model number (see nameplate).
To obtain replacement parts, contact your local Dealer.
Replacement parts for the engine, transaxle, or transmission, are available from the manufacturer's authorized service centre found in the yellow pages of the telephone directory. Also, see the individual engine or transmission warranties to order replacement parts.
When ordering the following information is required:
(1) The Model Number
(2) Serial Number
(3) Part Number
(4) Quantity
| TROUBLE | CAUSE | CORRECTION |
| Difficult starting | Defective spark plug. | Replace spark plug. |
| Water or dirt in fuel system. | Use carburetor bowl drain to flush and refill with fresh fuel. | |
| Engine runs erratic | Blocked fuel line, empty gas tank, or stale gasoline. | Clean fuel line; check fuel supply; add fresh gasoline. |
| Engine stalls | Unit running on CHoke. | Set choke lever to RUN position. |
| Engine runs erratic; Loss of power | Water or dirt in fuel system. | Use carburetor bowl drain to flush and refill with fresh fuel. |
| Excessive vibration | Loose parts: damaged impeller. | Stop engine immediately and disconnect spark plug wire. Tighten all bolts and make all necessary repairs. If vibration continues, have the unit serviced by a competent repairman. |
| Unit fails to propel itself | Drive belt loose or damaged. | Replace drive belt. |
| Unit fails to discharge snow | Auger drive belt loose or damaged. | Adjust auger drive belt; replace if damaged. |
| Auger control cable not adjusted correctly. | Adjust auger control cable. | |
| Shear bolt broken. | Replace shear bolt. | |
| Discharge chute clogged. | Stop engine immediately and disconnect spark plug wire. Clean discharge chute and inside of auger housing. | |
| Foreign object lodged in auger. | Stop engine immediately and disconnect spark plug wire. Remove object from auger. |
TABLE DES MATIÈRES
SYMBOLES DE DANGERS ET LEURS
SIGNIFICATIONS 17
SYMBOLES DE DANGERS ET LEURS
SIGNIFICATIONS 17
MONTAGE 22
FONCTIONNEMENT 23
TABLEAU DE MAINTENANCE 25
MAINTENANCE 25
TABLEAU DE DEPANNAGE 29
VEDLIKEHOLDSTABELL 65
VEDLIKEHOLD 66
FEILSØKINGSTABELL 69
WYKAZ CZYNNOSCI KONSERWACYJNYCH 105
KONSERWACJA 106
ROZWIAZYWANIE PROBLEMOW TECHNICZNYCH .... 109
WYKAZ CZYNNOSCI KONSERWACYJNYCH
IeJneKTop JeNo6a (3) - IV3MeHrT pacCToHne, Ha KOtOpoe OTbpaCbIbAetc CHer.
Pa3rpy30hBjXeJIO6 (4) - IV3MeHrT HnPaBJIeHne, B KOTOpOM OTo6paCbIbAeTCr CHER.
PbUar uHeKoBOr npuBoa (5)-3anyckaet nocTaHaBnBaet uHEK (c6op n oT6paCsbIbAHne cHera), KOtOpbI TaKKe oBeceuBaET DmXKeHne CheroOOnCTnteJI.
PbUar nepeKluoyenrackopocTei (6)-BbIbupaet ckopocTb dna CHEEROOuNCTITeJI.
Bb6pacbIbAembl 06BeKTbl
Jepkntecb Ha 6e3oanachom pacctoHn OT 06opuyoBaHn.
3anpeucho npnkaatcbc K BpaaHOUMCmDeTajm.
Ipejde yem BbInonHnTb 6cbnyxnbauoune IIN peMOHThbe pa60Tb1,3aRnyuWnte DBnraTeJIb N CHmITE HAKOHeYHk NPOBaODcBeyn3axnraHnA.
3KcnIyTaunOHhIe 06o3HaueHnI NIOaCHeHn K Hm
3Tn 0603NaYeHnHaHeceHbHa 06OpyDoBaHm,aix
onpeJeHnIaHbI B pyKOBoCTBe no 3KcNpyaTuIN.
Heo6xoJIMO npocmotpeTb ux npa3o6paTbcra B 3HaueHnax.
HepabunbHoe noHMaHne o6o3HaueHm MOKeT npBecTe K
Полуши Трав.
Macno

TOnnHbO

Bnpe
HeɪtpaɪbHoe
noJoxKeHne
3aDnXoA

BkIoueHo
BbIKJIHOyeHo

3axnraHne Bkl.

Hacoc pyhnoi
NOKaUKN TOJINBa

3axnraHne BbIKI.

Perjntop
NODaCh TOnJIbBa

Klou 3axnraHna

3acJIOHka
BbIKJ.
Haxmte,TO6bI
OCyUeCTBNTb
3JNeKtpnueckn 3aynck

3acNoHka BkJ.

3NeKtpnueckn
3anyck

Cron

3anyck DvrgateJra

MeDJIeHHO

Pa60ta Dnuratela

Bbictpo

Dbratelb 3arnyuweH

BkJIIOHTb
CzepnneHne

Cnla
cuenJIeHnI
UHeKobbI
c6opuzuk

UHeKOBa
myoTa

MycfTa npBbOda
BkHouHTb
CzepnneHne

BbIKHouHTb
cuenenne
Pa3rpy3ochny jxeno6

BNEBO

BIPABO
DeΦneKTop XeIIO6a

BBEPX

BHN3


ONACHO
KoHTaKT C BpaUaIOUIMcR 1HKeOBbIM MExaHN3MOM MoXeT PnIBEcTN K NOpUyeHIO TpaBM INI CMepeTbHOMy MCxOdy.
He npKacaiTec b K HeMy pyKaMn, HorAmn nIeOdekdoi.
OuNTka pa3rpy3oHOrO xeIIO6a YBnIeTcra OaCHO npOeIyPo.
3anpeeHOnPon3BOOnTbOuNCTky uHeKOBOro MexaHn3Ma OMycopa nn 3actpBwero Chera BO BpeM paobToyycTroPONCTBa nn npn 3anyueHHOM DBNrataTeJe.
OcuyseCTbIyOBnBaHneobOpyIOBaHn,3aRnyuHTe DBrIraTeJIbNOTCOeINHInTe npoBOCBeHn 3axuHaHn.
3anpeoHcTb6e3 npncMoTa ycTpoCTBO c pa6oTaUOUM DnBraTeJem. Bcerda OTKNoaayte UHeKOBbIe MexAHn3MbI n CpeDCTBA ynpabJeHnA cJeNneHnEM, rnyuHInTe DBnRaTeJIb N BBiHmAmTe KlnOu 3axnHaHn.
BoBpempa6oTbI HeDonyckaIteHa TeppuToPiOJeTei,DOMaUHnIX KINBOTbIX N DpyrNX NocToPOHHNX IInC. JeTeY qacto npinBJIeKaIOT pa3JInuHbIe ycTpoIcTBa. POMHnTe O haxoJauXxC BOKpyr JIOJAX.
Лица,Одъь ВCBObHyO OdExMy,HeДOLJHbI npi6bl3aTcKперdнeЧаTn CheroOoNCTnteЯ n шЕКOBOM MyexAHN3My.単рфы,Варжк, CBncaHOne shHypkn,CBO6Oня OdExJa NбPOKMOrYt 6bIT 點Ko 3axBaueHbBpaaUOuIMNCa DeTaIaMn,чTO MOKeT npINBeT K paCCHNeHNo.3aTaNHTeДПИHHbIe BOJOCbI n CHIMITE yKpaSeHnA.
- Chero0oHcTnTeIb npEJa3HaueH ToIbKO nIy y6OpKn Chera. Hn dIy kaKnx dpyrnx ceIeN OH ne npEJa3HaueH.
He ocyueCTbIyTe OunchTy Chera Ha nobepxHocTcxckIOHO. IporBJIte MaKcImaJIbHyIO OCTopoJXHOCTb PnCMeHe HnpaBHeHna CKNoHa. He nbITaIteCb OunchTtB KpyTbIe CKIOHbl.
He nOpIb3yIte cHeroOuNCTnTeIb Ha nobepxHocTEx, HaxoJauNXcra Hnd yPoBHeM 3emn, HapnpMeP, Ha KpbIaX JINbIX DOMOB, rapaKei N dpynx IIOO6NbIX CTpykTyp nJIn 3daHni.

ONACHO
Bpa3rpy3oohm JeIoo6e haoiHTcBbpaiaoouceKoJIeCO,OT6paCbIbAIOuee CHER.3aIpeuHnPOn3BOiNT OUncTkypa3rpy3oohro JoEIo6a pykamn IIN BO Bpemra6Otbl DBIrataTeJIA.
PJIbIcIb MOrYT 6bITb 3aXBaYeHbIMexAHN3MOM NOTOPBaHbI INI TReJeIO TpaBMnPOBaHbI.
Ouictska pa3rpy3oHoro keNo6a YBJIaTc8 onaCHO npoueDypoi.
- Hikorda He 3acobbaiTe pyKn B pa3rpy30HbI JKeIIO6 n He pa3MeaaiTe pyKn BO3Je Hero.
- Pocne toro, kak dBirataTeIb 3AflnyUWeH,doxndtecb octaHOBKn BCex BpaauOuXcra DeTaJIe, a NOTOM npn NOMOu n JaIKu OChCTnTe JeNo6.
B 3aCtpraBseM cHere, haoJiaSeMcB B JKeIIO6e, MoryT HaoDInbCp Dpynue NomExn, cnOcoBhIe npuBeCTN K NOBpeKJeHnO oOpdyoBaHnA, KpbJIbUaTkn I UHeKOBOrO MexaHn3Ma. BydTe octOpoxHbI, 3aNyckA yCTaHOBky nocne ydaHnHa Chera.


ONACHO
O6bekTbMOyT 6bItb NIOo6paHbI UHEKOBbIM MExAHN3MOM N Bbl6poWeHbI N3 XeJIo6a. 3aIpeSeHo HAnpabJIaTb OT6paCbBaembI cHer Ha JIOdei MM MaunHbI, a TaXke 3aIpeSeHo HaxOXdHeHne JIOde IpeEd CHEROOHnCTHTeJIeM.
Pa60TaC yCtpoiCTBOM, CNeDnTE 3a OkpyKaIooJIe o6ctaHOBKO.IpOxOKeJHHe YpeE3 HeKoTOpBie IpeDMeTbI, TaKHe KAK rpaBn, KObPKNДЯ HOr, Ra3eTbI, INpyuShKn KAMHN, CkpbITbIE NOd CHEROM, MOKeT pNBeCTn K BblOpacbIbAHH OTHX PpeDMeTOB UpeE3 JeNoO bIIN K Nx 6JLOKIpOBKe B uHEKOBOM MexAHn3Me.
Bcerda cneiTe, B kaKOM HappaBHeHm OToPacbIbAetc Cher. HaxoJyIeCn HeNoJaIeKy NeXeXoIbI, DomaUHHe JINBOTHbIe IIN IMyIeCTBO MOrY 6bITb paHeHbI INIOBpeXdHbI BBOpacbIbAemIMN ObBeKTAmN.
O3HaKombTeCb C TeppntOpne, Ha KOTopoI ppeCTOnT OcyuueCTBnTB pa6oTb. OTMeTbe rpaHnUbi neWexOJNbIX DopoxkeN Ipoe3XeY qactN, YTObI ppeDtBpaTnTB NOBpeXdHeHne IMyueCTBa OT6paCbIBaembIMN ObBeKTAMN
-БудьTe OCTOPOKHbI, HAnpabJIЯ OTo6pacbIbAeMbI ChER Ha He3HaKOMO TeppnTOpM. BydTe roTOBbl K BcTppe C HePpeDbUdEHHbIM NoBbEKTamN JIN DpyrIMN TpaHCnopTHbIMN cpeDCTBaMn.
- Pocne cToJKNHOBeHnC HEn3BecThbIM O6bEKTOM, 3AflyUHTNE dBrIaTeNb, NDoXdIte, Noka DBNxUHneCer DetanIO octAHOBaTcN u cpa3y npOIm3BEdNTe OCMTp Ha npEpdMeT HAnuH NoBPexKDeHn. Ecn nOBpeXdHn O6hApYKeHb, IpKeJde, Yem Bo3o6HOBntb paOToHa CHEeroOuHCTNTeJIe, UcTpaHNTe INX.
-После тoro,кakдвигатель 3АгЛУWEH,doхиТecь octahOBkn Bpaцюшинячstу,a дя оунстkn pa3ру3очHoro кeJO6a BCerda nCNoIb3yIte naKy.
- Ecni Bn6paqna yctpoiCTBa ycJInBaeTc3, 3AJIYUINTE DBnIaTeJIb.CNJbHaN Bn6paqna ObIyH OReJIaTeTc npI3NaKOM HeNCpPaBHOCTN. Ecni Heo6xOJMo, o6paTntecb K aBTOpI3nPoBAHHomy dJIlepy, KOToPbI npOn3BeDeT peMOHT.


PENEYNPEXKDEHNE
Дыгател Вьрабатыят Okисуглерда —ядовтулега 3а зета nцета.
PonadaHneBJeKneOKnUyIePoJaMOXeT npVBecTN KNoBJIeHnIO TOuHOTbI,NOTepe CO3HaHnI JIN CMePTN.
3anyck npabota DnBiratela DOJXHbI OcyueCTBJIaTbCRA 3a npedeJamn NOMEeHn.
He 3anyckaIte n He ocTaBJIte pa6oTaIOzIM DBrIaTeIb B NOMEUeHIn, daJce ecN dBepn INN OKHa OTKpbItbl.

PNEyPPEKDEHNE
TOnJIbBOIeroNCnapeHnJleKo BocPiamaHЯOTcN B3pbIBOONaCHbl.
BocnIameHHe Hn B3pyB MOryt npuBecTn K TjXeJIbIM OxOraM Hn CMepeTbHOMy IxCxoNy.
ПИДОЛINBE TONJIINA
3AΓЛУШИТЕ ДВИralteЛь, Даite emу OCTыть МИHMуM 1
ИЛN 2 MнHyть, И TOЛьКО NOСпe 3TOrO CHIMITE КрБИЖК
ТОЛINBHorO 6aKa.
3aOnHHeHnToNnHBnO6bKa CneNyET OcyIeCTBJIaTb 3a IpeJenAMN NOMEUeHNr NIN B XopoIo-BeHTNJIpyeMOM NOMEuHn.
He cJeNyEt nepenonHnTb TOnnBhbl 6aK.
-ДерхиTe TOnIINBO Ha paCCToHnO OT NCKp,OTKpbITOrO OTHr,3axKeHHbIX rOpEJIOK IN DpyrNX NCTOCHNKOB BO3rOpAHn.
- PeryjIrpH No npOBepaTe TOJINBONpOBOdBi, 6akn, KpbIuKIn n NaTPy6Kn Ha HauNue TpeUHN I pOteKaHN. EcnHne Heo6xOaMIO, npOn3BeDInTe 3aMeHy.
- He nepepkbIaIte 3acNoHky Kap6HopaTopa, UTo6bl 3aIyUHTb DnIraTeJIb.
ПИТРАСПОТИPOВКЕ OБОДOBАнЯ
- TpahcnpTnpoBky cneDyET ocUyecTBnAeTb C NYCTbIM TOJIINBHbIM 6aKOM.
KaOCTaHOBtB BbICOTy nNaTΦOpMbI(PucyHOK 1)
Chero0oHCTnTeJIb OchaIeH OnOpHbIMn
pamkamn, HmeIOUne BO3MOXHOCTb
n3MeHrTb BbICOTy (7) n OHn pnpKpePnEhbl K
BheuHne CTOpOHeo6NaCTn 6ypaba (4). YTo6bl
yCTaHOBtB XeJaEMyIO BbICOTy ONOpHbIX paMOK,
obpaTntecb K pa3JeLy «KaK n3MeHnTb BbcOTy
PiatopMbI» B pa3dJe «ObcnyKmbaHne».
Kak yctaHOBtB dnnHy kaBeIeN
Динна kaбелей 6ыla onpeделега Ha 3abodeи HET DoNOnIteIbHoI Heo6xOIMocTn onpeDЯлг bix Дину. Ho HecMoTpr Ha 3To, Korda pyuKIN yctAHOBNeHb B pa6Ouee noLOXKeHne, Ka6eIN MOrTy 6bITb IIN ДиNHHoBaTbIMn IIN KOpOTKOBAtBM. EcIn Heo6xOdIMO pOv3BecTn KopkeTIpOBkY, Torga O6paTntTeCb K pa3deNy «KaK npOBepNTb I I3MeHnTB ka6eIN» B pa3deNe «ObcnyKbBaHne ИКорpeТIpOBkA».
Kac yctpaHOBHTb pa36nBaTeJIb 3aHoca (ecnn npedycmOTpeHO B KOMJIeKeT)
Pa3bBATEJIN 3aHocA npEyCMOTpeHbI JnToro, yTO6bI npOKnaIbIBaTb NytB uee3 6oJIee BbICOKn yPoBeHb Chera, Yem yCTaHOBJIeH yPoBHem 6ypaba.
- (PucyHOK 11) OTKpyTITe KpenEkhBle yCTpOiCtBa (2), KOTOpbIe npuJepePxNBAIOt pa36nBaTeJI 3aHocA (1) Ha ypoBHe 6ypoBa.
2.ПОДНИМITE pa36иВател 3ahoca (1)Д Heo6xOДIMо BBICOTbl. - 3akpyntte kpenexhble yctpoicTBA (2).
Kak nojroTOBHTb MOTOP
PIMMEUAHVE: C 3aOda NoctabJraTeCMAOTOP, KOTOpbI yXe HAnONHeH MaCLlOM.PoBepbTe yPoBeHb MaCna. DObabTeMaCna, ecn Heo6xOdmo.

IPENUYPEXKDEHNE: TuaTeJIbHO CJeDuYte HNCTpyKcIyM npOn3BODnTEJIO MOTOpe, a TaKxE
OTHOCHTeBHO BnDa TOIINBa N Macna, KOTOpbIe HxNIO npImeHrTb. Bcerda nOJIb3yIteCb 6e3oNaChbIM KOITHePOM dJa TOnIINBa.He Kypnte, Korda do6aBJIareTe TOnIINBO B MOTOp. He HAnOJIhRAte 6eH3O6ak, HaxOJaTb B 3aMKHYtOM NOMeUeHN. NepeD TEM, KaK do6aBJIaTb TOINlBO, BBIKJIOuHTe MOTOp. DaIte MOTOpY OCTbITb B TeueHne HECKOJIbKnx MNHyT.
PpOBepbTe MaCIO. PpOCMOTnTE INHCTpyKcIN
PpON3BOIDTeIa O MOTope,a TaKKe
OTHOCTeBHO BnDa TOJIINBa N Macla, KOTOpBle
HyXHO pPIMHeTb. IpePe TEm KaK NaHNHaTb
HCNoB3OBAbArperaT, npOHTaIte
HΦopMauNIO o 6e3oNaChOCTn, pa6Ote,
peMOHTe I XpaHeHIn.
Baxho! Npeedem, kak BbI NaHHeTe npImeHeHne
IpoBepbTe KpenEJHbIe ycTpoiCTBa. Y6eJntEcB, yTO BCE KpenEJHbIe ycTpoiCTBa 3akpyeHbl.
Ha MoDeJIaX c 3JeKtpUyeCKIM BKNIOUeHHeM- arperat 6bln NOCTaBNeH C NyCKOBbIM TPOcNkOM, BKNIOUeHHbIM B MOTOp. IpeE HaayIOM NcNOJIb3OBAHn HJxHO BbIHytb NyCKOBtPOcNk N3 MOTopa.
NCIOJIb3OBAHNE
ПРIMEЧАНЕ: Ильострацнихадятсан CTpaицe2инастраицax 167 no171.
PPEyPExEHNIE: NcnoJIb3yIte ToJIbKO Te KOMJIeKtYIOUne I OCHaCTKN, KOToPbIe 6bln OoObeHHbIe PpOn3BOuNTeJem DnI CHEeroOChTInTeJI (K pRIMepy: Zenb IpOTNB CkOJIbXeHnI, 3NeKTpueckoe NyCKOBOE yCTpoiCTBO n T.I.).
3HaTe CBOB CHEEROOCHNTeJIb (PucyHOK 1)
ПочиайтКИнгуИнструкши Иправлал no 6e3oNaChocStиpeedTeM,TakHaunHaTb nCNoIb3ObaTb CheroOooHCTnTeJIb.CpaBHTe IJIIOCTpaUcN C BaUIM CheroOooHCTnTeJemДЯТOrTO,чTOБыЛучSe O3HaKOMITbСсРacnoIOnKeHHeMa pa3JIuHbIXУпrabLЯJOuxи PeryUnpurox.
Kak KohtpoJnIpOBaTb Bbl6poc chera

IPENyPEXKDEHNE: Hn B Koem cnlyae HnkOrda He HanpaBJIaTe OTBOd Chera Ha NoctOpOHnx.

PPEyIpyEKDEHNE: Bcerda BbIKJIOuaTe MOTOp nepeTeM, KaK npOn3BODnTb npOuCTky
cnyckhoro kjooba nnn uhekoBoro bypa, a TaKKe nepeTd TEM, KaK ocTabNTb CHERooHCTnTeJIb.
- (PucyHok 1) Повернite Крвоши (2).Дпг.TORO,ЧТбИ ИЗМЕнть НаразлесниБыбра сera.
- (PucyHok 13) HadaBHTe Ha cBemhbln HAKIOHHbI XeNo6 (2) BnepeD nToro, YTO DOCTaTB CHER, HaxoJusNcBbICOKO NIN daNEko. DePHnte CbEMhbln HAKIOHHbI JxKeNo6 (2) Ha3aD, YTO6blc6pocntb CHer.
Kak octaHOBntb CHeroOuHCTHTeJIb (PucyhoK 1)
1.ДяoctaHOBKOr6bOcAChera,OCBO6oJnte pyIur pa6oey 6ypaBkn (5).
2.ДяЯocTahOBKN KOJIeC,OCB6OJNTe pIyar pa6ooyer Taryn (1).
3. Yo6bIOCTHOBNTb paOToy MoTopa, nepeBeaTe pIur ynpaBJeHnA DpocceJem (13) B noLoXeHne «BbIKJIIOHTb/Off» I BbIHMeTe KlnOu (8).
PPEyIpyEeHHeN:YTo6bI BvIKNoUHTb MOTOp, He nepeBvraIte ynpaBJeHne 3acIOHcO B NOJoxHeNe «3ACIOHKA/CHOKE». MoKeT npOn3oTu o6paTHbI 3aynck nIn NoBpeXeHne MOTopa.
Kak DvRaTbCnBpeP (PucyHok 13)
1.ДЯТOrO,чTo6bIДВИгATbCЯВпeрED,OCBO6OДITE pblurФрнкUHNOHOROpnIBOda(1).KorJa CHEROOnHCTNtENbHaChET DBIVaTcBc BnepED,npeBeDHTe pblur nepeKlnHouEnH cKOpocTe (3)do HeOBxODIMoK cKOpocTn.Kpenko DepxNITepyKN HnapraBJIte ChERooHCTNtENbNopacuNlaeMoT TpOHnHKe.He bItaTecbTOJKA Tb CHEROOnHCTNtENb.
2.ДЯTORO,YTO6bI CHEROOCHNTeINb DnBraJIcH Na3aI,nepeBeDInTe the pbiur pepeKIOUeHnckOpOcTei (3) B noJIOKeHHe 3aDHeRo XoJa.
Kak ot6pacbBaTb CHER (PucyHok 1)
- 3aIeIcTByIte pbIur pa6oTbI 6ypaBkn (5).
2.ДлЯ OCTaHOBK OТБрОСA ChERa,OCBO6OДNTe pyIur pa60TbI 6ypaBKN (5).

IPENyIPEKJEHNE:YnpaBJIeHne JIObIM CHEROOCHNTeJIeM MOKeT npIBeCTN K TOMY,TO
nocToPOHHne npEaMeTbI MOyT 6bITb OTbpoWeHb I rna3a N 3TO MoKcET npBecTu K cepb3HOMy NOBpeJxDeHIO rna3a. Bcerda Hocnte Ouyk 6e3oNaChOCTu INN 3aunTHbIe OUYK BO Bpemr MCNoB3OBaHNc CHeRoOoNCTntTeIN.Mbl peKoMeHdyem CTaNdapTHbIe 3aunTHbIe OuyKn INN pInmHeHne 063OpHO 3aunTHoM Mackn NoBepx Baunx OOKOB.
Kac nCnoJb3OBA Tb yHKnIHO 6nOKnpOBKn KOnec (PucyHok 1)
KaKdoe KOneco npKpeHneHo Kocn C 6JIOkpyUOUM cTePckHem.Arperat n3HaayIbHO OChaueH 6JIOkpyUOUM cTePxHem B 3a6JIOknpOBaHHOM nOLOXKeHH.ДЯ lyuWei MaHEBpEHHOCTHn pRn JERKOM cHere,OTKnIOHTe 6JIOkpyUOIm cTePkeHcJeDyUOUM o6pa3OM.
1.ДернITEpykOry(21)ДЯТTOr,YTo6bIocBo6oDoNTb6JOKnpyUOni cTePKeHb.
2.ДЯТOrOуTO6bIЗakpeINtBOCBo6oxdEHHoe noloxeHne cTepxHn, nobepHnTe pyKoTky (21)HaJobopota(90rpaDycob).
IpeTeM, KaK 3aBoNtB MOTOP
1.Перд Tem,Как Ви haчнелу Исплььованe nJIN npimmehene MOTopa,ОзнakOMbTeCb co CheroOuHcTnTeJIeM.Y6eInteCbВ TOM,yTO noHmaeTeФyHKUIMn MeCTOHaxOXKeHne BCEx KOHTpOJInpYIOxN.
2. Поберъе упруrocъкабеля\
пескючATEЯ сКОРСТЕЙ рЕрД TEМ, КА\
ВКЛЮЧИТМOTOP. ПОСМOTРЕ «КаK\
ПОДКоррKEТиPoВАь KaБь KОРБКИ\
пескючЕНИССКОРСТЕй» B pa3ДЕп\
«ОбсIJУХИВАнUE» B DAнHо ИНСТPyKUIN.
3. Y6eIntecb TOM, yTO BCE kpeJExHbIe yCTpoIcTBA 3aTAYtI.
4. Y6eIntecb B TOM, YTO BbICota paMbI yCTaHOBJeHa npaBUNbHo. IocMOTpIte «Kak noDKoppeKTIpoBaTb BbICOTy paMbI» B pa3dene «O6cnyJbBAHne» B daHHoINHCTpyKUIN.
5. ПоберьтЕ давелене ВОзdyxa вшинх. Правильhoe давелене ВОзdyxa должно сокtabлгьот 1 BAR (14 ФуHT/КВ. ДюМ)do 1,25 BAR (17 ФуHT/КВ. ДюМ). He Накачиваite shinbI b6OJBSe,чem уka3aHo HaCAMоIshHe.
Kak octaHOBNTb MOTop (PucyHok 1)
YTO6bIOCTHOBnTb pa6Otu MOTopa, IpeVeBdnte pyIur ynpaBJeHnA DpOceIeM (3) B NOJIOXHeNIE BbIKJIOHTb / Off N BbIHmTe KJIou (8). XpaHInTe KJIou (8) B NaIeXHOM MecTe. MotOp He MoKet 6bITb 3aBeIeH 6e3 KJIoua (8).
PPEyynPExKDeHNE:YTo6bI BbIKNoHTb MOTOp,He nepeBnraite ynpaBneHne 3aclonkO B noJoxKeHne «3ACLOHKA/ CHOKE》.MooTe npOn3oTn o6paTHb 3anyck nII NOBpeXdeHne MOTopa.
Kak 3anyctntb MOTOP (PucyHOK 1)
Moden, KOtOpbIe OCHaSeHbI 3JeKtpnueckm 3anyckom
ПРМЕЧАНЕ:БLOK 3ЛЕКТРУСЕСКО 3aNYSCa MoXeT 6bITb Do6abNeH DЯ TOrO, 7TO6bI 3aNYCKaTb MOTOp.БLOKI 3JIeKTPuYCECKO 3aNYSCa MoXeT 6bITb ПиббретнВ bLnxKaIseM aBTOpN3nPoBaHHom CepBnCHOM cEHTpe.

PPEyPPEXDEHNE:БLOK 3anycka ochaueH Tpex-tpoBOHDbIM npoBOdo
nHTaHnBVKIOuOteMeHpa3pa6oTaH
dIpa6oTbHa 220 BONbTx ToKa,
noCTabNREMORO DOMA. SHypr nHTaHnB
DOJxHc6bITb NOCTOBHHO 3a3eMJIeH DnI
TOrO, YTObIs N36ExaTb BO3MOXHO
3JeKTPnuCecKO Woka, KOTOpbIM MOKeT
npOn3oHTn CyeNoBekOM pa6oTaOuIm C
arperaTOM.BHNMaTeLbHO CneDyIte
MHCTpyKzHM B pa3DeJe KaK BKNIOUHTb
MOTOP).Y6eDInTeCB TOM, YTO nOdaCa
ToKa B BaW dOM OcyueCTBnEaTc no
Tpex-IPBOAoHNO 3a3eMJIeHHo CnCTeMe.
EcII Bbl B 3tOM He yBepHebl, TOrDa
nPOKOHcyIbTnpyIteCb C
LIuChEN3IOPOBaHHbIM 3JeKTPNKOM.EcII B
BaWeDMe He IcNoJIb3yETc
Tpex-IPBOAoHNA 3a3eMJIeHHa CNCTeMa, He
HCNoJIb3yIte 3JeKTPnuCKeK 3aynck Hn
PiKaMM npedlORom. EcnB Bawa
CmCTeMa 3a3eMJIeHa, HO He IMeET pO3ETOK
C TpeMg DbIPkAMn, YTO HeO6XoDIMO dJa
3JeKTPnuCeCKoro 3aynck, TOrDa
ObPaTNTECb K LIuChEN3IOPOBaHHOMy
3JeKTPNKy DnI yCTaHOBVKn
Tpex-IPBOAoHNO CNCTeMb.I Da toro,
YTObI NODKIIIOHTb 220-BONbTHbl
PpOBoD 3aNycka, BcerDa ChauJa
BKlIOUaIte PpOBoD 3aynckaYepe3
IpeXeOHyIO CoeINHInTeBHyIO Kopo6Ky (11) Ha MOTope. 3aTEM, NODcoeINHte
dpyro KoHeuB 3a3eMJIeHHyIO PO3ETky C
TpeMdbIPkAMn. Korda OTKnIOuaete Whyp
nHTaHnB, BcERDa OTKnIOuaiTe ChauJaero KOHeuOT P03ETKn C TpeMdbIPkAMn.
Kak 3anyctntb oxnaXdEHHbIM MOTOP (PucyHok 1)
- ПоберьтЕ мOTOPhoe MacJIO.
2.Испльзут eобчньи HeэтнлроваHHb 6eH3nH.CmToTte «Kak noDrToTobt b MOTop». - Y6eIntecb,HTo pa6oyn pbIyarФpIKcUNHO npBODa (1) np6oyn pIyar 6ypoba (5) HaxOJrTCB He3aJeCTBOAHHOM (OCBO6XdEHOM) NIOJOKeHNH.
4.ПеревадиTe Дресьнhoe perуларованe(13)В пооженебICTpoi pa60tbl. - BCTaBbTe KInOu (8) BO BKInOuChaTeNb 3aKInaHnYbEInTEcbBTOM, YTO KInOu (8) 3aUeIKNHyncBa CBOeM MeCTe. He NOBOpaUnBaIte KInOu (8). CHINmTe 3aIacHbIe KInOu IN XpaHnTe INX B 6e3OnaChom MeCTe.
- Пелеведу уравlainец заслонков (14) в пооженце заслонки «погhoe/full».
- (3neKmpuueckoe 6knHoueHe) CoeHHnTe UHyp nHTaHnC NyCKOBbIM DBrIaTeJem (11), HaxoJaUIMcHa MTope.
-
(3Jekmpuueckoe BkHoueHue)
IodKlUChTe dpyroT KOHeT zHypa NTaHnB TpEx-PIPOBOHyO 3a3eMJIeHHyO pO3eTKy Ha220 BoJbT. (CMOTPnTe
IPDEyIPEXKDEHnB DaHHom pa3deJe). -
HaxmTe KhONky npokaKn (9).KaXdbi pa3, KOrDa BbI HaxmaeTe KhONky npokaKn (9), nOdoXdnte DBe CeKYHbI.ДЯ nHΦopMaUcN O TOM, cKoJIbKO pa3 HxJHo HaxmAtb KOnkny npokaKn (9), o6paTneCb K INCTpyKUmaN pOn3BODnteJIa NO NOBOy MOTopa.
10.(3Jekmpuueckoe BkHoueHue)HaXmntHa KhONKy 3Jektpnueckoro BkHoueHna (10) I NOOxKdIte, YTO6bI BKIOHcNcRA MOTOp. He 3aBOJNTe 6OJIee yem B TeUeHne 5 cekyHd 3a pa3. IPOJxDITe OndHy MInHyTc MOMeTa 3anycka dIra TORO, YTO6bI CTAPTeP ocTbI.
11.(3anyck nymem o6pamhoomdau) MeDnEHNO dePNHe 3a pyky cTapTe paObPAHOIOTdau (12),Noka He nouyBCTByeTe CONPOTNBENHe I 3aTEM dePNHe 6bICTPO, YTObI 3aNyCTNb MOTOp. He no3BOJnIte pyKe cTApTe paObPAHOI OTdau (12pe3KO paCKpyHbATbcr. MeDnEHNO bepHnTe pyKy cTapTe paObPAHOI OTdau (12).
12.EcnnMOTOp He 3aynCkaetcra 5nIn6pa3, o6paTntecb K cekuIN B INHCTpykUIN, Ha3bIbAeMoN «Ta6nua peSeHnna npo6nem».
13.ДаиTe MOTOpy BO3MOxHocTb nporpeTbcraB TeueHne HeckonbKnx MnHyT. B To BpemЯ kak MOTop nporpeBaetcra, noKOppeKtnpyuTe pyKoRrTKy «NoDcoca》(14)В CTOPOHy noLoXeHnA «PIMMEHryTb/RUN». PIoKoNte noka MOTNe He naHET pa6OtaTb yCTOnuHBO nepeDe TEM, KaK KoprpeKtnpoBaTaB pyKoRrTKy «NoDcoca». - (3neKmpuueckoe Bknouehue) Bnauane OTKIOHNTe SHyP NtAHNOr OT TpEx-BnIKOBOn pO3ETKn. 3aTeM, OTCoeDNHTe SHyP NtAHNOr OT paCnpedeIITbHOH Kopo6Kn (11).
TABJIULA OBCJNYKBAHNA
OTBETCTBEHHOCTN KJINEHTA
Kac yctaHOBntb BbICOTy paMbI (PucyHOK 1)
B daHHOM cheeroouchntteJe ectb Dba BapnaHTa BBICOTb paMbI (7).3Tu paMbI NOHIMaIO TnepeHIOU qacb cheeroouchntteJI.ДЯ NCNoIb3OBAHnHa Ho obIuHbIX TBePbIX NOBepxHOCTX, TaKnx KaK dopOJKN K DOmy ININ TpaTyapbl, PNOkOppeKTnpyTe paMbI cJeDyIOUIm O6pa3OM.
- NocTaBbTe CheroOoHcTnTeIb Ha poBHyo NOBepXHOCTb.
- Y6eIHTecb B TOM, YTO o6a KOneca xopoWo HakaYeHb.InpaBnIbHoe dAbJeHne Bo3dyxa DOJnxHO coCTaBnTb OT 1 BAR (14 FyHT/KB. IIOIM) Do 1,25 BAR (17 FyHT/KB. IIOIM). He HakaUHbaIte uHHbOJIbSe, Yem Yka3aHo HA cAmOu ShinHe.
- NocTaBbTe DOnONHnTeIbHbIe Cpe3HbIe 6oNTbI(KOTOpbIE MoXHO HaHTN B KOpO6Ke DeTaleN) NOK KaXdIy n3 NoXeO6pa3ObATEnei (15) pAOM c peryInpuyEmbIM paamm (7).
- PackpyTnte 3akpennnaoune 60ntbl (16), KOtOpbIe depXaT perynnypeMbIe nnatfopmbIy (7).ДЯТOrO,уTo6bl OTNYCTNtB nepeNDIOu cactb CHEEROOCHNTeR, NOdHmNte KaJkyU H3 peynnyeMbIX pam (7).3akpyTnte 3akpennnaoune 60ntbl (16).
INPIMEUYAHHE:HaKaMeHnCTbIX INHePOBbIX NOBepxHOCTX INPNIOHNMITE NepeDHIOU qaCTb CHEROOuNCTHTeJI, ONyCTNTB perynpyeMbI paMbI (7) BHN3.

PNEyIPEKJEHNE:Y6eIITecbB TOM,HTO MeCTo,KOTOpoe Bbl CObnpaTeCb paCnuSuaTb He
HMeeT Ha HEm NOCTOPOHnX O6bEKeTOb. TaKne 06BeKtbl KaK rpaBn, KameuKn I dpyrHe NOMexdIa CHeroOChTNeJIeCJINx 3acocet B arperaT, TO OHN MOryt 6bItb BbIbpoWeHbIC BoNBso CnIO, YTO MOKeT BbI3BaT bTaPbMy y YeNoBeka, HAHeTeN BpeD cO6CTBEHNOCTn, a TaKxe NOBpeNTb cam CheroOChTNeIb.
Kak nodkoppeKtnpoBaTb loxoe6pa3oBaTeIb (PucyHok 1)
Iocne doJrro IcnoJb3OBAHnra, cam loxoe6pa3oBaTeNb (15) MoXeT n3HOCNTbcra. Cam loxoe6pa3oBaTeNb (15), BMeCTe c paAMMa,doJXhbl 6bItb KoJkoppeKtnpoBaHbI TaKM o6pa30M, yTo6bl 6bIIO pacCTOaHne B 3 MM (1/8 dUma) MeXy Joxoe6pa3oBaTeNeM