
TACTICAL RIFLESCOPES - Shooting optics BUSHNELL - Free user manual and instructions
Find the device manual for free TACTICAL RIFLESCOPES BUSHNELL in PDF.

| Product type | Tactical riflescope |
| Brand | BUSHNELL |
| Model | TACTICAL RIFLESCOPES |
| Lens coating | RAINGUARD® HD (water-repellent, fog-proof) |
| Reticle type | Mil-dot |
| Reticle focal plane | First or second focal plane depending on model |
| Eyepiece adjustment | Fast focus |
| Elevation adjustment | Turret with clicks (1/4 or 1/8 MOA) |
| Windage adjustment | Turret with clicks (1/4 or 1/8 MOA) |
| Parallax compensation | Side focus |
| Turret zero reset | Yes, with included Allen key |
| Power source | None (passive optics) |
| Housing material | Metal (precision alloy) |
| Weight | Varies by model (approx. 500-800 g) |
| Warranty | Elite Limited Lifetime Warranty |
| Lens maintenance | Blow, soft brush, cotton cloth with cleaning fluid |
| Lubrication | Lubricated for life, do not lubricate |
| Storage | Avoid extreme heat and direct sunlight |
| Safety | Never look at the sun; mount the scope far enough forward to avoid injury from recoil |
| Repairability | Repair or replacement under warranty; contact Bushnell or dealer |
Frequently Asked Questions - TACTICAL RIFLESCOPES BUSHNELL
User questions about TACTICAL RIFLESCOPES BUSHNELL
0 question about this device. Answer the ones you know or ask your own.
Ask a new question about this device
Download the instructions for your Shooting optics in PDF format for free! Find your manual TACTICAL RIFLESCOPES - BUSHNELL and take your electronic device back in hand. On this page are published all the documents necessary for the use of your device. TACTICAL RIFLESCOPES by BUSHNELL.
USER MANUAL TACTICAL RIFLESCOPES BUSHNELL
ELITE
USING YOUR ELITE TACTICAL RIFLESCOPE UTILISATION DE VOTRE LUNETTE DE VISÉE TACTIQUE ELITE UTILIZACIÓN DE LA MIRA TÁCTICA PARA RIFLE DE ELITE DER GEBRAUCH IHRES TAKTISCHEN ZIELFERNROHRS VON ELITE USO DEL CACCOCCHIALE DI PUNTAMENTO TACTICAL ELITE
CONGRATULATIONS.
You've Purchased The Finest
RIFLESCOPE MONEY CAN BUY.
Our Elite Riflescopes are simply this:
The brightest, clearest, most durable line of riflescopes available in the world at any price.
FÉLICITATIONS ET MERCI.
Congratulations on your choice of a Bushnell® Elite® riflescope. It is a precision instrument constructed of the finest materials and assembled by highly skilled craftsmen for a lifetime of trouble-free use under the most demanding conditions.
This booklet will help you achieve optimum performance by explaining how to use its various features and how to care for it. Read the instructions carefully before mounting and using your scope.
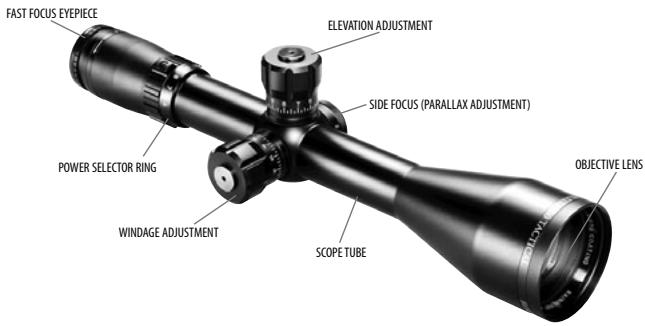
The accompanying photographs are guides to the nomenclature and location of the riflescope parts mentioned throughout this text.
RAINGUARD® HD
This new technology gives you a significant improvement in brightness and light transmission and provides unequaled clarity in the worst conditions. RAINGUARD ^® HD is the first coating to protect your riflescope against external fogging. Has your scope ever fogged on a cold day because you accidentally breathed on your eyepiece? Have you ever hunted on a cold, wet day and found it almost impossible to keep the outside of your scope from fogging? RAINGUARD ^® HD will help prevent these problems.
HOW IT WORKS
RAINGUARD ^® HD is a special water repellant coating on which condensation forms in much smaller droplets than on standard coatings. These droplets form when the scope is exposed to rain, fog or snow. These smaller droplets scatter much less light than the larger droplets on other coatings. This results in a much clearer and more useable sight picture. Additionally, water sheets off RAINGUARD ^® HD much more readily than a standard coating. For the first time, the hunter will not miss the shot of a lifetime because moisture was on the lens.
CARE OF RAINGUARD® HD
RAINGUARD ^® HD is an extremely durable, scratch-resistant, permanent coating that will give you years of service. To get the best performance, just keep the lenses clean. To clean, first blow away any dirt and dust or use a soft lens brush. Fingerprints and lubricants can be wiped off with lens tissue or a soft, clean cotton cloth moistened with lens cleaning fluid.
EYEPIECE FOCUSING
This adjusts the focus so that the reticle (cross hairs) appears sharp to your eyes. All Bushnell riflescopes are focused at the factory for 20/20 or corrected vision. If the reticle appears sharp, no adjustment is needed. If the reticle appears unsharp, adjust as follows:
The eyepiece is designed to provide a precise fast focus. Simply look at a distant object for several seconds without using your scope. Then, shift your vision quickly, looking though the scope at a plain background. Turn the fast-focus eyepiece clockwise or counter clockwise until the reticle pattern is sharp and clear.
natural_image
Close-up of a hand holding a cylindrical mechanical component with a small circular mark (no visible text or symbols)WARNING: Never look at the sun through the riflescope (or any other optical instrument). It may permanently damage your eye.
MOUNTING
To achieve the best accuracy from your rifle, your Bushnell scope must be mounted properly. (We strongly recommend that those unfamiliar with proper procedures have the scope mounted by a qualified gunsmith). Should you decide to mount it yourself:
- Use a high-quality mount with bases designed to fit your particular rifle. The scope should be mounted as low as possible without touching either the barrel or the receiver.
- Carefully follow the instructions packed with the scope mounts you have selected.
- Before tightening the mount rings, look through the scope in your normal shooting position. Adjust the scope (either forward or backward) until you find the furthest point forward (to insure maximum eye relief) that allows you to see a full field of view.
WARNING: If the scope is not mounted far enough forward, its rearward motion may injure the shooter when the rifles recoils. - Rotate the scope in the rings until the reticle pattern is perpendicular to the bore and the elevation adjustment is on top.
- Tighten the mounting screws as tight as possible.
VARIABLE POWER ADJUSTMENTS
To change magnification, simply rotate the Power Selector Ring to align the desired number on the power scale with the Index Dot. When still-hunting or stalking game, a variable scope should be set to the lowest power. You then have the widest field of view for quick shots at close range. Higher powers should be reserved for precise long-range shots.
WARNING: A scope should never be used as a substitute for either a binocular or spotting scope. It may result in your inadvertently pointing the gun at another person.
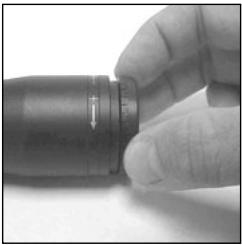
ELEVATION AND WINDAGE ADJUSTMENT
Your Bushnell ^® Elite ^® scope features finger-adjustable, audible-click elevation and windage adjustment turrets. Grasp the Adjustment Turret and turn it in the appropriate "UP" (and/or "R") direction indicated by the arrows. Each "click" or increment on the Adjustment Scale Ring will change the bullet impact by 1/4" Minute of Angle or 0.1 Mil (depending on your scope model). See scope adjustment dial for the click adjustment value on your scope. 1/4 MOA corresponds to 1/4 inch at 100 yards, 1/2 inch at 200 yards, 3/4 inch at 300 yards and so on.
natural_image
Close-up of a black mechanical knob with a pointer indicating measurement (no visible text or symbols)ELEVATION ADJUSTMENT TURRET
natural_image
Close-up of a mechanical gear component with no visible text or symbols
BORE SIGHTING
Bore sighting is a preliminary procedure to achieve proper alignment of the scope with the rifle bore. It is best done using a Bushnell Bore Sighter. If a bore sighter is not available, it can be done as follows: Remove the bolt and sight through the gun barrel at a 100 yard target. Then sight through the scope and bring the crosshairs to the same point on the target. Certain mounts have integral windage adjustments and, when bore sighting, these should be used instead of the scope's internal adjustments. If major elevation adjustments are needed, they should be accomplished by shimming the mount base.
ZEROING
Final sighting-in of your rifle should be done with live ammunition, based on your expected shooting distance. If most of your shots will be at short range, zero-in at 100 yards. But, for long-range shooting at big game, most experienced shooters zero-in about three inches high at 100 yards. Three-shot groups are useful for averaging the point of impact.
USING YOUR BUSHNELL TACTICAL RIFLESCOPE
Once you have finished sighting in your scope and your firearm is consistently on target, you may want to realign the zero marks on the windage and elevation dial scales with the index lines. To do this, first remove the target turret, then reset the dial to zero and replace the turret.
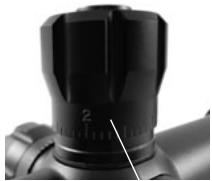
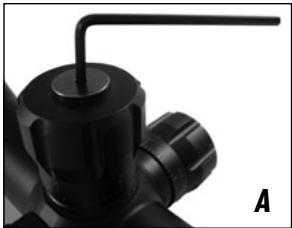
REMOVING THE TARGET TURRETS
Using the included Allen wrench (hex key), loosen the turret bolt (A) by turning it counter-clockwise while firmly holding the turret in place. You can either remove the bolt entirely (B), or just loosen it enough to be able to pull up on the turret and rotate it freely in either direction (make sure the adjustment itself does not change-you don't want to loose your zero setting).
natural_image
Close-up of a black mechanical component with a cylindrical shaft and flanged end (no visible text or symbols)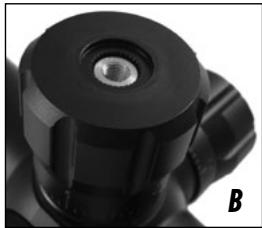
natural_image
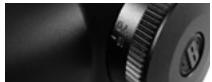
Close-up of a black mechanical component with a central screw and circular base (no visible text or symbols)RESETTING THE DIALS TO ZERO
Once the turret bolt is loose (or removed), and you are able to pull up the elevation turret and rotate it freely, line up the "0" on the adjustment scale with the index line, then push the turret back down into place. Be careful not to lose any clicks when pushing the turret back down, which might affect your targeting at the next use. Replace the turret bolt and use the Allen wrench to tighten it (turn clockwise) until the turret is securely in place. Repeat this process with the windage turret.
natural_image
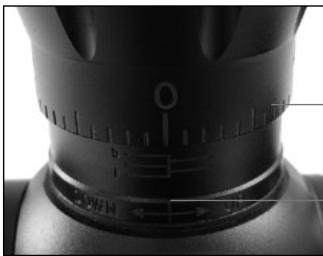
Close-up of a camera lens with measurement scale and adjustment knobs (no visible text or symbols)Adjustment Scale
Index Line
USING THE SIDE FOCUS CONTROL (ADJUSTING FOR PARALLAX)
You may have noticed that placing your eye at different positions behind the scope's eyepiece causes the reticle crosshairs to appear to move around to different points on your target. This is called "parallax error" (target and reticle are not in the same focal plane), and it becomes more noticeable (and more of a problem) at shorter distances and/or when the scope is set to higher powers. Your tactical riflescope provides an adjustment for parallax compensation, which works by moving an optical element until the target (based on its distance) appears in the same plane of focus as the reticle. Instead of the typical parallax compensation design which adjusts the objective lens at the front of the scope ("adjustable objective" or "AO"), your scope uses an movable lens back near the reticle, so the adjustment can be more easily made with a "side focus" knob placed next to the windage and elevation adjustments. Just line up the estimated distance (on the side focus dial- you may want to use the mil dot reticle to range it first) to your target with the index line on the body of the scope, and you will eliminate the aiming errors caused by parallax. After setting the side focus, you can double check by moving your head around from side to side behind the eyepiece-the point of aim should not shift if the side focus is correctly set. An alternative method is to look through the scope and turn the Objective Adjustment Ring until the target, at whatever range, is sharply focused.
natural_image
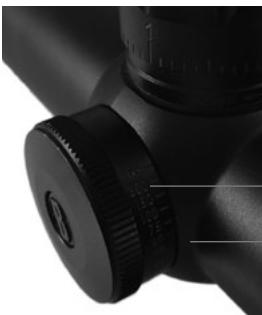
Close-up of a black mechanical component with a circular head and adjustment knob (no visible text or symbols)Yardage Marks on Side Focus Knob Scale
Index Line
ABOUT RETICLE FOCAL PLANES
Variable power riflescopes may have their reticles located in either the first focal plane (in the section nearest to the objective lens), or in the second focal plane (nearer to the eyepiece or ocular lens). This location determines how the reticle will behave relative to the target when you change the scope's power (magnification).
If your scope's reticle is located in the first focal plane, the size of the reticle will appear to increase or decrease when you increase or decrease the scope's power (using the zoom ring), just as the target itself does. If the reticle is in the second focal plane, the reticle always appears at a constant size and does not follow your changes in power-only the apparent size of the target changes.
This is especially significant in riflescopes with mil dot or other range estimation type reticles. A first focal plane reticle may be more convenient, as it allows you to use the guide marks at any power you select. A second focal plane reticle can only be used for range estimation at a single power setting, the one it has been calibrated for (unless you do a little math, as described later in this manual). You can of course use the scope crosshairs at any power for accurate shooting—however you will only get accurate distance estimation by using the ranging marks at the calibrated magnification.
USING MIL DOT RETICLES
Your Bushnell Tactical riflescope contains a mil-dot reticle (1st or 2nd focal plane, depending on the model), the most accurate means of range estimation using a manual optical device. These mil dots also allow precise leads for moving targets and exact compensation for shooting in a crosswind.
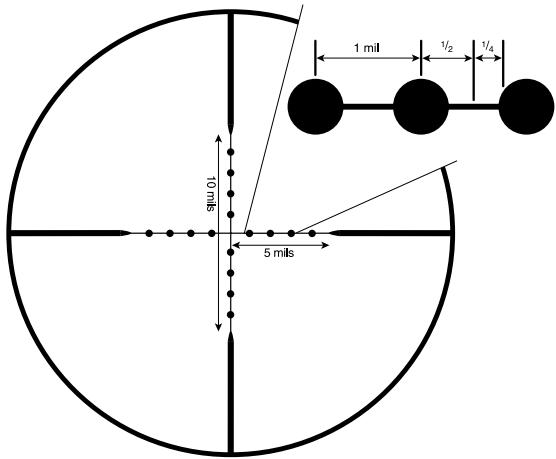
RETICLE DESCRIPTION
The middle of this reticle contains four evenly spaced mil-dots arrayed outward vertically and horizontally from the center. Actually, because the very center dot was left out to allow clear aiming, the reticle represents five mils in any direction — ten vertical mils — as shown in the illustration. Note that the most outward dot is replaced by the edge of the heavier reticle line.
One mil is the space from center-dot to center-dot. One-half and one-quarter mils are easy to estimate mentally; with practice, you can measure tenths of mils for the most exact ranging.
RANGING WITH YOUR MIL-DOT RETICLE
The mil is an angular measurement — 1/6400th of a circle — which equals almost precisely one yard at 1000 yards, or one meter at 1000 meters. This proportional relationship makes possible a simple formula to compute distances:
$$ \frac {\text { The Measured Object's Width or Height in Yards } \times 1 0 0 0}{\text { Object's Width or Height in Mils }} = \text { Range in Yards } $$
This formula works equally well with meters, but don't mix meters and yards: Measure the object in yards to find the distance in yards, use meters to yield distances in meters.
Looking through your scope (if yours has a 2nd focal plane reticle, be sure to set it on the synchronized magnification setting-marked in red or white), select an object at the distance you want to range — an object whose width or height you know or can estimate accurately. Man-made objects of uniform size, such as fenceposts, are best, but any object of known dimensions will do. Measure the object's height or width carefully in mils, compute it according to the formula and you will find its range. Support your rifle and be precise when measuring objects; any measuring error causes an error in the computed range. Equally, a mistake in estimating the object size results in a proportional range error.
Here's an example: A coyote is sunning himself in a snowfield beside a fencepost; having crossed the fence earlier, you know that the post is four feet high, or 1.33 yards. The fencepost measures 2.5 mils in your reticle.
$$ \frac {1 . 3 3 \text { yards } \times 1 0 0 0}{2 . 5 \text { mils }} = \quad \frac {1 3 3 0}{2 . 5} = 5 3 2 \text { Yards } $$
If you have a variable power scope with a 2nd focal plane reticle (the reticle stays the same size regardless of magnification), it must be set at the calibrated power mark to synchronize the mil-dot size for ranging. But you also can range at half that power if you divide the range estimate in half, or at double the calibrated power, by doubling the range estimate, as shown in the next section (using as an example a 2nd focal plane reticle with a calibrated (synchronized) setting of 12x power):
CALCULATING HOLDS FOR WIND AND MOVING TARGETS
Your horizontal mil dots provide a precise way of holding for crosswinds and target movement. Just look in your cartridge's wind drift and moving target tables to determine the exact holds for different distances. The accompanying table lists one-mil widths from 100 to 600 yards, so you can calculate how many mils to hold right or left when firing in a crosswind, or engaging a moving target.
MIL WIDTH FOR WIND AND MOVING TARGET LEADS
| Distance | One Mil At This Distance (Inches) |
| 100 Yards | 3.6" (0.1 Yard) |
| 200 Yards | 7.2" (0.2 Yard) |
| 300 Yards | 10.8" (0.3 Yard) |
| 400 Yards | 14.4" (0.4 Yard) |
| 500 Yards | 18.0" (0.5 Yard) |
| 600 Yards | 21.6" (0.6 Yard) |
One mil is the distance between centers of dots. It's easy to measure in half-mils or even quarter-mils but with practice you can measure tenths of a mil.
natural_image
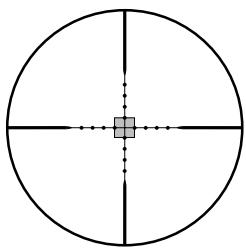
Simple geometric diagram of a circle with intersecting lines and a central square (no text or symbols)6x
Object measures half as large as 12x, so calculate the distance, then divide by half. Examples only-use the synchronized power setting for your scope if it is not 12x.
natural_image
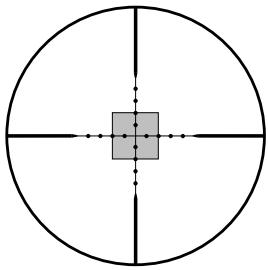
Pure geometric diagram with a central square and intersecting lines, no text or symbols present.12x
Synchronized setting for this mil-dot reticle. Calculate as normal.
natural_image
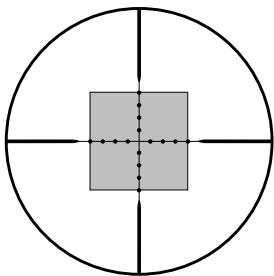
Geometric diagram showing a square inscribed in a circle with intersecting lines (no text or symbols)24x
Object measures twice as large as 12x, so calculate the distance, then double it.
MAINTENANCE
Your Bushnell Elite riflescope, though amazingly tough, is a precision instrument that deserves reasonably cautious care.
- When cleaning the lenses, first blow away any dry dirt and dust, or use a soft lens brush. Fingerprints and lubricants can be wiped off with lens tissue, or a soft clean cloth, moistened with lens cleaning fluid.
WARNING: Unnecessary rubbing or use of a course cloth may cause permanent damage to the lens coatings. - All moving parts of the scope are permanently lubricated. Do not try to lubricate them.
- No maintenance is needed on the scope's outer surface, except to occasionally wipe off dirt or fingerprints with a soft cloth.
- Use lens covers whenever it is convenient.
STORAGE
Avoid storing the scope in hot places, such as the passenger compartment of a vehicle on a hot day. The high temperature could adversely affect the lubricants and sealants. A vehicle's trunk, a gun cabinet or a closet is preferable. Never leave the scope where direct sunlight can enter either the objective or the eyepiece lens. Damage may result from the concentration (burning glass effect) of the sun's rays.
WARRANTY / REPAIR
ELITE® LIFETIME LIMITED WARRANTY
We are so proud of our Bushnell ELITE Riflescopes that their materials and workmanship are warranted to be free of defects for the life of the ELITE Riflescope*. The warranty is available to any owner of the ELITE Riflescope. No receipt or warranty card is required. This warranty does not cover damages caused by misuse or improper handling, installation or maintenance of the riflescope.
At our option, we will repair or replace any defective ELITE Riflescope, which shall be your sole remedy under this warranty. In no event shall we be liable for transportation costs to us, costs of removal or reinstallation of the riflescope, or incidental or consequential damages. Some states do not allow the exclusion of limitation of incidental or consequential damages, so the above limitation or exclusion may not apply to you.
No agent, representative, dealer or unauthorized employee of Bushnell has the authority to increase or alter the obligation of this warranty.
Any return made under this warranty must be accompanied by the items listed below:
1) Name and address for product return
2) An explanation of the defect
3) You are responsible for transport of the defective product, but we will pay for shipping the repaired or replacement product back to you anywhere in the continental United States.
4) Product should be well packed in a sturdy outside shipping carton, to prevent damage in transit, to the address listed below:
IN U.S.A. Send To:
Bushnell Outdoor Products
Attn.: Repairs
8500 Marshall Drive
Lenexa, Kansas 66214
IN CANADA Send To:
Bushnell Outdoor Products
Attn.: Repairs
25A East Pearce Street, Unit 1
Richmond Hill, Ontario L4B 2M9
For products purchased outside the United States or Canada please contact your local dealer for applicable warranty information. In Europe you may also contact Bushnell at:
Bushnell Germany GmbH
European Service Centre
Mathias-Brüggen-Str. 80
D-50827 Köln
GERMANY
This warranty gives you specific legal rights.
You may have other rights which vary from country to country.
©2010 Bushnell Outdoor Products
natural_image
Close-up of a hand holding a black cylindrical object with a small circular mark on its side (no visible text or symbols)natural_image
Close-up of a black mechanical knob with a white measurement scale (no text or symbols visible)RÉGLAGE DE L'ELEVATION
natural_image
Close-up of a mechanical component with gear-like teeth and a circular logo (no readable text or symbols)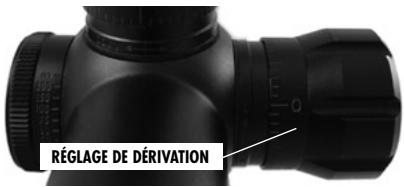
VÉRIFICATION DE LA LIGNE DE MIRE
natural_image
Close-up of a black mechanical component with a bent shaft and cylindrical shaft (no visible text or symbols)
natural_image
Close-up of a black mechanical component with a central screw and flange (no visible text or symbols)natural_image
Close-up of a black mechanical component with a circular head and adjustment knobs (no visible text or symbols)natural_image
Pure geometric diagram of a circle with intersecting lines and a central square (no text or symbols)6x
natural_image
Pure geometric diagram of a circle with intersecting lines and a central square (no text or symbols)12x
natural_image
Geometric diagram showing a square inscribed in a circle with intersecting lines (no text or symbols)24x
Bushnell Outdoor Products
Attn.: Repairs
8500 Marshall Drive
Lenexa, Kansas 66214
Bushnell Outdoor Products
Attn.: Repairs
25A East Pearce Street, Unit 1
Richmond Hill, Ontario L4B 2M9
European Service Centre
Mathias-Brüggen-Str. 80
D-50827 Köln
GERMANY
©2010 Bushnell Outdoor Products
natural_image
Close-up of a hand holding a cylindrical mechanical component with a knob (no visible text or symbols)MONTAJE
natural_image
Close-up of a black mechanical knob with a pointer indicating measurement (no text or symbols visible)AJUSTE DE ELEVACION
natural_image
Close-up of a mechanical gear or pulley with a circular emblem (no visible text or symbols)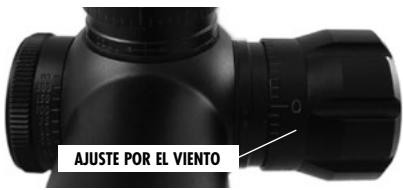
ALINEAMIENTO DEL VISOR CON EL ÁNIMA
natural_image
Close-up of a black mechanical component with a bent tube and cylindrical shaft, labeled 'A' (no text or symbols on the object itself)
natural_image
Close-up of a black mechanical component with a central screw and circular base (no visible text or symbols)natural_image
Close-up of a camera lens with measurement scale and adjustment knobs (no text or symbols visible)Escala de ajuste
Línea de índice
natural_image
Close-up of a black optical lens component with measurement markings (no visible text or symbols)natural_image
Simple geometric diagram of a circle with intersecting lines and a central square (no text or symbols)6x
natural_image
Pure geometric diagram with concentric circles and a central square, no text or symbols present12x
natural_image
Geometric diagram showing a square inscribed in a circle with intersecting lines (no text or symbols)24x
Bushnell Outdoor Products
Attn.: Repairs
8500 Marshall Drive
Lenexa, Kansas 66214
Bushnell Outdoor Products
Attn.: Repairs
25A East Pearce Street, Unit 1
Richmond Hill, Ontario L4B 2M9
European Service Centre
Mathias-Brüggen-Str. 80
D-50827 Köln
GERMANY
natural_image
Close-up of a hand holding a black cylindrical object with a white arrow pointing to its side (no text or symbols visible)natural_image
Close-up of a black mechanical knob with a pointer indicating measurement (no text or symbols visible)HÖHENEINSTELLUNG
natural_image
Close-up of a mechanical gear or cam component with no visible text or symbols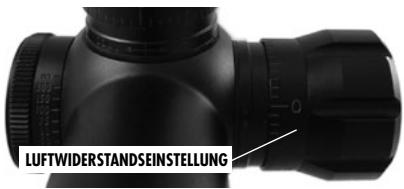
Once you have finished sighting in your scope and your firearm is consistently on target, you may want to realign the zero marks on the windage and elevation dial scales with the index lines. To do this, first remove the target turret, then reset the dial to zero and replace the turret.
natural_image
Close-up of a black mechanical component with a bent shaft and flange, labeled 'A' (no text or symbols on the object itself)
natural_image
Close-up of a black mechanical component with a central screw and circular base (no visible text or symbols)DIE STELLRINGE AUF NULL ZURÜCKSTELLEN
natural_image
Close-up of a black optical instrument tip with adjustment knobs and a circular connector (no visible text or symbols)natural_image
Simple geometric diagram of a circle with intersecting lines and a central square (no text or symbols)6x
natural_image
Pure geometric diagram with a central square and intersecting lines, no text or symbols present.12x
natural_image
Geometric diagram showing a square inscribed in a circle with intersecting lines (no text or symbols)24x
GARANTIE / REPARATUR
BESCHRÄNKTE LEBENSLANGE GARANTIE FÜR ELITE®-PRODUKTE
Bushnell Outdoor Products
Attn.: Repairs
8500 Marshall Drive
Lenexa, Kansas 66214
Bushnell Outdoor Products
Attn.: Repairs
25A East Pearce Street, Unit 1
Richmond Hill, Ontario L4B 2M9
European Service Centre
Mathias-Brüggen-Str. 80
D-50827 Köln
GERMANY
©2010 Bushnell Outdoor Products
natural_image
Close-up of a hand holding a cylindrical mechanical component with a dial indicator (no visible text or symbols)natural_image
Close-up of a black mechanical knob with a measurement scale (no visible text or symbols)natural_image
Close-up of a mechanical gear component with no visible text or symbols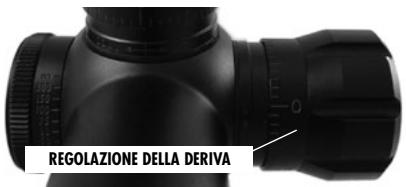
MIRA DALLA CANNA
natural_image
Close-up of a black mechanical component with a bent tube and cylindrical shaft (no visible text or symbols)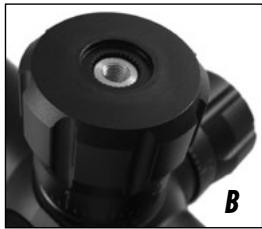
natural_image
Close-up of a black mechanical component with a central screw and cylindrical body (no visible text or symbols)REIMPOSTARE A ZERO I QUADRANTI
natural_image
Close-up of a camera lens with measurement scale and adjustment labels (no readable text or symbols beyond basic markings)natural_image
Close-up of a black optical instrument tip with adjustment knobs and a circular lens (no visible text or symbols)USO DEI RETICOLI MIL DOT
natural_image
Simple geometric diagram of a circle with intersecting lines and a central square (no text or symbols)6x
natural_image
Pure geometric diagram with a central square and intersecting lines, no text or symbols present.12x
natural_image
Geometric diagram showing a square inscribed in a circle with intersecting lines (no text or symbols)24x
Bushnell Outdoor Products
Attn.: Repairs
8500 Marshall Drive
Lenexa, Kansas 66214
Recapito in Canada:
Bushnell Outdoor Products
Attn.: Repairs
25A East Pearce Street, Unit 1
Richmond Hill, Ontario L4B 2M9
European Service Centre
Mathias-Brüggen-Str. 80
D-50827 Köln
GERMANY
For further questions or additional information please contact:
Bushnell Outdoor Products
9200 Cody, Overland Park, Kansas 66214
4 rue Diderot, Suresnes, France 92150
(800) 423-3537
www.bushnell.com
- ELITE
- RAINGUARD® HD
- HOW IT WORKS
- CARE OF RAINGUARD® HD
- EYEPIECE FOCUSING
- WARNING: Never look at the sun through the riflescope (or any other optical instrument). It may permanently damage your eye.
- MOUNTING
- VARIABLE POWER ADJUSTMENTS
- WARNING: A scope should never be used as a substitute for either a binocular or spotting scope. It may result in your inadvertently pointing the gun at another person.
- ELEVATION AND WINDAGE ADJUSTMENT
- BORE SIGHTING
- ZEROING
- USING YOUR BUSHNELL TACTICAL RIFLESCOPE
- REMOVING THE TARGET TURRETS
- RESETTING THE DIALS TO ZERO
- USING THE SIDE FOCUS CONTROL (ADJUSTING FOR PARALLAX)
- Yardage Marks on Side Focus Knob Scale
- ABOUT RETICLE FOCAL PLANES
- USING MIL DOT RETICLES
- RETICLE DESCRIPTION
- RANGING WITH YOUR MIL-DOT RETICLE
- CALCULATING HOLDS FOR WIND AND MOVING TARGETS
- MAINTENANCE
- STORAGE
- WARRANTY / REPAIR
- ELITE® LIFETIME LIMITED WARRANTY
- IN U.S.A. Send To:
- IN CANADA Send To:
- VÉRIFICATION DE LA LIGNE DE MIRE
- MONTAJE
- ALINEAMIENTO DEL VISOR CON EL ÁNIMA
- DIE STELLRINGE AUF NULL ZURÜCKSTELLEN
- GARANTIE / REPARATUR
- BESCHRÄNKTE LEBENSLANGE GARANTIE FÜR ELITE®-PRODUKTE
- MIRA DALLA CANNA
- REIMPOSTARE A ZERO I QUADRANTI
- USO DEI RETICOLI MIL DOT
- Recapito in Canada:
Brand : BUSHNELL
Model : TACTICAL RIFLESCOPES
Category : Shooting optics