Bakesteam 4000 Combi Gyro Advance - Cooker CECOTEC - Free user manual and instructions
Find the device manual for free Bakesteam 4000 Combi Gyro Advance CECOTEC in PDF.


| Brand | Cecotec |
| Model | Bakesteam 4000 Combi Gyro Advance |
| Product Type | Steam oven with grill and air fryer |
| Product Reference | 02237 |
| Power | 2100-2400 W |
| Voltage | 220-240 V |
| Frequency | 50-60 Hz |
| Capacity | 40 L |
| Control Type | Rotary knob and touch icons |
| Display | LED display |
| Cooking Functions | Steam, top and bottom heat, grill, air fryer, rotisserie |
| Preset Recipes | 37 preset recipes (F-01 to F-37) |
| Menu Modes | Ferment (P-01), Preheat (P-02), Defrost (P-03), Yoghurt (P-04) |
| Preset Cooking Modes | d-01: top + bottom heat + convection; d-02: top heat + convection; d-03: top heat + convection + rotisserie; d-04: top heat + rotisserie |
| Temperature Range | 90-230 °C depending on function |
| Timer Range | 0:05 to 2:00 hours for most functions; up to 8 hours for yoghurt |
| Delay Start Range | 0:30 to 24:00 hours |
| Water Tank | Removable, with MIN and MAX level marks |
| Safety Features | Child safety lock, door protection, overheat protection |
| Included Accessories | Baking tray, grill, rotisserie fork, rotisserie-fork extractor |
| Cleaning and Maintenance | Descaling program, removable water tank, easy-clean interior |
| Technical Support | Official Cecotec Technical Support Service |
Frequently Asked Questions - Bakesteam 4000 Combi Gyro Advance CECOTEC
User questions about Bakesteam 4000 Combi Gyro Advance CECOTEC
0 question about this device. Answer the ones you know or ask your own.
Ask a new question about this device
Download the instructions for your Cooker in PDF format for free! Find your manual Bakesteam 4000 Combi Gyro Advance - CECOTEC and take your electronic device back in hand. On this page are published all the documents necessary for the use of your device. Bakesteam 4000 Combi Gyro Advance by CECOTEC.
USER MANUAL Bakesteam 4000 Combi Gyro Advance CECOTEC
Steam oven with capacity for 40 litres and 2400 W.
Safety instructions 8
-
Parts and components 55
-
Before use 55
-
Operation 56
-
Cleaning and maintenance 64
-
Troubleshooting 64
-
Technical specifications 65
-
Disposal of old electrical and electronic
appliances 66
-
Technical support and warranty 66
-
Copyright 66
INDICE
Before using the appliance, read the following instructions carefully. Keep this instruction manual for future reference or new users.
- When using electrical and electronic appliances, basic precautions must always be followed to reduce the risk of fire, electrical shock, and injury.
- Make sure the voltage of your mains supply matches the voltage requirements specified in the rating label of the appliance.
- We recommend that the room where you intend to use the appliance is equipped with a working extractor fan or is well ventilated.
- Use the appliance only for the purposes described in this instruction manual. Any other use is not recommended by the manufacturer and could have a detrimental effect on the lifespan of the appliance and/or the safety of the user.
- Unplug the appliance from the mains supply before moving it, carrying out any cleaning or maintenance task, or when not in use.
- Do not use outdoors.
- Check the power cable regularly for visible damage. If the cable is damaged, it must be replaced by the official Cecotec Technical Support Service to avoid any type of danger.
- Do not twist, bend, pull, or damage the power cable. Protect it from sharp edges and heat sources. Do not allow the cable to touch hot surfaces. Do not let the cable hang over the edge of the working surface or worktop.
-
Do not use extension leads, unless advised by a qualified electrician. Using the wrong type of extension lead could cause damage to the appliance or injuries to the user.
-
Do not use the appliance if its cable, plug, or housing are damaged, nor after it malfunctions or has been dropped or damaged in any way.
- The appliance should not be used in potentially dangerous locations, such as flammable, explosive, chemical-laden, or wet atmospheres.
- Place the appliance on an even, heat-resistant surface. Do not place the appliance near heat sources, places with high humidity levels, or combustible materials.
- This appliance is not intended to be operated by means of an external timer or separate remote-control system.
- Do not insert or allow fingers or foreign objects to enter any ventilation or exhaust openings, as it could cause electrical shock or fire.
- Do not touch the inside of the appliance while in operation.
- This symbol means: warning, hot surface. The temperature of accessible surfaces may be high when the appliance is in operation. Be careful not to burn yourself.
- Do not immerse the cable, plug, or any other non-removable part of the appliance in water or any other liquid. Do not expose the electrical connections to water.
- Make sure your hands are dry before handling the plug or switching on the device.
- Do not rest cooking utensils or baking trays on the glass door.
- Unplug the appliance from the outlet when not in use or during cleaning. Allow it to cool down completely before attaching or removing parts and before cleaning the appliance.
-
Do not leave the appliance unsupervised while plugged to the mains.
-
Do not touch the surface of the appliance when in operation, as it will become hot when in use.
- Cleaning and maintenance must be carried out according to this instruction manual to make sure the appliance operates properly.
- Do not place the appliance against the wall. Leave a safety distance of 10 cm on the back of the appliance and 10 cm on each side. Do not place any object on top of the appliance when in use.
- Hot steam is released through the air outlet openings of the appliance during operation. Keep your hands and face at a safety distance from the steam and from the air outlet openings.
- Unplug the appliance immediately if you notice black smoke coming out of it.
- We recommend the use of gloves when handling the trays and other accessories.
- Do not use the appliance for any use other than the one specified in this manual.
- This device is designed for domestic use only and is not intended for bars, restaurants, farmhouses, hotels, motels, and offices.
- Do not try to repair the appliance by yourself.
-
The appliance is not intended to be used by children under the age of 8. The appliance can be used by children over the age of 8, as long as they are given continuous supervision. This appliance can be used by persons with reduced physical, sensory, or mental capabilities or lack of experience and knowledge, as long as they have been given supervision or instruction concerning the use of the appliance in a safe way and understand the hazards involved.
-
Keep this appliance and its power cable out of reach of children under the age of 8.
- Cleaning and maintenance tasks should not be carried out by children.
- Supervise children to prevent them from playing with the appliance.
- The water level must not exceed the "MAX" mark on the tank.
- Remove the water tank and empty it after each use.
- If the door or seal are damaged, do not use the oven until it has been repaired by a qualified technician.
- Do not place anything on top of the oven. It could be dangerous. Objects placed on top of the oven may deform, scorch or catch fire due to the heat given off. Metal objects, such as knives or carving forks, could become very hot.
- Do not insert foreign objects into any part of the oven.
- Use suitable utensils and make sure that the containers you put in the oven are not full of food (the food should only occupy two thirds of the container).
- Cook foods with skin or peel, such as apples/chestnuts/potatoes/sausages/chicken wings, etc., by piercing them with a knife and fork to prevent them from bursting.
- Do not heat food in a sealed container such as a stoppered glass bottle or a milk carton; it may explode. Remove the food from its container and place it in another container before putting it in the oven.
- Wear insulating gloves when removing food from the oven to avoid burns.
INSTRUCTIONS DE SÉCURITÉ
The graphics in this manual are schematic representations and may not exactly match the device.
2. BEFORE USE
- This appliance is packaged in a way as to protect it during transport. Take the device out of its box and remove all packaging materials. You can keep the original box and other packaging elements in a safe place. This will help you prevent damage to the device when transporting it in the future. In case the original packaging is disposed of, make sure all packaging materials are recycled accordingly.
- Make sure all parts and components are included and in good conditions. If there is any piece missing or in bad conditions, contact the official Cecotec Technical Support Service immediately.
Box content
- Oven
- Baking tray
- Grill
- Rotisserie fork
- Rotisserie-fork extractor
- Instruction manual
3. OPERATION
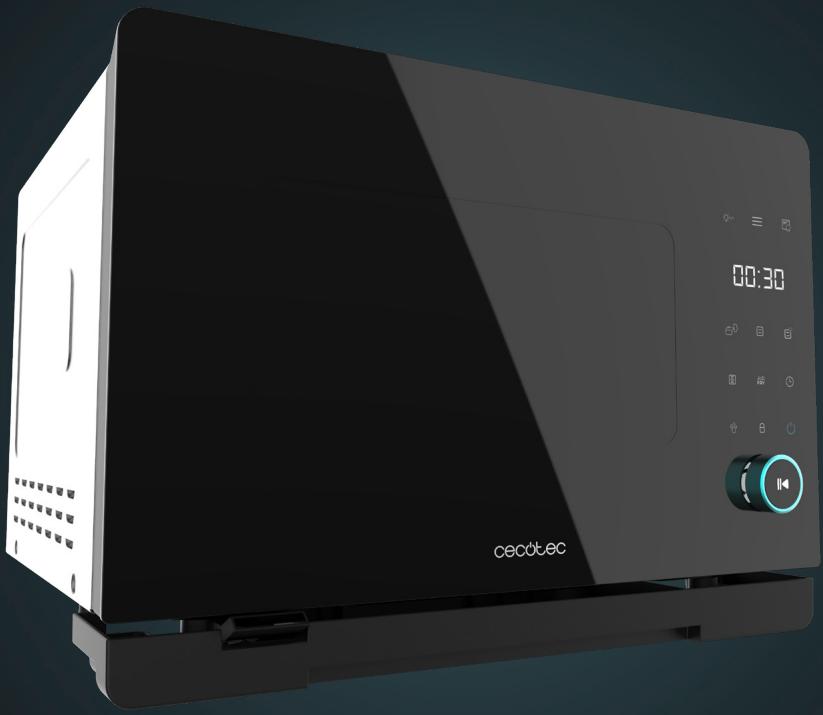
Below, you will find a detailed chart describing every icon on the control panel and its respective function.
| Icon | Name | Description |
 | Knob | Turn the knob to choose between different functions and recipes. Press to start the oven after selection. |
| Once you have selected the function, you can turn the knob to set the time and temperature (these two values cannot be set in the recipes). | ||
 | Light | Press this icon to turn on the light. Press it again to switch it off. |
| Lack of water warning | When this icon flashes, it means that the water level in the water tank is low. | |
 | Menu | When pressing this icon, the display will show the preset function code (P-01). You can turn the knob to select the desired function: P-01: Ferment; P-02: Preheat; P-03: Defrost; P-04: Yoghurt. |
 | Recipes | When pressing this icon, the display will show the preset recipe code (F-01). You can turn the knob to select the desired recipe (from F-01 to F-37). |
| 88:88 | Display | Time and temperature are shown on the display, as well as the function, modes, and recipes codes. |
| [DAST] | Steam | Press this icon to activate the steam function. You can set the time and temperature using the knob. |
 | Top and bottom heat | Press this icon to access baking and cooking mode. The top and bottom heating elements can be individually adjusted for time and temperature using the knob. |
 | Grill | Press this icon to activate the grill function. You can set the time and temperature using the knob. |
 | Preset modes | When pressing this icon, the display will show the preset mode code (d-01). You can turn the knob to select the desired mode:d-01: top heat + bottom heat + convectiond-02: top heat + convectiond-03: top heat + convection + rotisserie functiond-04: top heat + rotisserie functionWhen you have selected the mode, the default time will be displayed. You can change it using the knob. Press the knob to confirm the selected time. Then, set the temperature. After selecting the desired temperature, press the knob to confirm. Press it again to start the oven. If you press the Power icon, the oven will switch off. |
| [XX4T] | Air fryer | Press this icon to select the air fryer function. |
 | Delay Start | Press this icon to activate delay start. The corresponding indicator light will flash. The default time that will be shown on the display is 30 minutes. You can set the time from 0:30 to 24:00 using the knob (the time will increase in 30-minute intervals). When you have selected the time, choose the function you want. The corresponding indicator light will flash. You can choose the temperature and time of the function using the knob. The green indicator light on the knob will turn on, indicating that the countdown has started. When finished, the indicator light will turn white, and the oven will start. |
 | Descaling | If you press this icon, the display will show the code C-01. You can also select the C-02 using the knob.C-01: DescalingC-02: High temperature disinfection |
 | Child safety lock | When the oven is in operation, press and hold the child safety lock icon. The icon will light up and the rest of the icons will be blocked. To deactivate the lock, press and hold the icon. |
 | On/off | When the oven is in standby mode, this icon will flash. Press it to switch on the oven. All icons will light up. If you press this icon when the oven is running, it will switch off. |
1. First use
When the oven is switched on for the first time, it will beep and all icons will light up. After three seconds, they will switch off and the oven will enter standby mode. If you do not perform any operation for 5 minutes, all the settings you have selected will be cancelled and the oven will return to standby mode. Press the On/off icon to exit the oven from this mode.
ENGLISH
NOTE:
When using the oven for the first time, it is recommended that you preheat it for 10-15 minutes. The first time you start it up, it will give off a slightly peculiar smell. This is normal, because the heating element is coated with a film that protects it from corrosion.
2. Operation
Press the knob to set the time and temperature for the oven to start. The oven will go back to standby mode if you press the On/off icon during operation. When the set time is up, the oven will beep, and it will return to standby mode.
Functions
Steam
If you press this icon , it will flash, and the other icons will remain lit. The default values to be shown on the display are 100 °C and 30 minutes. You can set the time and temperature using the knob. Each time you turn it, the temperature will increase or decrease by 5 °C. The temperature range is 90 - 100 °C and the time range is 0:01-2:00. Once the values have been set, press the knob to start the oven. If, after 5 minutes, you have not pressed the knob to confirm the values and start the oven, the oven will enter standby mode. When baking is complete, a beep will sound. The display will show 88:88 and the oven will enter standby mode.
Top/bottom heat
If you press this icon ☐, it will flash, and the other icons will remain lit. The default time that will be shown on the display is 30 minutes. You can set the time using the knob (from 0:05 to 2:00 hours). Once the time has been set, confirm it by pressing the knob. Then, adjust the temperature of the top heating element (from 120 to 230 °C); each time you turn the knob, the temperature will increase or decrease by 5 °C. Press the knob to confirm the setting. Then, adjust the bottom heating element temperature in the same way. When you confirm the temperature, the oven will start. If you wish to adjust the time or temperature in the middle of the baking process, press the knob. The oven will pause, and you will be able to make the desired settings.
When baking is complete, a beep will sound. The display will show 88:88 and the oven will enter standby mode.
Grill
If you press this icon ☐, it will flash, and the other icons will remain lit. The default values to be shown on the display are 180 °C and 30 minutes. You can set the time and temperature using the knob. Each time you turn it, the temperature will increase or decrease by 5 °C. The temperature range is 120 - 230 °C and the time range is 0:05-2:00. Once the time and
temperature values have been set, press the knob to start the oven. If, after 5 minutes, you have not pressed the knob to confirm the values and start the oven, the oven will enter standby mode. When baking is complete, a beep will sound. The display will show 88:88 and the oven will enter standby mode.
Preset modes
- If you press this icon 📄, it will flash. The display will show by default d-01: top heat + bottom heat + convection. Press the knob to confirm this mode so that the time and temperature can be set.
- If you do not press the knob, turn it to select mode d-02: top heat + convection. Press the knob to confirm this mode so that the time and temperature can be set.
- By turning the knob again, you can select the d-03 mode: top heat + convection + rotisserie function. Press the knob to confirm this mode so that the time and temperature can be set.
- By turning the knob again, you can select the d-04 mode: top heat + rotisserie function. Press the knob to confirm this mode so that the time and temperature can be set.
- If you turn the knob again, you will return to the first mode. The default time that will be shown on the display is 30 minutes. You can set the time and temperature using the knob. Each time you turn it, the temperature will increase/decrease by 5 °C. The temperature range is 120-230 °C and the time range is 0:05-2:00. Once the time and temperature values have been set, press the knob to start the oven. If, after 5 minutes, you have not pressed the knob to confirm the values and start the oven, the oven will enter standby mode. When baking is complete, a beep will sound. The display will show 88:88 and the oven will enter standby mode.
Air fryer
If you press this icon FRY, it will flash. The default values to be shown on the display are 180°C and 30 minutes. You can set the time and temperature using the knob. Each time you turn it, the temperature will increase or decrease by 5 °C. The temperature range is 120 - 230 °C and the time range is 0:05-2:00. Once the time and temperature values have been set, press the knob to start the oven.
If, after 5 minutes, you have not pressed the knob to confirm the values and start the oven, the oven will enter standby mode. When baking is complete, a beep will sound. The display will show 88:88 and the oven will enter standby mode.
Menu
P-01: Ferment
The default time is 30 minutes, and the temperature is 40 °C. The time range is 0:05-2:00.
Three different temperatures can be selected: 35\ °C , 40\ °C , and 45\ °C .
ENGLISH
P02: Preheat
Select P-02 function as described above and press the knob to start preheating the oven. When the oven reaches the correct temperature, it will beep and 88:88 will be shown on the display.
P03: Defrost
The default time is 30 minutes, and the temperature is 60°C . The time range is 0:05-2:00. The temperature cannot be adjusted.
P04: Yoghurt
The default time is 8 hours. Neither the temperature nor the time is adjustable.
Descaling
C01: Descaling
The default time is 50 minutes. It cannot be adjusted.
- When the oven detects that it has been used for 100 hours, it reminds the user to descale (this function can be activated at any time). The descaling icon will flash on the display.
- Following the ratio 1:8 (oven descaling mixture: water), make the mixture, stir it well and add it to the water tank. The mixture must exceed the MIN mark on the tank.
- When you have added the mixture, close the tank cap and the oven, select the descaling function, and confirm it by pressing the knob.
- The oven will start a countdown. With 20 minutes left, it will remind you to remove the contents of the tank and fill it with clean water. When the water tank is replaced, the oven will start. With 10 minutes left, it will remind you to remove the contents of the tank and fill it with clean water. When the water tank is replaced, the oven will start up and warn you when the function is finished.
C02: Disinfection
The default time is 30 minutes, and the temperature is 100 °C. The time range is 0:01-2:00. The temperature cannot be adjusted.
Recipes
| Code | F-01 | F-02 | F-03 | F-04 | F-05 |
| Food type | Steamed vegetables | Steamed rice | Steamed fish | Steamed shrimp | Steamed crab |
| Cooking time (minutes) | 16 | 50 | 30 | 15 | 30 |
| Temperature (°C) | 100 | 100 | 100 | 100 | 100 |
| F-06 | F-07 | F-08 | F-09 | F-10 | |
| Steamed eggs | Steamed chicken | Steamed buns | Steamed potatoes | Steamed lamb | |
| 18 | 50 | 30 | 50 | 30 | |
| 100 | 100 | 100 | 100 | 100 | |
| Code | F-11 | F-12 | F-13 | F-14 | F-15 |
| Food type | Roasted chicken | Grilled steak | Roasted lamb | Roasted salmon | Roasted chicken leg |
| Cooking time (minutes) | 28 | 11 | 35 | 20 | 25 |
| Temperature (°C) | 230 | 230 | 200 | 200 | 220 |
| Code | F-21 | F-22 | F-23 | F-24 | F-25 |
| Food type | Fluffy bread | Wheat bread | Pizza | Yogurt cheesecake | Chiffon cake |
| Cooking time (minutes) | 16 | 20 | 23 | 60 | 50 |
| Temperature (°C) | 180 | 180 | 180 | 150 | 150 |
| Code | F-30 | F-31 | F-32 | F-33 | |
| Food type | Beef hamburger | Peanuts | Almonds | Nuts | |
| Cooking time (minutes) | 12 | 12 | 10 | 12 | |
| Temperature (°C) | 180 | 160 | 140 | 160 | |
Other functions
Light
When the function is activated, the icon will light up. When deactivated, it will be switched of.
Child safety lock
When the oven is in operation, you can activate the child safety lock by pressing and holding the icon. All icons will be locked. To unlock them, press and hold the icon again.
Door protection
If the door is open, the oven cannot be started. If the oven is in operation and the door is opened, the selected function will stop. When the door is closed, the oven will automatically switch back on.
| F-16 | F-17 | F-18 | F-19 | F-20 | |
| Baked saury | Baked potatoes | Baked shrimp | Roasted sausage | Baked sweet potato | |
| 20 | 35 | 10 | 10 | 50 | |
| 200 | 200 | 180 | 200 | 220 |
| F-26 | F-27 | F-28 | F-29 | |
| Chocolate cake | Biscuits | Puff pastry | Egg tart | |
| 50 | 14 | 32 | 22 | |
| 150 | 180 | 180 | 180 |
| F-34 | F-35 | F-36 | F-37 | |
| Melon seeds | Cashew nuts | Chestnuts | Yoghurt | |
| 12 | 12 | 20 | 8 hrs | |
| 160 | 160 | 180 | 45 |
4. CLEANING AND MAINTENANCE
- Do not use strong detergents or sharp metal scrapers to clean the oven glass, otherwise you may damage it.
- Unplug the oven when cleaning the inside of the it or changing the light bulb.
- Do not use strong detergents or sharp metal scrapers to clean the oven tray, otherwise you may damage the enamel coating.
- Do not clean the tray with a metal tool or abrasive materials, as the surface has a non-stick coating.
- Clean the inside of the oven frequently. If there is grease on the walls, clean it with a soft cloth and a non-abrasive cleaner.
- It is recommended to use pure or distilled water for cooking in the steam oven. If you use tap water frequently, limescale will form on the inside walls.
- Check the water tank periodically. If necessary, pull it out horizontally.
- The water tank should be cleaned carefully using a soft cloth. After cleaning the inside walls, put the water tank back in position. When you have finished cooking, remove the water from the tank.
- The oven door seal must be cleaned frequently with a soft, dry cloth.
- If the oven is not used for a long period of time, unplug it, clean the inside, and store it in a dry place where it will not be exposed to corrosive gases.
- In the event of a fault, the oven may only be repaired by qualified personnel. Do not disassemble it yourself.
- Do not clean the oven glass with abrasive products or with a metal or sharp scraper, as this may damage it.
- Do not use steam cleaners.
5. TROUBLESHOOTING
| Problem | Possible causes | Solution |
| Er1 and Er2 | The inside of the oven reaches too high a temperature. | Switch it off, open the door and wait 10 minutes for the oven to cool down. If it doesn't, please contact the official Cecotec Technical Support Service. |
| Er7 and Er8 | The steamer tube reaches too high a temperature. | Contact the official Cecotec Technical Support Service. |
| The display does not work | Check that the oven is plugged in. | Unplug the oven and plug it in again. |
| The display is not receiving enough power. | Contact the official Cecotec Technical Support Service. | |
| Oven light does not turn on | The light bulb is damaged. | Replace it or contact the official Cecotec Technical Support Service to do so. |
| The oven light is not receiving enough power. | Contact the official Cecotec Technical Support Service. | |
| The fan does not work | The fan is not receiving enough power. | Contact the official Cecotec Technical Support Service. |
| The icons do not work | The printed circuit board is faulty or damaged. | Contact the official Cecotec Technical Support Service. |
| No steam | The water tube is blocked. | Contact the official Cecotec Technical Support Service. |
| The heating system is damaged. | ||
| The water inlet system is damaged. | ||
| The oven does not work | The door is not closed properly. | Close the door. |
| The door lock detector does not detect that the door is closed. | Contact the official Cecotec Technical Support Service. | |
| Steam escapes through the oven door | The door is not closed properly. | Contact the official Cecotec Technical Support Service. |
| The seal is damaged. | ||
| Door structure is damaged or not properly assembled. |
6. TECHNICAL SPECIFICATIONS
Product reference: 02237
Product: Bake&Steam 4000 Combi Gyro Advance
Power: 2100-2400 W
ENGLISH
Voltage: 220-240 V
Frequency: 50-60 Hz
The appliance power consumption when off is 0.4 W, following the guidelines of EN 50564:2011 and the European regulations 1275/2008/EC and 801/2013/EC. For this purpose, the device is connected to the mains without performing any function. The switch/controller of the appliance was set to the Off position.
Technical specifications may change without prior notification to improve product quality.
Made in China | Designed in Spain
7. DISPOSAL OF OLD ELECTRICAL AND ELECTRONIC APPLIANCES

This symbol indicates that, according to the applicable regulations, the product and/or batteries must be disposed of separately from household waste. When this product reaches the end of its shelf life, you should dispose of the cells/batteries/accumulators and take them to a collection point designated by the local authorities.
Consumers must contact their local authorities or retailer for information concerning the correct disposal of old appliances and/or their batteries.
Compliance with the above guidelines will help protecting the environment.
8. TECHNICAL SUPPORT AND WARRANTY
Cecotec shall be liable to the end user or consumer for any lack of conformity that exists at the time of delivery of the product under the terms, conditions, and deadlines established by the applicable regulations.
It is recommended that repairs be carried out by qualified personnel.
If at any moment you detect any problem with your product or have any doubt, do not hesitate to contact the official Cecotec Technical Support Service at +34 963 210 728.
9. COPYRIGHT
The intellectual property rights over the texts in this manual belong to CECOTEC INNOVACIONES, S.L. All rights reserved. The contents of this publication may not, in whole or in part, be reproduced, stored in a retrieval system, transmitted, or distributed by any means (electronic, mechanical, photocopying, recording or similar) without the prior authorization of CECOTEC INNOVACIONES, S.L.
1. PIÈCES ET COMPOSANTS
Image 1

The Ground Truth image displays a single, solid horizontal line. According to Rule 2 (UNDERSCORE & LINE RULES), this is a stylistic or background line, not a placeholder underscore. Therefore, the OCR result must ignore it and output nothing or only meaningful text. The provided OCR content is "____", which consists of four underscores. This is an incorrect interpretation of the line as a placeholder, violating the rule that stylistic lines must be ignored. The OCR has hallucinated underscores where none should exist based on the GT's visual context. Hence, the OCR result is inconsistent with the Ground Truth.
Product: Bake&Steam 4000 Combi Gyro Advance
Vermogen: 2100-2400 W
Voltage: 220-240 V

- INDICE
- INSTRUCTIONS DE SÉCURITÉ
- BEFORE USE
- BOX CONTENT
- OPERATION
- FIRST USE
- ENGLISH
- NOTE
- FUNCTIONS
- STEAM
- TOP/BOTTOM HEAT
- GRILL
- PRESET MODES
- AIR FRYER
- MENU
- P02: PREHEAT
- P03: DEFROST
- P04: YOGHURT
- DESCALING
- C01: DESCALING
- C02: DISINFECTION
- OTHER FUNCTIONS
- LIGHT
- CHILD SAFETY LOCK
- DOOR PROTECTION
- CLEANING AND MAINTENANCE
- TROUBLESHOOTING
- TECHNICAL SPECIFICATIONS
- DISPOSAL OF OLD ELECTRICAL AND ELECTRONIC APPLIANCES
- TECHNICAL SUPPORT AND WARRANTY
- COPYRIGHT
- PIÈCES ET COMPOSANTS
- IMAGE 1
Brand : CECOTEC
Model : Bakesteam 4000 Combi Gyro Advance
Category : Cooker