
GCT-2000 - Hair clippers REMINGTON - Free user manual and instructions
Find the device manual for free GCT-2000 REMINGTON in PDF.

| Brand | REMINGTON |
| Model | GCT-2000 |
| Product Type | Rechargeable hair clipper |
| Power Supply | Rechargeable (AC adapter included) |
| Charging Time | Approximately 14 to 16 hours |
| Battery Type | Nickel-cadmium (Ni-Cd) |
| Adjustment Wheel | 9 positions |
| Cutting Lengths | From 1.5 mm (position #1) to 18 mm (position #9) |
| Blades | EZ TRIM blades, self-lubricating |
| Indicators | Charge indicator (green) and low battery indicator (red) |
| Included Accessories | Scissors, comb, neck brush, cleaning brush, mustache comb, hair clips, storage case |
| Maintenance | Clean with provided brush; blades are self-lubricating |
| Safety | For household use only; do not use in water; unplug before cleaning |
| Limited Warranty | 5 years (excluding blades and cord) |
| Money-back Guarantee | 30 days |
Frequently Asked Questions - GCT-2000 REMINGTON
User questions about GCT-2000 REMINGTON
0 question about this device. Answer the ones you know or ask your own.
Ask a new question about this device
Download the instructions for your Hair clippers in PDF format for free! Find your manual GCT-2000 - REMINGTON and take your electronic device back in hand. On this page are published all the documents necessary for the use of your device. GCT-2000 by REMINGTON.
USER MANUAL GCT-2000 REMINGTON
When using an electrical appliance, basic precautions should always be observed, including the following. Read all instructions before using this appliance.
DANGER
To reduce the risk of electric shock:
- Do not reach for an appliance that has fallen into water. Unplug it immediately.
Do not use while bathing or in the shower.
Do not place or drop into water or other liquid. - Do not place or store this appliance where it can fall or be pulled into a tub or sink.
Except when charging, always unplug this appliance from the electrical outlet immediately after using.
Unplug this appliance before cleaning it.
WARNING
To reduce the risk of burns, fire, electric shock or injury to persons:
This appliance is for household use only.
An appliance should never be left unattended when it's plugged in, except when charging a rechargeable appliance.
Close supervision is necessary when this appliance is used by, on, or near children or invalids.
Use this appliance only for its intended use as described in this manual. Do not use attachments not recommended by Remington.
- Keep the cord away from heated surfaces.
- Never operate this appliance if it has a damaged cord or plug, if it is not working properly, if it has been dropped or damaged, or if it has been dropped into water. If any of these things happen, return the appliance to a Remington® authorized service center for examination and repair.
- Never drop or insert any object into any of the appliance's openings.
- Do not use outdoors or operate where aerosol (spray) products are being used, or where oxygen is being administered.
Always store this appliance and cord in a moisture-free area. Make sure the cord is disconnected from the clipper.
-
Do not use this appliance with a damaged or broken cutter unit, as injury may occur. Always make sure blades are aligned properly.
Always attach plug to appliance, then adapter to outlet. To disconnect, turn all controls to OFF, then remove adapter from outlet, then detach power cord from the clipper for storage. -
Dispose of used batteries properly. Do not incinerate. Batteries may explode if overheated. Do not wrap in metal or aluminum foil. Wrap in newspaper before discarding. It is suggested that you contact local battery redemption site(s) in your area.
- Do not attempt to recharge alkaline, heavy-duty, or regular batteries in a nickel-cadmium battery charger.
SAVE THESE INSTRUCTIONS
Contents
English 1
Spanish 13
French 25
Product Features
Congratulations on your purchase of one of the finest hair clippers available today. Your Remington® EZ TRIM hair clipper is designed to perform dependably and efficiently for years, helping you maintain a range of hair styles.
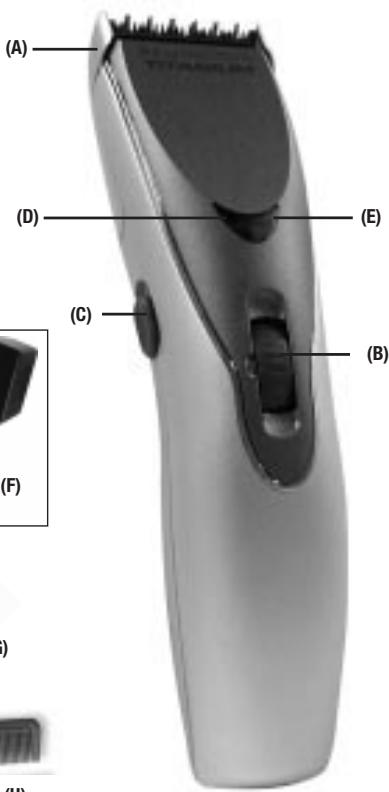
Clipper Parts
(A) Adjustable trimmer guard attachment
(B) Zoom wheel
(C) ON/OFF button
(D) Charging indicator (Green)
(E) Low-battery indicator (Red)
(F) Power cord adapter
(G) Scissors
(H) Barber's comb
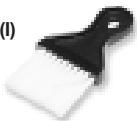
(I) Neck brush
(J) Instruction book
(K) Storage pouch
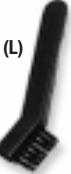
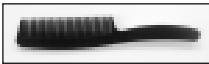
(L) Cleaning brush
(M) Mustache brush
(N) Sectioning clips
(H)
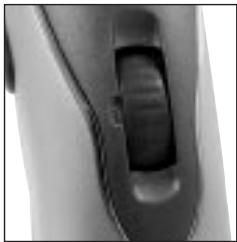
9-position Zoom Wheel
A 9-position Zoom Wheel provides the greatest choice of cutting lengths for a consistent trim every time. Adjust the trimming length by rotating the Zoom Wheel to the desired position number. Refer to the chart below for the position number of your desired hair length.
| SETTING | 1 | 2 | 3 | 4 | 5 | 6 | 7 | 8 | 9 |
| LENGTH | 1.5 mm0.06" | 2.5 mm0.1" | 4 mm0.16" | 5.5 mm0.22" | 7 mm0.28" | 9 mm0.35" | 11 mm0.43" | 14 mm0.55" | 18 mm0.71" |
(I)
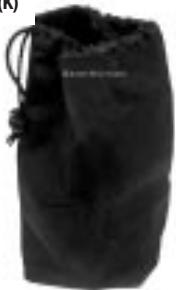
(K)
(M)
(J)
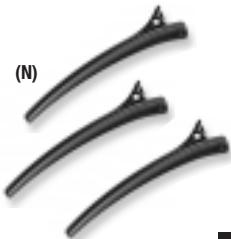
(N)
How to Use
Charging/Recharging
To recharge, use only the charging adapter provided.
Turn the clipper off. Insert the adapter plug into the bottom of the clipper, then plug the adapter into an electric outlet. The charging indicator will glow green, indicating the unit is charging. A full charge will take approx. 14-16 hours. The low-battery indicator will glow red when the clipper needs to be recharged.
- Your clipper cannot be overcharged. You may leave it plugged in between uses. However, if the clipper is not going to be used for an extended period (2 weeks), unplug the unit and recharge when resuming use.
Charge the clipper at temperatures between 40 - 90^ to avoid adversely affecting battery life.
Blade Care
The life of your clippers will depend on frequency of use, care, and hair type and condition. The EZ TRIM's blades are lubed for life and do not require additional oil. Blades should be replaced when cutting efficiency has deteriorated. Contact a Remington Service Center for a quotation.
Before Cutting Hair
- Make sure your hair clipper is running smoothly, with a slight vibration.
- The person should be seated so that the top of his head is at your eye level.
- Comb the hair as it is normally styled.
- Comb out all knots and tangles.
- Ensure the hair is dry. Hair clippers perform best with dry hair, making it easier to see how much hair is being cut.
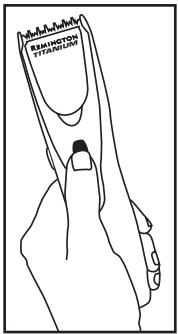
- Hold the hair clipper in the palm of one hand with your thumb resting firmly on the top of the hair clipper. This grip provides comfortable cutting control.
Storage
Always store this appliance and cord-adapter in a moisture-free area. Do not store it in temperatures exceeding 140^ (60^)
- Do not wrap the cord around the appliance.
This appliance has no user serviceable parts. For any other servicing contact an authorized Remington® Service Center.
Selecting Hair Length Setting
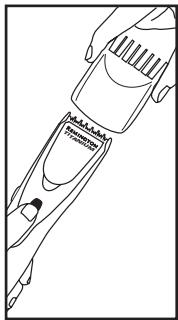
The EZ TRIM's adjustable trimmer attachment lets you change trim lengths simply by rolling the clipper's Zoom Wheel.
Roll the Zoom Wheel toward the top of the clipper to adjust for longer length, and toward the bottom of the clipper for shorter length. The wheel will click into one of 9 positions.
Begin trimming at one of the
longest settings (#8 or #9) to avoid accidentally trimming hair too short. As you become familiar with the settings, you can then select your desired length setting.
Trimmer Guard Attachment
NOTE: Trimmer guard must be attached to the clipper in order to use the hair length selector.
Remove trimmer guard attachment if you are defining hairline edges such as sideburns, trimming the nape of your neck, trimming your beard line on front of neck, or if you want to clean the cutter assembly.
To remove:
- Be sure the clipper is in the OFF position.
While holding clipper in one hand and holding the Zoom Wheel to prevent it from turning, gently pull the trimmer guard attachment away from the clip
per. The guard can be removed and replaced on any setting.
To replace:
■ Be certain clipper is in OFF position.
While holding the clipper in one hand, and holding the Zoom Wheel to prevent it from turning, slide the guard over the top of the clipper until it clicks into position.
NOTE: The trimmer guard attachment can only be placed on the clipper one way; if it does not fit properly, remove and reverse it.
Usage Tips
Giving a Comfortable, Even Cut
Allow the clipper to cut through the hair without moving it too quickly. Moving the clipper too quickly may create a pulling sensation.
Use short strokes when cutting, and initially use the longest setting. You can always use a closer setting later if you want a closer cut.
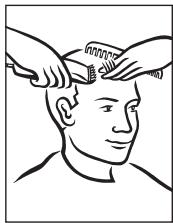
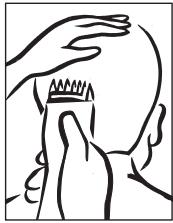
How to Give a Haircut
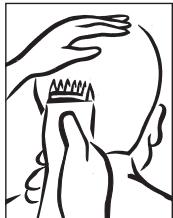
- Start at the back of the head. Holding the clipper as shown, lightly stroke upward making sure you are taking off the desired amount
of hair. Work your way up to the crown of the head in layers. When completed, comb the area to remove any loose hair and to determine whether
you need any further cutting.
- Repeat the same procedure for each side of the head. Make sure the length of the hair is trimmed to the same length on both sides of the head.
-
To cut the hair at the top of the head, hold the hair between your fingers and cut a small amount at a time. Cut from the front to the back.
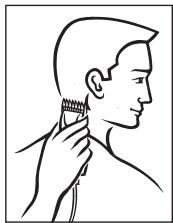
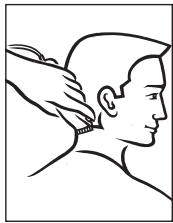
-
To trim around the ears and short hairs at the nape of the neck you must remove the trimming guard. Angle the clipper and lightly stroke around each ear to the
back of the neck. Be careful not to touch the ears or to press too hard.
- The final trim can be made with the hair clipper or the included scissors. Make sure to check over the entire head for any uneven areas. For styled hair or giving quick trims, you may prefer using your hair clipper without the trimming guide.
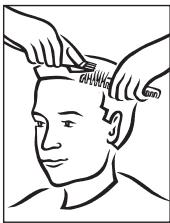
Very short styles
- Using a shorter setting (#1 or #2), hold the comb flat against the head and move the hair clipper from the back of the neck to the crown of the head.
- Cut in a similar manner from the side to the top of the head. Then cut from the front to the crown of the head.
- If a "Flat Top" style is desired, remove the trimming guide and use the barber's comb. Trim a little at a time until a flat look is achieved.
Trimming Beards & Mustaches
- Comb your beard in the direction it grows.
- Determine the length you want the beard to remain, and choose the corresponding setting.
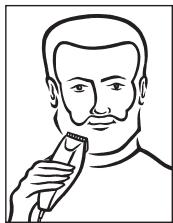
Remember the 1.5mm (#1) guide will give you the shortest beard while the 14mm (#8) or 18mm (#9) will give you the longest. If you want a longer beard you can use the barber's comb as a trimming guide.
- Start trimming under your chin and work toward your ear and beard line. Cut in different directions for a uniform trim.
- Lightly stroke the edge of your mustache in a downward movement.
Battery Removal
When your rechargeable clipper reaches the end of its useful life, the batteries must be removed and recycled or disposed of properly in accordance with ye requirements.
The following procedure should be followed for battery removal:
Make sure your clipper is unplugged from any outlets so you don't risk an electric shock.
Remove the clipper guard and remove the blade assembly.
Using a small Phillips head screwdriver, remove the 4 screws from the clipper's back cover.
Remove the metal spring clip using a screwdriver or pliers. Face unit away from you when removing.
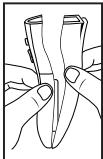
Pull or gently pry the clipper halves apart, exposing the batteries.
Pull or pry batteries from PC board.
Twist batteries to break wires. Wires may also be cut.
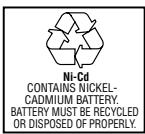
CAUTION: THESE NICKEL-CADMIUM BATTERIES MUST BE RECYCLED OR DISPOSED OF IN ACCORDANCE WITH STATE AND LOCAL REGULATIONS.
Do not burn or mutilate, as they may burst or release toxic materials. Do not short-circuit, as this may cause burns.
The EPA-certified RBRC^® Battery Recycling Seal on the nickel-cadmium (Ni-Cd) battery indicates Remington Products Company, L.L.C. is voluntarily participating in an industry program to collect and recycle these batteries at the end of their useful life, when taken out of service in the United States or Canada. The RBRC^® program provides a convenient alternative to placing used Ni-Cd batteries into the trash or the municipal waste stream, which may be illegal in your area. Please call 1-800-8-BATTERYSM for information on Ni-Cd battery recycling and disposal bans/restiction in your area. Remington Products Company, L.L.C.'s involvement in this program is part of our commitment to preserving our environment and conserving our natural resources.
Performance Guarantee
Performance Guarantee
Remington Money-Back Offer
If within 30 days after you have purchased your Remington® product, you are not satisfied with it and would like a refund, just return it, together with the sales receipt, to the retailer from whom it was purchased. Remington will reimburse all retailers who accept such appliances within 30 days from date of purchase. If you have any questions regarding this money-back guarantee, please call 800-736-4648 in the U.S. or 888-277-6333 in Canada.
Limited Five-Year Warranty
Remington® warrants that this product (excluding blade and line cord) is free from defect in material and workmanship for five years after its original purchase date. If the product should become defective within the warranty period, Remington® will repair it or elect to replace it free of charge. We will return your product, shipping charges prepaid, if you do the following within five years of the purchase date:
- Return the complete product in person or by mail, postage paid, to a Remington Company-owned Service Center or Authorized Service Dealer.
- Include the original purchase receipt with the product.
- Include a description of the problem or defect.
- Do not return the product to the store that sold it to you.
This warranty does not cover products damaged by the following:
Accident, misuse, abuse or alteration of it
Servicing by unauthorized persons
Use with unauthorized accessories
- Connecting it to incorrect current and voltage
Any other conditions beyond our control
No responsibility, obligations, or liability is assumed for the installation or maintenance of this product.
REIMINGTON SHALL NOT BE RESPONSIBLE FOR ANY INCIDENTAL, SPECIAL OR CONSEQUENTIAL DAMAGES RESULTING FROM THE USE OF THIS PRODUCT. ALL IMPLIED WARRANTYES INCLUDING BUT NOT LIMITED TO IMPLIED WARRANTYES OF FITNESS AND MERCHANTABILITY, ARE LIMITED IN DURATION TO TWO YEARS FROM DATE OF ORIGINAL PURCHASE.
This warranty gives you specific legal rights, and you may also have other rights that vary from state to state. Some states do not allow the exclusion or limitation of incidental or consequential damages, or limitations on how long an implied warranty lasts, so the above limitations and exclusions may not apply to you.
U.S. residents:
To order accessories, contact us at
800-736-4648, visit us at
www.remington-products.com, or visit your local retailer.
Canadian residents:
To order accessories, please call
800-268-6531 or visit us at
www.remington-products.com
Warranty
Warranty Service
In the U.S. and Canada, service is provided by authorized service dealers. For the address of your nearest authorized service dealer, contact us at 800-736-4648 (in U.S.), 888-277-6333 (in Canada), visit our website at www.remington-products.com or consult your local Yellow Pages under "Shaver-Electric-Repair."
KEEP ORIGINAL SALES RECEIPT AS PROOF OF PURCHASE FOR WARRANTY PURPOSES.
Questions or comments:
Call 800-736-4648 in the U.S. or
888-277-6333 in Canada
Or visit www.remington-products.com
Remington and Precision are trademarks of Remington Products Company, L.L.C. in the U.S.
Remington is a trademark of Remington
Products Company, L.L.C. in Canada.
2004 R.P.C, L.L.C.
Job #G03-032 1/04 Part No.14577
U.S. Patent: 6,578,269
Patent Pending in Canada


Remington Products Company, L.L.C.
In the U.S. call 800-736-4648
MADE IN CHINA
Remington Products Company, L.L.C.
In Canada call 888-277-6333
PRECISION NTI KIT DE COUPE x 21
CONTAINS NICKEL-CADMIUM BATTERY. BATTERY MUST BE RECYCLED OR DISPOSED OF PROPERLY.
to see how much hair is being cut.
- Hold the hair clipper in the palm of one hand with your thumb resting firmly on the top of the hair clipper. This grip
provides comfortable cutting control. Although the hair clipper may be used with the left or right hand, using it right-handed allows you to access the taper lever more easily.
Stockage
Ou visite www.remington-products.com
- DANGER
- WARNING
- SAVE THESE INSTRUCTIONS
- Contents
- Product Features
- Clipper Parts
- How to Use
- Charging/Recharging
- Blade Care
- Before Cutting Hair
- Storage
- Selecting Hair Length Setting
- Trimmer Guard Attachment
- To remove:
- To replace:
- Usage Tips
- Giving a Comfortable, Even Cut
- How to Give a Haircut
- Very short styles
- Trimming Beards & Mustaches
- Battery Removal
- The following procedure should be followed for battery removal:
- CAUTION: THESE NICKEL-CADMIUM BATTERIES MUST BE RECYCLED OR DISPOSED OF IN ACCORDANCE WITH STATE AND LOCAL REGULATIONS.
- Performance Guarantee
- Remington Money-Back Offer
- Limited Five-Year Warranty
- U.S. residents:
- Warranty
- Warranty Service
- Questions or comments:
- MADE IN CHINA
- PRECISION NTI KIT DE COUPE x 21
- Stockage
Brand : REMINGTON
Model : GCT-2000
Category : Hair clippers