
BKT-1500 - Electric mower REMINGTON - Free user manual and instructions
Find the device manual for free BKT-1500 REMINGTON in PDF.

| Product type | Electric bikini trimmer |
| Brand | REMINGTON |
| Model | BKT-1500 |
| Power source | 2 AAA batteries (not included) |
| Main functions | Trimming, shaving, shaping |
| Length settings | 5 positions (1/8 inch to 1/2 inch) |
| Included accessories | Adjustable comb, trimmer blade, shaver head, cleaning brush, mesh pouch |
| Dimensions (approx.) | 15 cm in length |
| Weight (approx.) | 100 g (with batteries) |
| Care and cleaning | Dry cleaning with brush; do not use water |
| Safety precautions | Do not use in bath or shower; keep out of reach of children |
| Warranty | 2 years |
| Markings | REMINGTON, Trim&Shape |
| Country of manufacture | China |
| Usage | Household use only |
Frequently Asked Questions - BKT-1500 REMINGTON
User questions about BKT-1500 REMINGTON
0 question about this device. Answer the ones you know or ask your own.
Ask a new question about this device
Download the instructions for your Electric mower in PDF format for free! Find your manual BKT-1500 - REMINGTON and take your electronic device back in hand. On this page are published all the documents necessary for the use of your device. BKT-1500 by REMINGTON.
USER MANUAL BKT-1500 REMINGTON
IMPORTANT SAFETY INSTRUCTIONS
When using electrical appliances, basic precautions should always be observed, including the following. Read all instructions before using this appliance.
READ ALL INSTRUCTIONS BEFORE USING.
KEEP AWAY FROM WATER.
DANGER
To reduce the risk of electric shock:
- Do not reach for an appliance that has fallen into water. Unplug it immediately.
Do not use the BKT-1500 while bathing or in the shower. - Do not place or drop into water or other liquid.
- Do not place or store this appliance where it can fall or be pulled into a tub or sink.
WARNING
To reduce the risk of burns, fire, electric shock or injury to persons:
This appliance is for household use only.
- Close supervision is necessary when this appliance is used by, on, or near children or invalids.
Use this appliance only for its intended use as described in this manual. Do not use attachments not recommended by Remington.
- Never operate this appliance if it is not working properly, if it has been dropped or damaged, or if it has been dropped into water.
Never drop or insert any object into any of the appliance's openings.
- Do not use outdoors or operate where aerosol (spray) products are being used, or where oxygen is being administered.
- Do not use this appliance with damaged or broken cutters, as injury may occur.
SAVE THESE INSTRUCTIONS
Product Features
Congratulations on your purchase of a Remington® branded bikini trimmer. Personal grooming was never so fun! Women are using the Trim & Shape® to create all kinds of fresh and sexy effects. Visit http://www.trimandshape.com for ideas.
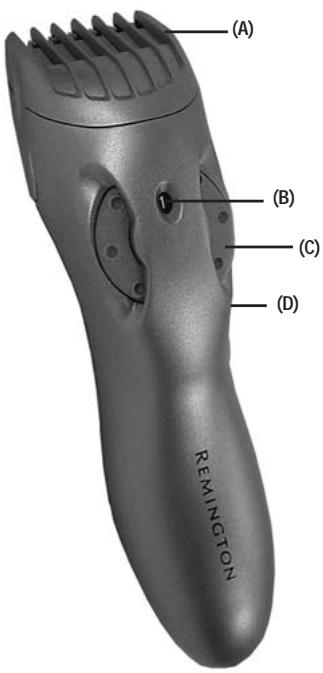
Styler Parts
(A) Bikini trimmer
(B) Length position indicator
(C) 5-position Thumb Wheel
(D) ON/OFF switch
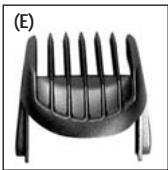
(E) Trimmer comb attachment
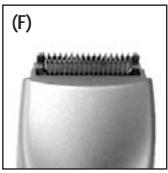
(F) Trimmer blade
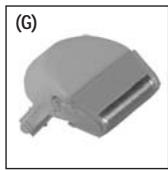
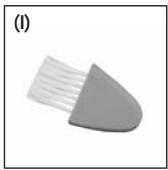
(G) Shaver attachment
(H) Cleaning brush
(1) Battery compartment
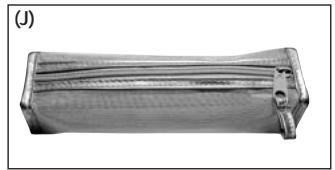
(J) Mesh pouch with zipper
How to Use
Batteries
The BKT-1500 runs on 2 AAA batteries.
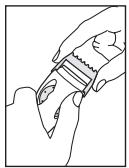
Inserting the batteries
Make sure the trimmer is turned OFF.
- Open the battery compartment by pressing its tab in toward the door and lifting the door up.
Insert the batteries so
that the (+) and (-) marks on the batteries face the same marks inside the battery compartment. The BKT-1500 will not operate if batteries are inserted incorrectly.
Replace the battery cover by inserting the end opposite the tab and then pressing the tab until it clicks into place. The battery cover fits only one way. If it does not go on correctly, try turning it around.
Battery Care
To prevent battery corrosion, keep the groomer in a dry environment.
Batteries should not be left in the unit if it is not in use for long periods.
Dead batteries should be removed immediately and disposed of properly.
Can't turn on the BKT-1500?
The batteries may be improperly installed. The trimmer will not operate unless the batteries are positioned correctly.
The batteries may be depleted. Replace them with 2 new AAA batteries.
Adjusting the Trim Length
You can set your Trim & Shape to give you 5 different trim lengths--from a bold 1/8 inch to a demure 1/2 inch. Simply turn the Thumb Wheel to a lower setting for shorter lengths and a higher setting for longer lengths. The wheel will click into place as it reaches each setting, and the setting number will appear on the Length Position Indicator. Here's what the length settings mean:
Setting
Hair Length
1
1/8
2
3/16"
3
1/4"
6 4
5/16"
F
1/2
Attachments
The Trim & Shape® trimmer's attachments give you 3 ways to achieve the look you want:
Use the adjustable trimmer comb attachment to trim the hair in the bikini area.
Use the shaver attachment for touch-up shaving in tight spots.
Use trimmer blade without attachments to define or shape hairline.
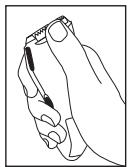
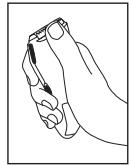
Changing attachments is easy. Whether you are taking an attachment off or putting one on, it's best to hold the trimmer in one hand with your thumb firmly on the Thumb Wheel to keep it from turning. The Thumb Wheel can be pointed to any setting, but the trimmer must be turned off.
Removing shaver and comb attachments
The shaver and trimmer comb are removed the same way.
- Make sure the trimmer is turned off.
- Hold the Thumb Wheel still.
- Hold the attachment by the plastic sides and pull it straight off the trimmer.
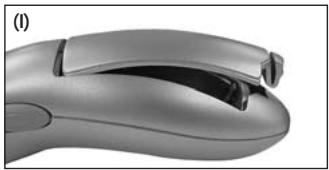
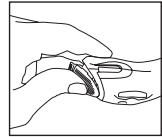
Adding the shaver
attachment
- If the trimmer comb attachment is on the unit, remove it.
- Remove the trimmer blade by gently pushing upward on its teeth until it pops off the unit.
- Hold the shaver attachment by the plastic sides, and slide it into the grooves on either side of the trimmer head until it clicks into place. Don't press down on the foil, or it could become damaged and irritate your skin when you use it.
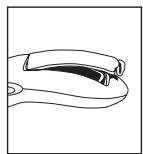
Adding the trimmer blade
- If the shaver attachment is on the unit, remove it.
- Slide the trimmer blade's plastic tab into
its slot in the trimmer head.
3. Push down on the blade's teeth until it clicks into place.
Adding the trimmer comb attachment
- Make sure the trimmer blade is already in place.
- Slide the comb over the top of the trimmer until it clicks into place.
! The attachments fit only one way. If the attachment does not go on correctly, turn it around and try again.
Cleaning & Maintenance
Getting Started
It's a good idea to begin trimming at one of the longest settings (4 or 5) to avoid accidentally trimming hair too short. As you become familiar with the settings you can then select your desired length setting.
For best results, make sure hairs are clean and lotion-free before trimming.
Trimming Hair Length
What to use: trimmer blade with trimmer comb
- Use the Thumb Wheel to set the trimmer comb to the desired length setting.
- Turn the unit on.
- Place the flat top of the trimmer comb against your skin.
- Slowly slide the trimmer through the hair Repeat from different directions, as necessary.
- If hair builds up in the trimmer comb during the trimmer process, shut the unit off, pull off the adjustable trimmer comb, and simply brush or blow the hair off.
Shaping and Edging
What to use: trimmer blade without trimmer comb
Without the comb, the trimmer is perfect for shaping and defining the hairline.
- Remove the adjustable trimmer comb to expose the trimmer blade.
-
Turn the unit on.
-
Place the cutters lightly against your skin outside the hairline, and slowly sweep the trimmer along the skin toward the desired
trim line. Use slow, light pressure. Too much pressure may trim off more hair than desired. You may find it helpful to hold the skin taut while you trim
4. After trimming, go over the surrounding areas with the shaver attachment to remove any remaining short hairs.

Shaving
What to use: shaver attachment
For precision or touch-up shaving around the bikini area, underarms, ankles, or elsewhere, use the shaver attachment.
- Remove the trimmer comb AND trimmer blade and replace them with the shaver attachment.
- Turn the unit on.
- Run the shaver lightly over the area to be shaved. Avoid pressing the shaving head very hard against the skin; this could damage the foil and irritate your skin.
! Never use trimmer or shaver with damaged or broken cutter units.
Blades won't move even though the trimmer's on?
The trimmers may be dirty and clogged Clean and the unit as described on the next page.
Make sure the batteries are correctly installed and have not been depleted.
Clean Your Trimmer Regularly
To get the best performance from your bikini trimmer, make sure to clean it between uses. Here's how:
Weekly
Turn the trimmer off.
Remove the trimmer comb and shaver attachments, as described above.
Push upward on the trimmer blade teeth to pop it off the unit.
- Shake or blow out any accumulated hairs.
Do not use water on any part of the BKT-1500
Cleaning cautions
Avoid using harsh or corrosive cleaners.
Only the trimmer and shaver attachments and the cutter assembly may be removed from the trimmer for cleaning.
Do not take apart the trimmer blade.
Use a soft brush to clean away hairs. Do not apply pressure or hard objects.
Storage
Always store this appliance in a moisture-free area, in temperatures below 140^ (60^)
This appliance has no user serviceable parts.
Performance Guarantee
Full Two-Year Warranty
Rayovac Corporation warrants this product against any defects that are due to faulty material or workmanship for a two-year period from the original date of consumer purchase. This warranty does not include damage to the product resulting from accident or misuse.
If the product should become defective within the warranty period, we will repair it or elect to replace it free of charge. Return your product and sales receipt with your name, address and day time phone number to: Rayovac Corporation, Attention: Consumer Services, 601 Rayovac Drive, Madison, WI 53711. For more information call 800-736-4648.
KEEP ORIGINAL SALES RECEIPT AS PROOF OF PURCHASE FOR WARRANTY PURPOSES.
This warranty does not cover products damaged by the following:
Accident, misuse, abuse or alteration of the product
Servicing by unauthorized persons
Use with unauthorized accessories
- Connecting it to incorrect current and voltage
Wrapping cord around appliance causing premature wear & breakage
Any other conditions beyond our control
No responsibility, obligation, or liability is assumed for the installation or maintenance of this product.
RAYOVAC CORPORATION SHALL NOT BE RESPONSIBLE FOR ANY INCIDENTAL, SPECIAL OR CONSEQUENTIAL DAMAGES RESULTING FROM THE USE OF THIS PRODUCT. ALL IMPLIED WARRANTYES INCLUDING BUT NOT LIMITED TO IMPLIED WARRANTYES OF FITNESS AND MERCHANTABILITY, ARE LIMITED IN DURATION TO TWO YEARS FROM DATE OF ORIGINAL PURCHASE.
This warranty gives you specific legal rights and you may also have other rights which vary from state to state or province to province. Some states do not allow the exclusion or limitation of incidental, special or consequential damages.
Rayovac Money-back Offer
If within 30 days after you have purchased your Remington® branded product, you are not satisfied and would like a refund, return it with the sales slip indicating purchase price and date of purchase to the retailer from whom it was purchased. Rayovac Corporation will reimburse all retailers who accept the product within 30 days from the date of purchase. If you have any questions concerning the money-back guarantee, please call 800-736-4648.
Questions or comments:
Call 800-736-4648 in U.S.
Or visit www.remington-products.com
REMINGTON and TRIM&SHAPE are trademarks of Rayovac Corporation.
©2005 RAYOVAC CORPORATION
03/05 Job# CS27547
Rayovac Corporation
800-736-4648
MADE IN CHINA
T2217372

CS27547_BKT-1500_IB 1/19/06 2:06 PM Page 12
REmInGToN
- IMPORTANT SAFETY INSTRUCTIONS
- READ ALL INSTRUCTIONS BEFORE USING.
- KEEP AWAY FROM WATER.
- DANGER
- WARNING
- SAVE THESE INSTRUCTIONS
- Product Features
- Styler Parts
- How to Use
- Batteries
- Inserting the batteries
- Battery Care
- Can't turn on the BKT-1500?
- Adjusting the Trim Length
- Setting
- Hair Length
- Attachments
- Removing shaver and comb attachments
- Adding the shaver
- attachment
- Adding the trimmer blade
- Adding the trimmer comb attachment
- Cleaning & Maintenance
- Getting Started
- Trimming Hair Length
- Shaping and Edging
- Shaving
- Blades won't move even though the trimmer's on?
- Clean Your Trimmer Regularly
- Weekly
- Cleaning cautions
- Storage
- Performance Guarantee
- Full Two-Year Warranty
- Rayovac Money-back Offer
Brand : REMINGTON
Model : BKT-1500
Category : Electric mower