ZEN MICRO SE - Mp3 player CREATIVE - Free user manual and instructions
Find the device manual for free ZEN MICRO SE CREATIVE in PDF.

User questions about ZEN MICRO SE CREATIVE
0 question about this device. Answer the ones you know or ask your own.
Ask a new question about this device
Download the instructions for your Mp3 player in PDF format for free! Find your manual ZEN MICRO SE - CREATIVE and take your electronic device back in hand. On this page are published all the documents necessary for the use of your device. ZEN MICRO SE by CREATIVE.
USER MANUAL ZEN MICRO SE CREATIVE
Congratulations on your purchase of Zen Micro! Follow the next few steps to set up the software and your player to enjoy a new level in portable digital entertainment.

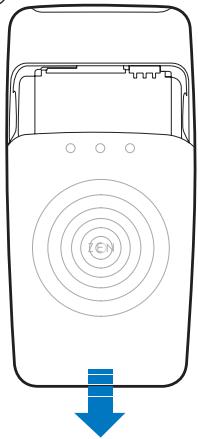
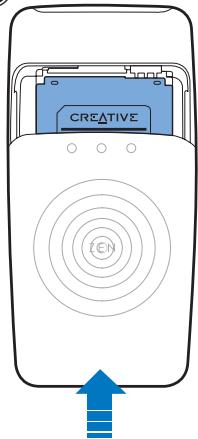
2 Insert the battery
Step 1: Insert the battery
(1)


(3)
WARNING DO NOT connect your player to your computer before setting up the software.
Set up the software 3
Step 2: Set up the software
1 Turn on your computer.
If you have Microsoft® Windows® XP or Windows 2000, remember to log on as an administrator before setting up the software. For more information, refer to your operating system's online Help.
2 Insert the Installation and Applications CD into your CD-ROM/DVD-ROM drive.
Your CD should start automatically. If it does not, follow the steps below:
i. Start Windows Explorer.
ii. On the left pane, click the My Computer icon.
iii. Right-click the CD-ROM/DVD-ROM drive icon, and then click Autplay.
3 Follow the instructions on the screen.
4 If prompted, restart your computer.

4 Charge the battery
Step 3: Charge the battery
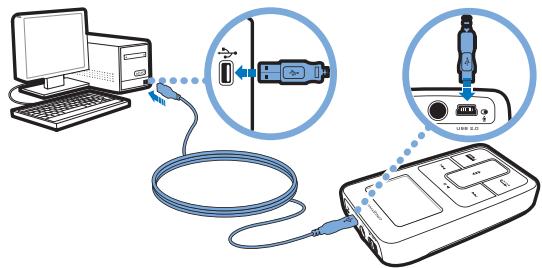
1 Connect your player to your computer's USB port with the supplied USB cable.
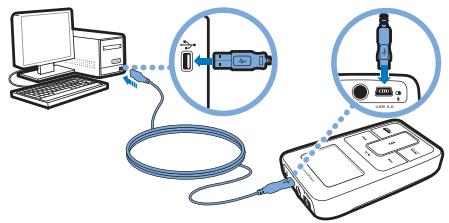
NOTE
- For continuous battery charging using the USB port, make sure your computer is not in power conservation mode. For more information on power conservation modes, refer to your operating system's Help.
- Connect to a computer USB port only; avoid connecting to a USB hub.
- To charge your player without using the computer, use the power adapter (if supplied) or purchase Zen Micro Universal Travel Adapter. For more information on this and other Zen Micro accessories, visit www.creative.com.
2 When the battery is charging, the battery charging icon 山 山 flashes on the LCD.
3 Disconnect your player from your computer when the battery is fully charged and you see on your player's LCD. Fully charging your player takes approximately three hours. If your fully charged player remains connected to your computer for a prolonged period, the LCD blanks out automatically to save battery power.
Play music 5
Step 4: Play music
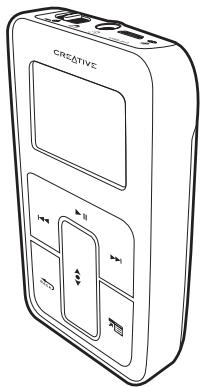
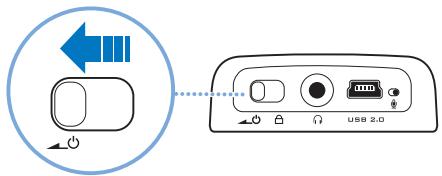
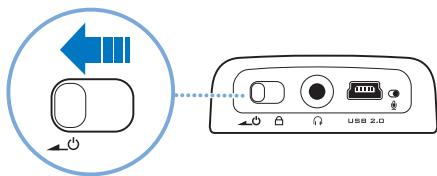
1 Slide the Power switch towards the power icon and hold it there until the LCD lights up.
2 When you turn on Zen Micro for the first time, the menu is in English. To change the language:
i. Press the Menu/Back button. The main menu appears.
ii. Use the Vertical Touch Pad to select System▶ Language, and then select the language that you want. For tips on using the Vertical Touch Pad, see "Using the Vertical Touch Pad" on page 8, or refer to the User's Guide on the Installation and Applications CD.
3 Congratulations! You can now use your player. Zen Micro is preloaded with some music to get you started immediately. Connect the earphones and press the Play/Pause button to start listening.
TIP
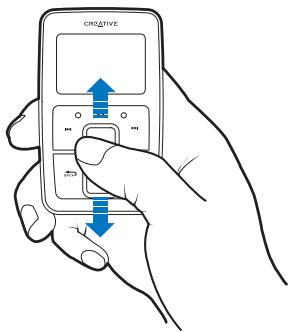
During playback, move your thumb up and down the Vertical Touch Pad to adjust the volume.
To start listening to your own music on Zen Micro, proceed to the next step.

6 Transfer music
Step 5: Transfer music
1 Connect your player to your computer's USB port with the supplied USB cable.
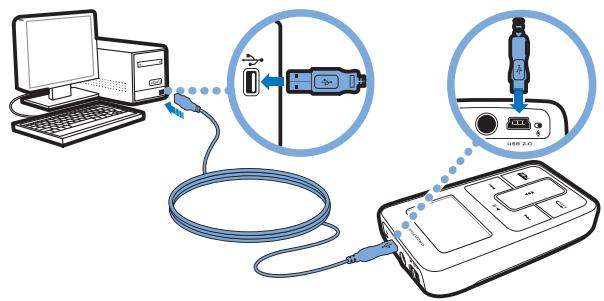
2 When your computer detects your player, Creative MediaSource™ or Windows Media Player starts automatically. Transfer your music tracks [MP3 or WMA files] to Zen Micro with either one of these applications.
TIP
For tips on downloading music tracks from the Internet, refer to the User's Guide on your Installation and Applications CD: d:\manual\language>manual.pdf (replace d:\ with the drive letter of your CD-ROM/DVD-ROM drive and language with the language that your document is in)
You can find information on ripping and transferring music in Creative MediaSource's online Help.
Transfer music 7
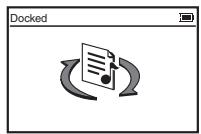
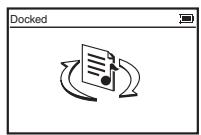
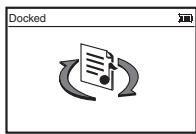
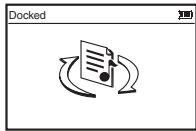
3 When you have finished transferring music tracks, disconnect Zen Micro. DO NOT disconnect your player if you see the first picture below on the LCD. Track or data file transfer is in progress and disconnecting your player may damage the content being transferred.
Wait until you see the second picture below before disconnecting your player.

8 Using the Vertical Touch Pad
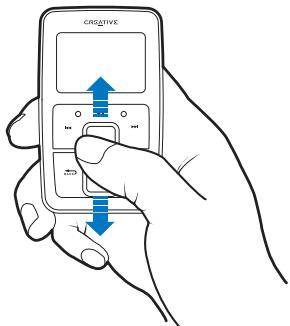
Using the Vertical Touch Pad
- Move your thumb up and down the Vertical Touch Pad to scroll through menu items.
To rapidly scroll though menu items, hold down the top or bottom portion of the Vertical Touch Pad with your thumb.
To select a menu item, firmly tap the Vertical Touch Pad.
To adjust the sensitivity of the Vertical Touch Pad, press the Menu/Back button, and select System▶ Player Settings▶ Touch Pad▶ Sensitivity. Sensitivity can be set to low, medium or high.
To turn the Vertical Touch Pad's clicking sound on and off, press the Menu/Back button, and select System▶ Player Settings▶ Touch Pad▶ Clicker.
- Slide the Power switch towards the Lock icon to disable Zen Micro's Vertical Touch Pad and buttons. This is useful when you do not want to activate controls accidentally when your player is in your pocket or bag.
Storing and Transferring Data Files 9
Storing and Transferring Data Files
Using Zen Micro Media Explorer
Use Zen Micro Media Explorer if you need to transfer data files between Zen Micro and your computer. Zen Micro Media Explorer offers you the ease of managing your player's data files (as well as music tracks), in a Windows Explorer environment. Zen Micro Media Explorer is automatically installed when you set up the Zen Micro software on your computer. For more information, refer to Zen Micro Media Explorer's online Help.
Using Removable Disk mode
If you are using a shared computer in school or at the office, and installing Zen Micro Media Explorer is not possible, you can still transfer data files. Just enable Zen Micro's Removable Disk mode. Read on for tips on using Removable Disk mode. For detailed information, refer to the User's Guide in the Installation and Applications CD.
I do not need to transfer data files using Removable Disk mode. Do I still need to select hard disk space settings for Removable Disk mode?
No, you should only enable Removable Disk mode and select its settings if you need to use it.

10 Storing and Transferring Data Files
How do I enable Removable Disk mode?
Press the Menu/Back button, and select Extras Removable Disk.
When you enable Removable Disk mode for the first time, you will be prompted to select the amount of hard disk space you want to use for this mode. It may take up to a couple of minutes for Zen Micro to set up the Removable Disk hard disk space.
Make sure the Removable Disk mode icon appears on Zen Micro's LCD before you connect your player to your computer.
Can I change the Removable Disk hard disk space settings later?
Yes, you may change the allocated hard disk space at any time. However, do note that the space allocated for Removable Disk mode cannot be smaller than the space used by your existing files.
To delete all the data files in the Removable Disk hard disk space, press the Options button while in Removable Disk mode and select Format. Use Windows Explorer if you want to delete individual data files stored in Removable Disk mode.
Storing and Transferring Data Files 11
When Zen Micro is in Removable Disk mode, can I use Zen Micro Media Explorer to transfer files?
No, files transferred using Removable Disk mode are stored separately from files transferred using Zen Micro Media Explorer. In fact, when Zen Micro is in Removable Disk mode, you will not see your player in Zen Micro Media Explorer.
To transfer files using Zen Micro Media Explorer, exit from Removable Disk mode by clicking the Zen Micro Media Explorer icon. To access the files stored in Removable Disk mode again, enable Removable Disk mode and then reconnect Zen Micro to your computer.
12 Safety Advice
Safety Advice
Refer to the following information to use your player safely, and to reduce the chance of electric shock, short-circuiting, damage, fire, hearing impairment or other hazards.
NOTE
Improper handling may void the warranty for your player. For more information, read the Warranty available with your product.
- Do not dismantle or attempt to repair your player, battery or power adapter.
Refer all servicing to Creative or authorized repair agents. - Do not expose your player or battery to temperatures outside the range of 0^ to 45^ ( 32^ to 113^ ).
Do not pierce, crush or set fire to your player or battery. - Keep your player or battery away from strongly magnetic objects.
Do not subject your player to excessive force or impact.
Do not expose your player or battery to water or moisture.
If your player is moisture-resistant (see product packaging for details), take care not to immerse your player in water or expose it to rain.
- Do not listen to audio at high volume for prolonged periods of time.
The battery must be recycled or disposed of properly. Contact local agencies for recycling and disposal information.
Do not allow metal objects to touch the terminals of your battery.
If there is leakage, an offensive odor, discoloration or deformation during charging or use, remove the battery and do not use it again. Clean your hands well before touching food or sensitive areas, for example, your eyes.
Waste Electrical and Electronic Equipment (WEEE) Symbol
The use of the WEEE Symbol indicates that this product may not be treated as household waste. By ensuring this product is disposed of correctly, you will help protect the vvironment. For more detailed information about the recycling of this product, please contact your local authority, your household waste disposal service provider or the shop where you purchased the product.
More Information 13
More Information
Creative Knowledge Base
Resolve and troubleshoot technical queries at Creative's 24-hour self-help Knowledge Base. Go to www.creative.com and select your region.
Register your product!
Registering your product ensures you receive the most appropriate service and product support available. You can register your product during installation or at www.creative.com/register.
Please note that your warranty rights are not dependent on registration.
Customer Support Services and Warranty
You can find Customer Support Services, Warranty and other information in the Installation and Applications CD.
| Customer Support Services | d:\support\region\language\support.chm |
| Warranty | d:\warranty\region\language\warranty.chmPlease keep your Proof of Purchase for the duration of the warranty period. |
| User's Guide | d:\manual\language\manual.pdf |
(replace d:\ with the drive letter of your CD-ROM/DVD-ROM drive,
Copyright © 2005 Creative Technology Ltd. All rights reserved. The Creative logo, Creative MediaSource and Zen are trademarks or registered trademarks of Creative Technology Ltd. in the United States and/or other countries. Microsoft, Windows and the Windows logo are registered trademarks of Microsoft Corporation. All other products are trademarks or registered trademarks of their respective owners and are hereby recognized as such. All specifications are subject to change without prior notice. Actual contents may differ slightly from those pictured.

Français
14 Demarrage
Démarrage
WEEE- (Waste Electrical and Electronic Equipment)-Symbol
Creative Knowledge Base
1 Schakel de computer in.
Creative Knowledge Base
Creative Knowledge Base
Creatives Knowledge Base
WEEE-symbolet (Waste Electrical and Electronic Equipment)
Creative Knowledge Base
Creative Knowledge Base
Uar 4: Bocnpoun3BedeHne My3bIKn
1 Iepemecntte BbIKIOUateJIb NtAHnB CTOPOHY 3HaUka NtAHnY udepXNBaTe eO B TAKOM NIOLOXKeHn Do TEX NOP, NOKa HE BKJIIOHTcA KK-ducnnne.
2ПипьвомВКЛЮЧЕнIMnpОгрьВATEЯ Zen Micro NOBHTcMaHNoHa aHrIyCKOMЯ3bIKe.N3MeHeHneЯ3bIka:
i. Haxmnte KhoNky Menu/Back .IorBntcra JnaBHOe MeHIO.
ii. Ha BepTnKaIbHOH cEHcOpHoi nAHeJI bIb6pe TcIcTeMa Ra3bIK, a 3aTeM bIb6pe NTyXhblra3bIK. HNΦopMaIIMo 06 NcPb3OBAHmE BepTnKaIbHOH cEHcOpHoi nAHeJI MOnxHO HAITn Bpa3dJe "UcPb3OBAHmE BepTnKaIbHOH cEHcOpHoi nAHeJI" HA cTp. 18 INIuB pyKOBODCTBE nIb3BaTeAeHa KOMnAkt-DicKe C yctaHOBOHyIMn pIprKNaIbHMn pIporpaMMam.
184 Perepenoc My3bIKI
3Ппмпге haи nOЗдравлелн! Baш npОИрьВATEЛь roTOВ K mСПОЛьЗOBAHИО.
B Zen Micro npedBapntelbHo 3aRpyKeHO HeckoIbKO My3bIkaJIbHbIX npoun3BeHeHn, YTO No3BOJNT Bam cpa3y Xe HaauTa pa6Ory C npounpbyBaTeHem. YTo6bHaauTa Bocnpoun3BeHeHne, NOpCoEHNHT HayuHnKn n HaxMmTe KONKy BOCnpoun3BeHeHn/Nay3bl II.
COBET
IpyeruyIpOBaHnI rPOMKoCTN BO BpeM BOCpOn3BedeHnI nepeMeuAte NaIeC BN3 NIM BBepx NO CeHCOPHO NaHeJI.
TtO6bI Naatb npocnyuBnBaHne c06CTBeHHo My3bIKc NOMOuIbIO npOnrPbBaTeJIa Zen Micro, nepeJdnte K cJeDyUoIeMy wary.
Uar 5: Ipehenoc My3bIKN
1 PoiKJIIOUHTe npOurpIbIbATEnb K npOry USB kOMnIbIOTepa c nOmoIbIOpnunaraemoro ka6eJIra USB.
IpepeHoc My3bIKu 185
2 Korda Baushi Kombliptep 6hapyknT pokkHHe npnIpyBaTeIb, abTomatueeKn 3aynctntc npuIoXeHne Creative MediaSourceTM uIn Windows Media Player. IpeHecTm My3bKaIbHbIe dopoxK (paJb MP3 uIN WMA) B Zen Micro moxHo c nOmoCbIO lIO6oI u3 tIX npuIoXeHn.
COBET
IINΦOPMaMIO O 3arpy3ke My3bkaJbHbX 3aIncE n3 INHTepHeTa MOKHO HAntB yPKOBoCTBe NOJIbOBATeJIA HA KOMnAKT-IMCKe C yctahoBOOHTbIMN I pRnKlaJbHMn IporpramMMn.
d:\manual\
IINΦOPMauNIO O pneo6pa3OBAHMM ΦOPMaTAt MBybKaJbHBx 3aIncEиOBix NpeHoce MOxHO HaHTB INTEpArKTHBOH cnPABKe npnIoXeHNA Creative MediaSource.
3 3aKoHnB npeHoc My3bKaIbHbIX 3aIInCeI, OTKIIouHte Zen Micro.
HE OTKIIOUaIte IpnIrpBbATEJI, ecNI Ha KK-dncJIee OTo6paKeH nepBbIM 3HaOK (CM. HIXe). OH O3HaayeT, YTO BbIOnHReTcpeHoc 3aIINu INI paJla daHHbIX uYTO OKIIOUeHne IpnIrpBbATEJI MoKet pInBeCTN K NOBpeXdEHIO peHocMm INHOpMaUN.
IpoJxnte, nKa He IoBtCByTOPOI 3HaOK, NToIbKO NOTOM OTKIOUHTe npOnrpbBaTeIb.
YTo6bI Bb6paTb NHT MeHIO, Ha CeHCOPHy IaHeJIb Heo6xOJIMO KOChyTbCn BePTnKaIbHOI CeHCOPHOI NaHEII.
TTo6bOtpErpyIInpoBaTb YyBCTBnTeNbHocTb BepTknAJIbHOI cEHcOpHn NaHen, HaxKMITE KhoNky Menu/Back 一 , Bbl6epnte Cnctema HaCtpoKn npOnpRbBaTea CenCOPHa naHenb YyBCTBnTeNbHocTb. MoXHO yCTaHOBtB H3Km, cpeHn nn BblcOKn yPoBeHb YyBCTBnTeNbHocTb.
TTo6bBVKIOUaTB/OTKIOUaTB 3ByKn PnHaxaTmN,HaxMNTe KHOIky Menu/Back 一 _ i ,Bb6epTe Cntema HactpoKn npOirpbyBaTeA CeHCOPHa NaHeB 3ByKn Pn HaxaTmN.
IepeMeCTte BbIKIOuateJIb IITaHnB CTOPOHy 3HaUka
БлOKИРОВКа Ддг ATKЛЮЧЕнma BepTINKaJIbHо CEHCOPHOI
naHEni uKHOnOK Zen Micro. 3To yUdObNo Ia npeDOTBpaueHnra CnyauHoro BKUIOeHnO prAonHO BynpABNeHn, KOrda npOrrpBbaTeBJI JIeXHT B KAPMaHE INI CYMKe.
CoxpaHneI napeHoc faiJIOB daHHbIX
IcnoB3OBAHne Zen Micro Media Explorer
B clyae Heo6xOIMocTnpeHoca faJIOB daHHbIX MeKdy KOMbIOTepom U Zen Micro moXHO nCnoJIb3OBaTb npInOKeHne Zen Micro Media Explorer. Zen Micro Media Explorer oecneuBaET lerKoe ynpabLeHne faJAMn daHHbIX npOnrPbIBaTeJI (m My3bIkaJIbHbIMn dOpokKaMn) B cpe IpoBoDnIka Windows. Zen Micro Media Explorer yctahAbNlBaetc aBTOMaTNUeCKn npn 3aRpy3ke nporpamMHoro o6ceueHn Zen Micro Ha KOMnbIOTep.ДЯ noJyEHeJaDonoiHHTeJIbHOu INΦopMaUIN o6paITeB K INTEpAKTUBHO cnPabKe Zen Micro Media Explorer.
Pa6ota B pexnme cbeMHoro dNcKa
EcINBbIIOJIb3yETecbO6UeCTBeHHbIMKOMTbIOTepoB M KOJIe NIN B Oocce n yctaHOBKa Zen Micro Media Explorer HeBO3MOXHa, Bbl N B 3tOM cLyuae cMOxTepeHOCHTaJIb DaHHbx.CJeDyET NLIb BKJIOHITb IJrZen Micro pexIM cbEMHOrO dNcKa. CobTeI IO NCIOJIb3OBAHIO peXIMa CbeMHO rNcKa npuBeHeH HnKe. DOnOIHNteJIbHbIe CBeDEHm CM.BpyKOBoIDCTBE NOIb3OBATeJIHa KOMNaKT-DnCKe C yCTaHOBOUHbIMn IN npNKlaIDhbIMn PpOrpaMMamn.
188 CoXpaHHeHne n IpeHoc faJIOB daHHbIX
He c6bpaIOcb nepeHocntb daHHble b peXIMe cbemHoro DNCKa. CneJeT IIN MHE B 3TOM cIyuae deJaTa hAcToPkn DnCKOBOR npoctpaHCTBa dI pyexIMA cbemHoro DNCKa?
He, BbIbIpaTb pexIM CbeMHOrO IuCKa N BbIIOJIHrTb COOTBcTcByIOUne HAcTPOJIKN CJIeNyET JINsB B TOM CInyae, ECIN B 3TOM BO3HnKaeT Heo6XoDmOcTb.
KaK BKNIOUHTb peXIM cbEMHO rNcKa?
Hakmte KhoNky Menu/Back , BbI6epTe DOnoJIHnteBHO CbeMHbI dNCK.
Creative Knowledge Base
Baza 3HaHn Creative Knowledge Base DocTyHa KpyIocyToCuNo n PpeHaaHauHe dIra camocTaeTbeHOro peuHn TExHuecKxB BonpocOB u YctpaHEnHa HenoIaOk. PpeiDte Ha y3eJl www.creative.com n BbIbepnte Cboi perIOH.
3apeHnCTpnpuyTe cBOn npOnrpbBaTeJIb!
PerncpaiaBaIero npourpBbateIe oecneHIT ppeoctabIeHne Hau6oJIee BbCOKn yPOBeHb 06cIyJmbaHn I NpOdepKKn.3apeuCTpnpoBaTb CBOE yCTPOICTBO MOXHO BO BVPEMraYCTaHOBKn IIN Ha y3JIe
www.creative.com/register.
Baun npaba Ha rapaHTIO He 3aBnCT OT perncpaun.
Cnyx6a noidepKn nokypaneIe n rapaHTnHbIe 6o3aTeJIbCTBa
Name and Address of Customer
- Nom et adrese du client
- Nome e indirizzo del cliente
- Name & Anschrift des Käufers
- Nombre & direction del cliente
- Naam & adresvan de klant
Kundensnavn & adress - Asiakkaan nimi & osoite
Kundens namm & adress
Kundensnavn &adresse
- Imiei adres klienra
- Meno a adresa zákaznika
- Nome e morada do comprador
-Фамлииuaapc nokyntaTeIa
A Vásárló neve és címe
Hyeopounvia Ayopac Ovoua & Dteuobunyou TceA
- Pirkéjo vardas, pavarde ir adresas
- Meno a adresa zákaznika