
ESPRIMO P5600 (SIS761) - Desktop computer FUJITSU SIEMENS - Free user manual and instructions
Find the device manual for free ESPRIMO P5600 (SIS761) FUJITSU SIEMENS in PDF.


User questions about ESPRIMO P5600 (SIS761) FUJITSU SIEMENS
0 question about this device. Answer the ones you know or ask your own.
Ask a new question about this device
Download the instructions for your Desktop computer in PDF format for free! Find your manual ESPRIMO P5600 (SIS761) - FUJITSU SIEMENS and take your electronic device back in hand. On this page are published all the documents necessary for the use of your device. ESPRIMO P5600 (SIS761) by FUJITSU SIEMENS.
USER MANUAL ESPRIMO P5600 (SIS761) FUJITSU SIEMENS
Are there any technical problems or other questions you need clarified?
Please contact:
Intel, Pentium and Celeron are registered trademarks of Intel Corporation, USA.
Microsoft, MS, MS-DOS and Windows are registered trademarks of Microsoft Corporation.
PS/2 and OS/2 Warp are registered trademarks of International Business Machines, Inc.
All other trademarks referenced are trademarks or registered trademarks of their respective owners, whose protected rights are acknowledged.
All rights, including rights of translation, reproduction by printing, copying or similar methods, even of parts are reserved.
Offenders will be liable for damages.
All rights, including rights created by patent grant or registration of a utility model or design, are reserved. Delivery subject to availability.
Right of technical modification reserved.
This manual has been printed on recycled paper.
Printed in the Federal Republic of Germany
AG 08/05
Ausgabe/Edition 3
List of onboard features
| Chipset | SiS761GX / 965L |
| Board size | μATX |
| VGA | ✓ |
| Audio / 8-channel / S/PDIF 5.1 | ✓ / - / - |
| Buzzer / int. Speaker Support | - / ✓ |
| LAN 1 Gbit / 100 Mbit / 10 Mbit | ✓ / ✓ / ✓ |
| LAN ASF / AoL / WoL / Boot | - / - / ✓ / ✓ |
| Serial ATA2 / ATA / RAID | ✓ / ✓ / ✓ |
| FireWire™ / USB 2.0 | - / ✓ |
| FAN monitored PSU** / CPU (FAN1) / AUX1 (FAN2) / AUX2 (FAN3) | - / - / - / - |
| FAN controlled PSU** / CPU (FAN1) / AUX1 (FAN2) / AUX2 (FAN3) | - / ✓ / - / - |
| TEMP monitored CPU/ONB1/ONB2/HDD | ✓ / - / - / - |
| SmartCard SystemLock (USB / serial) | ✓ / - |
| Fujitsu Siemens Computers Keyboard Power Button Support | ✓ |
List of special onboard features
| Silent Fan / Silent Fan LT / System Guard | - / ✓ / - |
| Silent Drives / Recovery BIOS / Desk Update | ✓ / ✓ / ✓ |
| Multi Boot / Safe Standby / HDD Password | ✓ / - / - |
| Logo Boot / Intel On Screen Branding | ✓ / ✓ |
** Not supported by standard Power Supplies
| Special Features | |
| Green Edition | Halogen-free and lead-reduced product |
| Silent Fan LT | Independent temperature related processor fan control |
| Silent Drives | Noise reduction for optical and hard disk drives |
| Recovery BIOS | Restores a disrupted BIOS |
| Desk Update | Simple driver update with DU CD |
| Multi Boot | Comfortable boot from any boot device |
Power Supply Requirements - for onboard components (worst case)
| Source | Voltage | Maximal variation | Mainboard current (Maximal) |
| Main Power Supply | + 12 V | +/- 5 % | 7 (9) A |
| - 12 V | +/- 10 % | 0.05 A | |
| + 5 V | +/- 5 % | 3 (6) A | |
| + 3.3 V | +/- 5 % | 6 (8) | |
| Aux. Power Supply | + 5 V | +/- 5 % | 2 A |
Mainboard D2030

Audioeingang (Line in), hellblau

Integrated Mirage™ 1 Graphics Engine, 85 Hz max. Refresh Rate, 2048 x 1536 x 24 max. Resolution with 75Hz, 32, 64 or 128 MB shared memory, upgradeable with PCI Express x16 Graphics Card, High performance 256 bit 3D Engine, DirectX 7 complaint
Information about boards
Be sure to observe the following for boards with ESD:
- You must always discharge static build up (e.g. by touching a grounded object) before working.
The equipment and tools you use must be free of static charges. - Remove the power plug from the mains supply before inserting or removing boards containing ESDs.
Always hold boards with ESDs by their edges. - Never touch pins or conductors on boards fitted with ESDs.
An overview of the features is provided in the data sheet.
Special features
Your mainboard is available in different configuration levels. Depending on the configuration, your mainboard is equipped with or supports special features.
This manual describes the most important properties of this mainboard.
Additional information on mainboards is contained in the manual "Basic information on mainboard" on the "User Documentation" or "OEM Mainboard" CDs, or on the Internet.
Interfaces and connectors
The location of the interfaces and connectors of your mainboard is specified at the beginning of the manual.
The components and connectors marked are not necessarily present on the mainboard.
External ports
The location of the external connections of your mainboard is specified at the beginning of the manual.

PS/2 keyboard port, purple

Parallel port/Printer, burgundy

LAN port (RJ-45)

Monitor port, blue

Audio input (Line in), light blue

Serial interface, turquoise

PS/2 mouse port, green

Microphone jack (mono), pink

USB - Universal Serial Bus, black

Audio output (Line out), light green
Installing/removing or replacing processor (with heat sink)

Disconnect the system from the mains voltage before performing any of the tasks described below. Details are contained in the operating manual of your system.
Technical data
AMD Athlon 64 in the mPGA 939 design
Sempron in the mPGA 939 design
- A current list of the processors supported by this mainboard is available on the Internet at: www.fujitsu-siemens.com/mainboards.
Remove the fan that there may be and the heat sink.
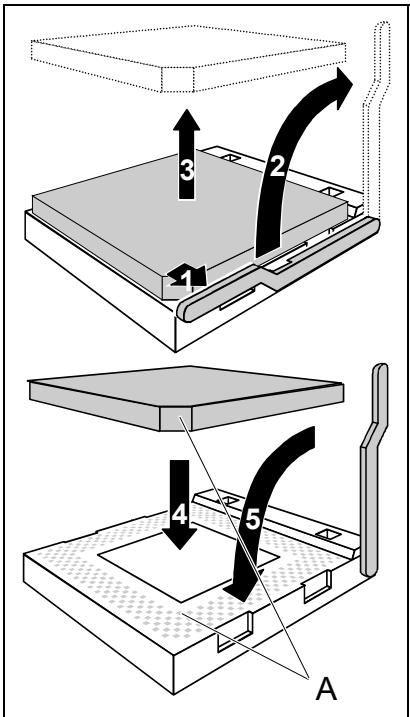
Pull the lever in the direction of the arrow (1) and lift it as far as it will go (2).
Fold up the frame.
Remove the old processor from the socket (3).
Insert the new processor in the socket so that the angled corner of the processor matches the coding on the socket (A) with regard to the position (4).

The angled corner of the processor can also be at a different location than shown in the illustration.
Push the lever back down until it clicks into place (5).

Please note that, depending on the heat sink used, different heat sink mounts are required on the mainboard.
Depending on the configuration variant, you must pull a protective foil off the heat sink or coat the heat sink with heat conducting paste before fitting it.
Depending on the processor variant, clips may also be supplied for mounting the heat sink that fix it in place.
Installing/removing or replacing main memory
Technical data
Technology: DDR 333 SDRAM or DDR 400 SDRAM unbuffered DIMM modules 184-Pin; 2.5 V; 64 Bit or 72 Bit, without ECC
Size: 128 Mbytes to 4 Gbyte DDR
Granularity: 128, 256, 512 or 1024 Mbyte for one socket
A current list of the memory modules recommended for this mainboard is available on the Internet at: www.fujitsu-siemens.com/mainboards.
At least one memory module must be installed. Memory modules with different memory capacities can be combined.

You may use only unbuffered 2.5V memory modules with ECC.
DDR-DRAM memory modules must meet the PC2700 or PC3200 specification.

If you use more than one memory module, then make sure to distribute the memory modules over both memory channels. By doing this you use the performance advantages of the dual-channel mode.
The maximum system performance is given when the same memory size is used in Channel A and Channel B.
To simplify equipping, the slots are colour coded.
With a memory configuration of 4 Gbytes the visible and usable main memory can be reduced down to 3.5 Gbytes (depending on the system configuration).

| Number of inserted memory modules | ||||
| slot to be used | 1 | 2 | 3 | 4 |
| Channel A, slot 1 | X | X | X | X |
| Channel B, slot 3 | X | X | X | |
| Channel A, slot 2 | X | X | ||
| Channel B, slot 4 | X | |||
The installation/removal is described in the "Basic information on mainboard" manual.
Graphics port
Technical data
Integrated Mirage™ 1 Graphics Engine, 85 Hz max. Refresh Rate, 2048 x 1536 x 24 max. Resolution with 75Hz, 32, 64 or 128 MB shared memory, upgradeable with PCI Express x16 Graphics Card, High performance 256 bit 3D Engine, DirectX 7 complaint
Screen resolution
Depending on the operating system used, the screen resolutions in the following table refer to the mainboard screen controller.
If you are using an external screen controller, you will find details of supported screen resolutions in the operating manual or technical manual supplied with the controller.
| Screen resolution | Refresh rate (Hz) | Colour |
| 640 x 480 | 85 | 32 bit |
| 800 x 600 | 85 | 32 bit |
| 1024 x 768 | 85 | 32 bit |
| 1280 x 1024 | 85 | 32 bit |
| 1600 x 1200 | 85 | 32 bit |
| 1920 x 1440 | 85 | 32 bit |
| 2048 x 1536 | 75 | 32 bit |
PCI bus interrupts - Selecting correct PCI slot
Extensive information on this section is contained in the manual "Basic information on mainboard".

To achieve optimum stability, performance and compatibility, avoid the multiple use of PCI IRQ Lines (IRQ sharing). Should IRQ sharing be unavoidable, then all involved devices and their drivers must support IRQ sharing.
Which ISA IRQs are assigned to the PCI IRQ Lines is normally automatically specified by the BIOS (see "BIOS Setup" description).
Monofunctional expansions cards
PCI/PCI Express expansion cards require a maximum of one interrupt, which is called the PCI interrupt INT A. Expansion cards that do not require an interrupt can be installed in any desired slot.
Multifunctional expansion cards or expansion cards with integrated PCI-PCI bridge
These expansion cards require up to four PCI interrupts: INT A, INT B, INT C, INT D. How many and which of these interrupts are used is specified in the documentation provided with the card.
The assignment of the PCI interrupts to the IRQ Lines is shown in the following table:
| PCI INT LINE | Controller or slot INT | ||||||||||||||||
| On board controller | Mechanical slot | ||||||||||||||||
| USB 1.1 | USB 2.0 | IDE | SATA | AC97 / HD Audio | LAN | VGA | 1 | 2 | 2 | 3 | - | - | - | ||||
| \( 1^{st} \) | \( 2^{nd} \) | \( 3^{rd} \) | PCIe x16 | PCIe x1 | 1 | 2 | - | - | - | ||||||||
| 1 (A) | - | - | - | - | X | - | - | - | X | X | X | D | A | - | - | - | |
| 2 (B) | - | - | - | - | - | X | - | - | - | - | X | A | B | - | - | - | |
| 3 (C) | - | - | - | - | - | - | X | - | - | - | X | B | C | - | - | - | |
| 4 (D) | - | - | - | - | - | - | - | - | X | - | X | C | D | - | - | - | |
| 5 (E) | - | - | - | - | - | - | - | - | - | - | - | - | - | - | - | - | |
| 6 (F) | - | - | X | - | - | - | - | - | - | - | - | - | - | - | - | - | |
| 7 (G) | - | X | - | - | - | - | - | - | - | - | - | - | - | - | - | - | |
| 8 (H) | X | - | - | X | - | - | - | - | - | - | - | - | - | - | - | - | |
| ID SEL | 14 | 14 | 14 | 14 | 13 | 16 | 13 | - | 20 | - | 17 | 21 | 23 | - | - | - | |
| Dev # | 03h | 03h | 03h | 03h | 02h | 05h | 02h | - | 09h | 00h | 1Fh* / 01h | 06h | 0Ah | 0Ch | - | - | - |
| Func tion# | 0 | 1 | 2 | 3 | 5 | 0 | 7 | - | 0 | 0 | 0 | 0 | 0 | 0 | - | - | - |
| Bus# | 0 | 0 | 0 | 0 | 0 | 0 | 0 | - | 0 | 1 | 0 | 0 | 0 | 0 | - | - | - |
- with onboard Graphics
Use first PCI/PCI Express slots that have a single PCI IRQ Line (no IRQ sharing). If you must use another PCI/PCI Express slot with IRQ sharing, check whether the expansion card properly supports IRQ sharing with the other devices on this PCI IRQ Line. The drivers of all cards and components on this PCI IRQ Line must also support IRQ sharing.
BIOS update
When should a BIOS update be carried out?
Fujitsu Siemens Computers makes new BIOS versions available to ensure compatibility to new operating systems, new software or new hardware. In addition, new BIOS functions can also be integrated.
A BIOS update should always also be carried out when a problem exists that cannot be solved with new drivers or new software.
Where can I obtain BIOS updates?
The BIOS updates are available on the Internet at www.fujitsu-siemens.com/mainboards.
How does a BIOS update work?
You have two ways of doing this:
- BIOS update under DOS with bootable BIOS update floppy disk - brief description
Download the update file from out website to your PC.
Insert an empty floppy disk (1.44 Mbyte).
Run the update file (e.g. 2030103.EXE).
A bootable update floppy disk is created. Leave this floppy disk in the drive.
Restart the PC.
Follow the instructions on screen.

Detailed information on the BIOS update under DOS is provided in the manual on "BIOS Setup" ("Drivers & Utilities" CD).
- BIOS update under Windows with DeskFlash utility
A BIOS update can also be carried out directly under Windows with the DeskFlash utility. DeskFlash is contained on the "Drivers & Utilities" CD (under DeskUpdate).
Mainboard D2030

Yka3aHnI IO MoDyJIaM
Дя мodyн e EGB obra3aTeIbHo yuHtIbAite CneJeIoue:
- Ipeed pa60toC moyJnMn Tpe6yeTc StaHueckn pa3pndt CBOe TeNo (Hapimep nocpeDCTBOM kacaHna KAKORo-JIn6o 3aemJeHHoro npdeMeTa).
- ICKHIOHTB BO3MOXHOCTb CTaTNUeCKOTo 3apraIa IcNoJIb3yEmbIX yCTpOJCTB INHCTpyMentOB.
- Ipepe yctaHOBkoI INI CHrTneM MOyIe BbIHbTe BnIKy CeTeBOrO Ka6eJIra I3 po3eTKI.
KacaiTecb ToIbKO KpOMOK MoyJe.
He npikacaiTecb K uTnfoTobbIM BbIOaM uJI NpeaTHbIM npOBOdHkAm MOdyIa.
O630p npo13B0dCTBeHHbIX poka3aTeNe Bbl naJeTe B texHnueckom nacIopTe!
OTJNUHTeJIbHbIe OcO6eHHoCTn
Bb mokeTe npno6peCTn BaUy MaTePHCKYIOIaTy B pa3JIuHbIX KOHcHpyraCIOHOHbIX NcOJIHeHnx. Ba7a MaTePHckAIIATA OblaAeT ONpeDeIeHHbIMN NOKa3aTeJIaMn IIN NOdEprKbNAeT IN B 3aBNCIMoCTn OT eKoHcHpypaCm.
B 3TOM PykoBoDCTBe NO 3KcPnPyatauN Bbl NaIeTe OINCAHne BaxHeiXx CBOCTB 3TOI MaTePHCKOIIaTbI.
AydnoBxOa (Line in), CBeTnO-cnHn

nocneObaTeIbHbI INHTeppeic, 6npu30bI

AkyaIbHbI CNUCOK MOyJeN pAmrTn, peKoMeHNIOBaHbIX DnI 3ToI MaTePHCKO IIaTbI, Bbl NaIeTe B INTEPHeTe Ha caIte: www.fujitsu-siemens.com/mainboards.
HeoXoDIMO BCTpOHTb XOTa 6bl OJINH MOyIb nAMrTn. MoxHO KOM6HnHPOBaTb MOyIi namrTn c pa3JIuHoi EMKoCTbO 3Y.

Integrated Mirage™ 1 Graphics Engine, 85 Hz max. Refresh Rate, 2048 x 1536 x 24 max. Resolution with 75Hz, 32, 64 or 128 MB shared memory, upgradeable with PCI Express x16 Graphics Card, High performance 256 bit 3D Engine, DirectX 7 complaint
IopndepxnbaeblenapaMeTpblpa3peHnna 3kpaHa
B 3aBcHmOCTn OI NCIOb3yEmoONepaunOHHO CNTeMb yKa3aHHbIe HNKe npaMeTpbl pa3peHEnHa 3KpaHa DeiCtBnteHbI DnK KOHTpOJIpe MoHITopa Ha MaTePHNCKO pNaTe.
B cnyuae nCnOlb3oBaHnna DpyrOro KOHTpOJIpepa MOHITopa BbI haJIDeTe NODepKnBaemble npaMeTpbl pa3peSeHnna 3kpaHa B DOKymEntaunn Ha KOHTpOJIpe moHITopa.
ДяТOrO,чTo6bI DoCTNHy ONTImaJIbHOb CTa6JIbHOCtN, pa6OuNx xapaKTepeNtIK u COBMeCTMIOcTи,ИЗбeraIte MHOrOKpaTHORO IcNoJIb3OBAHnRA PCI IRQ Lines (IRQ Sharing). EcIn HeJIb3Я OTKa3aTbCЯ OT MExaHn3Ma COBMeCTHOrO IcNoJIb3OBAHnRA npeRbIbAHn (IRQ Sharing),TO BCE 3aDeIeCTBOBaHnBHe yCTpOiCtBa n IN dpaIBePbI DoJXKnbl NODePxNbAtb IRQ Sharing.
OБьИно BIOS aВТOMaTиЧeСКи hab3нчаET COOTBeTCTByUПЕ ISA IRQ ha PCI IRQ Lines (cM. onICaHne «BIOS-Setup»).
MoHOFyHKUHOHaJIbHbIe paCUnpITeJIbHbIe nJaTbI
Port microphone, rose

Port moniteur, bleu

USB - Universal Serial Bus, noir

Entrée audio (Line in), bleu ciel

Sortie audio (Line out), vert clair
Integrated Mirage™ 1 Graphics Engine, 85 Hz max. Refresh Rate, 2048 x 1536 x 24 max. Resolution with 75Hz, 32, 64 or 128 MB shared memory, upgradeable with PCI Express x16 Graphics Card, High performance 256 bit 3D Engine, DirectX 7 complaint
Integrated Mirage™ 1 Graphics Engine, 85 Hz max. Refresh Rate, 2048 x 1536 x 24 max. Resolution with 75Hz, 32, 64 or 128 MB shared memory, upgradeable with PCI Express x16 Graphics Card, High performance 256 bit 3D Engine, DirectX 7 complaint