
DSL-320T - ADSL Modem D-LINK - Free user manual and instructions
Find the device manual for free DSL-320T D-LINK in PDF.

| Brand | D-LINK |
| Model | DSL-320T |
| Product Type | ADSL Modem |
| Connectivity | 1 Ethernet 10/100 port (RJ-45) |
| Supported WAN Protocols | PPPoE, PPPoA, Static IP, Bridge Mode |
| Encapsulation | Supports multiple encapsulation types (depending on ISP) |
| Management | Web Interface (Internet Explorer 6+, Netscape 6.2.3+) |
| DHCP Server | Built-in (DHCP client by default) |
| Power Supply | AC adapter (mains voltage, not specified) |
| Power Consumption | Not specified |
| Dimensions | Not specified |
| Weight | Not specified |
| Operating Temperature | Not specified |
| Operating Humidity | Not specified |
| Package Contents | DSL-320T modem, Ethernet cable, telephone cable, AC adapter, CD-ROM |
| Idle Time Management Feature | Adjustable maximum idle timer (default 0, recommended 300 seconds) |
| Technical Support France | Phone: 0820080303, Email: support@dlink.fr, Website: http://www.dlink.fr |
| Technical Support Canada | Phone: (800) 361-5265, Website: http://support.dlink.ca |
| Warranty | Void if used with improper power adapter (duration not specified) |
| Guided Configuration | Built-in Setup Wizard |
| Browser Compatibility | Internet Explorer 6 or higher, Netscape Navigator 6.2.3 or higher |
| Networking | Connect a computer via Ethernet cable |
Frequently Asked Questions - DSL-320T D-LINK
User questions about DSL-320T D-LINK
0 question about this device. Answer the ones you know or ask your own.
Ask a new question about this device
Download the instructions for your ADSL Modem in PDF format for free! Find your manual DSL-320T - D-LINK and take your electronic device back in hand. On this page are published all the documents necessary for the use of your device. DSL-320T by D-LINK.
USER MANUAL DSL-320T D-LINK
Make sure you have all the necessary information and equipment on hand before beginning the installation.
Check Your Package Contents
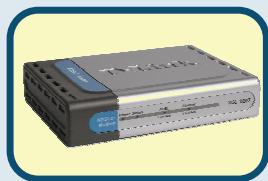
DSL-320T ADSL Modem

CD-ROM (containing Manual)
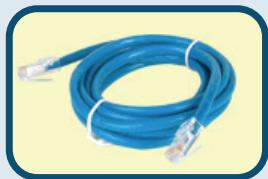
Ethernet (CAT5 UTP) Cable
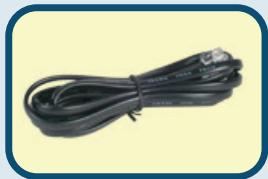
Telephone Cable
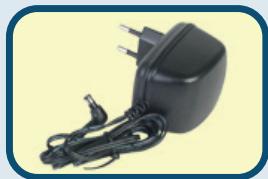
Power Adapter

Using a power supply with a different voltage
rating will damage and void the warranty for this product.
If any of the above items are missing, please contact your reseller.
Connecting the Modem to Your Computer
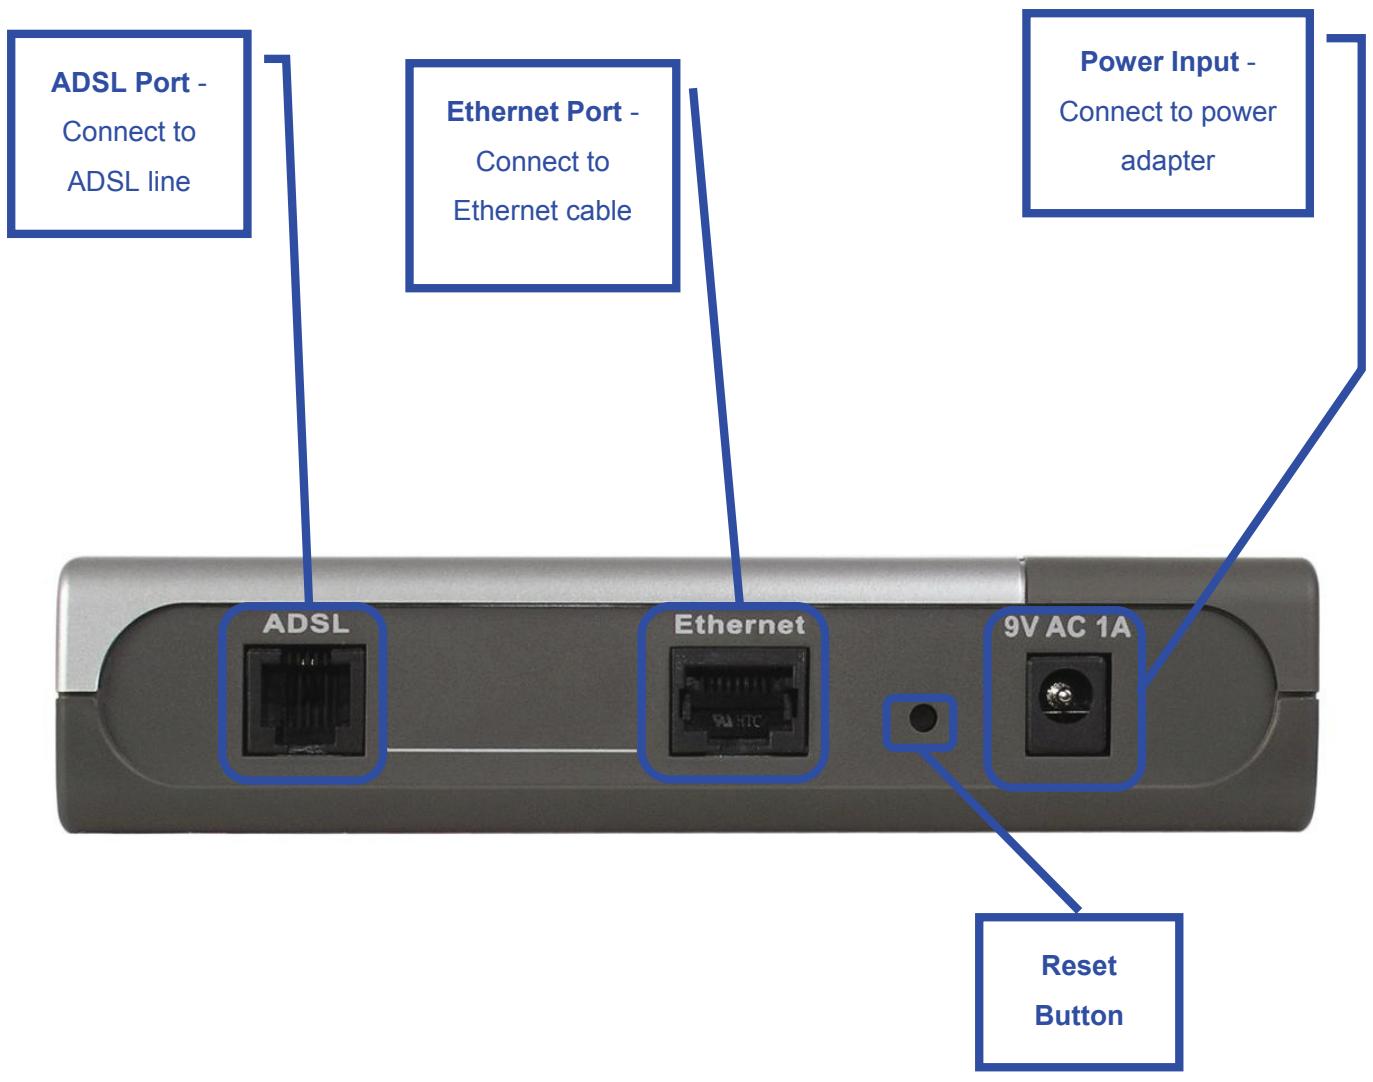
A. First, connect the power adapter to the receptor at the back panel of the DSL-320T and then plug the other end of the power adapter to a wall outlet or power strip. The Power LED will turn on to indicate proper operation.
B. Insert one end of the cable into the Ethernet port on the back panel of the DSL-320T and the other end of the cable to an Ethernet Adapter or available Ethernet port on your computer.
Configuring the Modem
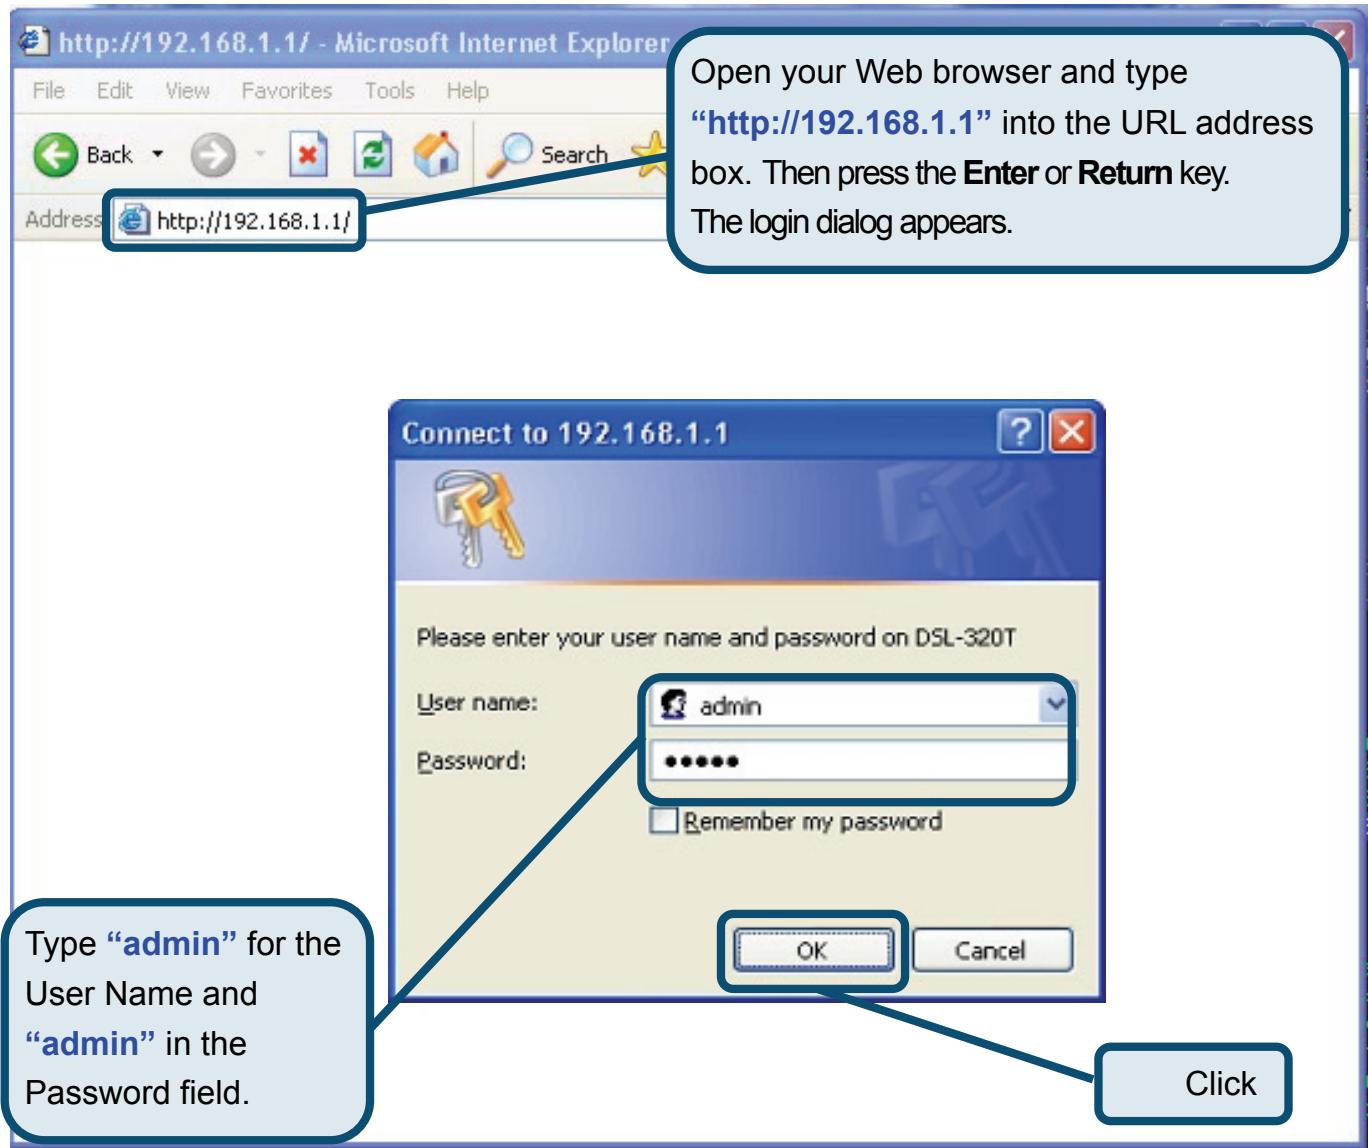
To use your Web browser to access the web pages used to set up the Modem, your computer must be configured to "Obtain an IP address automatically," that is, you must change the IP network settings of your computer so that it is a DHCP Client. If you are using Windows XP and do not know how to change your network settings, skip ahead to Appendix A and read the instructions provided. You may also read the User Manual for instructions on changing IP settings for computers running Windows operating systems.
Configuring the Modem (continued)
Once you have logged in, the Home directory tab featuring the Setup Wizard window opens. Most users will be able to use the Setup Wizard to establish the ADSL connection to your ISP. To begin using the Setup Wizard, click on the Run Wizard button in the middle of the web page. The first pop-up Setup Wizard window opens.
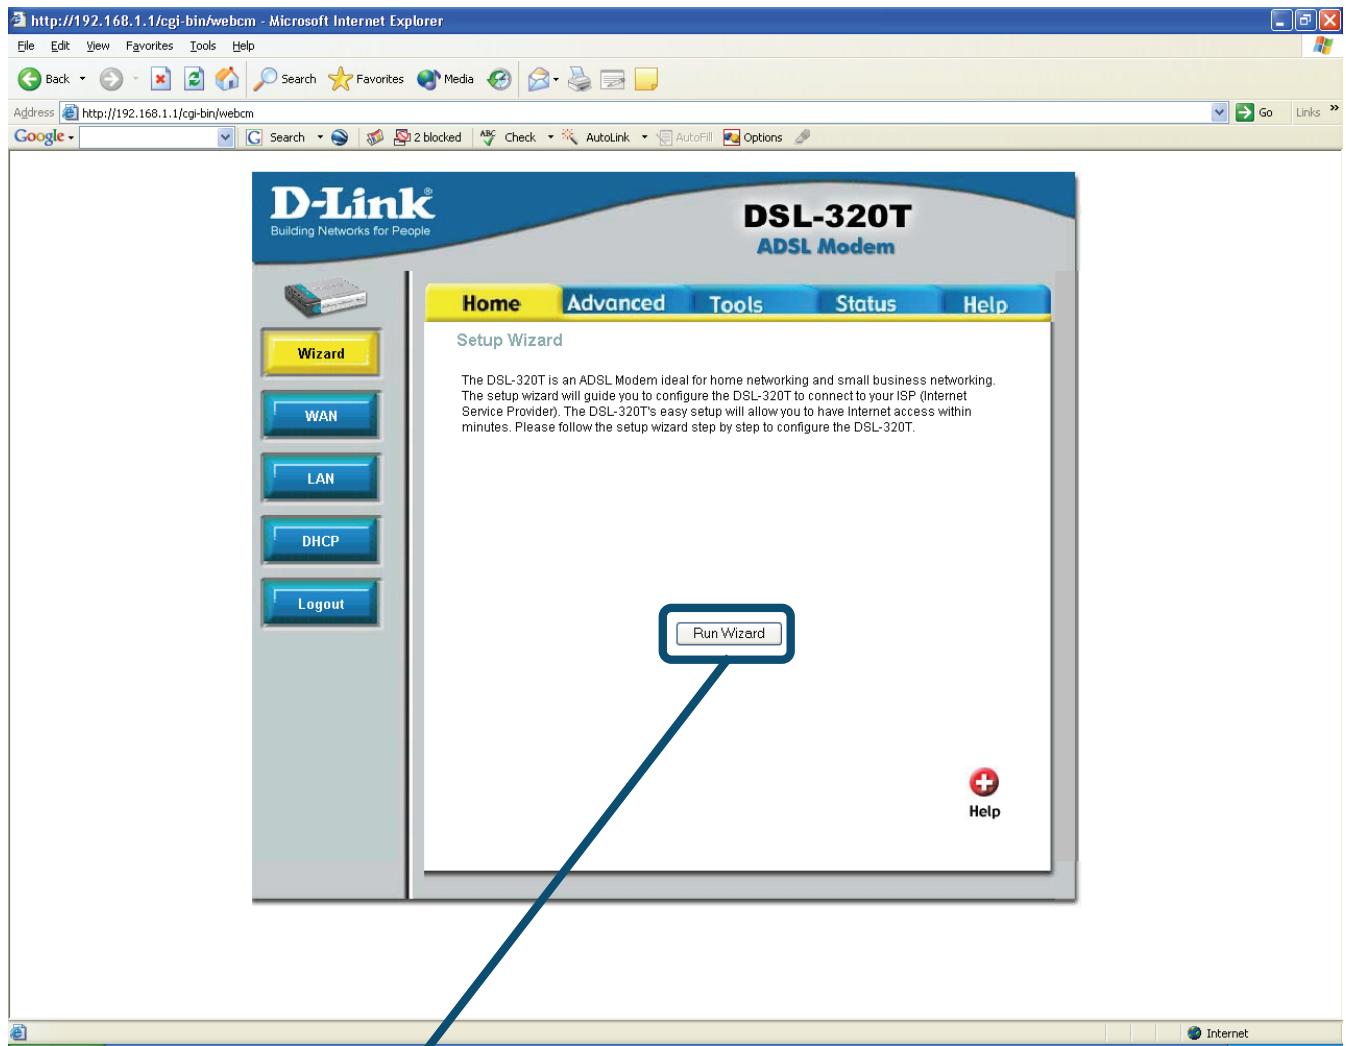
Click on the Run Wizard button.
Configuring the Modem (continued)
The Setup Wizard procedure consists of two general steps:
- Set the Internet connection
- Restart the Modem
When you setup the Internet connection, you will need to enter information provided by your ISP. If you have not been given information about the connection type, the VPI and VCI numbers, as well as other information related to the connection type, you will not be able to complete the setup.
The first Setup Wizard window lists a summary of the steps required to complete the setup. Click the Next button to begin setup.

Configuring the Modem (continued)
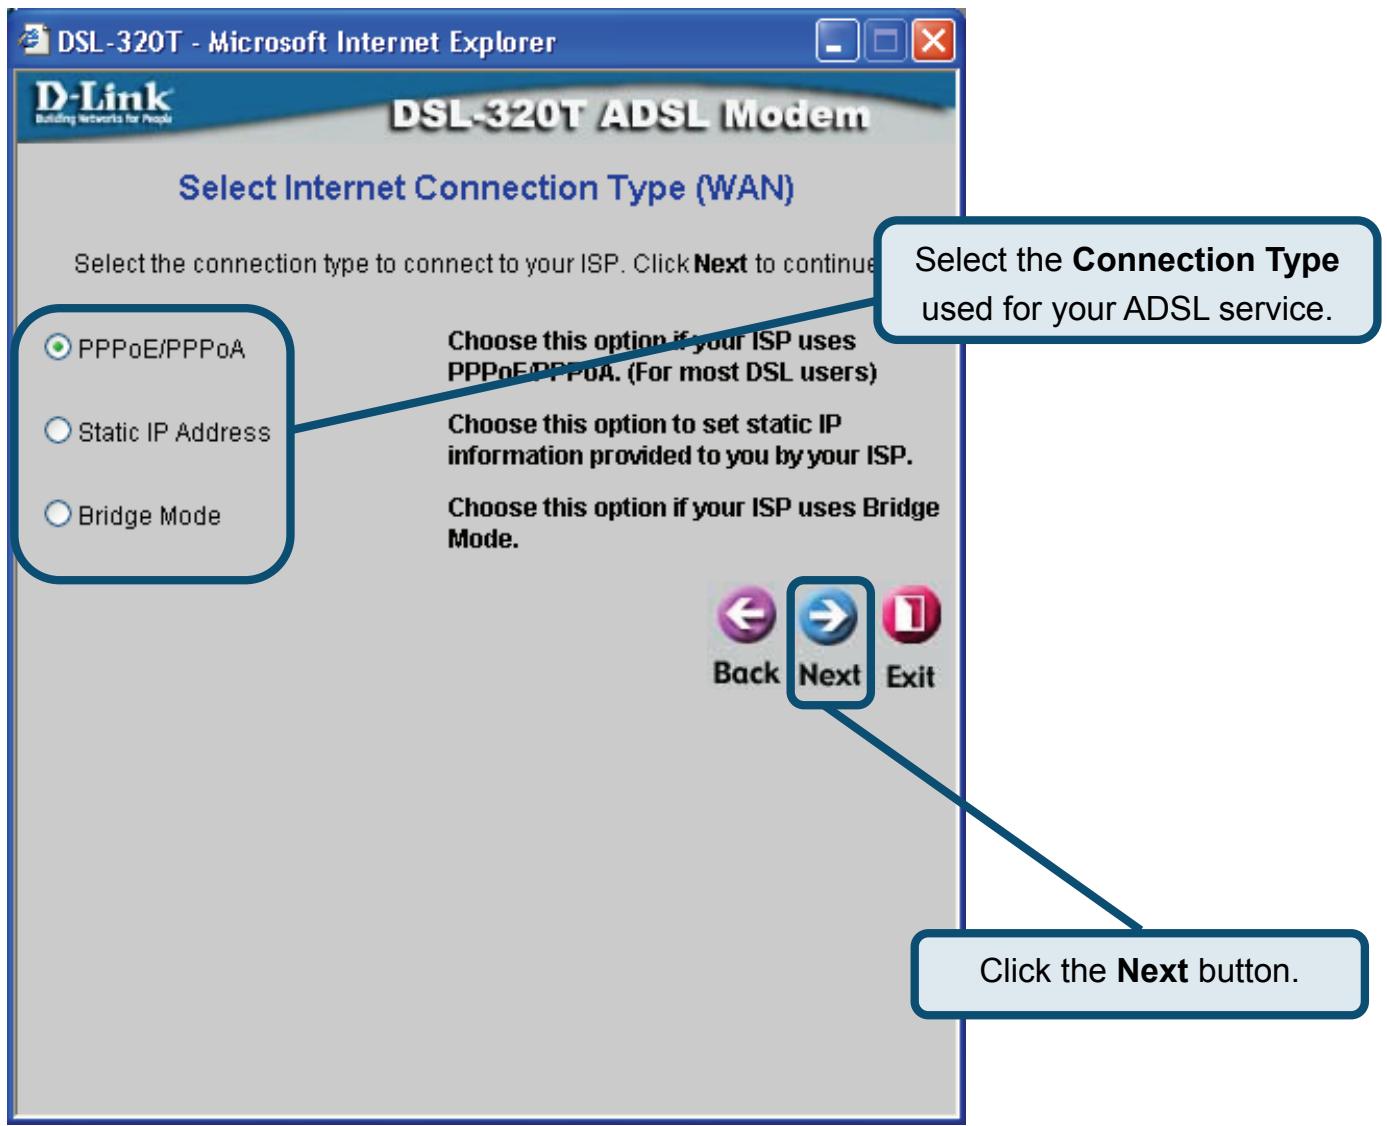
The initial step is to Select the Internet Connection Type for the WAN interface. Your ISP has given this information to you. If you do not know what type of connection to use, exit the Setup Wizard and contact your ISP for the information. The Setup Wizard window that appears when you click the Next button depends on what connection type you select. The connection types available in the Setup Wizard window are PPPoE/PPPoA, Static IP Address, and Bridge Mode. Follow the instructions below for the type of connection you are using.
PPPoE/PPPoA Connections
If you selected the PPPoE/PPPoA connection type in the previous window, you will see the Setup Wizard window pictured here. Type in theUsername and Password used to identify and verify your account to the ISP. If you have been instructed to change the VPI number and VCI number, type in the new values. Select the Connection Type used for encapsulation specific to your service. Click Next when you are ready to continue to the Setup Completed window.

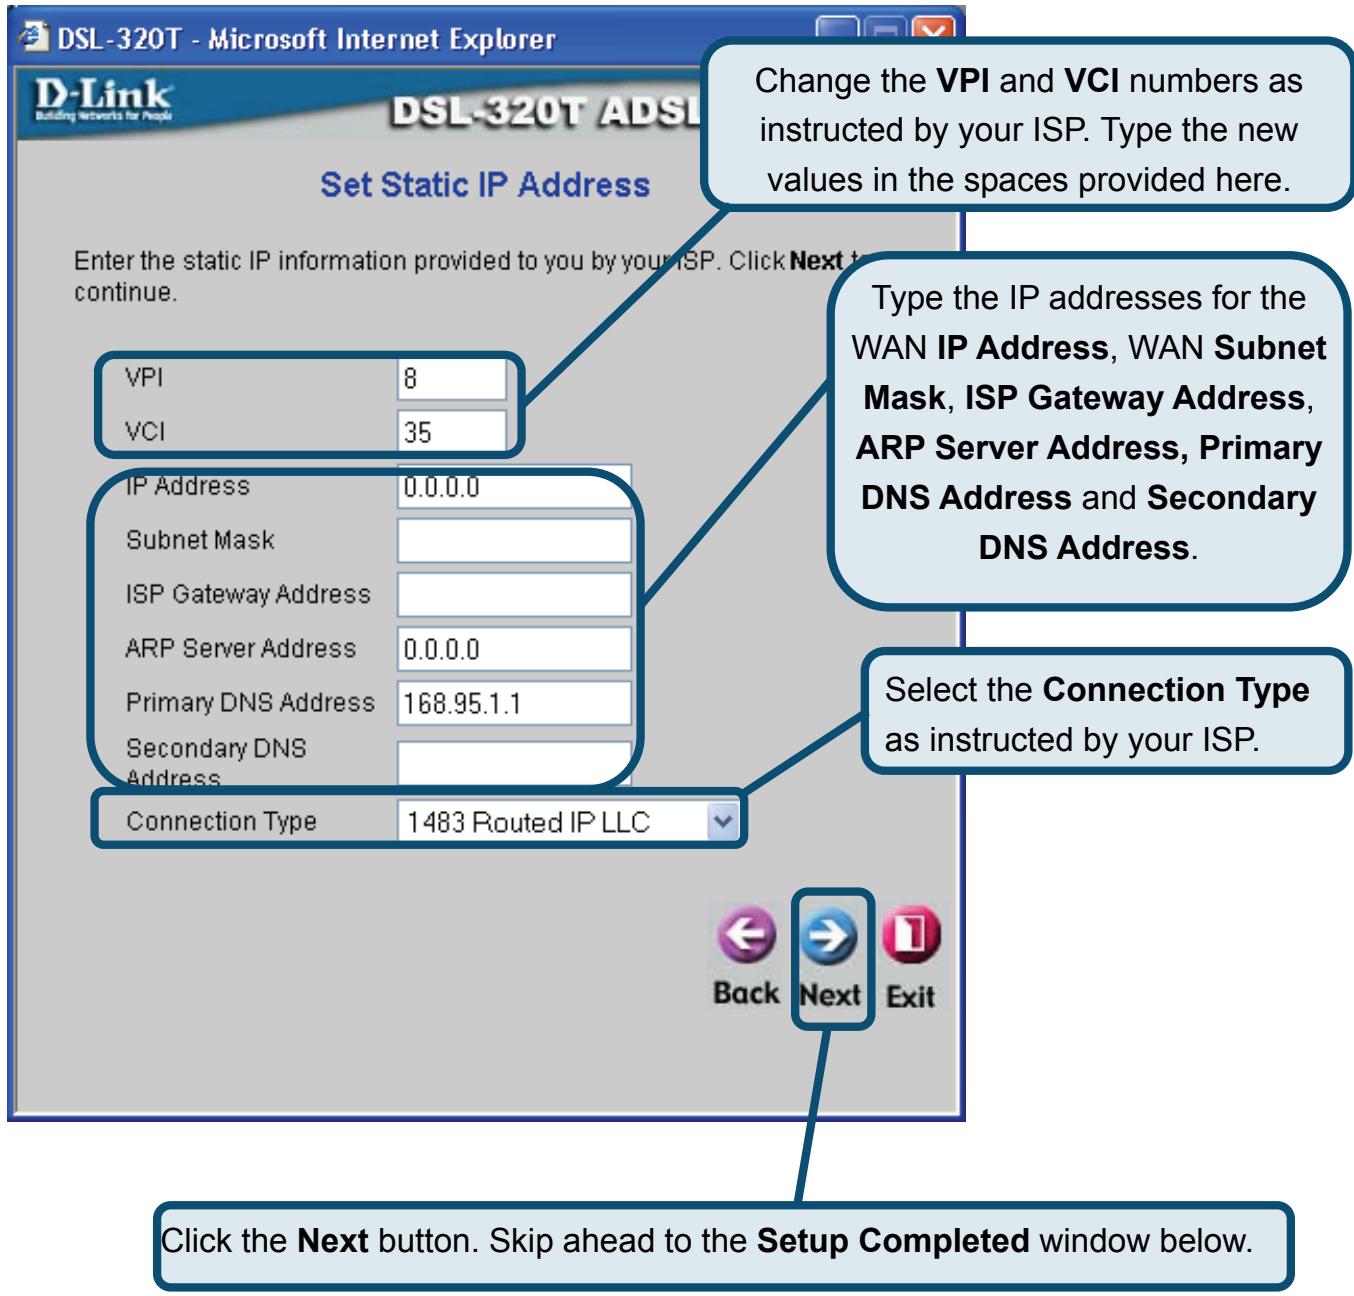
Static IP Address Connections
If you selected the Static IP Address connection type, change the WAN IP Address, Subnet Mask, ISP Gateway Address, Primary DNS (Server IP) Address and (if available) Secondary DNS (Server IP) Address as instructed by your ISP. Select the Connection Type used for encapsulation. If you have been instructed to change the VPI number and VCI number, type in the new values. Click Next when you are ready to continue to the Setup Completed window.
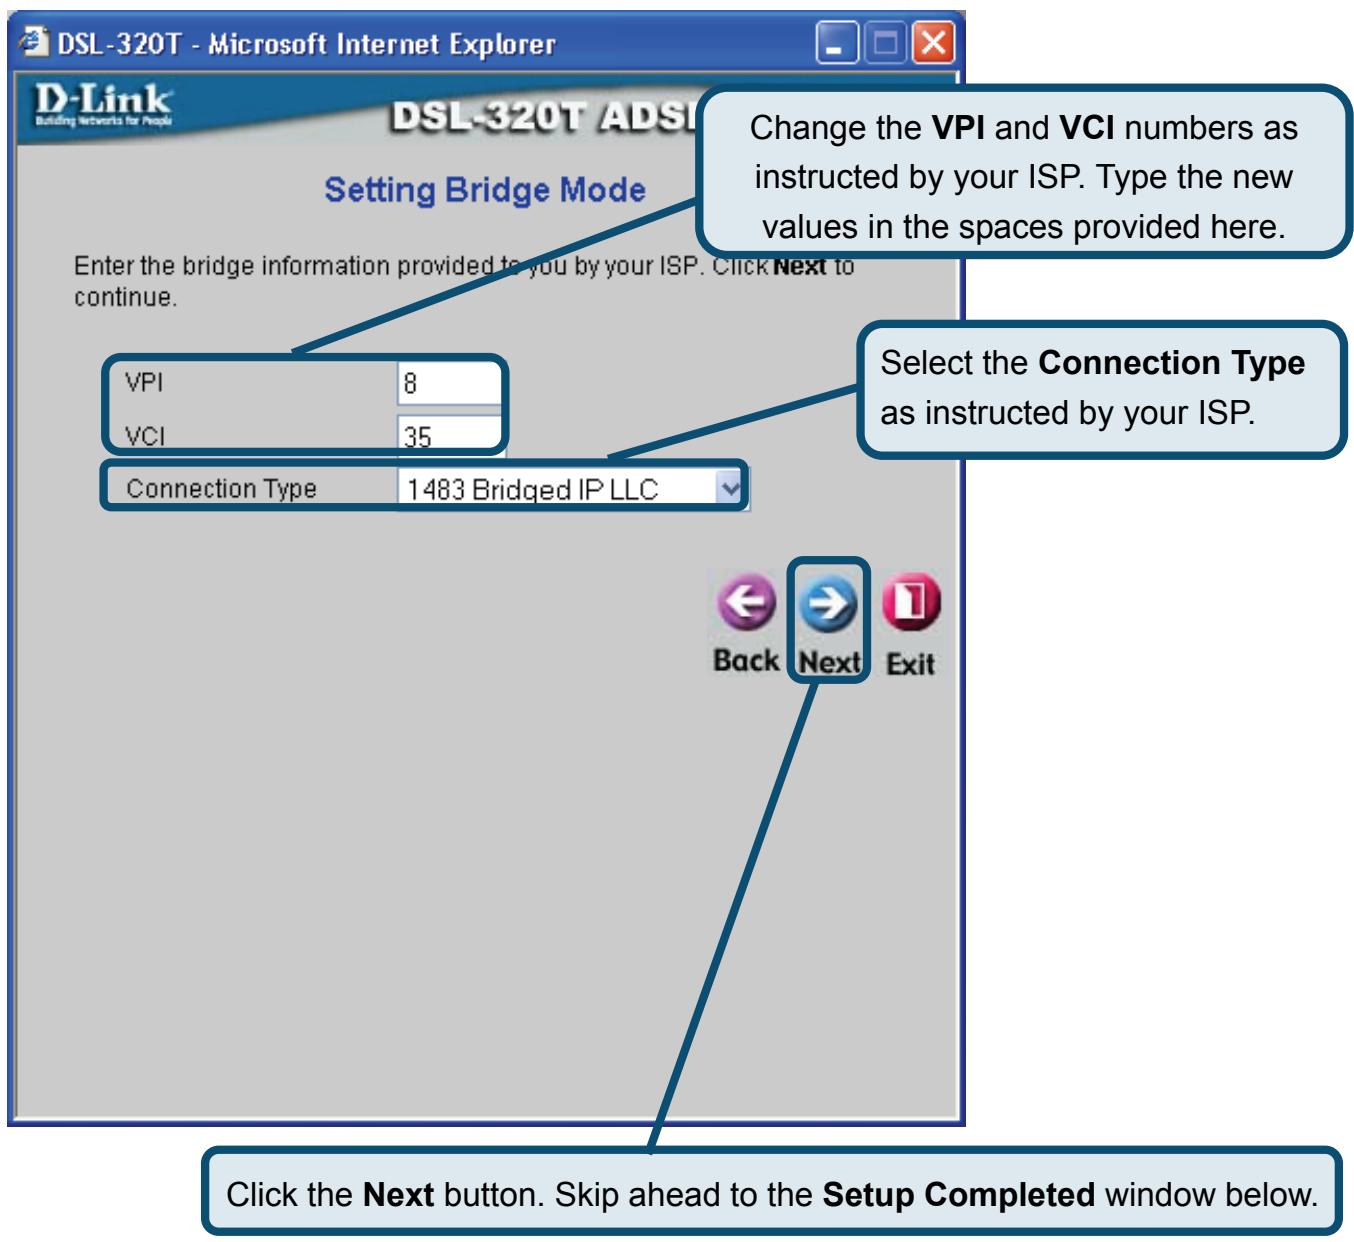
Bridge Connections
If you selected the Bridge connection type, select the Connection Type used for encapsulation. If you have been instructed to change the VPI number and VCI number, type in the new values. Click Next when you are ready to continue to the Setup Completed window.
Configuring the Modem (continued)
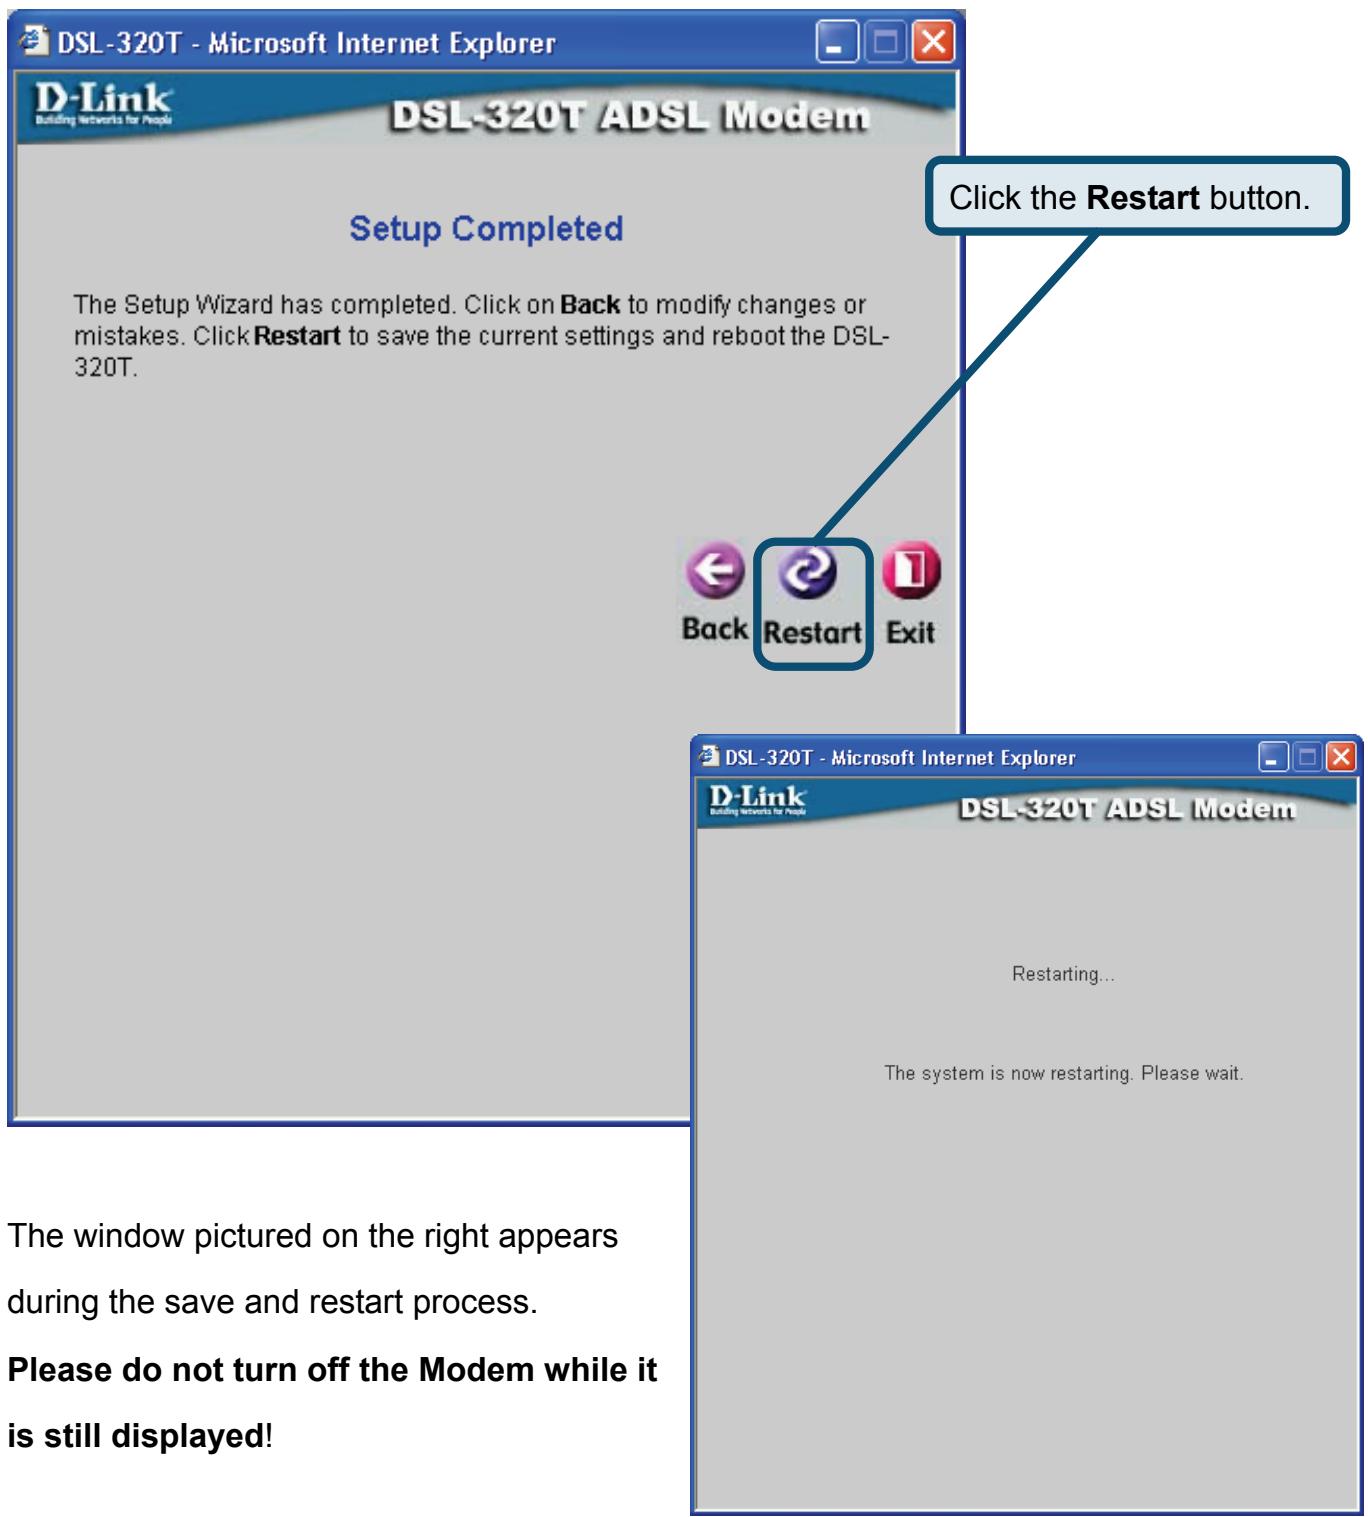
Setup Completed
All the settings for the ADSL connection are now completed. Click the Restart button to save the new settings and restart the Modem. It will take about two minutes to restart the Modem.
Appendix
For additional settings or information, refer to the Advanced, Tools, or Status tabs on the Web Management interface; or to the manual located on the CD-ROM.
Configuring IP Settings in Windows XP
Use the following steps to configure a computer running Windows XP to be a DHCP client.
- From the Start menu on your desktop, go to Control Panel.

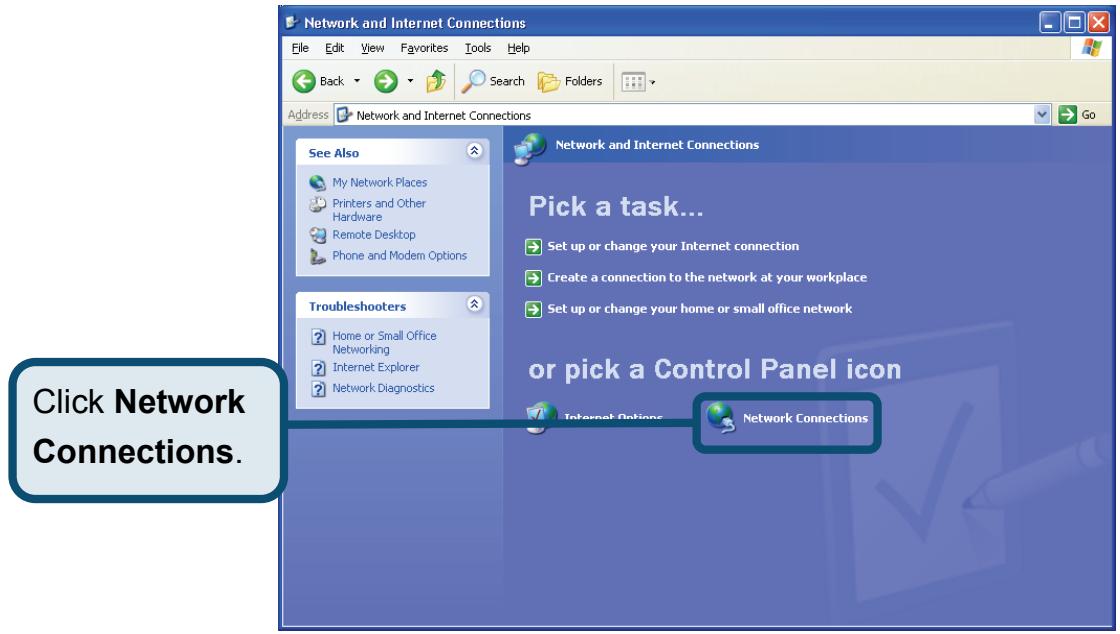
- In the Control Panel window, click Network and Internet Connections.

- In the Network and Internet Connections window, click Network Connections.
- In the Network Connections window, right-click on Local Area Connection, then click Properties.
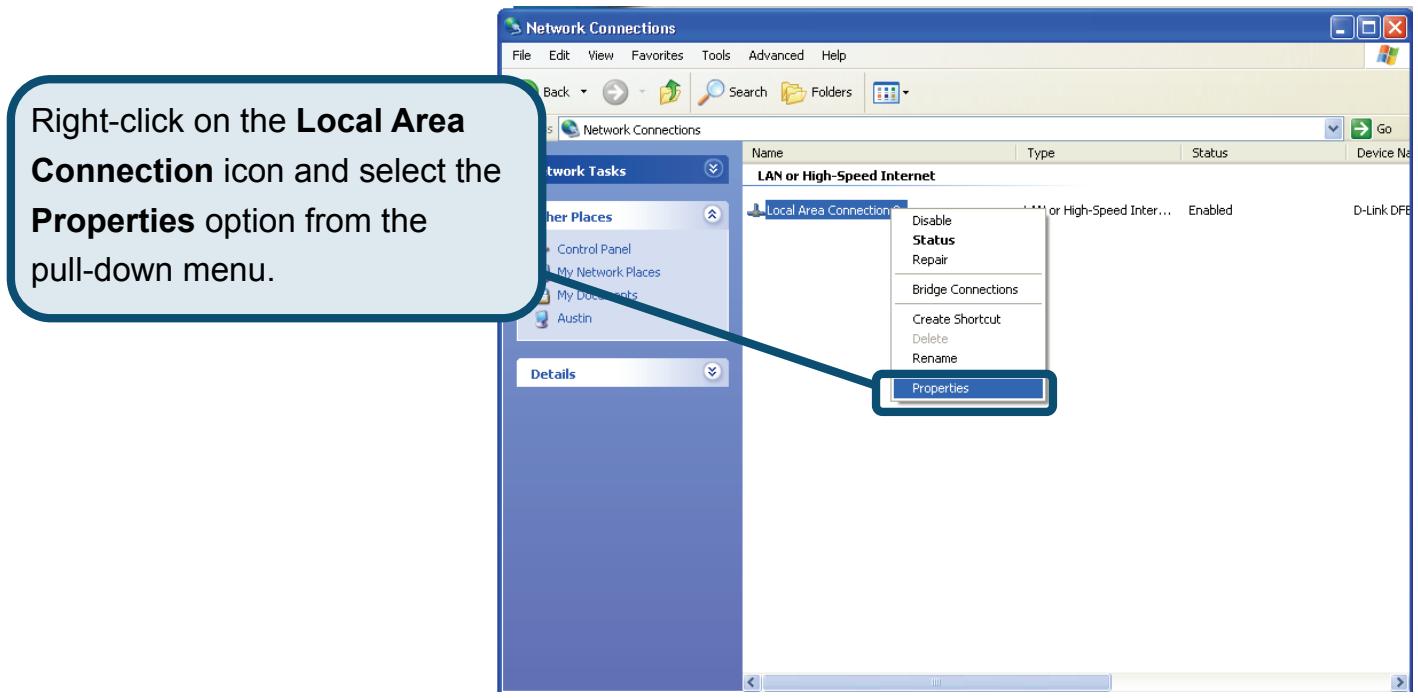
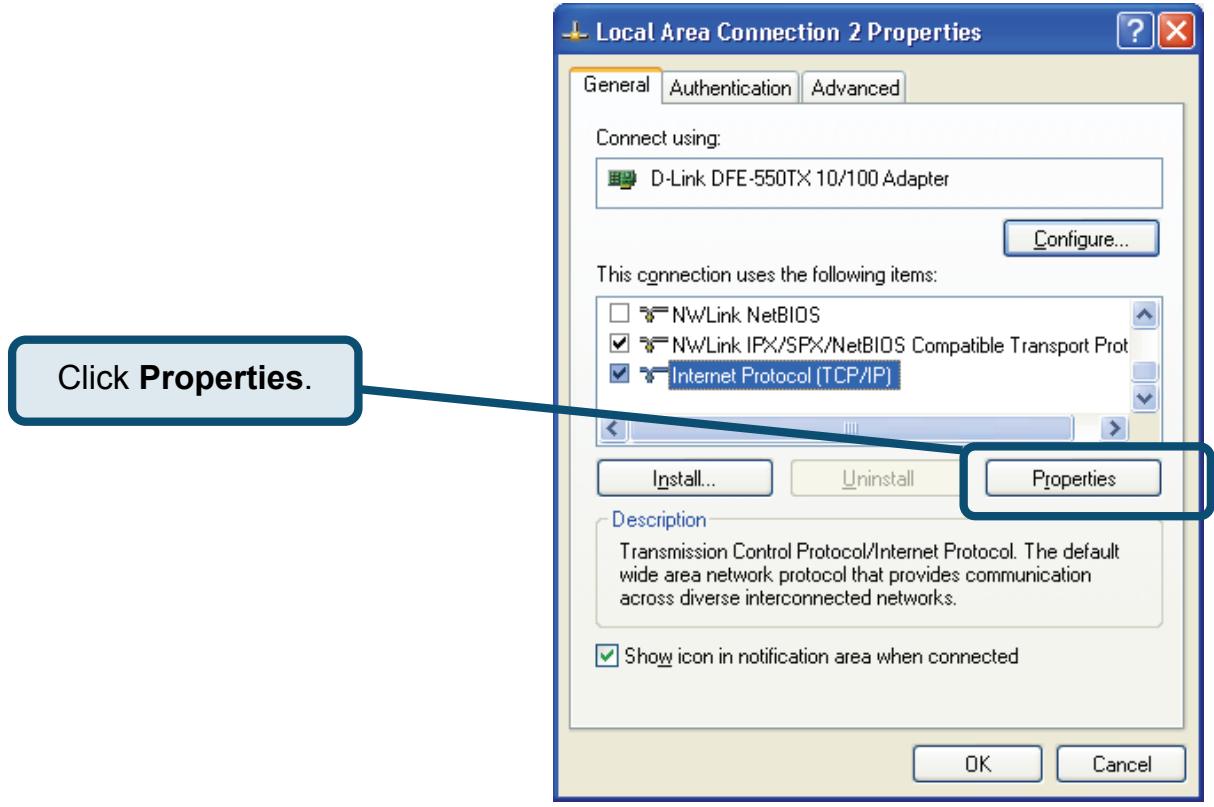
- In the General tab of the Local Area Connection Properties window, highlight Internet Protocol (TCP/IP) under "This connection uses the following items:" by clicking on it once. Click on the Properties button.
- Select "Obtain an IP address automatically" by clicking once in the circle. Click the OK button.
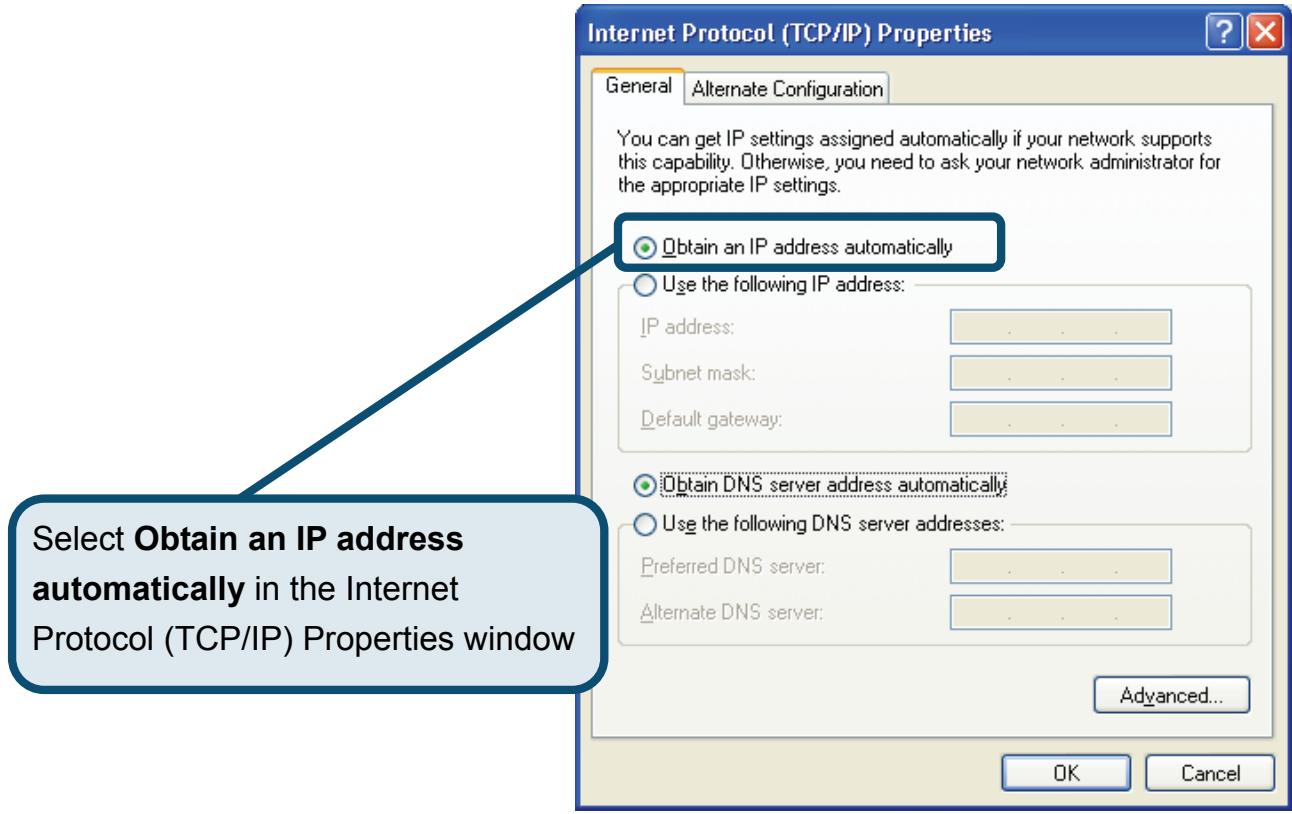
Your computer is now ready to use the Modem's DHCP server.
Technical Support
You can find software updates and user documentation on the D-Link websites.
D-Link provides free technical support for customers within Canada, the United Kingdom, and Ireland.
Customers can contact D-Link technical support through our websites, or by phone.
For Customers within
The United Kingdom & Ireland:
D-Link UK & Ireland Technical Support over the Telephone:
08456 12 0003 (United Kingdom)
+44 8456 12 0003 (Ireland)
Lines Open
8.00am-10.00pm Mon-Fri
10.00am-7.00pm Sat & Sun
D-Link UK & Ireland Technical Support over the Internet:
http://www.dlink.co.uk
ftp://ftp.dlink.co.uk
For Customers within Canada:
D-Link Canada Technical Support over the Telephone:
1-800-361-5265 (Canada)
Mon. to Fri. 7:30AM to 9:00PM EST
D-Link Canada Technical Support over the Internet:
http://support.dlink.ca
email: support@dlink.ca
Important Information
Important information regarding your internet subscription
Users who subscribe to limited or "pay as you use" broadband internet access.
In the WAN configuration settings, there is a parameter called Maximum idle timer. This parameter controls how many seconds of inactivity before dropping connection to the internet. The default setting is "0" which disables this functionality and the internet will be connected all the time. We suggest that you should change the Maximum idle timer to "300" (5 minutes) so that the device will drop the line after 5 minutes of inactivity and keep usage costs down.
Users who subscribe to unlimited broadband internet access.
You can just leave this parameter unchanged or enable Auto-reconnect to be always on line.
Technical Notes:
The Maximum idle timer is only relevant if your ISP is using PPPoE connection.
"ALWAYS-ON" - "MANUAL" - "CONNECT-On-DEMAND"
"IMMER AN" - "MANUELL" - "AUF ANFRAGE"
Assistance technique
e-mail : support@dlink.ca
D-Link
Guía
Este producto pueda configurarse con los siguientes navegadores: Internet Explorer 6 o superior, Netscape Navigator 6.2.3 o superior.

DSL-320T
Modem ADSL
Antes de empezar
Asegúrese de que tiene a mano la información y el equipo Neededos antes de起初ar la instalación.
Comprobación del contenido del paquete

Módem ADSL DSL-320T

CD-ROM (contiene Manual)

Cable Ethernet (CAT5 UTP)

Cable telefónica

Adaptador de alimentación

El uso de una fuente de alimentación condistincto voltaje puedeserperjudicial yanular la garantíade este producto.
Si falta algunos de"These componentes,contacte con su proveedor.

Conexión del MODem al ordinador
A. Conecte el adaptor de alimentación a la toma de alimentación que se enquirytra en el panel trasero del DSL-320T, y conecte el除外 extremo del adaptor de alimentación a una base de pared o regleta de alimentación. El LED de alimentación se encenderá para indicar que la operación se ha realizado correctamente.
B. Introduzca un extremo del cable Ethernet en un puerto Ethernet del panel trasero del DSL-320T, y el除外 extremo del cable en un adaptor Ethernet o puerto Ethernet disponible del ordinador.

Configuración del MODem
Para usar el navegador web con el objetivo de acceder a las páginas web que permiten configurar el módem; su ordinador ha de estar configurado para Obtener automatistically una direccion IP («Obtain an IP address automatically»); por tanto, ha deCambiar los parámetros de red IP del ordinador para que sea un cliente DHCP. Si usa Windows XP y no@sabe como Cambiar los parámetros de red, consulte el «Apéndice» y siga las instrucciones. En el Manual del usuario también encontrará instrucciones para Cambiar los parámetros IP en ordinadores conOthers sistemas operativos Windows.

Configuración del MODem (continuación)
Cuando hayaentrado en elsystema,verá la ficha Home con elmenú Setup Wizard.Lamayoría de usuario podrán usar el asistente de configuración para establishar la connexion ADSL al ISP. Para empezar a usar el asistente de configuración,haga click en el botón Run Wizard, en el centro de la páginaweb. Se做不到a un menú emergente, es el menú Setup Wizard.

El asistente de instalación le guiará en dos pasos principales:
1. Definir la connexion a internet.
2. Reinecer el moderation.
Cuando haya configurado la connexion a internet, necessitará introducir la información que le haya proportionsioned el ISP. Si no dispone de información sobre el tipo de connexion ni sobre los nombres VPI y VCI, noEARá completar la configuración.
La primera párgina del asistente de configuración muestra un resumen de los pasos necessarios para completar la configuración. Hagablick en el botón Next para iniciar la configuración.

Configuración del MODem (continuación)
El primer paso consiste en selectionar el tipo de connexion a internet uso para la interfaz WAN. Su ISP le habra proportionado esta informacion. Si no sabe qué tipo de connexion usa, salga del asistente de configuracion y contacte con su ISP para que le de informacion al respecto. La pagea del asistente de configuracion que aparecerá al hacerblick en el boton Next depende del tipo de connexion que haya selectionado. Los temas de connexion disponibles en el menu del asistente de configuracion son: PPPoE/PPPoA, Static IP Address (dirección IP estática) y Bridge Mode (modo bridge). Siga las instrucciones para建立起cer el tipo de connexion.

Conexiones PPPoE/PPPoA
Si en el menu anter ha selecctionado el tipo de connexion PPPoE/PPPoA, vera la pagina de la imagen seguiente. Escribe el nombre de usuario (Username) y la clave de acceso (Password) usados para identificar y verificar su cuenta con el ISP. Si se le ha indication que cambie el número VPI y el número VCI,onga los nuevos valeurs.Seleccione el tipo de connexion (Connection Type) uso para este service. Haga click en Next cuando esté lista para continuar y vaya a la pagina Setup Completed.

Conexiones con direccion IP estatica
Si ha selección el tipo de connexion con direccion IP estática, cambie los siguientes parámetros de la WAN: direccion IP (IP address), mácara de subred (Subnet Mask), direccion gateway del ISP (ISP Gateway Address), DNS primo (Primary DNS) y, si está disponible, direccion IP del servidor DNS secundario (Secondary DNS Server), como le haya indicado su ISP. Seleccion el tipo de connexion uso para la encapsulación. Si se le ha indicate que cambie el número VPI y el número VCI,onga losutures价值观a Haga cli en Next cuando esté lista para continuar y vaya a la page Setup Completed.

Conexiones bridge
Si ha的选择acion el tipo de connexion bridge, seleccione el tipo de connexion uso para la encapsulacion. Si se le ha indicatedo que cambie el numero VPI y el numero VCI,onga losutures价值观. Haga click en Next cuando esté lista para continuar y vaya a la pagea Setup Completed.

Configuración del MODem (continuación)
Configuración completada
Se ha completado la configuración de la connexion ADSL. Hagablick en el botón Restart para guardar los最新的 parámetros y reinocrar el módem. El módem tardará uno dos Minutes en reinciarse.

Apéndice
En las fichas Advanced, Tools o Status de la interfaz de gestion basada en web o en el manual del CD-ROM, encontrará más información.
Configuración de los parámetros IP en Windows XP
Siga"These pasos a fin de configurar un ordinador con Windows XP para que sea un cliente DHCP.
1. Aside el menu Start del escritorio, vaya a Control Panel.

2. En la ventana Control Panel, hagablick en Network and Internet Connections.

3. En la ventana Network and Internet Connections, hahablick en Network Connections.

4. En la ventana Network Connections, hagablick con el boton de la derecha en Local Area Connection, y bajo en Properties.

5. En la ficha General del menu Local Area Connection Properties, hagablick en Internet Protocol (TCP/IP), bajo «This connection uses the following items:», para seleccionarlo. Hagablick en el botón Properties.

6. Sezione «Obtain an IP address automatically», paraarlo, hagablick en el círculo. Hagablick en el botón OK.

El ordinador está lista para usar el servidor DHCP del MODem.
Asistencia Técnica
Puede encontrar el software másrecente ydocumentaciónparael usuario enelsitio web
D-Link . D-Link ofrece asistencia的技术ica gratuite para clientedes在内的 España durante el periodo de garantía del producto. Losclientes españoles peuvent ponerse en contacto con la asistencia技术ica de D-Link a工程技术 web o por téléphone.
Asistencia Técnica de D-Link por téléphone: 902 304545
de Lunes a Viernes desde las 9:00 hasta las 14:00 y de las 15:00 hasta las 18:00
Asistencia Técnica de D-Link a工程技术:
http://www.dlink.es
email: soporte@dlink.es
D-Link
Guida di Installazione rapida
Il presente prodotto può essere configurato con un qualunque browser Web aggiornato come Internet Explorer, versione 6 o superiore, e Netscape Navigator versione 6.2.3 o superiore.

DSL-320T
Modem ADSL
Prima di cominciare
Prima di procedere con l'installazione, verificare la disponibilità di tutte le informazioni e di tutti i componenti hardware necessari.
Contenuto del sacchetto

Modem ADSL DSL-320T

CD-ROM (con manuale)

Cavo Ethernet (CAT5 UTP)

Cavo Telefonico

Trasforma

L'utilizzo di un trasformatore con voltaggio differente danneggia il prodotto e promotte la validità della garanzia
Se uno dei componenti dovesse risultare mancante, contattare il rivenditore.

Concessione del modem al computer
A. Collegare il trasformatatore al relative connettore sul pannello posteriore del dispositivo DSL-320T e alla presa di corrente. Il LED Power si accende per indicare il correto funzionamento.
B. Collegare le due estremità del cavo Ethernet rispettivamente alla porta Ethernet (LAN) sul pannello posteriori del dispositivo DSL-320T e all'adattatore/porta Ethernet del computer.

Configurazione del Modem
Per accedere alle pagine web di configurazione del Modem mediante un browser, è necessario configurare il computer in modo che ottenga automaticamente un indirizzo IP. In altre parole è necessario configurare il computer come client DHCP, selezionando l'opzione “Ottieni automaticamente un indirizzo IP”. La procedura per modificare le impostazioni di rete in ambiente Windows XP è descritta nelle’Appendice del presente manuale rapido d’s installation. Per altri sistemi operativi Windows, consultare il manuale utente.

Configurazione del modem (continua)
Dopo il login, il sistema visualizza la sched a Home del programma Setup Wizard. In molti casi è possibile utilizzare il programma Setup Wizard per instaurare la connessione ADSL con il proprio ADSL Internet Service Provider (ISP). Per avviare il programma Setup Wizard, cliccare sul pulsante Run Wizard al centro della pagina web. Ilsystema visualizza il menu del programmato Setup Wizard.

La procedura di configurazione del programma preveDE due passi:
1. Impostazione della connessione
2. Riavvio
Per configurare la connessione a Internet è necessario richiedere all'ISP alcuni dati tra cui il tipo di connessione e altre informazioni correlate e i valori dei parametri VPI e VCI. In mancanza di questeindicazioni non è possibile portare a termine la procedura di configurazione.
La prima网首页 del programma Setup Wizard elanca i passi da effettuare per completare la configurazione. Cliccare sul pulsante Next per cominciare la configurazione.

Configurazione del modem (continua)
IL primo passo consiste nel selezionare il tipo di connessione Internet per l'interfaccia WAN. Questo dato deve essere fornito dall'ISP. Se non si dispone di但这a informazione, uscire dal programma Setup Wizard e contattare l'ISP. Cliccando sul pulsante Next, il programma Setup wizard visualizza la pagina successiva, in funzione del tipo di connessione selezionata. I tipi di connessione selezionabili dal menu del programma Setup Wizard sono PPPoE/PPPoA, Static IP Address e Bridge Mode. Seguire le istruzioni relative al tipo di connessione da utilizzato.

Connessioni PPPoE/PPPoA
Se nel precedente menu è stata selezionata una connessione di tipo PPPoE/PPPoA, il programma Setup Wizard visualizza la pagina illustrata nella figura. Nei campi Nombre e Password inserire il nome utente e la password utilizzati per l'identificazione e la verifica dell'accaput fornito dall'ISP. Se richiesto, modificare i parametri VPI e VCI, digitando i valori corretti. Nel Campo Connection Type inserire il tipo di connessione specifico per il servizio. Cliccare su Next per accedere alla pagina Setup Completed.

Configurazione del modem (continua)
Connectioni Static IP Address
Se nel precedente menu è stata selezionata una connessione di tipo Static IP Address, modificare i campi IP Address, Subnet Mask, ISP Gateway Address, Primary DNS (Server IP) Address e (se disponibile ) Secondary DNS (Server IP), utilizzando i valori forniti dall'ISP per la connessione alla WAN. Utilizzato il Campo Connection Type per selezionare il tipo di connessione per l'incapsulamento. Se richiesto, modificare i parametri VPI e VCI, digitando i valori corretti. Cliccare su Next per accedere alla pagina Setup Completed.

Connessioni Bridge
Se nel precedente menu è stata selezionata una connessione di tipo Bridge, utilizzato il Campo Connection Type per selezionare il tipo di connessione per l'incapsulamento. Se richiesto, modificare i parametri VPI e VCI, digitando i valori corretti. Cliccare su Next per accedere alla pagina Setup Completed.

Configurazione del modem (continua)
Menu Setup Completed
Tutti i parametri relativi alla connessione ADSL sono impostati. Cliccare sul pulsante Restart per salvare le impostazioni e riavviare il modem, operazione che richiedera alcuni minuti.

Appendice
Maggiori informazioni o ulteriori parametri di configurazione sono disponibili nelle schede Advanced, Tools e Status dell'interfaccia di gestione basata sul Web o nel manuale utente contentuto nel CD-ROM.
Configurazione delle impostazioni IP in ambiente Windows XP
Per configurare come client DHCP un computer dotato di sistema operativo Windows XP, la procedura è la seguente.
1. Dal menu Start sul desktop, selezionare Pannello di Controllo.

2. Nella finestra Pannello di Controllociescare su Rete e Connessioni Internet.

3. Nella finestra Rete e Connessioni Internet cliccare su Connessioni di rete.

4. Nella finestra Connessioni di rete, clickcare su Connessioni alla rete Locale col tasto destro del mouse. Clickcare su Proprietà.

5. Nella scheda Generale del menu Proprietà Connessioni alla rete Locale, evidenziare con un cliç la voce Protocollo Internet (TCP/IP) nel riquadro “La connessione utilizza i componenti seguenti”: Cliccare sul pulsante Proprietà.

6. Selezionare l'opzione "Ottieni automaticamente un indirizzo IP". Cliccare sul pulsante OK.

Il computer è pronto per utilizzato il server DHCP del Modem.
Supporto tecnico
Gli ultimi aggiornamenti e la documentazione sono disponibili sul除去 D-Link.
Supporto tecnico per i clienti residenti in Italia
D-Link Mediterraneo S.r.L.
Via N. Bonnet 6/B 20154 Milano
Supporto Tecnico dal lunedi al venerdi dalle ore
9.00 alle ore 19.00 con orario continuato
Telefono: 02-39607160
URL : http://www.dlink.it/supporto.html
Email: tech@dlink.it
Antes de empezar
Asegúrese de que tiene a mano la información y el equipo Neededos antes de起初ar la instalación.Comprobación del contenido del paquete
 Módem ADSL DSL-320T  CD-ROM (contiene Manual)  Cable Ethernet (CAT5 UTP)  Cable telefónica  Adaptador de alimentación  El uso de una fuente de alimentación condistincto voltaje puedeserperjudicial yanular la garantíade este producto. Si falta algunos de"These componentes,contacte con su proveedor. Conexión del MODem al ordinador
A. Conecte el adaptor de alimentación a la toma de alimentación que se enquirytra en el panel trasero del DSL-320T, y conecte el除外 extremo del adaptor de alimentación a una base de pared o regleta de alimentación. El LED de alimentación se encenderá para indicar que la operación se ha realizado correctamente. B. Introduzca un extremo del cable Ethernet en un puerto Ethernet del panel trasero del DSL-320T, y el除外 extremo del cable en un adaptor Ethernet o puerto Ethernet disponible del ordinador. Configuración del MODem
Para usar el navegador web con el objetivo de acceder a las páginas web que permiten configurar el módem; su ordinador ha de estar configurado para Obtener automatistically una direccion IP («Obtain an IP address automatically»); por tanto, ha deCambiar los parámetros de red IP del ordinador para que sea un cliente DHCP. Si usa Windows XP y no@sabe como Cambiar los parámetros de red, consulte el «Apéndice» y siga las instrucciones. En el Manual del usuario también encontrará instrucciones para Cambiar los parámetros IP en ordinadores conOthers sistemas operativos Windows. Configuración del MODem (continuación)
Cuando hayaentrado en elsystema,verá la ficha Home con elmenú Setup Wizard.Lamayoría de usuario podrán usar el asistente de configuración para establishar la connexion ADSL al ISP. Para empezar a usar el asistente de configuración,haga click en el botón Run Wizard, en el centro de la páginaweb. Se做不到a un menú emergente, es el menú Setup Wizard.  El asistente de instalación le guiará en dos pasos principales: 1. Definir la connexion a internet. 2. Reinecer el moderation. Cuando haya configurado la connexion a internet, necessitará introducir la información que le haya proportionsioned el ISP. Si no dispone de información sobre el tipo de connexion ni sobre los nombres VPI y VCI, noEARá completar la configuración. La primera párgina del asistente de configuración muestra un resumen de los pasos necessarios para completar la configuración. Hagablick en el botón Next para iniciar la configuración. Configuración del MODem (continuación)
El primer paso consiste en selectionar el tipo de connexion a internet uso para la interfaz WAN. Su ISP le habra proportionado esta informacion. Si no sabe qué tipo de connexion usa, salga del asistente de configuracion y contacte con su ISP para que le de informacion al respecto. La pagea del asistente de configuracion que aparecerá al hacerblick en el boton Next depende del tipo de connexion que haya selectionado. Los temas de connexion disponibles en el menu del asistente de configuracion son: PPPoE/PPPoA, Static IP Address (dirección IP estática) y Bridge Mode (modo bridge). Siga las instrucciones para建立起cer el tipo de connexion. Conexiones PPPoE/PPPoA
Si en el menu anter ha selecctionado el tipo de connexion PPPoE/PPPoA, vera la pagina de la imagen seguiente. Escribe el nombre de usuario (Username) y la clave de acceso (Password) usados para identificar y verificar su cuenta con el ISP. Si se le ha indication que cambie el número VPI y el número VCI,onga los nuevos valeurs.Seleccione el tipo de connexion (Connection Type) uso para este service. Haga click en Next cuando esté lista para continuar y vaya a la pagina Setup Completed. Conexiones con direccion IP estatica
Si ha selección el tipo de connexion con direccion IP estática, cambie los siguientes parámetros de la WAN: direccion IP (IP address), mácara de subred (Subnet Mask), direccion gateway del ISP (ISP Gateway Address), DNS primo (Primary DNS) y, si está disponible, direccion IP del servidor DNS secundario (Secondary DNS Server), como le haya indicado su ISP. Seleccion el tipo de connexion uso para la encapsulación. Si se le ha indicate que cambie el número VPI y el número VCI,onga losutures价值观a Haga cli en Next cuando esté lista para continuar y vaya a la page Setup Completed. Conexiones bridge
Si ha的选择acion el tipo de connexion bridge, seleccione el tipo de connexion uso para la encapsulacion. Si se le ha indicatedo que cambie el numero VPI y el numero VCI,onga losutures价值观. Haga click en Next cuando esté lista para continuar y vaya a la pagea Setup Completed. Configuración del MODem (continuación)
Configuración completada
Se ha completado la configuración de la connexion ADSL. Hagablick en el botón Restart para guardar los最新的 parámetros y reinocrar el módem. El módem tardará uno dos Minutes en reinciarse. Apéndice
En las fichas Advanced, Tools o Status de la interfaz de gestion basada en web o en el manual del CD-ROM, encontrará más información.Configuración de los parámetros IP en Windows XP
Siga"These pasos a fin de configurar un ordinador con Windows XP para que sea un cliente DHCP. 1. Aside el menu Start del escritorio, vaya a Control Panel.  2. En la ventana Control Panel, hagablick en Network and Internet Connections.  3. En la ventana Network and Internet Connections, hahablick en Network Connections.  4. En la ventana Network Connections, hagablick con el boton de la derecha en Local Area Connection, y bajo en Properties.  5. En la ficha General del menu Local Area Connection Properties, hagablick en Internet Protocol (TCP/IP), bajo «This connection uses the following items:», para seleccionarlo. Hagablick en el botón Properties.  6. Sezione «Obtain an IP address automatically», paraarlo, hagablick en el círculo. Hagablick en el botón OK.  El ordinador está lista para usar el servidor DHCP del MODem.Asistencia Técnica
Puede encontrar el software másrecente ydocumentaciónparael usuario enelsitio web D-Link . D-Link ofrece asistencia的技术ica gratuite para clientedes在内的 España durante el periodo de garantía del producto. Losclientes españoles peuvent ponerse en contacto con la asistencia技术ica de D-Link a工程技术 web o por téléphone. Asistencia Técnica de D-Link por téléphone: 902 304545 de Lunes a Viernes desde las 9:00 hasta las 14:00 y de las 15:00 hasta las 18:00 Asistencia Técnica de D-Link a工程技术: http://www.dlink.es email: soporte@dlink.esD-Link
Guida di Installazione rapida
Il presente prodotto può essere configurato con un qualunque browser Web aggiornato come Internet Explorer, versione 6 o superiore, e Netscape Navigator versione 6.2.3 o superiore.  DSL-320T Modem ADSLPrima di cominciare
Prima di procedere con l'installazione, verificare la disponibilità di tutte le informazioni e di tutti i componenti hardware necessari.Contenuto del sacchetto
 Modem ADSL DSL-320T  CD-ROM (con manuale)  Cavo Ethernet (CAT5 UTP)  Cavo Telefonico  Trasforma  L'utilizzo di un trasformatore con voltaggio differente danneggia il prodotto e promotte la validità della garanzia Se uno dei componenti dovesse risultare mancante, contattare il rivenditore. Concessione del modem al computer
A. Collegare il trasformatatore al relative connettore sul pannello posteriore del dispositivo DSL-320T e alla presa di corrente. Il LED Power si accende per indicare il correto funzionamento. B. Collegare le due estremità del cavo Ethernet rispettivamente alla porta Ethernet (LAN) sul pannello posteriori del dispositivo DSL-320T e all'adattatore/porta Ethernet del computer. Configurazione del Modem
Per accedere alle pagine web di configurazione del Modem mediante un browser, è necessario configurare il computer in modo che ottenga automaticamente un indirizzo IP. In altre parole è necessario configurare il computer come client DHCP, selezionando l'opzione “Ottieni automaticamente un indirizzo IP”. La procedura per modificare le impostazioni di rete in ambiente Windows XP è descritta nelle’Appendice del presente manuale rapido d’s installation. Per altri sistemi operativi Windows, consultare il manuale utente. Configurazione del modem (continua)
Dopo il login, il sistema visualizza la sched a Home del programma Setup Wizard. In molti casi è possibile utilizzare il programma Setup Wizard per instaurare la connessione ADSL con il proprio ADSL Internet Service Provider (ISP). Per avviare il programma Setup Wizard, cliccare sul pulsante Run Wizard al centro della pagina web. Ilsystema visualizza il menu del programmato Setup Wizard.  La procedura di configurazione del programma preveDE due passi: 1. Impostazione della connessione 2. Riavvio Per configurare la connessione a Internet è necessario richiedere all'ISP alcuni dati tra cui il tipo di connessione e altre informazioni correlate e i valori dei parametri VPI e VCI. In mancanza di questeindicazioni non è possibile portare a termine la procedura di configurazione. La prima网首页 del programma Setup Wizard elanca i passi da effettuare per completare la configurazione. Cliccare sul pulsante Next per cominciare la configurazione. Configurazione del modem (continua)
IL primo passo consiste nel selezionare il tipo di connessione Internet per l'interfaccia WAN. Questo dato deve essere fornito dall'ISP. Se non si dispone di但这a informazione, uscire dal programma Setup Wizard e contattare l'ISP. Cliccando sul pulsante Next, il programma Setup wizard visualizza la pagina successiva, in funzione del tipo di connessione selezionata. I tipi di connessione selezionabili dal menu del programma Setup Wizard sono PPPoE/PPPoA, Static IP Address e Bridge Mode. Seguire le istruzioni relative al tipo di connessione da utilizzato. Connessioni PPPoE/PPPoA
Se nel precedente menu è stata selezionata una connessione di tipo PPPoE/PPPoA, il programma Setup Wizard visualizza la pagina illustrata nella figura. Nei campi Nombre e Password inserire il nome utente e la password utilizzati per l'identificazione e la verifica dell'accaput fornito dall'ISP. Se richiesto, modificare i parametri VPI e VCI, digitando i valori corretti. Nel Campo Connection Type inserire il tipo di connessione specifico per il servizio. Cliccare su Next per accedere alla pagina Setup Completed. Configurazione del modem (continua)
Connectioni Static IP Address
Se nel precedente menu è stata selezionata una connessione di tipo Static IP Address, modificare i campi IP Address, Subnet Mask, ISP Gateway Address, Primary DNS (Server IP) Address e (se disponibile ) Secondary DNS (Server IP), utilizzando i valori forniti dall'ISP per la connessione alla WAN. Utilizzato il Campo Connection Type per selezionare il tipo di connessione per l'incapsulamento. Se richiesto, modificare i parametri VPI e VCI, digitando i valori corretti. Cliccare su Next per accedere alla pagina Setup Completed. Connessioni Bridge
Se nel precedente menu è stata selezionata una connessione di tipo Bridge, utilizzato il Campo Connection Type per selezionare il tipo di connessione per l'incapsulamento. Se richiesto, modificare i parametri VPI e VCI, digitando i valori corretti. Cliccare su Next per accedere alla pagina Setup Completed. Configurazione del modem (continua)
Menu Setup Completed
Tutti i parametri relativi alla connessione ADSL sono impostati. Cliccare sul pulsante Restart per salvare le impostazioni e riavviare il modem, operazione che richiedera alcuni minuti. Appendice
Maggiori informazioni o ulteriori parametri di configurazione sono disponibili nelle schede Advanced, Tools e Status dell'interfaccia di gestione basata sul Web o nel manuale utente contentuto nel CD-ROM.Configurazione delle impostazioni IP in ambiente Windows XP
Per configurare come client DHCP un computer dotato di sistema operativo Windows XP, la procedura è la seguente. 1. Dal menu Start sul desktop, selezionare Pannello di Controllo.  2. Nella finestra Pannello di Controllociescare su Rete e Connessioni Internet.  3. Nella finestra Rete e Connessioni Internet cliccare su Connessioni di rete.  4. Nella finestra Connessioni di rete, clickcare su Connessioni alla rete Locale col tasto destro del mouse. Clickcare su Proprietà.  5. Nella scheda Generale del menu Proprietà Connessioni alla rete Locale, evidenziare con un cliç la voce Protocollo Internet (TCP/IP) nel riquadro “La connessione utilizza i componenti seguenti”: Cliccare sul pulsante Proprietà.  6. Selezionare l'opzione "Ottieni automaticamente un indirizzo IP". Cliccare sul pulsante OK.  Il computer è pronto per utilizzato il server DHCP del Modem.Supporto tecnico
Gli ultimi aggiornamenti e la documentazione sono disponibili sul除去 D-Link. Supporto tecnico per i clienti residenti in Italia D-Link Mediterraneo S.r.L. Via N. Bonnet 6/B 20154 Milano Supporto Tecnico dal lunedi al venerdi dalle ore 9.00 alle ore 19.00 con orario continuato Telefono: 02-39607160 URL : http://www.dlink.it/supporto.html Email: tech@dlink.it- Check Your Package Contents
- Connecting the Modem to Your Computer
- Configuring the Modem
- Configuring the Modem (continued)
- PPPoE/PPPoA Connections
- Static IP Address Connections
- Bridge Connections
- Setup Completed
- Appendix
- Configuring IP Settings in Windows XP
- Technical Support
- Important Information
- Important information regarding your internet subscription
- Assistance technique
- D-Link
- Guía
- Comprobación del contenido del paquete
- Conexión del MODem al ordinador
- Configuración del MODem
- Configuración del MODem (continuación)
- Conexiones PPPoE/PPPoA
- Conexiones con direccion IP estatica
- Conexiones bridge
- Configuración completada
- Apéndice
- Configuración de los parámetros IP en Windows XP
- Asistencia Técnica
- Guida di Installazione rapida
- Prima di cominciare
- Contenuto del sacchetto
- Concessione del modem al computer
- Configurazione del Modem
- Configurazione del modem (continua)
- Connessioni PPPoE/PPPoA
- Connectioni Static IP Address
- Connessioni Bridge
- Menu Setup Completed
- Appendice
- Configurazione delle impostazioni IP in ambiente Windows XP
- Supporto tecnico
Brand : D-LINK
Model : DSL-320T
Category : ADSL Modem