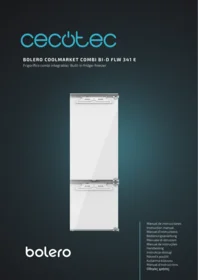
Bolero Coolmarket Combi Bi D Flw 341 E - Refrigerator CECOTEC - Free user manual and instructions
Find the device manual for free Bolero Coolmarket Combi Bi D Flw 341 E CECOTEC in PDF.


| Product type | Combined refrigerator with freezer |
| Total net capacity | Approximately 341 liters |
| Energy class | E (according to EU standards) |
| Dimensions (H x W x D) | 185 x 60 x 66 cm |
| Net weight | 68 kg |
| Power supply | 220-240 V ~ 50 Hz |
| Cooling function | Ventilated cooling (No Frost) |
| Temperature control | Electronic with LED display |
| Number of doors | 2 doors (refrigerator and freezer) |
| Refrigerant gas type | R600a |
| Noise level | 40 dB(A) |
| Defrost | Automatic for refrigerator, manual for freezer |
| Super Cool function | Yes |
| Super Freeze function | Yes |
| Interior lighting | LED |
| Casters | Yes, at the back |
| Maintenance and cleaning | Clean with a soft cloth and warm soapy water |
| Spare parts and repairability | Available from Cecotec after-sales service, repairability index 7.5/10 |
| Warranty | 2 years |
Frequently Asked Questions - Bolero Coolmarket Combi Bi D Flw 341 E CECOTEC
User questions about Bolero Coolmarket Combi Bi D Flw 341 E CECOTEC
0 question about this device. Answer the ones you know or ask your own.
Ask a new question about this device
Download the instructions for your Refrigerator in PDF format for free! Find your manual Bolero Coolmarket Combi Bi D Flw 341 E - CECOTEC and take your electronic device back in hand. On this page are published all the documents necessary for the use of your device. Bolero Coolmarket Combi Bi D Flw 341 E by CECOTEC.
USER MANUAL Bolero Coolmarket Combi Bi D Flw 341 E CECOTEC
bolero
Safety instructions 11
-
Parts and components 91
-
Before use 91
-
Installation 92
-
Operation 95
-
Instructions on food storage 97
-
Cleaning and maintenance 99
-
Troubleshooting 99
-
Technical specifications 102
-
Disposal of old electrical and electronic appliances 103
-
Technical support and warranty 103
-
Copyright 104
-
Simplified Declaration of Conformity 104
SOMMAIRE
EU01_101745 Bolero CoolMarket Combi BI-D FLW 341 E
EN • The coding in this manual is generic and applies to all code variants of the appliance.
Read these instructions thoroughly before using the appliance. Keep this instruction manual for future reference or new users.
- It is important to make sure all users are familiar with the operation and safety features of the appliance to prevent faults and unnecessary accidents.
- Make sure that the mains voltage in your house matches the voltage stated on the rating label of the appliance.
- This appliance can be used by children aged 8 and above and people with reduced physical, sensory, or mental capabilities or lack of experience and knowledge, as long as they have been given supervision or instruction concerning the use of the appliance in a safe way and understand the hazards involved. Children must not play with the device. The cleaning and maintenance of the appliance should not be carried out by children without supervision.
- Keep the packaging material away from children, as there is a risk of suffocation.
WARNING: if the interior light is damaged, contact the official Cecotec Technical Support Service. Do not try to repair it on your own.
- WARNING: when positioning the appliance, make sure the power cable does not get trapped or damaged. A crushed or
damaged plug may heat up and cause a fire.
- Make sure the appliance plug is accessible after installation.
- Do not place food directly against the air outlet on the interior of the appliance.
- Keep the ventilation openings clear from obstructions.
- Do not place carbonated or fizzy drinks in the freezer compartment, as this creates pressure in the container, which could explode and damage the appliance.
- WARNING: do not use mechanical appliances or other means to accelerate the defrosting process other than those recommended by Cecotec.
- WARNING: do not damage the refrigeration circuit.
- If the cable is damaged, it must be replaced by the manufacturer, the supplier, or qualified personnel to avoid hazards.
- WARNING: do not use electrical appliances inside the refrigerator.
- We recommend you check the power cable regularly to detect any sign of possible damage. Do not use the appliance if the cable is damaged.
- To avoid injuries or death caused by electric shock, do not use the appliance with your hands wet or over a wet surface.
- You should never use this refrigerator with an extension lead or a multi-socket adaptor. Make sure the appliance is plugged in directly to a power supply.
- When positioning the appliance, make sure there is enough free space at the rear, as it is the main heat outlet. This will allow for adequate ventilation.
- Do not place hot food or drinks in the refrigerator, allow them to cool down to room temperature beforehand.
-
Do not place any other appliance on top of the refrigerator and do not get it wet.
-
Do not store explosive substances such as aerosols or flammable propellants in this appliance.
- This appliance is designed for domestic use only and is not intended for bars, restaurants, farmhouses, hotels, motels, and offices.
- WARNING: to avoid any risk due to the instability of the refrigerator, you must install it according to the instructions.
- This appliance has a built-in earthed plug. Make sure the power supply in your house is properly earthed.
- Wait 5 minutes after a power failure before turning the appliance back on. Otherwise, the compressor may get damaged.
- This appliance is not intended to be operated by means of an external timer or separate remote-control system.
- Always handle the appliance carefully to avoid any damage on it.
- Frozen food can cause frostbites if consumed right after removing it from the freezer compartment.
- Do not remove or touch items in the freezer compartment with your hands wet, as it could cause skin abrasions or frost/freeze burns.
- Never use the base, drawers, or door as support.
- Do not overload the door shelves or place too much food on the drawers to prevent items from falling off and damaging the appliance.
- WARNING: do not attach multi-socket adaptors or multiple power supplies to the rear part of the appliance.
- To avoid food contamination, please follow the instructions below:
- Opening the door for a long period of time may cause a significant increase in temperature in the appliance compartments.
- Regularly clean the surfaces that come into contact with food and with the accessible draining systems.
o Clean the water tank if it has not been used for 48 hours. - Store raw meat and fish in proper containers in the freezer, so they do not come into contact with or leak on other food.
- The two-star compartments are suitable for storing pre-frozen food, storing or making ice cream, and making ice cubes.
- Compartments with one, two, or three stars are not suitable for freezing fresh food.
-
If the appliance is not going to be used or be empty for a long period of time, switch it off, allow it to defrost, clean it, dry it, and leave the doors open to prevent interior mould growth.
-
Before carrying out any maintenance and cleaning task, turn off the appliance and unplug it.
- It is advisable to wait for at least four hours before connecting the appliance to allow oil to flow through the compressor.
- Air must flow around the appliance. Lack of air leads to overheating. To achieve good ventilation, follow the installation instructions.
- Whenever possible, the rear part of the appliance should not be too close to the wall to prevent it from touching or reaching the hot parts (the compressor and the condenser). To avoid risk of fire, follow the installation instructions.
- Make sure that the mains plug is accessible after installation of the appliance.
- All electrical work required to maintain this appliance must be carried out by a qualified electrician.
- Use the appliance only for the purposes described in this manual. Incorrect or improper use can damage the appliance and be dangerous for the user.
Temperature range
- The appliance temperature range information can be found on its marking. It indicates the optimum room temperature for proper operation of the appliance.
| Climate range | Optimum room temperature |
| SN | From +10 °C to +32 °C |
| N | From +16 °C to +32 °C |
| ST | From +16 °C to +38 °C |
| T | From +16 °C to +43 °C |
Note:
- Taking into account the limiting values of the room temperature range for the climates for which the appliance is designed and that internal temperatures may be affected by factors such as the location of the appliance, room temperature and frequency of door opening, it may be necessary to modify the setting of any temperature control device according to these factors.
- If the appliance is operated in an environment other than the specified climate type (i.e. beyond the rated ambient temperature range), it may not be able to maintain the desired indoor temperatures.
Refrigerant
- Isobutane refrigerant (R600a), contained within the refrigeration circuit of the appliance, is a natural gas with a high level of environmental compatibility; however, it is flammable. Make sure that no components of the refrigeration circuit have been damaged during the transport
and installation of the appliance.
- WARNING: the refrigerant and the insulator gas are flammable. When disposing of the device, only dispose of it at an authorised waste-disposal facility. Do not expose it to flames.
- WARNING: the appliance contains refrigerant and gases in the insulation. The appliance and gases must be disposed of professionally, as they may cause injuries to eyes or ignition. Make sure the refrigeration-circuit pipe is not damaged before disposing of it correctly.
- This symbol means: warning, risk of fire/flammable materials.
-
If the refrigeration circuit is damaged:
-
Avoid open flames and sources of ignition.
- Completely air the room where the appliance is located.
INSTRUCTIONS DE SÉCURITÉ
- Door shelf
- Door shelf
- Door shelf
- Refrigerator compartment shelf
- Refrigerator compartment shelf
- Refrigerator compartment shelf
- Refrigerator compartment drawer
- Variable-temperature refrigerator compartment drawer (Fresh Zone Plus)
- Freezer compartment drawers
NOTE:
The graphics in this manual are schematic representations and may not exactly match the product.
To optimise energy savings, position the drawers and shelves in the refrigerator as shown in figure 1.
2. BEFORE USE
- This appliance is packaged in a way as to protect it during transport. Take the appliance out of its box and remove all packaging materials. You can keep the original box and other packaging elements in a safe place to prevent damage to the appliance if you need to transport it in the future. In case the original packaging is disposed of, make sure all packaging materials are recycled accordingly.
- Make sure all parts and components are included and in good conditions. If there is any piece missing or in bad conditions, contact the official Cecotec Technical Support Service immediately.
- Once installed, allow the refrigerator to stand for at least four hours before switching it on.
- It is recommended to clean the inside of the appliance before starting it up. To do this, use a solution of baking soda and warm water and then dry the inside of the refrigerator thoroughly. The refrigerator may give off a peculiar smell when it is opened for the first time. This smell will disappear as the appliance cools down.
- The first time you start the appliance, the refrigerator compartment and freezer compartment will operate at an initial temperature of 5 °C and -18 °C respectively, until it is lowered to the desired temperature.
- If the appliance is switched off, wait five minutes before switching it on again to avoid unnecessary damage to the compressor.
- Never store flammable or explosive objects, acids or corrosive alkaline substances in the appliance.
ENGLISH
- The appliance preserves food by cooling the bottom wall of the refrigerator. It is therefore normal for ice or frost to accumulate on this surface. After a while, this adhering layer of frost melts and is drained out through a small drain hole at the back of the refrigerator. The presence of frost on the rear does not mean that the refrigerator is not working properly.
Box content
- Refrigerator
- Instruction manual
Do not remove the serial number of the appliance in order to keep a correct traceability of it in case of assistance.
3. INSTALLATION
Installation preparation
- Never install the appliance near heat sources, such as heaters or cookers, or in damp places.
- At least two people are required to transport and install the appliance safely.
- When lifting the appliance, the edges may be somewhat sharp. Use appropriate protective equipment for transport and installation.
- To ensure that the refrigerator is level, adjust the front adjustable feet to the desired height.
- Make sure that the cooling system at the rear of the appliance does not touch the wall. The greater the separation distance, the better.
- The appliance must be installed in a well-ventilated place. Be sure to leave enough space at the top of the appliance to allow air to escape and to maintain an adequate depth distance between the back of the appliance and the wall.
- Do not tilt the appliance more than 40° (Fig. 2).
- In figure 3, you can see the dimensions required for the installation.
Ventilation
When installing any refrigeration appliance that can be built into a kitchen unit, it is essential to take ventilation into account. Good ventilation around the appliance is essential for the heat generated by the refrigerator to dissipate properly. Lack of ventilation can lead to premature compressor failure, excessive power consumption, total system failure and may void the product warranty. When installing this type of built-in appliances in the kitchen furniture, please observe the following instructions:
- Leave some ventilation openings at the rear of the cabinet to allow air to enter.
- Drill a hole in the plinth at the bottom of the refrigerator and fit a ventilation grille. Another option is to cut a small part of the plinth to allow air to enter the appliance. Recommended
dimensions: 500 x 40 mm.
- The top of the cabinet shall be provided with a ventilation opening to the room. Recommended size of ventilation opening: 500 x 40 mm. If the cabinet does not allow air to enter around the appliance, a ventilation grille in the plinth or other ventilation system must be installed to ensure that air can circulate naturally. Fig. 4
Fig. 4 key:
1.- Edge of the refrigerator.
2.- Top view of the rear ventilation opening.
- Sufficient space must also be left between the rear of the cabinet and the appliance so that cold air can circulate to the condenser. Recommended dimensions: 500 x 40 mm.
- For the appliance to work properly, it is important that the top of the refrigerator is not completely blocked. For most appliances it is advisable to leave a distance of 40-50 mm.
- To allow air to enter the compressor and heat exchanger, a ventilation opening must be made in the base of the cabinet.
- Generally, the more air that can flow in and out, the more efficiently the appliance will work.
Installation instructions
In figure 5 you can see which accessories are included and which tools are NOT included.
Fig. 5 key:
a. Crosshead screw
3.9×12, T20
(Inside the accessories bag)
b. Crosshead screw
3.9×16, T20
(Inside the accessories bag)
c. Trim strip: place between the refrigerator side and the cabinet side, attached to the outside of the condenser.
d. Spacers between the fixed hinge and the wooden cabinet: use them only when necessary, i.e. if the space between the two is too large.
(Inside the accessories bag)
e. Plastic covers for the hinge screw hole.
f. Plastic covers for the lower fixing piece of the refrigerator.
(Inside the accessories bag)
g. Spanner for the front feet of the appliance.
h. Screwdriver with interchangeable heads.
i. Scissors
j. Measuring tape
k. Electric screwdriver
l. Rope to attach the power cord when the appliance is integrated into the wooden cabinet.
ENGLISH
NOTE: Do not forget to remove the tape to fix the doors (Fig. 6).
Changing the opening direction of the doors.
Figure 7:
- Remove the left and right covers (next to the control panel).
- Remove the plastic screws from the middle and bottom plates.
- Remove the top hinge.
- Remove the fixed hinges from the doors.
- Remove the fixed hinges from the doors.
- Remove all threaded plugs from the door.
- Remove the top hinge and install it on the opposite side.
- Remove the bottom hinge and install it on the opposite side.
- Remove the top hinge and install it on the opposite side.
- Remove the bottom hinge and install it on the opposite side.
Figure 8:
- Install the freezer door first.
- Assemble and fix the hinge to the cabinet and then attach the plastic cover.
- Install the refrigerator door.
- Assemble and fix the hinge to the cabinet and then attach the plastic cover.
- Attach the plastic covers.
- Insert the threaded plugs.
Installation
Figure 9:
- Place the refrigerator in the cabinet.
- Use a rope to tie up and pull out the power cord at the back.
Figure 10:
- Adjust the feet using a spanner to keep the refrigerator flat on the floor (3.1). Then install the lower fixing piece (3.2 and 3.3).
- Insert the plastic cover (4.1). When ready, remove the measuring clip (4.3).
Figure 11:
- Secure the upper plate with the screws.
- If necessary (excessive space between the refrigerator and the cabinet), use the spacer (6.1). Install the refrigerator on the right side, next to the wooden cabinet using the hinge (6.2). Place the trim strip (6.3). Cut off the excess strip after installation (6.4).
Figure 12:
- Steps to install a wooden door over the appliance door. Disassemble the refrigerator installation assembly (7.1). After measuring, fix the installation kit on the wooden door (7.2).
- Attach the wooden door to the appliance door (8.1 and 8.2). Using 2 screws, adjust the door to the correct position (8.3). Add the decorative cover (8.4). Screw in the inner fixing plate (8.5).
Figure 13:
- The installation is now complete.
- Remember to dispose of all packaging material properly.
Refrigerator door does not close properly
After changing the opening direction of the door, it is normal for the gasket to be compressed and a little harder. With the door closed, use a hairdryer to apply a little heat to the gasket. The heat will, little by little, expand the rubber until it has reached the required shape, filling the space between the door and the body of the refrigerator. Avoid using the hair dryer too close to the appliance, as this may damage the gasket. A distance of about 10 cm is enough. When finished, allow the gasket and door to cool before touching them. Once this is done, the gasket will return to its original shape.
4. OPERATION
Control panel. Fig. 14
- Fresh Zone Plus icon
- Fast Cooling mode icon
- Holiday mode icon
- Refrigerator compartment settings icon
- Refrigerator compartment temperature indicator light
- Freezer compartment temperature indicator light
- Freezer compartment settings icon
- Smart mode icon
- Fast Freezing mode icon
-
Power icon
-
The first time you switch on the refrigerator it will operate with the following default temperature settings:
- Refrigerator compartment: +5 °C.
- Fresh Zone Plus: 0 °C.
ENGLISH
- Freezer compartment: -18 °C.
- If you wish to adjust the temperature or functions manually, press the corresponding icons.
- Setting the refrigerator compartment temperature: Press the refrigerator compartment settings icon 📋 on the left side of the control panel to set the desired temperature from 2 °C to 8 °C.
- Setting the freezer compartment temperature: Press the freezer compartment settings icon 📄 on the right side of the control panel to set the desired temperature from -15 °C to -25 °C.
- Setting the Fresh Zone Plus drawer temperature: Press the Fresh Zone Plus icon ^-15 to set the desired temperature from -3 °C to +3 °C. Press and hold the Fresh Zone Plus icon for 3 seconds to activate/deactivate this zone. The display will show "ON/OFF".
- Fast Cooling function: To activate this function, press the Fast Cooling mode icon and the corresponding indicator will light up. Once activated, the refrigerator compartment temperature will be automatically set to 2 °C. After 24 hours, the function will be automatically deactivated, and the corresponding indicator light will switch off.
- Holiday mode: To activate this mode, press the Holiday mode icon ⚙ and the corresponding indicator will light up. Once activated, the refrigerator compartment temperature will be automatically set to 17 °C, and that of the freezer compartment to -18 °C.
- Smart (ECO) mode: To activate this mode, press the Smart mode icon and the corresponding indicator will light up. Once activated, the refrigerator compartment temperature will be automatically set to 5 °C, that of the freezer compartment to -18 °C, and that of the Fresh Zone Plus drawer to 3 °C.
- Fast Freezing function: To activate this function, press the Fast Freezing mode icon and the corresponding indicator will light up. Once activated, the freezer compartment temperature will be automatically set to -25^ . After 24 hours, the function will be automatically deactivated, and the corresponding indicator light will switch off.
- To switch off the refrigerator, press and hold the power icon ⏻ for 3 seconds and the corresponding indicator light will turn off. The inner LED light will switch off and the compressor will stop working. To turn the refrigerator back on, press and hold the icon again for 3 seconds and the corresponding indicator light will light up.
- Models with "Total No Frost" system include an automatic defrost function. This function prevents the formation of ice in the freezer compartment. To activate this function, press and hold the freezer compartment settings icon and the power icon for 5 seconds, the freezer compartment temperature indicator light will light up. To deactivate this function,
press and hold both icons again for 3 seconds, the freezer compartment temperature indicator will switch off.
Defrost
Models with “Total No Frost” system are designed to prevent the formation and accumulation of excessive ice and/or frost inside the appliance. Under normal use, it should not be necessary to periodically defrost the freezer compartment.
Please note: if you regularly find a large accumulation of ice, frost or water puddles in the freezer compartment, it is likely that the door is not sealing properly. This could be due to a faulty door gasket or an incorrectly installed or too heavy decorative door.
5. INSTRUCTIONS ON FOOD STORAGE
Refrigerator compartment
- Close bottles and liquid containers tightly.
- Do not put hot or freshly cooked food directly into the refrigerator. Let hot food cool down to room temperature before putting it in the refrigerator compartment.
- Make sure that food is not in contact with the back wall of the refrigerator, as this can lead to frost formation and possible condensation problems.
- Be sure to wash the food and dry it thoroughly before placing it in the refrigerator.
- Wrap or cover food before placing it in the refrigerator. This will help prevent moisture loss, keep food fresh and prevent odours.
- When storing foods in the refrigerator, sort them according to their expiration day. Place foods that will be expiring soon at the front of the shelves to prevent them from spoiling if the door is left open by accident for an extended period of time.
- Do not overload the refrigerator with food. Make sure to leave enough space between the different foods so that cold air can circulate properly.
- Defrosting frozen foods in the refrigerator compartment will help maintain a low temperature and save energy.
- Separate raw meats from cooked products by using different shelves. This will prevent cross-contamination caused by the contact of raw meat juices with other foods.
Fresh Zone Plus
The temperature of the Fresh Zone Plus drawer can be adjusted from +3 °C to -3 °C. It is the ideal compartment for storing meat, fish and very cold drinks.
Freezer compartment
- The freezer compartment is designed for freezing fresh food, storing deep-frozen products and making ice cubes.
- Do not put hot or warm foods directly into the freezer. Allow them to cool to room temperature before storing.
ENGLISH
- When storing frozen foods, follow the storage instructions on the packaging. If it does not contain any specific information, the food must be consumed within three months from the date of purchase.
- Divide food into small portions and package them separately (ideally not exceeding 1 kg). This will reduce freezing time and improve food quality after thawing.
- Wrap or cover food properly before placing it in the refrigerator. To prevent the film wrappings from sticking together, make sure they are completely dry.
- Before freezing food, label it indicating the type of product, freezing date and expiration date.
- Once thawed, food cannot be refrozen. Thaw only the necessary amount of food to avoid wastage.
- Do not place bottled or canned beverages in the freezer, as they may explode.
- Do not exceed the maximum amount of food to be frozen.
Food storage
The refrigerator compartment is designed for short-term storage of food, i.e. food that will be consumed soon. Although this compartment can maintain very low temperatures, it is not recommended for long-term food storage. When distributing food in the refrigerator, keep in mind that the temperature tends to vary between the different zones. Therefore, each type of food must be stored in a specific zone.
Figure 15 shows where the following foods are best stored:
- Butter, cheese, etc.
- Canned and bottled foods.
- Drinks such as milk.
- Cooked food.
- Yogurts, canned foods, etc.
- 75 cl bottles, precooked dishes, etc.
- Fruits and vegetables.
- Fresh meat and fish/fruits and vegetables/beer and cold drinks.
The refrigerator shelves can be rearranged according to the storage conditions of each food:
- To remove a shelf, hold it on both sides with your hands and lift the back slightly. Then pull it out.
- To reposition the shelf, slide it back into the guide until it fits into place.
NOTE: The graphics in this manual are schematic representations and the internal layout may not exactly match the product.
6. CLEANING AND MAINTENANCE
- Always unplug the appliance from the mains socket before performing any cleaning or maintenance task.
- Use a solution of baking soda and warm water to clean the inside of the refrigerator. Do not use detergents or abrasive cleaning products. Then rinse and dry the inside of the refrigerator thoroughly.
- Remove the compartment shelves and door shelves and clean them with soap and water. Do not wash them in the dishwasher.
- If the unit is not to be used for an extended period of time, unplug it and clean it. Leave doors slightly ajar to prevent mould growth and development of unpleasant smells.
Note: If you notice a lot of ice or puddles of water forming in the freezer compartment, the door is probably not sealed properly. Check that the gasket is not damaged and that the door is properly installed. For more information, see the "Troubleshooting" section.
Replacing the inner LED light Fig. 16
Note: Only a qualified technician can change the 12 V LED light inside.
- Unplug the refrigerator from the electrical outlet.
- To replace the LED light, remove the aluminium trim strip on the top of the refrigerator and then unscrew both screws.
- Replace the LED light with a new one.
- Put the trim strip back in place.
7. TROUBLESHOOTING
Before contacting the official Cecotec Technical Support Service, please refer to the following troubleshooting table.
| The appliance does not work | Check that the appliance is connected to the power socket. |
| Make sure that the fuses are not blown. | |
| Check that the refrigerator is turned on. | |
| Check that the socket is working properly. To do this, plug another electrical appliance into the socket. | |
| The device does not work normally | Make sure that you have not overload the refrigerator with food. |
| Check that the thermostat is set to a suitable temperature. | |
| Make sure the door is properly closed. | |
| Make sure that the cooling system at the rear of the appliance has not accumulated dust and is not touching the wall. | |
| Make sure that you leave enough space around the appliance for good ventilation. | |
| The device vibrates or makes noise | Make sure that the appliance is levelled and installed on a stable surface. |
| Check that there is sufficient clearance between the walls and the appliance and that nothing is resting on it. | |
| It is normal for the refrigerant gas in the refrigerator to emit a slight bubbling or gurgling sound, even when the compressor is not running. | |
| The warning alarm has been activated | Check that the doors are properly closed. The alarm will be activated if the door remains open for more than 60 seconds. |
| A layer of ice has formed on the bottom of the refrigerator wall. | It is normal for ice to form on the bottom of the refrigerator wall. This does not affect the correct functioning of the device. |
| Make sure that no food touches the back wall of the refrigerator. | |
| Check that there is some resistance when opening the appliance door. If it opens easily, the door gasket may need to be replaced. | |
| Check that the door gasket is not deformed, dirty or damaged. If you notice a malfunction and are unable to fix it yourself, please contact the official Cecotec Technical Support Service to have the gasket replaced. | |
| This may also be due to improperly installed doors. | |
| Too much ice has formed in the freezer | Check that there is some resistance when opening the appliance door. If it opens easily, the door gasket may need to be replaced. |
| Check that the door gasket is not deformed, dirty or damaged. If you notice a malfunction and are unable to fix it yourself, please contact the official Cecotec Technical Support Service to have the gasket replaced. | |
| This may also be due to improperly installed doors. | |
| Interior LED light does not work | Contact the official Cecotec Technical Support Service. |
If none of these situations match your problem, do not attempt to disassemble or repair the appliance by yourself. Repairs carried out by unqualified people may result in injury or serious malfunctions. Contact the official Cecotec Technical Support Service. The repair must be carried out by an authorised technician, and you must only use original spare parts.
Unauthorised self-maintenance or maintenance will affect the safe use of the product and the application of the warranty policy.
NOTE:

Any electrical repairs to this appliance must conform to local and/or state laws. Please contact the official Cecotec Technical Support Service in case of doubt and before carrying out any of the above operations. Always disconnect the appliance from the power supply first.
Error codes
This appliance beeps when the refrigerator is not working properly. When the sensors detect a fault, the corresponding error code is shown on the temperature display. Even if the appliance continues to cool, it is advisable to contact the official Cecotec Technical Support Service.
| Error code | Error |
| F2 | Fresh Zone sensor fault |
| F3 | Fault of the refrigerator compartment sensor |
| F4 | Fault of the freezer compartment sensor |
| F5 | Defrost sensor fault |
ENGLISH
| 2E | Freezer fan/motor fault |
| CE | Communication error between PCB and control panel |
When any of the above error codes appears, no beeping will be emitted by the appliance but will only be shown on the display.
High freezer temperature alarm
If the refrigerator detects that the freezer compartment temperature is above -1^ , the alarm will be activated automatically, and the compartment temperature display will start flashing. Press any icon to cancel the alarm. The temperature display will remain lit until the freezer reaches a temperature below -1^ .
Note: The PCB is located in the compressor compartment.
| RECOMMENDED TEMPERATURE | CLIMATIC CONDITIONS |
| 5 °C/-18 °C | Summer or room temperature between 25-35 °C. |
| 5 °C/-18 °C | Spring, autumn or ambient temperatures between 15-25 °C. |
| 5 °C/-18 °C | Winter or room temperature between 5-15 °C. |
| Fast Cooling function | Fast cooling |
| Fast Freezing function | Fast freezing |
8. TECHNICAL SPECIFICATIONS
| Appliance | Bolero CoolMarket Combi BI-D FLW 341 E |
| Reference | EU01_101745 |
| QR code |  |
| Rated voltage | 220 - 240 V~ |
| Rated frequency | 50 Hz |
| Rated current | 0.8 A |
| Climate class (*) | SN, N, ST |
| Refrigerant | R600a (60 g) |
| Insulator | Cyclopentane |
This product features a light source with a Class F energy efficiency.
(*) Refrigerator intended for use at room temperatures between 10 °C and 38 °C.
Technical specifications may change without prior notification to improve product quality. Made in China | Designed in Spain
9. DISPOSAL OF OLD ELECTRICAL AND ELECTRONIC APPLIANCES
This symbol indicates that, according to the applicable regulations, the product and/or batteries must be disposed of separately from household waste. When this product reaches the end of its shelf life, you should dispose of the cells/batteries/accumulators and take them to a collection point designated by the local authorities.
Consumers must contact their local authorities or retailer for information concerning the correct disposal of old appliances and/or their batteries.
Compliance with the above guidelines will help protecting the environment.
10. TECHNICAL SUPPORT AND WARRANTY
Cecotec shall be liable to the end user or consumer for any lack of conformity that exists at the time of delivery of the product under the terms, conditions and deadlines established by the applicable regulations.
Repairs should be carried out by qualified personnel.
If at any moment you detect any problem with your product or have any doubt, do not hesitate to contact the official Cecotec Technical Support Service at +34 96 321 07 28.
ENGLISH
11. COPYRIGHT
The intellectual property rights over the texts in this manual belong to CECOTEC INNOVACIONES, S.L. All rights reserved. The contents of this publication may not, in whole or in part, be reproduced, stored in a retrieval system, transmitted, or distributed by any means (electronic, mechanical, photocopying, recording or similar) without the prior authorization of CECOTEC INNOVACIONES, S.L.
12. SIMPLIFIED DECLARATION OF CONFORMITY
CE
Cecotec Innovaciones hereby declares that this appliance complies with the essential requirements and other relevant provisions of the regulations applicable in the European Union. This appliance has been designed, manufactured and tested to meet the required safety and quality standards. The full text of the EU Declaration of Conformity can be found on the
following website: https://cecotec.es/es/information/declaration-of-conformity
1. PIÈCES ET COMPOSANTS
Image 1
7. PROBLEEMOPLOSSING
https://cecotec.es/es/information/declaration-of-conformity
es/es/information/declaration-of-conformity
1. PECES I COMPONENTS
Fig./Img./Abb./Afb./Rys.1

Fig./Img./Abb./Afb./Rys. 2
| A (mm) | B (mm) | C (mm) | D (mm) |
| 661 | 1233 | 1937 | 1939-1942 |

Fig./Img./Abb./Afb./Rys. 3

2
Fig./Img./Abb./Afb./Rys. 4


Fig./Img./Abb./Afb./Rys. 5

Fig./Img./Abb./Afb./Rys. 6

Fig./Img./Abb./Afb./Rys. 7
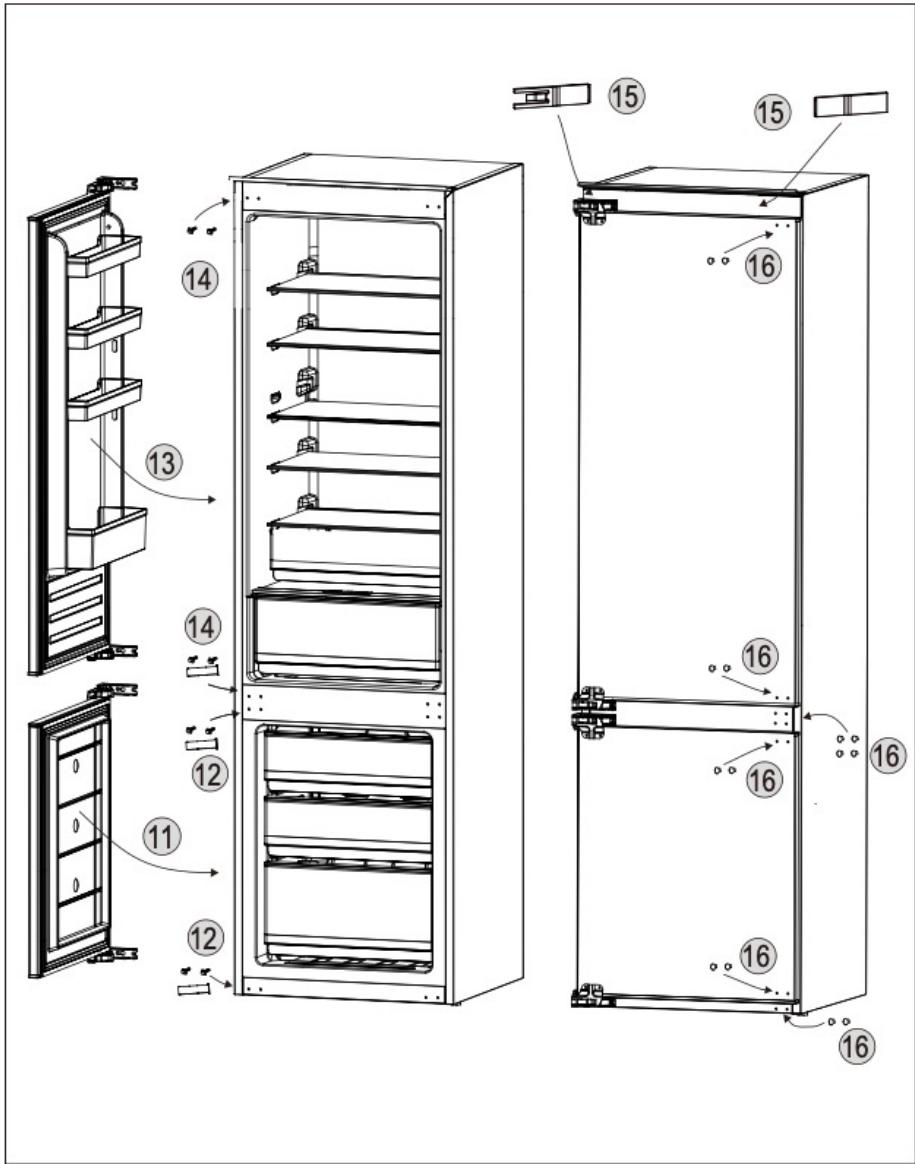
Fig./Img./Abb./Afb./ Rys. 8

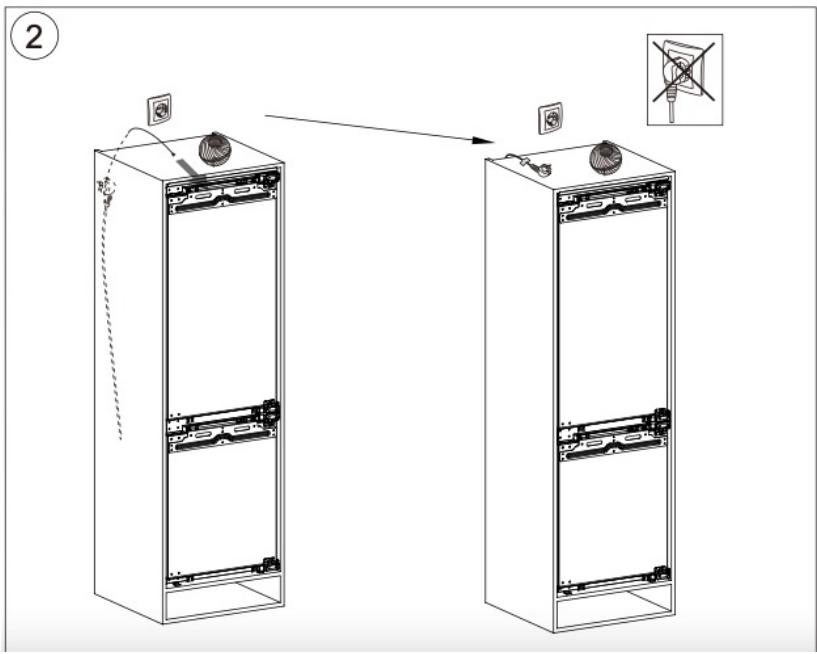
Fig./Img./Abb./Afb./Rys. 9
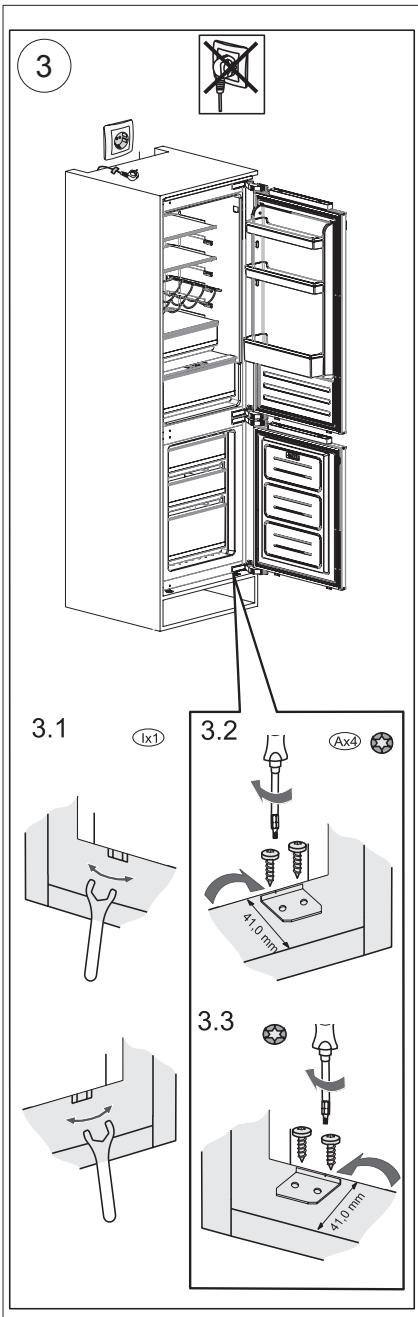

Fig./Img./Abb./Afb./Rys. 10
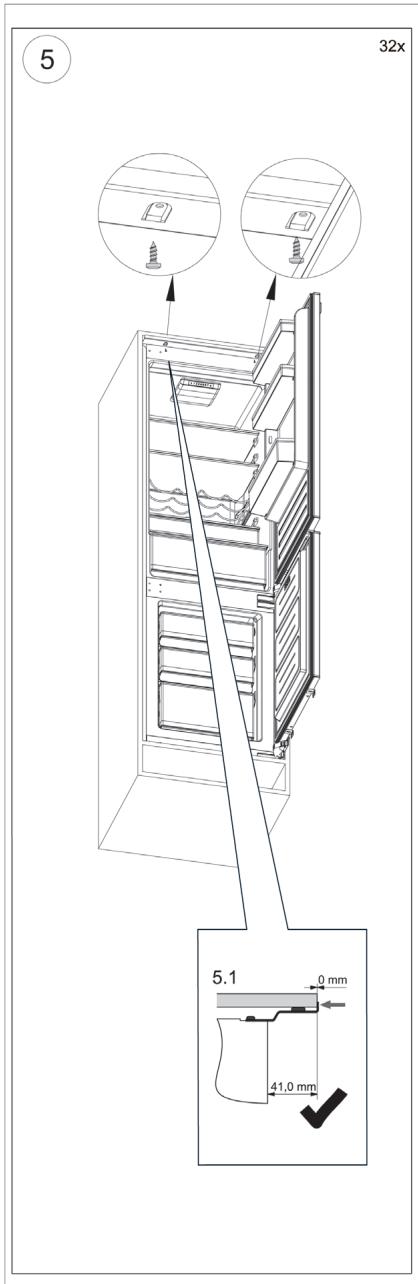
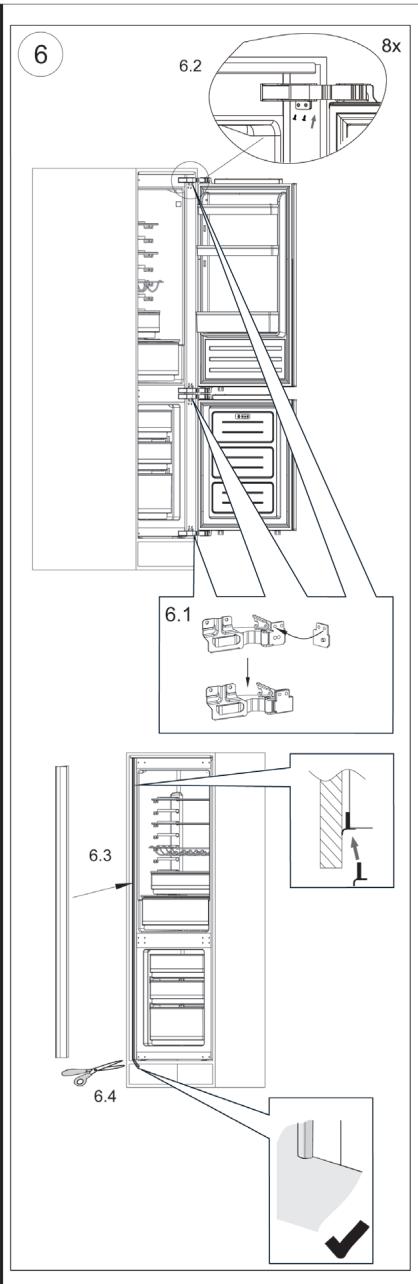
Fig./Img./Abb./Afb./Rys. 11


Fig./Img./Abb./Afb./Rys. 12

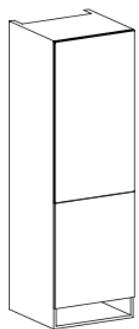
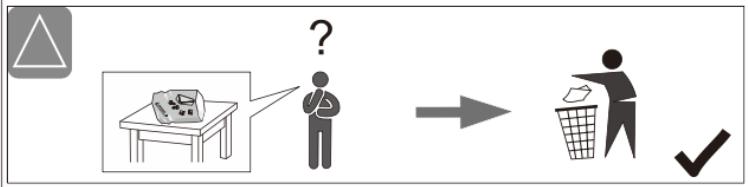
Fig./Img./Abb./Afb./Rys. 13

Fig./Img./Abb./Afb./Rys. 14
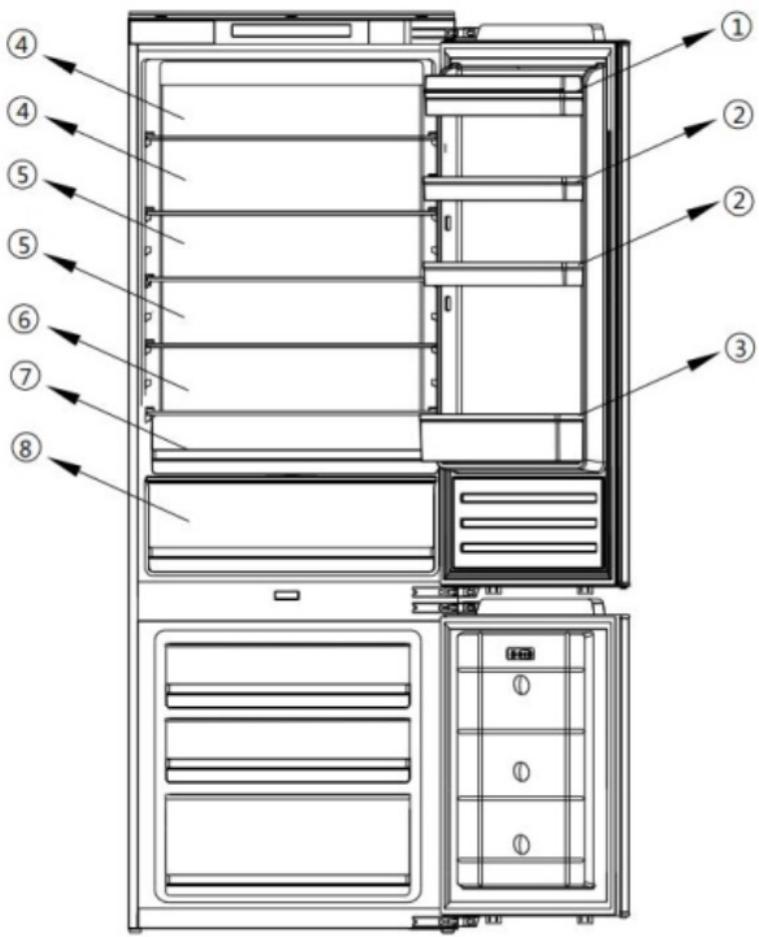
Fig./Img./Abb./Afb./Rys. 15

Fig./Img./Abb./Afb./Rys. 16
www.cecotec.es

- SOMMAIRE
- Temperature range
- Note:
- Refrigerant
- INSTRUCTIONS DE SÉCURITÉ
- BEFORE USE
- ENGLISH
- Box content
- INSTALLATION
- Installation preparation
- Ventilation
- Fig. 4 key:
- Installation instructions
- Changing the opening direction of the doors.
- Figure 7:
- Figure 8:
- Installation
- Figure 9:
- Figure 10:
- Figure 11:
- Figure 12:
- Figure 13:
- Refrigerator door does not close properly
- OPERATION
- Control panel. Fig. 14
- Defrost
- INSTRUCTIONS ON FOOD STORAGE
- Refrigerator compartment
- Fresh Zone Plus
- Freezer compartment
- Food storage
- CLEANING AND MAINTENANCE
- Replacing the inner LED light Fig. 16
- TROUBLESHOOTING
- Error codes
- High freezer temperature alarm
- TECHNICAL SPECIFICATIONS
- DISPOSAL OF OLD ELECTRICAL AND ELECTRONIC APPLIANCES
- TECHNICAL SUPPORT AND WARRANTY
- COPYRIGHT
- SIMPLIFIED DECLARATION OF CONFORMITY
- CE
- PIÈCES ET COMPOSANTS
- Image 1
- PROBLEEMOPLOSSING
- PECES I COMPONENTS
Brand : CECOTEC
Model : Bolero Coolmarket Combi Bi D Flw 341 E
Category : Refrigerator