
DVR4200SS - Digital Video Recorder AKAI - Free user manual and instructions
Find the device manual for free DVR4200SS AKAI in PDF.


| Product type | Digital video recorder |
| Brand | AKAI |
| Model | DVR4200SS |
| Dimensions (approx.) | 300 x 220 x 50 mm |
| Weight (approx.) | 2 kg |
| Power supply | 12V DC / 2A |
| Recording format | H.264 |
| Maximum resolution | 1080p |
| Number of channels | 4 BNC channels |
| Main functions | Continuous recording and motion detection, playback, USB backup |
| Connectivity | BNC inputs, HDMI/VGA output, RJ45 Ethernet port, USB 2.0 |
| Internal storage | SATA hard drive (not included, max 1 TB) |
| Network | Remote access via mobile app (iOS/Android) |
| Maintenance and cleaning | Clean with a dry, soft cloth. Avoid moisture and solvents. |
| Security | Administrator password protection |
| Spare parts and repairability | Power supply and remote control available. Repair by a certified professional. |
| Included accessories | Power adapter, BNC cables, remote control, user manual |
Frequently Asked Questions - DVR4200SS AKAI
User questions about DVR4200SS AKAI
0 question about this device. Answer the ones you know or ask your own.
Ask a new question about this device
Download the instructions for your Digital Video Recorder in PDF format for free! Find your manual DVR4200SS - AKAI and take your electronic device back in hand. On this page are published all the documents necessary for the use of your device. DVR4200SS by AKAI.
USER MANUAL DVR4200SS AKAI
Important Safety Instructions
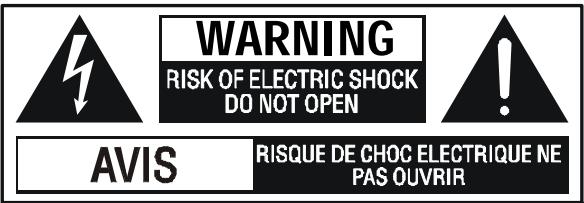
WARNING: TO REDUCE THE RISK OF ELECTRIC SHOCK, DO NOT REMOVE COVER (OR BACK). NO USER-SERVICEABLE PARTS INSIDE. REFER SERVICING TO QUALIFIED SERVICE PERSONNEL.
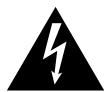
The lightning flash with an arrowhead symbol, within the equilateral triangle, is intended to alert the user to the presence of uninsulated "dangerous voltage" within the product's enclosure that may be of sufficient magnitude to cause an electric shock.

The exclamation point within the equilateral triangle is intended to alert the user to the presence of important operating and maintenance (servicing) instructions in this owner manual.
WARNING: TO PREVENT FIRE OR SHOCK HAZARD, DO NOT EXPOSE THIS APPLIANCE TO RAIN OR MOISTURE.


This symbol means that the unit complies with European safely and electrical interference directives.

The symbol for Class II (Double Insulation)
On Placement
- Do not use the unit in places which are extremely hot, cold, dusty, or humid.
- Place the unit on a flat and even surface.
- Do not restrict the air flow of the unit by placing it in a place with poor air flow, by covering it with a cloth, or by placing it on carpeting.
On Safety
- When connecting or disconnecting the AC cord, grip the plug and not the cord itself. Pulling the cord may damage it and create a hazard.
- When you are not going to use the unit for a long period of time, disconnect the AC power cord.
On Condensation
- When left in a heated room where it is warm and damp, water droplets or condensation may form inside the unit. When there is condensation inside the unit, the unit may not function normally. Let the unit stand for 1 to 2 hours before turning the power on, or gradually heat the room up and dry the unit before use.
WARNING:
- Should any trouble occur, disconnect the AC power cord and refer servicing to a qualified technician.
- Do not place anything directly on the top of the unit. Damage to the unit can result.
Notes on Copyright
It is forbidden by law to copy, broadcast, show, broadcast on cable, play in public, rent copyrighted material without permission.
Apparatus Claims of U.S. Patent Nos. 4,631,603; 4,577,216; 4,819,098 and 4,907,093 licensed for limited viewing uses only.
DVD video discs are copy protected, and any recordings made from these discs will be distorted. This product incorporates copyright protection technology that is protected by method claims of certain U.S. patents and other intellectual property rights owned by Macrovision Corporation and other rights owners. Use of this copyright protection technology must be authorized by Macrovision Corporation, and is intended for home and other limited viewing uses only, unless otherwise authorized by Macrovision Corporation. Reverse engineering or disassembly is prohibited.
Table of Contents
Important Safety Instruction 1
Disc Formats 3
Before You Start 4
Using the remote control 4
Parts and Functions 5-7
Remote Control 5-6
Front and Top Panel 7
Display 8
FrontPanelDisplay 8
Display Information 8
Setup 9-13
For better reception. 9
Connecting your TV 9-10
Connecting another source 10
Connecting a VCR 11
Connecting the speakers & subwoofer 12
Positioning the speakers and subwoofer 12
Mounting rear surround speakers 13
Turning on the Unit and TV 13
Power cord connection 13
Adjusting the Sound 14-15
Playing a Disc 16-18
Playing Disc 16
Pausing playback(still mode) 16
Stopping playback 16
To skip to a different track 16
Fast Foward/Fast Reverse 17
Slow-motion play 17
Skip(Forward/Reverse) 17
Zooming into an image 17
Angle selection 18
Audio selection 18
Subtitle selection 18
Special Functions 19-21
Display function (DVD) 19
Locating a specific title 20
Locating a specific title/chapter/track 20
Locating a specific time 21
Angle setting 21
Audio setting 21
Subtitle setting 21
CD/DVD programmable memory 22
DVD programmable memory 22
Title/Chapter programmed playback 22
CD programmable memory 22
Trackprogrammedplayback 22
RepeatPlayback 23
Repeating a title/chapter (DVD) 23
Repeating a single track/whole disc (CD) 23
Repeating a specific section (DVD) 23
Playing MP3 and Picture File Disc. 24-25
Playing a MP3 file disc 24
Playing a Picture file disc 25
Playing a MP3/Picture file disc 25
Radio Operation 26-27
Customizing the Function Settings 28-35
LANGUAGE setting 28
VIDEO setting 28-30
TV Shape 28
Video Output 29
Brightness 30
Edges 30
AUDIO setting 31-33
Digital Out. 31
L/R speaker 31
Subwoofer 32
Surround Delay 32
Center Delay 33
Pink noise 33
RATING setting 34-25
Password/Parentallock 34
Factory Set 35
Language Code List for Disc Language...... 36
Maintenance 37
Cleaning Disc 37
Cleaning the Unit 37
Important Note 37
Trouble Shooting Guide 37-38
Disc Formats
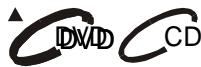
The unit can playback discs bearing any of the following marks:

DVDs [8cm(3")/12cm(5") disc]

Audio CDs [8cm(3")12cm(5") disc]

Video CDs [8cm(3")12cm(5") disc]


CD-R CD-RW Compatible
Region Management Information
Region Management Information: This unit is designed and manufactured to respond to the Region Management Information that is encoded on DVD discs. If the Region number printed on the DVD disc does not correspond to the Region number of this unit, this unit cannot play that disc.
The region number of this unit is 2.

Disc Function or Operation that is Not Available
When the symbol appears on the TV screen, it indicates that the function or operation attempted is not available at that time. This occurs because the DVD disc manufacturer determines the specific functions. Certain functions may not be available on some discs. Be sure to read the documentation provided with the disc.
Icons Used on DVDs
Sample Icons
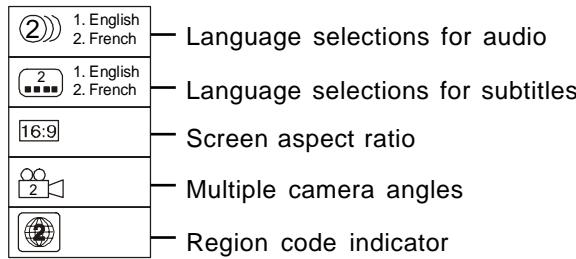
Notes:
- This unit supports 2-channel (L/R) audio and 5.1ch (Multi-channel) MPEG Audio 1/2 (only when the DIGITAL AUDIO OUT coaxial jack is used for connection). It does not support 7.1 channel MPEG Audio Version 2.0.
- When playing back a CD-G (Graphics) or CD EXTRA disc, the audio portion will be played, but the graphic images will not be shown.
Title, Chapter and Tracks
- DVDs are divided into "titles" and "chapters". If the disc has more than one movie on it, each movie would be a separate "title". "Chapters" are sections of titles.
Audio CDs and Video CDs are divided into "tracks". A "track" is usually one song on an Audio CD.
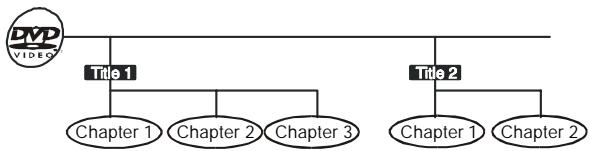

Note :
- Numbers identify each title, chapter, and track on a disc. Most discs have these numbers recorded on them, but some do not.
Notes on Unauthorized Discs
You may not be able to play back some DVD discs on this unit if they were purchased from outside your geographic area or made for business purposes.
Using the Remote Control
- Point the Remote Control at the REMOTE SENSOR located on the Unit.
- When there is a strong ambient light source, the performance of the infrared REMOTE SENSOR may be degraded, causing unreliable operation.
- The recommended effective distance for remote operation is about 16 feet (5 meters).
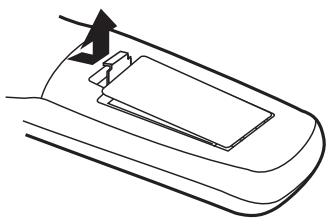
To install Batteries
- Open the battery door.
2.Insert two "AA" or UM-3 size batteries.
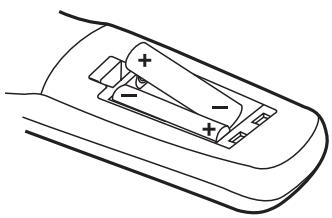
Battery Replacement
When batteries become weak, the operating distance of the Remote Control is greatly reduced and you will need to replace the batteries.
Notes:
- If the Remote Control is not going to be used for a long time, remove the batteries to avoid damage caused by battery leakage corrosion.
- Do not mix old and new batteries. Do not mix ALKALINE, standard (CARBON-ZINC) or rechargeable (NICKEL-CADMIUM) batteries.
Remote Control
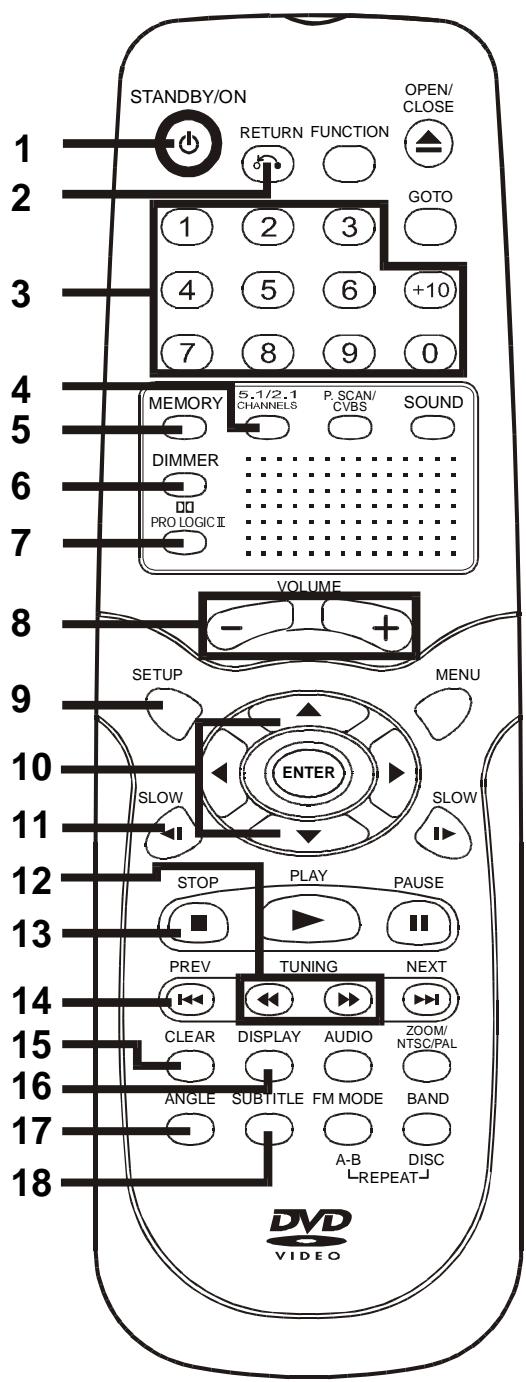
1) STANDBY 山 /ON button
Turns the Unit on and puts it in standby mode.
2) RETURN button
Return to the normal operation after using the SETUP menu.
3) Number (0 - 9) and (+10) buttons
Use when creating programs, and entering a parental level password. To select numbers over 9, press +10 button and then the second no. for example, to enter 18, press +10 and then 8.
4) 5.1/2.1 CHANNELS button
Switch speaker output to 5.1 channel mode. (All speakers + subwoofer)
Switch speaker outputs to 2.1 channel. (Front left/right speakers + subwoofer)
5) MEMORY button
Enter the number of a selected chapter or track.
Enter the number of a selected station.
6) DIMMER button
Adjust the brightness of the front panel display to the level you prefer.
7) PRO LOGIC II button
In AV_IN mode, switches to Dolby Pro Logic mode for VHS tapes encoded with Dolby Pro Logic.
8) VOLUME (+ / -) buttons
Adjust the volume.
9) SETUP button
Selects the SET UP menu screen.
10) / CURSOR buttons
Use to highlight selections on a menu screen and adjust certain settings.
11) SLOW button
Perform slow reverse playback of DVDs.
12) / TUNING buttons
:Fast reverse playback.
:Fastforwardplayback.
TUNING : Scan all available radio stations.
13) STOP button
Stop playback.
14) PREV button
Move reverse through titles, chapters or tracks on a disc.
Tune to the presetted stations.
15) CLEAR button
Clear input selections and cancel certain playback functions.
16) DISPLAY button
Change disc status information displayed on the TV.
17) ANGLE button
Switch the camera angle of the video presentation when scenes with multiple camera angles are recorded on a DVD.
18) SUBTITLE button
Select one of the subtitle languages programmed on a DVD.
Remote Control
19) FUNCTION button
Display the FUNCTION screen where you can check or change various setting.
20) OPEN/CLOSE button
Use to open or close the disc tray.
21) GOTObutton
Skip directly to a specific location on a DVD disc.
22) SOUND button
Selects sound balance and tone controls for adjustment with the cursor buttons.
23) P. SCAN / CVBS button
Changing YUV output to Progressive Scan Video mode.
24) / CURSOR buttons
Use to highlight selections on a menu screen and make adjust certain settings.
25) MENU button
Open and close DVD's menu.
26) ENTER button
Confirm selections on a menu screen.
27) SLOW▶ button
Perform slow forward playback of DVDs.
28) PLAY button
Start playback.
- STAPUSE button
Move forward through titles, chapters or tracks on a disc.
Tune to the presetted stations.
31) ZQWM button
Zoom into an image.
NTSC) PALbutton
In stop mode, select whether to output the video signal.
TV shows "AUTO" which means output signal depends on DVD disc (either NTSC or PAL).ITV shows "PAL" or "DAMMER".NTSC which means output signal fixed to PAL or NTSC. 23
PROLOGIC
32) AUDIO button
Select one of the audio soundtracks programmed on a DVD or selects the audio output mode on a AUDIO CD.
33) BAND/REPEAT-DISC button
Switch between AM(MW) onMEM.
Repeat chapter or title of a DVD.
Repeat single track or whole CD
34)EM MODE REPEAT A
Set FM MODE to FMSTEREO for FM stereo sound or to
FM MONO for menu sound:
PERFORT POINT TO POINT REUSE PLAY PAPER ON 28VD or CD.

Parts and Functions
Front Panel
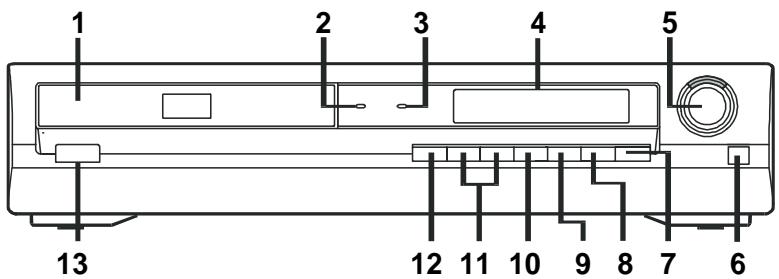
1) Disc tray
Open or close tray by pushing OPEN/CLOSE button. Place a disc on the disc tray, label side up.
2) standby indicator
When the unit is turned on by pressing the STANDBY/ON button, the light will illuminate a few seconds. If you press STANDBY /ON button on the Remote control. The Unit will turn off and go to standby mode. The light will continue to illuminate.
3) PRO LOGIC indicator
When PRO LOGIC sound selected in AV_IN mode, the light will illuminate.
4) Displaywindow
Display system information.
5) VOLUME control
Change the loudness of the sound from the speakers connected to the unit.
6) Remote sensor
Receive the remote control unit signals.
7) FUNCTION button
Select the source.
8) STOP button
Stop playing a disc.
9) II PAUSE button
Press to pause playback. Each time you press the PAUSE button the picture advances one frame. Press the PLAY button to resume.
10)▶PLAY button
Press to start or resume playback
11) SKIP buttons
Press SKIP button to go back to previous chapters/ tracks.
Press SKIP button to advance to chapters/tracks. Press and hold 山 SKIP button to begin fast scan. Four speeds are available.
Scan all available radio stations.
12) OPEN/CLOSE button
Use to open and close the disc tray.
13) STANDBY/ON button
Turn the power on or off.
Note:
Screen saver - If no button is pressed within 2 minutes, the function will active, If you want to return the normal screen, press any button.
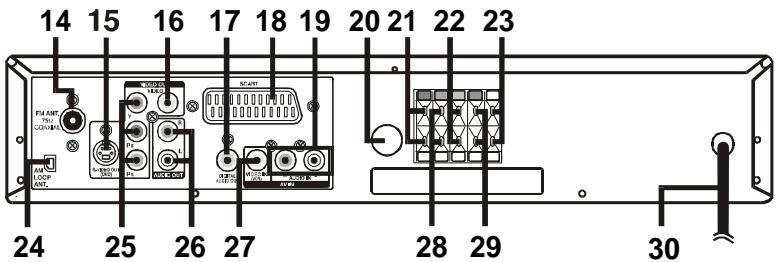
Rear Panel
The DVD displays the information shown below on the TV screen and on the Unit's DVD display depending on the operation status.
Display Examples
| TV Screen | Unit Display | Remarks | |
| If no disc is loaded when the Main Unit is switched on. | No Disc | NO DISC | "NO DISC" appears when the tray is closed and:1)There is no disc in the tray.2)The disc type is not playable in this Unit.3)The disc is not loaded correctly (upside-down, etc.) |
| Tray open | ▲ | OPEN | |
| Tray closed | ▲ Close | CLOSE | |
| Loading | |||
| Stopped | ■ Stop | The display changes to show other indicators (total time, etc.) | |
| Playing | ▶ Play | ||
| Paused | Freezes the image on the screen or pauses audio playback. | ||
| Fast forward | The display changes to show other indicators (total time, etc.) | ||
| Fast reverse | |||
| Slow | Does not function for Audio CDs. | ||
| Repeat A - B | Rep A- Rep A-B | A-B | Repeat a specific section. |
| The operation is not permitted by the DVD Unit or the disc. |
Region (Local) Number Error Indicator
If the region (local) number of the disc that you attempt to play differs from the region number of the Unit. "Invalid Region" appears on the TV screen. (The disc cannot be played).
Setup
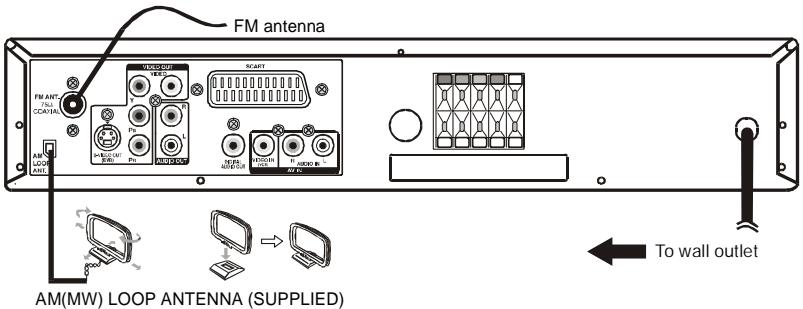
For better reception
FM
Connect FM antenna (included) to the FM ANTENNA jacks.
AM(MW)
Connect the loop antenna (included) to the AM(MW) LOOP ANTENNA terminals.
A Connecting your TV
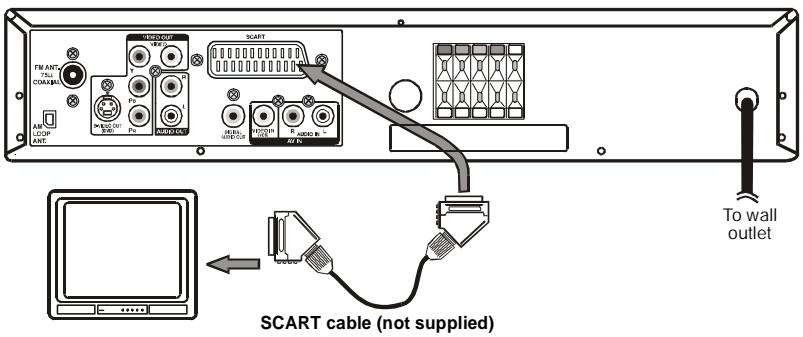
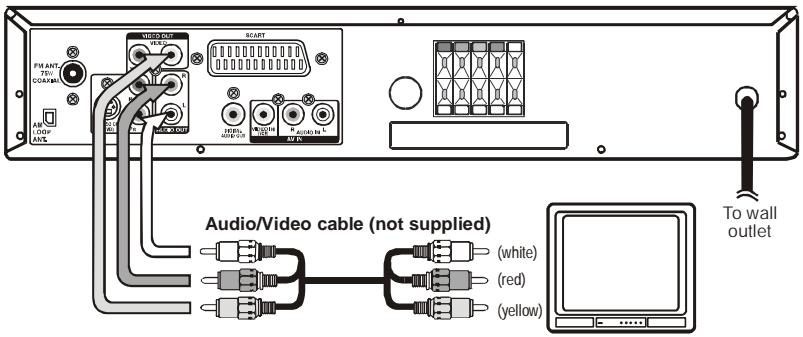
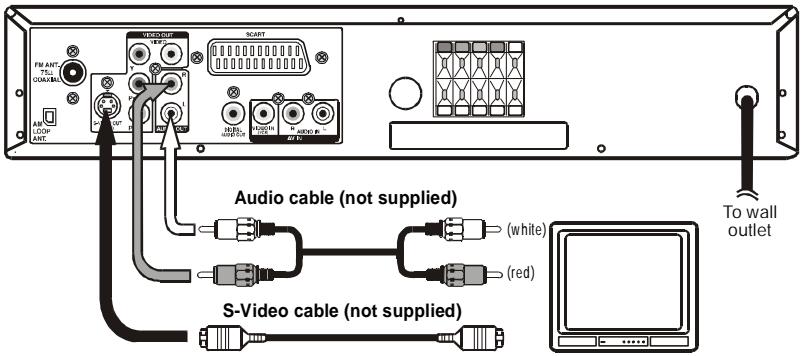
The unit can be connected to your TV in several different ways, depending on the design of your TV.
SCART cable
Use the SCART cable (not supplied), connect the SCART cable from the unit to your TV.
or
RCA Audio/Video cable
Use the Audio/Video cable (not supplied). Connect the VIDEO OUT and left/right AUDIO OUT jacks on the unit to theVIDEOINandleft/rightAUDIO INjacks on your TV.
or
S-Video cable
Use an S-Video cable (not supplied) and the Audio cable (not supplied).
- Use an S-Video cable to connect the S-VIDEO (DVD) jack on your unit to the S-VIDEO IN jack on your TV.
- Next, use the Audio cable to connect the left/right AUDIO OUT jacks on the unit to the left/right AUDIO IN jack on your TV.
or
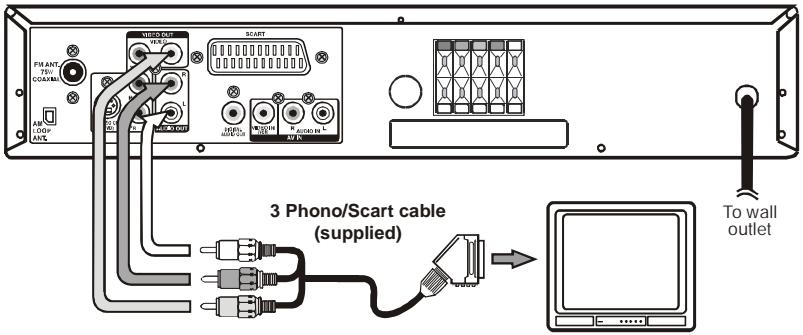
3 Phono/Scart cable
Use the 3 phono/Scart cable ( supplied). Connect the VIDEO OUT and left/right AUDIO OUT jacks on the unit and Scart to your TV.
Setup
or
Component video outputs (DVD)
Some TVs or monitors are equipped with component video inputs.
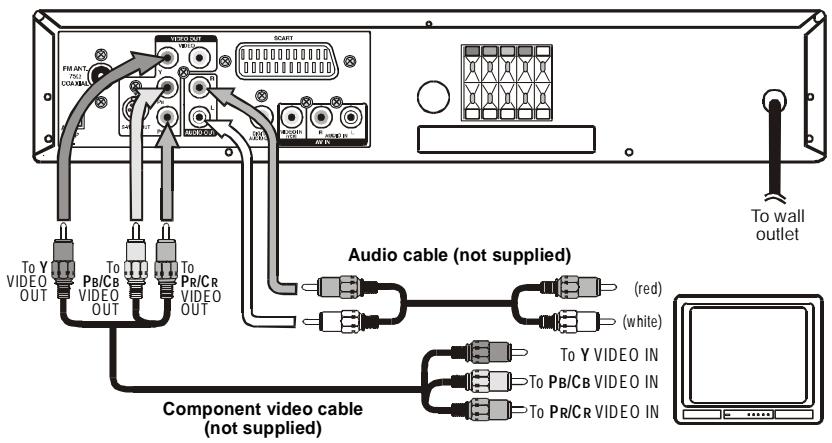
Using the Audio cable (not supplied), connect the left/right AUDIO OUT jacks on your Unit to the left/right AUDIO IN jacks on your TV and the Component video cable (not supplied), connect the Green plug Y VIDEO OUT jack on your Unit to YVIDEO IN jack on your TV, the Blue plug PB/CBVIDEO OUT jack on your Unit to PB/CBVIDEO IN jack on your TV and the Red plug PR/CRVIDEO OUT jack on your Unit to PR/CRVIDEO IN jack on your TV to view the higher quality picture playback.
Progressive outputs (DVD)
Some TVs or monitors are equipped with component video inputs that are capable of reproducing a progressively scanned video signal.
Using the Audio cable (not supplied), connect the left/right AUDIO OUT jacks on your Unit to the left/right AUDIO IN jacks on your TV and the Component video cable (not supplied), connect the Green plug Y VIDEO OUT jack on your Unit to YVIDEO IN jack on your TV, the Blue plug PB/CBVIDEO OUT jack on your Unit to PB/CBVIDEO IN jack on your TV and the Red plug PR/CRVIDEO OUT jack on your Unit to PR/CRVIDEO IN jack on your TV to enjoy highest quality picture with less flicker.
Press the SETUP button and select Video Output to YUV (see page 27). Connect the component video cable to TV, press the P. SCAN button on the remote control when DVD is stopped. You can select the output signal for better picture quality.
Attention:
- When progressive output is activated, no video signal output from S-video and RCA (CVBS) video jacks.
- Make sure your TV supports progressive scan component video signal, press the P. SCAN button twice until "CVBS" display for going back CVBS video signal.
Notes :
- Connect the Unit to your TV directly. If you connect the Unit through a VCR, the playback picture will be distorted because DVD discs are copy protected.
- When you connect the Unit to other equipment, be sure to turn off the power and unplug all of the equipment from the wall outlet before making any connection.
Refer to the instruction manual of the connected equipment as well.
B. Connecting another source
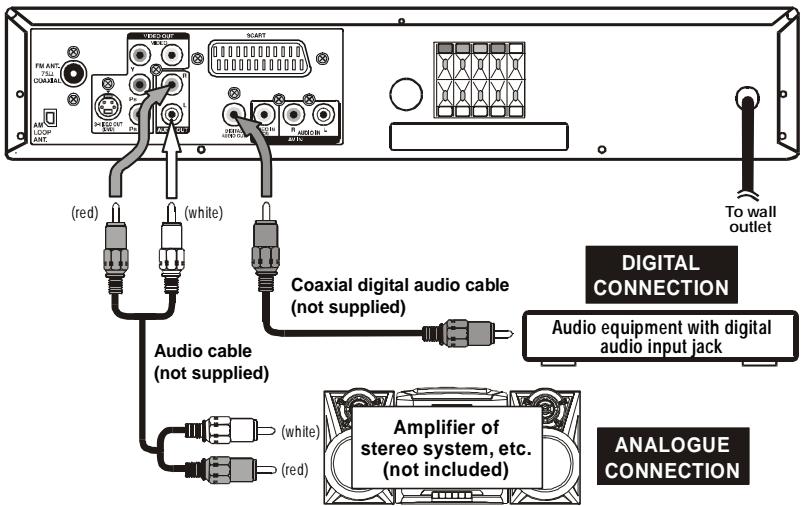
Analogue connection
Using the Audio cable (not supplied), connect the left/right AUDIO OUT jack on your Unit to the AUDIO IN jack.
Digital connection
Using the Coaxial Digital Audio cable (not supplied), connect the DIGITAL AUDIO OUT on your Unit to the DIGITAL AUDIO IN jack on your another equipment.
Listening to another audio equipment
- Turn on the Unit.
- Turn on your audio equipment and follow the instructions included with it to select the AUDIO IN or DIGITAL IN function.
Setup
C. Connecting a VCR
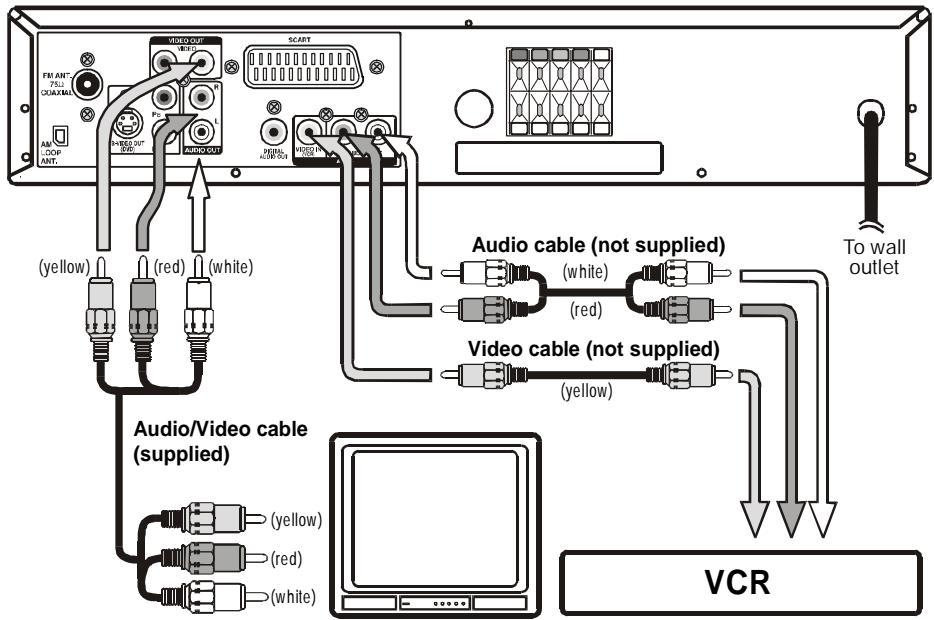
- Using the supplied Audio/Video cable, connect the yellow plug from VIDEO OUT jack on your Unit toVIDEO IN jack on your TV, connect the left and right AUDIO OUT jacks on your Unit to AUDIO IN jacks on your TV. If you want the sound come from the speakers of the Main Unit, you need not to connect these left and right Audio cable from the Main Unit to your TV.
- Using the Video cable (not supplied), connect the VIDEO IN (VCR) jack on your Unit to VIDEO OUT jack on your VCR.
- Using the Audio cable (not supplied), connect the left/right AUDIO IN jacks on your Unit to the AUDIO OUT jacks on your VCR.
- An adaptor can be bought locally to connect the round RCA-style plugs to a scart socket. For the TV get a scart INPUT adaptor. For the VCR get a scart OUTPUT adaptor.
Watching a DVD
- Turn on the Unit, use the FUNCTION button on the remote control or the front panel to select "DVD".
- Turn on your TV and follow the instructions included with it to select VIDEO function which is correspond to the VIDEO IN jack you need connected with the Main Unit.
Watching a Videotape
- Turn on the Unit, use the FUNCTION button on the remote control or the front panel to select "AV_IN".
- Turn on your TV and follow the instructions included with it to select VIDEO function which corresponds to the VIDEO IN jack that is connected with the Main Unit.
- Turn on the VCR and follow the instructions included with it to play the videotape.
Notes:
If you want sound from the Unit and sound from equipment connected to it (see next page) to come only from the speakers of the Unit, do not connect the left and right audio plugs from the Unit to your TV.
Sound from the VCR or other external equipment will not be heard from the television if you connect the television with a scart to scart cable. This is because the scart connector on the DVD amplifier Unit only carries output from the DVD player part.
- If VCR Audio is mono, surround speakers sound level will be low or absent.
To hear the sound from television programmes through the Unit
Sound from the television does not go to the speakers of the DVD amplifier Unit with the suggested connections. To hear sound from television programmes through the DVD amplifier's loudspeakers you need to use your video recorder as a television tuner. To do this follow these steps:
- Connect up the VCR as above in "Connecting a VCR". If your television does not have the round (RCA-style) connectors you can get an RCA to scart input adapter.
- Press the FUNCTION button on the DVD Amplifier Unit to get AV_IN mode, shown on the front panel display.
- On the television, select the AV or scart input channel for the DVD amplifier Unit.
- On the VCR, select the television programme you want to watch.
-
On the DVD amplifier Unit select normal stereo or Pro Logic decoder modes according to your preference.
-
Please refer to the AV_IN rows of the table on page 15 describing which speakers the sound will come out of.
- When using the VCR as a television tuner, you cannot watch one programme while recording another.
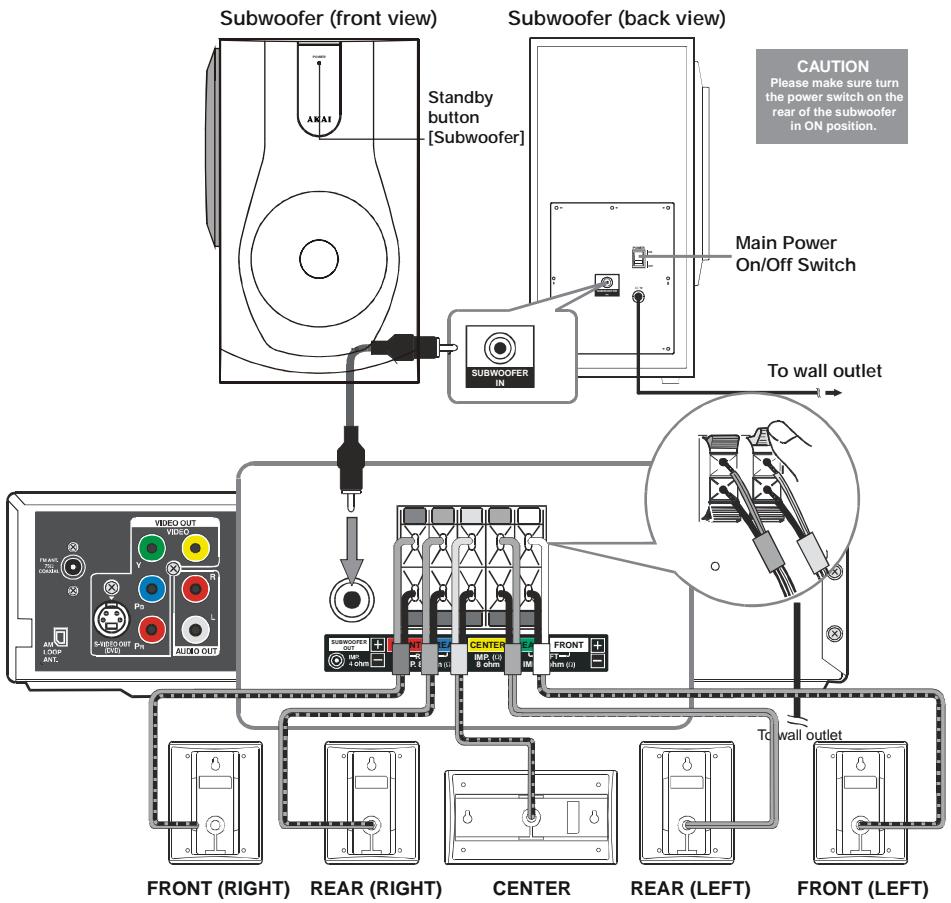
D. Connecting the speakers & subwoofer
- The speaker cords have been color-coded to simplify connection. Just plugthePOSITIVE (+) and NEGATIVE (-) ends of each speaker wire into the corresponding jacks on the rear of the Unit, matching the color tube on the end of the speaker wire to the color-coded connector.
- The front left/right and rear left/right speakers are all the same. However, make sure you connect to the center speaker which is slightly longer than the rest.
- Use the included RCA plug to connect subwoofer out jack on the rear of the main unit and subwoofer in jack on the rear of the active subwoofer. Turn the POWER switch on the rear of subwoofer on, then press the power On/Off button on the front panel of subwoofer while the subwoofer is in standby mode.
E. Speakers positioning
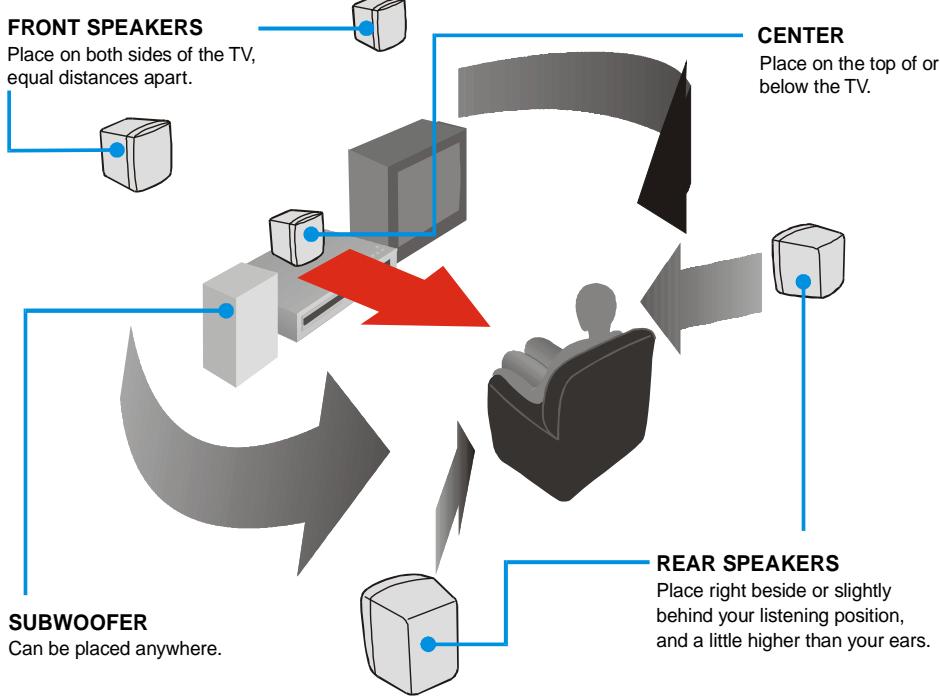
Setup
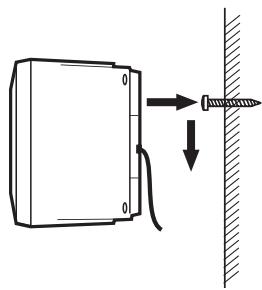
Mounting rear surround speakers
1) Mark the correct mounting position on the wall.
2) Insert a fixing screw(s) at the marked position on the wall.
3) Align the slot hole(s) of the speaker over the screw and pull the speaker downward until it is firmly hooked.
Turning on the unit and TV
1)Press the STANDBY/ON button to turn the unit ON, or
2)Press the STANDBY ON button on the remote control or the FUNCTION button or the PLAY button to turn on the unit while the unit is at standby mode.
3)Turn on the TV by pressing its POWER button.
4) Select the channel on your TV corresponding to the VIDEO IN jack that the unit is connected to. See TV User guide for more information.
- If you have connected the unit successfully, the DVD logo (start-up picture) will appear on your TV screen.
Notes :
- Whenever no disc or disc stop for 60 minutes, the system will be turned to POWER standby mode automatically.
- The LED of Standby will be turned on while the unit is at standby mode.
Power cord connection
- Make sure that all the components and speakers are connected correctly.
- Be sure the AC power cord is disconnected and all functions are off before making connections.
- When you are not going to use the unit for a long period of time, disconnect the power cord.
Adjusting the Sound
To adjust the surround sound balance while Pro Logic decoding is in effect
Use the remote control to make the following changes to speaker balance:
Front speaker (left)
- Press the SOUND button repeatedly to display LEFT, then press the or CURSOR button to adjust the sound level. It will show on the display of the Unit.
Front speaker (right)
- Press the SOUND button repeatedly to display RIGHT, then press the or CURSOR button to adjust the sound level. It will show on the display of the Unit.
Center speaker
- Press the SOUND button repeatedly to display CENTER, then press the or CURSOR button to adjust the sound level. It will show on the display of the Unit.
Rear speaker (left)
- Press the SOUND button repeatedly to display REAR L, then press the or CURSOR button to adjust the sound level. It will show on the display of the Unit.
Rear speaker (right)
- Press the SOUND button repeatedly to display REAR R, then press the or CURSOR button to adjust the sound level. It will show on the display of the Unit.
Subwoofer
- Press the SOUND button repeatedly to display WOOFER, then press the or CURSOR button to adjust the sound level. It will show on the display of the Unit.
Note :
- If you do not press any button within a few seconds, the display will return to normal.
To adjust the sound quality
Press the SOUND button repeatedly to select an equalization mode (BASS, TREBLE). Press the or CURSOR button to adjust the sound level.
BASS : the low range of sounds
TREBLE : the high range of sounds
Bass and treble control the sound from the front left and right speakers.
Dolby Digital
Dolby Digital is a sound system developed by Dolby Laboratories Inc. that gives movie theatre ambience to audio output when the Unit is connected to a Dolby Digital 5.1 channel processor or amplifier.
This Unit automatically recognizes DVDs that have been recorded with Dolby Digital.
Not all Dolby Digital sources are recorded with 6 channels.
Some sources marked Dolby Digital may be recorded in Dolby Surround, a 2 channel system. Look for this logo on your DVD Unit.
Dolby Pro Logic II creates five full-bandwidth output channels from two-channel sources. This is done using an advanced, high-purity matrix surround decoder that extracts the spatial properties of the original recording without adding any new sounds or tonal colorations.

"DTS" and "DTS Digital Surround" is a sound sytem which give movie theatre ambience to audio output when the Unit is connected to a DTS Digital Surround processor or amplifier. This Unit can recognizes DVDs that have been recorded with DTS Digital Surround. Look for this logo on your DVD Unit.

Movie Mode
The Movie mode in Pro Logic II is very similar to that of the original Pro Logic decoder. The main difference is that it has stereo surround channels and no surround filter, unlike Pro Logic which has a mono surround channel and a 7 kHz surround filter. Movie mode is the standard required for all A/V systems. When an autosound unit has a video screen, it is also considered an A/V system. It can be called simply "Pro Logic II".
Music Mode
The Music mode offers users some flexibility to control the end results to their own taste. Music mode should not be used with THX audio processing mode. Music mode is recommended as the standard mode for autosound music systems (without video), and is optional for A/V systems. It is recommended that Music mode be identified as the "Music" version of Pro Logic II, to distinguish it from the Movie mode.
Adjusting the Sound
Pro Logic Emulation Mode
The Pro Logic emulation mode offers users the same robust surround processing as original Pro Logic, in case the source content is not of optimum quality, or if there is a desire to hear the program more "as it used to be". When this mode is used, it is called Pro Logic, as before. There is no "Pro Logic I" mode. The Pro Logic emulation mode is optional. Dolby does not require PLII products to use the original Pro Logic decoding algorithm. However, if the DSP contains the original Pro Logic code, and if the product maker would like to use it, this is quite acceptable and even encouraged. A product must not offer both original Pro Logic and the Pro Logic emulation mode.
Matrix Mode
The Matrix mode is the same as the Music mode except that the directional enhancement logic is turned off. It may be used to enhance mono signals by making them seem "larger". The Matrix mode may also find use in auto systems, where the fluctuations from poor FM stereo reception can otherwise cause disturbing surround signals from a logic decoder. The ultimate "cure" for poor FM stereo reception may be simply to force the audio to mono.
Manufactured under license from Dolby Laboratories.
'Dolby', 'Pro Logic II' and the double-D symbol are trademarks of Dolby Laboratories.
To select the listening channel
- When the disc is stopped, you can press the 5.1/2.1 CH button on the remote control to select different speakers output status shown on below table.
- At AV IN function mode, you also can press the PRO LOGIC II button repeatedly on the remote control to select PRO LOGIC II (indicator on the front panel of display will illuminate).
- You can active or off subwoofer output by setup menu.
Notes:
- The wording "2.1 CH" will be corresponded to the audio/sound output from Front Left and Front Right speakers plus the Subwoofer.
- 5.1/2.1 CH button is no response to JPG CD-ROM or JPG/MP3 CD-ROM. Please select 5.1/2.1 CH output before putting such CD-ROM.
The following table show which speakers are work in the various modes.
| FUNCTION | DISCS | 5.1/2.1CH Button | L/R SPEAKER(SMALL/LARGE) | SUB-WOOFERON/OFF | Dolby Pro Logic II Selection | ||||
| EMU | MATRIX | MUSIC | MOVIE | BY PASS | |||||
| DVD MODE | DVD /CD | 5.1 CH | SMALL | ON | 5.1 | 5.1 | 5.1 | 5.1 | 5.1 or 2.1 |
| LARGE | ON | 5.1 | 5.1 | 5.1 | 5.1 | 5.1 or 2 | |||
| --- | OFF | 5 | 5 | 5 | 5 | 5 or 2 | |||
| 2.1 CH | SMALL | ON | 2.1 | 2.1 | 2.1 | 2.1 | 2.1 | ||
| LARGE | ON | 2 | 2 | 2 | 2 | 2 | |||
| --- | OFF | 2 | 2 | 2 | 2 | 2 | |||
| MP 3 | 5.1 CH | --- | --- | 5.1 | 5.1 | 5.1 | 5.1 | 5.1 | |
| 2.1 CH | --- | ON | 2.1 | 2.1 | 2.1 | 2.1 | 2.1 | ||
| --- | --- | OFF | 2 | 2 | 2 | 2 | 2 | ||
| PCM DVD | 5.1 CH | --- | ON | 5.1 | 5.1 | 5.1 | 5.1 | 5.1 | |
| --- | OFF | 5 | 5 | 5 | 5 | 5 | |||
| 2.1 CH | SMALL | ON | 2.1 | 2.1 | 2.1 | 2.1 | 2.1 | ||
| LARGE | ON | 2 | 2 | 2 | 2 | 2 | |||
| --- | OFF | 2 | 2 | 2 | 2 | 2 | |||
| TUNER | --- | --- | --- | --- | 2.1 | 2.1 | 2.1 | 2.1 | 2.1 |
| AV_IN | --- | --- | SMALL | ON | 5.1 | 5.1 | 5.1 | 5.1 | 5.1 |
| LARGE | ON | 5.1 | 5.1 | 5.1 | 5.1 | 5.1 | |||
| --- | OFF | 5 | 5 | 5 | 5 | 5 | |||
5.1 - Represents FRONT LEFT/RIGHT, REAR LEFT/RIGHT, CENTER speakers and SUBWOOFER.
2.1 - Represents FRONT LEFT/RIGHT speakers and SUBWOOFER.
5 - Represents FRONT LEFT/RIGHT, REAR LEFT/RIGHT and CENTER speakers.
2 - Represents FRONT LEFT/RIGHT speakers.
This owner's manual explains the basic instructions of this DVD Unit. Some DVD discs are produced in a manner that allows specific or limited operation during playback. As such, the DVD Unit may not respond to all operating commands. This is not a defect in the DVD Unit. Refer to the instruction notes of discs.
“ ” may appear on the TV screen during operation. A “ ” means that the desired operation is not permitted by the DVD Unit or the disc.
Playing a Disc
- Press the STANDBY/ON button on the front panel or press the POWER button on the remote control to turn on the Unit while the Unit is in standby mode, press the FUNCTION button to select DVD mode.
See CUSTOMIZING THE FUNCTION SETTINGS (page 28-35) before proceeding to step 2.
- Press the OPEN / CLOSE button. The disc tray opens.
- Place the disc on the disc tray with the label side up.
- Press the OPEN / CLOSE button. The disc tray closes.
It takes a short while for your Unit to load the disc. After loading, for some discs, the Unit will automatically start playback of the disc.
- Press the PLAY button.
Notes:
- Use the OPEN / CLOSE button on the front panel to open or close the disc tray. Do not push the disc tray or you may damage the Unit.
- Let the disc tray open completely before removing the disc. Press the OPEN/CLOSE button to close the disc tray after you remove the disc.
- Some Video CD are recorded with PBC (Playback Control), a menu with recorded contents may appear on the TV if you have turned the PBC on. You can make your selection according to its PBC menu. Press the MENU button on the remote control to turn PBC on and off anytime during you are playing back a Video CD.
Pausing playback (still mode)
Press the II PAUSE button. To resume normal playback, press the PLAY button.
Stopping playback
Press the STOP button at the location where you want to interrupt playback. To resume playback at the position where the disc was stopped, press the PLAY button.
If you press the STOP button twice, the Unit's memory will be cleared and pressing the PLAY button will reset the disc to the beginning.
To skip to a different track
- Press the SKIP button once to skip to the start of the previous track.
- Press the SKIP button to skip to the next track.
- For audio CD disc, use the number buttons (remote control only) to jump straight to that track number.
Playing a Disc
Fast Forward/Fast Reverse DVD CCD VCD
-
Press the TUNING or TUNING button when a disc is playing.
-
The disc begins fast scan at x2 speed.
- Four speeds are available. Each time TUNING or TUNING button is pressed, the speed of fast scan changes in the following sequence: x2 x4 x8 x20

Note :
You also can press and 卡 SKIP button on front panel repeatedly to select different fast scan speed.
- Press the PLAY button when you reach the desired point to resume playback at normal speed.
Slow-motion play DVD
-
Press the SLOW or SLOW button in the play mode.
-
Two speeds are available. Each time SLOW or SLOW button is pressed, the speed of slow-motion playback changes in the following sequence: 1/2 → 1/4 or 1/2 → 1/4
-
Press the PLAY button to return to the normal playback speed.
SKIP (Forward / Reverse)
While you are playing a disc, press the NEXT button of the remote to move to the beginning of the next chapter or track. Press the PREV button of the remote to move to the previous chapter or track and automatically start playing it.
Zooming into an image
While a disc is playing, press the ZOOM/NTSC/PAL button.
- While an image is zoomed, you can use , , and button to shift the view and display the part you want.
- To return to the normal view, press the ZOOM/NTSC/PAL button until the “Qoff” symbol shows. The screen will return to normal.
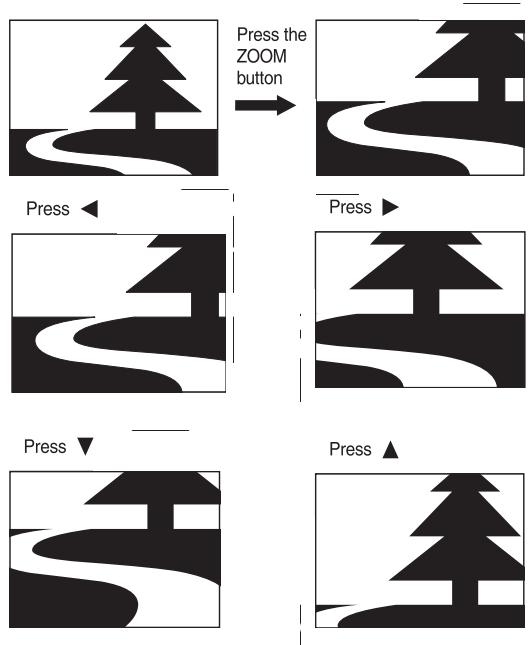
- When you reach the edge of the image, the display will not shift anymore in that direction.
Angle selection
Some DVDs contain scenes which have been shot from a number of different angles. For these discs, the same scene can be viewed from each of these different angles.
-
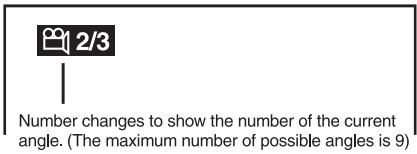
While you are playing a DVD with different angles recorded, press the ANGLE button to view the number of the current angle.
-
Press the ANGLE button repeatedly to change the scene to the next angle in those recorded.
-
About two seconds later, playback continues from the new angle you selected.
- If no button is pressed within 10 seconds, playback continues without changing the current angle.
Sequence of angle shots
(Example)

Notes:
This function can only be used for discs on which scenes shot from multiple angles have been recorded.
- If only one angle is recorded, " " is displayed.
Audio selection
On some discs, the sound is recorded in two or more formats. Follow the directions below to select the type of playback.
- While a disc is playing, press the AUDIO button to show the current audio format number.
- Press the AUDIO button repeatedly to select the desired audio format.
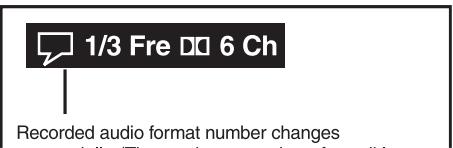
audio formats is 8)
Notes :
- If only one audio format is recorded, the number does not change.
- About two seconds later, playback continues in the new audio format.
Subtitle selection
- While a DVD is playing, press the SUBTITLE button to display the current language setting, as shown in the example below.
- Press the SUBTITLE button repeatedly to select the desired subtitle language.


Recorded language changes sequentially. (The maximum number of possible subtitle is 8)
Notes :
- If only one language is recorded, the language does not change.
- About two seconds later, playback continues with the new subtitle you selected.
- The number of languages recorded differs depending on the disc.
- If no button is pressed within a few seconds, playback continues without changing the current subtitle.
- This function can only be used for discs on which subtitles have been recorded in multiple languages.
- On some DVDs, subtitles are activated from the main menu of the DVD. Press the MENU button to activate the main menu.
DISPLAY function
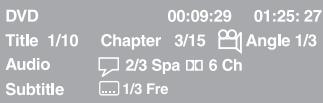
Using DISPLAY, you can check and change the current settings of the following items: ANGLE, AUDIO and SUBTITLE.
- While the disc is playing, press the DISPLAY button to display the screen shown below.
Elapsed time: Elapsed time from the beginning of the chapter which is currently playing.
Remaining time: Remaining time of the title which is currently playing.
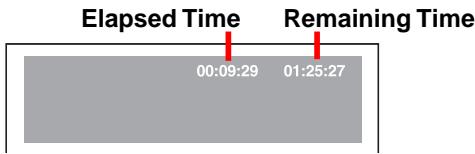
- Press the DISPLAY button twice to display the screen shown as below.
- Press the ANGLE, AUDIO and SUBTITLE button to change the selected item.
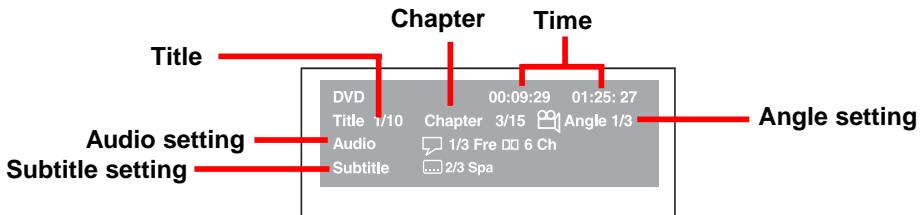
Title skip
- The number of the title currently playing and total titles of disc.
- Press the GOTO button to set your desired title, then press the ENTER button to confirm.
Chapter skip
The number of the chapter currently playing and total chapters 1/1 of the currently played title.
- Press the GOTO button to set your desired chapter, then press the ENTER button to confirm.
Time skip
- Elapsed time from the beginning of the currently playing chapter and the remaining time from the beginning of the currently playing title.
- Press the GOTO button to set your desired point to start playback, then press the ENTER button to confirm.
Angle setting
- The current angle is displayed. When a disc with only one angle is played back, " " is displayed.
- Press the ANGLE button to select the desired angle.
Audio setting
- The type of audio currently selected is displayed.
- Press the AUDIO button to select your desired type of audio.
Subtitle setting
- The subtitle number and language currently selected is displayed. When a disc with only one subtitle is played back, “ 1/1 Eng ” is displayed.
- Press the SUBTITLE button to select your desired language.
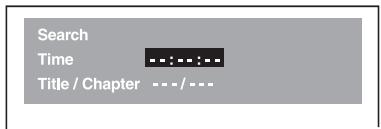
GOTO function
This function allows you to skip directly to any part of the disc while a disc is playing.
Note :
- After settings, press the DISPLAY button again to return to the normal screen.
Locating a specific title

If a DVD disc contains title numbers, you can locate a specific title by directly selecting a title number.
- In stop mode, press the GOTO button.
- Press , or button to highlight a specific field and press the corresponding number button(s) for the title you want.
- Press the ENTER button to confirm. The Unit will start playback about 3 seconds later.
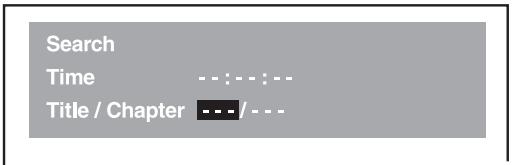
Note :
- Pressing the CLEAR button resets the title number.
Locating a specific title / chapter / track DVD CD VCD
If you know the title / chapter / track number you want to play, you can locate a specific title / chapter / track by directly selecting a title / chapter / track number.
- Press the GOTO button to search your desired title / chapter / track.
- Press , or button to highlight a title / chapter / track and press the corresponding number button(s) for the chapter you want.
- Press the ENTER button to confirm. The Unit will start playback about 3 seconds later.
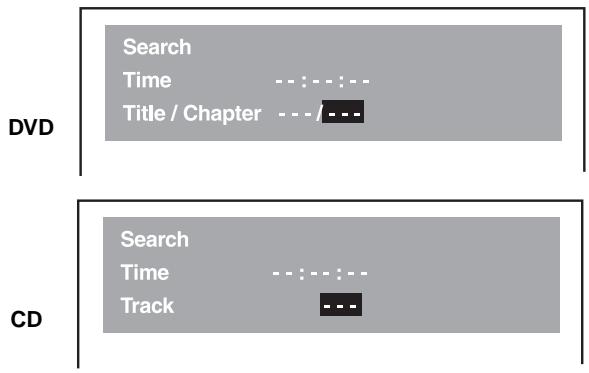
Note :
- Pressing the CLEAR button resets the title / chapter / track number.
Locating a specific time
You can move to a specific location by entering its corresponding time (hours, minutes, seconds)
- Press the GOTO button.
- Press or button to highlight time.
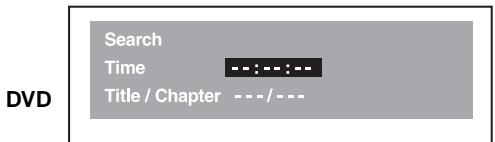
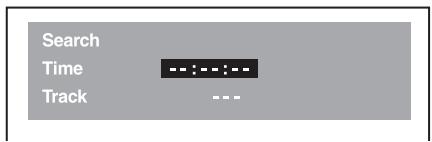
CD
- Press the corresponding number buttons for the setting point you want.
The first two numbers you entered represent hours.
- The second two numbers you entered represent minutes.
- The third two numbers you entered represent seconds.
- Press the ENTER button to confirm. The Unit will start playback about 3 seconds later.
Notes :
- Some discs may not respond to this process.
- Some scenes may not be located as precisely as you specified.
- This method for accessing specific locations is available only within the current title of the DVD disc.
- You can move through the menu by pressing the and buttons.
- Pressing the CLEAR button resets the time.
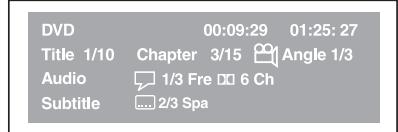
Angle setting

- Press the DISPLAY button twice. The FUNCTION menu is displayed on the screen and you can see how many angles are recorded on the disc.
- Press the ANGLE button repeatedly to select your desired angle.
- The Unit will change to your desired angle about 3 seconds later.

Audio setting
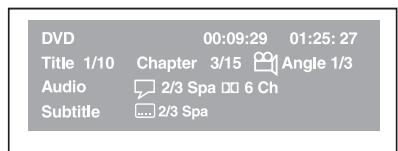
- Press the DISPLAY button twice. The FUNCTION menu is displayed on the screen and you can see how many audio formats are recorded on the disc.
- Press the AUDIO button repeatedly to select your desired type of audio.
- The Unit will change to your desired type audio about 3 seconds later.

Subtitle setting
- Press the DISPLAY button twice. The FUNCTION menu is displayed on the screen and you can see how many subtitle formats are recorded on the disc.
- Press the SUBTITLE button repeatedly to select your desired language.
- The Unit will change to your desired language about 3 seconds later.

Programmable memory

The two types of programmed playback provided by this Unit are title programmed playback and chapter programmed playback.
Title / Chapter programmed playback
- Press the MEMORY button while the disc is stopped.
- Enter the title numbers in . Use or button to move the highlight to chapter and enter the chapter numbers

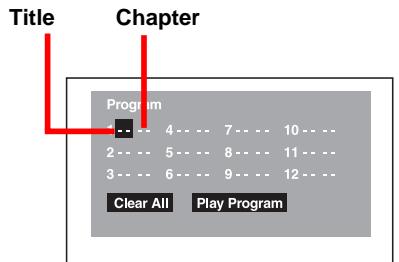
3.Use , , or button to move to the other field.
4. Repeat steps 2 to 3.
5. Press the PLAY button to start the programmed playback.
Notes :
- If you press the STOP button, the programmed selections will be cleared.
- If you press the CLEAR button while you are entering a title or chapter, the currently entered numbers will be erased and you can reset the numbers again.
Programmable memory
Track programmed playback
- Press the MEMORY button while the disc is stopped.
- Enter the track numbers in
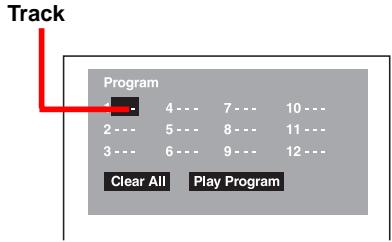
3.Use , , or button to other field.
4. Repeat steps 2 to 3.
5. Press the PLAY button to start the programmed playback.
Note :
- If you press the CLEAR button while you are entering a track, the currently entered numbers are erased and you can reset the numbers again.
You can play a specific title or chapter repeatedly. (Title repeat, chapter repeat, A-B repeat)
Repeating a title
You can play the same title repeatedly.
- While the disc is playing, press the REPEAT DISC button until the “indicator displays on the screen. The current title is played repeatedly.
Repeating a chapter
You can play the same chapter repeatedly.
- While the disc is playing, press the REPEAT DISC button until the "Repeat Chapter" indicator displays on the screen. The current chapter is played repeatedly.
To resume normal playback
- While the disc is playing, press the REPEAT DISC button until the “ ” indicator displays on the screen.
You can play a single track and whole disc repeatedly.
Repeating a single track
You can play the same track repeatedly.
- While the disc is playing, press the REPEAT DISC button until the " " indicator displays on the screen. The c Rep A - llingle repeatedly.
Repeating a whole disc
- While the disc is playing, press the REPEAT DISC button until the “indicator displays on the screen. The whole disc is played repeatedly.
To resume normal playback
- Press the REPEAT DISC button until the “Off” indicator displays on the screen.
Repeating a specific section
You can play a specific section repeatedly.
- While the disc is playing, press the REPEAT A-B button at the beginning of the section ( ) is displayed you want to play repeatedly.
- Press the REPEAT A-B button again at the end of the section (Rep A-B) is displayed.
- The Unit will immediately begin replaying your selection.
To resume normal playback
- While the disc is playing, press the REPEAT A-B button until the “Off” indicator displays on the screen.
Notes :
- A-B repeat can only be used within the same title. If the start and end of the section to be repeated are in different titles, A-B repeat is cancelled.
- The A-B repeat function does not operate in scenes where different camera angles are recorded.
Repeat Title
Repeat Chapter
Off
Repeat All
Off
Rep A -
Rep A-B
Off
Playing MP3 and Picture File Disc
This Unit will play MP3 and Picture files recorded on CD-R and CD-RW discs.
Playing a MP3 file disc
- Press the OPEN/CLOSE button, the disc tray opens.
- Insert a MP3 file disc on the disc tray with the label side up.
- Press the OPEN/CLOSE button, the disc tray closes.
- The Unit will take a short while to load the disc and automatically begin playback.
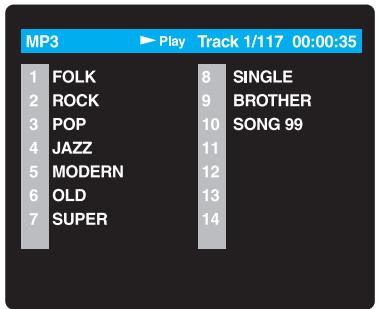
To pause playback
- Press the IIPAUSE button. To resume playback again, press the PLAY button.
To stop playback
- Press the STOP button.
To skip to the next or previous file
- Press the NEXT button on the remote control or SKIP button on the front panel briefly while playing, to skip ahead to the beginning of the next file. Each time you press the button consecutively, the beginning of the next file is located and played back.
- Press the \nPREV (Previous) button on the remote control or SKIP button on the front panel briefly while playing, to skip back to the beginning of the previous file. Each time you press the button consecutively, the beginning of the previous files is located and played back.
- You also can press the GOTO button, set the track number you want and then press the ENTER button.
Notes:
- You can not play in Fast reverse or Fast forward during MP3 playback.
- During MP3 playback, if you press the STOP button and then press PLAY button again, it will start to play from the beginning of the file which you stopped.
On-screen display
Turn on your TV to view the on-screen display of MP3 files.
- Press the MENU button on the remote control to view the DIR (directory) folder.
- Press the , , or CURSOR button on the remote control to select the folder, then press ENTER button to confirm.
- Press the , , or CURSOR button on the remote control to select the file you want to listen to, then press ENTER button and this selected file is located and played back.
Notes:
The ability of this Unit to read MP3 discs is dependent on the following:
- The Bit Rate must be within 64 - 256 kbps.
- The total number of files on the disc should not exceed 254.
- The maximum number of directories should not exceed 32.
- The maximum depth level of directories should not exceed 4.
- File names should be named using 7 or fewer letters and/or numbers, and must incorporate the "MP3" file extension. EXAMPLE: *****.MP3 where each * is a letter or number.
- Use only letters and / or numbers in file names. If you use special characters, the file and/or folder names may not be displayed correctly on the on-screen display.
- When recording on CD-R discs, use 74-minute (650Mb) discs.
- The CD-R or CD-RW discs should be "finalized" in computer by "single session format".
- See your CD/MP3 creation software for details.
Playing MP3 and Picture File Disc
Playing a Picture file disc
- Press the OPEN /CLOSE button, the disc tray opens.
- Insert a Picture CD on the disc tray with the label side up.
- Press the OPEN/CLOSE button, the disc tray closes.
- The unit will take a short while to load the disc.
- Press the PLAY button. The next picture will automatically display after 6 seconds.
Full-Screen Review

Thumbnail Review
Notes:
- If you press the MENU button on the remote control or press the STOP button in full-screen review, the Unit will display a menu of 9 thumbnail images.
- Use the cursor to highlight the NEXT or PREV in thumbnail screen and then press ENTER to review all the images. If you want to review one image in full-screen, you can use the CURSOR , , or buttons to highlight the image and then press the ENTER button to confirm. The image you selected will show on TV in Full-Screen and automatically display one by one again in about 6 seconds intervals.
- You can press the PAUSE button to interrupt playback, and press the PLAY button to resume playback.
- You also can use GOTO function or use the numbered buttons to enter the number to quickly select any image.
- You can press the ZOOM button to enlarge the picture in 3 levels.
- Press the ANGLE button on the remote control to rotate the picture orientation by 90^ .
Playing a MP3/Picture file disc
- Press the OPEN /CLOSE button, the disc tray opens.
- Insert a MP3 files/Picture CD on the disc tray with the label side up.
- Press the OPEN/CLOSE button, the disc tray closes.
- The unit will take a short while to load the disc.
- Use or button to select MP3 or Picture CD, then press the ENTER button.
MP3
Picture CD
Select Picture CD to view JPG file Select MP3 to play MP3 file
Notes:
- If you want to return to the menu of MP3 and Picture CD, press the SUBTITLE button on the remote control.
- When playing MP3 and Picture files, press the SUBTITLE button to select MP3 or Picture CD, the MENU button does not work in that moment.
- The SETUP button does not work during MP3 or Picture Disc playback or stop.
Tuning into a station manually
- Press the FUNCTION button until the frequency band appears on the display.
- Press the BAND button on the remote remote or STOP button on the front panel to select the desired band.
- Press the TUNING button to tune in the desired station.
FM Stereo
- Press the FM MODE button on the remote until " S T E R E O" appears on the display.
Weak FM stations
- Press the FM MODE button on the remote until the "M N O" word appears on the display. Background noise will be reduced but the signal reproduced will be mono. To restore stereo reception, press the FM MODE button on the remote to select STEREO.
Note:
- The left / right front speakers and subwoofer are activated only.
F M 10320MHZ
STEREO
MNO
To search for a station automatically
- Hold down the TUNING buttons on the remote or SKIP buttons on the front panel for 1 to 2 seconds, and a station is searched for automatically. After tuning in a station, the search stops.
- The search may not stop at a station with a very weak signal.
Presetting stations
You can tune into a stored station directly by entering the preset number.
20 stations on FM band can be preset.
20 stations on AM band can be preset.
- Press the FUNCTION button until the frequency band appears on the display.
- Press the BAND button on the remote to select the desired band.
3.Use the TUNING button to find your desired station. - Press the MEMORY button on the remote.
- Press the NEXT or PREVI button to select the preset number and press the MEMORY button on the remote to store the station.
- Repeat steps 2-5 to store other stations.
Tuning into a preset station
- Press the FUNCTION button on the front panel until the frequency band appears on the display.
-
Press the BAND button on the remote to select the desired band.
-
Press the PLAY button and NEXT or PREV button to select the presetted station or use the numbered buttons to enter the number to select the presetted station.
Example: To select preset number 15, press the +10 and 5 buttons.
To select preset number 10, press the +10 and 0 buttons.
RDS STATION SERVICE
Today many stations transmit so-called RDS (Radio Data System) codes that contain a variety of additional information along with regular sound signals through FM broadcasting.
If the stereo is currently receiving an RDS station, it displays the station name.
Example:
STEREO

PROGRAM TYPES (PTY)
The currently program type is displayed briefly.
Example:
STEREO
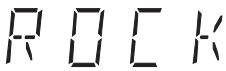
RADIOTEXT
Some RDS stations transmit information known as Radiotext. This is additional information about the station and its programmes. Radiotext appears as ticker text in the display. As this information is transmitted character by character, it may take some time before the text is received in full.
- Select the desired RDS station with the I<>SKIP I buttons on the remote control, or select RDS station directly with the numbered button on the remote control.
- To call up Radiotext keep pressing the DISPLAY button on the remote control, until "RT" displayed.
Notes:
- If Radiotext is not provided by the selected station, only the station frequency will be shown in the display.
- It is required about 2 minutes to receive all radiotext character, please wait if the station is just tuned or signal received is weak.
- Deactive Radiotext by pressing the DISPLAY button.
Example:
STEREO

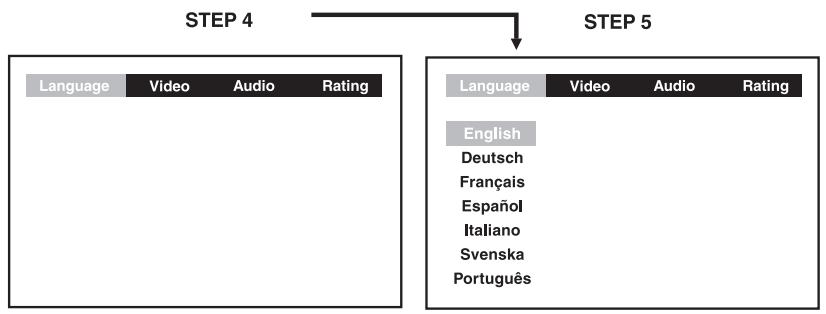
LANGUAGE setting
- Press the FUNCTION button until DVD appears on the display.
- Press the STOP button so that no disc is playing.
- Press the SETUP button.
4.Use or button to select the Language, then press the ENTER button.
5.Use or button to English, then press the ENTER button. The screen will change to English Wordings immediately. - To exit the FUNCTION SETUP MENU and return to the normal screen, press the RETURN button.
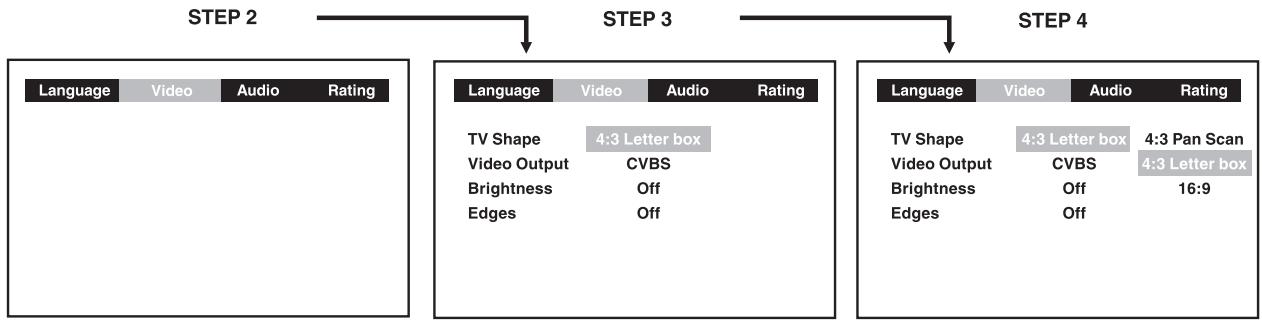
VIDEO setting
TV Shape
- Press the SETUP button.
2.Use or button to select Video, then press the ENTER button.
3.Use or button to select TV Shape, then press the ENTER button.
4.Use or button to shift and select the TV type, then press the ENTER button. - To exit the FUNCTION SETUP MENU and return to the normal screen, press the RETURN button.
Customizing the Function Settings
Cut off, when a wide-screen video image is played.
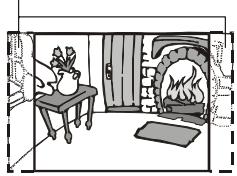
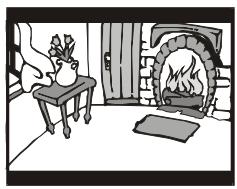
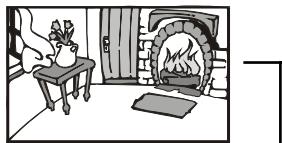
4:3 Pan Scan
- When wide-screen video material is played, this mode clips the right and left sides of the image so that it can be viewed on a conventional TV screen.
- Some wide-screen DVDs that do not permit Pan Scan mode playback are automatically played in letterbox mode (black bands top and bottom).
4:3 Letter Box
- When wide-screen video material is played in this mode on a conventional TV screen, black bands appear at the top and bottom of the screen.
16:9 Wide-screen
- This is the correct mode for playing wide-screen videos on a wide-screen TV.
- You must also set the screen mode on your wide-screen TV to "FULL".
The actual appearance of the image depends on the screen mode setting of your wide-screen TV.
Notes :
- The displayable picture size is preset on the DVD disc. Therefore the playback picture of some DVD discs may not conform to the picture size you select.
- When you play DVD discs recorded in the 4:3 picture size only, the playback picture always appears in the 4:3 picture size regardless of the TV shape setting.
- If you select 16:9 wide-screen mode and you own a 4:3 TV set, the DVD playback picture will be horizontally distorted during playback. Images will appear to be horizontally compressed. Always be sure that your TV shape conforms to the actual TV in use.
Video Output
- Press the SETUP button.
2.Use or button to select Video, then press the ENTER button.
3.Use or button to select Video Output, then press the ENTER button.
4.Use or button to shift and select the signal, then press the ENTER button. - To exit the FUNCTION SETUP MENU and return to the normal screen, press the RETURN button.
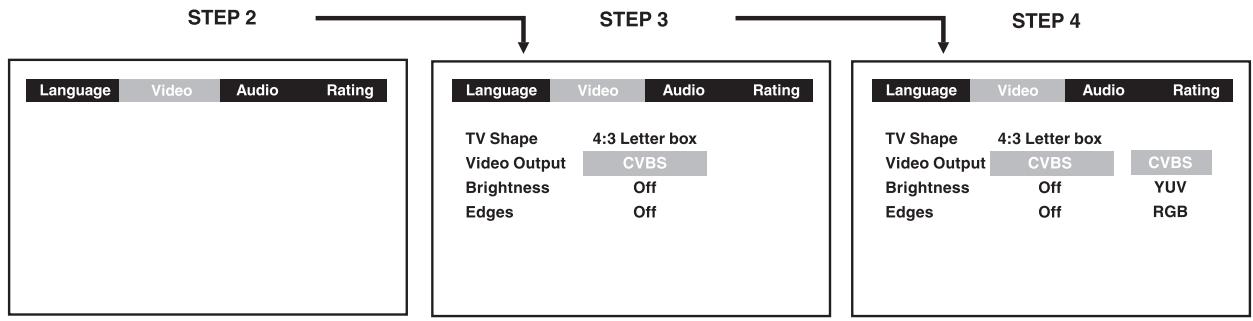
CVBS : Corresponding to your TV which has a video or S-video input.
YUV : Corresponding to your TV which has a YUV input. S-Video may not have video if YUV selected instead of CVBS.
RGB: ONLY useful for use in Europe.
Attention :
Always set Video Output in CVBS, otherwise, the picture on the TV may be distorted. If this occurs, and you cannot see the screen, press the P. SCAN button repeatedly until the "CVBS" display. Display may failed to show "CVBS" in case there is no disc or tray opened.
Customizing the Function Settings
Brightness
- Press the SETUP button.
2.Use or button to select Video, then press the ENTER button.
3.Use or button to select Brightness, and then press the ENTER button.
4.Use or button to shift and select the Off/On, then press the ENTER button.
5.If you want to exit the SETUP MENU and return to the normal screen, press the RETURN button.
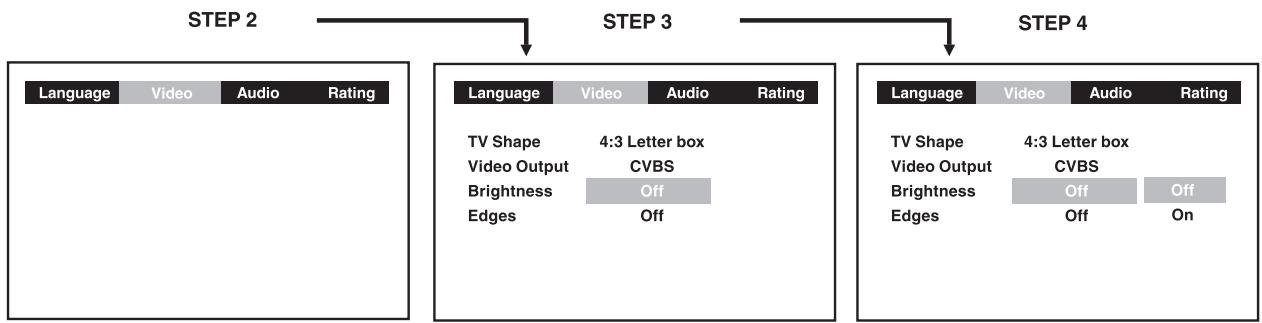
On : Picture will be brighter to clarify details.
Off : Picture will have deepened colors.
Note:
- Actual effect on pictures will vary depending on the TV.
Edges
- Press the SETUP button.
2.Use or button to select Video, then press the ENTER button.
3.Use or button to select Edges, and then press the ENTER button.
4.Use or button to shift and select the Sharpen / Soften / Off, then press the ENTER button.
5.If you want to exit the SETUP MENU and return to the normal screen, press the RETURN button.
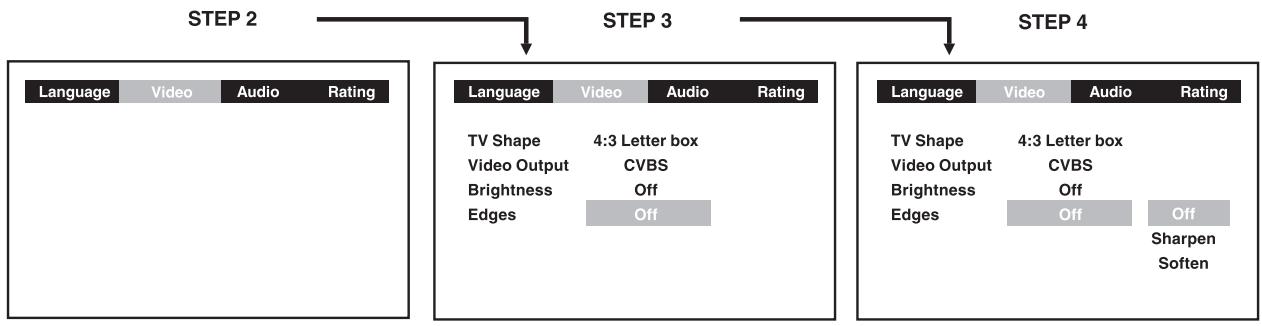
Sharpen : Fine detail will be easier to see.
Soften: Soft-focus effect.
Off : Picture will be returned to normal.
AUDIO setting
Digital Out
- Press the SETUP button.
2.Use or button to select Audio, press the ENTER button.
3.Use or button to select Digital Out, and then press the ENTER button repeatedly to select Digital Out type. - To exit the FUNCTION SETUP MENU and return to the normal screen, press the RETURN button.
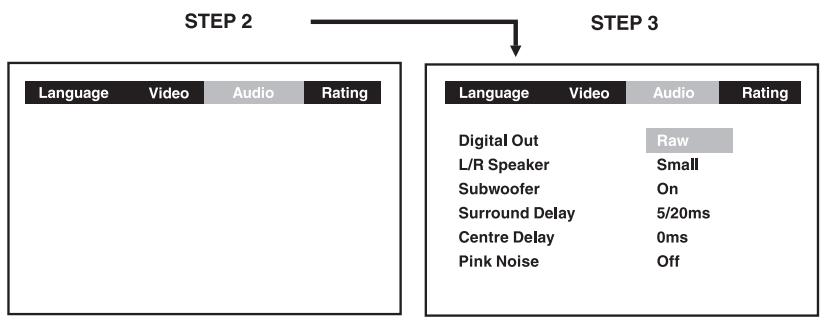
For Dolby Digital and DTS Digital Surround audio signal, the output signal from Digital Audio Out is:
Raw : The digital signal is not decoded.
PCM : The digital signal is converted into a 2 channel digital signal.
L/R Speaker
- Press the SETUP button.
2.Use or button to select the Audio, press the ENTER button.
3.Use or button to L/R Speaker, and then press the ENTER button.
4.Use or button to select the desired setting, and then press the ENTER button. - To exit the FUNCTION SETUP MENU and return to the normal screen, press the RETURN button.
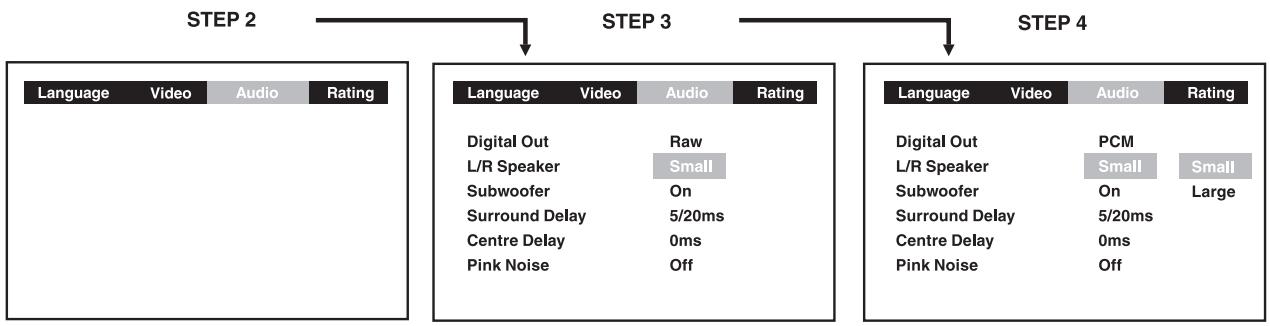
L/R Speaker
Small: Small size of Speaker.
Large : Large size of Speaker (speaker diameter normally larger than 4 inch or 10 cm)
Note :
- You can adjust the channel balance on your Unit. Please see "ADJUSTING THE SOUND" on page 15.
Customizing the Function Settings
Subwoofer
- Press the SETUP button.
2.Use or button to select the Audio, press the ENTER button.
3.Use or button to Subwoofer, and then press the ENTER button.
4.Use or button to select the desired setting, and then press the ENTER button. - To exit the FUNCTION SETUP MENU and return to the normal screen, press the RETURN button.
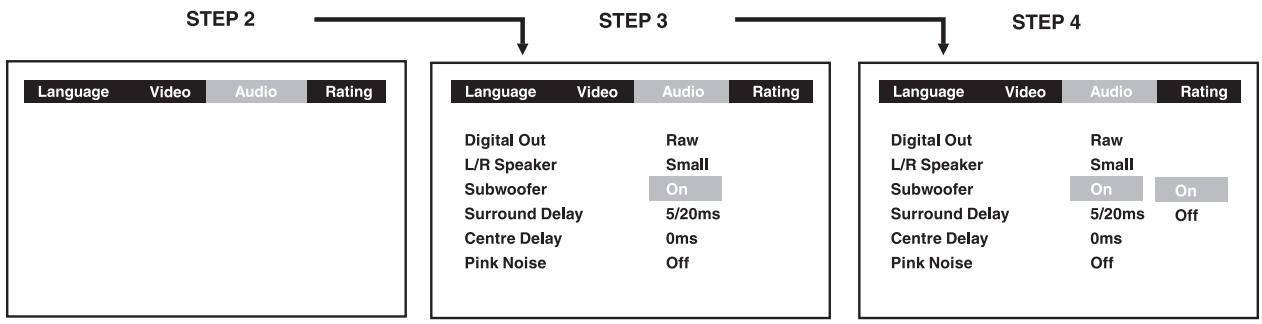
Subwoofer
"On" should be selected if your subwoofer is connected.
If "Off" is selected, no sound will be emitted by subwoofer.
Note :
- You can adjust the channel balance on your Unit. Please see "ADJUSTING THE SOUND" on page 15.
Surround Delay
- Press the SETUP button.
2.Use or button to select the Audio, press the ENTER button. - Use or button to Surround Delay, then repeatedly press the ENTER button to select the desired Surround Delay type. 0/15ms, 5/20ms, 10/25ms or 15/30ms appears.
- To exit the FUNCTION SETUP MENU and return to the normal screen, press the RETURN button.
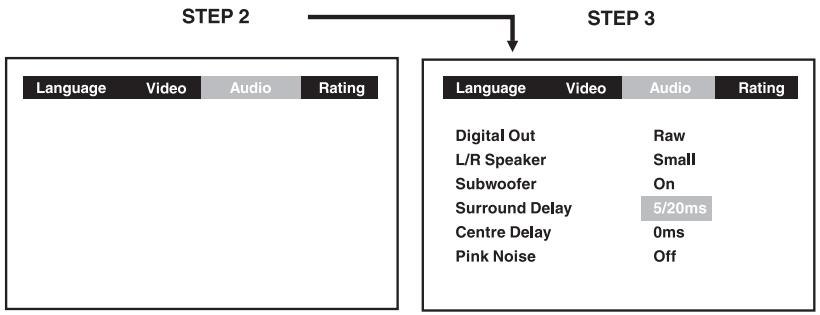
Notes:
- The first number represents the Dolby Digital and the second number represents the Pro Logic.
- The delay adjustment depends on the location of your surround speakers and the front speakers. If the location of the surround speakers is closer than the front speakers, the delay adjustment can compensate the distance difference.
Customizing the Function Settings
Center Delay
- Press the SETUP button.
2.Use or button to select the Audio, press the ENTER button. - Use or button to Center delay, then repeatedly press the ENTER button to select the desired Center Delay type. 0ms, 1ms, 2ms, 3ms, 4ms or 5ms appears.
- To exit the FUNCTION SETUP MENU and return to the normal screen, press the RETURN button.
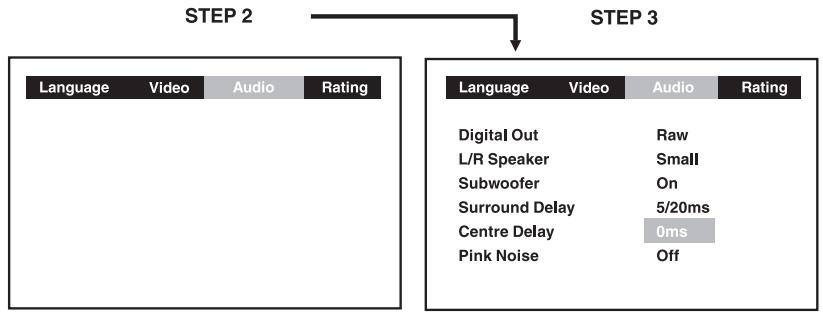
Note:
- This delay adjustment depends on the location of your center speaker. If the distance between the center speaker and the listener is less than the distance between the front right and left speaker and the listener, this delay adjustment is balanced.
Pink noise
- Press the SETUP button.
2.Use or button to select the Audio, press the ENTER button.
3.Use or button to Pink noise, and then press the ENTER button.
4.Use or button to select the desired setting, and then press the ENTER button. - To exit the FUNCTION SETUP MENU and return to the normal screen, press the RETURN button.
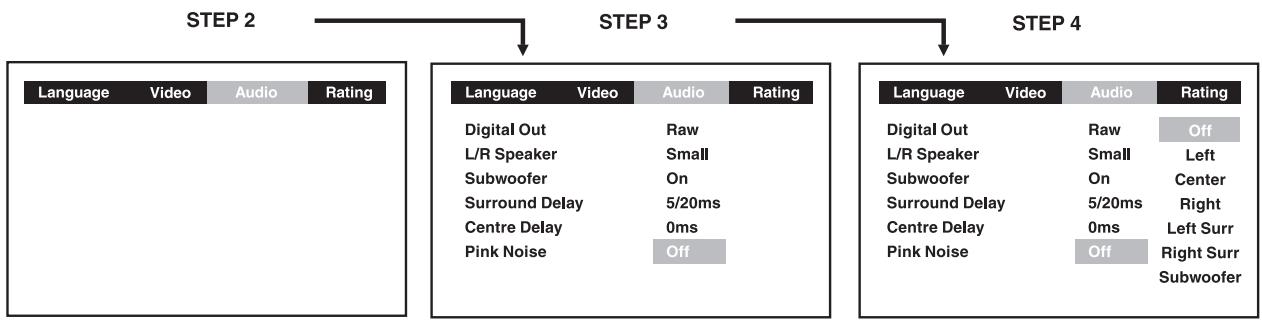
Pink noise
Off : Pink noise test mode should always be switched off, unless you are testing your speakers.
Left : Pink noise comes out from front left speaker for testing.
Center : Pink noise comes out from center speaker for testing.
Right : Pink noise comes out from front right speaker for testing.
Left sur : Pink noise comes out from rear surround left speaker for testing.
Right sur : Pink noise comes out from rear surround right speaker for testing.
Subwoofer : Pink noise comes out from subwoofer for testing.
Note :
- When using the pink noise generator to test your speakers, you can press the SOUND button on the remote control to adjust the channel balance. Please "Adjusting the Sound" on page 15.
RATING setting
Password/Parental lock
DVD discs equipped with the password function are rated according to their content. The contents allowed by a parental lock level and the way a DVD disc can be controlled may vary from disc to disc.
For example, if the disc allowed, you could edit out violent scenes unsuitable for children and replace them with more suitable scenes, or you could lock out playback of the disc altogether.
- Press the SETUP button.
2.Use or button to select Rating, press the ENTER button. - Use or button to select Parental lock and then press the ENTER button repeatedly to set the parental lock level.
4.Use or button to shift and select Password, enter your 4-digit security code and then press the ENTER button.
If you make a mistake before pressing the ENTER button, press the CLEAR button and enter your 4-digit security code again.
You cannot play DVD discs rated higher than the level you selected unless you cancel the parental lock function.
The parental lock level is equivalent to the following ratings.
Level 1: Kid Safe
Level 5:PG_R
Level 2:G
Level 6:R
Level 3:PG
Level 7:NC_17
Level 4:PG_13
Level 8 : Adult
- To exit the FUNCTION SETUP MENU and return to the normal screen, press the RETURN button.

Indicates Parental lock is NOT active.

The Parental lock is active.
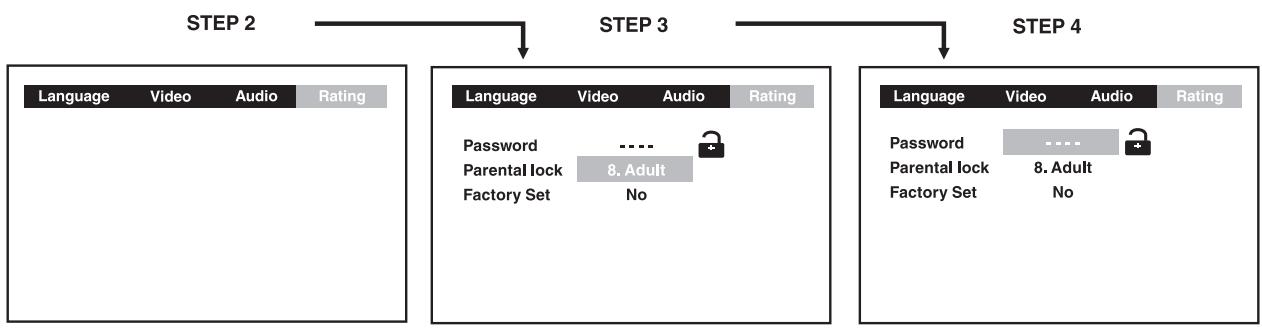
If you forget the password, you can erase your current password by pressing number button 8 on the remote four times, then press the ENTER button to confirm the setting.
password:8888
Customizing the Function Settings
Factory Set
If you want to return the initial language setting to the factory default, do the following:
- Press the SETUP button.
2.Use or button to select the Rating, then press the ENTER button.
3.Use or button to shift and select the Factory Set, then press the ENTER button.
4.Use or button to shift and select Yes, then press the ENTER button. - To exit the FUNCTION SETUP MENU and return to the normal screen, press the RETURN button.
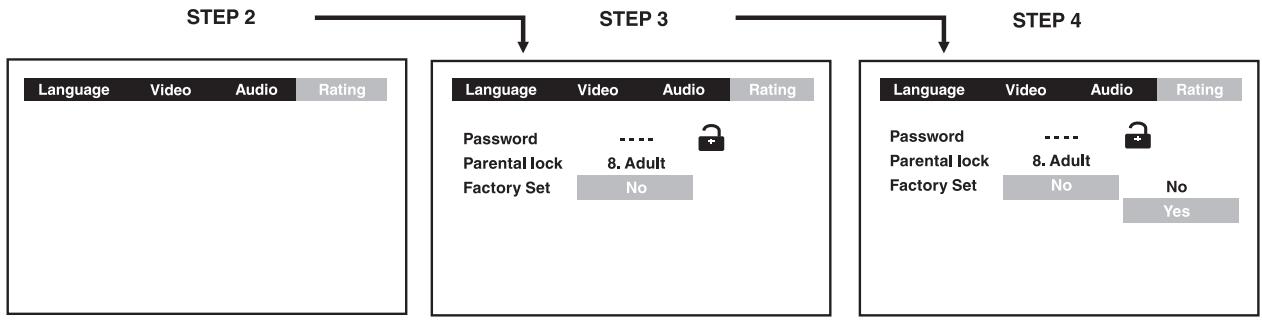
Note:
When you reset the Unit to the factory default, the Unit will take 3-5 seconds to reset.
| Code | Language Name | Code | Language Name | Code | Language Name | Code | Language Name |
| AA | Afar | FY | Frisian | MG | Malagasy | SL | Slovenian |
| AB | Abkhazian | GA | Irish | MI | Maori | SM | Samoan |
| AF | Afrikaans | GB | Scots Gaelic | MK | Macedonian | SN | Shona |
| AM | Ameharic | GL | Galician | ML | Malayalam | SO | Somali |
| AR | Arabic | GN | Guarani | MN | Mongolian | SQ | Albanian |
| AS | Assamese | GU | Gujarati | MO | Moldavian | SR | Serbian |
| AY | Aymara | HA | Hausa | MR | Marathi | SS | Siswat |
| AZ | Azerbaijani | HI | Hindi | MS | Malay | ST | Sesotho |
| BA | Bashkir | HR | Croatian | MT | Maltese | SU | Sundanese |
| BE | Byelorussian | HU | Hungarian | MY | Burmese | SV | Swedish |
| BG | Bulgarian | HY | Armenian | NA | Nauru | SW | Swahili |
| BH | Bihari | IA | Interlingua | NE | Nepali | TA | Tamil |
| BI | Bislama | IE | Interlingue | NL | Dutch | TE | Telugu |
| BN | Bengali | IK | Inupiak | NO | Norwegian | TG | Tajik |
| Bangla | IN | Indonesian | OC | Occitan | TH | Thai | |
| BO | Tibetan | IS | Icelandic | OM | (Afan) Oromo | TI | Tigrinya |
| BR | Breton | IT | Italian | OR | Oriya | TK | Turkmen |
| CA | Catalan | IW | Hebrew | PA | Panjabi | TL | Tagalog |
| CO | Corsican | JA | Japanese | PL | Polish | TN | Setswana |
| CS | Czech | JI | Yiddish | PS | Pashto, Pushto | TO | Tonga |
| CY | Welsh | JW | Javanese | PT | Portuguese | TR | Turish |
| DA | Danish | KA | Georgian | OU | Quechua | TS | Tsonga |
| DE | German | KK | Kazakh | RM | Rhaeto- | TT | Tatar |
| DZ | Bhutani | KL | Greenlandic | Romance | TW | Twi | |
| EL | Greek | KM | Cambodian | RN | Kirundi | UK | Ukrainian |
| EN | English | KN | Kannada | RO | Romanian | UR | Urdu |
| EO | Esperanto | KO | Korean | RU | Russian | UZ | Uzbek |
| ES | Spanish | KS | Kashmiri | RW | Kinyarwanda | VI | Vietnamese |
| ET | Estonian | KU | Kurdish | SA | Sanskrit | VO | Volapuk |
| EU | Basque | KY | Kirghiz | SD | Sindhi | WO | Wolof |
| FA | Persian | LA | Latin | SG | Sangho | XH | Xhosa |
| FI | Finnish | LN | Lingala | SH | Serbo- | YO | Yoruba |
| FJ | Fiji | LO | Laothian | Croatian | ZH | Chinese | |
| FO | Faroese | LT | Lithuanian | SI | Singhalese | ZU | Zulu |
| FR | French | LV | Latvian, Lettish | SK | Slovak |
Maintenance
Cleaning Disc
A defective or soiled disc inserted into the Unit can cause sound to drop out during playback.
Handle the disc by holding its inner and outer edges.
- Do NOT touch the surface of the unlabeled side of the disc.
- Do NOT stick paper or tape on the surface.
- Do NOT expose the disc to direct sunlight or excessive heat.
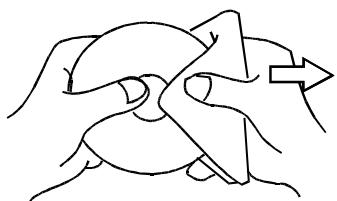
- Clean the disc before playback. Wipe the disc from the center outward with a cleaning cloth.
- NEVER use solvents such as benzine or alcohol to clean the disc.
- Do NOT use irregular shape discs (example : heart shaped, octagonal, etc.). They may cause malfunctions.
Cleaning the Unit
- Be sure to turn the Unit off and disconnect the AC power cord before maintaining the Unit.
- Wipe the Unit with a dry soft cloth.
If the surfaces are extremely dirty, wipe clean with a cloth which has been dipped in a weak soap-and-water solution and wrung out thoroughly, then wipe with a dry cloth.
- Never use alcohol, benzine, thinner, cleaning fluid or other chemicals. And do NOT use compressed air to remove dust.
Important Note
Before transporting the Unit, remove disc from the disc tray.
Trouble Shooting Guide
SYMPTOM CAUSE (AND REMEDY)
No power.
- Check that the AC power cord is connected.
No picture.
- The region number of the disc doesn't match the region number of this Unit.

- The TV is not set to receive DVD signal output.
- The video cable is not connected.
The TV is not turned on.
The picture is not clear.
- Clean the disc.
- If video from your system has to go through your VCR to get to your TV, the copy-protection applied to some DVD programs could affect picture quality. If you still experience problems after checking your connections, please try connecting your Unit directly to your TV through the S-Video-input, if your TV is equipped with this input.
The disc is scratched.
Trouble Shooting Guide
SYMPTOM
CAUSE (AND REMEDY)
| ·The location and orientation of the antenna are incorrect. If you use an indoor antenna, change to an outdoor antenna. ·The TV antenna wire is too close to the Unit. Separate the antenna wire of the TV set from the Unit. | |
| No sound or only a very low-level sound is heard. | ·Check that the speakers and equipment are connected securely. ·Make sure that you've selected the corrected equipment on the system. ·The system is in pause mode or in Slow-motion Play mode. Press the▶PLAY button to return to normal play mode. ·Fast forward or fast reverse is performed. Press the▶PLAY button to return to normal play mode. ·Check the speaker settings. ·Make sure that AUDIO output and AV IN input connections correct. ·Adjust the speakers volume. ·The DTS DVD disc cannot be decoded to have speaker output. ·This Unit is too hot, shut off for 30 minutes to cool down. ·You can use Pink Noise setting to test the speaker output. (Please see Customizing the Function Settings.) ·Make sure you turn on the power on the rear of the subwoofer. |
| Severe hum or noise is heard. | ·Check that the speakers and equipment are connected securely. ·Check that the connecting cords are away from a transformer or motor, and at least 10 feet (3 meters) away from a TV set or fluorescent light. ·Move your TV away from the audio equipment. ·The plugs and jacks are dirty. Wipe them with a cloth slightly moistened with alcohol. ·Clean the disc. ·Vibrations from the speakers are affecting the Unit. |
| The remote does not function. | ·Remove any obstacles between the remote and the Unit. ·Use the remote near the Unit. ·Point the remote at the remote sensor on the Unit. ·Replace all the batteries in the remote with new ones. |
| The disc does not play. | ·There is no disc inside ("No Disc" appears on the TV screen). ·Insert the disc correctly with the playback side facing down on the disc tray. ·Clean the disc. ·A non-PAL disc has been inserted. The Unit and disc region number are incompatible. ·Condensation may have formed inside the Unit due to a sudden change in temperature. Wait about an hour for it to clear and try again. |
| The DVD door cannot open. | ·Reset the Unit, press the POWER button to turn off the Unit, wait for a few seconds, then restart the Unit again. |
- Important Safety Instructions
- WARNING: TO PREVENT FIRE OR SHOCK HAZARD, DO NOT EXPOSE THIS APPLIANCE TO RAIN OR MOISTURE.
- On Placement
- On Safety
- On Condensation
- WARNING:
- Notes on Copyright
- Table of Contents
- Disc Formats
- Region Management Information
- Disc Function or Operation that is Not Available
- Icons Used on DVDs
- Notes:
- Title, Chapter and Tracks
- Note :
- Notes on Unauthorized Discs
- Using the Remote Control
- To install Batteries
- Battery Replacement
- Remote Control
- Parts and Functions
- Front Panel
- Note:
- Rear Panel
- Region (Local) Number Error Indicator
- Setup
- For better reception
- FM
- AM(MW)
- A Connecting your TV
- SCART cable
- or
- RCA Audio/Video cable
- S-Video cable
- Phono/Scart cable
- Component video outputs (DVD)
- Progressive outputs (DVD)
- Attention:
- Notes :
- Connecting another source
- Analogue connection
- Digital connection
- Listening to another audio equipment
- Connecting a VCR
- Watching a DVD
- Watching a Videotape
- To hear the sound from television programmes through the Unit
- Connecting the speakers & subwoofer
- Speakers positioning
- Mounting rear surround speakers
- Turning on the unit and TV
- Power cord connection
- Adjusting the Sound
- To adjust the surround sound balance while Pro Logic decoding is in effect
- Front speaker (left)
- Front speaker (right)
- Center speaker
- Rear speaker (left)
- Rear speaker (right)
- Subwoofer
- To adjust the sound quality
- Dolby Digital
- Movie Mode
- Music Mode
- Pro Logic Emulation Mode
- Matrix Mode
- To select the listening channel
- Playing a Disc
- Pausing playback (still mode)
- Stopping playback
- To skip to a different track
- Fast Forward/Fast Reverse DVD CCD VCD
- Slow-motion play DVD
- SKIP (Forward / Reverse)
- Zooming into an image
- Angle selection
- Sequence of angle shots
- Audio selection
- Subtitle selection
- DISPLAY function
- Title skip
- Chapter skip
- Time skip
- Angle setting
- Audio setting
- Subtitle setting
- GOTO function
- Locating a specific title
- Locating a specific title / chapter / track DVD CD VCD
- Locating a specific time
- Programmable memory
- Title / Chapter programmed playback
- Track programmed playback
- Repeating a title
- Repeating a chapter
- To resume normal playback
- Repeating a single track
- Repeating a whole disc
- Repeating a specific section
- Playing MP3 and Picture File Disc
- Playing a MP3 file disc
- To pause playback
- To stop playback
- To skip to the next or previous file
- On-screen display
- Playing a Picture file disc
- Playing a MP3/Picture file disc
- Tuning into a station manually
- FM Stereo
- Weak FM stations
- To search for a station automatically
- Presetting stations
- Tuning into a preset station
- RDS STATION SERVICE
- Example:
- PROGRAM TYPES (PTY)
- RADIOTEXT
- LANGUAGE setting
- VIDEO setting
- TV Shape
- Customizing the Function Settings
- 4:3 Pan Scan
- 4:3 Letter Box
- 16:9 Wide-screen
- Video Output
- Attention :
- Brightness
- Edges
- Digital Out
- L/R Speaker
- Surround Delay
- Center Delay
- Pink noise
- RATING setting
- Password/Parental lock
- Factory Set
- Maintenance
- Cleaning Disc
- Cleaning the Unit
- Important Note
- Trouble Shooting Guide
- SYMPTOM CAUSE (AND REMEDY)
- SYMPTOM
- CAUSE (AND REMEDY)
Brand : AKAI
Model : DVR4200SS
Category : Digital Video Recorder