
G2NU - Guitar effects pedal ZOOM - Free user manual and instructions
Find the device manual for free G2NU ZOOM in PDF.

| Product Type | Guitar Effects Pedal |
| Dimensions (G2Nu) | 166 mm (L) × 160 mm (W) × 64 mm (H) |
| Weight (G2Nu) | 800 g (without batteries) |
| Power Supply | DC 9 V center-negative 500 mA AC adapter (ZOOM AD-16) or 4 AA alkaline batteries or USB bus power |
| Battery Life | Approximately 6.5 hours with alkaline batteries (low backlight) |
| Main Functions | 83 effect types, 8 simultaneous modules, 10 user banks × 10 patches, 10 preset banks, tuner, looper, rhythms, direct mode, USB audio interface, patch pre-select |
| Expression Pedal | Built-in on G2.1Nu, external (FP02) on G2Nu |
| Input | Standard mono jack (1 MΩ impedance) |
| Output | Standard stereo jack (line/headphones) |
| USB Interface | 16-bit audio, sample rates 32/44.1/48 kHz |
| Display | LCD |
| Maintenance and Cleaning | Clean with a slightly damp soft cloth. Do not use solvents. |
| Safety | Use exclusively the specified adapter (ZOOM AD-16). Do not open the case. Avoid moisture, shocks, and extreme temperatures. |
| Spare Parts and Repairability | AD-16 adapter, FP02 expression pedal, FS01 footswitch. In case of malfunction, contact ZOOM support. |
| General Information | Energy-saving function (standby after 25 min). Firmware update possible via USB. |
Frequently Asked Questions - G2NU ZOOM
User questions about G2NU ZOOM
0 question about this device. Answer the ones you know or ask your own.
Ask a new question about this device
Download the instructions for your Guitar effects pedal in PDF format for free! Find your manual G2NU - ZOOM and take your electronic device back in hand. On this page are published all the documents necessary for the use of your device. G2NU by ZOOM.
USER MANUAL G2NU ZOOM
Thank you very much for purchasing the ZOOM G2Nu/G2.1Nu (in this manual, we will call it the G2Nu/G2.1Nu). Please read this manual carefully to learn about all the functions of the G2Nu/G2.1Nu so that you will be able to use it fully for a long time. Keep this manual in a convenient place for reference when necessary.
| Contents | |
| Usage and Safety Precautions . 2 | Set the master level, tempo, and tuner |
| Terms Used in This Manual . 3 | standard pitch. 30 |
| G2Nu Part Names . 4 | Set the direct monitoring and recording levels. 30 |
| G2.1Nu Part Names . 6 | Set the display backlight and contrast. 31 |
| Select a Patch and Play (Play Mode) . 8 | Setting the battery type. 31 |
| Using the Tuner . 10 | Check the current version. 31 |
| Using the Looper . 13 | Upgrading the Firmware Version. 32 |
| Using Rhythms (Rhythm Mode) . 16 | Effect Types and Parameters . 33 |
| Creating and Changing Patches (Edit Mode) . 18 | COMP (compressor) module . 34 |
| Saving and Copying Patches (Store Mode) . 22 | EFX module . 35 |
| Using Direct Mode . 24 | ZNR (ZOOM noise reduction) module . 37 |
| Patch Pre-selection (PRE SELECT) . 25 | DRIVE module . 38 |
| Using a Foot Switch . 26 | EQUALIZER module |
| Using an Expression Pedal . 27 | (low and middle frequency range) . 40 |
| Set the control parameter and adjustment range. 27 | EQUALIZER module (high frequency range) . 40 |
| Adjusting the built-in expression pedal . 28 | MODULATION module . 41 |
| Using Audio Interface Functions . 29 | DELAY module . 46 |
| Recording and playback with DAW software . 29 | REVERB module . 47 |
| Changing Various Settings (Global Menus). 30 | TOTAL module . 48 |
| Open the global menus . 30 | Troubleshooting . 49 |
| Specifications . 50 | |
| Rhythm List . 51 | |
200
© ZOOM CORPORATION
Copying or reproduction of this document in whole or in part without permission is prohibited.
Usage and Safety Precautions
Safety Precautions
In this manual, symbols are used to highlight warnings and cautions that you should read to avoid accidents. The meanings of these symbols are as follows.

This symbol indicates explanations about extremely dangerous matters. If users ignore this symbol and handle the device the wrong way, serious injury or death could result.

This symbol indicates explanations about dangerous matters. If users ignore this symbol and handle the device the wrong way, bodily injury and damage to the equipment could result.
Please observe the following safety tips and precautions to ensure safe use of this unit
Power considerations

Since power consumption of this unit is high, we recommend the use of an AC adapter. If you use batteries, use alkaline batteries.
AC adapter operation
- Always use a DC9V center minus 500-mA AC adapter (ZOOM AD-16). Use of an adapter other than that specified could damage the unit or cause malfunction and pose a safety hazard.
- Always connect the AC adapter to an AC outlet that supplies the rated voltage required by the adapter.
- When disconnecting the AC adapter from an AC outlet, always grasp the adapter itself.
- During lightning or when not using the unit for an extended period, disconnect the AC adapter from the AC outlet.
Battery operation
- Use 4 conventional 1.5-V AA batteries (or nickel metal hydride batteries).
- Carefully read the safety indications on the batteries before use.
- When not using the unit for an extended period, remove the batteries from the unit.
- If battery leakage should occur, thoroughly wipe the battery compartment and the battery terminals to remove battery fluid.
- Close the battery compartment cover when using the G2Nu/G2.1Nu.
Use environment considerations

Avoid using the unit in any of the following conditions that could cause malfunction.
- Extremely hot or cold places
Near heaters and other heat sources - Places that are extremely humid or exposed to splashing water
- Sandy or dusty places
- Places with lots of vibrations
Handling

- Never put objects filled with liquids, such as vases, on the unit since this could cause electric shock.
- Never place candles and other burning objects on top of the G2Nu/G2.1Nu. Doing so could cause a fire.

The G2Nu/G2.1Nu is a precision instrument. Do not apply excessive force to the switches and other controls. Exposing the unit to strong impacts, including applying excessive force, dropping it or bumping it, could cause it to break.
- Do not put foreign objects, including coins and wires, or liquids, including water, soft drinks and alcohol, into the G2Nu/G2.1Nu.
Connecting cables and input and output jacks

You should always turn OFF the power to the unit and all other equipment before connecting or disconnecting any cables. Also make sure to disconnect all connection cables and the AC adapter before moving the unit.
Alterations

Never open the case or attempt to modify the product in any way since this can result in damage to the unit. Zoom Corporation will not take responsibility for any damage to the unit caused by alterations.
Volume

Do not use the G2Nu/G2.1Nu at a loud volume for a long time since this could cause hearing impairment.
Usage precautions
Electrical interference with other equipment
In consideration of safety, the G2Nu/G2.1Nu has been designed to provide maximum protection against the emission of electromagnetic radiation from the device and to minimize external electromagnetic interference. However, equipment that is very susceptible to interference or that emits powerful electromagnetic waves should not be placed near the G2Nu/G2.1Nu, as interference could occur. In such a case, place the G2Nu/G2.1Nu and the other equipment sufficiently far apart.
With any type of digital control device, the G2Nu/G2.1Nu included, electromagnetic interference could cause malfunction and could corrupt or destroy data. Please use caution.
Cleaning
Use a soft cloth to clean the panels if they become dirty. If necessary, slightly moisten the cloth. Never use cleansers, wax, or solvents such as paint thinner, benzene or alcohol.
Malfunction
If the unit should malfunction, disconnect the AC adapter and turn the power OFF immediately. Then, disconnect all other connected cables.
Prepare information including the model name, serial number, specific symptoms related to the malfunction, your name, address and telephone number and contact the store where you bought the unit or ZOOM support.
Please keep this manual in a convenient place for future reference.
Terms Used in This Manual
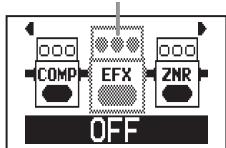
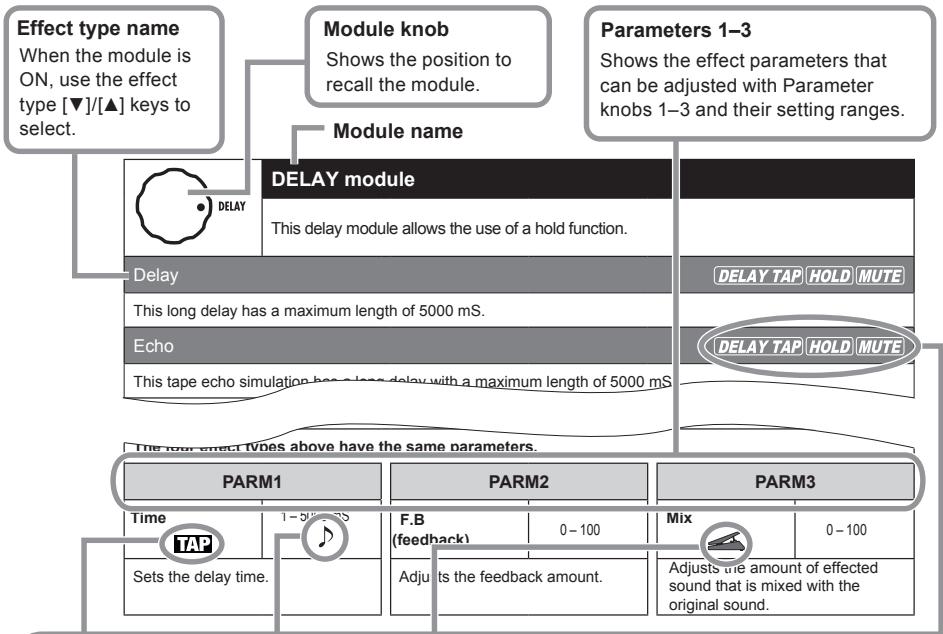
- Module
As shown in the illustration above, you can use up to 8 effect units simultaneously. Each of these units is called a "module."
Effect type
Among the modules, some allow different "effect types" to be activated. For example, when using the MODULATION module (modulation/delay effects) you can choose one of several effect types, including chorus, flanger and delay.
Parameter
Variables that determine the application of an effect are called "parameters." If we imagine each module as a separate effect pedal, then each parameter would be a knob on that pedal.
Patch
The ON/OFF status of each module and the parameter settings are stored in units called "patches." Use patches to recall and save effects.
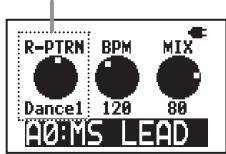
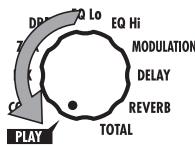
Bank
A set of 10 patches is called a "bank."
This unit has a total of 20 banks, including user banks A-J, which can be edited and saved and preset banks 0-9, which can only be recalled. (See the illustration at the top right.)
Mode
Each operation status of the G2Nu/G2.1Nu is called a "mode." Depending on the currently selected mode, the functions of keys and knobs change. The modes include the play mode in which you choose a patch and play your instrument, the rhythm mode in which you can play back a rhythm pattern, the edit mode in which you can create and change patches, and the store mode in which you can save patches.
Operating the unit on batteries
- Turn the unit over and open the battery compartment cover on the bottom.
Press the latch to release it and raise the cover.
- Insert 4 AA batteries into the battery compartment.
- Close the cover.
When the remaining charge is low, "Low Battery!" appears on the display. When operating with batteries, you can check the amount of remaining charge in the top right corner of the display when in play, rhythm and direct modes.

Remaining battery charge
When operating with an AC adapter or USB bus power, an adapter or USB icon appears instead.
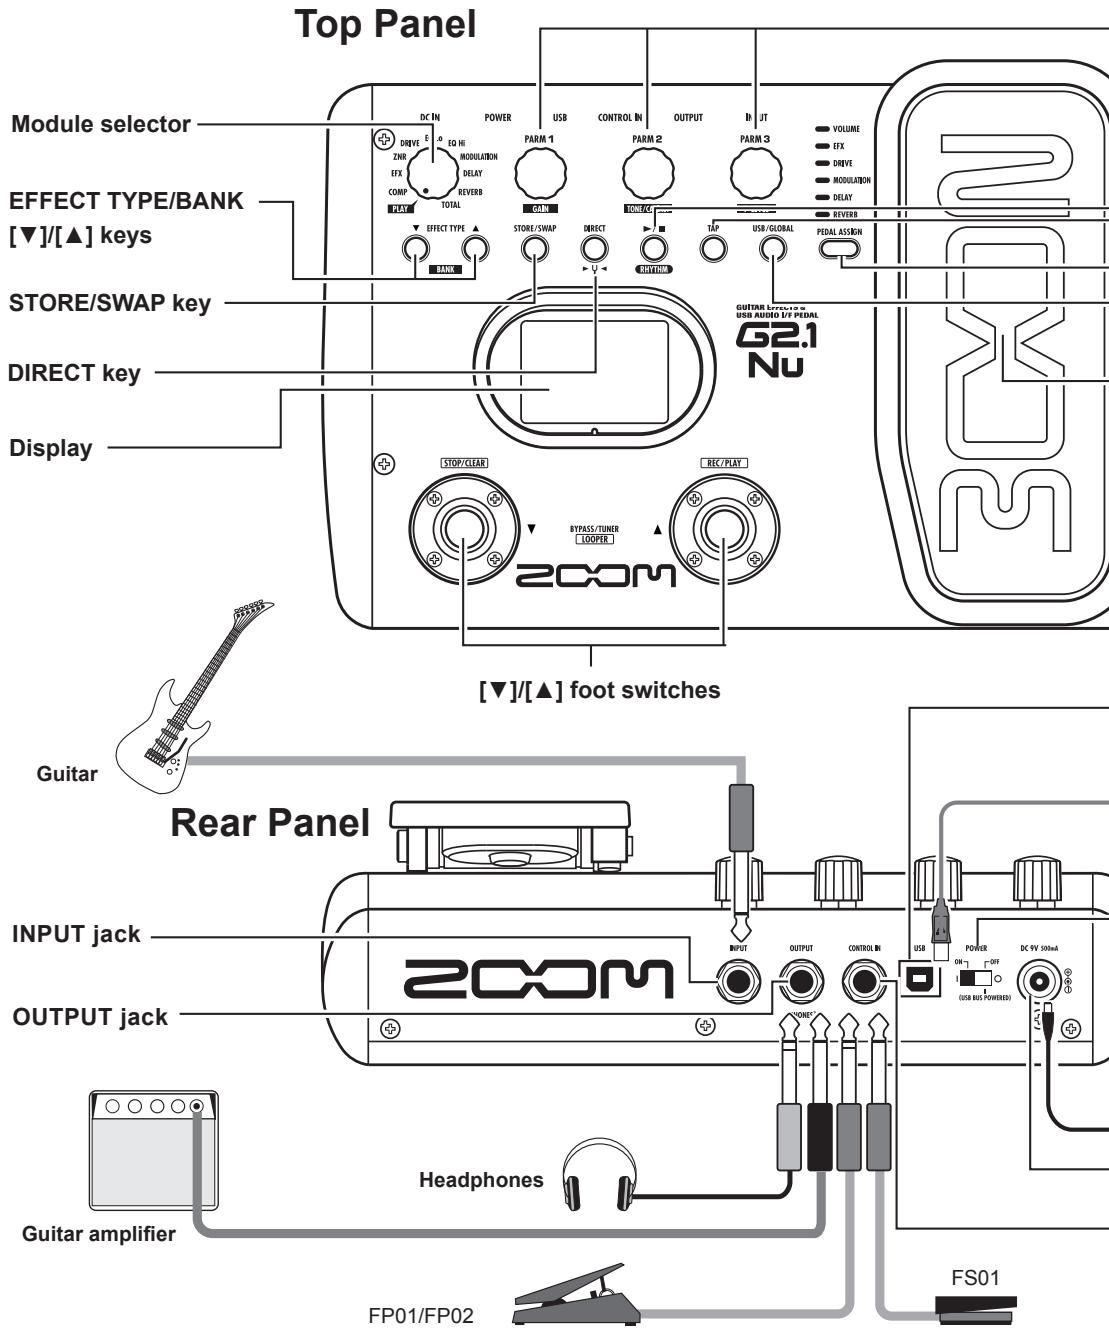
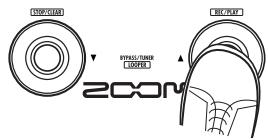
G2Nu Part Names
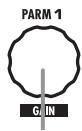
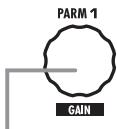
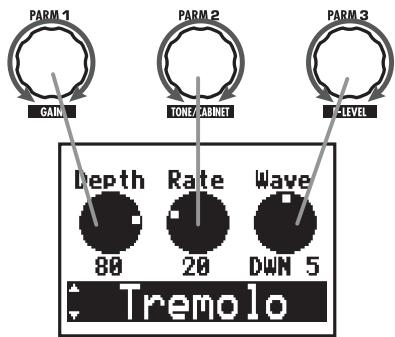
Parameter knobs 1-3
DIRECT key
RHYTHM [▶/■] key
USB/GLOBAL key
TAP key
[ ] / [ ] foot switches
USB connector
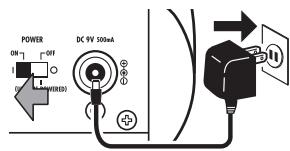
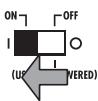
POWER switch
DC9V AC adapter jack
CONTROL IN jack
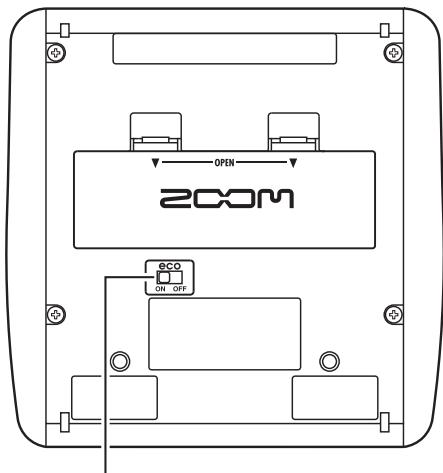
Bottom Panel

eco switch
When the eco switch is ON:
- If the unit is not used for about 25 minutes, it will enter power standby mode.
- As long as there is a signal input from a guitar, the unit will not enter standby mode.
When in power standby:
- The unit functions at the minimum necessary level to prevent battery drain and wasteful power consumption.
- Guitar signal input is ignored.
- Any operation causes the unit to return to normal.
G2.1Nu Part Names
Parameter knobs 1-3
RHYTHM [▶/■] key
TAP key
PEDAL ASSIGN key
USB/GLOBAL key
Expression pedal
USB connector
POWER switch

ZOOM AC adapter (AD-16)
DC9V AC adapter jack
CONTROL IN jack
Bottom Panel


eco switch
When the eco switch is ON:
- If the unit is not used for about 25 minutes, it will enter power standby mode.
- As long as there is a signal input from a guitar, the unit will not enter standby mode.
When in power standby:
- The unit functions at the minimum necessary level to prevent battery drain and wasteful power consumption.
- Guitar signal input is ignored.
- Any operation causes the unit to return to normal.
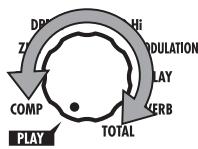
Select a Patch and Play (Play Mode)
1. Turn the power on
Minimize the volume of the amp.
- When using batteries
- Turn the POWER switch ON.
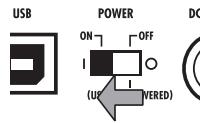
- When using an AC adapter
- Connect the AC adapter, and turn the POWER switch ON.
When using an amp, turn its power on and raise its volume.

Turn the POWER switch OFF and connect the USB connector to a computer to operate the unit using bus power ( P29)
2. Set the unit to play mode
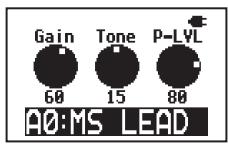
Turn the module selector to "PLAY."
Turn one of the parameter knobs (1-3) to open the following screen.
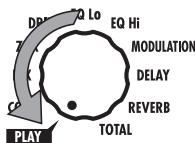
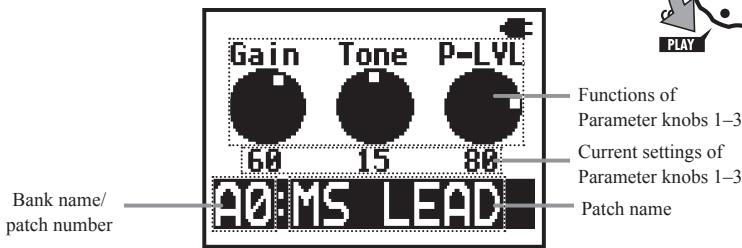

Immediately after turning the power ON, play mode is activated regardless of the position of the module selector.

DRIVE module tone

- If you do not save changed parameters ( P22) , all changes will be lost when you select a different patch.
- When using headphones or a mixer, we recommend that you use the direct mode ( P24), which simulates the sound of a guitar cabinet.
- Adjust the volume for all patches using the master level ( P30)
3. Select a patch
Press the [▲] foot switch to select the next patch.
Press repeatedly to cycle through the banks and patches in order from A0-A9...J0-J9→00-09...90-99→A0.

Press the [] foot switch to select the previous patch.

Using pre-select mode ( P25) you can jump directly to a patch that is far from the current patch.
4. Switch banks
Use the bank [] / [] keys to change to the next or previous bank.

You can also connect an external foot switch (FS01) and use it to change banks ( P26)
1. Set the unit to play mode
2. Set the unit to bypass/mute
Press both [ ] / [ ] foot switches at the same time.
To set the unit to bypass
After "Bypass/Tuner" appears on the screen, release the switches within one second.
To set the unit to mute
After "Bypass/Tuner" disappears and "Mute/Tuner" appears on the screen, release the switches within one second.
When set to bypass/mute, the tuner becomes active.
Standard pitch
Tuner type

Drop tuning adjustment

- If you continue to press both [] / [] foot switches for more than 2 seconds, the looper becomes active ( P13).
- You cannot set the unit to bypass/mute from edit mode ( P18)
- When you press both [] / [] foot switches at the same time, the foot switch that is momentarily pressed first could change the tone in some cases. Please avoid making sound when pressing the switches.
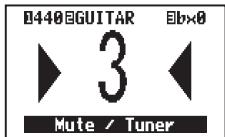
3. Select the tuner type
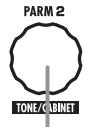
Turn Parameter knob 2 to select the tuner type.
CHROMATIC
The chromatic tuner shows the nearest pitch name (semitone) and how far the sound input is from that pitch.
Other tuning types
Depending on the selected type, the nearest string name and how far the sound input is from that pitch is shown. Select from the following tunings.
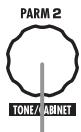
TONE/CABINET
| Display | Meaning | String number/Note name | ||||||
| 7 | 6 | 5 | 4 | 3 | 2 | 1 | ||
| GUITAR | Standard tuning for guitars, including 7-string guitars | B | E | A | D | G | B | E |
| OPEN A | In open A tuning, the open strings make an A chord | E | A | E | A | C# | E | |
| OPEN D | In open D tuning, the open strings make a D chord | D | A | D | F# | A | D | |
| OPEN E | In open E tuning, the open strings make an E chord | E | B | E | G# | B | E | |
| OPEN G | In open G tuning, the open strings make a G chord | D | G | D | G | B | D | |
| DADGAD | This alternate tuning is often used for tapping, etc. | D | A | D | G | A | D | |
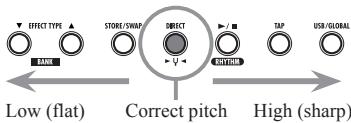
4. Tune the guitar
Play the open string that you want to tune, and adjust the pitch.
When set to CHROMATIC
The name of the nearest note, and the pitch accuracy is shown.

Low (flat)
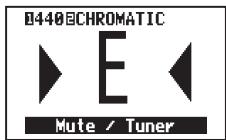
Correct pitch
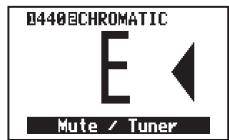
High (sharp)
When set to other tuner types
The number of the nearest string, and the pitch accuracy is shown. For example, when tuning the 3rd string, if 4 or a higher number appears, raise the pitch, and if 2 or a lower number appears, lower the pitch. After the correct number appears fine tune the string.
String number (when the 3rd string is tuned correctly)

You can also use the keys above the display to check the pitch.
5. Drop tuning
You can tune a string 1 to 3 semitones lower than usual for drop tuning.
Turn Parameter knob 3 to lower the tuning one (b× 1) , two (b× 2) or three (b× 3) semitones.

As shown in the illustration at right, if the tuning is lowered by one semitone ( × 1) when using the "GUITAR" tuned type, E is shown as the correct pitch when tuning the 6th string.
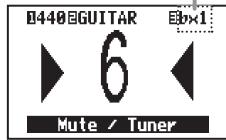
Drop tuning

Drop tuning cannot be used with the CHROMATIC tuner.
6. Change the frequency of the tuner's standard pitch.
Turn Parameter knob 1.

The standard pitch of middle A can be set in a range from 435 - 445Hz
(Default value: 440Hz )
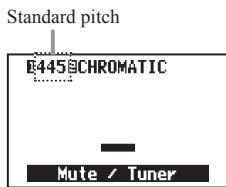

If you change the standard pitch in tuner mode, the setting is reset to the default value whenever the power is turned OFF and ON again.
If you want this setting to be saved, set it using the global parameters ( P30)
7. Return to play mode
Press either [] / [] foot switch.

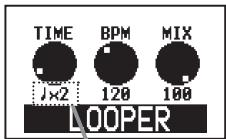
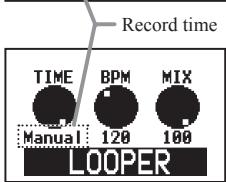
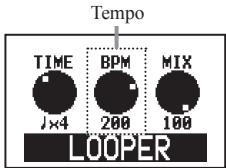
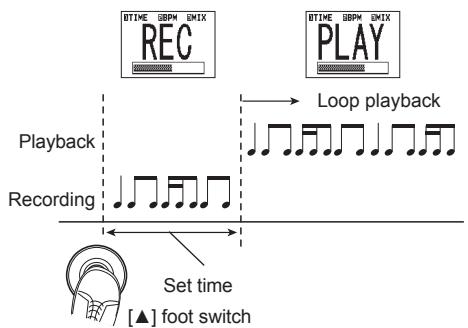
1. Activate the looper
In play mode, press both [] / [] foot switches until "LOOPER" appears on the screen.
Recording time
Tempo
Volume of recorded phrase
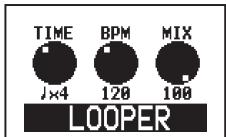

When the looper is activated, the DELAY module is turned OFF.
2. Set the recording time
Turn Parameter knob 1 to select the recording time.

Note mark Set the recording time by setting the tempo and the number of quarter notes. For example, the recording time is two beats at the current tempo when set to × 2
Manual Use the foot switch to start and stop recording.
3. Adjust the tempo
Turn Parameter knob 2 to set the tempo.

Tempo can be set in a range from 40-250 BPM (beats per minute). If you selected a note mark in step 2, recording time is calculated according to the tempo.

You can also adjust the tempo using the TAP key ( P17)
4. Record a phrase and play it back
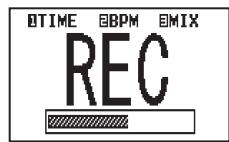
Press the [] foot switch, and play the phrase that you want to record.


"REC" appears on the display and recording starts.
Depending on the recording method chosen in step 2, recording occurs as follows.
If a note mark was chosen
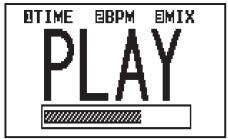
Recording continues for the set time and then loop playback starts (and "PLAY" appears on the display).
If "Manual" was chosen
When the [] foot switch is pressed again, or the maximum time (about 5 seconds) is reached, loop playback starts (and "PLAY" appears on the display).

When using the looper, the unit can also play a rhythm ( P16) . However, the parameter knobs only control the looper.
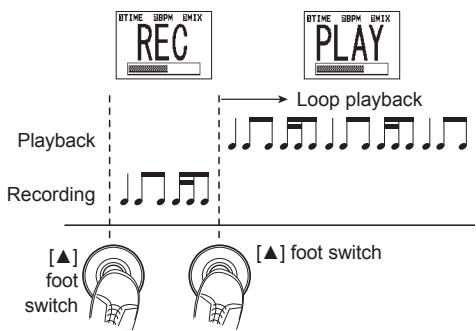
5. Overdub a phrase
During loop playback, press the [] foot switch.

"REC" appears on the display and overdubbing starts.
When the end of the recorded phrase is reached, playback returns to the loop beginning and overdubbing continues.
To end overdubbing, press the [] foot switch again.
"PLAY" appears on the display.


To stop loop playback, press the [] foot switch ("STOP" appears on the display). To start loop playback again, press the [] foot switch.
6. Adjust the phrase volume
Turn Parameter knob 3.
The setting range is 0-100.


Please note that if you turn Parameter knob 1 or 2 when a phrase has already been recorded, that phrase will be erased.
7. Erase the phrase
Press the [] foot switch until "CLEAR" appears on the display to erase the recorded phrase.
8. Return to play mode
PRESS both [] / [] foot switches.
Using Rhythms (Rhythm Mode)
1. Activating rhythm mode
In play mode, press the RHYTHM [▶/■] key to start playing a rhythm pattern.

Rhythm pattern

Rhythm tempo
Rhythm volume

When rhythm mode is activated, the REVERB module is turned OFF.

- When using the tuner or the looper, you can also play a rhythm. However, the parameter knobs will control the tuner or looper.
- When in rhythm mode, you can use the []/[] foot switches and bank []/[] keys to change the patch.
2. Select the rhythm pattern
Turn Parameter knob 1 (pattern types P51).

Rhythm pattern
3. Adjust the tempo
Tempo can be set in a range from 40-250 BPM (beats per minute).
Set the tempo with a number Turn Parameter knob 2 to set the BPM.

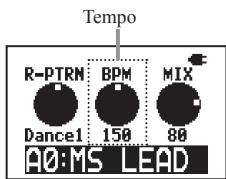
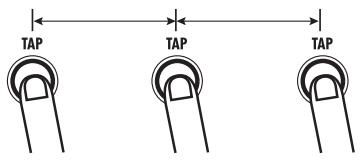
Set the tempo by tapping (Tap tempo)
Press the Tap key two or more times at the desired tempo. The tempo is set automatically according to the interval between key presses.

You can use a FS01 foot switch (sold separately) to adjust the tempo ( P26)
4. Adjust the rhythm volume
Turn Parameter knob 3.
The volume can be set in a range from 0-100.

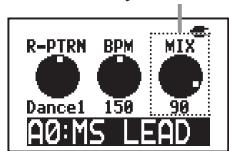
Rhythm volume
5. Stop the rhythm
Press the rhythm [ / ] key to stop the rhythm playback and return to ordinary play mode.

Creating and Changing Patches (Edit Mode)
1. Select a patch to edit (→P9)
2. Select a module to edit
Turn the module selector to the module you want to edit.
This activates edit mode.
The selected module is shown larger.
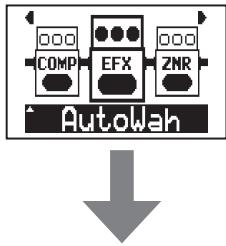
The edit screen opens automatically.
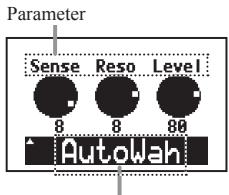
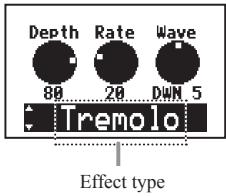
Effect type

The edit screen does not open if the selected module is OFF.
Parameter 1 of the current effect type
Parameter 2 of the current effect type
Parameter 3 of the current effect type

- The EQ module is a single module, but it is separated into "EQ Lo" and "EQ Hi" screens for editing.
- The TOTAL module is a special module that you can use to set the overall patch volume (patch level) and to edit the patch name, for example.
3. Turn a module ON/OFF
Press either [] / [] foot switch.
Module ON (dark)
Module OFF (light)

- The EQ module can be turned ON/OFF from either the "EQ Lo" or the "EQ Hi" screen.
- The TOTAL module cannot be turned OFF.
4. Change the effect type
Press the EFFECT TYPE [] / [] keys to change the effect type.
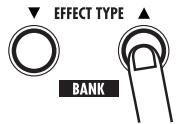
The parameters shown change according to the effect type.

- The EQ module has only one effect type.
- See pages 33-48 for information about the effect types and parameters included in each module.
5. Adjust the parameters
Turn parameter knobs 1-3.

Parameters related to time and frequency can also be set with Tap tempo ( P17)
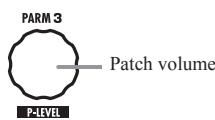
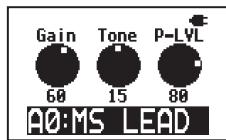
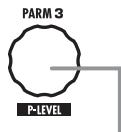
6. Adjust the volume of the patch (patch level)
Turn the module selector to "TOTAL" and use the effect type [] / [] keys to select "PatchLvl." Turn Parameter knob 1.


- Patch level can also be adjusted in play mode.
- Adjust the master level to change the volume of all patches ( P30)
7. Change the patch name
Turn the module selector to "TOTAL" and use the effect type [] / [] keys to select "PatchName."


Use parameter knobs 1-3 to change the name.
Change the character/symbol at the cursor position one character at a time.
Change the type of character/ symbol at the cursor position (upercase letters, lowercase letters, numbers and symbols).
Move the cursor
The following characters and symbols can be used.
$$ ! # \( \% & ^{\prime}() + , - ; = @ [ ] ^ {\wedge} _ {-} ^ {\prime} {} \sim $$
$$ \mathrm {A} - \mathrm {Z}, \mathrm {a} - \mathrm {z}, 0 - 9, (\text {s p a c e}) $$
For example, to change "Patch01" to "Patch02" use Parameter knob 3 to move the cursor and Parameter knob 1 to change the character/symbol.
8. Finish editing
Turn the module selector to "PLAY" to return to the play mode.

If you change to another patch, all edits will be lost.
Save the patch to keep your edits ( P22)
Saving and Copying Patches (Store Mode)
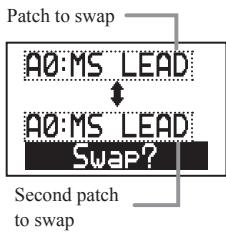
1. Activate store mode
Select the patch that you want to save or copy, and press the STORE/SWAP key.

STORE/SWAP
To save the patch
Release the STORE/SWAP key quickly.
"Store?" appears on the display.

To swap the patch
Continue pressing the key until "Swap?" appears on the display.


- Swapping can only be between patches in the user (A-J) banks.
- When the unit is shipped from the factory, the user banks contain the same patches as the preset banks.
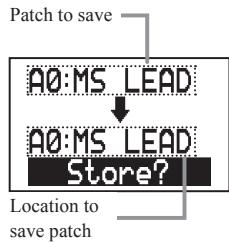
2. Select the location to save or the other patch to swap
Use the [ ] / [ ] foot switches.


To switch banks, use the bank [] / [] keys.

Swapping can only be between patches in the user (A-J) banks.
3. Execute patch saving/swapping
Press the STORE/SWAP key.
When "COMPLETE!" appears, the patch will be saved to the destination location or swapped with the second patch.

STORE/SWAP
COMPLETE!
B1:MS LEAD

To cancel this operation, turn the Module selector instead of pressing the STORE/ SWAP key.
Restoring patches to their factory settings (ALL INITIALIZE function)
You can restore all the patches in the A-J banks to their factory settings.
To use the ALL INITIALIZER function, turn the POWER switch ON while pressing and holding the STORE/SWAP key.

STORE/SWAP

USB

POWER

DC
The following message appears on the display.
ALL INITIALIZE
Are You Sure?
YES:STORE
NO : RHYTHM
Press the STORE/SWAP key again to restore all patches to their factory settings and return to play mode.

STORE/SWAP
To cancel this operation, press the rhythm [ / ■] key instead of pressing the STORE/SWAP key.


Executing ALL INITIALIZE erases all the patches saved in the user banks. Use this function with caution.
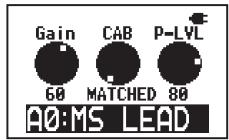
Using Direct Mode
Direct mode simulates the sound of a guitar cabinet. This allows you to achieve a sound that is optimized for use with headphones or a mixer.
- In play mode, press the DIRECT key. The key will light and the unit will switch to direct mode.

NOTE
- As in play mode, you can use the edit, rhythm and store functions, as well as the tuner and looper functions.
-
Select patches in the same way as in play mode.
-
Use Parameter knobs 1-3 to adjust the parameters.
Type of cabinet simulated
Cabinet types
| Type | Description |
| MATCHED | This cabinet setting is optimized according to the drive effect type. |
| COMBO | Simulates a 2 x 12 Fender combo amp. |
| TWEED | Simulates a 4 x 10 Fender tweed cabinet. |
| STACK | Simulates a 4x12 Marshall stack cabinet. |
- Press the DIRECT key to turn its light OFF and return to play mode.

Patch Pre-selection (PRE SELECT)
The pre-select mode allows you to select a bank and patch in advance, and only switch to that patch after you confirm the selection. This function is convenient during a live performance when you want to prepare switching to a patch that is saved in a distant position.
1. Turn the power ON while pressing the [▲] foot switch.
"PRE SELECT" appears on the screen and the unit starts in pre-select mode.
![ZOOM G2NU - Turn the power ON while pressing the [▲] foot switch. - 1](/content/2025/01/152209/images/00007601cd73ce28c92a9e344bd22f7a346d6dda680a3dadc554d59e290f479d.jpg)
![ZOOM G2NU - Turn the power ON while pressing the [▲] foot switch. - 2](/content/2025/01/152209/images/7d301655f9af304a4e0ef9698e51b704b83934ae0807a2f70c03c40d27e59d74.jpg)
![ZOOM G2NU - Turn the power ON while pressing the [▲] foot switch. - 3](/content/2025/01/152209/images/93af05180647e1c1b0e9bf52c923f2c66bf7a3ebfd91ff39e38935188787b209.jpg)
![ZOOM G2NU - Turn the power ON while pressing the [▲] foot switch. - 4](/content/2025/01/152209/images/037cd5eb33e35a249a877986ea0bfcbfcbab923cd43d4aa8cd88db761622f84a.jpg)
![ZOOM G2NU - Turn the power ON while pressing the [▲] foot switch. - 5](/content/2025/01/152209/images/eb80bfcf25013ab8bc99c19d366b837a213b7ad58719dbdc746fcf0dfc57bb50.jpg)
If you enter edit mode or store mode when the screen for step 2 is open, the current patch is the one affected.
3. To change the patch, press both [] / [] foot switches at the same time.
![ZOOM G2NU - To change the patch, press both [] / [] foot switches at the same time. - 1](/content/2025/01/152209/images/4960c29cfa177f8e1e00a46f341f7f68c66fd71e900b143c51ecc9181994cf3e.jpg)
![ZOOM G2NU - To change the patch, press both [] / [] foot switches at the same time. - 2](/content/2025/01/152209/images/e58fd57fd86451fe789a9703be18301ad11d392b27040de25fe89acaa6a11cec.jpg)
![ZOOM G2NU - To change the patch, press both [] / [] foot switches at the same time. - 3](/content/2025/01/152209/images/23c69ae52047c0704f3e9ddc38ccc348dc2ef1f1cc210791292b8f10e1167de9.jpg)
To return to the usual patch order, turn the power OFF and ON again.
2. Use the || / [] foot switches and bank [] / [] keys to select the next patch.
Patch selection is the same as in ordinary play mode. However, the patch does not change until confirmation is completed in step three.
![ZOOM G2NU - Use the || / [] foot switches and bank [] / [] keys to select the next patch. - 1](/content/2025/01/152209/images/ef1442ecbaacfe357ef1561879ec588fb2e37194763791c541063cf58bb4d712.jpg)
Current patch
![ZOOM G2NU - Use the || / [] foot switches and bank [] / [] keys to select the next patch. - 2](/content/2025/01/152209/images/11236918978b2be0488ec18943d9fb517abe7833e83d1957a3b723087bb41fab.jpg)
Next patch to be selected
Using a Foot Switch
You can connect an optional foot switch to the CONTROL IN jack, and use it to control additional settings of the unit with your feet, for example, by changing banks and operating effects.
- Connect a foot switch (FS01) to the CONTROL IN jack.
- Press the USB/GLOBAL key to light it and open the GLOBAL menu.

- Use the effect type || / [] keys to select "FootSwitch."
- Turn Parameter knob 1 to set the foot switch function.
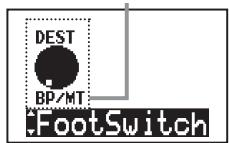
Foot switch function
The foot switch can be set to one of the following functions.
BP/MT
BANK UP
RHYTHM
BPM TAP
Set the unit to bypass/mute.
Increase the bank number by one with each press of the foot switch.
Turn Rhythm mode ON/OFF.
Set the tempo used for the rhythm, looper and effect by pressing the foot switch repeatedly at the desired tempo.
DL TAP
Set the Time parameter of the DELAY module by pressing the foot switch repeatedly.
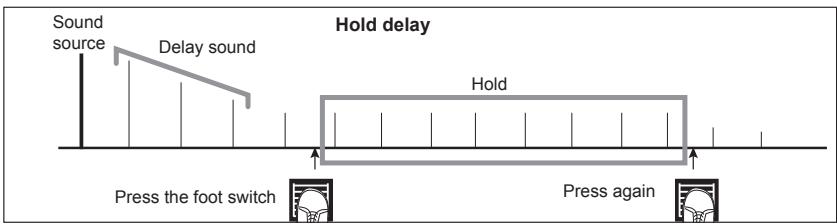
DL HOLD
Turn hold delay ON/OFF. Hold delay is a function that allows the delay sound to be repeated without decay (see the illustration below).
DL MUTE
Turn the DELAY module's input mute ON/OFF.

To use DL TAP, DL HOLD or DL MUTE, you must turn the DELAY module ON.
- After making the setting, press the USB/ GLOBAL key again to turn its light out.

The foot switch function setting affects all patches. Moreover, this setting is saved even when the power is turned OFF.
Using an Expression Pedal
Use the G2.1Nu's built-in expression pedal or an optional connected expression pedal (FP01/FP02) to control volume and effect parameters in real time.
Set the control parameter and adjustment range
1. Select a patch that uses the expression pedal.

When using the G2Nu, connect an optional expression pedal (FP01/FP02) to the CONTROL IN jack.
2. Set the module selector to "TOTAL" and use the effect type [] / [] keys to select "RTM."
![ZOOM G2NU - Set the module selector to "TOTAL" and use the effect type [] / [] keys to select "RTM." - 1](/content/2025/01/152209/images/22d3d8e2b049d9070a28ab285f0f718087241eebfe5a5314c9c6192f588c7f64.jpg)
![ZOOM G2NU - Set the module selector to "TOTAL" and use the effect type [] / [] keys to select "RTM." - 2](/content/2025/01/152209/images/da16f21f3176220396ce77c1723e7d8386d0b143c3bec16773f2056f572df021.jpg)
![ZOOM G2NU - Set the module selector to "TOTAL" and use the effect type [] / [] keys to select "RTM." - 3](/content/2025/01/152209/images/3b25dc13b3ba2d2b8d3216e3e0382e00857d20e92e33b6b4e13151e45a605c25.jpg)
3. Turn Parameter knob 1 to set the module to be controlled by the expression pedal.
On the G2.1Nu, you can also use the PEDAL ASSIGN key to set the module controlled. The indicator lights next to the selected destination.


DRIVE

DELAY
PEDAL ASSIGN

| Indicator | Destination (DEST) display | Parameter controlled |
| OFF | (None) | (None) |
| VOLUME | VOLUME | Volume |
| EFX | EFX | EFX module |
| DRIVE | DRIVE | DRIVE module |
| MOD | MODULATION | MODULATION module |
| DELAY | DELAY | DELAY module |
| REVERB | REVERB | REVERB module |

- In the Effect Type Parameters section, a pedal icon appears next to effect types/parameters that can be controlled by an expression pedal ( P33 - 48)
- When set to "VOLUME," the volume cannot exceed the range set by the master level and patch level parameters.
- For settings other than "VOLUME," if you press the built-in expression pedal until it stops and then push it down farther, you can turn the controlled module ON/OFF.
- When the controlled module is OFF, the indicator next to it blinks (on the G2.1Nu). In this state, you can press hard on the built-in expression pedal to turn the module ON, or choose a different module to be controlled.
4. Use Parameter knobs 2 and 3 to change the adjustment range of the control parameter.
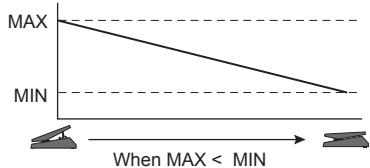
Use Parameter knob 2 to set the minimum value (MIN) and Parameter knob 3 to set the maximum value (MAX). The range that can be set depends on the controlled module selected in step 3.
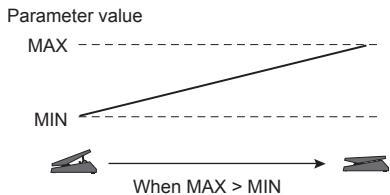
The minimum value can be set higher than the maximum value. Set this way, the effect is smallest when the pedal is fully pressed and largest when it is fully up.
Parameter value
- When you are finished setting the expression pedal, turn the module selector to "PLAY" to return to play mode.

The expression pedal setting will be lost if you select a different patch. Save the patch if necessary ( P22)
Adjusting the built-in expression pedal
(G2.1Nu only)
The G2.1Nu expression pedal has been adjusted for optimal performance when shipped from the factory, but you can adjust its sensitivity if necessary. If there does not seem to be much effect even when you press the pedal, or the volume or tone changes greatly even when the pedal is only pressed lightly, use the following procedures to readjust it.
- Turn the power on while pressing the PEDAL ASSIGN key.

PEDAL ASSIGN

USB
POWER

DC
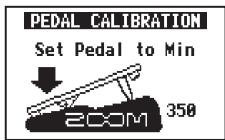
- Press the pedal all the way back toward the heel, and press the STORE/SWAP key.
Press pedal back

STORE/SWAP
The display should appear as below.
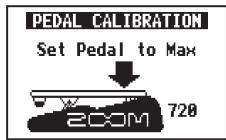
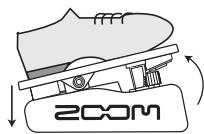
- Press the pedal all the way forward, lift your foot and then press the STORE/SWAP key.
After you finish making the adjustment, the unit enters play mode.

Press down hard so that contact occurs here.


Pedal rises slightly when you remove your foot.

STORE/SWAP

If "ERROR!" appears on the screen, return to step 2 and repeat the calibration.
Using Audio Interface Functions
This unit can be used with computers running the following operating systems
Compatible OS
- Windows XP SP2 or later
Windows Vista or later
Mac OS X (10.4.6/10.5/10.6 or later)
For recording and playback, this unit supports the following formats.
Quantization (bit-rate)
16-bit
Sampling frequency
32/44.1/48 kHz
The unit will be recognized by the computer as an audio device when it is connected by the USB cable. When running Windows, install a dedicated ASIO driver to make low-latency audio recording and playback possible.

If you turn the power switch OFF and connect the unit to a computer by USB, it will operate on bus power from that computer.
Recording and playback with DAW software
You can connect a guitar to the unit's input jack, apply effects to its sound, and record it on an audio track in digital audio workstation (DAW) software (Figure 1 below).
You can output a mix of the playback sound from DAW software audio tracks and the connected guitar with effects applied through the unit's output jack (Figure 2 below).
When necessary, you can turn OFF the sound of the guitar that passes directly to the output jack before going to the computer (turn direct monitoring OFF) (Figure 3 below). For details, see "Setting the direct monitoring and recording levels" ( P30) .
For details about recording, playback and other functions, please see the DAW software manual.

-
When using direct monitoring, if the DAW software has an echo back function (which sends the input signal directly to the output during recording), always turn it OFF. If you record with it ON, the signal output will sound like it has been processed with a flanger.
-
You can also adjust the recording level sent to the DAW software ( P30).
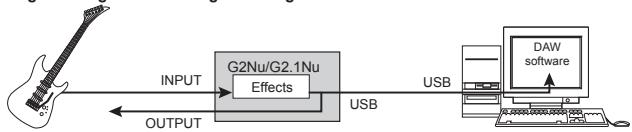
Figure 1. Signal flow during recording
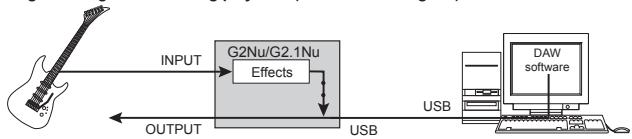
Figure 2. Signal flow during playback (direct monitoring ON)
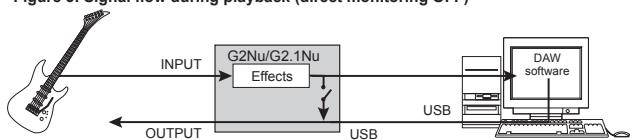
Figure 3: Signal flow during playback (direct monitoring OFF)
Changing Various Settings (Global Menus)
Using the global menus, you can change various settings related to the master level, display, USB and other items. Settings made to global parameters affect all patches.
Open the global menus
Press the USB/GLOBAL key to open the GLOBAL menu.

HINT
- See "Using a foot switch" for details about the "FootSwitch" global parameter ( P26).
- When in bypass, mute or looper mode, you cannot open the GLOBAL menu.
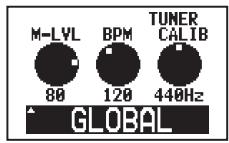
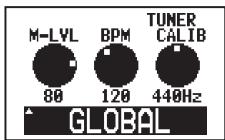
Set the master level, tempo, and tunes standard pitch
- Use the effect type [] / [] keys to select "GLOBAL," and use the Parameter knobs 1-3 to adjust the master level (knob 1), tempo (knob 2), and tuner standard pitch (knob 3).
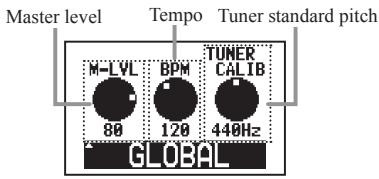

You can also use the Tap key to adjust the tempo ( P17)
- When you are done changing the settings, press the USB/GLOBAL key to turn its light OFF.

The tuner's standard pitch will be saved even when the power is turned OFF.
Set the direct monitoring and recording levels
- Press the effect type [] / [] keys to select "USB." Use Parameter knob 1 to turn direct monitoring ON/OFF, and use Parameter knob 2 to adjust the recording level.
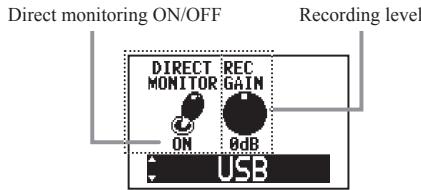
- When you are done changing the settings, press the USB/GLOBAL key to turn its light OFF.

The recording level setting will be saved even when the power is turned OFF.
Set the display backlight and contrast
- Use the effect type [] / [] keys to select "DISPLAY." Use Parameter knob 1 to adjust the backlight and Parameter knob 2 to adjust the contrast.
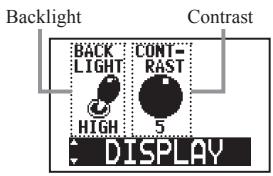
- When you are done changing the settings, press the USB/GLOBAL key to turn its light OFF.

The backlight and contrast settings will be saved even when the power is turned OFF.
Setting the battery type
-
Use the effect type [] / [] keys to select "BATTERY," and turn Parameter knob 1 to set the battery type to one of the following.
-
ALKALINE
Use this setting for alkaline or oxyride (oxy nickel hydroxide) batteries.
- NiMH
Use this setting for nickel metal hydride batteries that can be recharged and reused.
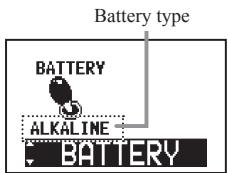

Set the battery type that you are using in order to display the remaining battery charge accurately.
- When you are done changing the setting, press the USB/GLOBAL key to turn its light OFF.

The battery type setting is saved even when the power is turned OFF.
Check the current version
- Use the effect type [] / [] keys to select "VERSION."
The following screen appears.
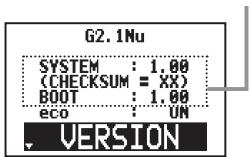
Current version information
- When you are done checking the version information, press the USB/GLOBAL key to turn its light OFF.

See the next page for how to upgrade the version.
Upgrading the Firmware Version
- Download the latest version upgrade application from the ZOOM website (http://www.zoom.co.jp/).
You must connect the unit to a computer to upgrade the version.

See the previous page for how to confirm the current version.
- Confirm that the POWER switch is set to "OFF." While pressing both [] / [] foot switches, connect the unit to a computer using the USB cable.
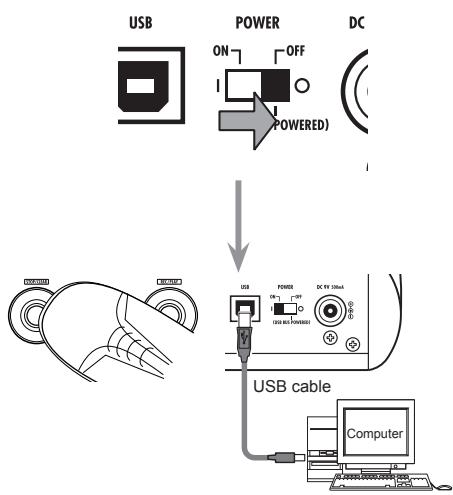
If connection with the computer is successful, the following message appears on the display.

- Launch the version upgrade application, and conduct the version upgrade.
See the ZOOM website for the upgrade procedures. When you complete the version upgrade, "Please Restart" appears on the screen.
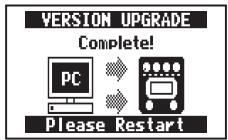

Do not disconnect the USB cable during the version upgrade process.
- When the version upgrade is complete, disconnect the USB cable and turn the power OFF.
Turn the power ON again in the usual manner, and the unit will start operating with the new version.
Effect Types and Parameters
Tap TAP
You can use the TAP key to set a parameter that has this icon shown next to it. When a module/effect type with this option is selected in EDIT mode, the parameter interval (modulation frequency, delay time, etc.) can be set by repeatedly tapping the TAP key.
Tempo mark
When a note mark is shown next to a parameter, the tempo set using the GLOBAL menu ( P30) can be synchronized to note intervals. For example, if the Time Parameter of the DELAY module is set to an 8th note, the delay time will be equivalent to an 8th note at the current tempo.
Expression pedal

When a pedal icon is shown next to a parameter, it can be controlled with an expression pedal. If you set the module to be controlled by the expression pedal ( P27) , you can control the parameter in real time when you select a patch that uses it. With the G2Nu, you will need to connect an external expression pedal (FP01/FP02).
Delay tap, hold delay and delay mute
DELAY TAP HOLD MUTE
Effect types that show these icons allow you to use a foot switch to set the delay time (DELAY TAP), to turn the hold delay function ON/OFF (HOLD) and to turn the DELAY module input mute ON/OFF (MUTE). To use these functions, you must connect a foot switch, set the function ( P26) and activate a compatible effect type.
Note: Manufacturer names and product names mentioned in the following table are trademarks or registered trademarks of their respective owners. The names are used only to illustrate sonic characteristics and do not indicate any affiliation with ZOOM CORPORATION.
| COMP | COMP (compressor) module | ||||
| This module reduces high level signals and increases low level signals. | |||||
| COMP (compressor) | |||||
| This compressor in the style of the MXR Dyna Comp. | |||||
| PARM1 | PARM2 | PARM3 | |||
| Sense (sensitivity) | 0-10 | ATTCK (attack) | Slow, Fast | Level | 2-100 |
| Adjusts the compressor sensitivity. Higher values result in higher sensitivity. | Sets compressor attack speed to Fast or Slow. | Adjusts the level of the signal after it has passed through the module. | |||
| RackComp (rack compressor) | |||||
| This compressor allows more detailed adjustment than COMP. | |||||
| PARM1 | PARM2 | PARM3 | |||
| THRSH (threshold) | 0-50 | Ratio | 1-10 | Level | 2-100 |
| Sets the level that activates the compressor. | Adjusts the compression ratio. | Adjusts the level of the signal after it has passed through the module. | |||
| M Comp (M compressor) | |||||
| This compressor provides a more natural sound. | |||||
| PARM1 | PARM2 | PARM3 | |||
| THRSH (threshold) | 0-50 | Ratio | 1-10 | Level | 2-100 |
| Sets the level that activates the compressor. | Adjusts the compression ratio. | Adjusts the level of the signal after it has passed through the module. | |||
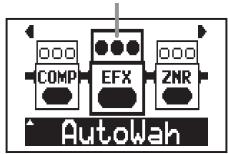
| EFX | EFX module | ||||
| This module includes wah and filter effects, as well as special effects such as a ring modulator and an octave. | |||||
| AutoWah | |||||
| This effect varies wah in accordance with picking intensity. | |||||
| Resonance | |||||
| This effect varies the resonance filter frequency according to picking intensity. | |||||
| The two effect types above have the same parameters. | |||||
| PARM1 | PARM2 | PARM3 | |||
| Sense (sensitivity) | -10--1, 1-10 | Reso (resonance) | 0-10 | Level | 2-100 |
| Adjusts the sensitivity of the effect. When set to a negative value, the filter movement is reversed. | Adjusts the intensity of the resonance sound. | Adjusts the level of the signal after it has passed through the module. | |||
| Booster | |||||
| The booster increases signal gain to make the sound more powerful. | |||||
| PARM1 | PARM2 | PARM3 | |||
| Range | 1-5 | Tone | 0-10 | Level | 2-100 |
| Adjusts the frequency range that is boosted. | Adjusts the tone. | Adjusts the level of the signal after it has passed through the module. | |||
| Tremolo | |||||
| This effect varies the volume at a regular rate. | |||||
| PARM1 | PARM2 | PARM3 | |||
| Depth | 0-100 | Rate | 0-50 | Wave | UP 0-9, DWN 0-9, TRI 0-9 |
| Adjust the depth of the modulation. | Adjusts the rate of the modulation. | Sets the modulation waveform to "UP" (rising sawtooth), "DWN" (falling sawtooth) or "TRI" (triangular). Higher numerical values cause stronger clipping, which emphasizes the effect. | |||
| RingMod (ring modulator) | |||||
| This effect produces a metallic ringing sound. Adjusting the "Freq" parameter results in a drastic change of sound character. | |||||
| PARM1 | PARM2 | PARM3 | |||
| Freq (frequency) | 1-50 | Tone | 0-10 | Bal (balance) | 0-100 |
| Sets the frequency of the modulation. | Adjusts the tone. | Adjusts the balance between original and effect sounds. | |||
| SlowATTCK (slow attack) | |||||
| This effect slows the attack of each note, resulting in a violin-like performance. | |||||
| PARM1 | PARM2 | PARM3 | |||
| Time | 1-50 | Curve | 0-10 | Level | 2-100 |
| Adjusts the attack time. | Set the curve of volume change during attack. | Adjusts the level of the signal after it has passed through the module. | |||
| Octave | |||||
| Adds an effect sound one octave below the unaffected sound. | |||||
| PARM1 | PARM2 | PARM3 | |||
| Tone | 0-10 | OctLV (octave level) | 0-100 | DryLV (dry level) | 0-100 |
| Adjusts the tone of the effect. | Adjusts the volume of the effect. | Adjusts the volume of the unaffected sound. | |||
| PedalVox | |||||
| This simulates a vintage Vox wah pedal. | |||||
| PedalCry | |||||
| This simulates a vintage CRYBABY wah pedal. | |||||
| The two effect types above have the same parameters. | |||||
| PARM1 | PARM2 | PARM3 | |||
| Freq (frequency) | 1-50 | DryMX (dry mix) | 0-10 | Level | 2-100 |
| Adjusts the emphasized frequency. When an expression pedal is not used, the effect is similar to a half open pedal. | Adjusts the mix with the unaffected sound. | Adjusts the level of the signal after it has passed through the module. | |||
| ZNR | ZNR (ZOOM noise reduction) module |
| This module reduces noise when not playing. | |
| ZNR (ZOOM noise reduction) | |
| ZOOM's unique noise reduction cuts noise during pauses in playing without affecting the tone. | |
| NoiseGate | |
| This is a noise gate that cuts the sound during playing pauses. | |
| DirtyGate | |
| This vintage style gate features a characteristic way of closing. | |
| The three effect types above have the same parameter. | |
| PARM1 | |
| THRSH (threshold) | 1-16 |
| Adjusts the effect sensitivity. Set the value as high as possible without causing the sound to decay unnaturally. | |
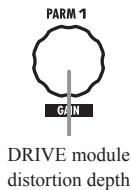
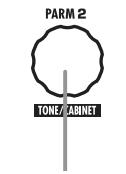
| DRIVE | DRIVE module | ||||
| This module includes 29 types of distortion and acoustic simulators. | |||||
| FD Combo | VX Combo | US Blues | |||
| Modeled sound of a Fender Twin Reverb ('65), which is loved by guitarists in various genres. | Modeled sound of a VOX AC30 combo amplifier operating in Class A. | Crunch sound of a Fender Tweed Bassman. | |||
| BG Crunch | HW Stack | MS Crunch | |||
| Crunch sound of a Mesa Boogie MkIII combo amp. | Modeled sound of the legendary Hiwatt Custom 100 all-tube amplifier from the UK. | The crunch sound of the Marshall 1959 that has given birth to many legends. | |||
| MS Drive | PV Drive | DZ Drive | |||
| The high gain sound of a JCM2000 Marshall stack amp. | The high gain sound of a Peavey 5150 developed in cooperation with a world-famous hard rock guitarist. | The 3-channel high gain sound of a Diezel Herbert, which is a handmade German guitar amplifier that allows control of three independent channels. | |||
| BG Drive | OverDrive | T Scream (tube scream) | |||
| The high gain sound of the Mesa Boogie Dual Rectifier red channel (Vintage mode). | Simulation of the Boss OD-1, the compact effect box that was the first to take the "overdrive" title. | Simulation of the Ibanez TS808, which is loved by many guitarists as a booster and has inspired numerous clones. | |||
| Governor | Dist + (distortion plus) | Dist 1 (distortion 1) | |||
| Simulation of the Guv'nor distortion effect from Marshall. | Simulation of the MXR distortion+ effect that made distortion popular worldwide. | Simulation of the Boss DS-1 distortion pedal, which has been a long-seller. | |||
| Squeak | FuzzSmile | GreatMuff | |||
| Simulation of the popular Pro Co Rat famous for its edgy distortion sound. | Simulation of the Fuzz Face, which has made rock history with its humorous panel design and smashing sound. | Simulation of the Electro-Harmonix Big Muff, which is loved by famous artists around the world for its fat, sweet fuzz sound. | |||
| MetalWRLD (Metal World) | HotBox | Z Clean | |||
| Simulation of the Boss Metal Zone, which is characterized by long sustain and a powerful lower midrange. | Simulation of the compact Matchless Hotbox pre-amplifier with a built-in tube. | ZOOM original unadorned clean sound. | |||
| Z Wild | Z MP1 | Z Bottom | |||
| A high gain sound with even more overdrive boost. | An original sound created by merging characteristics of an ADA MP1 and a MARSHALL JCM800. | A high gain sound that emphasizes low and middle frequencies. | |||
| Z Dream | Z Scream | Z Neos | |||
| A high gain sound for lead playing based on the Mesa Boogie Road King Series II Lead channel. | An original high gain sound balanced from low to high frequencies. | A crunch sound modeled on the sound of a modified VOX AC30. | |||
| Lead | ExtremeDS | ||||
| A bright and smooth distortion sound. | This distortion effect boasts the highest gain in the world. | ||||
| The 29 effect types above have the same parameters. | |||||
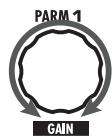
| PARM1 | PARM2 | PARM3 | |||
| Gain | 0-100 | Tone | 0-30 | Level | 1-100 |
| Adjusts the gain (distortion depth). | Adjusts the tone. | Adjusts the level of the signal after it has passed through the module. | |||
| Aco.Sim (acoustic simulator) | |||||
| This effect changes the tone of an electric guitar to make it sound like an acoustic guitar. | |||||
| PARM1 | PARM2 | PARM3 | |||
| Top | 0-10 | Body | 0-10 | Level | 1-100 |
| Adjusts the unique string tone of acoustic guitars. | Adjusts the body resonance of acoustic guitars. | Adjusts the level of the signal after it has passed through the module. | |||
| EQ Lo | EQUALIZER module (low and middle frequency range) | |||
| This unit has a six band equalizer. Set the module selector to "EQ Lo" to adjust the three low and middle frequency bands. | ||||
| EQ LOW | ||||
| Adjusts the low and middle frequency bands. | ||||
| PARM1 | PARM2 | PARM3 | ||
| 160Hz | ±12 | 400Hz | ±12 | 800Hz ±12 |
| Boosts or cuts the low (160 Hz) frequency band. | Boosts or cuts the low-middle (400 Hz) frequency band. | Boosts or cuts the middle (800 Hz) frequency band. | ||
| EQ Hi | EQUALIZER module (high frequency range) | |||
| This unit has a six band equalizer. Set the module selector to "EQ Hi" to adjust the three high frequency bands. | ||||
| EQ HIGH | ||||
| Adjusts the high frequency bands | ||||
| PARM1 | PARM2 | PARM3 | ||
| 3.2kHz | ±12 | 6.4kHz | ±12 | 12kHz ±12 |
| Boosts or cuts the high (3.2 kHz) frequency band. | Boosts or cuts the extremely high (6.4 kHz) frequency band. | Boosts or cuts the harmonics (12 kHz) frequency band. | ||
| MODULATION | MODULATION module | ||||
| This module includes chorus, pitch shifter, delay, echo and other modulation and delay effects. | |||||
| Chorus | |||||
| This effect mixes a shifted pitch with the original sound to add movement and thickness. | |||||
| PARM1 | PARM2 | PARM3 | |||
| Depth | 0-100 | Rate | 1-50 | Mix | 0-100 |
| Sets the depth of the modulation. | Sets the speed of the modulation. | Adjusts the amount of effected sound that is mixed with the original sound. | |||
| VintageCE | |||||
| This is a simulation of the BOSS CE-1. | |||||
| PARM1 | PARM2 | PARM3 | |||
| Comp (compressor) | 0-9 | Rate | 1-50 | Mix | 0-100 |
| Sets the sensitivity of the compressor. | Sets the speed of the modulation. | Adjusts the amount of effected sound that is mixed with the original sound. | |||
| StereoCho (stereo chorus) | |||||
| This is a stereo chorus with a clear tone. | |||||
| PARM1 | PARM2 | PARM3 | |||
| Depth | 0-100 | Rate | 1-50 | Mix | 0-100 |
| Sets the depth of the modulation. | Sets the speed of the modulation. | Adjusts the amount of effected sound that is mixed with the original sound. | |||
| Ensemble | |||||
| This is a chorus ensemble that features three-dimensional movement. | |||||
| PARM1 | PARM2 | PARM3 | |||
| Depth | 0-100 | Rate | 1-50 | Mix | 0-100 |
| Sets the depth of the modulation. | Sets the speed of the modulation. | Adjusts the amount of effected sound that is mixed with the original sound. | |||
| Phaser | |||||
| This effect adds a phasing variation to the sound. | |||||
| PARM1 | PARM2 | PARM3 | |||
| Rate ≤ TAP | 0-50 | Color | 4 STG, 8STG, inv 4,inv 8 | Level | 2-100 |
| Sets the speed of the modulation. | Sets the tone of the effect type toeither regular 4 stage (4 STG) or 8stage (8 STG) or inverted 4 stage (inv 4) or 8 stage. | Adjusts the level of the signal afterit has passed through the module. | |||
| Flanger | |||||
| This effect adds variation and strong undulations to the sound. | |||||
| PARM1 | PARM2 | PARM3 | |||
| Depth | 0-100 | Rate ≤ TAP | 0-50 | Reso (resonance) | ±10 |
| Sets the depth of the modulation. | Sets the speed of the modulation. | Adjusts the intensity of themodulation resonance. | |||
| DynaFLNGR (dynamic flanger) | |||||
| The volume of the effect sound changes according to the input signal level with this dynamic flanger. | |||||
| PARM1 | PARM2 | PARM3 | |||
| Depth | 0-100 | Rate ≤ TAP | 0-50 | Sense (sensitivity) | ±10 |
| Sets the depth of the modulation. | Sets the speed of the modulation. | Adjusts the sensitivity of the effect.When the input signal becomeslouder, positive values increasethe effect while negative valuesdecrease it. | |||
| Vibrato | |||||
| This effect automatically adds vibrato. | |||||
| PARM1 | PARM2 | PARM3 | |||
| Depth | 0-100 | Rate ≤ TAP | 0-50 | Bal (balance) | 0-100 |
| Sets the depth of the modulation. | Sets the speed of the modulation. | Adjusts the balance betweenoriginal and effect sounds. | |||
| Step | |||||
| This special effect gives the sound a stepped quality. | |||||
| PARM1 | PARM2 | PARM3 | |||
| Depth | 0-100 | Rate TAP | 0-50 | Reso (resonance) | 0-10 |
| Sets the depth of the modulation. | Sets the speed of the modulation. | Adjusts the intensity of the modulation resonance sound. | |||
| Cry | |||||
| This effect varies the sound like a talking modulator. | |||||
| PARM1 | PARM2 | PARM3 | |||
| Range | 1-10 | Reso (resonance) | 0-10 | Sense (sensitivity) | ±10 |
| Adjusts the frequency range processed by the effect. | Adjusts the intensity of the modulation resonance sound. | Adjusts the sensitivity of the effect. | |||
| Detune | |||||
| By mixing an effect sound that is slightly pitch-shifted with the original sound, this effect type has a chorus effect without much sense of modulation. | |||||
| PARM1 | PARM2 | PARM3 | |||
| Cent | ±50 | PreD (pre-delay) | 0-50 | Mix | 0-100 |
| Adjusts the detuning in cents, which are fine increments of 1/100-semitone. | Sets the pre-delay time of the effect sound. | Adjusts the amount of effected sound that is mixed with the original sound. | |||
| PitchSHFT (pitch shifter) | |||||
| This effect shifts the pitch up or down. | |||||
| PARM1 | PARM2 | PARM3 | |||
| Shift | -12--1, dt, 1-12, 24 | Tone | 0-10 | Bal (balance) | 0-100 |
| Adjusts the pitch shift amount in semitones. Selecting "dt" gives a detuning effect. | Adjusts the tone. | Adjusts the balance between original and effect sounds. | |||
| MonoPitch | ||||||
| This is a pitch shifter with little sound variance for monophonic (single note) playing. | ||||||
| PARM1 | PARM2 | PARM3 | ||||
| Shift | -12--1, dt, 1-12, 24 | Tone | 0-10 | Bal (balance) | 0-100 | |
| Adjusts the pitch shift amount in semitones. Selecting "dt" gives a detuning effect. | Adjusts the tone. | Adjusts the balance between original and effect sounds. | ||||
| HPS (harmonized pitch shifter) | ||||||
| This intelligent pitch shifter outputs the effect sound with the pitch shifted according to scale and key settings. | ||||||
| PARM1 | PARM2 | PARM3 | ||||
| Scale | ±6 (See below) | Key | C-B | Mix | 0-100 | |
| Sets the pitch of the pitch-shifted sound added to the original sound (see Table 1). | Sets the tonic (root) of the scale used for pitch shifting. | Adjusts the amount of effected sound that is mixed with the original sound. | ||||
| Table 1 | ||||||
| Setting | Scale used | Interval | Setting | Scale used | Interval | |
| -6 | Major | 6th down | 3 | Major | 3rd up | |
| -5 | 5th down | 4 | 4th up | |||
| -4 | 4th down | 5 | 5th up | |||
| -3 | 3rd down | 6 | 6th up | |||
| -m | Minor | 3rd down | ||||
| m | 3rd up | |||||
| PDL Pitch (pedal pitch) | ||||||
| Use an expression pedal to change the pitch in real time with this effect. | ||||||
| PARM1 | PARM2 | PARM3 | ||||
| Color | 1-9 (See below) | Tone | 0-10 | Bend | 0-100 | |
| Sets the type of pitch change control with the expression pedal (see Table 2). | Adjusts the tone. | Sets the amount of pitch shift. Depending on the Color setting, this also changes the balance between the original and effect sounds. | ||||
| Table 2 | ||||||
| Color | Pedal min | Pedal max | Color | Pedal min | Pedal max | |
| 1 | 0 cents | +1 octave | 6 | -1 octave + original | +1 octave + original | |
| 2 | 0 cents | +2 octaves | 7 | -700 cents + original | +500 cents + original | |
| 3 | 0 cents | -100 cents | 8 | Doubling | Detuned + original | |
| 4 | 0 cents | -2 octave | 9 | -∞ (0 Hz) + original | +1 octave + original | |
| 5 | 0 cents | -∞ | ||||
| CombFLTR (comb filter) | |||||
| This effect uses the comb filter that results from fixing the modulation of the flanger like an equalizer. | |||||
| PARM1 | PARM2 | PARM3 | |||
| Freq (frequency) | 1-50 | Reso (resonance) | -10-10 | Mix | 0-100 |
| This sets the emphasized frequency. | Adjusts the intensity of the resonance sound of the effect. | Adjusts the amount of effected sound that is mixed with the original sound. | |||
| Air | |||||
| This effect reproduces the ambience of a room to create spatial depth. | |||||
| PARM1 | PARM2 | PARM3 | |||
| Size | 1-100 | Tone | 0-10 | Mix | 0-100 |
| Sets the size of the space. | Adjusts the tone. | Adjusts the amount of effected sound that is mixed with the original sound. | |||
| Delay | |||||
| The maximum delay of this effect is 2000 mS. | |||||
| PARM1 | PARM2 | PARM3 | |||
| Time TAP | 1-2000 mS | F.B (feedback) | 0-100 | Mix | 0-100 |
| Sets the delay time. | Adjusts the feedback amount. Higher values cause more delay sound repetitions. | This adjusts the amount of the effect sound that is mixed with the original sound. | |||
| TapeEcho | |||||
| This effect simulates a tape echo. Changing the "Time" parameter changes the pitch of the echoes. | |||||
| PARM1 | PARM2 | PARM3 | |||
| Time TAP | 1-1200 mS | F.B (feedback) | 0-100 | Mix | 0-100 |
| Sets the delay time. | Adjusts the feedback amount. Higher values cause more delay sound repetitions. | Adjusts the amount of effected sound that is mixed with the original sound. | |||
| ModDelay (modulation delay) | |||||
| This delay effect allows the use of modulation. | |||||
| PARM1 | PARM2 | PARM3 | |||
| Time TAP | 1-2000 mS | F.B (feedback) | 0-100 | Mix | 0-100 |
| Sets the delay time. | Adjusts the feedback amount. Higher values cause more delay sound repetitions. | Adjusts the amount of effected sound that is mixed with the original sound. | |||
| DynaDelay (dynamic delay) | |||||
| This dynamic delay adjusts the volume of the effect sound according to the input signal level. | |||||
| PARM1 | PARM2 | PARM3 | |||
| Time TAP | 1-2000 mS | Sense (sensitivity) | ±10 | Mix | 0-100 |
| Sets the delay time. | Adjusts the effect sensitivity. As the input becomes louder, the effect sound increases with positive values and decreases with negative values. | Adjusts the amount of effected sound that is mixed with the original sound. | |||
| DELAY | DELAY module | ||||
| This delay module allows the use of a hold function. | |||||
| Delay | DELAY TAP | HOLD MUTE | |||
| This long delay has a maximum length of 5000 mS. | |||||
| Echo | DELAY TAP | HOLD MUTE | |||
| This tape echo simulation has a long delay with a maximum length of 5000 mS. | |||||
| AnalogDLY (analog delay) | DELAY TAP | HOLD MUTE | |||
| This analog delay simulation has a long delay with a maximum length of 5000 mS. | |||||
| PingPongD (ping-pong delay) | DELAY TAP | HOLD MUTE | |||
| This ping-pong delay outputs the delay sound alternately to the left and right. | |||||
| The four effect types above have the same parameters. | |||||
| PARM1 | PARM2 | PARM3 | |||
| Time TAP | 1-5000 mS | F.B (feedback) | 0-100 | Mix | 0-100 |
| Sets the delay time. | Adjusts the feedback amount. | Adjusts the amount of effected sound that is mixed with the original sound. | |||
| ReverseDL (reverse delay) | DELAY TAP | HOLD | MUTE | |||
| This reverse delay is a long delay with a maximum length of 2500 mS. | ||||||
| PARM1 | PARM2 | PARM3 | ||||
| Time TAP | 10-2500 mS | F.B (feedback) | 0-100 | Bal (balance) | 0-100 | |
| Sets the delay time. | Adjusts the feedback amount. | Adjusts the balance between original and effect sounds. | ||||
| REVERB | REVERB module | |||
| This module has various revers, an early reflections effect and a multi-tap delay. | ||||
| Hall | ||||
| This reverb effect simulates the acoustics of a concert hall. | ||||
| Room | ||||
| This reverb effect simulates the acoustics of a room. | ||||
| Spring | ||||
| This reverb effect simulates a spring reverb. | ||||
| Arena | ||||
| This reverb effect simulates the acoustics of a large enclosure such as a sports arena. | ||||
| TiledRoom | ||||
| This reverb effect simulates the acoustics of a tiled room. | ||||
| The 5 effect types above have the same parameters. | ||||
| PARM1 | PARM2 | PARM3 | ||
| Decay | 1-30 | Tone | 0-10 | Mix 0-100 |
| Sets the duration of the reverberations. | Adjusts the tone. | Adjusts the amount of effected sound that is mixed with the original sound. | ||
| EarlyRef (early reflections) | |||||
| This effect reproduces only the early reflections of reverb. | |||||
| PARM1 | PARM2 | PARM3 | |||
| Decay | 1-30 | Shape | -10-10 | Mix | 0-100 |
| Adjusts the duration of the reverb. | Adjusts the effect envelope. When negative, it is reversed. At 0, the effect is a gate reverb. When positive, it is a decay-type. | Adjusts the amount of effected sound that is mixed with the original sound. | |||
| MultiTapD (Multi-tap delay) | |||||
| This effect produces several delay sounds with different delay times. | |||||
| PARM1 | PARM2 | PARM3 | |||
| Time TAP | 1-3000 mS J | PTTRN (pattern) | 1-8 | Mix | 0-100 |
| Sets the base delay time. | Sets the tap pattern, which varies from rhythmical to random patterns. | Adjusts the amount of effected sound that is mixed with the original sound. | |||
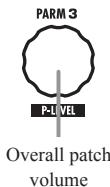
| TOTAL | TOTAL module | |
| Sets parameters for the entire patch. | ||
| PatchLvl (patch level) | ||
| Sets the overall volume for the patch. | ||
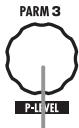
| PARM1 | ||
| P-LVL (patch level) | 2-100 | |
| Sets the overall patch volume. | ||
| RTM (real time modulation) | ||
| Sets the module/parameter controlled by the expression pedal (→P27). | ||
| PARM1 | PARM2 | |
| DEST (control destination) | MIN (minimum value) | |
| Sets the module controlled by the expression pedal. | Sets the value sent to the parameter when the pedal is fully up. | |
| PatchName | ||
| Changes the patch name (→P20). | ||
Troubleshooting
-
The unit will not turn ON
-
Confirm that the POWER switch is set to "ON."
- When using bus power, confirm that the switch is "OFF" before connecting the USB cable.
-
When using batteries, confirm that they are still charged.
-
No sound or very low volume
-
Check the connections ( P4 - 7)
- Adjust the patch level ( P20)
- Adjust the master level ( P30)
- When adjusting the volume with an expression pedal, make sure that a suitable volume setting has been set with the pedal.
- Confirm that unit is not in mute mode ( P10)
- The unit might have switched to standby to save power ( P5, 7). In standby, audio input and output are disabled.
There is a lot of noise
- Check the shielded cables that you are using for defects.
- Use only a genuine ZOOM AC adapter.
-
Try adjusting the ZNR module settings again.
-
Cannot change patches
The unit might be in "pre-select mode" ( P25) .If it is, turn the power OFF and ON again to restart in the normal mode.
Sound is distorted/tone is extreme
- Try adjusting the Gain and Level parameters of the DRIVE module.
- The unit might be in direct mode ( P24) , which simulates the sound of an amplifier cabinet.
The reverb effect is not working
If the unit is in rhythm mode, the REVERB module is disabled. Stop the rhythm and exit rhythm mode to use the reverb effect ( P17)
The delay effect is not working
If the looper is activated, the DELAY module is disabled. Stop using the looper ( P15)
The expression pedal is not working well
- Check the expression pedal settings ( P27)
- Adjust the expression pedal ( P28)
The recorded level in a DAW is low
Check the recording level setting ( P30)
-
Batteries lose their charge quickly
-
Are you using manganese batteries? Alkaline batteries should provide 6.5 hours of operation.
- Check the battery setting ( P31) . Set the type of battery being used for a more accurate display of the remaining charge.
Specifications
Effect types: 83 types
Effect modules: Max. 8 simultaneous modules
Number of user banks/patches: 10 patches x 10 banks
Preset banks/patches: 10 patches x 10 banks
Sampling frequency: 96kHz
A/D conversion: 24-bit with 64x oversampling
D/A conversion: 24-bit with 64x oversampling
Signal processing: 32-bit
Frequency characteristics: 20 - 40kHz + 1 dB, -3 dB (10 kΩ load)
Display: LCD
Input: Standard monaural phone jack
Rated input level: -20 dBm*
Input impedance: 1 MΩ
Output: Standard stereo phone jack (line/headphones)
Maximum output level: Line: +5 dBm*
(with output load impedance of 10k or more)
Headphones: 20mW + 20mW (into 32 load)
Control input: For FP02/FS01
S/N (equivalent input noise): 120 dB
Noise floor (residual noise): -100 dBm*
Power: AC adapter: DC9V (center minus plug), 500 mA
(ZOOMAD-16)
Batteries: 6.5 hours of continuous operation using 4 AA
alkaline batteries when BACKLIGHT set to LOW
USB: Bus power
Dimensions: G2Nu: 166mm (D) × 160mm (W) × 64mm (H)
G2.1Nu: 169mm (D) × 260mm (W) × 67mm (H)
Weight: G2Nu: 800g (without batteries)
G2.1Nu: 1300g (without batteries)
Options: FP02 expression pedal and FS01 foot switch
0dBm = 0.775Vrms
Rhythm List
| # | PatternName | TimSig |
| 1 | 8Beat1 | 4/4 |
| 2 | 8Beat2 | 4/4 |
| 3 | 8Beat3 | 4/4 |
| 4 | 8SHFFL | 4/4 |
| 5 | 16Beat1 | 4/4 |
| 6 | 16Beat2 | 4/4 |
| 7 | 16SHFFL | 4/4 |
| 8 | Rock | 4/4 |
| 9 | Hard | 4/4 |
| 10 | Metal1 | 4/4 |
| 11 | Metal2 | 4/4 |
| 12 | Thrash | 4/4 |
| 13 | Punk | 4/4 |
| 14 | DnB | 4/4 |
| 15 | Funk1 | 4/4 |
| 16 | Funk2 | 4/4 |
| 17 | Hiphop | 4/4 |
| 18 | R'nR | 4/4 |
| 19 | Pop1 | 4/4 |
| 20 | Pop2 | 4/4 |
| # | PatternName | TimSig |
| 21 | Pop3 | 4/4 |
| 22 | Dance1 | 4/4 |
| 23 | Dance2 | 4/4 |
| 24 | Dance3 | 4/4 |
| 25 | Dance4 | 4/4 |
| 26 | 3Per4 | 3/4 |
| 27 | 6Per8 | 3/4 |
| 28 | 5Per4_1 | 5/4 |
| 29 | 5Per4_2 | 5/4 |
| 30 | Latin | 4/4 |
| 31 | Ballad1 | 4/4 |
| 32 | Ballad2 | 3/4 |
| 33 | Blues1 | 4/4 |
| 34 | Blues2 | 3/4 |
| 35 | Jazz1 | 4/4 |
| 36 | Jazz2 | 3/4 |
| 37 | Metro3 | 3/4 |
| 38 | Metro4 | 4/4 |
| 39 | Metro5 | 5/4 |
| 40 | Metro |
FCC regulation warning (for U.S.A.)
This equipment has been tested and found to comply with the limits for a Class B digital device, pursuant to Part 15 of the FCC Rules. These limits are designed to provide reasonable protection against harmful interference in a residential installation. This equipment generates, uses, and can radiate radio frequency energy and, if not installed and used in accordance with the instructions, may cause harmful interference to radio communications. However, there is no guarantee that interference will not occur in a particular installation. If this equipment does cause harmful interference to radio or television reception, which can be determined by turning the equipment off and on, the user is encouraged to try to correct the interference by one or more of the following measures:
- Reorient or relocate the receiving antenna.
- Increase the separation between the equipment and receiver.
- Connect the equipment to an outlet on a circuit different from that to which the receiver is connected.
- Consult the dealer or an experienced radio/TV technician for help.
For EU Countries
CE
Declaration of Conformity:
This product complies with the requirements of EMC Directive 2004/108/EG,
Low Voltage Directive 2006/95/EC and EuP Directive 2005/32/EC
Disposal of Old Electrical & Electronic Equipment (Applicable in European countries with separate collection systems)
This symbol on the product or on its packaging indicates that this product shall not be treated as household waste. Instead it shall be handed over to the applicable collection point for the recycling of electrical and electronic equipment. By ensuring this product is disposed of correctly, you will help prevent potential negative consequences for the environment and human health, which could otherwise be caused by inappropriate waste handling of this product. The recycling of materials will help to conserve natural resources. For more detailed information about recycling of this product, please contact your local city office, your household waste disposal service or the shop where you purchased the product.
200
ZOOM CORPORATION
4-4-3 Surugadai, Kanda, Chiyoda-ku, Tokyo 101-0062 Japan
http://wwwzoomo.co.jp
| PATCH NAME | COMMENT | PEDAL SETTING | ||
| Demo | A | 0 Sc00ps | Spacey smooth but filthy tone in a cave. The scooping of the mids and high mids leaves bottom movement and a fuzzy top. | VOLUME |
| 1 Cream | Great warm sound for lead. Even if you turn the FX you can get a simple raw drive sound. | VOLUME | ||
| 2 Chalk | Mid-rangy semi-dirty tone with many peculiar anomalies and dimensions. | VOLUME | ||
| 3 Wowmen | Talking patch good as a semi clean FX sound with an FD Combo. Semi-clean. | VOLUME | ||
| 4 Synthish | Low octave synth sounding patch with some grit and attack. Cool for doubling a bass line. | VOLUME | ||
| 5 Leading | Squeak distortion. Warm usable lead tone with heavy fattening FX. Very lush melody playing. | VOLUME | ||
| 6 Grossnes | Groteque tone with heavy scooping and pitch shifting. Play "Frankenstein" type riffs with this patch. | VOLUME | ||
| 7 Angus | Arena style rhythm. HW Stack and some slight delay. If you double rhythms with Simphryt and then triple with Angus it's cool. | VOLUME | ||
| 8 Juice | Straight ahead crunchy rhythm tone with slight pitch shift for fatness. Good for chunky 5ths. | VOLUME | ||
| 9 AC House | Clean, warm acoustic tone with rich reverb. Good stand-by for clean strumming. | VOLUME | ||
| Artist | B | 0 EC LEAD | Lead sound for "Layla" by Eric Clapton. Fender crunch sound. The great sound for guitars with single-coil pickups. | VOLUME |
| 1 JB Oct | Octave sound for "Come Dancing" by Jeff Beck. Warm echo is great for "the oldies." | VOLUME | ||
| 2 ZepStd | Recording Supro amp sound for Jimmy Page (ex. Led Zeppelin) in his early days. Bright crunch sound. | VOLUME | ||
| 3 JimiFuzz | The fuzz sound for Jimi Hendrix. Using PitchSHIFT to add a sound octave higher to emulate the Octavia pedal. | VOLUME | ||
| 4 JF Riff | Single note rhythm guitar sound for "Give It Away" by John Frusciante from Red Hot Chili Peppers. Great crunch sound for Telecaster with bridge pickup. | VOLUME | ||
| 5 JM Lead | The sounds for "Gravity" by John Mayer. Well compressed lead sound. Great for finger picking playing. | VOLUME | ||
| 6 DT Slide | Tight tube-amp sound for "Leaving Trunk" by Derek Trucks. Great sound for finger picking and bottle-neck playing. | VOLUME | ||
| 7 WildOzz | Sound for "No Rest for the Wicked" by Zakk Wylide. Slight chorus gives a nice character to this powerful distortion sound. | VOLUME | ||
| 8 Cowboy | The metal sound for "Cowboys from Hell" by Dimebag Darrell from Pantera. The sound is so tight and great for bridge mute rhythm playing. | PDL Pitch : Bend | ||
| 9 KC Solo | The sound for "Smells Like Teen Spirit" by Kurt Cobain from Nirvana. DS-1 and chorus effect really make this sound come alive. | VOLUME | ||
| C | 0 G-Shock | Modern metal sound for technical guitarist Gus G. from Firewind. Well-balanced in tone that this metal sound is great for modern metal music. | VOLUME | |
| 1 Every BG | Blues sound for Buddy Guy. Dry overdriven sound adds some nice colors to your blues licks. | VOLUME | ||
| 2 EVH1959 | The famous sound for Eddie Van Halen in his early works. Great sound for playing "Eruption" when you add Phaser. | VOLUME | ||
| 3 SL Back | Intro sound for "Welcome To The Jungle" by Flash from Guns N' Roses. When you depress the expression pedal, you can get the sound of the main riff. | Delay : Mix | ||
| 4 BS Riff | Rockabilly sound for "Rock This Town" by Brian Setzer from Stray Cats. The sound changes with echoes and picking dynamics. | VOLUME | ||
| 5 BrianDrv | The drive sound for Brian May using Z Neos. You can make the lead sound for "Brighton Rock" when you push down the expression pedal. | Delay : Mix | ||
| 6 RitchStd | Main sound for "Machine Head" by Deep Purple. You can get a perfect Richie Blackmore sound when you play with Stratocaster. | VOLUME | ||
| 7 Carlos | "Smooth" sounds like Carlos Santana with BG Crunch. | Arena : Mix | ||
| 8 PeteHW | HIWATT Crunch sound for Pete Townshend. This powerful sound was made by turn the clean amp to 10. | VOLUME | ||
| 9 BROOTHER | Fat jazz sounds like George Benson. His unique sound is laid back with an edge to it. | VOLUME | ||
| D | 0 JW Talk | Solo sound for "Rocky Mountain Way" by Joe Walsh. This sound emulates the Talkbox. | PedalCry : Freq | |
| 1 MB Shock | The rare amp sound of HH for "Shock Rock" by Marc Bolan from T Rex. This sound is great for LesPaul guitar with bridge pickup. | AnalogDLY : Mix | ||
| 2 Kstone | Intro sound for "Satisfaction" by Keith Richards. This sound is beyond legend. | VOLUME | ||
| 3 ZZ | The sound for ZZ Top used in their early works. Great sound for Texas boogie rock style using Z Wild. | VOLUME | ||
| 4 RR Mtl | The sound for 80's Metal with the Metal Zone. Try optional chorus to get on the "Crazy Train" by Randy Rhoads. | VOLUME | ||
| 5 RSSitar | The sitar sound for Ravi Shankar. The unique attack of this sound is done by increasing the resonance. | VOLUME | ||
| 6 YngDrv | Shred guitar sound for Yngwie Malmsteen. Best for harmonic minor classical solo lines. | VOLUME | ||
| 7 EricFuzz | Fuzz sound for Eric Johnson. This great sound was blended with fuzz and analog delay. | VOLUME | ||
| 8 Edge | Perfectly delayed clean sound for The Edge from U2. Tap tempo to adjust to the song. | FD Combo : Gain | ||
| 9 JP Drv | High gain sounds of John Petrucci. Get a great sustain for solos when you push down the expression pedal. | Delay : Mix | ||
| SVX | E | 0 May | Midrangy lead tone with a long delay. Great for building harmonies in time. | VOLUME |
| 1 Woosh | Z-Clean tone with step for a rhythmic waterfall effect. Reminiscent of Zappa "Ships Ahoy". | VOLUME | ||
| 2 Wet Head | Dark and clean with wow resonance. Good for dynamic, clean lead playing. | VOLUME | ||
| 3 Wackjob | Phased and clean with sharp attack that's good for smacking rhythms. | VOLUME | ||
| 4 Dreamdrg | Clean tone with delayed attack and heavy FX dimensioning. | VOLUME | ||
| 5 Milky Way | Long, rich, cavernous kind of clean tone. Acoustic simulator. Stare into the night sky and play descending double stops in a Lydian sharp 5 scale. | VOLUME | ||
| 6 Oceans | Clean warm sound with folding reverse echoes in a lush hall. Good for background chords. | Hall : Mix | ||
| 7 Wreckles | This has the "kitchen sink!" Auto Wah, StereoChorus, Hall, etc. Play a solo with jumping intervals on every note. | VOLUME | ||
| 8 Waves | Wet wet wet, lush clean tone with forever delays in all directions. Try playing tension chords with sight whammy bar vibrations. | VOLUME | ||
| 9 Oceanflr | Heavy phased and revered delay melody tone. Good for legato type Holdsworth riffs. | VOLUME | ||
- Bank A (Demo) and Bank E (SVX) are created by Steve Vai.
- The preset area of banks 0 - 9 contains the same patches as A - J.
- We recommend you to adjust the Noise Reduction parameter according to your guitars, amps and recording or performance situation.
Manufacturer names and product names mentioned in this patch list are trademarks or registered trademarks of their respective owners and do not indicate any affiliation with ZOOM CORPORATION. All product and artist names are intended only to illustrate sonic characteristics that were used as reference in the development of this product.
| PATCH NAME | COMMENT | PEDAL SETTING | ||
| Modelling | F | 0 | FdComp | Fender Twin Reverb and compressor. Great for clean funk rhythm guitar. |
| 1 | FullVx | Overdriven Vox AC30 with room reverb. The reverb adds a unique closed back type sound. | ||
| 2 | TexasMan | Texas blues sound of a Fender Bassman volume at 10. The sound responds to the guitar volume. Great sound for blues. | ||
| 3 | BgLead | MESA/BOOGIE MKIII mild drive sound. Great for sustained leads. | ||
| 4 | HwCrunch | Fat crunch sound of HIWATT CUSTOM 100. Great rock crunch sound. | ||
| 5 | McCrunch | Marshall 1959 classic crunch sound. Feel the dynamics of this sound. | ||
| 6 | MdRhythm | Marshall JCM2000 rhythm sound. Heavy, but the sound still has a classic Marshall sound. | ||
| 7 | PvRhythm | Peavey 5150 rhythm sound. Great for metal rhythm guitar. | ||
| 8 | DzRhythm | Diezel Herbert heavy rhythm sound. Great for heavy riffs with tuned down guitars. | ||
| 9 | BdRhythm | MESA/BOOGIE Rectifier rhythm sound. Great for the progressive metal. | ||
| G | 0 | FatOd | Natural overdriven sounds like OD-1 with EQ. Great for both lead and rhythm. | |
| 1 | TsDrive | Sounds like Tube Screamer overdriven. Great for blues to rock. | ||
| 2 | GvDrive | Guv'nor pedal is great for hard rock sound. | ||
| 3 | dist+ | MXR distortion drive sound. | ||
| 4 | DS1 | DS-I pedal sound with some extra low end. | ||
| 5 | RAT | Well sustained lead sound of RAT. | ||
| 6 | FatFace | Great fuzz sound using FUZZ FACE with added some low end. | ||
| 7 | MuffDrv | BIG MUFF high gain sound. | ||
| 8 | M World | Classic Metal Zone shrapnel shred sound. | ||
| 9 | HOT DRV | Mild driven sound made by a tube saturation. Even though it is hard driving it still has a strong melodic core in the sound. | ||
| Original | H | 0 | Z CLEAN | Crystal clean sound based on Z CLEAN with chorus and delay. Great for arpeggio. |
| 1 | ZWILD | ZOOM's original hard overdrive sound. Boosted Overdrive gives a nice compression. | ||
| 2 | Z MP1 | The sound combination of ADA MP1 and Marshall JCM800. | ||
| 3 | Z Bottom | ZOOM's original high gain sound. Rich depth in the mids and lows. Great for 80's metal. | ||
| 4 | Z DREAM | ZOOM's original high gain sound. Great for 7 strings or tuned down guitar. Great progressive metal sound. | ||
| 5 | Z SCREAM | Well balanced ZOOM's original high gain sound. The sound is really sharp and cut through in the mix. | ||
| 6 | Z NEOS | Modified VOX AC30 crunch sound. Responds well to the guitar's volume. | ||
| 7 | LEAD | ZOOM's classic lead sound with strong mid-boost and long sustain. | ||
| 8 | EXT DS | Hard saturated distortion sound. Great sound for technical lead. | ||
| 9 | ACOSIM | Acoustic guitar simulator. Sounds best with single coil pickups in the neck position. | ||
| Simple | I | 0 | M Comp | M Compressor. Best sound for funk rhythm guitar. |
| 1 | Auto Wah | Auto Wah. Set sensitivity to cover rhythm guitar to lead. | ||
| 2 | Reso | Resonance. Best sound to play long sustained chords. | ||
| 3 | Tremolo | Tremolo. Rich versatile sound great for all kinds of style. | ||
| 4 | PDL Cry | Cry Wah. Use the expression pedal to control the wah. | ||
| 5 | Octave | Octave sound. You can play one note and an octave lower note plays simultaneously. | ||
| 6 | Vin CE | Vintage Chorus. Great chorus sound of BOSS CE-I. This sound has fatness and strong chorus waves. | ||
| 7 | Phaser | Versatile phaser with four types to choose from. You can set to use for rhythm to lead. | ||
| 8 | Flanger | Flanger sound. Adds sweeping waves to the chorus effect. Use this sound with drive sound for a jet sound. | ||
| 9 | Vibrato | Automatic Vibrato. Great sound for chord arpeggio. | ||
| J | 0 | Cry | Cry. Sound changes like a talkbox. | |
| 1 | H.P.S | Harmonized pitch shifter set to the key of C major. Great for playing melody or leads. | ||
| 2 | PDLPitch | Pedal controlled pitch shifter. Use the expression pedal to control the pitch. | ||
| 3 | TapeEcho | Tape echo effect gives you a unique sound by turn the feedback all the way up and control the pedal. | ||
| 4 | PP Delay | Ping Pong delay. Delay sound moves from left to right when you use stereo outputs/headphones. | ||
| 5 | Reverse | Reverse delay. It creates a unique reverse effect. | ||
| 6 | Hall | Concert hall reverb. You can control the size of the hall is by controlling Decay. | ||
| 7 | Spring | Spring reverb. Simulation of spring reversals built into guitar amplifiers. | ||
| 8 | EarlyRef | Early Reflection. The nice reverb sound that emulate the sound that was played in the studio. | ||
| 9 | MultiTapD | Multi Tap Delay. Rhythmic echoes come back from everywhere. | ||
Fender Twin Reverb '65
FD Combo
This amp modeling is based on the pre-CBS "Twin Reverb" from 1965 aka "Blackface". This amp has four 7025 (12AX7), one 12AX7 and two 12AT7 total of 7 tubes for preamp section and four 6L6GC tubes for power-amp section and silicon diodes for the rectifier circuit.
The amp incorporates a diode rectifier which is believed to give a tighter sound to than a tube rectifier does, this is the reason for this characteristic glittering sound of this "Twin Reverb".
The original amp has two 12" loudspeakers by Jensen and 80 watts of output power.
VOK AC30TBX
VX Combo
Tracing back the long history of VOX, one finds that it all began in 1958 under the moniker "Jennings Musical Instruments" (JMI). Originally, this company built amps in the ten to fifteen watt range, but as time went on, the demand for higher-power amps became stronger. It lead to the birth of the famous AC30. The original AC30 had two Alnico Celestion 12^ speakers, one EF86 tube for preamp section and one EL84 tube for power-amp section, along with a GZ34 rectifier. In the following years, musicians wanted even higher gain, and VOX responded with the Top Boost unit, an add-on that was later integrated in the AC30TBX. We decided to emulate AC30TBX.
Fender BASSMAN
When it first came out in 1951, the BASSMAN had an output of 26 watts and used a single Jensen 15-inch speaker. After various modifications, it reemerged in 1959 with a 50-watt output and four specially designed Jensen 10-inch speakers. We emulated the "bright" channel of the '59 BASSMAN.
It was introduced at the 1951 NAMM show along with the Precision Bass. This amp was originally intended for bass guitars, but its reedy distortion made it a favorite with some of the early blues giants, and later with many rock guitarists. Of course, the amp continues to be used by many musicians today.
US Blues
MESA/BOOGIE Mark III
The origin of the MESA/BOOGIE amplifier was a modified Fender Princeton, Randall Smith, an amp tech in San Francisco, souped up these small guitar amps to 100 watts of power and sold them to various clients. The first model was called "Mark I". The second model, the "Mark II" had lead and rhythm channels and a 4-band EQ to give wider variety of tone.
Until the model Mark II, MESA/BOOGIE amps were quite expensive, hand-made amplifiers, but the next model, the "Mark III" was more affordable. It had one 10" loudspeaker and 60 watt of power but retained all of the classic BOOGIE features: simul-power circuitry, the graphic EQ, and three (Rhythm1, Rhythm2 and Lead) separate channels.
We emulated this famous combo amp "Mark III".
BG Crunch
HIWATT Custom 100
The Custom 100 was the flagship amp from HIWATT, a British manufacturer that ranks with Marshall among the British legends. Vintage HIWATT amplifiers, which were made before the mid-1980s, used high-grade military-spec parts and hand-soldered point-to-point wiring. Their sound was the epitome of clean. The pre-stage tubes were ECC83, the power tubes were the same EL34s as used by Marshall. Unlike the glittering clean sound of a Fender amp, the clean sound of a HIWATT is darker, having that characteristic British tone. Especially in the "normal" channel, turning up the volume to maximum will simply increase the sound pressure, without breakup or loss of detail. In the high-gain "brilliant" channel, slight distortion is possible by connecting a guitar with a high-output pickup such as a Les Paul. But the sound always remains detailed and transparent, allowing the listener to clearly pick out the individual notes that make up a chord.
HW Stack
Marshall 1959 SuperLead100 MS Crunch
This 1959 stack amp that received the nickname "PLEXI" from the material of its front panel is one of the most famous amplifiers in Rock history. Its iconic sound was used on a number of rock albums by many famous guitarists all over the world. It is no exaggeration to say that virtually everybody has heard the sound of this amp at least once. It uses three ECC83 tubes for the preamp section and four EL34 tubes in the power-amp section. Two cabinets with four Celestion 12" speakers complete the package to make this epitome of British Rock. With the volume full up, the aggressive transients and resulting distortion are complemented by smooth harmonics are a guitarist dream.
Marshall JCM2000
MS Drive
"JCM2000" is based on the "PLEXI" amp (aka Old Marshall) whose rich overtones and powerful sound were legendary. It has very a flexible sound and can produce the traditional Marshall sound, modern heavy metal sound or sounds suitable for many musical genres. It has a modern Marshall's standard circuit with four ECC83 tubes in the preamp section and four EL34 tubes for the power section. It is an all-tube amplifier that can produce clean or heavily distorted sound and can be used in all kinds of musical situations. The sound is rather grainy but the response is fast and the guitar cuts through the mix very well. "JCM2000" series has two different models: the TSL and the DSL. We decided to emulate "DSL-100" for this one. We combined this amplifier with a "1960A" cabinet and used the Lead channel that has more distortion.
PEAVEY 5150 STACK
PV Drive
The "5150" and the "5150 MkII" were very famous guitar amplifiers originally developed as the signature models for Eddie Van Halen in the 1990s. We modeled the first version of the "5150". This amplifier has two (Rhythm and Lead) channels and 120 watts of power using five 12AX7 tubes for preamp section and four 6L6GC tubes for the power-amp section. The rectifier circuit employs silicon diodes. The uniqueness of the sound of this amplifier is characterized by its sharp attack, deep and smooth tone, fine distortion and fat and clinging low registers. This modeling is based on the combination of the Lead channel of the 5150 head with a "5150SL" four-12" cabinet.
This modern three-channel amp features great tonal versatility, ranging from a clean tone to heavy distortion. In particular, the extremely dry and gritty distortion produced by channel 3 gives a piercing effect that is hard to produce with any other amp. It is a favorite of Heavy Rock bands such as Metallica and Slipknot. The uncluttered sound compliments the tones of a tuned-down guitar. A DEEP control allows further boosting of the bass frequencies, for an extremely low sound.

DZ Drive
MESA/BOOGIE Dual Rectifier
This modeling is based on Mesa/Boogie Dual Rectifier, which has five 12AX7 tubes in the preamp section, and four 6L6GC tubes in the power-amp section, the amp produces 100 watts of power. Unlike the Mark series, this model gives more priority to the tone shaping, it features a tone control circuit after the volume control. After this model hits the scene, the Mesa/Boogie brand image changed from Fusion to Metal. The distinguishing feature of this amplifier, and its namesake, is of course the rectifier. The sound provided by this modeling is based on the Dual Rectifier which has two rectifier circuits, one of which is tube based and one configured with silicone diodes. The diodes create a tight, high-powered sound, while the tube sound is more soft and warm.
BG Drive
BOSS OD-1
The "OD-1" released by BOSS in 1977 was originally developed to simulate the natural overdrive sound of tube amplifiers, but this stomp box turned out to be popular as a booster used in front of the real tube amplifier to get tighter and more punchy sound with increased gain. The "OD-1" employs an asymmetrical "clipper" section in its circuit design that uses three diodes to create the overdrive sound that both mild and rich in nuances. If you are lucky enough to hear the sound of the real "OD-1", we invite you to try a blind test: to turn off all of the effect modules except the "OD-1" and compare the sound of this modeling and that of the real one. We believe that you will not hear a difference.
Ibanez TS808
This modeled is the early Tube Screamer that was introduced by Ibanez in 1979 for the non-US market. In Japan, it was sold under the MAXON name as the OD808. As the moniker implies, when using the pedal on its own, it produces natural distortion such as when driving a tube amp hard. But it often was used simply as a booster, with gain at 0 and volume at 10, to drive an amp up even further. Normally, this would not change the tone of the amp, but a slight peak in the mid-range gives an overall softer tone. This pedal is also famous for being used by blues guitar legend Stevie Ray Vaughan.
Marshall Guv'nor
Governor
The Marshall official sales talk for this distortion pedal "Guv'nor" was that you could get the distortion sound of the Marshall amps with this small stomp box. Depending on which guitar amps you combine, you can actually get the Marshall amps distortion. There are two different versions of the Guv'nor: the Britain-made ones from 1988 and the Korean-made ones from 1998. This model is based on the original version from 1988. The Guv'nor's characteristic feature is the frequency point you can tweak using the "TREBLE" control. Even if you lower this parameter value, the sound will get fat instead of dull. As you raise the value, the sound will get sweeter and clearer.
MXR Distortion+
Dist +
MXR, a company founded in the seventies by two high school students, is famous for stomp boxes such as the Dynacomp and Phase 90. In the early days, their products were actually built and painted in their garage and set out to dry in the garden. As the story goes, sometimes small insects would get stuck on the surface, and the lot would be shipped out as is. The pedals soon gained fame in the seventies, but eventually lost their market share to products from large companies like BOSS and others that provided high performance at lower cost. MXR disappeared from the scene, but in the late eighties, Jim Dunlop bought the company and is now producing a number of re-issue models. This pedal was loved by Randy Rhoads who made its "distortion" sound. The hard-edged tone stays detailed when playing fast solos or riffs with the muted lower strings. The music of heavy metal and hard rock wouldn't be the same without it.
This orange-colored pedal can be called the standard of distortion sound. Among the many distortion pedals from BOSS, it is a big-seller, along with the SD-1. In Japan, sales of the pedal ceased at one point (although production for the U.S. market continued), but as of 2005, the product is available again. This was the only BOSS pedal to be reintroduced to the market in this fashion. The sound is trebly and very "distortion-like", but it can hold its own in a band. This pedal was favored by Joe Satriani and Nirvana's Kurt Cobain.
Dist 1
PROCO RAT
This is one of the most widely used pedals. It has only three knobs (Distortion, Filter, Volume), but each knob has a wide adjustment range, allowing for a variety of sound types. With the distortion turned all-the-way up, the fat, up-front sound is similar to a Fuzz pedal. At the twelve o'clock position, it gets crunchy and brings out fine picking nuances, allowing the player to tweak the sound by varying the playing style. Unlike a regular tone control, the filter knob cuts the treble when turned clockwise. This is the secret behind the typical "RAT" sound. This model is simulated by the TONE parameter, but operation is reversed (treble is cut when turned counterclockwise).
Squeak
Dallas-Arbiter FUZZ FACE
"FUZZ FACE" was originally released from the Dallas-Arbiter company in 1966 encased in a uniquely designed housing that literally looked like a face. It was famous for being one of legendary guitarist Jimi Hendrix's favorite pieces of gear. He combined this "FUZZ FACE" with his Marshall amps because at the time, it was hard to get distorted sound from them. The heavy, fat low end and the fuzz sound with long sustain are the characteristics of this unit. The earliest model used two PNP germanium transistors and was very different in sound from the later models using silicon transistors. The model is based on the old Fuzz Face, the earliest, most sought after version that was released.
FuzzSmile
Electro-Harmonix BIG MUFF
GreatMuff
There are several versions of this pedal. This model is based on the so-called "Ram's Head" from the early seventies, characterized by very long sustain and rich distortion canvas. Players from the 70's associated with this sound are Carlos Santana and Robert Fripp of King Crimson. From the late eighties into the nineties, the grunge movement took over, with Nirvana's Cobain and J. Mascis of Dinosaur Jr. using the pedal to do their thing. Compared to an ordinary fuzz pedal, the BIG MUFF offers rich mid-range and detailed distortion that maintains presence, even when playing chords. The result is a wholly unique sound somewhere between distortion and fuzz.
BOSS MT-2
MetaIWRLD
The "MT-2" ("METAL ZONE") has the most intense distortion of lot. Its unique distortion sound has very fat mid to low range and it has a parametric EQ in addition to the Hi and Low EQ, which is the key to the scooped metal sound. This stomp box is reputed for its flexibility in sound because you can not only get that scooped metal sound by cutting the mid-range and boosting the high and low range but also the overdrive sound by reducing the gain and boosting the mid-range. This is one of the best-selling stomp boxes among many of the popular line-ups of BOSS products. Once connected, a Strat or Les Paul will have the "MT-2" sound regardless of the types of guitar pickups. It was first introduced in 1991 and is still in the BOSS's catalog today!
The "HOT BOX" was released as a pedal preamp bearing the MATCHLESS brand name. It uses two 12AX7A tubes for an accurate reproduction of the sound of the "MATCHLESS" guitar amplifiers. It has a compressed sound and a quick response that are distinctive characteristics of tube amps. Its sound is fat and cuts through very well. Even if you crank up the gain to get a distorted sound, you will still retain the nuances of the original guitar tone. Although it is categorized as preamp, the ideal way to get the best possible sound is to connect it, like a regular stomp box, to the input of your guitar amp. Its design features a case that is polished like a mirror and the "MATCHLESS" logo lights up when you turn it on. This "HOT BOX" is literally a magic box you can get the signature sound of "MATCHLESS" amps regardless of the guitar amplifier you connect it to.
This is a clean sound that makes the drive module virtually disappear. The lower range is tight, with a very slight treble emphasis. Why choose this effect type? Try it when creating patches for arpeggios and funk guitar. You'll get smoother and more rounded sound. If you want to produce clean guitar sound via a line input, excessive bass may make it sound as if the pick got caught between the strings. This effect type should solve such problems.
Z Clean
This is the original overdrive sound which is made by boosting the normal overdrive pedals. Unlike the distortion pedals this model has a hard driven tone but it still has natural warmth. This model doesn't have a hard edge that is unpleasant to your ears but it has its own unique characteristics. Have you ever thought about wanting more gain when you are using the overdrive pedals? The Z Wild is the answer to that question.
Z Wild
This is the original sound combining of using ADA MP1 and Marshall JCM800. This sound has a unique character at high frequencies and it cut through the mix when playing with a band. This sound is best matched with the single-coil pick up at the bridge position. You can easily adjust the amount of the drive by adjusting the guitar's volume knob.
Z Bottom
The original drive sound that has a heavily boosted bottom. A great sound for power chord riffs, it covers the entire range of the bass guitar. If you play this sound with bridge mute, it sounds a very tight and not as heavy. When you use this sound for lead playing, your lead will sound really wide with the support of the lower frequencies. If you're looking for an 80s metal sound this model would be a good place to start.
Z Dream
Z Dream
This is the original high-gain sound based on the lead channel of Mesa/Boogie Road King Series II. The drive sound is powerful and sounds like Rectifier series amps but with a quicker response to picking dynamics. The sound is great for heavy metal rhythm and also great for technical lead playing. It works great with tuned-down or a 7-string guitar.
Z Scream This is the original high-gain sound, well-balanced in tone from bottom end to the high registers. The tight low end has a great sharp edge, even if you crank up the gain to 10. Also, the quick response of this sound lets you to play fast lines and still easily hear all of the notes. This is Marshall-type sound but we tweaked the tone and make it a bit more modern. The sound is a great match for Hard Rock/Heavy Metal playing but can also work with many other styles of music.
Z Scream
This sound is based on mod-VOX AC30TBX. The color of the sound changes by turning the gain knob. When you set the gain slightly lower, you can get the traditional British tone, and when you bring the gain higher you can get an old hard rock type sound.
Z Neos
This bright distortion sound is good for lead with smooth saturation. It works well in situations from fusion to hard rock. The middle range is boosted a bit to slice through the mix. If you use single-coils or humbucking pickups it, you'll get a great sound for solos, long sustained leads or legato passages.
Lead
Extreme Distortion
ExtremeDS
Acoustic Simulator
Aco.Sim
This is the acoustic simulator that makes an electric guitar sounds like an acoustic guitar. We tweaked the tone to have it work best with the neck position pickup of a guitar. Now, you don't have to worry about feedback on stage, caused by using an acoustic guitar, this simulation gives a perfect solution for that problem and you can add an acoustic sound to your songs at any time you want.
Cubase LE 4 installation
Connections and preparation
Use Cubase LE 4 to record
Windows Vista / XP
To connect this unit to a computer running Windows Vista (or Windows XP) and to enable audio input/output, proceed as follows. The installation description uses Windows Vista as an example.

Download the latest ASIO driver from the web site of ZOOM Corporation (http://wwwzoomo.co.jp) and install the driver.
The ASIO driver software is required to enable use of Cubase LE 4 for audio input and output with a computer. Refer to the read_me file included in the download package for instructions on how to install the driver correctly.

Insert the supplied "Cubase LE 4" DVD-ROM into the DVD drive of the computer, and perform the installation steps.
When you insert the DVD-ROM, a screen asking what you want to do appears. Select "Open folder to view files". When the contents of the DVD-ROM are shown, open the "Cubase LE 4 for Windows" folder by double-clicking on it, and then double-click the executable "Setup" ("Setup.exe") file to start the installation process.

Setup
HINT
If nothing happens when you insert the DVD-ROM, open the Start menu and select "Computer" ("My Computer" in Windows XP). Then double-click the "Cubase LE 4" DVD-ROM icon to display the contents of the DVD-ROM.
NOTE
When the installation of Cubase LE 4 is complete, a screen asking about installation of activation (software license authentication) management software appears. Install this software, because it is required for registering Cubase LE 4.

Connect this unit to the computer using a USB cable.
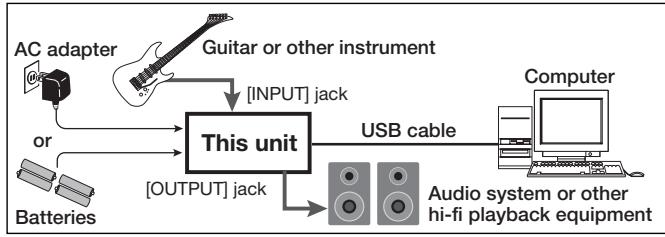
NOTE
- If you monitor the audio signal during recording via the audio output of the computer, there will be an audible delay. Be sure to use the [OUTPUT] jack of this unit to monitor the signal.
- When this unit is operated on USB bus power via the USB cable insufficient power may result in unstable operation or error indications appearing on the display. In such a case, power the device from an AC adapter or batteries.
- Use a high-quality USB cable and keep the connection as short as possible. If USB bus power is supplied to this unit via a USB cable that is more than 3 meters in length, the low voltage warning indication may appear.
HINT
No special steps are necessary for canceling the USB connection. Simply disconnect the USB cable from the computer.
When you connect this unit for the first time to a computer running Windows Vista, a message saying "New Hardware Found" will appear. Before proceeding, wait a while until this message disappears.

Bring up the "Sound" window from the Control Panel and make the input device setting for the computer.
To bring up the "Sound" window, select "Control Panel" from the Start menu and click "Hardware and Sound", then click "Sound".
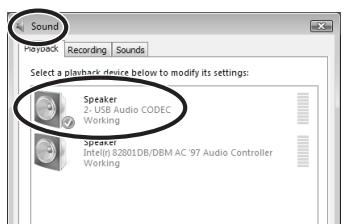
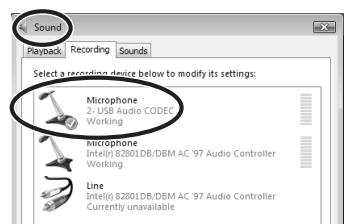
In the "Sound" window, verify that "USB Audio CODEC" is listed under the Play and Record devices and that the device is checked. (To switch between Play and Record, click the tabs at the top of the window.) If the device is not checked, right-click on the icon for the device and click "Set as Default Device" so that a check mark appears.

Start Cubase LE 4. Then access the "Devices" menu, select "Device Setup..." and click "VST Audio System".
To start Cubase LE 4, double-click the Cubase LE 4 shortcut icon that was created on the desktop. After startup, select "ZOOM ASIO Driver" as the ASIO driver in the right section of the Device Setup window. When you change the ASIO driver selection, a confirmation message appears. Click the "Switch" button.
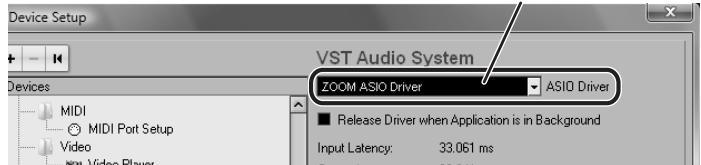
ASIO driver
The device indication in the left section of the window now shows "ZOOM ASIO Driver" as the ASIO driver.
Click on this indication to select it, and then click the "Control Panel" button in the right section of the Device Setup window.

The window that appears lets you set the latency and sampling frequency for the ASIO driver. The latency should be set to a value that is as low as possible without causing sound dropouts during recording and playback.
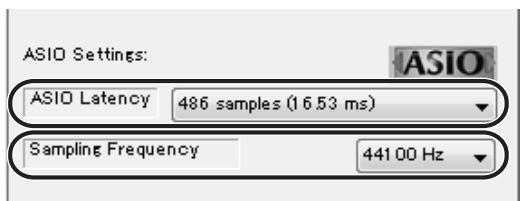
When the setting is complete, click the OK buttons in the respective windows to return to the startup condition of Cubase LE 4.

Continued overleaf
Cubase LE 4 installation
Connections and preparation
Use Cubase LE 4 to record
MacOS X
To connect this unit to a computer running MacOS X and enable audio input/output, proceed as follows.

Insert the supplied "Cubase LE 4" DVD-ROM into the DVD drive of the Macintosh.
The contents of the DVD-ROM appear automatically. If nothing happens when you insert the DVD-ROM, double-click the "Cubase LE 4" icon shown on the desktop.

Install Cubase LE 4 on the Macintosh.
When the contents of the DVD-ROM appear, open the "Cubase LE 4 for MacOS X" folder by double-clicking it, and then double-click the "Cubase LE 4.mpkg" file to start the installation process.
Cubase LE 4.mpkg

Connect this unit to the computer using a USB cable.
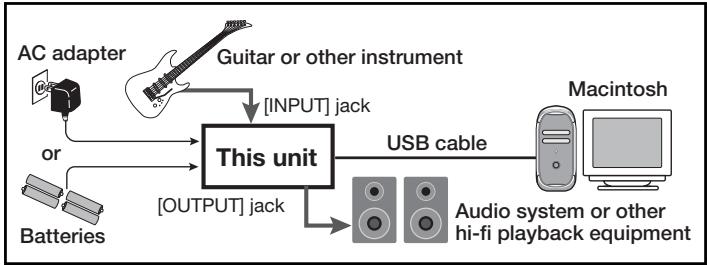
NOTE
- If you monitor the audio signal during recording via the audio output of the computer, there will be an audible delay. Be sure to use the [OUTPUT] jack of this unit to monitor the signal.
- When this unit is operated on USB bus power via the USB cable, insufficient power may result in unstable operation or error indications appearing on the display. In such a case, power the device from an AC adapter or batteries.
- Use a high-quality USB cable and keep the connection as short as possible. If USB bus power is supplied to this unit via a USB cable that is more than 3 meters in length, the low voltage warning indication may appear.
HINT
No special steps are necessary for canceling the USB connection.
Simply disconnect the USB cable from the computer.

Open the "Applications" folder and then the "Utilities" folder, and double-click "Audio MIDI Setup".
The Audio MIDI Setup screen appears. Click "Audio Devices" and check whether "USB Audio CODEC" is selected as default input/ default output.

If another device is selected, use the pull-down menu to change the selection to "USB Audio CODEC".
When the setting has been made, close Audio MIDI Setup.

Start Cubase LE 4. Then access the "Devices" menu, select "Device Setup..." and click "VST Audio System".
To start Cubase LE 4, double-click on the Cubase LE 4 icon that was placed in the "Applications" folder during installation.
After startup, be sure to verify that "USB Audio CODEC (2)" is selected as ASIO driver in the right section of the Device Setup window.

If another item is selected, use the pull-down menu to change the selection to "USB Audio CODEC (2)".
When the setting has been made, click the OK button to close the window.

Continued overleaf
From the "Devices" menu of Cubase LE 4, select "VST Connections" and select the device containing the string "Zm In (Out)" ("USB Audio CODEC" for MacOS X) as input port and output port.
Use the tabs at top (top center for Mac OS X) left to switch between input and output, and verify that "Zm In (Out)" is selected as device port. If another device is selected, click the device port field and change the selection.
7 Access the "File" menu and select "New Project".
The new project window appears. Here you can select a project template.
Make sure that the "Empty" template is selected, and click the OK button.
A window for selecting the project file save location appears
After specifying a suitable project file save location (such as the desktop), click the OK button (Choose button in MacOS X).
A new project is created, and the project window for controlling most of the Cubase LE 4 operations appears.
Project window
To create a new audio track, access the "Project" menu and select "Add track". In the submenu that appears, select "Audio".
he Add Track window for specifying the number of audio tracks and the stereo/mono setting appears.
In this example, set the number of tracks to "1" and select stereo, then click the OK button.
A new stereo audio track is added to the project window.
Make the following settings for the newly created audio track.
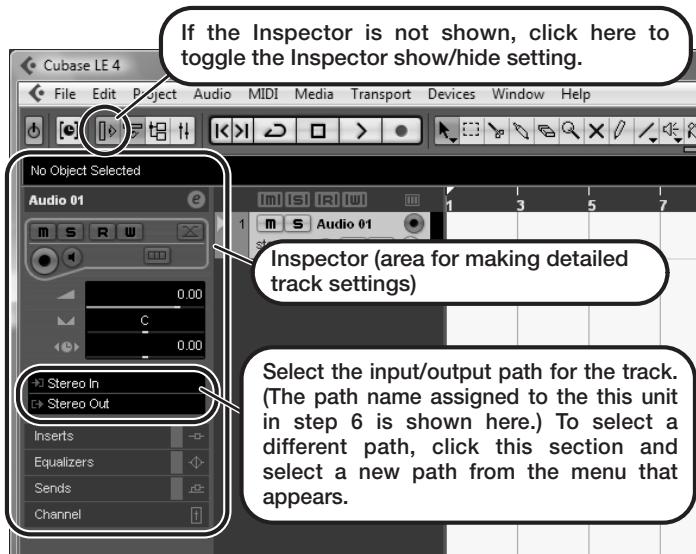
HINT
The Inspector shows information about the currently selected track. If nothing is shown, click on the track to select it.
Connect the guitar or other instrument to the [INPUT] jack of this unit and select the desired patch.
The sound selected here will be recorded on the computer via the [USB] port.
Access the "Devices" menu of Cubase LE 4 and select "Mixer".
The mixer window appears.
This window shows the channel assigned to the created track, and the master channel.
Perform the following steps here.
Mixer window
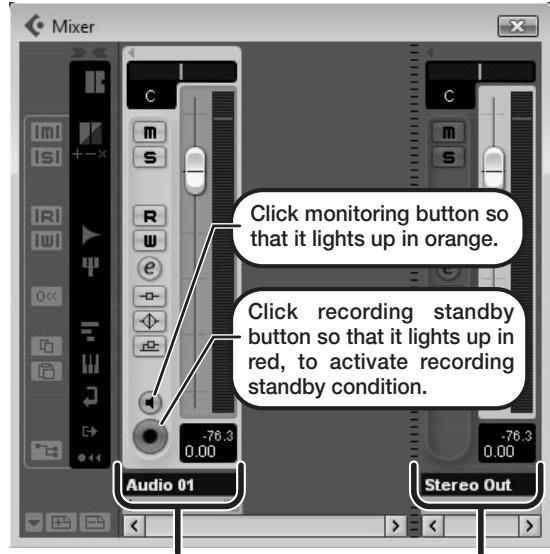
Channel assigned to audio track
Master channel
HINT
When the monitoring button is enabled, the level meter next to the fader shows the input level to the audio track. When the monitoring button is disabled, the meter fader shows the audio track output level.
While playing your instrument, adjust the output level of this unit to achieve a suitable recording level for Cubase LE 4.
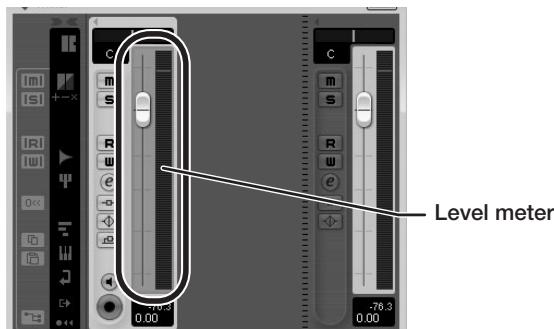
The recording level for Cubase LE 4 can be checked with the level meter for the channel that is assigned to the recording standby track. Set the level as high as possible without causing the meter to reach the end of the scale.
To adjust the level, do not use the fader of Cubase LE 4. Instead change the recording level and gain settings at this unit.
NOTE
- While the monitoring button is enabled, the direct signal input to this unit and the signal routed to the computer and then returned to this unit will be output simultaneously from this unit, causing a flanger-like effect in the sound. To accurately monitor the sound also while adjusting the recording level, temporarily set the output device port for the VST connection (step 6) to "Not Connected".
- The level meter as in the above illustration shows the signal level after processing in this unit. When you pluck a guitar string the meter may register with a slight delay, but this is not a defect.
When the recording level has been adjusted, click the monitoring button to disable it.
The input level is no longer shown on the meter, and the signal returned to this unit via the computer is muted.
In this condition, only the signal before sending to the computer can be monitored via the [OUTPUT] jack of this unit.
Verify that the transport panel is being shown.

If the transport panel is not shown, access the "Transport" menu and select "Transport Panel".
To start recording, click the Record button in the transport panel.

Stop button
Record button
Recording starts.
As you play your instrument, the waveform appears in real time in the project window.
To stop recording, click the Stop button in the transport panel.

Check the recorded content.
To play the recording, perform the following steps.
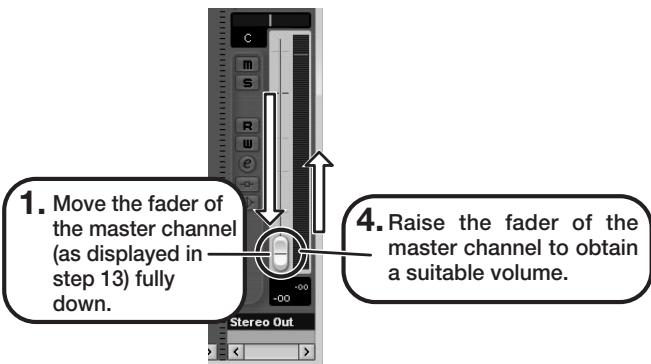

Go to beginning of project
Play button
-
Use the button in the transport panel to move to the beginning of the project.
-
Click the Play button in the transport panel to start playback.
HINT
If no sound is heard when you click the Play button after recording, check the VST connection settings (step 6) once more.
NOTE
To continue using Cubase LE 4, a process called activation (license authentication and product registration) is necessary. When you start Cubase LE 4, a screen offering to register the product will appear. Select "Register Now". A web site for registration will open in your Internet browser. Follow the instructions on that page to register and activate the product.
For optimum enjoyment
While using Cubase LE 4, other applications may slow down drastically or a message such as "Cannot synchronize with USB audio interface" may appear. If this happens frequently, consider taking the following steps to optimize the operation conditions for Cubase LE 4.
(1) Shut down other applications besides Cubase LE 4. In particular, check for resident software and other utilities.
(2) Reduce plug-ins (effects, instruments) used by Cubase LE 4.
When there is a high number of plug-ins, the computer's processing power may not be able to keep up. Reducing the number of tracks for simultaneous playback can also be helpful.
(3) Power the unit from an AC adapter.
When a device designed to use USB power is powered via the USB port, the current supply may sometimes fluctuate, leading to problems. See if using an AC adapter improves operation.
If applications still run very slowly or the computer itself does not function properly, disconnect this unit from the computer and shut down Cubase LE 4. Then reconnect the USB cable and start Cubase LE 4 again.
- 200
- © ZOOM CORPORATION
- Usage and Safety Precautions
- Safety Precautions
- Power considerations
- Use environment considerations
- Handling
- Connecting cables and input and output jacks
- Alterations
- Volume
- Usage precautions
- Electrical interference with other equipment
- Cleaning
- Malfunction
- Terms Used in This Manual
- - Module
- Effect type
- Parameter
- Patch
- Bank
- Mode
- Operating the unit on batteries
- G2Nu Part Names
- eco switch
- G2.1Nu Part Names
- Parameter knobs 1-3
- Bottom Panel
- When the eco switch is ON:
- When in power standby:
- Select a Patch and Play (Play Mode)
- Turn the power on
- Set the unit to play mode
- Select a patch
- Switch banks
- Set the unit to play mode
- Set the unit to bypass/mute
- Select the tuner type
- Turn Parameter knob 2 to select the tuner type.
- CHROMATIC
- Other tuning types
- Tune the guitar
- Play the open string that you want to tune, and adjust the pitch.
- When set to CHROMATIC
- When set to other tuner types
- Drop tuning
- Change the frequency of the tuner's standard pitch.
- Return to play mode
- Activate the looper
- Set the recording time
- Adjust the tempo
- Record a phrase and play it back
- "REC" appears on the display and recording starts.
- Overdub a phrase
- Adjust the phrase volume
- Erase the phrase
- Return to play mode
- Using Rhythms (Rhythm Mode)
- Activating rhythm mode
- Select the rhythm pattern
- Set the tempo by tapping (Tap tempo)
- Adjust the rhythm volume
- Turn Parameter knob 3.
- Stop the rhythm
- Creating and Changing Patches (Edit Mode)
- Select a patch to edit (→P9)
- Select a module to edit
- Turn a module ON/OFF
- Change the effect type
- Adjust the parameters
- Adjust the volume of the patch (patch level)
- Change the patch name
- Finish editing
- Saving and Copying Patches (Store Mode)
- Activate store mode
- Select the location to save or the other patch to swap
- Execute patch saving/swapping
- Press the STORE/SWAP key.
- Restoring patches to their factory settings (ALL INITIALIZE function)
- Using Direct Mode
- NOTE
- Patch Pre-selection (PRE SELECT)
- Turn the power ON while pressing the [▲] foot switch.
- To change the patch, press both [] / [] foot switches at the same time.
- Use the || / [] foot switches and bank [] / [] keys to select the next patch.
- Using a Foot Switch
- Using an Expression Pedal
- Set the control parameter and adjustment range
- Select a patch that uses the expression pedal.
- Set the module selector to "TOTAL" and use the effect type [] / [] keys to select "RTM."
- Turn Parameter knob 1 to set the module to be controlled by the expression pedal.
- Use Parameter knobs 2 and 3 to change the adjustment range of the control parameter.
- Adjusting the built-in expression pedal
- (G2.1Nu only)
- Using Audio Interface Functions
- Compatible OS
- Quantization (bit-rate)
- Sampling frequency
- Recording and playback with DAW software
- Changing Various Settings (Global Menus)
- Open the global menus
- Set the master level, tempo, and tunes standard pitch
- Set the direct monitoring and recording levels
- Set the display backlight and contrast
- Setting the battery type
- Check the current version
- Upgrading the Firmware Version
- Effect Types and Parameters
- Tap TAP
- Tempo mark
- Expression pedal
- Delay tap, hold delay and delay mute
- DELAY TAP HOLD MUTE
- Troubleshooting
- Specifications
- Rhythm List
- FCC regulation warning (for U.S.A.)
- For EU Countries
- CE
- Fender Twin Reverb '65
- FD Combo
- VOK AC30TBX
- VX Combo
- Fender BASSMAN
- US Blues
- MESA/BOOGIE Mark III
- BG Crunch
- HIWATT Custom 100
- HW Stack
- Marshall 1959 SuperLead100 MS Crunch
- Marshall JCM2000
- MS Drive
- PEAVEY 5150 STACK
- PV Drive
- DZ Drive
- MESA/BOOGIE Dual Rectifier
- BG Drive
- BOSS OD-1
- Ibanez TS808
- Marshall Guv'nor
- Governor
- MXR Distortion+
- Dist +
- Dist 1
- PROCO RAT
- Squeak
- Dallas-Arbiter FUZZ FACE
- FuzzSmile
- Electro-Harmonix BIG MUFF
- GreatMuff
- BOSS MT-2
- MetaIWRLD
- Z Clean
- Z Wild
- Z Bottom
- Z Dream
- Z Scream
- Z Neos
- Lead
- Extreme Distortion
- ExtremeDS
- Acoustic Simulator
- Aco.Sim
- Cubase LE 4 installation
- Connections and preparation
- Use Cubase LE 4 to record
- Windows Vista / XP
- HINT
- Connect this unit to the computer using a USB cable.
- MacOS X
- Access the "File" menu and select "New Project".
- Make sure that the "Empty" template is selected, and click the OK button.
- After specifying a suitable project file save location (such as the desktop), click the OK button (Choose button in MacOS X).
- To create a new audio track, access the "Project" menu and select "Add track". In the submenu that appears, select "Audio".
- Connect the guitar or other instrument to the [INPUT] jack of this unit and select the desired patch.
- Access the "Devices" menu of Cubase LE 4 and select "Mixer".
- Mixer window
- While playing your instrument, adjust the output level of this unit to achieve a suitable recording level for Cubase LE 4.
- When the recording level has been adjusted, click the monitoring button to disable it.
- Verify that the transport panel is being shown.
- To start recording, click the Record button in the transport panel.
- Check the recorded content.
- For optimum enjoyment
Brand : ZOOM
Model : G2NU
Category : Guitar effects pedal