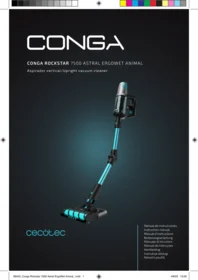
Conga Rockstar 7500 Astral Ergowet Animal T - Stick vacuum CECOTEC - Free user manual and instructions
Find the device manual for free Conga Rockstar 7500 Astral Ergowet Animal T CECOTEC in PDF.


| Product type | Cordless 2-in-1 stick vacuum (vacuuming and washing) |
| Brand | Cecotec |
| Model | Conga Rockstar 7500 Astral Ergowet Animal T |
| Dimensions (L x l x H) | 26 x 20 x 115 cm |
| Weight | 3.5 kg |
| Power supply | Lithium-ion battery 22.2 V, 2500 mAh |
| Runtime | Up to 45 min (eco mode), 25 min (max mode) |
| Charging time | 4 hours |
| Dust container capacity | 600 ml |
| Water tank capacity | 250 ml |
| Filtration | Washable HEPA filter |
| Motor | Digital brushless motor |
| Suction power | 200 Air Watts |
| Noise level | 80 dB |
| Main functions | Vacuuming, washing, combined vacuuming + washing |
| Accessories included | Long nozzle, motorized floor/carpet brush, pet hair brush, slot nozzle, water tank with microfiber cloth |
| Maintenance and cleaning | Washable filter, washable tanks, removable brushes |
| Security | Automatic shut-off in case of overheating, battery with protection |
| Spare parts and repairability | Battery, filter, brushes, tanks available separately |
Frequently Asked Questions - Conga Rockstar 7500 Astral Ergowet Animal T CECOTEC
User questions about Conga Rockstar 7500 Astral Ergowet Animal T CECOTEC
0 question about this device. Answer the ones you know or ask your own.
Ask a new question about this device
Download the instructions for your Stick vacuum in PDF format for free! Find your manual Conga Rockstar 7500 Astral Ergowet Animal T - CECOTEC and take your electronic device back in hand. On this page are published all the documents necessary for the use of your device. Conga Rockstar 7500 Astral Ergowet Animal T by CECOTEC.
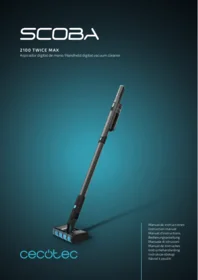
USER MANUAL Conga Rockstar 7500 Astral Ergowet Animal T CECOTEC
Aspirador vertical/Upright vacuum cleaner

cecòtec
Safety instructions 7
-
Parts and components 39
-
Before use 40
-
Assembly 40
-
Operation 41
-
Cleaning and maintenance 43
-
Troubleshooting 44
-
Technical specifications 45
-
Disposal of old electrical and
electronic appliances 45
-
Technical support and warranty 46
-
Copyright 46
SOMMAIRE
Read these instructions thoroughly before using the device. Keep this instruction manual for future reference or new users.
- This appliance can be used by children aged 8 years and above and persons with reduced physical, sensory, or mental capabilities or lack of experience and knowledge if they have been given supervision or instruction concerning use of the appliance in a safe way and understand the hazards involved. Children must not play with the appliance. Cleaning and user maintenance should not be carried out by unsupervised children.
- This device is designed for domestic use only and is not intended for bars, restaurants, farmhouses, hotels, motels, and offices.
- The device must only be supplied at a safety extra-low voltage in accordance with the voltage indicated on the device.
- Inspect the power cable regularly for visible damage, especially the cable, plug, and charger casing. If the power cable is damaged, it must be replaced with a special cable or set to be supplied by the official Cecotec Technical Support Service.
- WARNING: to recharge the battery, only use the power supply included with the device, with reference CZH024360075EUWQ.
- Non-rechargeable batteries should not be recharged.
- The supply terminals must not be short-circuited.
- Batteries may leak under extreme conditions. Do not touch any liquid that leaks from the battery. If the liquid gets into contact with skin, wash immediately with soap and water.
If the liquid gets into the eyes, wash them immediately with clean water for a minimum of 10 minutes and seek medical attention. Wear gloves to handle the battery and dispose of it immediately in accordance with local regulations.
- Unplug the power cable of the charging base before cleaning or maintenance.
- ATTENTION: use the appliance and its accessories with caution, as is a risk of entrapment by rotating parts of the appliance.
- WARNING: this tube contains electrical connections. Do not immerse in water for cleaning. Do not use the appliance to vacuum water. The hose should be checked regularly and must not be used if damaged.
- The appliance can only be used with the supply unit provided with it.
- Do not try to repair the appliance by yourself. Contact the official Cecotec Technical Support Service for advice.
- Make sure that the mains voltage matches the voltage stated on the product marking.
- Do not use any accessory that has not been recommended by Cecotec, as they might cause injuries or damage.
- Do not place the appliance close to heat sources, flammable substances, or wet surfaces where it could fall, nor allow it to come into contact with water or other liquids. Do not use outdoors.
- Do not use the appliance to vacuum liquids, lit matches, cigarette ends, hot ash, or on wet surfaces.
- Do not use on concrete, tarmac, or other rough surfaces.
-
Stop using the appliance if you notice an abnormal sound or sense a temperature higher than usual.
-
Keep the air outlet unblocked to avoid losing suction power.
- Do not immerse the cable, plug, or any other part of the appliance in water or any other liquid or expose electrical connections to water. Make sure your hands are dry before handling the plug or switching on the appliance.
INSTRUCTIONS DE SÉCURITÉ
- Ergonomic handle
- On/off trigger
- Dust-tank release button
- Dust tank
- Tube release button
- Ergoflex tube
- Vacuum-head release button
- Vacuum head
- LED display
- Speed button
- Removable battery
- Battery release button
- Main unit
- Ergoflex button
- Accessory for corners
- 2-in-1 accessory
- Charger
- Flexible hose
- Wall bracket
- Accessory for pets
- Water tank
- Cleaning brush
- Jaliscazo brush
Control panel. Fig. 2
- Operating light ring
- Blocked brush indicator light
- Filter failure indicator light
- Blocked tube indicator light
- Auto Mode indicator light
- Battery percentage indicator light
- Power percentage indicator light
- Filter cleaning indicator light
- Mode indicator light
- Speed button (3 levels + AUTO mode)
2. BEFORE USE
- This upright vacuum cleaner includes a package designed to protect it during transport. Take the upright vacuum cleaner out of the box and remove all packaging materials. Keep the original box and other elements in a safe place, as this will help you prevent damage to the upright vacuum cleaner when transporting it in the future. In case the original packaging is disposed of, make sure all packaging materials are recycled accordingly.
- Make sure all parts and components are included and in good conditions. If there is any piece missing or in bad conditions, contact the official Cecotec Technical Support Service immediately.
Box content
- Upright vacuum cleaner
- 2 in 1
- Accessory for corners
- Jaliscazo brush
- Wall bracket
- Accessory for pets
- Extensible tube
- Water tank
3. ASSEMBLY
Tube installation. Fig. 3
- Insert the tube into the main unit until you hear a click.
- To remove the vacuuming tube, press the tube release button.
Vacuum head installation. Fig. 4
- Insert the vacuum head into the end of the tube until it clicks.
- To remove the vacuum head, press the vacuum-head release button.
Battery installation. Fig. 5
- Install the battery into the bottom of the main unit until it clicks into place.
- To remove the battery, press the battery release button.
Charge. Fig. 6
Plug the charger into the charging port and then plug the other side of the adapter into the power socket.
Note:
- Charge the battery before using the device for the first time.
- It is recommended to charge the battery fully within the first 3 uses.
- Do not charge the battery for long periods of time, as this may damage it.
During charging
The battery indicator light will flash, and the battery percentage will increase. Once charging is complete, the indicator light will turn off after 5 seconds.
During use
When the battery charge is less than 10 %, the indicator will flash. Recharge battery when the appliance is off.
Wall bracket. Fig. 7
- Place the wall bracket against the wall and mark the drilling points for later fixing of the bracket. It is recommended that the vacuum head rests on the floor so that the wall bracket does not support the full weight of the vacuum cleaner.
- Drill the holes and fix the wall bracket with the expansion screws, then place the vacuum cleaner.
4. OPERATION
You can use this vacuum cleaner in two different manners:
- Handheld vacuum cleaner, attaching the accessories directly to the main body.
- Upright vacuum cleaner, using the suction tube with the accessories assembled.
Using the vacuum cleaner
- Select the accessory according to the cleaning task you want to perform.
- Press the on/off trigger to switch on the appliance. Press it again to stop operation.
- Press the speed button to set the 3 speed levels and the Auto mode. Bear in mind that if the battery percentage is below 20% you will not be able to set speed. This vacuum cleaner features the following modes:
- Low: low speed.
- Medium: medium speed.
- High: high speed.
- Automatic: speed adjusts automatically based on the amount of dirt. When activated, the auto mode indicator light lights up.
Accessories
Vacuum head
The vacuum head is suitable for both carpets and hard floors.
Accessory for corners
Use this accessory to clean corners, recesses, edges, and other hard-to-reach places.
2-in-1 accessory
Use this accessory to clean upholstered surfaces, keyboards, lamps, curtains, blinds, vents, etc. To switch between the wide side and narrow side, press the button on the accessory and slide the brush up or down. Fig. 8
Accessory for pets. Fig. 9
This accessory allows you to effortlessly brush and untangle hair (depending on the head you use) from your pet's coat.
- To attach the accessory for pets to the main body, align and fit both until the accessory clicks into place.
- To remove the accessory, press the accessory-for-pets release button with one hand while holding the main body firmly with the other.
- Press the head release button to remove the head so that the desired head can be fitted. To attach the head, insert the lower tabs and then press the upper part until it clicks into place.
- Press the trigger to release the hair and instantly vacuum it.
Fig. 9 key:
- Head release button
- Trigger
- Accessory for pets release button
Water Tank accessory
- With this accessory you will mop and scrub your floor just by attaching it to the vacuum cleaner.
- Do not use cleaning agents. Use clean and room temperature water only. Do not use the vacuum cleaner to vacuum water.
- When the vacuum clener is not going to be used for a long period of time, remove the water tank and empty the remaining water. Do not expose it to direct sunlight or to damp environments.
- When using this product for the first time, make sure the water tank plug is not open.
Mop installation
- Place the mop cloth on the ground with the Velcro facing upwards.
- Align the mop cloth with the Velcro strips on the water tank and attach it without covering the wheels.
Replacing the mop
- Remove the water tank from the vacuum cleaner.
- Use your foot to hold the accessory against the ground and pull the vacuum cleaner upwards until both parts are separated.
- Replace the mop and refill the water tank.
- Install the water tank again, insert the tank in the lower part of the vacuuming brush head, and press until it is fixed.
5. CLEANING AND MAINTENANCE
- Always turn off and unplug the vacuum cleaner before cleaning or maintenance.
- Use a soft, slightly dampened cloth to clean the surface of the appliance.
- Never immerse the appliance in water or other liquids. Do not allow liquids to enter the appliance.
- Do not use abrasive cleaners or scouring pads to clean the device.
- Do not leave the vacuum cleaner in a place with direct sunlight.
- Do not leave the vacuum cleaner in a wet place after cleaning it.
- After the brush has been used for a long time, bristles might start to tangle with hair and other dirt. Clean the brush to ensure cleaning efficiency.
Cleaning the water tank and the filters
- Press the dust-tank release button and remove it. Fig. 10
- Press the dust-tank release button to open the tank cover and empty it. Fig. 11
- Use the cleaning brush to clean the filter. Fig. 12
- Hold the dust tank, remove the filter and lift the filter cover to remove the parts inside. Fig. 13
- Wipe all parts with a slightly damp cloth.
- After cleaning the filter, press the button on the display for 3 seconds to restart.
Motor filter cleaning. Fig. 14
- Turn the filter cover counterclockwise to remove it.
- Remove the filter and clean it.
It is recommended to clean the filter at least every six months.
Cleaning the brush and the vacuum head
- Press the release tab on the hard floor brush and remove the brush as shown in figure 15.
- Remove hair and debris around the brush with your fingers or the cleaning brush blade.
ENGLISH
- Wash the brush under running water.
- Allow the brush to dry completely before reassembly.
- Replace the brush.
WARNING:
The motorised brush includes electrical connections, do not immerse in water for cleaning. Make sure the brush is completely dry before replacing it.
Water tank cleaning
- To clean the water tank, fill it with clean water, shake it, and empty it.
- The mop is washable; therefore, it is suggested to wash it after every use.
- Replace the cloth after 20-30 uses, depending on the use.
6. TROUBLESHOOTING
Error codes
| Error code | Error description |
| E1 | Battery overvoltage |
| E2 | Undervoltage or significant battery voltage difference. |
| E3 | Undervoltage, overvoltage or overcurrent of the charger |
| E4 | Switch failure, cannot switch on |
| E5 | Thermistor failure |
| E6 | Main motor disconnected or engine failure |
| E8 | Main motor overload |
| E9 | Main motor short circuit |
If you notice a problem with the appliance or if it is not working properly, you can carry out a few simple checks before calling the official Cecotec Technical Support Service.
| Problem | Solution |
| The upright vacuum cleaner does not turn on | Before using the appliance, check that it is fully charged.Check if the appliance is off.Check whether the filter is correctly positioned or installed. |
| Not suctioning/not sufficiently suctioning | Check the inlets for clogging, unplug them and clean them if necessary.Make sure that the filter is installed correctly. Empty the dust tank and clean the filter. |
| The device does not charge | To charge the battery, use only the supplied charger.The battery has overheated, recharge the device when it has cooled down completely. |
For any further doubt or question, contact the official Cecotec Technical Support Service.
7. TECHNICAL SPECIFICATIONS
Product reference: 00794
Product: Conga Rockstar 7500 Astral ErgoWet Animal
Voltage and frequency: 100-240 V \~ 50-60 Hz
Motor rated power: 650 W
Brush rated power: 30 W
Li-Ion battery 29.6 V 3000 mAh 88.80 Wh
Rated power of charger 36 V 0.75 A 27.0 W
Technical specifications may change without prior notification to improve product quality.
Made in China | Designed in Spain
8. DISPOSAL OF OLD ELECTRICAL AND ELECTRONIC APPLIANCES

This symbol indicates that, according to the applicable regulations, the appliance and/or batteries must be disposed of separately from household waste. When this product reaches the end of its shelf life, you should dispose of the batteries/accumulators and take them to a collection point designated by the local authorities.

Consumers must contact their local authorities or retailer for information concerning the correct disposal of old appliances and/or their batteries. Compliance with the above guidelines will help protecting the environment.
9. TECHNICAL SUPPORT AND WARRANTY
Cecotec shall be liable to the end user or consumer for any lack of conformity that exists at the time of delivery of the product under the terms, conditions, and deadlines established by the applicable regulations.
It is recommended that repairs be carried out by qualified personnel.
If at any moment you detect any problem with your product or have any doubt, do not hesitate to contact the official Cecotec Technical Support Service at +34 963 210 728.
10. COPYRIGHT
The intellectual property rights over the texts in this manual belong to CECOTEC INNOVACIONES, S.L. All rights reserved. The contents of this publication may not, in whole or in part, be reproduced, stored in a retrieval system, transmitted, or distributed by any means (electronic, mechanical, photocopying, recording or similar) without the prior authorization of CECOTEC INNOVACIONES, S.L.
1. PIÈCES ET COMPOSANTS
Img. 1
Accessoire Water tank
Accessorio Water Tank
Water tank accessoire
6. PROBLEEMOPLOSSING
Foutcodes
Instalace trubice. Obr. 3

23
Fig. / Img. / Rys. / Obr. 1

Fig. / Img. / Rys. / Obr. 2

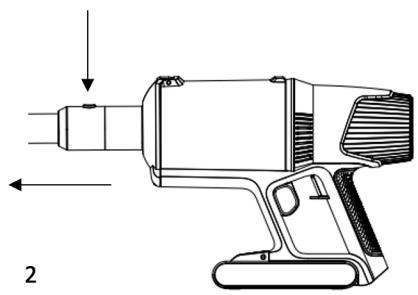
Fig. / Img. / Rys. / Obr. 3
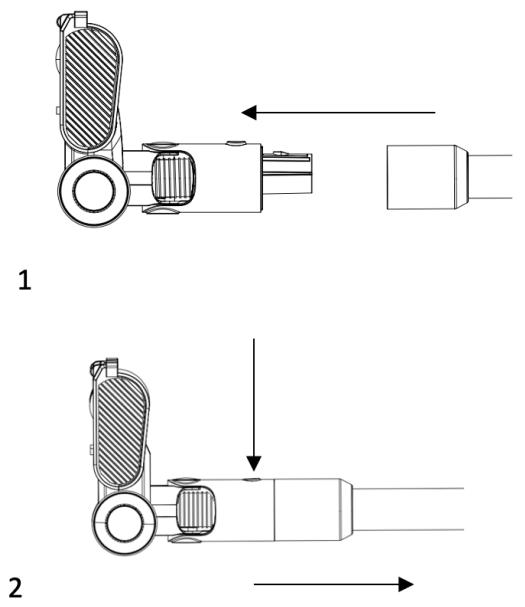
Fig. / Img. / Rys. / Obr. 4

Fig. / Img. / Rys. / Obr. 5

Fig. / Img. / Rys. / Obr. 6

Fig. / Img. / Rys. / Obr. 7

Fig. / Img. / Rys. / Obr. 8

Fig. / Img. / Rys. / Obr. 9

Fig. / Img. / Rys. / Obr. 10
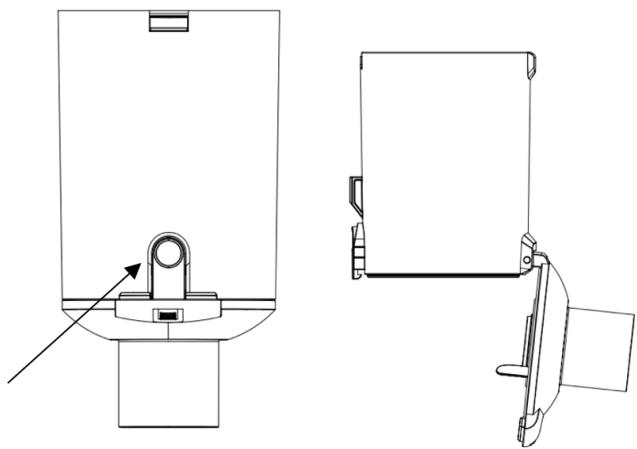
Fig. / Img. / Rys. / Obr. 11

Fig. / Img. / Rys. / Obr. 12

Fig. / Img. / Rys. / Obr. 13


Fig. / Img. / Rys. / Obr. 14


Fig. / Img. / Rys. / Obr. 15
www.cecotec.es
- SOMMAIRE
- INSTRUCTIONS DE SÉCURITÉ
- Control panel. Fig. 2
- BEFORE USE
- Box content
- ASSEMBLY
- Tube installation. Fig. 3
- Vacuum head installation. Fig. 4
- Battery installation. Fig. 5
- Charge. Fig. 6
- Note:
- During charging
- During use
- Wall bracket. Fig. 7
- OPERATION
- Using the vacuum cleaner
- Accessories
- Vacuum head
- Accessory for corners
- 2-in-1 accessory
- Accessory for pets. Fig. 9
- Fig. 9 key:
- Water Tank accessory
- Mop installation
- Replacing the mop
- CLEANING AND MAINTENANCE
- Cleaning the water tank and the filters
- Motor filter cleaning. Fig. 14
- Cleaning the brush and the vacuum head
- ENGLISH
- WARNING:
- Water tank cleaning
- TROUBLESHOOTING
- TECHNICAL SPECIFICATIONS
- DISPOSAL OF OLD ELECTRICAL AND ELECTRONIC APPLIANCES
- TECHNICAL SUPPORT AND WARRANTY
- COPYRIGHT
- PIÈCES ET COMPOSANTS
- Img. 1
- Accessoire Water tank
- Accessorio Water Tank
- Water tank accessoire
- PROBLEEMOPLOSSING
- Instalace trubice. Obr. 3
Brand : CECOTEC
Model : Conga Rockstar 7500 Astral Ergowet Animal T
Category : Stick vacuum