
Conga Rockstar 1500 Horizon X Treme Xl - Stick vacuum CECOTEC - Free user manual and instructions
Find the device manual for free Conga Rockstar 1500 Horizon X Treme Xl CECOTEC in PDF.


| Product type | Stick vacuum cleaner |
| Brand | Cecotec |
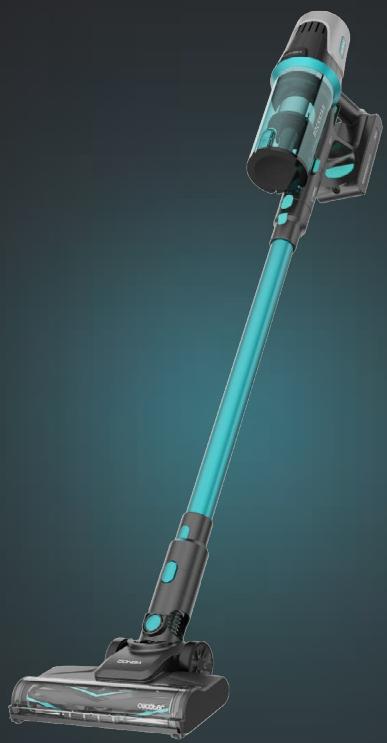
| Model | Conga Rockstar 1500 Horizon X Treme Xl |
| Dimensions (L x W x H) | 25 x 15 x 110 cm |
| Weight | 2.5 kg |
| Power supply | Lithium-ion battery 22.2 V, 2000 mAh |
| Runtime | 40 minutes |
| Charging time | 4 hours |
| Dustbin capacity | 0.6 liter |
| Filtration type | Washable HEPA |
| Suction power | 150 W |
| Noise level | 75 dB(A) |
| Main functions | Normal mode, turbo, anti-tangle motorized brush |
| Included accessories | Crevice tool, flat nozzle, furniture brush |
| Maintenance and cleaning | Filter and dustbin washable with water |
| Safety | Overload and overheating protection |
| Spare parts and repairability | Battery, filter, brush and nozzles available |
| Warranty | 2 years |
| General information | Power adapter included, color black/red |
Frequently Asked Questions - Conga Rockstar 1500 Horizon X Treme Xl CECOTEC
User questions about Conga Rockstar 1500 Horizon X Treme Xl CECOTEC
0 question about this device. Answer the ones you know or ask your own.
Ask a new question about this device
Download the instructions for your Stick vacuum in PDF format for free! Find your manual Conga Rockstar 1500 Horizon X Treme Xl - CECOTEC and take your electronic device back in hand. On this page are published all the documents necessary for the use of your device. Conga Rockstar 1500 Horizon X Treme Xl by CECOTEC.
USER MANUAL Conga Rockstar 1500 Horizon X Treme Xl CECOTEC
Aspirador vertical/ Upright vacuum-cleaner
cecòtec
Safety instructions 9
-
Parts and components 61
-
Before use 62
-
Assembling the appliance 62
-
Operation 63
-
Cleaning and maintenance 64
-
Troubleshooting 65
-
Technical specifications 66
-
Disposal of old electrical and electronic appliances 66
-
Technical support and warranty 67
-
Copyright 67
SOMMAIRE
EN • The coding in this manual is generic and applies to all code variants of the appliance.
Before using the appliance, read the following instructions carefully. Keep this instruction manual for future reference or new users.
- This appliance can be used by children aged 8 years and above and people with reduced physical, sensory, or mental capabilities or lack of experience and knowledge if they have been given supervision or instruction concerning use of the appliance in a safe way and understand the hazards involved. Children must not play with the appliance. Cleaning and user maintenance should not be carried out by unsupervised children.
- This appliance is designed for domestic use only and is not intended for bars, restaurants, farmhouses, hotels, motels, and offices.
- Inspect the power cable regularly for visible damage, especially the cable, plug, and charger casing. Should the cable be damaged, or the appliance not work properly, it must be repaired by the official Cecotec Technical Support Service to avoid any danger.
- The appliance must be powered at a low safety voltage as stated on the marking.
- Do not attempt to repair the appliance yourself. Contact the official Cecotec Technical Support Service for advice.
- WARNING: the appliance has rotating parts which may pose a risk of entrapment. Exercise extreme caution.
- Ensure that the mains voltage matches the voltage specified on the appliance marking and that the mains plug is earthed.
- Do not use the appliance if it has been dropped or if there are any visible signs of damage.
-
Do not use any accessory that has not been recommended by Cecotec, as they might cause injuries or damage.
-
Do not place the appliance close to heat sources, flammable substances, or wet surfaces where it could fall, nor allow it to come into contact with water or other liquids. Do not use outdoors.
- Do not use the appliance to vacuum liquids, lit matches, cigarette ends, hot ash, or on wet surfaces.
- Do not use on concrete, tarmac or other rough surfaces.
- Stop using the appliance if you notice an abnormal sound or sense a temperature higher than usual.
- Keep the air outlet unblocked to avoid losing suction power.
- Check the suction tube from time to time to make sure it is not blocked.
- Take special care when using the appliance near stairs.
- Do not block the appliance openings or airflow. Keep openings free of any objects, and do not block them with clothes or your fingers.
- Do not pull on the cable to disconnect the appliance. Pull from the plug.
- Do not immerse the cable, plug, or any other part of the appliance in water or any other liquid or expose electrical connections to water. Make sure your hands are dry before handling the plug or switching on the appliance.
Battery instructions
- WARNING: to recharge the battery, only use the supply unit provided with the appliance, with reference CZH015350050EUWP.
- Do not allow children to replace batteries without adult supervision.
- Do not disassemble, open, or break secondary batteries.
-
Keep the batteries out of the reach of children. Pay particular attention to small batteries. In case of battery ingestion, please seek medical attention immediately.
-
Do not expose batteries to heat or fire. Avoid storage in direct sunlight.
- Do not short-circuit the battery. Do not store batteries in an untidy manner, in a box, or drawer where they can short-circuit each other or be short-circuited by other metal objects.
- Do not subject batteries to mechanical shock.
- Both batteries and cells can leak under extreme conditions. In the event of a battery leak, keep your skin and eyes away from the liquid. If the liquid gets into contact with skin, wash immediately with soap and water. If the liquid gets into the eyes, wash them immediately with clean water for a minimum of 10 minutes and seek medical attention. Wear gloves to handle the battery and dispose of it immediately in accordance with local regulations.
- Do not use any charger other than the one supplied specifically for this appliance.
- Observe the positive (+) and negative (-) markings on the battery and equipment and make sure the former is inserted accordingly.
- Do not use any battery that is not designed for this appliance.
- Do not use the appliance if powered with batteries that differ in capacity, size, or type.
- Children must be supervised if they handle the battery.
- In case of battery ingestion, please seek medical attention immediately.
- Always use the battery recommended for this appliance.
- Keep batteries and cells clean and dry.
- Wipe the battery terminals with a clean, dry cloth if they become dirty.
-
Secondary batteries must be charged before use. Always use the specified charger and refer to these instructions.
-
Do not leave the battery on prolonged charge when not in use.
- After long periods of storage, it may be necessary to charge and discharge the batteries several times to obtain maximum performance.
- Keep this instruction manual for future reference.
- Use the battery only for its intended purpose, i.e., for use with this appliance.
- Remove the battery from the appliance when not in use whenever possible.
- Dispose of the battery properly.
- Non-rechargeable batteries must not be recharged.
INSTRUCTIONS DE SÉCURITÉ
- Vacuum cleaner body and dirt tank
- 2 in 1 upholstery brush
- Tube
- Motorised brush
- Accessory for corners
- Battery
- Charger
- Wall bracket
- Clamping piece x 2 and screw x 2
Fig. 2
- Parallel cyclone system
- Dirt tank opening button
- Dirt tank lid
- Dirt tank release button
- Charging port
- Battery release button
- Trigger
- Dirt tank
- Main body
- Display
- Mode button
- Battery
Display information
Fig. 3
- Indicator light for selected mode:
o ECO mode
o TURBO mode - Battery level indicator lights
- Mode button
- Filter cleaning reminder
- Motorised brush blocked warning
NOTE:
The graphics in this manual are schematic representations and may not exactly match the device.
2. BEFORE USE
- This appliance is packaged in a way as to protect it during transport. Take the appliance out of its box and remove all packaging materials. You can keep the original box and other packaging elements in a safe place to prevent damage to the appliance if you need to transport it in the future. In case the original packaging is disposed of, make sure all packaging materials are recycled accordingly.
- Make sure all parts and components are included and in good conditions. If there is any piece missing or in bad conditions, contact the official Cecotec Technical Support Service immediately.
Box content
- Conga Rockstar 1500 Horizon X-treme XL upright vacuum cleaner
- 2 in 1 accessory
- Accessory for corners
- Brush
- Suction tube
- Wall bracket
- Power adapter
- Instruction manual
3. ASSEMBLING THE APPLIANCE
Assembling the suction tube and vacuum head
- To install the vacuum head into the suction tube, match both parts ensuring the tab on the vacuum head matches the guides on the tube and insert the tube into the vacuum head until firmly fixed.
- To disassemble them, press the vacuum head release button, and pull from the suction tube while firmly holding the vacuum head.
Note
When assembling these 2 parts, make sure the handle and the brush are facing the same direction.
Assembling the suction tube, vacuum head, and main body
Fig. 4
To complete the vacuum cleaner's installation, once the vacuum head is mounted on the suction tube, hold the tube vertically and insert it into the main body.
Battery assembly
Fig. 5.
- Insert the battery in the corresponding slot on the main body. Once inserted, it will click into place. Make sure it's secured in position.
- To remove the battery, press the battery release button and remove it.
Note
Remove the battery and store it in a safe, dry place if the appliance is not going to be used in a long period of time.
Fit the tube and motorised brush
Insert the tube into the body of the vacuum cleaner and check that its release button is in the locked position.
Place the motorised brush on the tube and check that its release button is in the locked position.
Fitting the accessories
Fig. 6.
In addition to the motorised brush, this vacuum cleaner has a 2 in 1 accessory and a corner accessory. These accessories can be connected to the tube.
4. OPERATION
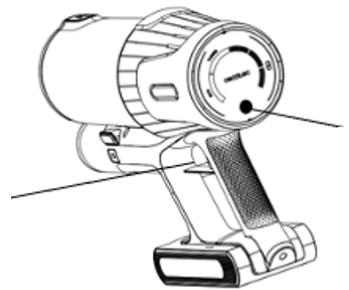
Fig. 7
- Power button
- Mode selection button
Trigger
When the trigger is pulled, the vacuum cleaner will start in ECO mode. You can switch to TURBO mode by pressing the mode button. If you press this button again, the appliance will return to ECO mode. If you release the trigger, the appliance will turn off.
Charging the vacuum cleaner
Fig. 8
- Battery level indicator light on the display
- Battery level indicator lights on the battery
To charge the vacuum cleaner use the charger supplied. Insert the charger plug into the battery
charging port. When doing so, the battery level indicator light on the display and the battery level indicator lights on the battery will flash. While the vacuum cleaner is charging, the three indicator lights will flash one by one intermittently. When charging is complete, the three indicator lights will remain steady. The battery level indicator lights on the display and on the battery work synchronously. If desired, the battery can be removed from the appliance body for charging.
Battery level indicator lights on the display
Battery level indicator lights on the battery
As the battery level decreases, the corresponding indicator lights (both on the display and battery) will switch off. If the battery level is too low, the last indicator light will start flashing. When it switches off, the appliance will stop working. Charge the vacuum cleaner before the battery runs out completely.
Changing the battery
Fig. 9
Press the battery release button to remove it. Then, insert the new battery in the correct direction and make sure that the release button returns to the locked position.
Using the wall bracket
Fig. 10
The wall bracket must be positioned taking into account the height of the tube and accessories. Use the two clamping pieces and the two screws provided to fix it to the wall. The bracket should be placed near a power outlet. The appliance can be charged when it is placed on the wall bracket. You can place the accessories in the side holes of the bracket.
5. CLEANING AND MAINTENANCE
Cleaning the dirt tank
Fig. 11
Press the tube release button to remove the tube. Next, also remove the motorised brush (or the accessory you have fitted). After that, press the dirt tank opening button to empty it. When you have finished emptying it, close the lid and make sure that the opening button has returned to the locked position.
Cleaning the filters
Fig. 12
First, press the dirt tank release button. Then, hold the tank by the end and pull it vertically to remove it.
Fig. 13
Remove the sponge filter from the tank, and the HEPA filter from the body of the vacuum cleaner. Clean both filters with a brush or wash them with tap water (water temperature should not exceed 40 °C ). Before replacing the filters on the appliance, make sure that they are completely dry.
Fig. 14
Remove the parallel cyclone system from the dirt tank. Then, clean the dust accumulated around the stainless steel mesh with a brush. Next, replace the parallel cyclone system in the tank and then push both filters back into place. Finally, place the dirt tank in the vacuum cleaner's body and make sure that the release button is in the locked position.
Fig. 15
Fit the top part of the tank first, then push the other end down.
Warning: make sure that the filters are correctly fitted before using the vacuum cleaner.
Cleaning the motorised brush
Fig. 16
First of all, turn the motorised brush upside down. Then, press the release button to remove and clean it. After that, put it back into place.
- TROUBLESHOOTING
| Problem | Possible causes | Solutions |
| The appliance does not switch on | The battery has run out of power. | Charge the battery. |
| Battery not inserted. | Insert the battery. | |
| Some of the internal parts are damaged. | Contact the official Cecotec Technical Support Service. | |
| Appliance makes a strange noise when in operation | Ventilation openings have become obstructed. | Clean the ventilation openings. |
| The appliance has low suction power | Dirt tank is full or clogged. | Clean the dirt tank. |
| Battery level is low. | Charge the vacuum cleaner. | |
| Ventilation openings are obstructed. | Clean the ventilation openings. | |
| The appliance does not charge | The charger has not been connected to the mains socket. | Connect the charger to the mains socket. |
| The charger is not connected to the charging port of the appliance. | Connect the charger to the charging port. | |
| The charger is broken. | Replace the charger. | |
| Some of the internal parts are damaged. | Contact the official Cecotec Technical Support Service. | |
| The motorised brush does not work | Motorised brush is clogged. | Clean the motorised brush. |
| Dirt tank leaks out | The filter is broken. | Replace the filter. |
| You have not fitted the filter. | Place the filer. |
7. TECHNICAL SPECIFICATIONS
Product: Conga Rockstar 1500 Horizon X-treme XL
Product reference: EU01_102266
Rated motor power: 200 W
Brush rated power: 15 W
Charger output: 35 V = 0.5 A 17.5 W
Battery information:
29.6 V = 2600 mAh 76.96 Wh
Input: 35 V 0.5 A
Type: GLBP01-8S26
Technical specifications may change without prior notification to improve product quality.
Made in China | Designed in Spain
8. DISPOSAL OF OLD ELECTRICAL AND ELECTRONIC APPLIANCES
This symbol indicates that, according to the applicable regulations, the product and/or batteries must be disposed of separately from household waste. When this product reaches the end of its shelf life, you should dispose of the cells/batteries/accumulators and take them to a collection point designated by the local authorities.
Consumers must contact their local authorities or retailer for information concerning the correct disposal of old appliances and/or their batteries.
Compliance with the above guidelines will help protecting the environment.
9. TECHNICAL SUPPORT AND WARRANTY
Cecotec shall be liable to the end user or consumer for any lack of conformity that exists at the time of delivery of the product under the terms, conditions and deadlines established by the applicable regulations.
Repairs should be carried out by qualified personnel.
If at any moment you detect any problem with your product or have any doubt, do not hesitate to contact the official Cecotec Technical Support Service at +34 96 321 07 28.
10. COPYRIGHT
The intellectual property rights over the texts in this manual belong to CECOTEC INNOVACIONES, S.L. All rights reserved. The contents of this publication may not, in whole or in part, be reproduced, stored in a retrieval system, transmitted, or distributed by any means (electronic, mechanical, photocopying, recording or similar) without the prior authorization of CECOTEC INNOVACIONES, S.L.
1. PIÈCES ET COMPOSANTS
Image 1
Utiliser le support mural
Img. 10
Fig./Img./Abb./Afb./Rys.1

Fig./Img./Abb./Afb./Rys.2
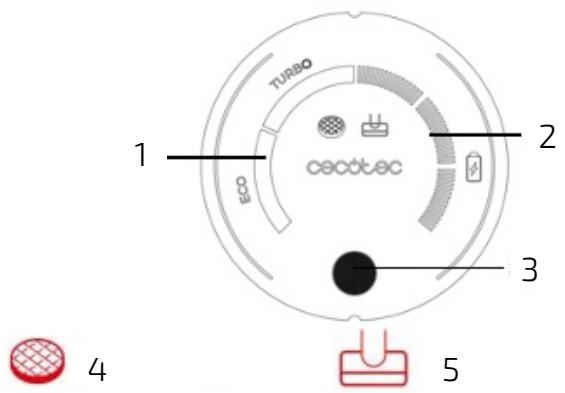
Fig./Img./Abb./Afb./ Rys. 3

Fig./Img./Abb./Afb./ Rys. 5

Fig./Img./Abb./Afb./Rys. 4

Fig./Img./Abb./Afb./ Rys. 6
1
2
Fig./Img./Abb./Afb./Rys. 7

Fig./Img./Abb./Afb./Rys. 8

Fig./Img./Abb./Afb./Rys. 9

Fig./Img./Abb./Afb./Rys. 10

Fig./Img./Abb./Afb./ Rys.11
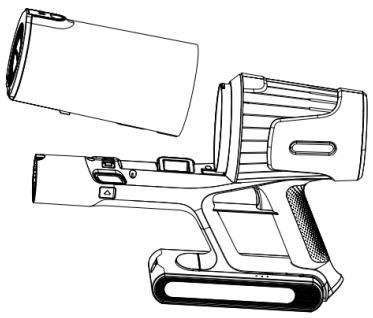
Fig./Img./Abb./Afb./ Rys. 12

Fig./Img./Abb./Afb./ Rys. 13

Fig./Img./Abb./Afb./ Rys. 15

Fig./Img./Abb./Afb./Rys. 14
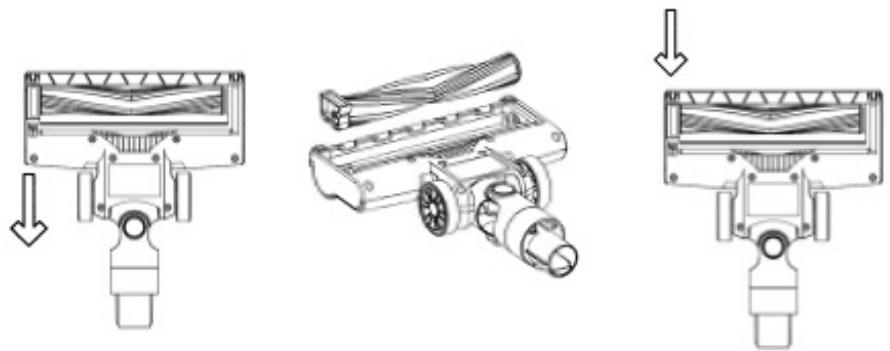
Fig./Img./Abb./Afb./ Rys. 16
www.cecotec.es
- SOMMAIRE
- Battery instructions
- INSTRUCTIONS DE SÉCURITÉ
- Fig. 2
- Display information
- Fig. 3
- NOTE:
- BEFORE USE
- Box content
- ASSEMBLING THE APPLIANCE
- Assembling the suction tube and vacuum head
- Note
- Assembling the suction tube, vacuum head, and main body
- Battery assembly
- Fit the tube and motorised brush
- Fitting the accessories
- OPERATION
- Trigger
- Charging the vacuum cleaner
- Battery level indicator lights on the display
- Battery level indicator lights on the battery
- Changing the battery
- Using the wall bracket
- CLEANING AND MAINTENANCE
- Cleaning the dirt tank
- Cleaning the filters
- Cleaning the motorised brush
- TECHNICAL SPECIFICATIONS
- DISPOSAL OF OLD ELECTRICAL AND ELECTRONIC APPLIANCES
- TECHNICAL SUPPORT AND WARRANTY
- COPYRIGHT
- PIÈCES ET COMPOSANTS
- Image 1
- Utiliser le support mural
Brand : CECOTEC
Model : Conga Rockstar 1500 Horizon X Treme Xl
Category : Stick vacuum