RDR02 - Tiller EUROSYSTEMS - Free user manual and instructions
Find the device manual for free RDR02 EUROSYSTEMS in PDF.


| Brand | Eurosystems |
| Model | RDR02 |
| Product type | Tiller |
| Dimensions (L x W x H) | 150 x 60 x 90 cm |
| Weight | 45 kg |
| Engine type | 4-stroke petrol |
| Engine power | 6.5 HP |
| Fuel tank capacity | 1.5 L |
| Working width | 50 cm |
| Adjustable working depth | Up to 25 cm |
| Number of blades | 4 steel blades |
| Main functions | Plowing, hoeing, soil preparation |
| Maintenance and cleaning | Clean after each use, drain fuel for winter storage |
| Safety | Emergency stop, tiller blade guards |
| Spare parts and repairability | Available on the Eurosystems website |
| Fuel | Unleaded 95 petrol |
| Cooling | Forced air |
| Transmission | Belt + chain |
| Transport wheels | Yes, with lock |
| Noise level | 85 dB (A) |
Frequently Asked Questions - RDR02 EUROSYSTEMS
User questions about RDR02 EUROSYSTEMS
0 question about this device. Answer the ones you know or ask your own.
Ask a new question about this device
Download the instructions for your Tiller in PDF format for free! Find your manual RDR02 - EUROSYSTEMS and take your electronic device back in hand. On this page are published all the documents necessary for the use of your device. RDR02 by EUROSYSTEMS.
USER MANUAL RDR02 EUROSYSTEMS
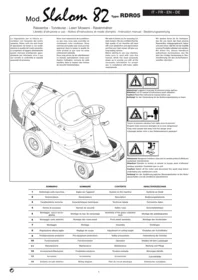
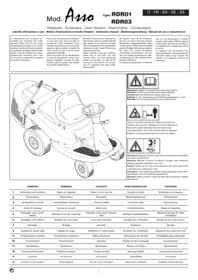
We wish to thank you for choosing our lawn mowers. We are confident that the high quality of our machine will meet with your satisfaction and appreciation and that your lawn mower will give you long-lasting service.
Before starting to use your machine, make sure to read with care this manual, which has been purposely drawn up to provide you with all the necessary information for proper use, in compliance with basic safety requirements.

Caution! Read the instructions manual before use.
Keep other people well away from the danger area!
Caution! Switch off the motor and disconnect the spark plug before undertaking any maintenance work.
The following symbols are fixed on the ride-on-mower:
- Read the instructions manual before operating on the machine
- Rotating blade, risk of limb injury
- Danger, hurling objects
- Service and maintenance works only after reading the operator's handbook and after removing the ignition key
- Keep the safety range from the operating ride-on-mower (except operator)
- Max. work slope: 10°
- Noise level in accordance with the law.
Generelle Warnetikette

Attenzione: pericolo ferimento arti. Parti rotanti.
Attention ! Danger de blessures des membres. Parties tournantes.
Warning: risk of limb injury. Rotating parts.
Achtung: Gliederverletzung Drehende Teile
Atención: peligro heridas a extremidades. Piezas giratorias.

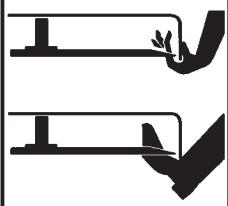
Warning: risk of hand and feet injury.

Warning: risk of burns. Hot parts
Warning: opening part.
Differential release
Differential-Freigabe
- Manufacturer identification
- Model
- Product identification code
- Item serial number
- Mass
- Year / Month
- Motor power
- Type of product
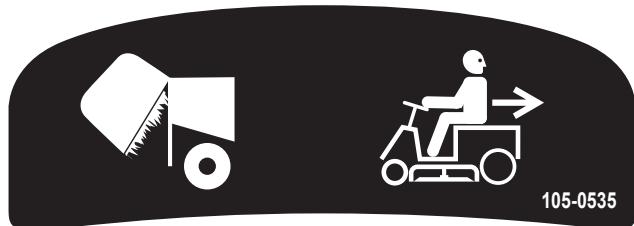
-
Cesto pieno
-
Bac à herbe plein
- Grass collector full
- Graskollektor voll
-
Cesto recogedor lleno
-
Taglio in retromarcia
- Travail en marche arrière
- Operating reverse
- Betrieb im Rückwärtsgang
- Corte en marcha atrás
Fig.1
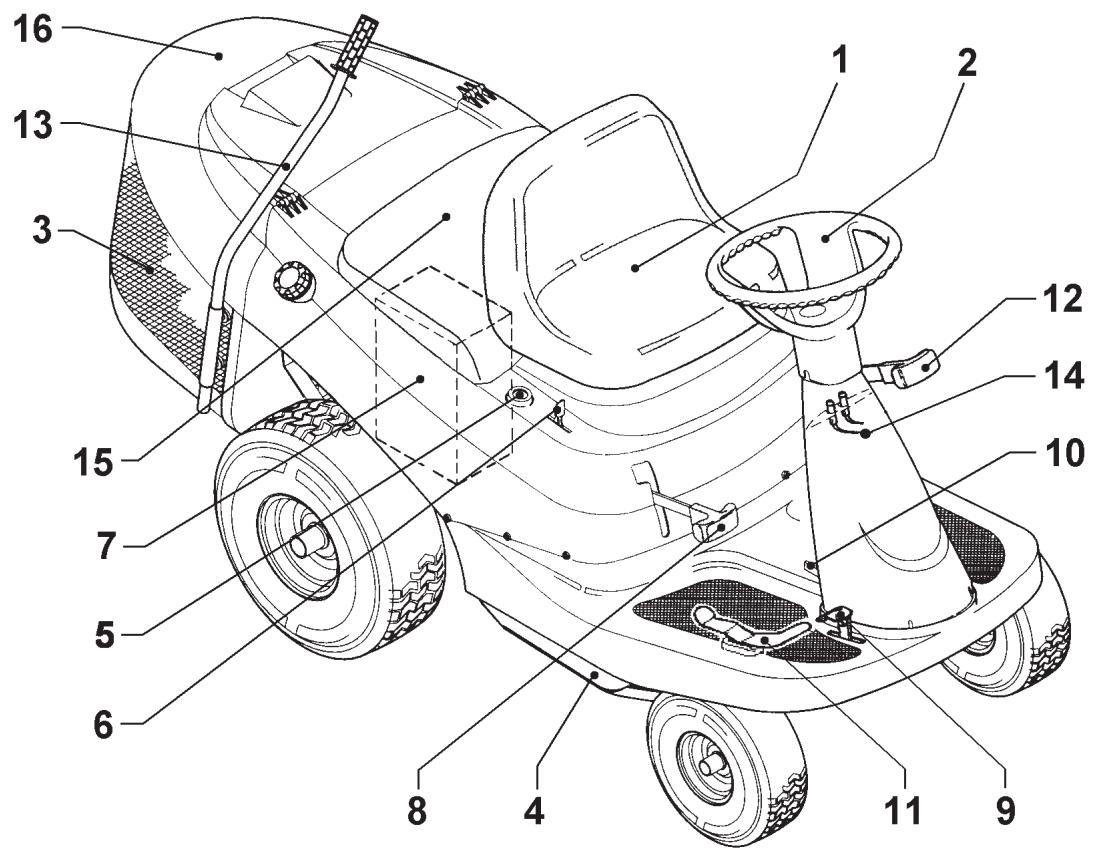
Fig.2
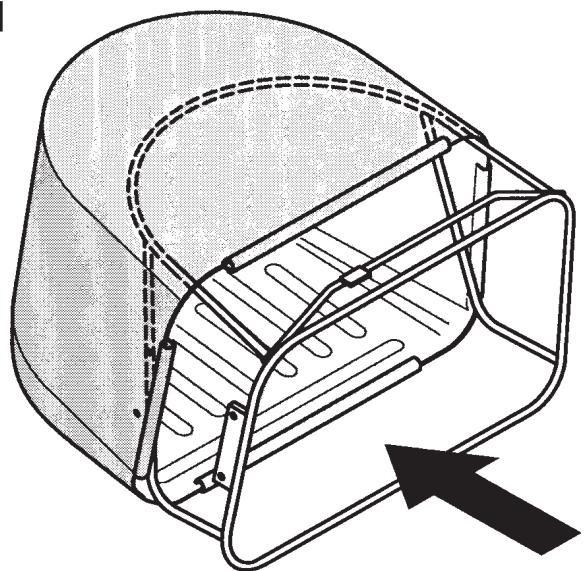
Fig.4

Fig.3
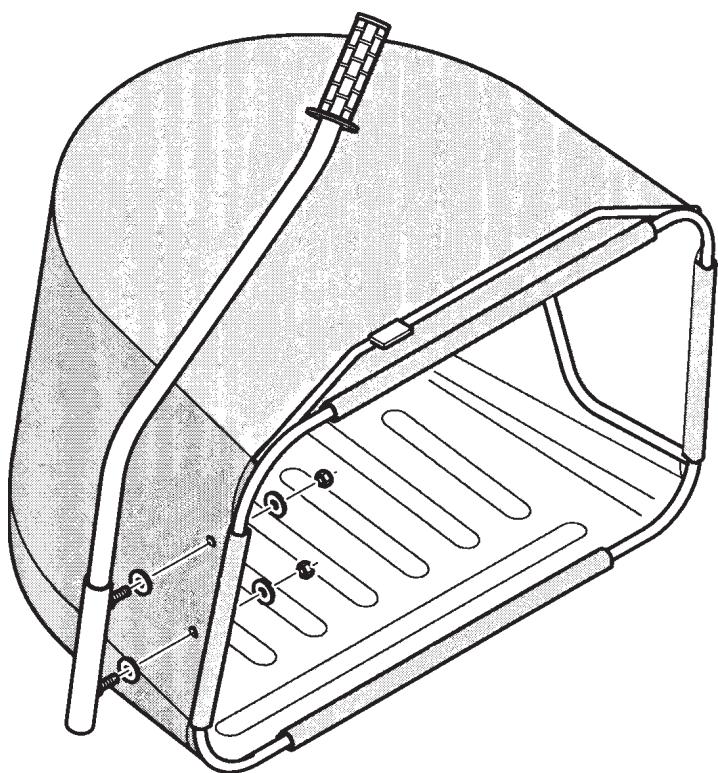
Fig.5


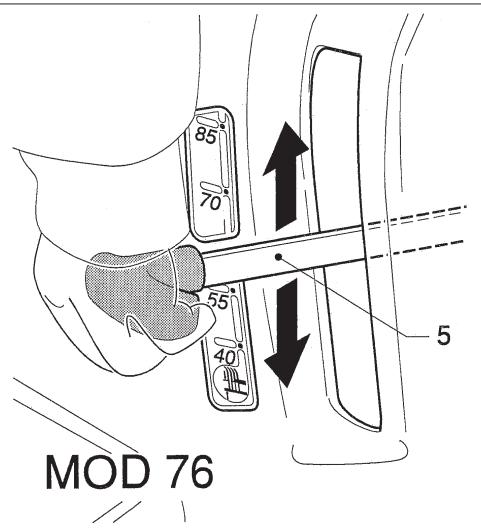
Fig.7

Fig.8





RETRAIT DU CAPOT MOTEUR.
| 1 | Seat | 6 | Throttle lever | 11 | Drive pedal |
| 2 | Steering wheel | 7 | Battery | 12 | Agjusting levers for cutting height |
| 3 | Grass catcher bag | 8 | Blade coupling lever | 13 | Motor safety houding |
| 4 | Blade | 9 | Brake pedal | 14 | Pilot light for check-in and for full grass collection bin |
| 5 | Ignition key | 10 | Brake lever | Protection casing battery/engine | |
| 15 |
3 - TECHNICAL DETAILS
| Mod. 67 | Mod. 76 | |||
| Electric starter | Electric | |||
| Advance | Hydrostatic advance forward and back | |||
| Maximun speed | 8,0 Km/h | |||
| Grass collection bin | 2000 mm x 820 mm x 1020 mm | |||
| Body | Polypropylene | |||
| Cutting plate | Sheet steel | |||
| Cutting width | 67 cm | 76 cm | ||
| Cutting height regulation | Centralised on 5 positions | Centralised on 4 positions | ||
| Curvature radius | 0,7 m | |||
| Grass collection bag | 150 litri | |||
| Tyres | Height | Width | Recommended pressure | |
| front | 265 mm | 85 mm | - | 1,5 bar |
| rear | 360 mm | 120 mm | 2 bar | |
| Weight with collection bag | 177 kg | |||
| Assembled with | Steering wheel, grass collection bag, front wheels and bin cover | |||
| Acoustic power value according to Directive 2000/14/CE | CE declaration label on the last page | |||
| Measured acoustic power according to Directive 2000/14/CE | CE declaration label on the last page | |||
| Acoustic pression power according to Appendix H from regulations En836 | CE declaration label on the last page | |||
| Vibrations value according to Appendix G from regulations En836 | CE declaration label on the last page | |||
PETROL MOWER WORKING HOURS
Monday to Saturday 08.00 - 12.00 h / 15.00 - 19.00 h
Show respect for those living nearby and avoid using in afternoon rest period, evening or Sundays.
4 - SAFETY RULES
1) All persons operating the mower must be familiar with the operating instructions.
● Very important regulation: anybody under the age of 16 or under the effects of alcohol or medicines cannot operate the machine.
2) Exhaust fumes from petrol engines: these fumes contain harmful carbon monoxide, never operate the engine in closed environments.
3) When operating on the mower make sure that no other persons, especially children or pets, are in the vicinity of the mower.
4) Please ensure that foreign matters (strips, twigs, iron wire, etc.) are removed from the lawn. Splinters can be hurled outwards or the blades can get damaged.
5) No smoking in the vicinity of the mower during operation.
6) The machine is not equipped with devices for artificial lighting of the work area. Only mow during daylight or under good lighting conditions.
7) Do not use on slopes of more than 10^ . To guard against overturning: only mow at an angle to the slope, never up- or downwards; do not stop or start suddenly when going up or downhill; machine speeds should be kept low on slopes and during tight turns; stay alert for humps and hollows and other hidden hazards.
8) Disengage drive to blade when transporting or not in use.
9) Before using, always visually inspect to see that the blades, blade bolts and cutter assembly are not worn or damaged. Never use machine in the event of damage to the bodywork or without protective equipment (i.e. grass collector bin, etc).
10) The correct position of the engine block has been specifically designed and set at the factory and must not be altered
11) Start by pressing the drive pedal with the greatest care, following the manufacturer's instructions. Pay attention to feet positioning at a sufficient distance from the cutting blade.
12) Do not tilt the engine when departing and starting up.
13) Do not start the engine when the cutter mechanism is switched on. Remain sitting on the ride-on-mower.
14) Keep your hands or feet away from the rotating blades. Stay away from the discharge opening whilst the blade are rotating. While mowing, always wear substantial footwear and long trousers. Do not operate the equipment when barefoot or wearing open sandals.
15) This unit has been designed in order to reduce to the minimum level the noise value and the vibration emissions. Furthermore in case you need to use it for a longer period, please stop working for short breaks and please use always acoustics protections.
16) Do not manually move or lift the machine with engine running.
17) Disengage drive to attachments, stop the engine and remove the ignition key,
● before cleaning, checking or working on the machine;
● before clearing blockages or unclogging chutes;
- if the machine starts to vibrate abnormally (check immediately).
18) Before leaving the operator's position disengage the power take-off and lower the attachments, change into neutral and set the parking brake, stop the engine and remove the key.
19) Take the greatest care during the cutter regulation operations. Risk of injury!! Keep fingers away from the area between cutter and bodywork. Wear gloves. Always switch off the cutter mechanism.
20) Make sure that all nuts, bolts and screws are tight.
21) Never store the mower with petrol in the tank inside any building where petrol fumes could possibly come into contact with fire or sparks. Danger of explosion.
22) Only empty the petrol tank in the open.
23) Before storing in a closed room, let the engine cool down.
24) In order to avoid risk of fire, the engine and exhaust must be kept free of grass, leaves and leaking grease.
25) The grass collection bin must regularly be checked for signs of damage
26) For safety reasons, faulty, worn or damaged parts must be replaced immediately with original spares. Replace faulty silencers.
27) Replacement blades must only be installed according to the manufacturer's instructions and in the mower they are intended for. Only in this way can the performance and safety of your mower be ensured.
28) Take the greatest care during the blade maintenance, checking and sharpening operations as indicated in the user's instructions.
29) Only use original spare blades, paying attention to the instructions on "blade sharpening and replacement"
30) Do not change the engine governor settings or overspeed the engine. Operating the engine at excessive speed can increase the hazard of personal injury.
31) May we point out that, according to the law governing Product Liability, we are not responsible for damages which are caused by our machines as a result of:
- improper repairs which were not carried out by our authorized service agents
● failure to use original spares.
The same applies for the operating accessories.
32) Do not dispose of any waste into the environment, for example: oil, gasoline and exhausted batteries. These are polluting substances which must be disposed of according to EU, country and local regulations.
33) IMPROPER USE:
- Do not use the machine to transport objects, people or animals.
- Do not use the machine to tow and/or push carts or other devices.
- Do not mount equipment not authorized by the manufacturer.
- Do not modify machine parts.
- Do not exclude or tamper with protection systems.
The grass collection sack is included in all the models of the ride-on-mower as a standard accessory.
For assembly, you need the following parts:
- 1 Fabric sack with clips
- 1 Frame
- 1 Bar
- 4 Washers ∅ 9x24
- 2 Self-locking nuts (M8)
1- Allow the sack to slide on the frame and secure with suitable clips.
2- Fix the bar with the 4 washers 9x24 (two before and two after the fabric sack) and with the 2 M8 nuts.
6 - FRONT WHEEL ASSEMBLY (Fig.4)
- Mount the front wheels on the pins (1), positioning a washer (2), the wheel (3) and 2 washers (4).
- Secure with a stop (5).

Attention: Assemble the wheel with the grease nipple outwards
7 - ASSEMBLY (Fig. 5-17)
UNPACKING/ ASSEMBLY
The ride-on-mower is packed in a carton and is ready assembled apart from the steering wheel, seat, grass collection bin and front wheels. Please observe the following sequence when unpacking the machine:
- Unpack all the parts that have been delivered. Dispose of the carton and pallet in an environmentally friendly way.
- Check all the parts
- Begin assembly.

It is strictly forbidden to start the ride-on-mower (even for trial purposes) without completing assembly.
STEERING WHEEL ASSEMBLY
- Fix the steering wheel (2) pulling until it is connected with the steering column (1).
- Secure the steering wheel (2) by means of the socket pin (3); put the socket pin through the openings (at the steering column and steering wheel)

The openings at the steering wheel and at the steering column must be in exact alignment.
SEAT ASSEMBLY
1- Fasten the seat (4) to the support plate (5) through the 4 M8x18 screws. Assembly with 4 washers ∅ 9x24 and 4 groovers. 2- Before tightening the screws, adjust the position of the seat on the holes of the plate according to the user's needs.

Check at regular intervals that the nuts are tightly screwed down.
ASSEMBLY OF THE GRASS COLLECTION SACK
- Fasten the bin to the rear part of the ride-on-mower with the 2 H.H. 6x16.2 screws, the 2 Z-shaped plates and 2 M6 nuts.
- Fix the bin cover to the engine casing inserting the two ∅ 5 plugs
PLATE ASSEMBLY FOR FULL GRASS-BAG DETECTION
- Insert the plate (12) into the slot (13).
8 - ADJUSTING THE CUTTING HEIGHT (Fig.6-7)

Before the cutting height is adjusted, the engine must be switched off and the blades must have come to complete standstill.
ADJUSTMENT
- Push the adjustment lever (5) outwards in order to release it from its seat.
- Push the lever into the required notch for the cutting height.
- Release the lever slowly till it sticks in the notch.
The cutting height is now set.
CARE OF THE LAWN AND MOWING
The modern gardening technology has designed and developed labour-saving devices (mower with grass collection sack). For a good, healthy green lawn, it is essential to mow and aerate it regularly.
Fertilising is also essential
Always make sure the blades are sharp and in perfect conditions to avoid grass fraying and yellowing lawn.
You will achieve a clean cut with regular and straight windrows.
The mowing tracks should always overlap a few centimetres to avoid any uncut strips in between.
EMPTYING THE GRASS COLLECTION BIN

Empty the grass collection bin in time before it overflows.
The orange light shows that the bin is full.
Don't go on filling the grass collection bin when the orange light situated under the steering wheel is on.
Switch off the engine.
- Hold the rod and swivel the bin. Shake the sack twice until it is completely empty.
- Let the grass collection sack return slowly to its original position.
- Switch on the engine.
Lawn cutting frequency depends on the rate of growth. In the main growing season (May-June) often (twice a week) or at least once a week. The cutting height should be between 4-6 cm. and the growth before the next cut should not be more than 4-5 cm. During hot and dry periods, the lawn should be cut 1,5 cm. higher than normal, to avoid ground and root drying out.
If the grass is somewhat higher than normal, you should not make the mistake of cutting it immediately; you can damage the lawn. Do no cut to more than half the necessary height.
9 - SAFETY PRECAUTIONS (Fig.8-9)
It is the operator's responsibility to verify that during the work phases there are no people or animals inside the safety zone which extends for five meters around the machine.
fig. 8
Before mowing, remove all foreign objects from the lawn which may be thrown by the machine. While mowing, stay alert for any foreign objects which may have been missed.
fig. 9
Never place your hands or feet underneath the deck or into the rear discharge chute while the engine is running.
10 - OPERATION (Fig. 10-11-12-13-14-15-16-17)
Don't put the mower into operation before you have completely finished its assembly. Before putting the mower into operation for the first time, don't forget to fill it with petrol and oil. Connect the red cables to the positive terminal and the black cables to the negative terminal (the battery is placed in the battery-holder got on the body on the right of the seat). The mower may be put into operation for the first time only by trained persons who have read and understood these operating instructions.
Operating fuels:
Use only the following on your mower:
Petrol
engine oil
lead free (min. octane rating 77)
SAE 30 ("SE", "SF" O "SG")
STARTING THE ENGINE

Start up the engine only after filling the tanks with sufficient petrol and oil. Carefully follow the instructions in the enclosed manufacturer's operating and maintenance manual.
REFUELLING

Danger of explosion! Fill the tank only in the open! Never refuel while the engine is running or is still very hot! Do not smoke!
Store fuel in containers specifically designed for this purpose.
If petrol is spilled, do not attempt to start the engine but move the machine away from the area of spillage and avoid creating any source of ignition until the petrol vapours have dissipated.
The gasoline tank is placed on the right side of the unit.
-
Unscrew the tank cap (2) and fill up with lead-free petrol.
-
Screw the tank cap back.
ELECTRIC ENGINE START

The exhaust fumes contain carbon monoxide, an odourless and deadly gas.
Never start the engine in closed or badly ventilated rooms.
Look for a flat piece of ground with short grass for starting the engine.
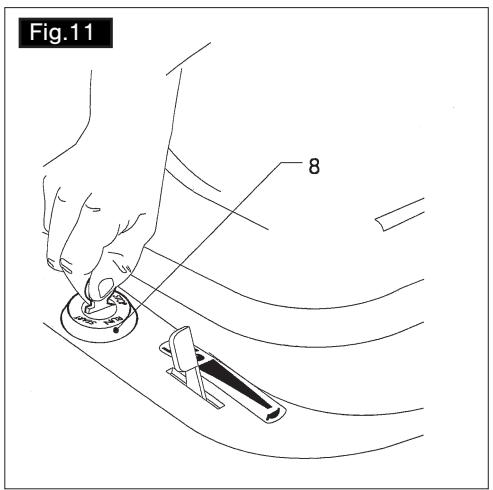
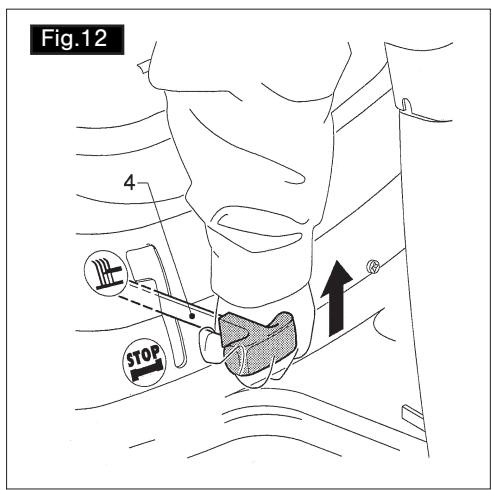
Operate the electric starter (8 Fig.11) only when sitting on the tractor with blade clutch (4 Fig.12) in stop position and with brake engaged.
- Set the clutch blade (4) to STOP position
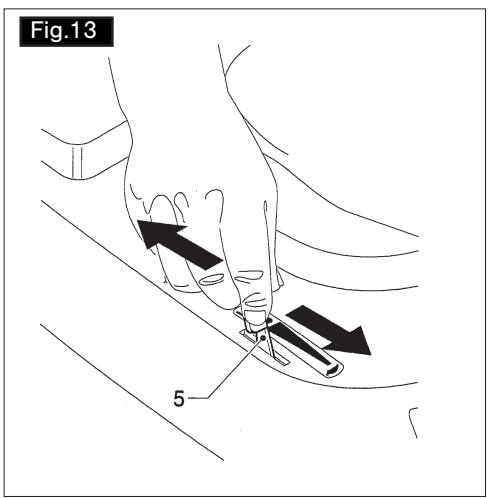
- Set the gas throttle lever (5) to START position
- Press the brake pedal (7) and pull the lever to block the brake (10) (parking brake).
- Press the brake pedal (7).
- Turn the key to the right and release it, after starting in "RUN" position. Should the engine fail to start within 5 seconds, wait a further 10 ten seconds before trying again to avoid damaging the battery
- Set the lever (5) between 🍴 and 🍻 until you judge the revs to be correct for your work ____
Do not touch ignition key while running.
The oil filler cap is placed in the engine block, below the seat.
- Lift the seat
- Unscrew the oil filler cap (3)
- Fill up the oil until the "MAX." mark on the dip stick is reached
- Screw the oil filler cap again
STARTING UP

Before starting up check the oil and petrol levels.
Do not smoke during the oil and petrol refuelling and checking operations. Top up with petrol or oil if necessary (as described in detail in previous chapter).
Starting up (engine start) must be carried out as described in detail under the heading "initial starting up".
Never change gear while driving, the mower must always be at a standstill.
The gear pedal (9) is situated to the right of the steering column (second pedal) and must be operated with the right foot.
Pressing the pedal with tiptoe moves the mower forward.
Pressing the pedal with heel moves the mower back.
The harder the pedal is pressed the greater the speed.
Never mow the grass with reverse gear engaged.
MOVING WITHOUT GEAR PEDAL ENGAGED (PUSHING)

Movement without power (pushing)
Only possible with the engine off.
Pushing the mower may be necessary to move it to the storage area.
Should it be necessary to manually move the mower the gear lever must be positioned to neutral. Warning! For all manual shift operations the engine must be off and the ignition key removed.
- Position the hydrostatic gear block level (11-fig.17) on the discharge plate to neutralA (fig.17). At the end of the manual push operation, reposition lever 11 to drive engagement pos.B.
DRIVING INSTRUCTIONS
Ensure that there are no persons or animals within the operating vicinity of the machine. Select the required speed and drive carefully. Transportation of other persons is forbidden. Transmission occurs on the rear wheels by means of the hydrostatic gear, braking is by pressing the pedal (7) on the right of the steering wheel column.
DRIVING
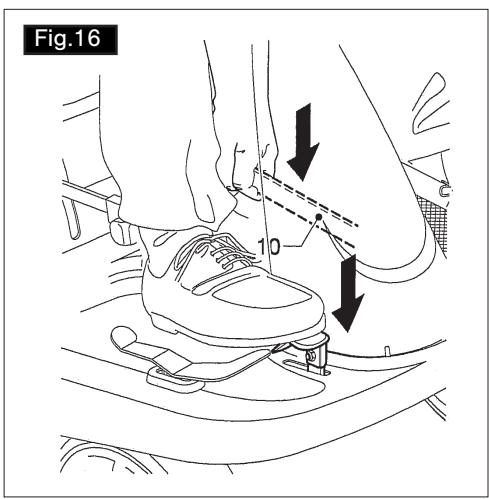
- Press the pedal (9) slowly fully down. The advance speed of the mower will vary according to the pressure applied to the pedal.
- Advance speed may also be varied by manually operating the gas throttle lever (5).
SWITCHING OFF THE ENGINE
To switch off the engine position the key to "STOP".
Reduce the throttle setting during engine run-out.
Only switch the engine off when the machine is at a complete standstill.
Always remove the ignition key to prevent accidental starting.
BRAKING
Remove the right foot from the drive pedal (9). Press the brake pedal (7). To activate the parking brake, pull the lever (10) upwards.
Pressing the brake, the drive pedal will automatically position itself on neutral.
DRIVING NOTICE
If possible, avoid driving at full throttle.
The present vehicle is not homologated to be used on roads, nevertheless in case it is necessary to cross the road or if you are working in the neighbourhood, please be very careful to the traffic.
The mower mechanism can only be switched on when the machine is at a standstill
(parking brake engaged), with engine running, and throttle on (full) and with operator seated on the mower.
Caution! Keep hands and feet out of the moving mower mechanism!
ENGAGING THE MOWER MECHANISM
- Take the right foot off the drive pedal (9)
- Engage the brake (7)
- Set the lever (4) on START position
The mower mechanism is now engaged and the blade is rotating. - You can now start to mow by pushing the drive pedal down with the right foot.
If the user stands up from the seat during the mowing, the engine switches off.
SWITCHING OFF THE MOWER GEAR
Set the clutch blade lever (4) into STOP position.

The blade stops turning in about 5 seconds.
SETTING THE SWITCH TO OPERATE WITH THE MOWER MECHANISM IN REVERSE :
The safety device prevents the use of the mower mechanism when the reverse gear is on. The engine is stopping if the reverse gear is operated when the mower mechanism is operating. DO NOT USE THE MOWER MECHANISM IN REVERSE IF NOT STRICTLY NECESSARY. If to operate the mower mechanism in reverse is strictly necessary you can turn the safety device off pushing the switch (1 fig. 10) located on the unit left side near the seat. A red light (14 fig. 1) on the instruments panel is switching on to indicate the safety device is off.
11 - MAINTENANCE

The following operations may be carried out by the user himself. All other maintenance, service and repair works must be carried out by an authorized dealer.
Carry out all maintenance operations with the engine switched off and the spark plug disconnected and wearing the mandatory personal protective equipment (safety shoes and gloves).
| AFTER USING EACH TIME | AFTER FIRST 5 HOURS | OFTEN | MONTHLY | EVERY 25 OPERATING HOURS | EVERY 50 OPERATING HOURS | EVERY 100 OPERATING HOURS | AFTER BEGINNING OF EVERY SEASON | PRIOR TO STORING | |
| Engine check | ■ | ■ | ■ | ||||||
| Oil change | ■ | ■ | |||||||
| Filter cleaning | ■ | ||||||||
| Spark plug checke | ■ | ■ | |||||||
| Air filter replacement | ■ | ||||||||
| Air duct cleaning | ■ | ||||||||
| Switch check | ■ | ||||||||
| Battery and terminal cleaning | ■ | ||||||||
| Brake check | ■ | ■ | |||||||
| Tyre pressure check | ■ | ■ | ■ | ||||||
| Blade sharpening or replacement | ■ | ||||||||
| Loose part check | ■ | ■ | |||||||
| Mower cleaning | ■ | ■ |

In the event of use under extreme conditions and very high temperatures, check more often.
OIL LEVEL CHECK
You can check the motor oil level with the dip stick placed in the oil filler tank cap. The oil level must be between "MAX." and "MIN." notches.
OIL CHANGE
Used oil can be removed from the oil tank by means of an adapter (1).

The used oil must not be drained into the sewer system or waterworks. In order to prevent any pollution to the water-table. Most garages have used oil deposits, or use the authorized deposits according to your local authority regulations.

REMOVAL OF THE ENGINE COVER:
Attention! you have always to perform such operation taking care to take out the switching-on key (fig. 1, part. 5) to avoid accidental setting in motion. To remove the conveyor (for example: in order to perform some adjustments or cleaning operations of the carburettor) it is necessary to unscrew the 3 screws shown in pict. 10/A. To get the first 2 screws you have to take the engine protection casing off (fig. 1, part. 15), for the 3rd screw you should furthermore take the battery out from its seat (fig. 10/A part. D).
CARE AND MAINTENANCE
| Inspections to be carried out by authorized personnel | |
| After driving into an obstacle | Defective belts |
| After engine suddenly stops | Worn brake |
| If blades are bent | Drive belt slipping |
| If engine shaft is bent | Defective blade clutch |
| Damaged gearbox | |
FURTHER MAINTENANCE AND REPAIR ADVICE
Always wear protective gloves when handling the blades (during checking or cleaning operations).

Regularly check that the grass collection device is in good condition. Due to the risk of fire it is essential that both the engine and exhaust are kept free of grass, leaves or any combustible material!
For safety reasons always replace used and or damaged parts immediately (by an authorized dealer).
AIR FILTER AND SPARK PLUG
Please follow the engine manufacturer operating instructions enclosed with the mower and the fault finding guide.
BLADE SHARPENING AND REPLACEMENT
Always use only original spares!
Should you not have the necessary tools to undertake this operation, take the mower to an authorized dealer for blade sharpening or replacement.
Wear protective gloves when you replace the blade and remove the ignition key.
- Release the blade. Fit a new blade or re-sharpen the old one and fit that.

For safety reasons, the blade cannot be re-sharpened removing more than 6 cm. of material. Over this amount, replace the blade.
BATTERY
Remove the battery during storage!
The mower can be fitted with various types of battery (see battery sheet for instructions and use).
BATTERY CONNECTION
- Open the engine cover (15-fig.1)
- Insert the battery (as illustrated in the relative instruction sheet)
- Connect the red wire to the positive pole and the black wire to the negative pole
- Replace the cover after connection.

Recharge the battery only in a dry room. IMPORTANT! Protect the contacts from dirt, damp and moisture. DO NOT SPRAY WITH WATER!
MOWER CLEANING

For engine cleaning, remove the ignition key and wait 10-15 minutes for the engine to cool down. With the mower tilted the carburettor must always point upwards. Always clean the mower with engine off.
Do not hose the engine casing from the outside to prevent any water getting onto the spark plugs or carburettor causing damage.
Use cloths or brushes to clean away any dirt of grass residue.
STORAGE

Never store your mower with petrol in the tank in places where petrol vapours could come into contact with naked flames or sparks.
Before storing the mower in a closed room allow the engine to cool off!
In any event never leave the machine unattended and with ignition key inserted in the ignition block.
12 - TROUBLES - REMEDIES
| FAULT | POSSIBLE CAUSES | CORRECTION |
| Engine does not start. | No petrol | Fill the tank, check that petrol reaches the carburettor, check the tank venting . |
| Poor, contaminated petrol | Always use clean, fresh petrol. Clean the carburettor. | |
| Fails to arrive at START and STOP position | Check the Bowden pulley, adjust and secure if necessary. | |
| Dirty air filter | Clean the spark plug and replace if necessary. | |
| Engine does not start | No spark | Clean the spark plug and replace if necessary. Check the cable |
| Difficulty in starting, flooded engine | Unscrew the plug and dry it | |
| Flat battery | Recharge | |
| Starter cord incorrectly connected | Check the connection | |
| Engine stalls | Grass too high or damp | Adjust the cutting height, in high position create air flow by reversing |
| Mower casing blocked | Clean the casing (Important: before cleaning extract the spark plug lead) | |
| Closed throttle | Open throttle by moving lever to MAX pos. | |
| Dirty air filter | Clean air filter (see engine instructions also) | |
| Carburettor calibration incorrect | Have the calibration checked by a soocialized centre | |
| Blade badly worn | Replace the blade | |
| Poor cut | Blunt blade | Replace or sharpen blade |
| Incorrect cutting height | Adjust the cutting height | |
| Grass bin fails to fill | The cutter plate is positioned too low. Their is no airflow to the blade and therefore there is no airflow to convey the grass | Adjust the cutting height |
| Grass too heavy or too damp to be conveyed by the air stream | Wait until the lawn surface has dried off | |
| Blade badly worn, blunt | Replace or sharpen the blade | |
| Grass is to high causing problems in transportation to the box | Cut the lawn twice, altering the cutting height accordingly | |
| Casing blocked with previous grass cutting | Clean the casing (do not use water). NB: remember to remove the spark plug connector | |
| The drive does not function | Drive cable detached | Insert the cable |
| Defective belt | Seek assistance from Service Workshop | |
| Defective drive chain | Seek assistance from Service Workshop | |
| Blade clutch does not function | Bowden pulley maladjusted | Seek assistance from Service Workshop |
| Cabling defect | Seek assistance from Service Workshop | |
| Clutch damage | Seek assistance from Service Workshop | |
| Charging current fuse defect | Fit new safety fuse |
13 - ACCESSORIES
- Hook for towing a trailer.
● Deflector for the cut grass discharge onto the lawn.
● Only for RDR 04 (Slalom 76): kit mulching to chop the cut grass and scatter it on the ground.
14 - WIRING
2 - BEDIENUNGSELEMENTE (Fig.1)
ENTFERNUNG DES MOTORDECKELS
DESMONTAJE DE LA TAPA MOTOR
EC certificate of conformity
The company (A) declares under its own responsibility that the machine (B) referred to in point (C-D-E-F) complies with all the relevant provisions of the European Directives referred to in point (G). The harmonised standards and technical specifications referred to in point (H) have been applied for adaptation of the machinery, as far as relevant.
- RETRAIT DU CAPOT MOTEUR.
- - SAFETY RULES
- - FRONT WHEEL ASSEMBLY (Fig.4)
- - ASSEMBLY (Fig. 5-17)
- UNPACKING/ ASSEMBLY
- STEERING WHEEL ASSEMBLY
- SEAT ASSEMBLY
- ASSEMBLY OF THE GRASS COLLECTION SACK
- PLATE ASSEMBLY FOR FULL GRASS-BAG DETECTION
- - ADJUSTING THE CUTTING HEIGHT (Fig.6-7)
- ADJUSTMENT
- CARE OF THE LAWN AND MOWING
- EMPTYING THE GRASS COLLECTION BIN
- - SAFETY PRECAUTIONS (Fig.8-9)
- - OPERATION (Fig. 10-11-12-13-14-15-16-17)
- Operating fuels:
- STARTING THE ENGINE
- REFUELLING
- ELECTRIC ENGINE START
- STARTING UP
- MOVING WITHOUT GEAR PEDAL ENGAGED (PUSHING)
- DRIVING INSTRUCTIONS
- DRIVING
- SWITCHING OFF THE ENGINE
- BRAKING
- DRIVING NOTICE
- ENGAGING THE MOWER MECHANISM
- SWITCHING OFF THE MOWER GEAR
- SETTING THE SWITCH TO OPERATE WITH THE MOWER MECHANISM IN REVERSE :
- - MAINTENANCE
- OIL LEVEL CHECK
- OIL CHANGE
- REMOVAL OF THE ENGINE COVER:
- FURTHER MAINTENANCE AND REPAIR ADVICE
- AIR FILTER AND SPARK PLUG
- BLADE SHARPENING AND REPLACEMENT
- BATTERY
- BATTERY CONNECTION
- MOWER CLEANING
- STORAGE
- - ACCESSORIES
- - WIRING
- ENTFERNUNG DES MOTORDECKELS
- DESMONTAJE DE LA TAPA MOTOR
Brand : EUROSYSTEMS
Model : RDR02
Category : Tiller