
PRINTER DOCK 3 - Photo printer KODAK - Free user manual and instructions
Find the device manual for free PRINTER DOCK 3 KODAK in PDF.

| Product type | Photo printer |
| Brand | KODAK |
| Model | PRINTER DOCK 3 |
| Dimensions (approx.) | 20 x 15 x 8 cm |
| Weight (approx.) | 0.5 kg |
| Power supply | Included AC adapter |
| Main functions | Photo printing, device docking station, battery charging |
| Printing technology | Thermal (ZINK) |
| Compatible paper | ZINK photo paper 5 x 7.6 cm (2 x 3 inches) |
| Connectivity | Bluetooth, NFC, physical connection docking station |
| Device compatibility | iOS/Android smartphones and tablets |
| Maintenance and cleaning | Clean the exterior with a soft dry cloth; do not use solvents |
| Safety | Use only the supplied adapter; avoid moisture and extreme temperatures |
| Spare parts / repairability | AC adapter, cleaning kit, ZINK photo paper available separately |
| General information | Compact photo printer with docking station; complies with NMB-003 (Class B) standard |
Frequently Asked Questions - PRINTER DOCK 3 KODAK
User questions about PRINTER DOCK 3 KODAK
0 question about this device. Answer the ones you know or ask your own.
Ask a new question about this device
Download the instructions for your Photo printer in PDF format for free! Find your manual PRINTER DOCK 3 - KODAK and take your electronic device back in hand. On this page are published all the documents necessary for the use of your device. PRINTER DOCK 3 by KODAK.
USER MANUAL PRINTER DOCK 3 KODAK
Kodak EasyShare printer dock series 3

User's Guide
www.kodak.com
For interactive tutorials, www.kodak.com/go/howto

Eastman Kodak Company
Rochester, New York 14650
© Eastman Kodak Company, 2004
All screen images are simulated.
Kodak, EasyShare, ImageLink, and XtraLife are trademarks of
Eastman Kodak Company.
P/N 4J1893
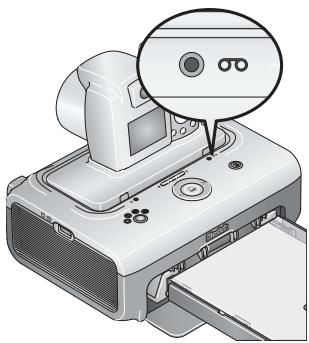
Front/top/side view
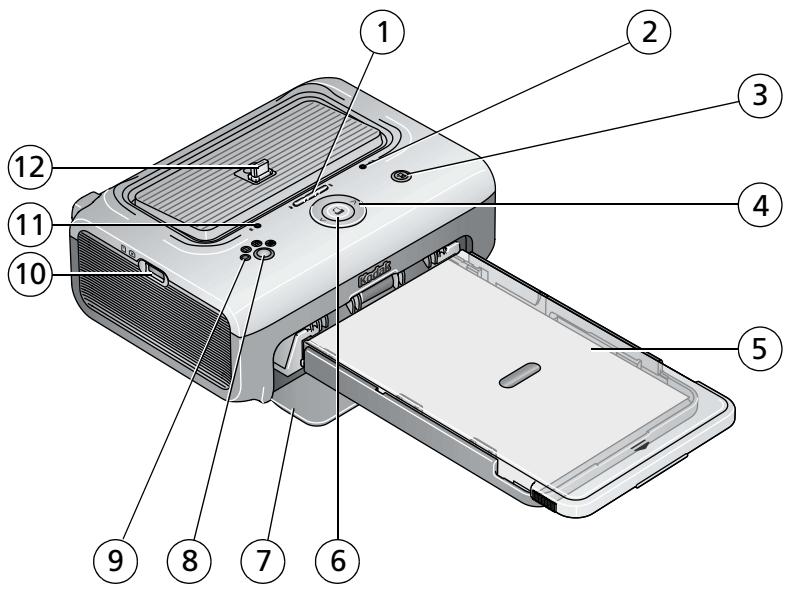
1 Battery charging lights/
Refresh button

2 Color cartridge light

3 Transfer button/light

4 Left/Right control

5 Paper tray
6 Print button/light

7 Paper tray door
8 Picture Size button
9 Picture Size lights
10 USB device connector (for optional Kodak card reader or PictBridge compatible device)
11 Paper light
12 Camera connector
Back/top/side view
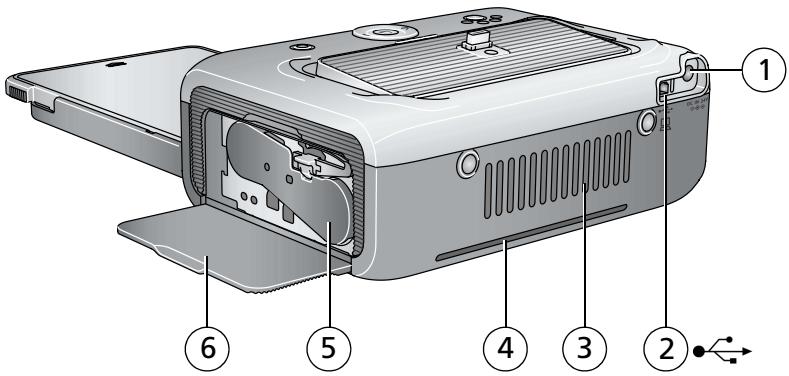
1 Power connector (DC-in)
4 Slot for paper path
2 USB connector (to computer)
5 Color cartridge (installed as shown)
3 Cooling vents
6 Cartridge door
Table of contents
1 Getting started 1
Finding a location for your printer dock. 1
Installing the custom camera insert. 2
Connecting the power 3
Handling and storing the color cartridge 3
Installing and removing the color cartridge 4
Handling and storing the paper 5
Loading the paper 6
7
2 Setting up your digital camera 8
Choosing the right camera battery for your EasyShare camera............ 8
Docking and charging your digital camera 10
Setting the picture quality. 12
Tagging pictures for printing 12
3 Printing without a computer 13
Printing from your digital camera. 13
Printing from a Kodak card reader 14
Printing tagged pictures 15
Printing from a PictBridge compatible device 15
Changing the printed picture size 16
Canceling printing. 19
Removing the perforated tabs from the paper 19
4 Installing software 20
Minimum system requirements 20
Installing the software 20
5 Using the printer dock with a computer 23
Connecting to a computer 23
Transferring pictures from your digital camera 24
Transferring pictures from a Kodak card reader 25
Printing from a computer 26
Canceling printing 29
6 Care and maintenance 30
General care 30
Cleaning the paper feed roller 31
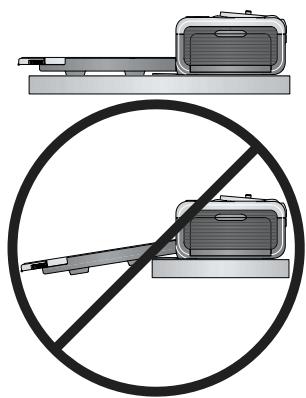
Traveling with your printer dock 32
7 Troubleshooting 33
Printing problems 33
Transfer/communication problems 40
Printer dock status lights 41
8 Getting help 47
Helpful links. 47
Telephone customer support 48
9 Appendix 49
Printer dock specifications 49
Important safety instructions 50
Upgrading your software and firmware 51
Additional care and maintenance 51
Warranty. 52
Regulatory information 54
1 Getting started
Finding a location for your printer dock
- Place the printer dock on a flat, clean, dust-free surface, in a dry location, and out of direct sunlight.

- Allow at least 5 in. (12.7 cm) clearance from the back of the printer dock for paper travel.
For proper ventilation, make sure the top and back of the printer dock are not blocked. -
When connecting power or USB cables, keep the cables clear of the paper path to the front and rear of the printer dock.
-
Avoid areas where ventilation ducts, open doors, or frequent passersby might expose the printer dock and paper to high levels of dust and debris. Airborne dirt particles can affect picture quality.
- Allow enough space on all sides of the printer dock to let you connect and disconnect cables, change the color cartridge, and add paper.
Installing the custom camera insert
IMPORTANT: Use the custom insert that came with your digital camera to dock the camera, otherwise the camera may not fit on the printer dock.
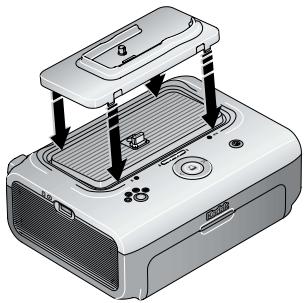
- Locate and install the custom insert included with your camera.
IMPORTANT: Depending on your camera connector, you may also need to use the Kodak dock adapter D-26. See the instructions included with the dock adapter.
a Remove any packing material covering the connector.
b Place the rear tabs of the insert in the slots toward the back of the printer dock.
c Press the front of the insert down and snap into place.
Purchase a custom camera insert for your Kodak EasyShare digital camera and other accessories at www.kodak.com/go/accessories.
Connecting the power

RISK OF ELECTRIC SHOCK:
Use only the AC power adapter included with your printer dock. Other adapters or cords can damage your camera, printer dock, or computer.
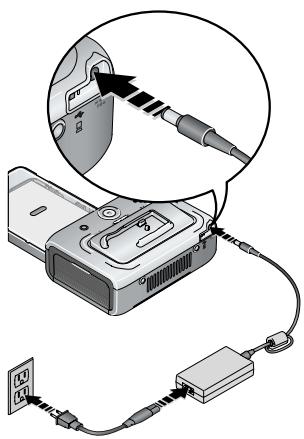
1 Remove the camera from the printer dock.
2 Connect the AC power cord to the AC power adapter, then to the back of the printer dock.
NOTE: The AC power cord included with your printer dock may not require assembly, and may be different from the one shown.
3 Connect the AC power cord into a power outlet.
Purchase an AC power cord and other accessories at www.kodak.com/go/accessories.
Handling and storing the color cartridge
For best quality prints, store the color cartridge in a location where the temperature does not exceed 85^ (30^) .
To avoid getting fingerprints on the ribbon, handle the color cartridge by the spool ends.
- Keep the color cartridge away from direct sunlight and out of high-temperature environments (such as a vehicle parked in the sun).
Installing and removing the color cartridge
1 Open the cartridge door on the side of the printer dock.
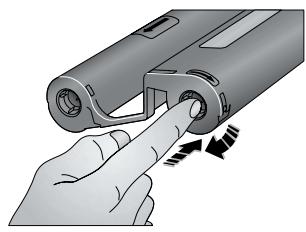
2 Check to make sure there is no slack in the color cartridge ribbon.
To remove slack, push in on the cartridge spool, then rotate the spool clockwise.
IMPORTANT: Be careful not to rotate the spool more than necessary. Doing so could reduce the number of prints you are able to make.
3 Slide the color cartridge in, label side up, with the arrow pointing toward the printer dock. Push the cartridge until it "clicks" into place.
4 Close the cartridge door.
IMPORTANT: The color cartridge may lock in place if there is a paper error. Do not attempt to remove the cartridge without first clearing the paper error. Make sure the Paper light is off before attempting to remove the cartridge (see Paper light under Printer dock status lights, page 41).

To remove the color cartridge, open the color cartridge door, then push up on the green lever and slide the cartridge out.
- When the cartridge is almost empty, the Color cartridge light blinks slowly for several seconds.
- When the cartridge is depleted, the Color cartridge light glows steady amber.
After installing a new color cartridge, press the Print button to clear the cartridge error and resume printing.
Handling and storing the paper
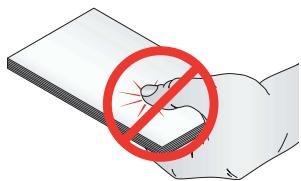
To avoid fingerprints, handle the paper by the edges or by the perforated tabs. Do not touch the glossy side of the paper.
- When storing, remove the paper tray, then close the paper tray cover and paper tray door to keep out dust and debris. Store paper flat.
- Keep the paper away from direct sunlight and out of high-temperature environments (such as a vehicle parked in the sun).
Loading the paper
1 Remove the paper tray from the printer dock if installed (see page 7).
2 Slide the paper tray cover back until it "clicks" into place, about 1.25 in. (3 cm), then lift up on the end of the paper tray cover.
IMPORTANT: Do not load more than 25 sheets of paper. Use the upper limit line inside the paper tray as a guide to prevent overloading. Do not load paper that is missing perforated tabs. To avoid fingerprints, do not touch the glossy side of the paper.
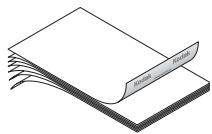
3 Carefully "fan" the paper to keep the sheets from sticking together.
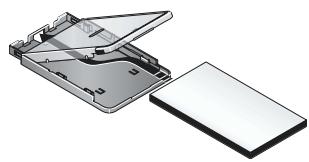
4 Load the paper into the paper tray, with the Kodak logo side facing down.
5 Close the paper tray cover.
Purchase Kodak color cartridge & paper kits and other accessories at a retailer of Kodak products, or visit www.kodak.com/go/accessories.
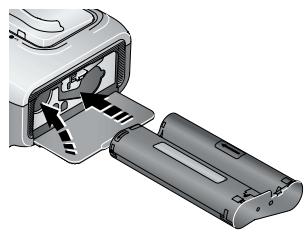
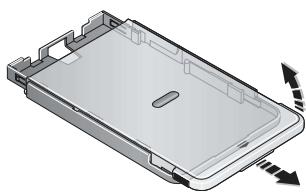
Installing and removing the paper tray
1 Open the paper tray door on the printer dock.
2 Slide the paper tray cover back until it "clicks" into place, about 1.25 in. (3 cm).
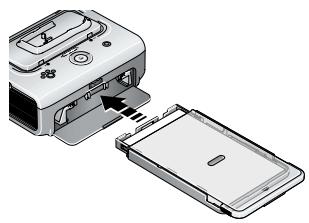
3 Slide the paper tray in the printer tray slot until the tray locks into place.
IMPORTANT: To ensure the paper tray fits squarely on the printer dock, make sure to keep the paper tray cover all the way open while installing.
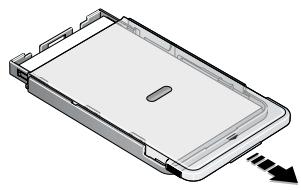
Pull the paper tray out to remove it.
Close the paper tray cover and paper tray door to keep out dust and debris.
When the paper tray is empty, the Paper light glows steady amber.
After refilling and installing the paper tray, press the Print button to clear the paper error and resume printing.
2 Setting up your digital camera
Choosing the right camera battery for your EasyShare camera

CAUTION:
Damage caused by unauthorized accessories is not covered under warranty.
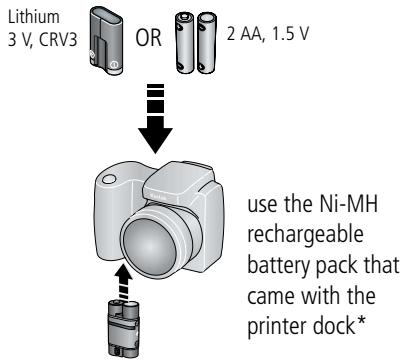
If your EasyShare digital camera came with non-rechargeable batteries:
If your EasyShare digital camera came with a rechargeable Li-Ion battery:
install it in your camera.
Do not use the Ni-MH rechargeable battery pack that came with the printer dock*

- Contents subject to change.
NOTE: The Kodak EasyShare Ni-MH rechargeable battery pack and Kodak Li-1on rechargeable battery are not charged when you receive them. Completely charge them before using them with your EasyShare camera (see page 10). For battery information for other brands of ImageLink print system compatible cameras, see the camera user's guide.
Extending battery life
Limit the following activities that quickly deplete battery power:
Reviewing your pictures on the camera screen
Using the camera screen as a viewfinder
- Excessive use of the flash
- Dirt on the battery contacts can affect battery life. Wipe the contacts with a clean, dry cloth before loading batteries in the camera.
- Battery performance is reduced at temperatures below 41^ F ( 5^ C). When using your camera in cold weather, carry spare batteries and keep them warm. Do not discard cold batteries that do not work; when they return to room temperature, they may be usable.
If you are getting fewer than 20 pictures per charge with your Kodak EasyShare Ni-MH rechargeable battery pack, (and if none of the tips above seem to help), consider refreshing the battery pack (see page 11).
For more information on batteries, see your camera user's guide, or visit www.kodak.com/global/en/service/batteries/batteryUsage.jhtml.
Docking and charging your digital camera
Docking your digital camera lets you make prints directly from the camera, transfer pictures from the camera to the computer, and charge the camera battery.
The Kodak EasyShare printer dock series 3 is ImageLink print system compatible. So in addition to docking Kodak EasyShare digital cameras, you can dock other brands of ImageLink system compatible digital cameras.
1 Make sure a custom camera insert is installed on the printer dock (see page 2), and a dock-rechargeable battery is installed in the camera (see page 8).
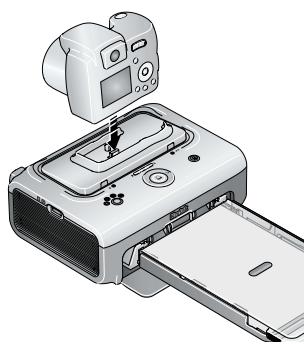
2 Place the camera on the printer dock. Push down to seat the connector.
Keep the camera wrist or neck strap clear of the paper path to the front and rear of the printer dock. The camera is now powered by the printer dock instead of the camera battery.
- The Kodak EasyShare Ni-MH rechargeable battery pack and the Kodak EasyShare Li-Ion rechargeable battery charge up to 3 hours.
The Battery charging lights turn on as charging progresses. Charging is complete when all three lights are lit.
You may leave the camera on the printer dock to maintain the charge.
For battery information for other brands of ImageLink system compatible cameras, see the camera user's guide.
Refreshing the Kodak EasyShare Ni-MH rechargeable battery pack
NOTE: The battery refresh feature is intended for use with the Kodak EasyShare Ni-MH rechargeable battery pack only. Li-on batteries do not require refreshing. For battery information for other brands of ImageLink system compatible cameras, see the camera user's guide.
If you are getting fewer than 20 pictures per charge with your Kodak EasyShare Ni-MH rechargeable battery pack, follow the tips under Extending battery life, page 9. If these don't help, the battery pack needs to be refreshed. The refresh cycle completely discharges the battery pack, then fully recharges it.
NOTE: A full refresh cycle takes up to 8 hours, depending on how much charge is left in the battery pack. For best results, refresh the battery pack overnight; do not interrupt the discharge/recharge cycle.
1 Make sure the Ni-MH rechargeable battery pack is in the camera.
2 Place your EasyShare camera on the printer dock (see page 10).
3 Press and hold the Battery charging lights/Refresh button, , until the Battery charging lights begin flashing green (approximately 5 seconds).
The charging lights monitor the refresh status:
| Descending blinking green lights | Discharging battery pack (lights turn off as discharging progresses). | |
| Ascending steady green lights | Charging battery pack (lights turn on as charging progresses). Charging is complete when all three lights are lit. |
Setting the picture quality
Before taking pictures, change the picture quality setting (or resolution) on your digital camera to
3:2 ★★★★. This ensures that the pictures you take are proportional to the printer dock paper, preventing unwanted cropping of your pictures.
See your camera user's guide for more information.
Tagging pictures for printing
NOTE: The following procedure pertains to Kodak EasyShare digital cameras. For information on tagging pictures on other brands of ImageLink system compatible cameras, see the camera user's guide.
1 Press the Share button.
2 Press / to locate a picture.
3 Make sure Print is highlighted (to tag all pictures in the current image storage location, highlight Print All ), then press the OK button.
4 Press to select the number of copies (0 - 99). The default is one. Zero removes the tag for a selected picture.
The Print icon is displayed in the status area.
To apply a print quantity to other pictures, press / to locate them. Keep the print quantity as is, or press / to change it.
5 Press the OK button.
6 Press the Share button to exit.
NOTE: To remove print tagging from all pictures: from the Share menu, highlight Cancel Plints , then press the OK button.
To print tagged pictures from your digital camera, see page 15. To print tagged pictures from your computer, see page 26.
3 Printing without a computer
IMPORTANT: Wait until printing is complete before removing paper, the paper tray, or the camera. Failure to do so can cause paper misfeeds or jams.
Printing from your digital camera
1 Take a picture with your camera (see your camera user's guide).
2 Place the camera on the printer dock (see page 10).
The current or most recent picture appears on the camera screen.
To print the current picture, press the Print button,
NOTE: If you tagged pictures for printing using your digital camera, instead of printing the current picture, all tagged pictures are printed (see page 15).
Press the Left/Right control on the printer dock, to review and choose pictures to print.
3 Press the Print button,
The copy screen appears.
To print more than one copy, press to select the number of copies, then press .
(If you don't press any buttons, after 10 seconds printing starts automatically.)
The Print light blinks, and printing starts. The paper cycles four times during the printing process before the finished print is ejected. The first three passes apply layers of yellow, magenta, and cyan colors to the print, and the fourth pass applies the Kodak XtraLife coating that protects and preserves the image.
Printing from a Kodak card reader
The Kodak EasyShare printer dock series 3 is compatible with the Kodak 8-in-1 card reader and the Kodak 6-in-1 card reader (each sold separately). Other Kodak USB card readers may work with the printer dock; however, other manufacturers' card readers are not supported.
1 For best results, tag pictures on your memory card for printing (see page 12 or your camera user's guide). If you do not tag pictures on your memory card, you will have the option of printing only the most recent picture on the card.
2 Plug the USB connector from the card reader into the USB connector located on the side of the printer dock.
NOTE: If the card reader is already plugged in but the connection is no longer available, disconnect then reconnect the USB cable to re-establish the connection.
3 Insert the memory card into the card reader (see your card reader user's guide for details). Do not insert more than one card at a time.
4 Press to begin printing, or press / to cancel.
Purchase a Kodak card reader and other accessories at a retailer of Kodak products, or visit www.kodak.com/go/accessories.
Printing tagged pictures
If your camera or memory card contains pictures tagged for printing (see page 12 or your camera user's guide), the printer dock gives you the option to print tagged pictures first. If your camera is docked, a message appears on the camera screen indicating that tagged pictures have been found:
To print tagged pictures—press
The Print light blinks, printing starts, and tagged pictures are printed. Print tags are removed from tagged pictures on your camera or card as they are printed.
To bypass printing of tagged pictures—press /
The message disappears after 10 seconds of inactivity.
Printing from a PictBridge compatible device
The Kodak EasyShare printer dock series 3 offers PictBridge technology, which lets you print from any PictBridge compatible camera or device.
1 Plug the USB connector from the PictBridge compatible device into the USB device connector located on the side of the printer dock.
NOTE: If the PictBridge compatible device is already plugged in but the connection is no longer available, disconnect then reconnect the USB cable to re-establish the connection.
2 Use your PictBridge compatible device to review pictures, choose printing options, and print. See your device user's guide for details.
Changing the printed picture size
1 Follow the procedure for printing from your digital camera (see page 13), Kodak card reader (see page 14), or PictBridge compatible device (see page 15).
2 Before printing, while making selections or changing settings, press the Picture Size button repeatedly to scroll through and select a picture size.
| Picture Size setting | Number and size of prints per sheet | |
| □ | 1 up (full photo) | One 4 x 6 in. (102 x 152 mm) picture |
| □ | 2 up (card size) | Up to two 2.1 x 3.3 in. (54 x 85 mm) pictures |
| □ | 4 up (wallet size) | Up to four 2 x 3 in. (51 x 76 mm) pictures |
| □ | 9 up (mini photo) | Up to nine 1.3 x 2 in. (34 x 51 mm) pictures |
3 Continue changing other settings or begin printing.
To change the default picture size:
- Select a picture size (see above), then press and hold the Picture Size button for 4 seconds.
The selected Picture Size light blinks, then glows steady.
Effect of picture size on number of copies
In most cases, the picture size setting also determines the number of copies that are printed. For example, if you choose to print a picture with 2 up selected, 2 copies are printed on one sheet of paper.
When printing tagged pictures (see page 15), the number of copies that are printed is determined by the setting on your camera or device. For example, if three pictures on your camera are each tagged for printing one copy, and the 4 up option on the printer dock is selected, three 2 × 3 in. ( 51 × 76 ~mm ) pictures are printed on one sheet of paper.
For best results, choose a picture size or number of copies (on your camera or device) that optimizes the use of white space on the paper.
NOTE: When printing from a PictBridge compatible device (see page 15), picture size and number of copies are determined by the device's multi-up and copies settings. Change these settings on your device before printing. If the picture size option selected on your device does not match any of the picture size options on the printer dock, the closest available picture size option on the printer dock is automatically selected.
Printing different pictures on the same sheet

1 Tag the pictures you want to print on your digital camera (see page 12).
2 Place the camera on the printer dock, or insert the memory card into a connected Kodak 8-in-1 or 6-in-1 card reader (sold separately).
If your camera is docked, a message appears on the camera screen indicating that tagged pictures have been found.
3 Press the Picture Size button repeatedly to scroll through and select either 2 up , 4 up , or 9 up , depending on the picture size you wish to print (see page 16).
4 Press to begin printing.
NOTE: If you select more than one copy of a picture when tagging them on your camera, duplicate pictures are printed on the same sheet (see below).
Printing duplicate pictures on the same sheet
Method 1: by setting it up on your digital camera

1 Tag the pictures you want to print on your digital camera (see page 12). For each picture, choose the number of copies you would like to print.
2 Place the camera on the printer dock, or insert the memory card into a connected Kodak 8-in-1 or 6-in-1 card reader (sold separately).
If your camera is docked, a message appears on the camera screen indicating that tagged pictures have been found.
3 Press the Picture Size button repeatedly to select either 2 up , 4 up , or 9 up , depending on the picture size you wish to print (see page 16).
4 Press to begin printing.
Method 2: using the printer dock
- Place the camera on the printer dock, or insert the memory card into a connected Kodak 8-in-1 or 6-in-1 card reader (sold separately).
The current or most recent picture appears on the camera screen.
Press the Left/Right control on the printer dock, / to review and choose a picture to print.
5 Press the Print button,
The copy screen appears.
Press / to select the number of copies, then press. (If you don't press any buttons, after 10 seconds printing starts automatically.)
Canceling printing
Press and hold for 2 seconds.
The print job is canceled and ejected from the printer dock. If you cancel a print during the fourth pass (clear coat), the print is ejected upon completion.
NOTE: Using the Print button to cancel a print job only works when printing from a docked camera.
Removing the perforated tabs from the paper
IMPORTANT: Remove perforated tabs only after printing. Paper missing perforated tabs will not feed properly.
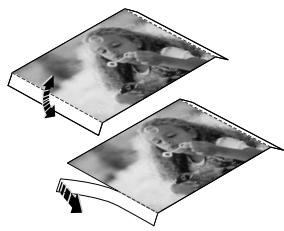
1 Fold the tabs up, then down.
2 Remove each tab and discard.
4
Installing software
Minimum system requirements
Windows OS-based computers
Windows 98, 98SE, ME, 2000 SP1, or XP OS
Internet Explorer 5.01 or higher
233 MHz processor or greater
64 MB RAM (128 MB RAM for Windows XP OS)
200 MB hard disk space available
CD-ROM drive
Available USB port
Color monitor, 800 x 600 pixels (16-bit or 24-bit recommended)
Macintosh computers
Power Mac G3, G4, G5, G4 Cube, iMac; PowerBook G3, G4; or iBook computers
Mac OS 10.2 or higher
Safari 1.0 or higher for complete installation
128 MB RAM
200 MB hard disk space available
CD-ROM drive
Available USB port
Color monitor, 1024 x 768 pixels (thousands or millions of colors recommended)
Installing the software
IMPORTANT: Install Kodak EasyShare software before connecting the printer dock to the computer.
1 Close all software applications that are open on your computer (including anti-virus software).
2 Place the Kodak EasyShare software CD into the CD-ROM drive.
3 Load the software:
Windows OS-based computer—if the install window does not appear, choose Run from the Start menu and type d:\setup.exe where d is the drive letter that contains the CD.
Mac OS X—double-click the CD icon on the desktop, then click the Install icon.
4 Follow the on-screen instructions to install the software.
- Select Complete to automatically install the most commonly used applications.
Select Custom to choose the applications you wish to install.
IMPORTANT: To use the printer dock with a computer, you must install the printer driver. If you choose Custom, make sure the printer dock is selected. The printer driver is automatically installed if you choose Typical.
Add the printer for Mac OS X:
a Open the finder window and click the Applications button. If you don't see the Applications button, open the Applications folder on your operating drive.
b Open the Utilities folder, then double-click Print Center.
c In the Printer List window, click the Add Printer button.
d Select the printer dock, then click Add.
The printer dock is added to your computer.
IMPORTANT: When prompted, take a few minutes to electronically register your printer dock and software. This lets you receive information regarding software updates and registers some of the products included with the printer dock. You must be connected to your Internet service provider to register electronically. To register later, visit www.kodak.com/go/register.
5 Restart the computer if prompted. If you turned off anti-virus software, turn it back on. See the anti-virus software manual for details.
For more information on installing the software, see the ReadMe file on the Kodak EasyShare software CD. For information on the software applications included on the Kodak EasyShare software CD, click the Help button in the EasyShare software.
Uninstalling the software
If you wish to remove the printer driver or EasyShare software from your computer, use the following procedure:
Windows OS-based computer:
1 Open the Control Panel:
From the Start menu, select Settings, then select Control Panel. (On Windows XP operating systems, depending on your configuration, Control Panel may be found in the Start menu.)
2 Double-click Add/Remove Programs.
3 Select Kodak EasyShare software, then click Remove.
4 Select Modify to uninstall single components, such as the printer driver, or select Remove to uninstall all components.
5 Follow the on-screen instructions. Restart the computer if prompted.
Mac OS X:
1 Double-click the operating drive for your system.
2 Select Library, then select Printers.
3 Open the Kodak folder, then open the printer dock folder.
4 Double-click the printer dock installer program.
5 Follow the on-screen instructions.
5 Using the printer dock with a computer
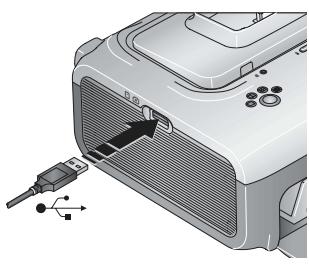
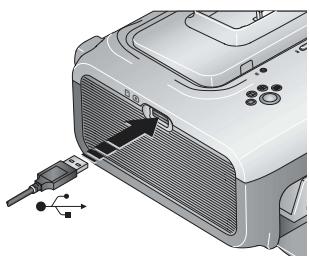
Connecting to a computer
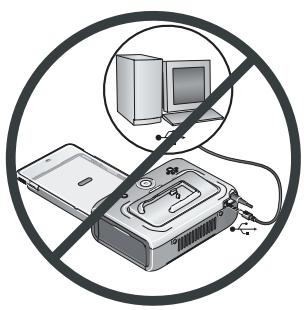
IMPORTANT: Make sure your camera is NOT docked when you connect the printer dock to the computer.
1 Make sure Kodak EasyShare software is installed on the computer (see page 20).

2 Plug the labeled end of the USB cable (included) into the labeled USB port on your computer. See your computer documentation for details.
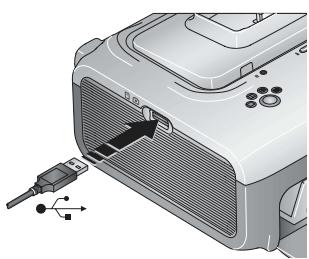
3 Plug the other end of the USB cable into the square USB connector on the back of the printer dock.
Transferring pictures from your digital camera
1 Make sure Kodak EasyShare software is installed (see page 20) and the printer dock is connected to your computer (see page 23).
2 If you have the optional USB card reader, disconnect it from the printer dock.
3 Place the camera on the printer dock (see page 10).
4 Press the Transfer button, on the printer dock.
Kodak EasyShare software opens on your computer (if it is installed).
5 Use Kodak EasyShare software to transfer pictures from the camera to your computer. See the Kodak EasyShare software Help for details.
The printer dock Transfer light blinks while the pictures are being transferred. The Transfer light continues to blink until the Transfer or Print button is pressed, the camera is removed from the printer dock, or the connection is no longer available.
NOTE: With the software installed, pressing the Transfer button establishes a new drive connection for the docked camera. You can view, copy, delete, and otherwise manage files on the new drive, as you do with other drives on your computer. See your computer documentation for details.
Transferring pictures from a Kodak card reader
The Kodak EasyShare printer dock series 3 is compatible with the Kodak 8-in-1 card reader and the Kodak 6-in-1 card reader (each sold separately). Other Kodak USB card readers may work with the printer dock; however, other manufacturers' card readers are not supported.
1 Make sure Kodak EasyShare software is installed (see page 20) and the printer dock is connected to your computer (see page 23).
2 If a camera is docked, remove it.
3 Plug the USB connector from the card reader into the USB connector located on the side of the printer dock.
NOTE: If the card reader is already plugged in but the connection is no longer available, disconnect then reconnect the USB cable to re-establish the connection.
4 Insert the memory card into the card reader (see your card reader user's guide for details). Do not insert more than one card at a time.
5 Press the Transfer button, on the printer dock.
Kodak EasyShare software opens on your computer (if it is installed).
6 Use Kodak EasyShare software to transfer pictures from the card reader to your computer. See the Kodak EasyShare software Help for details.
The printer dock Transfer light blinks while the pictures are being transferred. The Transfer light continues to blink until the Transfer or Print button is pressed, or until the connection is no longer available.
NOTE: With the software installed, pressing the Transfer button establishes one or more new drive connections for the card reader. You can view, copy, delete, and otherwise manage files on the new drives, as you do with other drives on your computer. See your computer documentation for details.
Purchase a Kodak card reader and other accessories at a retailer of Kodak products, or visit www.kodak.com/go/accessories.
Printing from a computer
We recommend using Kodak EasyShare software (included) for printing. This software lets you take advantage of a wide range of features, including full color enhancement, red-eye reduction, picture organization, and much more.
If there are no pictures on your computer, use the printer dock to transfer pictures from your camera or memory card before printing (see page 24).
IMPORTANT: Wait until printing is complete before removing paper or the paper tray. Failure to do so can cause paper misfeeds or jams.
Printing with Kodak EasyShare software
1 Make sure Kodak EasyShare software is installed (see page 20) and the printer dock is connected to your computer (see page 23).
2 Click the My Collection tab.
3 Select the pictures you wish to print.
4 Click the Print at Home tab.
5 Make sure the printer dock is selected as the current printer.
6 Change any other settings, such as paper size and print layout, then click Print.
NOTE: The Picture Size button on the printer dock is disabled when printing from a computer. Set printing options using EasyShare software.
See the EasyShare software Help for details.
Printing tagged pictures from your computer
1 Make sure Kodak EasyShare software is installed (see page 20) and the printer dock is connected to your computer (see page 23).
2 Transfer the tagged pictures to your computer (see page 24).
3 Follow steps 4 through 6 above.
Printing using other applications
1 Make sure the printer driver is installed (see page 20), and the printer dock is connected to your computer (see page 23).
2 Open the pictures you wish to print in the application from which you want to print.
3 Access printer settings by selecting Print or Page Setup from the File menu (depending on your application and operating system).
4 Make sure the printer dock is selected as the current printer.
5 Change any other settings as needed, then click OK or Print. (Depending on your application and operating system, you may first need to return to the main menu and select Print from the File menu.)
NOTE: The Picture Size button on the printer dock is disabled when printing from a computer. Set printing options in the application from which you are printing.
Choosing a color mode
Kodak's color mode feature uses automatic color correction feature to help you make great-looking prints in no time. The Kodak EasyShare printer dock series 3 features three color mode options:
Enhanced—to get richer, more vivid colors.
Natural—to get great, natural color for everyday picture-making.
None—to disable automatic color correction.
To change the color mode:
Windows 2000/XP OS:
1 From the Start menu, select Settings, then select Printers.
NOTE: Depending on your Start Menu configuration, you may need to select Printers and Faxes from the Control Panel.
2 Right-click the Kodak EasyShare printer dock series 3 icon, then select Printing Preferences.
3 Click the Color Correction tab.
4 Select a color correction option, then click OK.
Windows 98/ME OS:
1 From the Start menu, select Settings, then select Printers.
2 Right-click the Kodak EasyShare printer dock series 3 icon, then select Properties.
3 Click the Color Correction tab.
4 Under Color Correction, select a color mode option.
5 Click OK when complete.
Mac OS X:
1 Make sure the printer dock is selected as the current printer.
2 From an application File menu, select Print.
3 Select Color Control from the Copies & Pages pop-up menu.
4 Select Kodak color.
5 Select a color mode option.
Canceling printing
Windows OS-based computer:
1 Double-click the printer icon in the system tray.
2 Click the print job you want to cancel.
3 Select Document, then select Cancel.
Mac OS X:
1 In Print Center, double-click the printer icon.
2 Click the job you want to cancel, then select Delete.
6
Care and maintenance
General care
IMPORTANT: Always disconnect the power before cleaning. Do not use harsh or abrasive cleaners or organic solvents on the printer dock or any of its parts.
To clean, wipe the outside of the printer dock with a clean, dry cloth.
Support the printer dock and tray by placing it on a flat, level surface. Do not block the cooling vents.
- Avoid blocking the back of the printer dock and paper tray exit.
- Keep power and USB cables away from the paper path.
- Keep the surrounding area vacuumed and litter-free.
- Protect the printer dock from tobacco smoke, dust, sand, and liquid spills.
Avoid placing objects on the printer dock.
- Keep the printer dock, accessories, and supplies away from direct sunlight and out of high-temperature environments (such as a vehicle parked in the sun).
- When storing, remove the paper tray, then close the paper tray cover (see page 7) and paper tray door to keep out dust and debris. Store paper flat.
Cleaning the paper feed roller
To prevent misfeeds and to make sure your pictures look their best, we recommend that you keep the paper feed roller clean. Inspect the roller weekly for debris particles, and clean if necessary.
IMPORTANT: Unplug the power before cleaning the paper feed roller.
1 Unplug the AC power cord from the power outlet.
2 Remove the paper tray from the printer dock, and leave the paper tray door open.
3 Lightly moisten a lint-free cloth with water.
IMPORTANT: Do not use cotton or cotton swabs to clean the paper feed roller.

4 Use the moistened cloth to gently wipe clean the surface of the paper feed roller. Advance the feed roller with your thumb as necessary, and continue cleaning.
5 Allow the paper feed roller to fully dry before reconnecting the power.
Traveling with your printer dock
IMPORTANT: When traveling, keep the printer dock, accessories, and supplies away from direct sunlight and out of high-temperature environments (such as a vehicle parked in the sun).
Consider purchasing the AC power cord for the region to which you are traveling.
1 Disconnect the power and remove all cables.
2 Remove the paper tray from the printer dock; close the paper tray cover and the paper tray door on the printer dock.
3 Repack the printer dock in the original packing box, or use the optional printer dock travel bag.
Purchase an AC power cord, printer dock travel bag, and other accessories at a retailer of Kodak products, or visit www.kodak.com/go/accessories.
7 Troubleshooting
When you have questions about your printer dock, start here. Additional technical information is available in the ReadMe file located on the Kodak EasyShare software CD. For updates to Troubleshooting information, visit www.kodak.com/go/printerdocks.
Printing problems
| If... | Try the following |
| Paper does not feed(Paper light may glow steady amber) | IMPORTANT: Use only Kodak color cartridge & paper kits for your printer dock. Do not use inkjet paper. ■ The paper tray may be empty. Load paper (page 6), re-install the paper tray, then press □. ■ Check the paper: 1 Remove the paper tray (page 7). 2 Inspect the paper supply: make sure paper is not damaged in any way, or removable tabs have not been detached. Replace with new paper if necessary. 3 Carefully "fan" the paper to keep the sheets from sticking together. 4 Reload the paper tray. Do not exceed the fill line. 5 Re-install the paper tray, then press □ to resume printing. ■ Clean the paper feed roller (page 31). |
| Multiple sheets of paper are pulled through printer | 1 Remove the paper tray (page 7). 2 Remove the paper supply from the paper tray. Carefully "fan" the paper to keep the sheets from sticking together. 3 Reload the paper tray. Do not exceed the fill line. 4 Re-install the paper tray, then press □ to resume printing. |
| Printer is jammed(Paper and/or cartridge lights may blink quickly) | IMPORTANT: Use only Kodak color cartridge & paper kits for your printer dock. Do not use inkjet paper. ■ If the Paper light is blinking quickly: 1 Remove the paper tray (page 7). 2 Disconnect the power from the printer dock for 5 seconds, then reconnect the power. Carefully remove the paper if it does not automatically eject. IMPORTANT: Always check the paper slot on the back of the printer dock for jammed paper: 3 Remove the paper supply from the paper tray. Carefully "fan" the paper to keep the sheets from sticking together. 4 Reload the paper tray. Do not exceed the fill line. 5 Re-install the paper tray, then press □ to resume printing. ■ If the Color cartridge light is blinking quickly, check the color cartridge: IMPORTANT: The color cartridge may lock in place if there is a paper error. Do not attempt to remove the cartridge without first clearing the paper error. Make sure the Paper light is off before attempting to remove the cartridge (see Paper light under Printer dock status lights, page 41). Remove the color cartridge, remove any slack from the ribbon, then re-install the cartridge (page 4). Press □ to resume printing. |
| Printing stops during mid-print (paper stops feeding, and Paper light may blink) | IMPORTANT: Use only Kodak color cartridge & paper kits for your printer dock. Do not use inkjet paper. ■ Check the paper: 1 Remove the paper tray (page 7). 2 Check the paper slot on the back of the printer dock. 3 Remove loose paper from the printer dock. If paper is jammed, see page 34. 4 Inspect the paper supply: make sure removable tabs have not been detached from the paper. Reload with new paper if necessary. 5 Carefully "fan" the paper to keep the sheets from sticking together. 6 Reload the paper tray. Do not exceed the fill line. 7 Re-install the paper tray, then press □ to resume printing. ■ Clean the paper feed roller (page 31). |
| Print is smudged | ■ Fingerprints may be on glossy side of paper. Handle paper by the edges or by the removable tabs (page 5). |
| Print is spotted | ■ Check to see if the paper is dirty, and use a dry, lint-free cloth to wipe clean. For excessive dirt or debris, thoroughly clean the paper tray, and load new paper (page 6). Check and clean the paper feed roller if necessary (page 31). NOTE: When storing paper, remove and close the paper tray and paper tray door to keep dust and debris from collecting on the paper or inside the printer dock (page 5). |
| Print is too light | IMPORTANT: Use only Kodak color cartridge & paper kits for your printer dock. Do not use inkjet paper. ■ Make sure the paper is loaded with the Kodak logo facing down. Reload if necessary (page 6). ■ Try re-taking the picture with the flash off. See your camera user's guide for details. ■ Adjust the exposure compensation on your camera, and try re-taking the picture. See your camera user's guide for details. ■ Edit the picture using Kodak EasyShare software on your computer. See the EasyShare software Help for details. |
| Print is too dark or is discolored | Try re-taking the picture with the flash on, or move within the flash range of the camera. See your camera user's guide for details. Adjust the exposure compensation on your camera, and try re-taking the picture. See your camera user's guide for details. Edit the picture using Kodak EasyShare software on your computer. See the EasyShare software Help for details. Make sure the printer dock is not placed in direct sunlight or is not operating in a high-temperature environment. Make sure the cooling vents are not blocked or dirty (page 1). |
| Pictures are cropped | Change the picture quality setting (or resolution) on your digital camera to 3:2. See your camera user's guide for details. Adjust cropped pictures using Kodak EasyShare software on your computer. If you are printing from an application on your computer, select the proper paper size in print options. NOTE: Cropping may vary depending on the selected picture size (page 16). |
| A selected picture does not print. | The image file may be corrupt. Review the picture on the camera or computer and delete if necessary. The image file may not be JPEG format. The printer dock can only print JPEG files in standalone mode. Connect to a computer (page 23) and use EasyShare software to print BMP and TIFF formats (page 26). |
| Nothing happens when you try to print | ■ Check the power connections (page 3).■ Remove the paper tray, check that paper is properly loaded, and re-install (page 7).■ If the Paper light glows steady amber, load paper (page 6).■ Make sure the color cartridge is properly installed (page 4). If the Color cartridge light is on, install a new cartridge. |
| Nothing happens when you try to print (from docked camera) | ■ The camera is not properly seated on the connector. Reseat the camera on the printer dock (page 10).■ Re-establish the connection: remove, then reseat the camera on the printer dock.■ Make sure there is at least one picture in the camera's internal memory or memory card. |
| Nothing happens when you try to print (from Kodak card reader) | NOTE: The Kodak EasyShare printer dock series 3 is compatible with the Kodak 8-in-1 card reader and the Kodak 6-in-1 card reader (each sold separately). Other Kodak USB card readers may work with the printer dock; however, other manufacturers' card readers are not supported.■ Check the USB connections from the card reader to the printer dock (page 14).■ Re-establish the connection: disconnect, then reconnect the USB cable from the card reader to the printer dock.■ Make sure a memory card is inserted and that there is at least one picture on the memory card. |
| Nothing happens when you try to print (from PictBridge compatible device) | ■ Check the USB connections from the PictBridge compatible device to the printer dock (page 15).■ Re-establish the connection: disconnect, then reconnect the USB cable from the PictBridge compatible device to the printer dock.■ Make sure there is at least one picture in the PictBridge compatible device's internal memory or memory card. |
| Nothing happens when you try to print (from computer) | ■ Check the USB connections from the printer dock to the computer (page 23). ■ The computer may be transferring pictures. Wait a few seconds, then try to again. ■ Access the printer menu for your system. Remove check marks next to Pause Printing and Offline, if checked. ■ Close unnecessary software applications. Disconnect then reconnect the USB cable from the printer dock to the computer (page 23). ■ Make sure Kodak EasyShare software is installed (page 20). Install if necessary. If you choose Custom installation, make sure to install the printer driver. ■ Uninstall, then reinstall Kodak EasyShare software (page 20). ■ Make sure your computer meets the minimum system requirements (page 20). Upgrade your system if necessary. |
| Printing is slow | NOTE: When printing a large number of prints, printing may slow down to prevent the print head from overheating. ■ Make sure the printer dock is not placed in direct sunlight or is not operating in a high-temperature environment. ■ Make sure the cooling vents are not blocked or dirty (page 1). ■ Close unnecessary software applications. ■ Make sure your computer meets the minimum system requirements (page 20). Upgrade your system if necessary. |
| Unable to remove color cartridge (paper light may glow steady amber or blink) | IMPORTANT: The color cartridge may lock in place if there is a paper error. Do not attempt to remove the cartridge without first clearing the paper error. Make sure the Paper light is off before attempting to remove the cartridge (see Paper light under Printer dock status lights, page 41). ■ Check to see if the paper tray is empty or if paper is missing perforated tabs. Reload paper if necessary (page 6), then try again. ■ Make sure paper is not jammed. Clear the jam if necessary (page 34), then try again. ■ Disconnect then reconnect the power and try again. IMPORTANT: Upon reconnecting the power, the color cartridge may advance to the next picture slot on the ribbon, resulting in a supply mismatch (see below). |
| Paper runs out before the color cartridge (or vice versa) | ■ Supply mismatch can result from several different situations, including: —Scrapping of paper as a result of jams or other errors —Gradual advancement of the color cartridge ribbon as a result of removing ribbon slack or clearing jams —Advancement of the color cartridge ribbon upon reconnecting power to unlock the color cartridge Supply mismatch is likely to occur as you continue to use your printer dock. If you wish to keep your cartridge and paper supply synchronized, discard unused cartridge or paper when one or the other is fully depleted. |
Transfer/communication problems
| If... | Try one or more of the following |
| Nothing happens when you try to transfer pictures to the computer | ■ Press the Transfer button, on the printer dock. ■ Check the power and USB connections from the printer dock to the computer (page 23). ■ If you are trying to transfer pictures from a docked camera, make sure to disconnect the optional USB card reader first (page 24). ■ The camera is not properly seated on connector. Reseat the camera on the printer dock (page 10). ■ If you are trying to transfer pictures from a compatible Kodak card reader (page 25) and a camera is docked, remove it. Check the USB connections between the printer dock and the card reader or device. NOTE: The Kodak EasyShare printer dock series 3 is compatible with the Kodak 8-in-1 card reader and the Kodak 6-in-1 card reader (each sold separately). Other Kodak USB card readers may work with the printer dock; however, other manufacturers' card readers are not supported. ■ Close unnecessary software applications, and minimize remaining application windows. Follow any messages on the screen that may have been hidden by other windows. ■ Disconnect then reconnect the USB cable from the printer dock to the computer (page 23). ■ Make sure Kodak EasyShare software is installed (page 20). Install if necessary. If you choose Custom installation, make sure to install the printer driver. ■ Uninstall, then reinstall Kodak EasyShare software (page 20). ■ Make sure your computer meets the minimum system requirements (page 20). Upgrade your system if necessary. |
Printer dock status lights
| Color cartridge light | ||
| Light status | Cause | Action/solution |
| IMPORTANT: The color cartridge may lock in place if there is a paper error. Do not attempt to remove the cartridge without first clearing the paper error. Make sure the Paper light is off before attempting to remove the cartridge (see Paper light). | ||
| Light is off | The color cartridge is properly installed and is working normally. | None required. |
| Light blinks amber | Slow blink (for several seconds): the color cartridge is nearly depleted. | None required. |
| Fast blink: there is a color cartridge jam | Clear the jam (page 34), then press □. | |
| Light glows steady amber | The color cartridge is depleted. | Install a new color cartridge (page 4), then press □. |
| The color cartridge is not installed or is not fully seated. | Remove and re-install the color cartridge (page 4), then press □. | |
| Paper light | ||
| Light status | Cause | Action/solution |
| IMPORTANT: The color cartridge may lock in place if there is a paper error. Do not attempt to remove the cartridge without first clearing the paper error.Make sure the Paper light is off before attempting to remove the cartridge. | ||
| Light is off | The paper tray is properly installed and has an ample supply of paper. | None required. |
| Light blinks amber | There is a paper jam. | Clear the jam (page 34), then press☐. |
| Printing stopped during mid-print; the paper may be damaged or is missing removable tabs (page 35). | Remove loose paper. Check the paper supply. Reload with new paper if necessary, then press☐. | |
| Light glows steady amber | The paper tray is empty. | Load paper (page 6), then press☐. |
| The paper tray is not installed or is improperly installed. | Remove the paper tray, check that paper is properly loaded, and re-install (page 7). Press ☐ to resume printing. | |
| Paper did not feed; removable tabs may be missing or sheets may be stuck together (page 33). | Check the paper supply. Reload with new paper if necessary, then press☐. | |
| The paper feed roller may be dirty. | Clean the paper feed roller (page 31). | |
| Battery charging lights | ||
| Light status | Cause | Action/solution |
| All lights are off | The camera may not be properly seated on connector. | Reseat the camera on the printer dock (page 10). |
| The camera is turned on. | Turn off the camera. | |
| An unrecognized battery type is installed, or camera does not support charging. | Install a Kodak EasyShare Ni-MH rechargeable battery pack or Kodak EasyShare Li-Ion rechargeable battery (page 8). See your camera user's guide for other charging options. | |
| One steady green light | The camera was just placed in camera dock. | None; dock is checking the charge status of the battery. |
| Ascending steady green lights | The battery is charging. Charging is complete when all three lights are lit. | Leave the camera on the dock to continue charging or maintain charge. |
| One blinking red light | The battery is not properly installed. | Re-install the battery. |
| The battery or connector pin is damaged. | Check for damage. | |
| The camera and battery have been exposed to extreme temperatures. | Slowly return the camera and battery to room temperature. | |
| Descending blinking green lights | The Ni-MH battery pack refresh cycle in progress: discharging (lights turn off as discharging progresses). | Leave the camera on the dock to continue refresh cycle (page 11). |
| Print button/light | ||
| Light status | Cause | Action/solution |
| Light glows steady green | The printer dock is ready for printing. | None required. |
| Light blinks green | The printer dock is printing. | |
| Light is off | There are no pictures in the camera or on the card. | None required. To enable Print: 1 Take pictures. 2 Dock the camera, or connect a compatible Kodak card reader (page 14). If using a card reader, make sure a memory card is inserted. |
| The camera is not docked or a compatible Kodak card reader is not connected. | ||
| The camera is not properly seated on the connector. | Reseat the camera on the printer dock (page 10). | |
| The camera or card reader is transferring pictures to the computer, or has established an active connection to the computer. | None required. When transfer is complete, press the blinking Transfer button, | |
| A PictBridge compatible device is connected. | None required. The Print button is disabled; print command is controlled from the PictBridge compatible device. To print from another source, unplug the PictBridge compatible device. | |
| Picture Size lights | ||
| Light status | Cause | Action/solution |
| One light glows steady green | The indicated picture size is available and selected. | None required. To change picture size, press the Picture Size button repeatedly. |
| All lights are off | There are no pictures in the camera, on the card, or on the PictBridge compatible device. | To enable the picture size option: 1 Take pictures. 2 Dock the camera or connect a compatible Kodak card reader or PictBridge compatible device is not connected, or a memory card is not inserted. |
| The camera is not docked, a compatible Kodak card reader or PictBridge compatible device is not connected, or a memory card is not inserted. | ||
| The camera is not properly seated on the connector. | Reseat the camera on the printer dock (page 10). | |
| The camera or card reader is transferring pictures to the computer, or has established an active connection to the computer. | None required. | |
| Transfer button/light | ||
| Light status | Cause | Action/solution |
| Light glows steady green | The printer dock is ready for transferring pictures. | None required. |
| Light blinks green | Pictures are being transferred to the computer. | None required. After transferring pictures, the transfer light continues to blink green until either the Transfer button is pressed again or the connection is no longer available. |
| Light is off | There are no pictures in the camera or on the memory card. | None required. To enable Transfer: 1 Connect printer dock to computer (page 23). 2 Take pictures. 3 Dock the camera, or connect a compatible Kodak card reader (page 14). If using a card reader, make sure a memory card is inserted. |
| The camera is not docked, a compatible Kodak card reader is not connected, or a memory card is not inserted. | ||
| The printer dock is not connected to the computer. | ||
| The camera is not properly seated on connector. | Reseat the camera on the printer dock (page 10). | |
| The printer dock is printing in standalone mode. | The Transfer button is disabled. | |
| The computer is off. | Turn on the computer. | |
Still having problems?
Visit www.kodak.com/go/support, or see Chapter 8, Getting help, or contact your camera manufacturer.
Helpful links
| Printer dock | Get support for your product (FAQs, troubleshooting information, etc.) | www.kodak.com/go/printerdocks |
| Purchase full range of digital camera and dock accessories. | www.kodak.com/go/accessories | |
| Download latest printer dock software, firmware and drivers | www.kodak.com/go/printerdockdownlo ads | |
| See online tutorials | www.kodak.com/go/howto | |
| Software | Get information on EasyShare software | www.kodak.com/go/easysharesw (or click the Help button in the EasyShare software) |
| Get help with the Windows operating system and working with digital pictures | www.kodak.com/go/pcbasics | |
| Other | Get support for Kodak docks, cameras, software, accessories, more | www.kodak.com/go/support |
| Get information on Kodak EasyShare printer docks | www.kodak.com/go/printerdocks | |
| Get information on Kodak inkjet products | www.kodak.com/go/inkjet | |
| Optimize your printer for truer, more vibrant colors | www.kodak.com/go/onetouch | |
| Register your printer dock | www.kodak.com/go/register |
Telephone customer support
If you have questions concerning the operation of the software or printer dock, you may speak with a customer support representative. Before you call, have the camera or dock connected to your computer. Be at your computer, and have the following information available:
Computer model, Operating system
Printer dock and camera serial numbers
Processor type and speed (MHz)
Version of Kodak EasyShare software
Amount of memory (MB) & free hard disk space
Exact error message you received
| Australia | 1800 147 701 | Greece | 00800 441 25605 | Spain | 91 749 76 53 |
| Austria | 0179 567 357 | Hong Kong | 800 901 514 | Sweden | 08 587 704 21 |
| Belgium | 02 713 14 45 | India | 91 22 617 5823 | Switzerland | 01 838 53 51 |
| Brazil | 0800 150000 | Italy | 02 696 33452 | Taiwan | 0800 096 868 |
| Canada | 1 800 465 6325 | Japan | 03 5540 9002 | Thailand | 001 800 631 0017 |
| China | 800 820 6027 | Korea | 00798 631 0024 | UK | 0870 243 0270 |
| Denmark | 3 848 71 30 | Netherlands | 020 346 9372 | US | 1 800 235 6325 |
| Indonesia | 001 803 631 0010 | New Zealand | 0800 440 786 | Outside US | 585 726 7260 |
| Ireland | 01 407 3054 | Norway | 23 16 21 33 | International Toll Line | +44 131 458 6714 |
| Finland | 0800 1 17056 | Philippines / Metro Manila | 1 800 1 888 9600 / 632 6369600 | International Toll Fax | +44 131 458 6962 |
| France | 01 55 1740 77 | Portugal | 021 415 4125 | ||
| Germany | 069 5007 0035 | Singapore | 800 6363 036 |
Visit: http://www.kodak.com/US/en/digital/contacts/DAllInternationalContacts.shtml
9 Appendix
Printer dock specifications
For more specifications, visit www.kodak.com/go/printerdocks.
| Printer dock specifications | |
| Printing process | Thermal dye transfer |
| Operating environment (for optimum picture quality) | Temperature: 50 to 95 °F (10 to 35 °C) Humidity: 10% to 86% RH |
| Power | Output: 24 V DC Input: 100 V to 120V AC @ 50/60 Hz, via AC power adapter (US and Canada only) 100 V to 240V AC @ 50/60 Hz, via AC power adapter (all other countries) Consumption while printing: 60 watts maximum |
| Print speed | Approximately 90 seconds for full 4 x 6 in. print NOTE: First print may take an additional 25 seconds when printing from camera. Print speed is dependent on picture size, number of continuous prints, and environmental conditions. |
| Size | Without paper tray: 5.28 x 7.40 x 3.27 in. (134 x 188 x 83 mm) |
| With paper tray: 12.17 x 7.40 x 3.27 in. (309 x 188 x 83 mm) | |
| Weight | Without paper tray: 33.5 oz (950 g) |
| With paper tray: 38.4 oz (1090 g) | |
| Print size | 4 x 6 in. (102 x 152 mm) |
| Paper size with perforated tabs | 4 x 7.25 in. (102 x 184 mm) |
| Picture resolution | 300 ppi, continuous tone |
Important safety instructions
Using this product
- Read and follow these instructions before using Kodak products. Always follow basic safety procedures.
The use of an accessory attachment that is not recommended by Kodak, such as an AC adapter, may cause fire, electric shock, or injury.

CAUTION:
Do not disassemble this product; there are no user-serviceable parts inside. Refer servicing to qualified service personnel. Do not expose this product to liquid, moisture, or extreme temperatures. Kodak AC adapters and battery chargers are intended for indoor use only. The use of controls, adjustments, or procedures other than those specified herein may result in exposure to shock and/or electrical or mechanical hazards.
Battery safety and handling

CAUTION:
When removing batteries, allow them to cool first; batteries may be hot.
- Read and follow all warnings and instructions supplied by the battery manufacturer.
Use only batteries that are approved for this product. - Keep batteries out of the reach of children.
- Do not allow batteries to touch metal objects, including coins. Otherwise, a battery may short circuit, discharge energy, become hot, or leak.
-
Do not disassemble, install backward, or expose batteries to liquid, moisture, fire, or extreme temperature.
-
Replace all batteries of a set at the same time. Do not mix new batteries with used ones. Do not mix rechargeable and non-rechargeable batteries. Do not mix lithium, Ni-MH, and Ni-Cd batteries together. Do not mix batteries of different chemistry types, grades, or brands. Failure to observe this precaution may cause leakage.
- Remove batteries when the product is stored for an extended period of time. In the unlikely event that battery fluid leaks inside the product, contact your local Kodak Customer Service representative.
In the unlikely event that battery fluid leaks onto your skin, wash immediately with water and contact your local health provider. For additional health-related information, contact your local Kodak Customer Service representative. - Dispose of batteries according to local and national regulations.
If the battery contacts touch metal objects, the battery may short-circuit, discharge energy, become hot, or leak.
Do not charge non-rechargeable batteries.
For more information on batteries, see www.kodak.com/global/en/service/batteries/batteryUsage.jhtml
Upgrading your software and firmware
Download the latest versions of the software included on the Kodak EasyShare software CD and the printer dock firmware (the software that runs on the printer dock). Visit www.kodak.com/go/printerdockdownloads.
Additional care and maintenance
-
Do not allow chemicals, such as suntan lotion, to come into contact with the painted surface of the printer dock.
If the printer dock has been subjected to inclement weather or you suspect water has gotten inside the printer dock, turn off the printer dock and remove the paper tray and color cartridge. Allow all components to air-dry for at least 24 hours before using the printer dock again. If this does not resolve the problem, contact customer support (see page 48). -
Connect a tripod directly to the camera; do not connect a tripod to the camera dock or printer dock.
Service agreements are available in some countries. Contact a dealer of Kodak products for more information.
The printer dock and the AC power adapter contain a small amount of lead in the circuit board. Disposal of this material may be regulated due to environmental considerations.
Disposal of the color cartridge is not regulated and should not be subject to state or local landfill, incineration, or recycling requirements.
For more disposal or recycling information, contact your local authorities. In the US, visit the Electronics Industry Alliance Web site at www.eiae.org.
Warranty
Limited Warranty
Kodak warrants Kodak digital cameras and accessories (excluding batteries) to be free from malfunctions and defects in both materials and workmanship for one year from the date of purchase.
Retain the original dated sales receipt. Proof of the date of purchase will be required with any request for warranty repair.
Limited warranty coverage
This limited warranty will be honored only within the geographical location that Kodak digital cameras and accessories were purchased.
Kodak will REPAIR or REPLACE Kodak digital cameras and accessories if they fail to function properly during the warranty period, subject to any conditions and/or limitations stated herein. Such repair service will include all labor as well as any necessary adjustments and/or replacement parts. Such repair or replacement is the sole remedy under this warranty.
If replacement parts are used in making repairs, these parts may be remanufactured, or may contain remanufactured materials. If it is necessary to replace the entire product, it may be replaced with a remanufactured product.
Limitations
Request for Warranty service will not be accepted without proof of date of purchase, such as a copy of the original dated Kodak digital camera or accessory sales receipt. (Always keep the original for your records.)
This warranty does not apply to the battery(s) used in digital cameras or accessories. This warranty does not cover circumstances beyond Kodak's control, nor problems caused by failure to follow the operating instructions in the Kodak digital cameras and accessories User's Guides.
This warranty does not apply when failure is due to shipping damage, accident, alteration, modification, unauthorized service, misuse, abuse, use with incompatible accessories or attachments, failure to follow Kodak's operation, maintenance or repacking instructions, failure to use items supplied by Kodak (such as adapters and cables), or claims made after the duration of this warranty.
Kodak makes no other express or implied warranty for this product. In the event that the exclusion of any implied warranty is ineffective under the law, the duration of the implied warranty will be one year from the purchase date.
The option of replacement is Kodak's only obligation. Kodak will not be responsible for any special, consequential or incidental damages resulting from the sale, purchase, or use of this product, regardless of the cause. Liability for any special, consequential or incidental damages (including but not limited to loss of revenue or profit, downtime costs, loss of the use of the equipment, cost of substitute equipment, facilities or services, or claims of your customers for such damages resulting from the purchase, use or failure of the product), regardless of cause or for breach of any written or implied warranty is expressly disclaimed and excluded herefrom.
Your rights
Some states or jurisdictions do not allow exclusion or limitation of incidental or consequential damages, so the above limitation or exclusion may not apply to you. Some states or jurisdictions do not allow limitations on how long an implied warranty lasts, so the above limitation may not apply to you.
This warranty gives you specific rights, and you may have other rights which vary from state to state or by jurisdiction.
Outside the United States and Canada
In countries other than the United States and Canada, the terms and conditions of this warranty may be different. Unless specific Kodak warranty is communicated to the purchaser in writing by a Kodak company, no warranty or liability exists beyond any minimum requirements imposed by law, even though defect, damage, or loss may be by negligence or other act.
Regulatory information
FCC compliance and advisory

Kodak EasyShare printer dock series 3
This equipment has been tested and found to comply with the limits for a Class B digital device, pursuant to Part 15 of the FCC Rules. These limits are designed to provide reasonable protection against harmful interference in a residential installation.
This equipment generates, uses, and can radiate radio frequency energy and, if not installed or used in accordance with the instructions, may cause harmful interference to radio communications. However, there is no guarantee that interference will not occur in a particular installation.
If this equipment does cause harmful interference to radio or television reception, which can be determined by turning the equipment off and on, the user is encouraged to try to correct the interference by one or more of the following measures: 1) reorient or relocate the receiving antenna; 2) increase the separation between the equipment and the receiver; 3) connect the equipment to an outlet on a circuit different from that to which the receiver is connected; 4) consult the dealer or an experienced radio/TV technician for additional suggestions.
Any changes or modifications not expressly approved by the party responsible for compliance could void the user's authority to operate the equipment. Where shielded interface cables have been provided with the product or specified additional components or accessories elsewhere defined to be used with the installation of the product, they must be used in order to ensure compliance with FCC regulation.
Canadian DOC statement
DOC Class B compliance—This Class B digital apparatus complies with Canadian ICES-003.
English translation:
This is a Class B product based on the standard of the Voluntary Control Council for Interference from Information Technology Equipment (VCCI). If this is used near a radio or television receiver in a domestic environment, it may cause radio interference. Install and use the equipment according to the instruction manual.
Index
A
AC power adapter & cord, connecting, 3
accessories & supplies, ordering, 47
B
battery
charging, 10
charging lights, i, 10, 11, 43
extending life, 9, 11
loading, 8
refreshing Ni-MH battery pack, 11
safety and handling, 50
types, 8
button
left/right control, i
picture size, i
print, i
refresh, i
transfer, i
C
cable
AC power adapter & cord, 3
USB, 14, 15, 23, 25
camera
battery, loading, 8
connector, i
docking and charging, 10
preparing for use with printer dock, 8
printing from, 13
setting picture quality, 12
tagging pictures for printing, 12
transferring pictures from, 24
Canadian compliance, 55
canceling printing, 19, 29
card reader. See Kodak card reader
care & maintenance
general, 30
handling, storing cartridge, 3
handling, storing paper, 5
paper feed roller, 31
tips, 51
traveling with printer dock, 32
cartridge. See color cartridge
charging
camera battery, 10
lights, battery, i, 10, 11, 43
color cartridge
door, ii, 4
handling, storing, 3
installing, removing, 4
light,i,41
color, automatic correction, 28
computer
connecting printer dock, 23
installing software, 20
printing from, 26
system requirements, 20
transferring pictures to, 24, 25
uninstalling software, 22
connecting
Kodak card reader, 14, 25
PictBridge compatible device, 15
power,3
connector
camera, i
power (DC-in), ii, 3
USB (from device), i, 14, 15, 25
USB (to computer), ii, 23
cooling vents, ii
copies, selecting number of, 12, 13, 16
customer support, 48
DC-in, power connector, ii, 3
disposal and recycling of batteries, 50 of printer dock, 51
docking and charging the camera, 10
door cartridge, ii, 4 paper tray, i, 7
E EasyShare software. See Kodak EasyShare software
F FCC compliance, 54 firmware, upgrading, 47, 51
H
help software,47 telephone support, 48 troubleshooting,33 web links,47
ImageLink print system, 10
insert, custom camera, 2
installing
battery, 8
custom camera insert, 2
paper tray, 7
software, 20
Japanese compliance, 55
K
Kodak card reader printing from, 14 transferring pictures from, 25
Kodak EasyShare software help, 47 installing, 20 printing with, 26 uninstalling, 22
Kodak web sites, 47
L
layout. See picture size
left/right control, i
lights
battery charging, i, 11, 43
color cartridge, i, 41
paper, i, 42
picture size, i, 45
print,i,44,46
status, 41
transfer, i
M
Macintosh OS
installing software on, 20
system requirements, 20
uninstalling software, 22
maintenance
general, 30
handling, storing cartridge, 3
handling, storing paper, 5
paper feed roller, 31
tips, 51
multi-up. See picture size
P
paper
feed roller, cleaning, 31
handling, storing, 5, 19
light, i, 42
loading, 6
removing perforated tabs, 19
slot, ii
paper tray, i
door, i
installing, removing, 7
PictBridge compatible device, printing from, 15
picture size
and number of copies, 16
button, i
changing default, 16
lights, i, 45
printing different pictures on same sheet, 17
printing different sizes/outputs, 16
printing duplicate pictures on same sheet, 18
pictures
automatic color correction of, 28
printing different pictures on same sheet, 17
printing duplicate pictures on same sheet, 18
printing from Kodak card reader, 14
printing from PictBridge compatible device, 15
printing tagged, 15
reviewing on camera, 13, 18
selecting number of copies, 12, 13, 16
setting quality, 12
tagging for automatic printing, 12
transferring from camera, 24
transferring from Kodak card reader, 25
power
ACadapter&cord,3
connecting, 3
connector (DC-in), ii, 3
print button/light, i, 44
print order
bypassing, 15
creating on camera (tagging pictures), 12
printing, 15
printer driver
installing, 20
updating, 47, 51
printing
canceling, 19, 29
from a computer, 26
from applications, 27
from docked camera, 13
from Kodak card reader, 14
from PictBridge compatible device, 15
print order, 15
problems, 33
tagged pictures from computer, 27
tagging pictures for, 12
with Kodak EasyShare software, 26
Q
quality setting on camera, 12
R
recharging. See charging
recycling and disposal
of batteries, 50
of printer dock, 51
refresh
button,i,11
of Ni-MH rechargeable battery
pack, 11
regulatory information
Canadian compliance, 55
FCC compliance, 54
VCCI compliance, 55
requirements, system, 20
reviewing pictures on camera, 13, 18
S
safety, 50
service and support, 48
setup
color cartridge, 4
custom camera insert, 2
loading paper, 6
location for printer dock, 1
paper tray, 7
slot, paper path, ii
software
help, 47
installing, 20
KodakEasyShare,printingwith,26
printing from applications, 27
system requirements, 20
uninstalling, 22
upgrading, 47, 51
specifications, 49
status lights, 41
supplies & accessories, ordering, 47
support,technical,48
system requirements, computer, 20
T
tagging pictures for printing, 12
telephone support, 48
transfer button/light,i,46
transferring pictures
from camera to computer, 24
from Kodak card reader, 25
problems, 40
traveling with printer dock, 32
tray, paper. See paper tray
troubleshooting
printing problems, 33
status lights, 41
transferring pictures, 40
U
uninstalling software, 22
upgrading software & firmware, 47, 51
URLs, Kodak web sites, 47
USB
cable, 14, 15, 23, 25
connector (from device), i, 14, 15, 25
connector (to computer), ii, 23
V
VCCI compliance, 55
vents, cooling, ii
W
warranty, 52
Windows OS
installing software on, 20
system requirements, 20
uninstalling software, 22