KH 3162 PNEUMATIC HAMMER DRILL - Pneumatic hammer drill PARKSIDE - Free user manual and instructions
Find the device manual for free KH 3162 PNEUMATIC HAMMER DRILL PARKSIDE in PDF.
Download the instructions for your Pneumatic hammer drill in PDF format for free! Find your manual KH 3162 PNEUMATIC HAMMER DRILL - PARKSIDE and take your electronic device back in hand. On this page are published all the documents necessary for the use of your device. KH 3162 PNEUMATIC HAMMER DRILL by PARKSIDE.
USER MANUAL KH 3162 PNEUMATIC HAMMER DRILL PARKSIDE
me | il] Operation and Safety Notes Operation and Safety Notes …
Content D) | 2 rein. nf te page conaning te ilsratons Ë and familiarise yoursel with all functions of the deuice, 1 dfamil M with al functions of the dé ‘The following icons/symbols are used in this instruction manual: Read instruction manual! V- Voltage VAN Observe caution and safety notes! W Watt (performance) Caution — electric shock! Dangerous ®© ver protection, safety goggles, electric current - danger to ifel Q® rar dus [C=| Protection category power tool LA Rated idle running speed Introduction For your safety. . Page 6 Intended Use... Page 6 Equipment . Page 6 Scope of Del . Page 6 Technical Informatior . Page 6 General Safety Notices Workplace safety. Page 7 Electrical safety … Page 7 Safety of personnel... Page 7 Service Page 8 Original ancillaries / accessories. Page 8 . Page 8 Page 8 Safet, Safety Information Specific to this Device... Page 9 Using the Device Operation. .Page 9 Assembling the Additional Handgrip. Page 9 Inserting/Removing Tools... Page 9 Rôhm quick action chuck for Selecting the Function with the Function Selector Switch Switching on and off... Selecting the Angle of Rotation Pre-selecting the Speed. Overload Clutch Page 9 Page 10 Page 10 Page 10 Page 11 Page 11 Bit Stop. . Page 11 Maintenance and Cleaning.…………… Page 11 Disposal………. Page 11 Information Service … Page 12 Declaration of conformity/Producer . Page 12
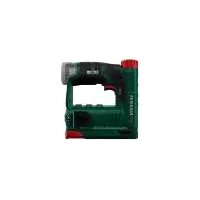
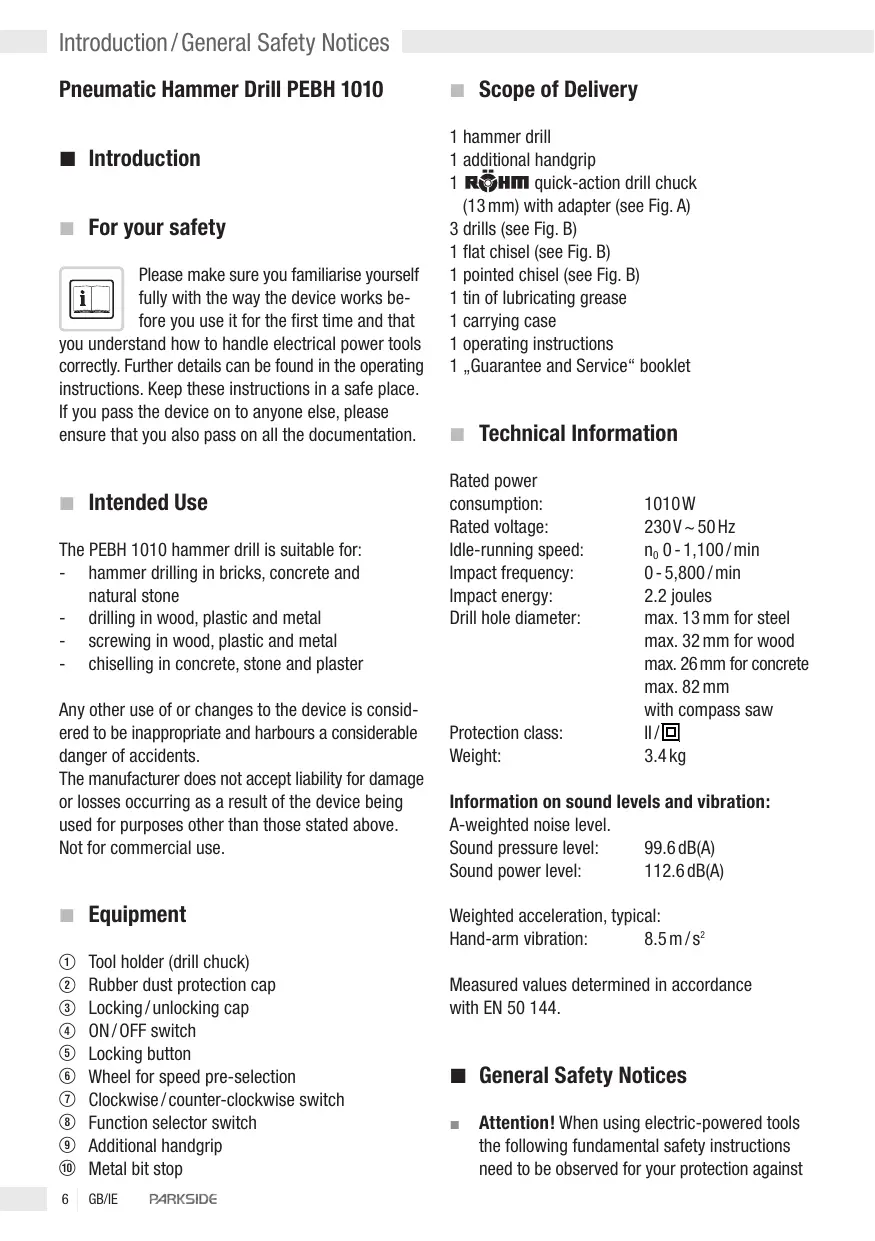
Introduction / General Safety Notices Pneumatic Hammer Drill PEBH 1010 = Introduction For your safety _ Please make sure you familiarise yourself ER fully with the way the device works be- fore you use it for the first time and that you understand how to handle electrical power tools correctiy. Further details can be found in the operating instructions. Keep these instructions in a safe place. If you pass the device on to anyone else, please ensure that you also pass on all the documentation. Intended Use The PEBH 1010 hammer drill is suitable for: - hammer drilling in bricks, concrete and natural stone - drilling in wood, plastic and metal -_ Screwing in wood, plastic and metal -_ chiselling in concrete, stone and plaster Any other use of or changes to the device is consid- ered to be inappropriate and harbours a considerable danger of accidents. The manufacturer does not accept liability for damage or losses occurring as a result of the device being used for purposes other than those stated above Not for commercial use. Equipment Tool holder (drill chuck) Rubber dust protection cap Locking/unlocking cap ON/OFF switch Locking button Wheel for speed pre-selection Clockwise/counter-clockwise switch Function selector switch Additional handgrip Metal bit stop GBIE
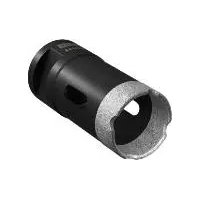
PARKSIDE Scope of Delivery À hammer drill 1 additional handgrip 4 RH quick-action drill chuck (13mm) with adapter (see Fig. A) 3 drills (see Fig. B) 1 flat chisel (see Fig. B) 1 pointed chisel (see Fig. B) 1 tin of lubricating grease À carrying case 1 operating instructions 1 ,Guarantee and Service“ booklet Technical Information Rated power consumption: 1010W Rated voltage: 230V-50Hz Idie-running speed: n0-1,100/min Impact frequency: 0-5,800/min Impact energy: 2.2 joules max. 13 mm for steel max. 32 mm for wood max. 26 mm for concrete Drill hole diameter: max. 82 mm With compass saw Protection class: 1/7 Weight: 3.4kg Information on sound levels and vibration: A-weighted noise level. Sound pressure level: Sound power level:
112.6dB{A) Weighted acceleration, typical: Hand-arm vibration: 8.5m/s Measured values determined in accordance with EN 50 144. & General Safety Notices = Attention! When using electric-powered tools the following fundamental safety instructions need to be observed for your protection against
electric shock, personal injury and the danger of fire. Read and take note of these operating instruc- tions and the safety advice contained therein before using the appliance, and preserve them for future reference. Non-observance of the following instructions could cause an electric shock, fire and/or serious personal injury. Workplace safety Keep your working area clean and tidy. Disorderty and dark working areas can lead to accidents. Do not work with the appliance in areas subject to the danger of explosions, in which flammable liquids, gases or dusts are located. Electrical tools produce sparks which could ignite the dust or the vapours. Wa Keep children and other third parties | at a distance when using electrical tools. If distracted, you could lose the control over the appliance. Electrical safety EN Avoid mortal danger through electric shock: The power plug of the appliance must fit cor- rectly into the wall socket. The plug may not be altered in any way. DO NOT use adapter plugs together with earthing-protected appliances. Non-modified plugs and appropriate wall sockets reduce the risk of electric shock. Avoid physical contact with earthed surfaces, such as pipes, heating elements, cookers and refrigerators. There is an increased risk of electric shock if your body is earthed. Protect the appliance from rain and moisture. The permeation of water into an electrical appli- ance increases the risk of an electric shock. Do not misuse the power cable, e.g. to carry the appliance, to hang it up or for pulling the plug General Safety Notices from the wall socket. Keep the cable away from heat, oil, sharp edges and moving appliance components. Damaged or tangled power cables or plugs increase the risk of an electric shock. ; Damaged appliances, power cables and power plugs mean mortal danger 3e from electric shock. Regularly check the condition of the appliance, power cable, power plug, if need be the charger and the battery pack. Regularly check the connection cables of electrical appliances and, in the event of damage being discovered, arrange for them to be repaired or renewed by a recognised specialist. When working outdoors, use only extension cables which are certified for use outdoors. The use of an extension cable suitable for employ- ment outdoors reduces the risk of receiving an electrical shock. Do not take appliances into use that have damaged components. In a case of emergency, immediately disconnect the power supply. Warning! - NEVER open the appliance. Arrange for repair or component exchange work to be carried out only by the Service Centre or qualified electricians. Safety of personnel Always be alert and be aware of what you are doing. Use lots of common sense when working with electrical appliances. DO NOT use such appliances when you are unconcentrated or tired, or under the influence of drugs, alcohol or medications. Simply a few moments of inat- tention in the use of an electrical appliance can lead to serious personal injuries. @ ©) Wear personal protective clothing and, © @ always, protective glasses. The wearing of personal protective clothing such as dust masks, antislip safety shoes, protective gloves, hard helmet and hearing protection can, depending on the use of the electrical appliance, reduce the risk of injuries. Avoid unintentional starting of the appliance. Ensure that the switch is in the "OFF" position before inserting the plug into a wall socket. lf PARKSIDE GBA 7
General Safety Notices
you carry the appliance with your finger on the ON/OFF switch or connect the appliance to the mains supply whilst it is switched on, this can lead to serious accidents. Remove all adjustment tools or screwdrivers before switching the appliance on. A tool or key in a spinning appliance component can cause serious injuries. Do not overrate yourself. Ensure you have a secure positioning and are in balance at all times. You can thus control the appliance so much better, especially in unexpected situations. Wear suitable clothing. Do not wear loose clothing or jewelery. Keep your hair, clothing and gloves away from moving components. Wear a hair net if you have long hair. Loose and hanging clothing, jewellery and hair can become caught up in fast rotating appliance components. Use dust collecting equipments if these can be assembled onto the appliance. Take note thereby that the dust collecting equipment must be suit- able for this particular operation. The correct application of these equipments reduces the dangers originating from dust. When working with electrical appliances that have a dustsack, or can be connected with such a facility by means of a dust suction an-cillary, there is a danger of fire! Under unfavourable conditions, such as for example flying sparks, grinding of metal or metal remnants in wood, the wood dust in the dust sack (or in the filter sack of a vacuum suction device) can ignite itself. This can happen especially if the wood dust has paint particles on it or is mixed with other chemical substances and the grinded material is hot after extensive working. You should there- fore avoid an overheating of grinding products and of the appliance, and always empty the dust sack or the filter sack of the vacuum suction device before work pauses. Secure the workpiece firmly. Use clamps or a vice to firmly hold the workpiece. Thus it is held safer than with your hand. GBIE PARKSIDE Service Arrange for your appliance to be repaired only by qualified specialists and only with original spare parts. lt can thus be ensured that the safety of the appliance is assured Always arrange for the exchange of the plug or the power cable to be carried out by the manu- facturer of the appliance or by his approved cus- tomer services. can thus be ensured that the safety of the appliance is assured Original ancillaries / accessories Use only the ancillaries and accessories that are detailed in the operating instructions. The use of ancillaries and accessories other than those recommended in the operating instructions could lead to an increased risk of personal injury for you. Attention - Service lines! Warning! Take steps to ensure that you do not hit upon any service lines (electricity, gas, water) when working with electrical appliances. Check, if need be with a service line detector, before you start to cut or bore into a surface. Understood everything? When you have become familiar with these gen- eral safety instruction for electrical appliances, and, with the help of the appropriate operating instructions, know all about the functions and handling of your electrical appliance, then you can start working with it. You will work at your safest only with careful at- tention to all of the declaration and instructions of the manufacturer.
m Safety À Safety Information Specific to this Device = For safety reasons this device may only be used with the additional handgrip ©. = When working with this device, hold it tightly with both hands at all times. Ensure that you are Standing in a stable position. = Caution: Please ensure that the ventilation slits are not covered during operation. Do not insert any objects into the ventilation slits. = Using the Device Operation Note the mains voltage! The voltage of the mains socket must match that shown on the rating plate on the device (Devices marked with 230V- can also be operated at 220V-). Assembling the Additional Handgrip For safety reasons this device may only be used when the additional handgrip © is correctly assembled (see also Fig. D, E). Attach the additional handgrip © to the spindle neck and turn it in an anticlockwise direction until it is tight. Inserting/Removing Tools Inserting a Tool Before inserting the tool, apply a small amount of grease to the tool holder ©. In order to insert the tool, pull the locking/un- locking cap ® to the rear and insert the tool. Release the locking/unlocking cap ©. This locks the tool holder in place. Safety/Using the Device Pull the tool to ensure that it is firmly locked in place. The tool has some radial play inherent in the system. Removing a Tool In order to remove the tool, pull the locking/ unlocking cap ® to the rear. R@Hm quick action chuck for round-shank drills À Caution! Do not use the round-shank drill for hammer drilling or chiselling work! Inserting the RÔHM Quick-Action Drill Chuck for Round-Shank Drills To insert the additional drill chuck for round shank drills (see also Fig. A), pull the locking/ unlocking cap ® towards the rear and insert the additional drill chuck. Release the locking/unlocking cap @). This locks the tool holder in place. Pull the tool to ensure that it is firmly locked in place. Removing the RÜHM Quick-Action Drill Chuck for Round-Shank Drills In order to remove the additional drill chuck, pull the locking/unlocking cap © towards the rear and take out the additional drill chuck. Inserting Tools À Caution! Before making any modifications to the device ensure that it is switched off and that the mains plug has been removed from the socket. The RÜHM quick-action drill chuck allows you to change the tool quickly without any additional implements. Releasing the tool holder and inserting a tool Hold the rear sleeve of the quick-action drill chuck tightly and turn the front sleeve until it is wide enough for the tool (e.g. round-shank drill) to be inserted. Then insert the tool. PARKSIDE GBAE 9
Using the Device Clamping the Tool Hold the rear sleeve of the quick-action drill chuck tightiy and turn the front sleeve forcefully until you hear a repeated clicking noise. The drill chuck is now locked in place. The lock can be released again by tuning the front sleeve in the opposite direction. Using Assembly Tools for Screws and Nuts Use an appropriate bit holder if you would like to use screwdriver inserts/bits for screwing. You should only use inserts/bits which fit the screw head. Turn the function selector switch ® to the drill symbol 2. Selecting the Function with the Function Selector Switch changed when the device is switched off, as otherwise it may be damaged. Depending on the intended use, you can select between four functions by turning the function selector switch @). Note: The function must only be Turn the function selector switch ® so that the desired symbol locks into place next to the arrow mark. The functions are marked as follows: Function Symbol
Chiselling T Chisel position adjustment 10 GBIE PARKSIDE Adjusting the Chisel Position a. This function makes chiselling work con- { *_ siderably easier by the setting of individual a angle positions for the chisel. This enables you to turn the tool for the chiselling work (see also Fig. C, D) to the required position. Turn the function selector switch © to the position @. Turn the tool in the tool holder © to the required position. For the chiselling work turn the function selector switch © to the position T. Switching on and off When operating the hammer drill you can choose between temporary and permanent operation. Use the temporary operation for small jobs and permanent operation for long jobs. Your desired setting is operated as follows: Switching on temporary operation: Press the ON/OFF switch @). Switching off temporary operation: Release the ON/OFF switch @. Switching on permanent operation: Press the ON/OFF switch © and lock it in the on position by means of the locking button ©. Switching off permanent operation: Press the ON/OFF switch © and release it again. Selecting the Angle of Rotation Note: Use/adjustment of the clockwise /counter- clockwise switch © is only permitted with the device standing still When switched to counter-clockwise rotation the device automatically runs at a reduced speed.
Using the Device / Maintenance and Cleaning/Disposal Pre-selecting the Speed With the wheel on the speed pre-selector © you can pre-select the operating speed to your individual requirements. If a low speed has been pre-selected, the ON/OFF switch © is automatically restricted in the extent to which it can be pulled back (due to the reduced speed of rotation). Recommended speed ranges (non-binding; if necessary, you should determine the correct setting by a practical test): - High-speed: for hammer drilling in concrete or stone and for chiselling - Medium speed: for drilling into steel or wood - Low speed: for screwing Low speed/high speed: Turn the wheel for speed pre-selection ®). The ON/OFF switch © has a variable speed control. By pressing the switch you can increase the speed continuously. Overload Clutch For your safety the PEBH 1010 hammer drill is fitted with an overload clutch. This ensures that the drive is automatically interrupted if the drilling tool becomes jammed, thereby considerably reducing the risks when working. Nevertheless, you should always ensure that you stand in a stable position, hold the hammer drill tightly with both hands and always use the additional handgrip ©. Bit Stop With the help of the bit stop @ you can adjust the drilling depth and therefore carry out accurate drilling. Define the required drilling depth by moving the bit stop 6. m Maintenance and Cleaning = Warning! Before carrying out any work on the drill you should always remove the plug from the socket! = Noliquids must be allowed to enter the hammer drill. Clean the hammer drill regularly, preferably always immediately after finishing your work. Please use a dry cloth for cleaning the housing. Under no circumstances should you use petrol, solvent or cleaning agents which might attack the plastic. Clean the tool holder © regularly. To do so, pull the locking/unlocking cap © towards the rear and lever off the rubber dust protection cap @). Release the locking/unlock- ing cap © slowly. Caution! This is pre-stressed! Clean the components with a brush and apply a small amount of grease to them. Æ Disposal The packaging is made entirely of recyclable Ô materials, which you may dispose of at local recycling facilities. = : Do not dispose of electrical appliances = in household waste. In accordance with European Directive 2002/96/EC on used electrical and electronic appliances and its implementation in national law, used power tools must be collected separately and recycled in an ecologically compatible manner. Information on options for disposing of electrical appliances after their useful life can be obtained from your local or city council. PARKSIDE GBA 11
Information ΠInformation Service Details of the Service Centre responsible for your region are shown in the warranty documents. Declaration of conformity/ Producer CE We, KompernaB GmbH, Burgstr. 21, D-44867 Bochum, Germany, hereby declare that this product complies with the following EU directives: Machinery Directive (89/392/EEG), (91/368/EEG), (93/44/EEG), (93/68/EEG) EU Low Voltage Directive (73/23/EEG), (93/68/EEG): EN 50144-1:1998, EN 50144-2-6:1996 Electromagnetic Compa (92/31 /EEG), (93/68/EE1 EN 55014-1:1993+A1+A2, EN 61000-3-2:1995+A1+A2, EN 61000-3-3:1995, EN 55014-2:1997 (89/336/EEG), Device Type/ Designation: Parkside Pneumatic Hammer Drill PEBH 1010 Bochum, 31.10.2006 Hop Hans KompernaB - Managing Director - We reserve the right to make technical modifications in the course of further development. 12 GBIE PARKSIDE