E70YTE - Hair clippers BABYLISS - Free user manual and instructions
Find the device manual for free E70YTE BABYLISS in PDF.
| Product type | Hair clipper |
| Brand | BABYLISS |
| Model | E70YTE |
| Cutting guides | 2 guides (1.2 and 1) for 22 lengths: from 3 to 18 mm and from 21 to 36 mm, 1.5 mm steps |
| Precision guide | 1 guide, 5 positions: from 0.5 to 2.5 mm |
| Blade technology | Moving blade: 3D sharpening by electrochemistry; fixed blade: titanium coating |
| Turbo function | Yes, TURBO button for increased power |
| Power supply | Mains and rechargeable Ni-MH battery |
| Runtime | 30 minutes after full charge |
| Charging time | 16 hours for first use, then every 3 months |
| Cutting height adjustment | Adjustment wheel with 1.5 mm steps |
| Height display | Yes, on the right and left sides |
| Height maintenance system | SMART ADJUSTING SYSTEM: height maintained regardless of angle |
| Removable blades | Yes, for easy cleaning |
| Self-lubricating blades | Yes, with oil reservoir pad |
| Included accessories | Cleaning brush, comb, transformer |
| Mains use | Possible after 1 minute of connection |
| Specific transformer | Ref. E702XTE/E702YTE, 3.0V - 1000mA |
| Maintenance | Clean blades with brush, oil periodically |
| Safety | Use only the supplied transformer |
| Spare parts available | Replacement blades, BaByliss oil |
Frequently Asked Questions - E70YTE BABYLISS
User questions about E70YTE BABYLISS
0 question about this device. Answer the ones you know or ask your own.
Ask a new question about this device
Download the instructions for your Hair clippers in PDF format for free! Find your manual E70YTE - BABYLISS and take your electronic device back in hand. On this page are published all the documents necessary for the use of your device. E70YTE by BABYLISS.
USER MANUAL E70YTE BABYLISS
1.2 cutting guides for 22 lenghts (from 3 to 18mm and from 21 to 36mm , in 1.5mm steps)
2.1 precision guide 5 positions (0.5 to 2.5mm
3. Blades:
Moveable blade:
- Sharpened using 3D etching process: for an exceptionally sharp cutting edge.
Fixed Blade:
Titanium coating: for longer life.
These two technologies provide perfect surface condition and their combination is optimal for reducing the friction coefficient.
- Turbo function
- ON/OFF switch
- Cutting length control knob
- Lateral display of selected length
- Charging indicator light
- Plug for use on the mains and for charging
- Cleaning brush and comb
IMPORTANT INFORMATION
REGARDING THE NI-MH BATTERIES OF THIS UNIT
To obtain and maintain the longest battery autonomy possible, allow it to charge for 16 hours before using it for the first time and then approximately every three months. Full
autonomy of the unit will only be obtained after three complete recharge cycles.
CHARGING THE CLIPPER
Before using the clipper for the first time, allow it to charge for 16 hours.
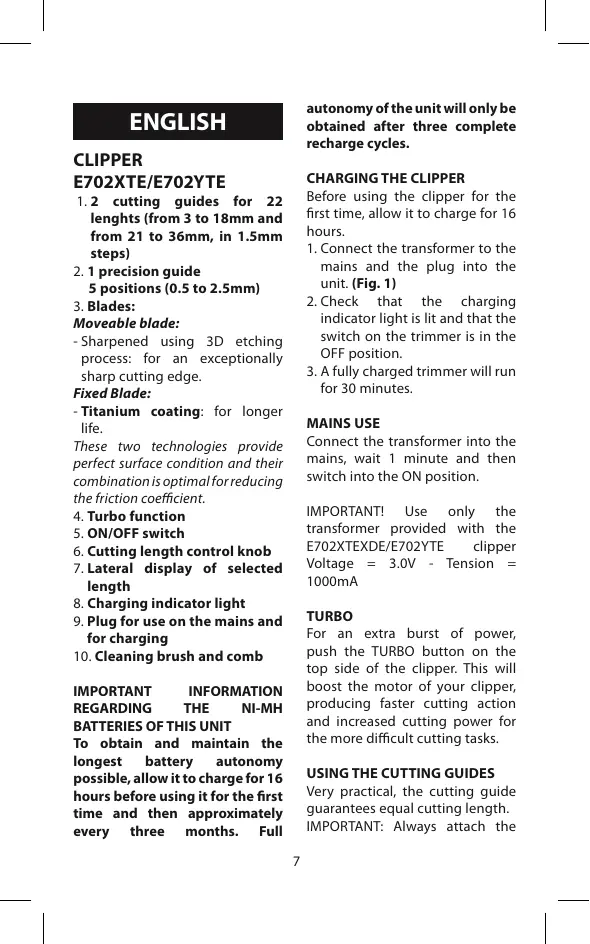
- Connect the transformer to the mains and the plug into the unit. (Fig. 1)
- Check that the charging indicator light is lit and that the switch on the trimmer is in the OFF position.
- A fully charged trimmer will run for 30 minutes.
MAINS USE
Connect the transformer into the mains, wait 1 minute and then switch into the ON position.
IMPORTANT! Use only the transformer provided with the E702XTEXDE/E702YTE clipper Voltage = 3.0V - Tension = 1000mA
TURBO
For an extra burst of power, push the TURBO button on the top side of the clipper. This will boost the motor of your clipper, producing faster cutting action and increased cutting power for the more difficult cutting tasks.
USING THE CUTTING GUIDES
Very practical, the cutting guide guarantees equal cutting length.
IMPORTANT: Always attach the
cutting guide BEFORE turning the trimmer on, and turn it off before changing the guide.
To attach the cutting guide, first adjust the cutting length to 3mm or 21mm and place it on the support guide adjusting first both sides and then pushing on the bottom of the guide until you hear a 'click' (Fig. 2)
To remove the cutting guide, first adjust the cutting length to 3mm or 21mm and push the guide out of the support lifting it up with your thumb. (Fig. 3)
NOTE: The precision guide must be placed like the cutting guides but it is adjusted manually and independently of the grooved wheel.
TURNING ON AND USING
To adjust the clipper's cutting length, turn the grooved wheel (6) up or down.
The selected length is displayed on the right or left side of the clipper.
Switch the ON/OFF button.
You can change the cutting length at any time.
Thanks to the SMART ADJUSTING SYSTEM, the length of the cut is maintained even if the angle of the clipper varies, so it guarantees precise result.
CUTTING TECHNIQUES AND ADVICE FROM THE EXPERTS
- Use the clipper on clean, dry hair.
- To familiarize yourself with the clipper, begin with the cutting guide for a longer cut, then, if you want a shorter cut, adjust it by pushing the knob. You will soon know the lengths of each guide and each position.
Always move the clipper against the direction of hair growth. - Begin at the nape. Place the guide on the scalp and move the clipper toward the crown of your head. Move your clipper slowly, pointing the teeth of the guide slightly upward. Keep the clipper in contact with your head at all times. (Fig. 4)
- For the crown of the head, move from front to back, that is, from your forehead to the crown of your head.
- For the finishing touches, that is, around the nape and sideburns, use the clipper without a cutting guide. Turn your clipper over and move it from top to bottom. (Fig. 5)
- If you want a length greater than 30mm , or if you are experienced, you can create 'comb' or 'finger' cuts:
-Work without a cutting guide. - Take up a small section of hair with a comb or in your fingers.
-
Move the comb or your fingers along the section of hair to the desired length.
-
Cut your hair along the comb or your fingers.
- Remove the cut hair using a comb and check the evenness of the cut regularly. (Fig. 6)
MAINTENANCE
Remove the cutting guide after each use.
Cleaning the clipper blades regularly will maintain their optimal performance.
Removable blades
To make cleaning easier, the BaByliss clipper blades can be removed. Make sure the clipper is turned off. Hold the clipper with the blades pointing up and remove them by pressing the top of the blade. (Fig. 7)
Brush the blades using the cleaning brush to remove any hair.
Self-lubricating blades
The blades of your clipper have a reservoir pad that dispenses the amount of oil necessary for your clipper to operate properly, every time. It is nevertheless recommended that you occasionally refill, when you notice the clipper isn't performing as well.
Remove the blades as described above.
Carefully squeeze a few drops of BaByliss oil onto the pad. (Fig. 8) Then put the blades back on the clipper.
BaBylliss oil is specially formulated for clippers, it will not evaporate or slow the blades down.
You can get new blades when these are worn or damaged.
DEUTSCH
NataTe to koumi ON/OFF.
Mnopeite va aaaaEte to uvooc konnc ooniaadnote otivmu.
Xapn oTo Suotnma SMART ADJUSTING SYSTEM, to uoc tnc konnic nuexi emeeyei diatnpieitra otaepeo onoiadntote kivival n yuvia klaic ntc koupeutiknc mxavnc kai oac eyyuata ev anotEeogua me akipbetaia.
TEXNIKEKONIHKAI SYMBOYAE TOY EIKOY
XpnoiotoiieTe TnV Koupeutikn mJxavn Oaalia Kathetapa Kaoteyva.
Tia va Eoikieiwte ie Tn mynav, mnoipeite va apxioete ie tvov oNyo koini yia kajputepo mukoc kai katomiv, eav oLeTe va meoiwote to mukoc, mnoipeite va metakivtoe to koumi npoc ta naaw npoc ta kTu. Ioluyopaa Eoikieiwte ie To mukoc konnc kae odnyoukai kae thec
-Metakiveite navta tnu koupeutikn oac mynavni npoc tnu avtiBtN KAteuBvON e autn nou ouptpwovu tauaia.
- Apixite anti tov auxva. TOnotheite tov ony noaw otic trixc kai kateuOuvete nT KOUPEUTIK OAC uNxavn npoc Tnv KOPUOT KOU KEAPAIou NpETAKVITE apya kai me Ta "Dovtia tov onyou va exouv KATEUVON npoc ta naW. Dpvotcete n Koupeutik mXavn va Bpioketai oEvxh enapH ME To Kepal. (EtK,4)
Tia ta maalai tnc kopupn tou kepaioiu, metakiveite ano ta npooata npoc ta nioi, olaoh ano toetwno npoc tnv kopun tou kepaioiu.
Tia ta TEleiwata, yia napadeiyua to neipyaumaa otov auexva, xnpoiouoite tnv koueutikn uaxavn wupic onoyo konc.
FupiTE TIV KOUPEUTKnOac KAI TAKIVEIe ano endvw npoc ta kTu. (Euk.5)
-Eav Erioueite to nKoc v eivai meyauutepo ano ta 30mm n eavEtLeTe v kavete bokun, mOpoeite va koupeuteitee "Tn xteva" n Ta dxtua":
-Δouλενετεχωρις oδηγο κοπίκ.
- Naipvete jia iikpn toupa maaiwju Te xteva n Tnv iavete avae oea 0a daxtula.
-Metakive TE n TVEA n Ta aXuTALA kata uKoc TCuTOUpac Hxvi va pTa- eTe OTo uKoc Nou mEhuiye.
-KoBETe ta maalia kata minkoc tnc xTeVAC nTwdaxTuWv.
-Ma(EvEte ME Tn XTeva Ta KoojEva maiia kai ta NTate, ELeyovtac taktiakavokoupeiaivaooiOpoppo.(Eik.6)
SYNTHPHsH
Na byaCete naVt aov oSyo konnc
muT a ano kaTe xPnO.
H Taktikun oovtnpon T wv Aeniov nT Koupeutikic muaxavc ta ot diatnpi Oe o diptn kataaotaan letoupyilac.
AnoWuEvEcAeic
Tia va dieukolovetai o KaBapiaoic,oi
AenieC TNC KOUPEUTIKC mNxAVHC TNC
BaBylls Eivai AnOIOJIuevEC Beai
Wteite OTI exETe OBOHoei TN OUKEUN.
Kpatate TNI KOUPEITIK ETAI WOTE
OIenieC VA KATEUBUVOTAI NPOC TA
NaWu KIC BYaCeTE NATOWAC ENAW
OTny Akn TuvieniDw.(Eik.7)
BouptoicTe TIC IaIeDC ME TO BoupTaKa Kaapaou yia va aapaipeTe TC tpiEe.
Aenides autómuţn lacavonc
Ot aleidec tnc coupeutiknc acn xnuvnc diabetouv eva taunov to omoio diayeei tvn anapaitnnt noootnta lianavtkiou ia tvn kaln aleioupyia tnc unxavnc aoc xonne mte tn xhon. suviotata va to yeicete taktiku, moLc diianiotwve et ot n anodoo ntc ouokeucn elattuwetai.
Apaapeite tic leiioec ouuovva u Tny npakatw EvdeieIg.
Pijxvete npoooxn meipikec otayovec ano to lanvatikog TaBByllss enawo tOJtarnov. (Euk.8)
Katoniv tootheite tic eini8e, otyn koupeutikn yavni.
To Iaivitko Tc BBylliss ivai Eidiko viiaic KOUeutikec uXaveg, dEv Ea-tietai kai dE"OTouweiTc aeiniDc.
Mnopeite va npouhveutei avaalaktikec lneide oepintwn nou aopouv.
MAGYAR
3aTeM BHOBb yCTaHOBNTeJe3BnHa MaunHKy.
ΦopMyna Macna Mapkn BaByliss pa3pa0bTaHa CneuNaIbHo IJN MaShnIOK; OHO He IcnapaTeCn Ie 3aTOpMaXINBaET ne3BvI.
KoJ4aNe3BnI INHOCTcINIOBpeDITcB, BO3MOJHO pNIO6pCTu 3anaC HbIeNE3BnI.