PIRANHAMAX 15 - Fish Finder HUMMINBIRD - Free user manual and instructions
Find the device manual for free PIRANHAMAX 15 HUMMINBIRD in PDF.
| Product Type | Fish Finder |
| Brand | HUMMINBIRD |
| Model | PIRANHAMAX 15 |
| Sonar Technology | Dual Beam 200 kHz and 83 kHz |
| Vertical Range | 180 m (600 ft) |
| Output Power | 100 W (RMS) |
| Sonar Coverage | 20° at -10 dB (200 kHz), 20° at -10 dB (83 kHz) |
| Display | LCD Screen 160 V x 132 H pixels |
| Transducer | XHS-9-20-T, 6 m (20 ft) cable |
| Power Supply | 10 to 20 V DC (external battery) |
| Power Consumption | Low, backlight adjustable 0 to 5 |
| Main Features | Fish detection, depth, temperature, auto zoom, fish identification (Fish ID+), alarms, simulation |
| Settings | Sensitivity (0-10), depth scale (auto or manual), scroll speed (1-5), contrast (1-5) |
| Alarms | Fish alarm (selectable size), depth alarm (3-99 ft), low battery alarm (8.5-13.5 V) |
| Languages | Multilingual (international models) |
| Units | Feet/Fahrenheit, Meters/Celsius, Fathoms/Celsius (selectable) |
| Warranty | 1 year, free after-sales service first year |
| Maintenance and Cleaning | Clean with a soft cloth and fresh water; do not use chemical glass cleaner |
| Safety | Do not use as a navigation instrument; do not handle the transducer while operating; contains lead |
| Repairability | No user-serviceable parts; repair by authorized technician only |
Frequently Asked Questions - PIRANHAMAX 15 HUMMINBIRD
User questions about PIRANHAMAX 15 HUMMINBIRD
0 question about this device. Answer the ones you know or ask your own.
Ask a new question about this device
Download the instructions for your Fish Finder in PDF format for free! Find your manual PIRANHAMAX 15 - HUMMINBIRD and take your electronic device back in hand. On this page are published all the documents necessary for the use of your device. PIRANHAMAX 15 by HUMMINBIRD.
USER MANUAL PIRANHAMAX 15 HUMMINBIRD
Thank you for choosing Humminbird®, America's #1 name in fishfinders.Humminbird® has built its reputation by designing and manufacturing top-quality, thoroughly reliable marine equipment. Your Humminbird® is designed for trouble-free use in even the harshest marine environment. In the unlikely event that your Humminbird® does require repairs, we offer an exclusive Service Policy-free of charge during the first year after purchase, and available at a reasonable rate after the one-year period. For complete details, see the separate warranty card included with your unit. We encourage you to read this operations manual carefully in order to get full benefit from all the features and applications of your Humminbird® product.
Contact our Customer Resource Center at 1-334-687-0503 or visit our website at www.humminbird.com. The PiranhaMax comes in three models:
- PiranhaMax10 - Single Beam, 160V x 132H Display
- PiranhaMax15 - Dual Beam, 160V x 132H Display
- PiranhaMax20 - Dual Beam, 240V x 160H Display
WARNING! This device should not be used as a navigational aid to prevent collision, grounding, boat damage, or personal injury. When the boat is moving, water depth may change too quickly to allow time for you to react. Always operate the boat at very slow speeds if you suspect shallow water or submerged objects.
CAUTION: Do not handle the bottom of the transducer while it is transmitting sonar. Prolonged contact with the transducer element can cause physical discomfort or minor tissue damage.
WARNING! Disassembly and repair of this electronic unit should only be performed by authorized service personnel. Any modification of the serial number or attempt to repair the original equipment or accessories by unauthorized individuals will void the warranty. Handling and/or opening this unit may result in exposure to lead, in the form of solder.
WARNING! This product contains lead, a chemical known to the state of California to cause cancer, birth defects and other reproductive harm.
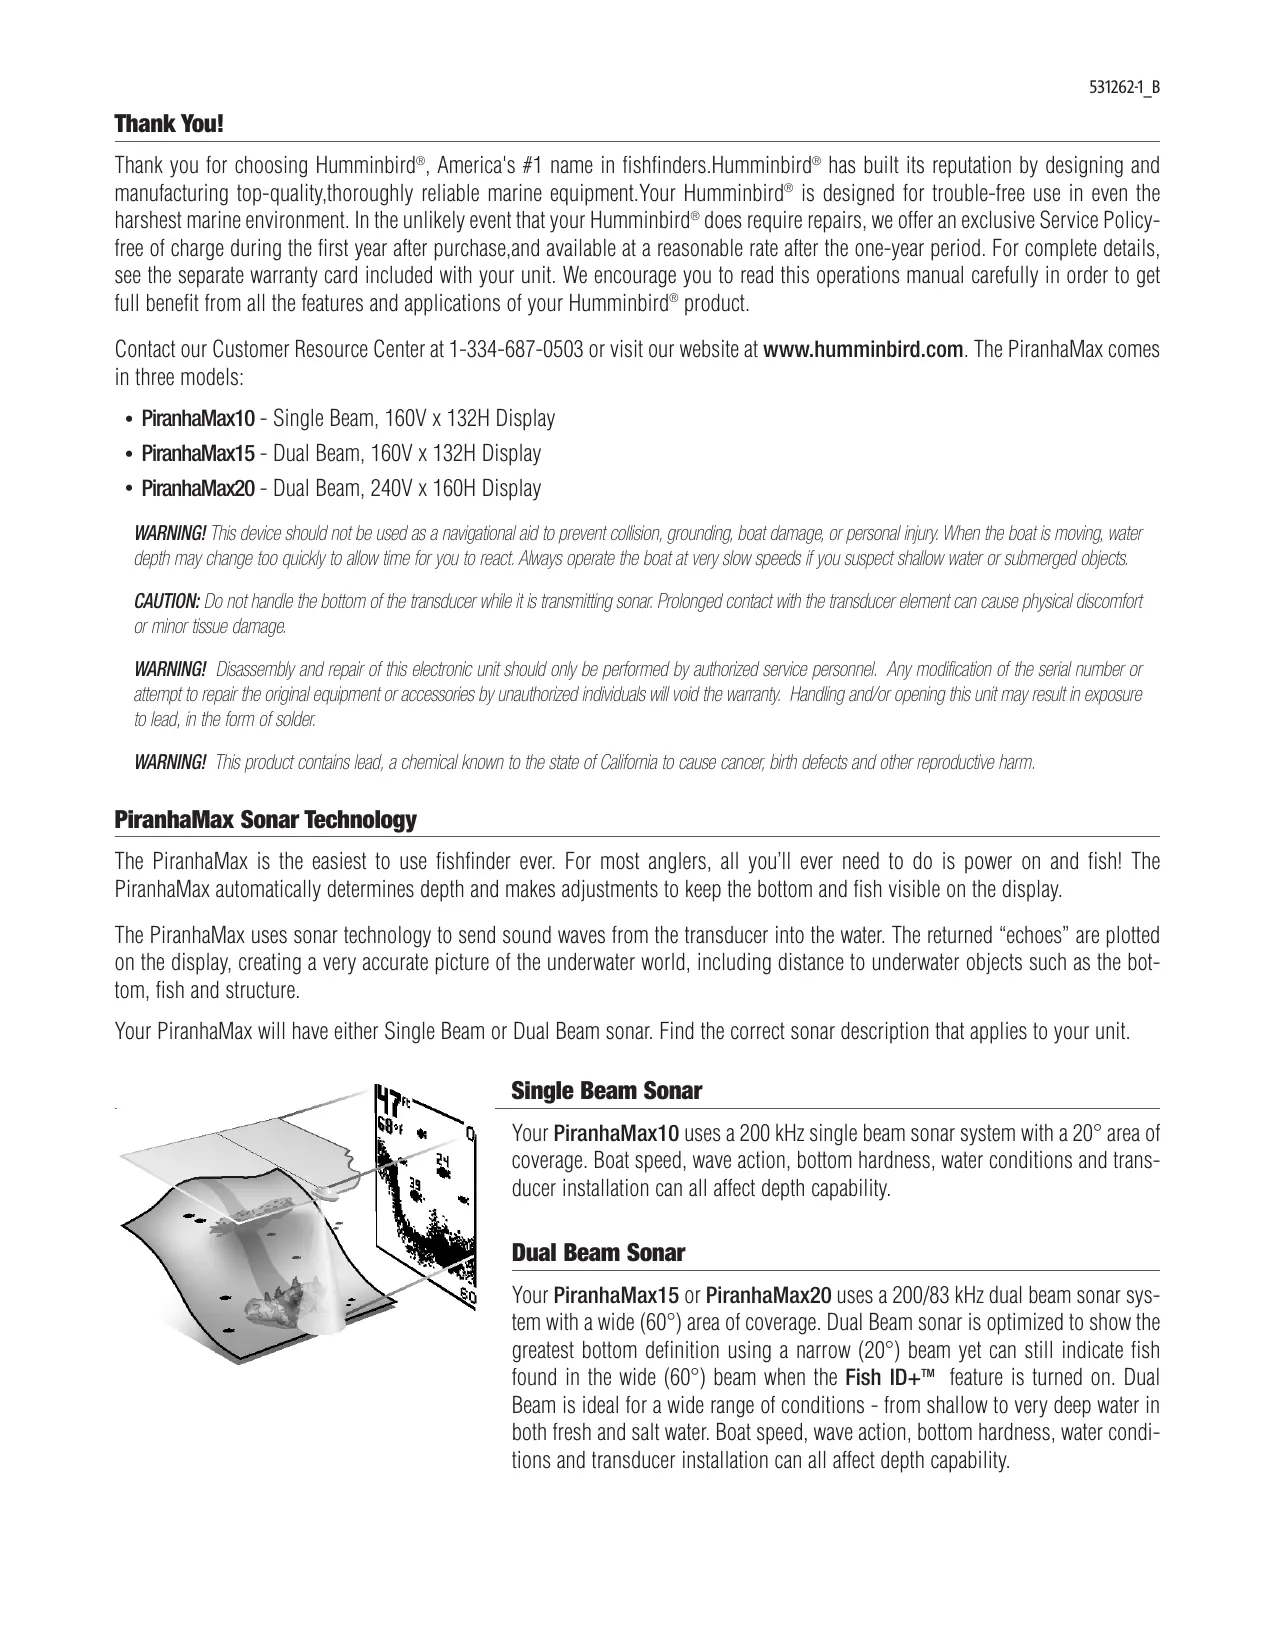
PiranhaMax Sonar Technology
The PiranhaMax is the easiest to use fishfinder ever. For most anglers, all you'll ever need to do is power on and fish! The PiranhaMax automatically determines depth and makes adjustments to keep the bottom and fish visible on the display.
The PiranhaMax uses sonar technology to send sound waves from the transducer into the water. The returned "echoes" are plotted on the display, creating a very accurate picture of the underwater world, including distance to underwater objects such as the bottom, fish and structure.
Your PiranhaMax will have either Single Beam or Dual Beam sonar. Find the correct sonar description that applies to your unit.
Single Beam Sonar
Your PiranhaMax10 uses a 200 kHz single beam sonar system with a 20^ area of coverage. Boat speed, wave action, bottom hardness, water conditions and transducer installation can all affect depth capability.
Dual Beam Sonar
Your PiranhaMax15 or PiranhaMax20 uses a 200/83 kHz dual beam sonar system with a wide (60^) area of coverage. Dual Beam sonar is optimized to show the greatest bottom definition using a narrow (20^) beam yet can still indicate fish found in the wide (60^) beam when the Fish ID+™ feature is turned on. Dual Beam is ideal for a wide range of conditions - from shallow to very deep water in both fresh and salt water. Boat speed, wave action, bottom hardness, water conditions and transducer installation can all affect depth capability.
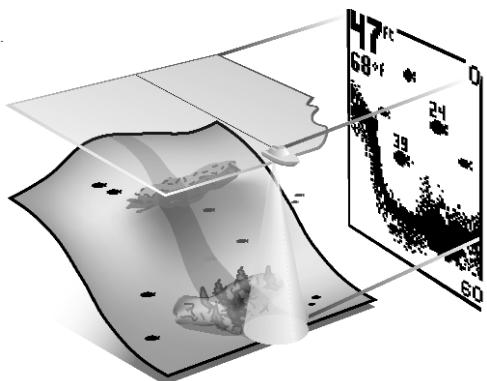
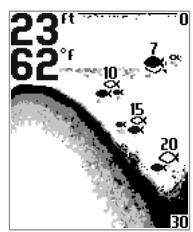
What You See On the Display
The PiranhaMax displays underwater information in an easy-to-understand format. The top of the display corresponds to the water surface at the transducer, and the bottom of the display corresponds to the Depth Range automatically selected for the current water depth. The Bottom Contour varies as the depth under the boat changes. Digital readouts provide precise information for depth, fish and water temperature.
As the boat moves, terrain and bottom composition variations are displayed. Fish, baitfish and thermoclines (underwater temperature changes) are displayed when detected. Underwater conditions vary greatly, so some experience and interpretation is needed to realize all the benefits of the PiranhaMax – use the picture above as a guide to the most common conditions and practice using the PiranhaMax over known bottom types.
Powering ON and OFF
Press and release the POWER-MENU key to power the PiranhaMax on. Press and hold the POWER-MENU key until the unit shuts down to power off.

When the PiranhaMax powers on, the Start-Up menu temporarily appears. From this menu, select either Start-Up, Simulator, or SetUp.
- Use Start-Up for on the water use
- Use Simulator for learning how to use the system with simulated sonar data; access Simulator by pressing the RIGHT Arrow Key once
- Use SetUp to display additional set-up menu choices; access SetUp by pressing the RIGHT Arrow Key twice (See SetUp Menu for more information).
The Menu System
A simple menu system allows you to access your PiranhaMax's adjustable settings. To activate the menu system, press the POWER-MENU key. Press the POWER-MENU key repeatedly to display the PiranhaMax menu settings, one at a time. When a menu setting is on the display, use the RIGHT and LEFT Arrow keys to adjust the menu setting. Menus settings are removed from the screen automatically after several seconds. In Normal operating mode, most menu settings saved to memory will not return to their default values when the unit is turned off. See individual menu choices for more information.
NOTE: Each time the POWER-MENU key is pressed, the backlight momentarily illuminates for easy viewing at night. Adjust the LIGHT menu setting to keep the backlight on.
NOTE: If Simulator Mode is selected from the Start-Up Menu and a transducer is plugged in, some menu setting changes will be saved in memory even after the unit is powered down. Menu setting changes will not be saved from Simulator mode when a transducer is not connected.
NOTE: Turning on the SetUp menu choice from the Main Menu System allows you to access additional set-up menu choices. See SetUp Menu for more information.
Light

(Setting Not Saved in Memory)
Press the POWER-MENU key until LIGHT appears. Use the backlight for night fishing. Select either 0 (Off), or 1 through 5 to activate the backlight at the desired level. (0 to 5, Default = 0)
NOTE: Continuous backlight operation will significantly decrease the battery life for PiranhaMax Portables.
Sensitivity

(Setting Saved in Memory)
Press the POWER-MENU key until SENSITIVITY appears. Sensitivity controls how much detail is shown on the display. Increasing the sensitivity shows more sonar returns from small baitfish and suspended debris in the water; however, the display may become too cluttered. When operating in very clear water or greater depths, increased sensitivity shows weaker returns that may be of interest. Decreasing the sensitivity eliminates the clutter from the display that is sometimes present in murky or muddy water. If Sensitivity is adjusted too low, the display may not show many sonar returns that could be fish. (0 - 10, Default = 5)
Depth Range

(Setting Not Saved in Memory)
Press the POWER-MENU key until DEPTH RANGE appears. Automatic is the default setting. When in automatic, the lower range will be adjusted by the unit to follow the bottom. (Auto, 15 to 600 Feet, Default = Auto)
NOTE: In manual operation, if the depth is greater than the depth range setting, the bottom will not be visible on the display. Select AUTO to return to automatic operation.
Zoom

(Setting Not Saved in Memory)
Press the POWER-MENU key until ZOOM appears. Select Auto to magnify the area around the bottom in order to reveal fish and structure close to the bottom that may not be visible during normal operation. When ZOOM is set to Auto, the upper and lower Depth Ranges are automatically adjusted to keep the area above and below the bottom on the display. Select Off to return to normal operation. (Off, Auto, Manual Ranges, Default = Off)
There is also a series of manual ranges which can be selected. The manual depth ranges are determined by the present depth conditions.
Chart Speed

(Setting Saved in Memory)
Press the POWER-MENU key until CHART SPEED appears. Select a setting from 1-5 to increase or decrease the chart speed, where 1 is the slowest and 5 is the fastest chart speed. Chart speed determines the speed at which the sonar information moves across the display, and consequently the amount of detail shown. A faster speed shows more information and is preferred by most anglers; however, the sonar information moves across the display quickly. A slower speed keeps the information on the display longer, but the bottom and fish details become compressed and may be difficult to interpret. (1 to 5, Default = 5)
Fish Alarm

(Setting Saved in Memory)
Press the POWER-MENU key until FISH ALARM appears. Select Off for no fish alarm, or one of the following symbols to set the alarm. An alarm will sound when the PiranhaMax detects fish that correspond to the alarm setting. Fish Alarm will only sound if Fish ID+ is also set to On.

Large fish only
Large/Medium fish only.
All fish.
(Off, Large, Large/Medium, All, Default = Off)
Depth Alarm

(Setting Saved in Memory)
Press the POWER-MENU key until DEPTH ALARM appears. Select OFF for no Depth Alarm, or select 3 to 99 feet to set the alarm depth. An audible alarm sounds when the depth is equal to or less than the setting. (Off, 3 to 99 feet, Default = Off)
Filter

(Setting Saved in Memory)
Press the POWER-MENU key until FILTER appears. Select either Off or On. Filter adjusts the sonar filter to limit interference on the display from sources such as your boat engine, turbulence, or other sonar devices. (On, Off, Default = Off)
Setup Menu

(Setting Not Saved in Memory)
Press the POWER-MENU key until SetUp appears. Select either Off or On. (Off, On, Default = Off)
When you choose SetUp, additional menu choices will become available that are not a part of the Main Menu system. After selecting SetUp, press the POWER-MENU key to display the SetUp menu choices, one at a time. SetUp Menu choices include:
- Contrast
- Fish ID+
- Bottom View
- Battery Alarm
- Language (International Only)
- Units (International Only)
Scroll through all SetUp menu choices to exit the SetUp menu.
(Setting Saved in Memory)
Make sure that the SetUp menu is selected, then press the POWER-MENU key until CONTRAST appears. Select a setting from 1 through 5. (1 to 5, Default = 3)
Scroll through all SetUp menu choices to exit the SetUp menu.
Fish ID+ (SetUp Menu)

(Setting Saved in Memory)
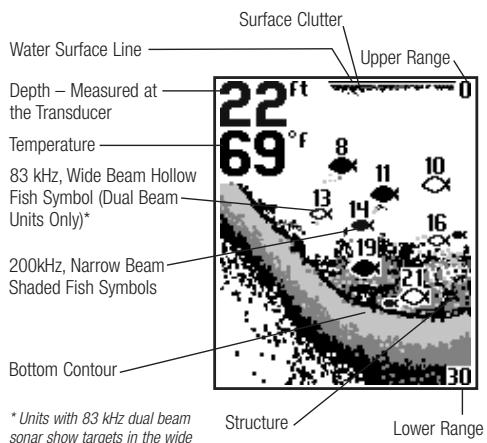
Make sure that the SetUp menu is selected, then press the POWER-MENU key until FISH ID+ appears. Select either Off to view "raw" sonar returns from the 200 kHz narrow beam, or On to view Fish symbols. Fish ID+ uses advanced signal processing to interpret sonar returns, and will display a Fish Symbol when very selective requirements are met. A select number of possible fish returns will be displayed with their associated depth. (On, Off, Default = On)
Scroll through all SetUp menu choices to exit the SetUp menu.
NOTE: Returns from the 200 kHz narrow beam are shown with shaded fish symbols while the 83 kHz wide beam returns are displayed with hollow fish symbols.
NOTE: Hollow fish symbols are only available on 200/83 kHz Dual Beam sonar units.
Bottom View (SetUp Menu)

(Setting Saved in Memory)
Make sure that the SetUp menu is selected, then press the POWER-MENU key until BOTTOM VIEW appears. Bottom View selects the method used to represent the bottom and structure on the display.
Structure ID® represents weak returns as light pixels and strong returns as dark pixels. This has the benefit of ensuring that strong returns will be clearly visible on the display.
Black (Bottom Black) displays all pixels below the bottom contour as black, regardless of signal strength. This has the benefit of providing a high contrast between the bottom and other sonar returns on the display.
WhiteLine® highlights the strongest sonar returns in white resulting in a distinctive outline. This has the benefit of clearly defining the bottom on the display.
Inverse is a method where weak returns are shown with dark pixels and strong returns with lighter pixels. This has the benefit of ensuring that weak signals will be clearly visible on the display.
(Structure ID, Black, WhiteLine, Inverse, Default = Inverse)
Scroll through all SetUp menu choices to exit the SetUp menu.
Battery Alarm (SetUp Menu)

(Setting Saved in Memory)
Make sure that the SetUp menu is selected, then press the POWER-MENU key until BATTERY ALARM appears. Select Off or 8.5 to 13.5 Volts. Battery Alarm sounds when the input battery voltage is equal to or less than the menu setting. (Off, 8.5 to 13.5 Volts, Default = Off)
Scroll through all SetUp menu choices to exit the SetUp menu.
Language (SetUp Menu: International Only)

(Setting Saved in Memory)
Make sure that the SetUp menu is selected, then press the POWER-MENU key until LANGUAGE appears (International Units Only). LANGUAGE selects the display language for menus. (Settings vary, Default = English)
Scroll through all SetUp menu choices to exit the SetUp menu.
Units (SetUp Menu: International Only)

(Setting Saved in Memory)
Make sure that the SetUp menu is selected, then press the POWER-MENU key until UNITS appears (International Units Only). UNITS selects the units of measure. (Feet/F, Meters/C, Fathoms/C, Default = Meters/C, where F stands for Fahrenheit and C stands for Celsius)
Scroll through all SetUp menu choices to exit the SetUp menu.
Maintenance
Your PiranhaMax is designed to provide years of trouble-free operation with virtually no maintenance. Follow these simple procedures to ensure your PiranhaMax continues to deliver top performance.
If the unit comes into contact with salt spray, wipe the affected surfaces with a cloth dampened in fresh water.
Do not use a chemical glass cleaner on the lens - this may cause cracking in the lens.
When cleaning the LCD protective lens, use a chamois and non-abrasive, mild cleaner. Do not wipe while dirt or grease is on the lens. Be careful to avoid scratching the lens.
If your boat remains in the water for long periods of time, marine growth can reduce the effectiveness of the transducer. Periodically clean the face of the transducer with liquid detergent.
If your boat remains out of the water for a long period of time, it may take some time to wet the transducer when returned to the water. Small air bubbles can cling to the surface of the transducer and interfere with proper operation. These bubbles dissipate with time, or you can wipe the face of the transducer with your fingers after the transducer is in the water.
Never leave the unit in a closed car or trunk—the extremely high temperatures generated in hot weather can damage the electronics.
Troubleshooting
Do not attempt to repair the PiranhaMax yourself. There are no user-serviceable parts inside, and special tools and techniques are required for assembly to ensure the waterproof integrity of the housing. Repairs should be performed only by authorized Humminbird technicians.
Many requests for repair received by Humminbird involve units that do not actually need repair. These units are returned "no problem found." If you have a problem with your PiranhaMax, use the following troubleshooting guide before calling the Customer Resource Center or sending your unit in for repair.
1. Nothing happens when I turn the unit on.
Check the power cable connection at both ends. Be sure the cable is connected correctly to a reliable power source — red lead to positive, black lead to negative or ground. Ensure the power available is between 10 and 20 VDC. If the unit is wired through a fuse panel, ensure the panel is powered. Often accessory fuse panels are controlled by a separate switch or the ignition switch.
Also, often a fuse can appear to be good when it is not. Check the fuse with a tester or replace it with a fuse known to be good.
Check the power connection to the PiranhaMax. It is possible to force the power cable connector into the cable holder incorrectly. If the connector is reversed, the unit will not work. Examine the contacts on the back of the unit to ensure there is no corrosion.
2. There is no transducer detected.
The PiranhaMax has the ability to detect and identify that a transducer is connected. When powering on, if a message indicates "transducer not connected", make sure that an appropriate transducer connector is plugged into the unit. In addition, inspect the transducer cable from end to end for breaks, kinks, or cuts in the outer casing of the cable. Also make sure that the transducer is fully submerged in water. If the transducer is connected to the unit through a switch, temporarily connect it directly to the unit and try again. If none of these actions identifies an obvious problem, the transducer itself is probably at fault. Be sure to include the transducer if returning the unit for repair.
3. There is no bottom reading visible on the display.
If the loss of bottom information occurs only at high boat speeds, the transducer needs adjusting - see your Piranha Installation Guide for details. Also, in very deep water, it may be necessary to increase the sensitivity setting manually to maintain a graphic depiction of the bottom. If you are using a transducer switch to connect two transducers to the PiranhaMax, make sure that the switch is in the correct position to connect a transducer that is in the water. (If a trolling motor transducer is selected and the trolling motor is out of the water, no sonar information appears.) If none of these actions solves the problem, inspect the transducer cable from end to end for breaks, kinks, or cuts in the outer casing of the cable. If the transducer is connected to the unit through a switch, temporarily connect it directly to the unit and try again. If none of these actions identifies an obvious problem, the transducer itself may be at fault. Be sure to include the transducer if returning the unit for repair.
4. When in very shallow water, I get gaps in the bottom reading and inconsistent digital depth indication.
The PiranhaMax will work reliably in water 3 feet (0.9 meter) or deeper. Remember that the depth is measured from the transducer, not from the surface of the water.
- The unit comes on before I press the POWER-MENU key, and won't turn off.
Check the transducer cable — if the outer jacket of the cable has been cut and the cable is in contact with bare metal, you will need to repair the cut with electrical tape. If there is no problem with the cable, disconnect the transducer from the unit and see if the problem is corrected, to confirm the source of the problem.
- I get gaps in the reading at high speeds.
Your transducer needs adjusting. If the transducer is transom-mounted, there are two adjustments available to you: height, and running angle. Make small adjustments and run the boat at high speeds to determine the effect. It may take several tries to optimize high-speed operation. This can also be a result of air or turbulence in the transducer location caused by rivets, ribs, etc.
- My unit loses power at high speeds.
Your PiranhaMax has over-voltage protection that turns the unit off when input voltage exceeds 20 VDC. Some outboard motors do not effectively regulate the power output of the engine's alternator and can produce voltage in excess of 20 Volts when running at high RPMs.
- The display begins to fade out. Images are not as sharp as normal.
Check the input voltage. The PiranhaMax will not operate on input voltages below 10 VDC.
- The display shows many black dots at high speeds and high sensitivity settings.
You are seeing noise or interference caused by one of several sources. Noise can be caused by electronic devices. Turn off any nearby electronics and see if the problem goes away. Noise can also be caused by the engine. If engine noise is causing the interference, the problem will intensify at higher RPMs. Increase the engine speed with the boat stationary to isolate this cause. Propeller cavitation can also appear as noise on the display. If the transducer is mounted too close to the propeller, the turbulence generated can interfere with the sonar signal. Make sure that the transducer is mounted at least 15^ (380 mm) from the propeller.
International Purchases
A separate warranty is provided by international distributors for units purchased outside the United States. This warranty is included by your local distributor and this distributor maintains local service for your unit. Warranties are only valid in the area of intended distribution. Units purchased in the United States or Canada must be returned to our factory in the United States for service.
Contact Humminbird
Your Humminbird accessory is designed for trouble-free operation and is backed by a one year warranty. If you have any questions, contact our
Humminbird Customer Resource Center:
By Telephone
(Monday - Friday 8:00 a.m. to 4:30 p.m.
Central Standard Time):
334-687-0503
By e-mail
(typically we respond to your e-mail within three business days):
custserv@techsonic.com
For direct shipping, our address is:
Techsonic Industries, Inc.
Service Department
108 Maple Lane
Eufaula, AL 36027 USA

HUMMINBIRD®
SPECIFICATIONS
PiranhaMax10 Specifications:
Depth Capability 600 feet (180 m)
Power Output 100 Watts (RMS)
Sonar Operating Frequency 200 kHz Single Beam
Sonar Coverage 20° @-10 dB
LCD Display 160V x 132H
Transducer XHS-9-20-T
Transducer Cable Length 20 ft (6 m)
PiranhaMax15/20 Specifications:
Depth Capability 600 feet (180 m)
Power Output 100 Watts (RMS)
Sonar Operating Frequency .... 200 kHz and 83 kHz Dual Beam
Sonar Coverage 20° @-10 dB in 200 kHz
60^ @-10 dB in 83 kHz
LCD Display 160V x 132H (PiranhaMax15)
240V x 160H (PiranhaMax20)
Transducer XHS-9-20-T
Transducer Cable Length 20 ft (6 m)
Merci!
Techsonic Industries, Inc.
Service Department
108 Maple Lane
Eufaula, AL 36027 USA