STENDINO ELECTRIC - Electric heater DELTACALOR - Free user manual and instructions
Find the device manual for free STENDINO ELECTRIC DELTACALOR in PDF.


| Product type | Electric radiator |
| Brand | DeltaCalor |
| Model | STENDINO ELECTRIC |
| Dimensions (L x H x D) | 60 x 40 x 20 cm |
| Weight | 5 kg |
| Power supply | 220-240 V / 50 Hz |
| Power | 1000-1500 W |
| Thermostat function | Yes, adjustable |
| Programming | Daily and weekly |
| Heat type | Convection or radiation |
| Operating modes | Eco, Comfort, Frost-free |
| Maintenance and cleaning | Clean with a soft, dry cloth. Do not use abrasive products. |
| Safety | Overheat protection, automatic cut-off |
| Spare parts | Available (remote control, feet, etc.) |
| Repairability | Repairability index: 8/10 |
| General information | Designer electric radiator, ideal for supplementary heating |
Frequently Asked Questions - STENDINO ELECTRIC DELTACALOR
User questions about STENDINO ELECTRIC DELTACALOR
0 question about this device. Answer the ones you know or ask your own.
Ask a new question about this device
Download the instructions for your Electric heater in PDF format for free! Find your manual STENDINO ELECTRIC - DELTACALOR and take your electronic device back in hand. On this page are published all the documents necessary for the use of your device. STENDINO ELECTRIC by DELTACALOR.
USER MANUAL STENDINO ELECTRIC DELTACALOR
ELECTRIC HEATED TOWEL RAILS


INSTALLATION MANUAL
These instructions should be reading carefully for your safety and for ensuring the product operates properly.
Therefore, it is strongly recommend reading this instruction before starting on installation and keep them as future reference.
Contact a qualified personnel for assistance if you have any doubts about the product installation
Deltacalor cares about the planet.
The complete version of the instruction, use and maintenance manual is always available on the website:
www.deltacalor.com/en/download/
or, if prefer, you can scan the QR code here at the side with your mobile phone


SCALDASALVIETTE ELETTRICI


TOALLERO ÉLECTRICO

FRANÇAIS......[4]
ENGLISH......[9]
ITALIANO......[14]
ESPAÑOL......[19]

CONSIGNES DE SÉCURITÉ

UTILISATION CORRECTE
- Should damages be caused from breach of these regulations, the manufacturer's guarantee shall be invalidated.
- Do not use the appliance outdoors.
- Your appliance is intended for domestic use. It may not be used for other purposes.
- If the appliance has been dropped, has been damaged or does not function correctly, do not use it and ensure that the appliance power supply has been disconnected (fuse or switch).
- Do not dismantle the appliance. A poorly-repaired appliance can cause risks for the user. Contact your retailer for any problem.
- If the power lead has been damaged, it must be replaced by the manufacturer, after-sales service or another professional to avoid all danger.
- Warning: the power lead must not touch the heating body.
- Warning: to avoid a risk of overheating, do not cover the unit.
- If you do, the rise in temperature will activate the built-in protection device.
- This appliance is intended only to dry laundry washed with water.
- The heater must be installed in such a way that the switches and other control devices can not be affected by a person in the bathtub or under the shower (ref.: NF C15-100 standard).
- The heater must not be installed below a plug.
- The power supply circuit of this device must have a device om-nipolar cutoff (ref: NF C15-100 standard).
WARNING
In order to avoid any hazard to young children, it is recommended to install the unit so that the lower radiant bar is at least 600 mm above the floor.

WARNINGS FOR PEOPLE WITH DISABILITIES AND CHILDREN

- This equipment may not be used by people with reduced physical, sensory, or mental capacity, those without any knowledge of the equipment, or children over 8 years of age, unless supervised and instructed on safe use of the equipment, and aware of all the risks.
• Children must not play with the equipment. - Cleaning and maintenance tasks must not be done by children without supervision.
• We recommend keeping the device out of reach of children below 3 years of age, unless under constant adult supervision. - Children between 3 and 8 may only switch the device on and off, providing it is installed regularly in the stipulated position, that the children are under constant adult supervision or have been instructed in the safe use of the equipment, and that they fully understand potential dangers.
- Children between 3 and 8 must not set up, regulate or clean the device, nor undertake maintenance on it.
ATTENTION
Some parts of this product may overheat and cause burns. Be especially careful in the presence of children and vulnerable adults.
INSTALLING THE DEVICE
Before connecting the heater, turn off the electricity at the general circuit breaker.
- The heater is a class II appliance, so it can be installed in all rooms of the house including in volumes protection 2 and 3 of a bathroom (IP24). You should check the protection grade (IPXX) of your own appliance.
- The heater must be installed 15 cm minimum of any obstacle (shelves, curtains, furniture etc.).

POWER SUPPLY AND ELECTRICAL CONNECTIONS
- The power supply to the heater must be protected, according to the standards in force, by a 30 mA differential switch and a protection device against overcurrents adapted to the characteristics of the connecting line.
- Before the first use, check that the voltage used corresponds to to the one indicated on the device.
- This heater is a Class II appliance (double electrical insulation).
• The connection to earth is prohibited. - The three wires must be connected in one electrical connection box complies with the standards in force.
- For security issues, you must isolate the pilot wire if it is not used.
- Single phase power supply 230 V \~ ± 10% 50 Hz.
• Blue / gray thread: Neutral
• Brown Wire: Phase - Black wire: Pilot wire
DIAGRAMM FOR THE CORRECT USE OF THE PILOT WIRE
Configuration in which the pilot wire is used.
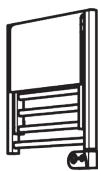

Configuration in which the pilot wire is not used.


CORRECT USE
Use the product as shown in figure 1. Never cover the entire unit with towels or clothing (figure 2). The manifolds (vertical pipes) cannot be covered. Incorrect use can cause dangerous overheating, and compromise how the equipment works.
To clean the equipment, do not use chemical products, but only a non abrasive damp cloth.
l)

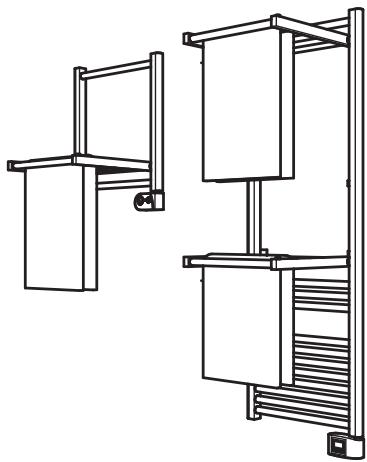

2)

IMAGES ARE PROVIDED FOR ILLUSTRATIVE PURPOSES ONLY. PRODUCTS MAY BE DIFFERENT.
The symbol ✉ placed on the device indicates the obligation to dispose of the device by entrusting to a specialized selective collection center, in accordance with Directive 2012/19 / EU. If the device needs to be replaced, it can be returned to the dealer. This device does not belong to the category of ordinary household waste. By eliminating it correctly you participate in protecting the environment and limiting the exploitation of natural resources.
Declaration of conformity: The manufacturer declares, under his exclusive responsibility, that the product concerned by this manual conforms to the prescriptions of the Low Voltage Directives 2014/35 / EU, EMC 2014/30 / EU and RoHS 2011/65 / EU.


UTILIZZO CORRETTO
USO CORRECTO
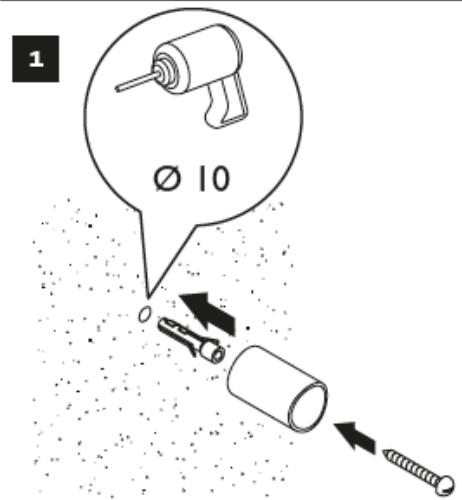
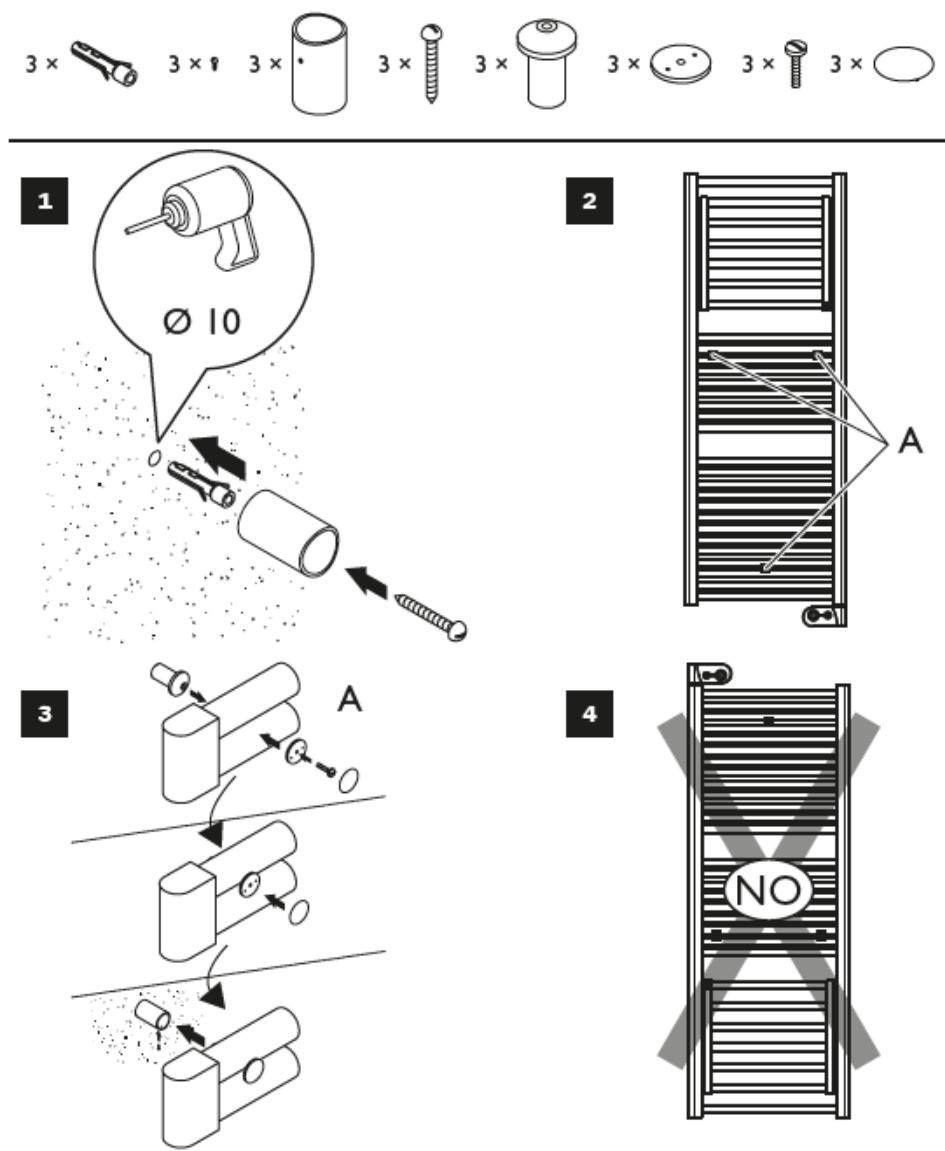
WALL MOUNTING THE FIXING KIT


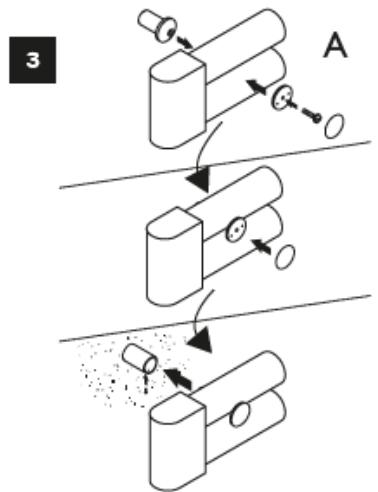

NOTE
The screws and anchors are not supplied.
INSTALLATION
| WHITE | |||
| Power | 300 W | 500 W | 750 W |
| L | 300 mm | 300 mm | 300 mm |
| H | 350 mm | 490 mm | 700 mm |
| CHROME | ||
| Power | 300 W | 500 W |
| L | 300 mm | 300 mm |
| H | 490 mm | 700 mm |

FIXATIONS DES CONSOLES MURALES
REMARQUE


Index
Icônes écran LCD 3
Mode Programme | P 8
Programme Mode | P 21
Special Functions 24
Thermostat Switching On / Off 24
Lock Keypad 0—25
Adaptive ITCS start control ITCS 25
Window Open Detection 25
Internal Sensor Calibration 25
Settings Menu 26
LCD Screen Icons

- Operating mode (active mode highlighted)
- Programme or parameter number if "3" is displayed
- Setting menu
- Keypad locked
- Room temperature indicator
- Hour display type (12H Am/Pm or 24 H)
- Graphic display of current day programme
- Time, temperature, and settings display area
- Temperature unit of measurement
- Heating indicator
- Pictogram for assisted programme creation / programme status in normal mode
- Pictogram indicating the pilot wire
- Current day
- ITCS (Intelligent start control) function
- Window open detection function

| Radiator on/off key | |
| — | Less key |
| OK | Confirm key |
| + | More key |
| ▶ | Navigation key |
Operating modes
Push ▶ the navigation key to view the operating modes bar. Use the navigation key again to select an operating mode, the framed icon ▶ indicates the mode selected. Push the OK to activate the mode chosen.

Comfort Manual Mode

The Comfort mode ⚙ makes it possible to set the temperature to be maintained, by selecting a value between 5°C and 30°C.
Select the mode by repeatedly pushing the navigation ▶ key and push to activate it. To set the reference temperature, push OK and select it using the +and — keys.
Push again to OK to confirm. The thermostat displays the measured temperature again. In any case, after a delay of 10 seconds, the thermostat displays the ambient temperature measured again.
The thermometer icon ⚡ indicates that the temperature shown in the screen is the ambient temperature. Use the set key OK to view the Comfort ⚙ (the ⚡ icon disappears).

If the heating icon is displayed, this indicates that the Comfort ⚙ temperature set is higher than the measured ambient temperature. The radiator is therefore operating whereas, if it is not displayed, the radiator is on but not operating.
ECO Manual Mode

The ECO mode ℰ maintains a lower temperature, which must be between 5°C and 19°C.
Select the mode by repeatedly pushing the navigation key, and push ▶ to activate it.
To set the reference temperature, push OK and select it using the + and - keys. Push OK again to confirm, the thermostat displays the measured temperature again. In any case, after a delay of 10 seconds, the thermostat displays the ambient temperature measured again.
Automatic Mode
Auto
To use this mode, the Programme mode P must be set, and the date and time must be set correctly. Select the mode by repeatedly pushing the navigation key ▶, and push OK to activate it.
Automatic mode allows the thermostat to operate automatically, according to the programme selected, which must be chosen using the relevant Programme mode P. When Auto mode is active, by pushing the OK key repeatedly, the measured temperature, temperature setting, and current time can be displayed.
Temperature setting

Measured temperature

Current time.


Early start in mode Auto
When the thermostat is on in automatic mode, it is possible to change the temperature (for the current half hour) manually, by repeatedly pushing the + and - keys. This generates an early start and the ⏻ pictogram is displayed on the screen. On expiry of the half hour in which the temperature was changed, the ⏻ pictogram disappears and the thermostat returns to applying the programme set.
Pilot Wire Mode
In this mode the radiator is controlled via an external unit. It only switches on if the thermostat is in mode, and if Auto a signal is received from the pilot wire (black wire).
The pilot wire mode is indicated by:
- Flashing pictogram above the home logo.
- “FP” message displayed in the top right corner of the display.
The operating modes available are described below:
 | The thermostat uses the Comfort -3,5°C temperature setting. |
 | The thermostat is switched off.WARNING - In this mode, the installation is at risk of freezing. |
| [TYHZ] | The thermostat uses the anti-freeze temperature setting.(Settable in the settings menu - item 04) |
 | The thermostat uses the Comfort temperature. |
 | The thermostat uses the Comfort -1°C temperature. |
 | The thermostat uses the Comfort -2°C temperature. |
Anti-freeze Mode

This mode protects the installation against freezing, by applying a minimum temperature pre-set at 5° C, which can be changed by the user.
Select the mode by repeatedly pushing the navigation key

To set the anti-freeze temperature ✦ see item 04 in the Settings Menu (page 27).
Boost Mode

The Boost mode ☐ makes it possible to set a specific temperature for a time period. To configure the mode:
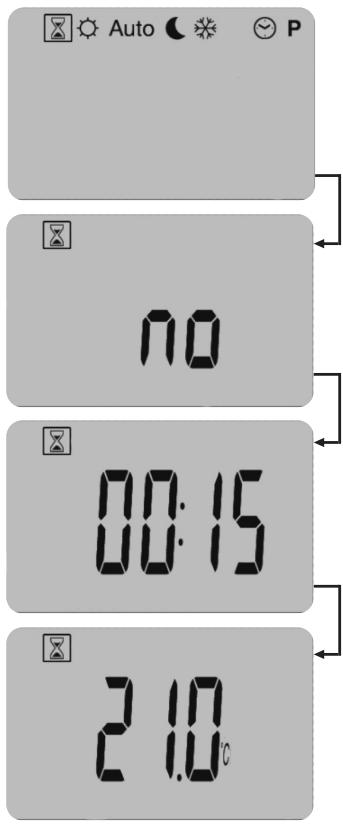
- Select the mode by repeatedly pushing the navigation key.
- Push to OK begin editing
- Use the + and — keys to select the time period (from 15 minutes to 44 days). A no message indicates that the time period is null, and so to activate this mode correctly, set at least 15 minutes.
- Push OK to confirm
- Use the + and — keys to select the required temperature (pre-set at 21° C)
- Push OK to confirm
At this stage the mode is activated, the Boost icon 📄 flashes and the countdown begins, starting from the time period set previously.
Clock mode

In this mode the system's date and time can be set.
Select the mode by repeatedly pushing the navigation key ▶, and push OK to activate it.
Then hold OK down until the hour starts to flash. Each time a parameter flashes on the display, it can be edited using the + and - keys. Once the value has been selected, it must be confirmed by pushing OK and the next parameter will begin to flash. (A message at the top of the display shows the type of parameter selected H=hour, M=minutes or months, d=day). Setting sequence:
Time and day of the week:
• Hour and minute setting.
• Day of the week setting (1 Monday, 2 Tuesday, and so on).
When the day of the week is confirmed, a “DATES” message appears for a few seconds, and date editing begins automatically.
Date:
Day setting.
• Month setting.
- Year setting.
On completion of configuration a “SAVE” message is displayed. To confirm the date and time settings, push OK.
Programme mode P
The programme mode P is used to choose the programme to be applied in automatic mode Auto.
Select the mode by repeatedly pushing the navigation ▶key and push OK to activate it. To select the required programme, repeatedly push the +and—keys.
Push OK again to launch the programme.
There are 9 pre-set programmes that cannot be edited (from P1 to P9) and 4 programmes that can be edited by the user (from U1 to U4).
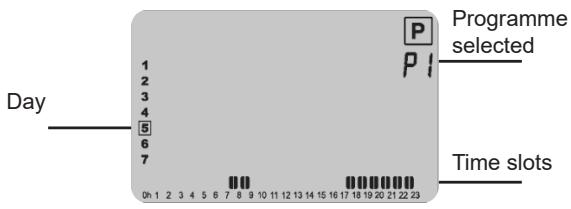
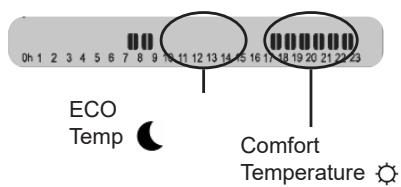
PLEASE NOTE
The time slots described below indicate when the Comfort ⚙ temperature is applied by the programme. For the remaining time slots, the ECO ⚙ temperature will be applied.
 | The Comfort temperature ⚙ is set in the half hour selected / in execution. | [S35H] | The ECO temperature ⚙ is set in the half hour selected / in execution |
Pre-set (non-editable) programmes available:
• P1 - Monday to Friday → morning (7-9) and evening (17-23)
- Saturday and Sunday→(8-23)
• P2 - Monday to Friday → morning (7-9) midday (12-14) and evening (18-23)
- Saturday and Sunday → (8-23)
• P3 - Monday to Friday → (6-23)
- Saturday → (7-24)
- Sunday → (7-23)
• P4 - Monday to Friday → (15-23)
- Saturday → (7-24)
- Sunday → (7-23)
• P5 - Monday to Friday → mattino(6-8) and evening (21-23)
- Saturday and Sunday → mattino(7-9) and evening (18-23)
• P6 - Monday to Friday → morning (6-8) midday (14-21)
- Saturday and Sunday→(7-21)
• P7 - Monday to Friday → (7-19) (OFFICE)
- Saturday and Sunday→Off
• P8 - Monday to Friday → (8-19) (OFFICE)
- Saturady → (8-18)
-Sunday → Off
• P9 - Venerdi e Weekend → acceso (HOLIDAY HOME)
User (editable) programmes:
The thermostat has 4 weekly programmes that can be edited by the user:
• To launch a programme, see the Programme mode paragraph P
• To edit the programme, select it and hold down OK.

- Editing begins with the first day of the week, from midnight and for half hour intervals. A cursor indicating the first half hour (from 00:00 to 00:30) begins the flash in the bottom left corner of the screen.
- Push the + key to set the Comfort temperature ⚙ for the time slot indicated by the cursor.
- Push the — key to set the ECO temperature
- Push the ▶navigation key to move the cursor to the right without editing the time slot.
• Each time the key is pushed, the cursor moves to the next half hour. - Once the time slot sequence for day 1 has been completed, push OK to confirm, and the next screen will appear:
In this mode it is possible to choose whether to copy the previous sequence set for the next day without having to repeat the whole procedure.
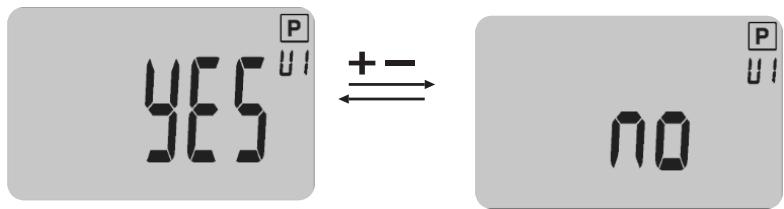
• To confirm the choice push OK
- Continue until you have configured day 7 (Sunday).
PLEASE NOTE:
To save all the changes made, day 7 must be confirmed by pushing OK, otherwise the changes will not be saved.
Once confirmed, the system goes back to automatic mode, applying the programme configured beforehand.
Special Functions
Thermostat Switching On / Off
To switch the radiator on and off, push ⏻the key.
When this key is pushed, a buzzer is activated.
When the product is in switching off mode, the following screen is displayed:
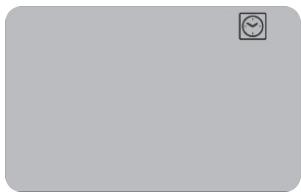
Push the keys OK, ▶, -o + to display the temperature measured for a few seconds.

Push keys OK, ▶, -o + again to display the time for a few seconds.
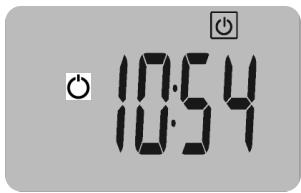
To exit switching off mode, push the ⏻key.
Lock Keypad 0
This function is used to lock the keypad, excepting for the ⏻ button, using a combination of specific keys.
• To lock the keypad, push the OK and ▶ keys at the same time.
- The “0” lock symbol is displayed when the keypad is locked.
• To unlock the keypad, apply the same procedure.
NOTE - This lock keypad function is available in all of the system's modes / menus.
Adaptive ITCS Start Control
This function can be activated / deactivated via item 06 in the settings menu.
When a programme is running in Auto mode, it can be used to start the system heating earlier than programmed. This function ensures the required temperature, when the programme switches to Comfort mode. To start system heating ahead of tie intelligently, the system executed various temperatures measurements over time. It uses this data to estimate the ideal time to start heating, before the next palliative Comfort set-point.
Window Open Detection
This function can be activated via item 07 in the settings menu If this function is active, the icon is displayed on the LCD monitor.

- Phase n°1 – window open detection: the thermostat goes into a window open detection state (the icon and temperature reading flash) when the temperature has dropped by at least 1,2°C over the last 10 minutes.
- Phase n°2 – detection of closing or action by the user: If, over 10 minutes, the temperature rises by 0,3°C, the window open state is cancelled. The thermostat automatically goes back to the current mode. If this does not happen, the radiator switches off for 30 minutes, and then goes back to the state set previously.
If the user pushes a key, the window open state is cancelled as well.
The thermostat automatically goes back to the current mode.
Calibrating the internal sensor
This function is available in item 05 of the settings menu and is used to recalibrate the thermostat if the temperature it measures differs from that measured by another thermometer in the home:
• Maximum editable value ±5 °C
- Steps 0,1°C
Settings Menu
The thermostat has a settings menu:
• To access the menu, hold the key down OK for 5 seconds.
• Use the navigation key to scroll the menu.
- Push OK to access editing of the setting selected
• Utiliser les touches + et — pour modifier la valeur.
- Push OKagain to confirm.
Exemple de modification de configuration 01
Configuration 01
![graph TD A["DEC 0.1%"] -->|Push to edit| B["2.5°C"] A -->|Push to confirm| C["7.25°F"] B --> D["Configuration 02"] C --> D style A fill:#f9f,stroke:#333 style B fill:#ccf,stroke:#333 style C fill:#cfc,stroke:#333](/content/2026/07/1492462/images/9eca35a4508465443fbd14768fc2f2da62f2ee8240d27fe6ffa50cbc59865182.jpg)
| 01 | °C/°F | Degree type displayed |
| °C | degress Celsius | |
| °F | degrees Fahrenheit | |
| 02 | _:24H12H | Time format(24:00)(12:00 AM (motning) / PM (afternoon) |
| 03 | dstYESno | Automatic time change (summer <--> winter)The time changes automatically.The time must be changed manually. |
| 04 | AF Anti-freeze temperatureCe menu permet de configurer la température du mode « antigel ».La valeur prédéfinie de cette configuration.Il valore predefinito di questa impostazione è 5.0°C .Modifica del valore con i tasti — o + e convalida con OK. |
| 05 | ___. Calibrating the internal sensorDisplaying the value measured by the thermostat with a deviation value.To edit the value read, push the — or + keys, and then the OK key to save the value.Pus the OK key again to view the deviation added to the temperature value. |
| 06 | ITCS Intelligent Temperature Control SystemEarly activating / deactivating of the automatic heating programme (see special functions paragraph 3.3)YES Function activated.no Function deactivated. |
| 07 | Win Window open detectionActivating / deactivating the window open detection function (see special functions paragraph 3.4)YES Function activated.no Function deactivated. |
| 08 | Clr Default settingsThis is used to reinstate the default settings for the thermostat (time, programmes, etc.).Confirm by holding down the OK key for 10 seconds. |
| 09 | Software versionVers ___. (non editable) |
| 10 | END Exit user menuPush the OK key to exit the menu and go back to the home screen. |
Indice
Icone schermo LCD 29

- ELECTRIC HEATED TOWEL RAILS
- INSTALLATION MANUAL
- SCALDASALVIETTE ELETTRICI
- TOALLERO ÉLECTRICO
- CONSIGNES DE SÉCURITÉ
- UTILISATION CORRECTE
- WARNING
- WARNINGS FOR PEOPLE WITH DISABILITIES AND CHILDREN
- ATTENTION
- INSTALLING THE DEVICE
- BEFORE CONNECTING THE HEATER, TURN OFF THE ELECTRICITY AT THE GENERAL CIRCUIT BREAKER
- POWER SUPPLY AND ELECTRICAL CONNECTIONS
- DIAGRAMM FOR THE CORRECT USE OF THE PILOT WIRE
- CORRECT USE
- UTILIZZO CORRETTO
- USO CORRECTO
- INDEX
- ICÔNES ÉCRAN LCD 3
- SPECIAL FUNCTIONS 24
- SETTINGS MENU 26
- LCD SCREEN ICONS
- OPERATING MODES
- COMFORT MANUAL MODE
- ECO MANUAL MODE
- AUTOMATIC MODE
- EARLY START IN MODE AUTO
- PILOT WIRE MODE
- ANTI-FREEZE MODE
- BOOST MODE
- CLOCK MODE
- DATE
- PROGRAMME MODE P
- PLEASE NOTE
- PRE-SET (NON-EDITABLE) PROGRAMMES AVAILABLE
- USER (EDITABLE) PROGRAMMES
- SPECIAL FUNCTIONS
- THERMOSTAT SWITCHING ON / OFF
- LOCK KEYPAD 0
- ADAPTIVE ITCS START CONTROL
- WINDOW OPEN DETECTION
- CALIBRATING THE INTERNAL SENSOR
- SETTINGS MENU
- INDICE
- ICONE SCHERMO LCD 29
Brand : DELTACALOR
Model : STENDINO ELECTRIC
Category : Electric heater