CUBO WI PLUS - Electric heater DELTACALOR - Free user manual and instructions
Find the device manual for free CUBO WI PLUS DELTACALOR in PDF.


| Product type | Connected Wi-Fi electric radiator |
| Brand | DeltaCalor |
| Model | CUBO WI PLUS |
| Dimensions (H x W x D) | 600 x 400 x 100 mm |
| Weight | 15 kg |
| Power supply | 230 V, 50 Hz |
| Power | 2000 W |
| Main functions | Weekly programming, remote control via Wi-Fi, open window detection, comfort/eco/frost-free mode, integrated temperature sensor |
| Maintenance and cleaning | Dust with a soft, dry cloth. Do not use abrasive products or solvents. |
| Safety | Automatic shut-off in case of overheating, frost protection, child lock, tip-over detection |
| Spare parts and repairability | Available on request from customer service. Repairability index: 8.3/10 |
| General information | Made in France. Warranty: 2 years. CE certification. Compatible with home automation systems. |
Frequently Asked Questions - CUBO WI PLUS DELTACALOR
User questions about CUBO WI PLUS DELTACALOR
0 question about this device. Answer the ones you know or ask your own.
Ask a new question about this device
Download the instructions for your Electric heater in PDF format for free! Find your manual CUBO WI PLUS - DELTACALOR and take your electronic device back in hand. On this page are published all the documents necessary for the use of your device. CUBO WI PLUS by DELTACALOR.
USER MANUAL CUBO WI PLUS DELTACALOR

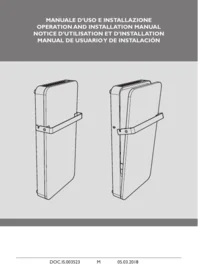
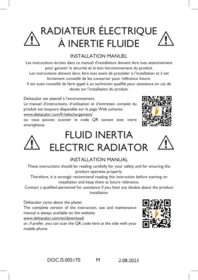
STONE INERTIA ELECTRIC RADIATOR

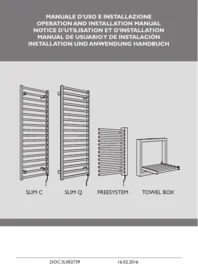
INSTALLATION MANUAL
These instructions should be reading carefully for your safety and for ensuring the product operates properly.
Therefore, it is strongly recommend reading this instruction before starting on installation and keep them as future reference.
Contact a qualified personnel for assistance if you have any doubts about the product installation
Deltacalor cares about the planet.
The complete version of the instruction, use and maintenance manual is always available on the website:
www.deltacalor.com/en/download/
or, if prefer, you can scan the QR code here at the side with your mobile phone


RADIATORE ELETTRICO CON PIETRA


EMISOR TÈRMICO CON PIEDRA

FRANÇAIS......[4]
ENGLISH......[10]
ITALIANO......[16]
ESPAÑOL ....[22]

CONSIGNES DE SÉCURITÉ

UTILISATION CORRECTE
2

- Any damage resulting from non-compliance with these instructions causes the non application of the manufacturer's warranty.
- Do not use the device outdoors.
- Your device is intended for a domestic use and must not be used for other purposes.
- If the device is dropped, damaged or does not work correctly, do not turn on the unit and make sure that the power supply on the device is switched off (fuse or circuit breaker).
- Never disassemble the device. A poorly repaired device can present risks for the user.
- Contact your retailer for any problem.
- If the power cable is damaged, it must be replaced by the manufacturer, his after-sales service or another professional, to avoid all danger.
- Caution: the power cable must not touch the heater body.
- The heater must be installed in such a way that the switches and other control devices can not be affected by a person in the bathtub or under the shower (ref.: NF C15-100 standard).
- The heater must not be installed below a plug.
- The power supply circuit of this device must have a device om-nipolar cutoff (ref: NF C15-100 standard).
- Warning: In order to avoid overheating, do not cover the device. If the device is covered, the rise in temperature will activate the built-in protection device.

Do not cover

WARNINGS FOR PEOPLE WITH DISABILITIES AND CHILDREN

- This equipment may not be used by people with reduced physical, sensory, or mental capacity, those without any knowledge of the equipment, or children over 8 years of age, unless supervised and instructed on safe use of the equipment, and aware of all the risks.
• Children must not play with the equipment. - Cleaning and maintenance tasks must not be done by children without supervision.
• We recommend keeping the device out of reach of children below 3 years of age, unless under constant adult supervision. - Children between 3 and 8 may only switch the device on and off, providing it is installed regularly in the stipulated position, that the children are under constant adult supervision or have been instructed in the safe use of the equipment, and that they fully understand potential dangers.
- Children between 3 and 8 must not set up, regulate or clean the device, nor undertake maintenance on it.
WARNING
In order to avoid any hazard to young children, it is recommended to install the unit so that the lower radiant bar is at least 600 mm above the floor.

WARNING FOR WIFI THERMOSTAT

The device allows remote control through a WI-FI connection It is mandatory to respect a minimum distance of at least 20 cm from the habitable area for humans.
INSTALLING THE DEVICE
Before connecting the heater, turn off the electricity at the general circuit breaker.
- The heater is a class II appliance, so it can be installed in all rooms of the house including in volumes protection 2 and 3 of a bathroom (IP24). You should check the protection grade (IPXX) of your own appliance.
- The heater must be installed 15 cm minimum of any obstacle (shelves, curtains, furniture etc.).

POWER SUPPLY AND ELECTRICAL CONNECTIONS
- The power supply to the heater must be protected, according to the standards in force, by a 30 mA differential switch and a protection device against overcurrents adapted to the characteristics of the connecting line.
- Before the first use, check that the voltage used corresponds to to the one indicated on the device.
- This heater is a Class II appliance (double electrical insulation).
• The connection to earth is prohibited. - The three wires must be connected in one electrical connection box complies with the standards in force.
- For security issues, you must isolate the pilot wire if it is not used.
• Single phase power supply 230 V \~ ± 10% 50 Hz.
• Blue / gray thread: Neutral - Brown Wire: Phase
- Black wire: Pilot wire
DIAGRAMM FOR THE CORRECT USE OF THE PILOT WIRE
Configuration in which the pilot wire is used.


Configuration in which the pilot wire is not used.


CORRECT USE
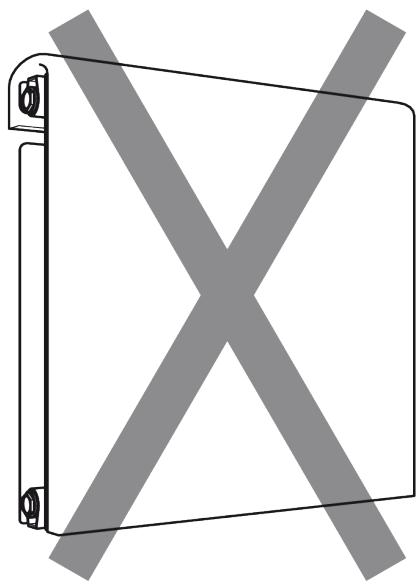
Use the product as shown in Figure 1. Do not ever put towels or clothing on the outer frame (figure 2). Incorrect use may cause dangerous overheating and compromise the operation of the device.
To clean the unit, do not use any chemicals, but use a damp, non-abrasive cloth.
1

2
The symbol ✉ placed on the device indicates the obligation to dispose of the device by entrusting to a specialized selective collection center, in accordance with Directive 2012/19 / EU. If the device needs to be replaced, it can be returned to the dealer. This device does not belong to the category of ordinary household waste. By eliminating it correctly you participate in protecting the environment and limiting the exploitation of natural resources.
Declaration of conformity: The manufacturer declares, under his exclusive responsibility, that the product concerned by this manual conforms to the prescriptions of the Low Voltage Directives 2014/35 / EU, EMC 2014/30 / EU and RoHS 2011/65 / EU.


UTILIZZO CORRETTO
2

USO CORRECTO
2

DIGITAL THERMOSTAT
INSTRUCTION MANUAL

Sommaire
PREMIÈRE CONFIGURATION 3

RÉINITIALISATION DU WI-FI
USINE
HORS-GEL

Smartphone app and wi-fi connection 31
Configuration with qr code 33
Manual configuration 34
Adding a system 35
Configuration without wi-fi 37
OPERATING MODES 38
Comfort mode 38
Eco mode 38
Automatic mode 39
Anti-freeze mode 39
Boost mode 40
Settings 40
User settings 40
Unit of measurement 41
Date and time 41
Wi-fi on 41
Wi-fi off 42
Night mode 43
Programme 42
Language 44
OPTIONS 45
Temperature sensor calibration 45
Adaptive start control 45
Open window detection 46
Heating power 46
Power limit 47
Boost setpoint 47
Limit value 47
Wi-fi settings 48
Wi-fi information 48
Connection 48
Ad hoc 49
Wi-fi off/on 49
Reset wi-fi 50
FACTORY 50
Restoring the factory settings 50
CONSUMPTION MENU 51
USING THE SMARTPHONE APP 52
Configuring multiple thermostats in a single system 52
Comfort 52
Programme 53
Eco/reduced 55
Boost 55
Anti-freeze 56
On/off 56
Whole system management 57
Holiday mode (not available for this model) 57
CONFIGURING THE DEVICE FOR THE FIRST TIME
SMARTPHONE APP AND WI-FI CONNECTION
The DELTACALOR COMFORT app enables you to configure the thermostat's Wi-Fi connection and control it from your smartphone.
- Download the free DELTACALOR COMFORT app. (available for IOS and Android devices)
- Log into the app by entering your credentials. If you are logging in for the first time, you will need to register by clicking "Sign up now", entering the required details and then confirming the email. Now go back to the login page and enter the credentials you have just set up.

- Once you have logged into the app, switch on the thermostat by pressing the button.

Select your preferred language by pressing the ▶ navigation key repeatedly.
Press OK to confirm

Once you have reached these screens, go back to your smartphone again without doing anything on the thermostat. Display the QR on the screen and proceed with points 6 and 7 for configuration with the camera; display the credentials to proceed with manual configuration.
-
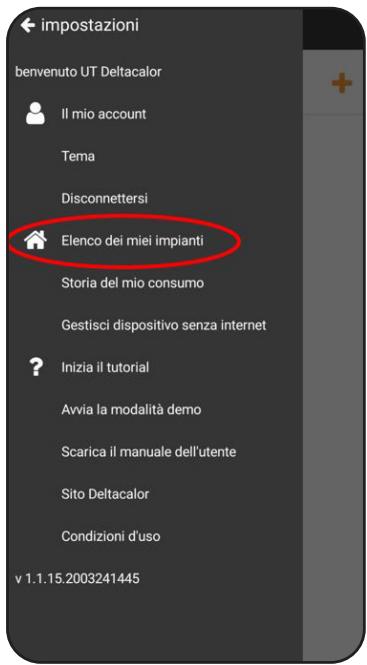
Click "My systems"
-
Click + to add the device
NOTE - if the app does not have everything it needs to complete the configuration, the screen shown in the figure may appear.
• WI-FI: to proceed with configuration, the device needs to be connected to the home Wi-Fi network;
- AUTHORISATION: this is provided when you download the app;
- POSITION: you need to enable the app to access your smartphone's location.
CONFIGURATION WITH QR CODE
-
Click "Open camera" and scan the QR code on the thermostat screen.
-
Click "Connect" and wait for a few seconds. You can now proceed from point 9 of the "Adding a system" paragraph.

- Click "OPEN WI-FI SETTINGS". This will take you to the device's Wi-Fi settings.
Now connect your smartphone to the thermostat's Wi-Fi and enter the password shown on the thermostat screen. Next, go back to the app.

NOTE - to proceed with configuration, you need to display the credentials on the thermostat instead of the QR code.

Press ▶ to view the QR code or credentials


ADDING A SYSTEM
- Name the system, room and device, then click "Save".

-
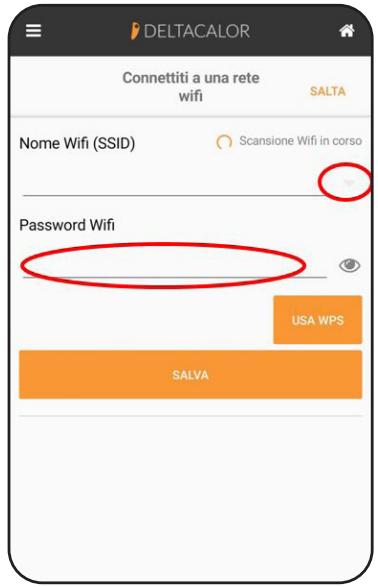
Now you can connect the thermostat to the home Wi-Fi. Select your MODEM from the dropdown menu and enter the password.
-
Save the configuration.

- Click "End" to confirm the procedure.

Once the screen shown here appears on the thermostat, the Wi-Fi configuration has been completed successfully and you now need to set the date and time. Press OK to proceed.

Select the time zone using the + and - keys. Press OK to proceed.

Select the time format using the + and - keys. Press OK to proceed.
CONFIGURATION WITHOUT WI-FI

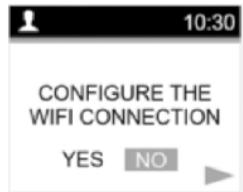

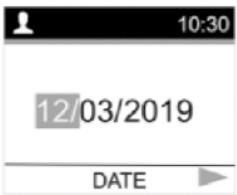
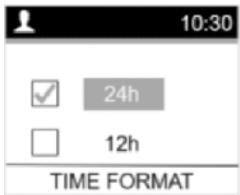
Select your preferred language by pressing the ▶ navigation key repeatedly.
Press OK to confirm
Select NO to configure the thermostat without WI-FI using the ▶ navigation key
Press OK to confirm
Change the hour and minutes using the + and — keys
Press OK to confirm
Change the date using the + and - keys
Press OK to confirm
Select the time format using the ▶ navigation key. Press OK to proceed.
OPERATING MODES
Use the ▶ navigation key to select one of the available operating modes. Press OK to access the selected mode, otherwise the thermostat will go back to the last mode used.
COMFORT MODE

In this mode, the radiator keeps the temperature at the Comfort setting ⚙️, regardless of the time
Use the + and — keys to change the temperature and press OK to save it (while you are changing the temperature, the temperature read-out will flash; you can set any temperature from 10°C to 30°C). If you do not press OK, the new temperature you have set will be saved automatically after 15 seconds.
You can also use the OK key to toggle between the set temperature and the temperature measured in the room.
Use the ▶ key to go back to mode selection.

ECO MODE

In this mode, the radiator keeps the temperature at the Reduced setting
Use the + and — keys to change the temperature and press OK to save it (while you are changing the temperature, the temperature read-out will flash; you can set any temperature from 5°C to 19°C). If you do not press OK, the new temperature you have set will be saved automatically after 15 seconds.
You can also use the OK key to toggle between the set temperature and the temperature measured in the room.
Use the ▶ navigation key to go back to mode selection.

AUTOMATIC MODE
IMPORTANT
The set Comfort ✉ temperature is used in the Comfort phases of the programme run in Auto mode.
The set Reduced temperature is used in the Eco phases of the programme run in Auto mode.
In this mode, the thermostat operates automatically in accordance with the selected programme. (Programmes are selected in the settings/user/programme menu; there is a choice of pre-set programmes from P1 to P9, plus a custom programme, which is only available on the app).
Use the OK key to display the set temperature and the measured temperature.
When Auto mode is running, you can still change the temperature manually using the + and — keys
Doing this activates an override and
the 🔔 icon appears on the display. The override remains active until you next change the temperature in the programme or, at most, for two hours.
Use the ▶ key to go back to mode selection.

ANTI-FREEZE MODE

In this mode, the radiator keeps the minimum temperature needed to protect the system against freezing.
Use the + and — keys to change the temperature and press OK to save it (while you are changing the temperature, the temperature read-out will flash; you can set any temperature from 0.5°C to 7°C). If you do not press OK, the new temperature you have set will be saved automatically after 15 seconds. You can also use the OK key to toggle between the set temperature and the temperature measured in the room.
Use the ▶ navigation key to go back to mode selection.

BOOST MODE

This mode enables you to set a time span in which the thermostat is set to a specific temperature that can be programmed in the settings menu (default value 30^ C).
Use the + and — keys to change the duration of the timer (default value 1 hour, minimum 30 mins, maximum 24 hours).
Press OK to save the changes and activate the mode; if you do not press any key, the mode is activated automatically after 15 seconds. When the mode is running, the display alternates between the temperature measured in the room and the time left on the timer.
Use the ▶ navigation key to exit and go back to mode selection.

SETTINGS
To open the settings menu, select SETTINGS from the mode menu, using the navigation key.
Press OK to access the settings.
To go back to the mode menu, select CANCEL and press OK to confirm.
USER SETTINGS
To open the user settings, select USER from the settings menu, using the navigation key. Press OK to open the corresponding menu; use the navigation key again to scroll through the menu. To go back to the settings menu, select CANCEL and press OK to confirm.
UNIT OF MEASUREMENT
You can change the unit of temperature measurement.

Default setting °C (Celsius) Other option °F (Fahrenheit)
To change the unit of measurement, select UNIT from the user settings menu.
Press OK to start making the change; make the change + using the and — keys, then press OK again to confirm your choice.
DATE AND TIME
WI-FI ON
Select DATE AND TIME from the user settings menu, then press OK to make changes. If the thermostat is connected to the WI-FI, you will only be asked to select the geographical area and the format. The correct date and time will be set automatically from the WI-FI connection.

WI-FI OFF
Select DATE AND TIME from the user settings menu, then press OK to make changes. If the thermostat is not connected to the WI-FI, you will be asked to set the parameters manually.

NIGHT MODE
This setting enables you to change the display on the stand-by screen. Select NIGHT MODE from the user settings menu, then press OK to make changes.

Select enable using the + and - keys, then press OK to display the temperature measured.
Select disable using the + and - keys, then press OK to display the temperature measured.
PROGRAMME
This function enables you to select which of the 9 pre-set programmes will be used in Auto mode.
Select PROGRAMME from the user settings menu, then press OK to proceed. Use the key to decide whether to select a programme or cancel the operation. In both cases, you need to press OK to proceed.
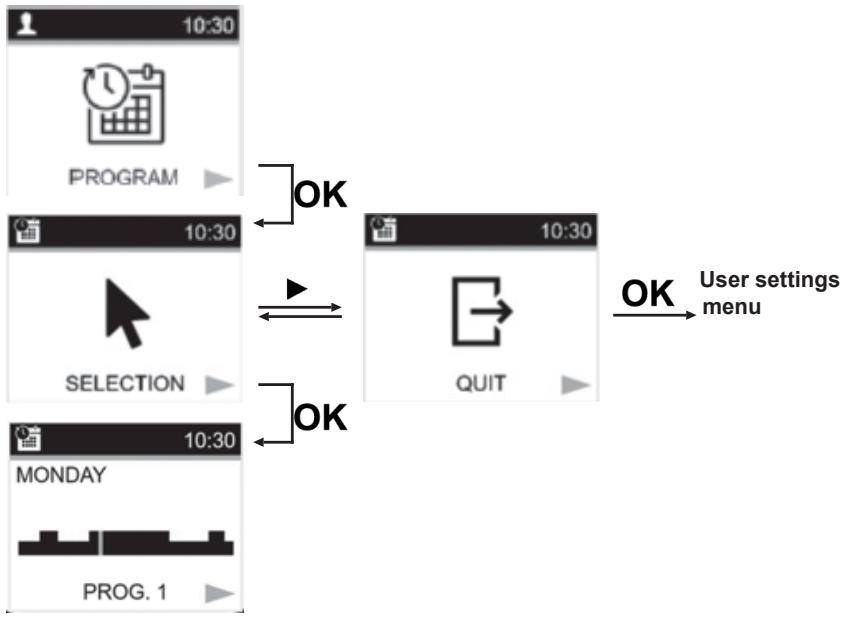
Select the desired programme using the ▶ navigation key and press OK to confirm your choice.
The thermostat will now go back to Auto mode and run the selected programme.
IMPORTANT
The thermostat has 9 pre-set programmes, which can NOT be changed. To configure a programme, you need to use the DELTACALOR COMFORT app.
Description of integrated programmes:
• P1: morning (7h-9h), evening (17h-23h), and weekend (8h-23h)
• P2: morning (7h-9h), noon (12h-14h), evening (18h-23h) and weekend (8h-23h)
• P3: day (6h-23h), Saturday (7h-24h) and Sunday (night (0h-1h), day (7h-23h))
• P4: evening (15h-23h) and Saturday (7h-24h) and Sunday (night (0h-1h), day (7h-23h))
• P5: morning (6h-8h), evening (21h-23h) and Saturday (morning 7h-9h), evening 18h-24h) and Sunday (morning (7h-9h), evening (18h-23h))
• P6: morning (6h-8h), noon (14h-21h) and weekend (7h-21h)
• P7: office from Monday to Friday (7h-19h) and weekend (off)
• P8: Warehouse: from Monday to Friday (8h - 19h) and Saturday (8h -18h) and Sunday (off)
• P9: Second home: from Friday (13h) to Monday (7h)
LANGUAGE

This function enables you to change the system language. Select LANGUAGE from the user settings menu, using the navigation key, then press OK to make changes.
Use the ▶ navigation key again to scroll through the various options and press OK to confirm your choice.
AVAILABLE OPTIONS: English, French, Italian, German and Spanish
OPTIONS
To open the radiator settings, select OPTIONS from the settings menu, using the navigation key.
Press OK to open the corresponding menu; use the ▶ navigation key again to scroll through the menu. To go back to the settings menu, select CANCEL and press OK to confirm.
TEMPERATURE SENSOR CALIBRATION
This function enables you to calibrate the temperature measured by the sensor. Select CALIBRATION from the options menu, then press OK to make changes.

To perform the process correctly, you need to:
- Position a thermometer at the same distance from the floor as the thermostat and check it after 30 minutes.
- Enter the correct temperature using the + and - keys.
- Press OK to confirm.
ADAPTIVE START CONTROL
ENABLING
You can use this function to enable/disable adaptive start control. Select ITCS from the options menu, then press OK to make changes.

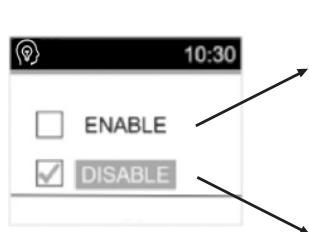
Select enable using the + and - keys. Press OK to enable ITCS.
Select disable using the + and - keys. Press OK to disable ITCS.
DESCRIPTION
This function enables you to start the system in advance (maximum 2 hours) when the thermostat is in Auto mode, thus ensuring the desired temperature at the programmed time, according to the weekly programme that is running.
In order to work properly, the ITCS system measures the system's heating speed so that it can calculate the exact time at which to switch the system on. A default value of 1 hour will be used initially, but this will be updated automatically over time.
When the system performs an adaptive start, the Ⓞ ITCS icon appears on the screen.
OPEN WINDOW DETECTION
ENABLING
You can use this function to enable/disable open window detection. Select WINDOWS from the options menu, then press OK to make changes.


Select enable using the + and - keys. Press OK to enable detection.
Select disable using the + and - keys. Press OK to disable detection.
DESCRIPTION
This function switches the thermostat off if the latter is heating and an open window is detected. The system detects an open window by measuring temperature changes over the previous 20 minutes of operation.
If, with this function enabled, a significant drop in temperature is detected in the previous 20 minutes, the radiator goes into stand-by. As soon a rise in temperature is detected in the subsequent 20 minutes, the radiator goes back to the last mode used.
When the thermostat goes into open window detection mode, the icon appears on the display.
HEATING POWER
This function enables you to change the power reference value. Select POWER from the options menu, then press OK to make changes.
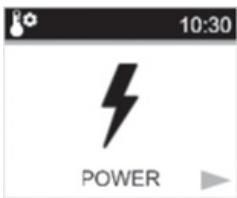
Use the + and — keys to change the power value and press OK to confirm your choice.
• Default value: 900 W
• Available options: 900W,1000W,1100W,1500W,1600W,1800W,2000W
This parameter is only used to calculate the radiator's energy consumption. It does not in any way change the actual power of the radiator, which depends on the chosen model.
POWER LIMIT
This function enables you to limit the operating power of the radiator (by changing it, in effect). Select POWER LIMIT from the options menu, then press OK to make changes.

Use the + and — keys to change the power value and press OK to confirm your choice.
• Default value: 100%
• Available options: 100%, 75%, 50%
BOOST SETPOINT
This function enables you to change the temperature used in boost mode. Select POWER LIMIT from the options menu, then press OK to make changes.

Use the + and — keys to change the temperature value and press OK to confirm your choice.
• Default value: 30°C
• Available options: 20°C to 30°C
LIMIT VALUE
This function enables you to limit the maximum temperature that can be set remotely using the app. Select LIMIT VALUE from the options menu, then press OK to make changes.

Use the + and — keys to change the temperature value and press OK to confirm your choice.
• Default value: 30°C
• Available options: 20°C to 30°C
WI-FI SETTINGS
To open the radiator Wi-Fi settings, select WI-FI from the settings menu, using the navigation key.
Press OK to open the corresponding menu; use the ▶ navigation key again to scroll through the menu. To go back to the settings menu, select CANCEL and press OK to confirm.
WI-FI INFORMATION
This function enables you to view various items of information about the device's network connection. Select WI-FI INFO from the options menu, then press OK to access the information.
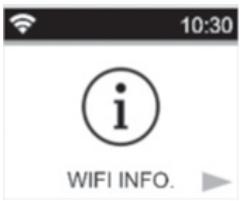
Use the ▶ navigation key to scroll through the available pages, and press OK to go back to WI-FI INFO.
Available information:
• Status: Connected / Not connected
• SSID name of Wi-Fi connection
- IP address
- MAC address
CONNECTION
This function enables you to connect the thermostat to the cloud. You need to configure the connection before you can enable this function, either during first start-up or by using the AD HOC function.

Select CONNECTION from the options menu, press OK to make changes and then press OK again to activate the cloud connection. Use the ▶ navigation key to exit the function.
AD HOC
This function enables you to connect the device to the Wi-Fi if this was not done during first start-up of the thermostat, if you want to change network, or if you need to restore an existing Wi-Fi connection that has been lost for some reason.
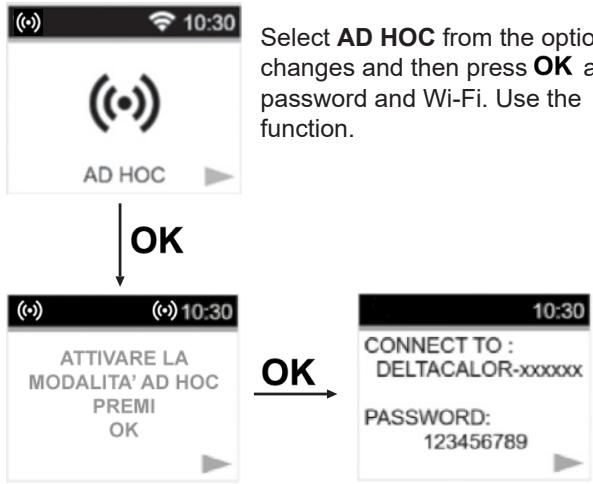
Select AD HOC from the options menu, press OK to make changes and then press OK again to display the thermostat password and Wi-Fi. Use the ▶ navigation key to exit the function.
You now need to leave the thermostat fixed on the “CONNECT TO” screen: open the DELTACALOR COMFORT app on your smartphone and follow the instructions from point 4 to 11 of the first paragraph of the “SMARTPHONE APP AND WI-FI CONNECTION” manual
WI-FI OFF/ON
This function enables you to switch the Wi-Fi connection on or off.
Select WI-FI ON/OFF from the options menu, press OK to make changes and then press OK again to switch the Wi-Fi on/off. The thermostat will now restart and the operation is completed. Use the ▶ navigation key to exit without making any changes.


RESET WI-FI
This function enables you to cancel all of the configured Wi-Fi connections. Select RESET WI-FI from the options menu, press OK to make changes and then press OK again to complete the reset. Use the ▶ navigation key to exit without resetting the Wi-Fi.

FACTORY
To open the radiator's factory menu, select FACTORY from the settings menu, using the navigation key.
Press OK to open the corresponding menu; use the ▶ navigation key again to scroll through the menu. To go back to the settings menu, select CANCEL and press OK to confirm.
RESTORING THE FACTORY SETTINGS
This function enables you to restore the thermostat's factory settings. To restore the factory settings, select "Restore factory settings" and press OK.
The thermostat will now restart and the factory settings are restored.
To exit without restoring the factory settings, use the ▶ navigation key.

CONSUMPTION MENU
To open the radiator's consumption menu, select CONSUMPTION from the settings menu, using the ▶ navigation key.
PressOK to open the corresponding menu; use the navigation key again to scroll through the menu. To go back to the settings menu, press OK.

Available data:
• Consumption over previous 24hrs.
• Consumption over previous 7 days.
• Consumption over previous 30 days.
Press and hold the + or - keys to reset the values shown on the screen.

IMPORTANT
To use this function correctly, you need to set the correct radiator power in the options menu (page 16). This power must correspond to the power of the model purchased and will be used as a parameter in the calculation of consumption. Readings are taken every 4 hours.
USING THE SMARTPHONE APP
This thermostat can be controlled by means of the DELTACALOR COMFORT app, the initial configuration of which is presented on page 3 of the manual. It is also possible to configure the Wi-Fi later, using the AD HOC function described on page 19.
CONFIGURING MULTIPLE THERMOSTATS IN A SINGLE SYSTEM
Once you have created the home system on the app, you can connect multiple thermostats if applicable. To do this, you need to switch on the new thermostat and configure it,

following the procedure described for initialising a new thermostat (page 3). In this case, the home system already exists, so there is no need to name a new one. Instead, simply select the existing system and then add the new room.
By clicking on the “home” system, you can then access the various rooms you have set up and control their respective thermostats.

Temperature to which the thermostat is set
Temperature measured by the thermostat in the room
COMFORT
This mode enables you to set a temperature that you want a specific thermostat in the system to maintain. To do this, click the system and then the room. Click the 📄 icon and set the temperature by moving the white circle. Click “Apply” to confirm and wait for the thermostat to update.


PROGRAMME
ENABLING
This function in the app enables you to create a customised weekly thermostat programme (this cannot be done directly from the thermostat). To enable this mode, click the 🔒 icon and then click “Apply”.
IMPORTANT
In this mode, the thermostat runs automatically, using the COMFORT and ECO temperatures, which you must therefore select in advance from the app.
CUSTOMISING THE WEEKLY PROGRAMME
To edit the programme in the app, select PROGRAMME mode.
Click the word "Programme"


The display shows the entire weekly programme. To edit it, click “Add COMFORT/ECO period”.

The example shows the addition of an operating period in COMFORT mode on Monday from 1200 to 1400hrs. Click to save.

By repeating this procedure, you can create a customised weekly programme. Once you have completed the changes, click the orange arrow in the top left to go back to PROGRAMME mode and click “Apply” to enable the mode.
ECO/REDUCED
This mode enables you to set a reduced temperature that you want a specific thermostat in the system to maintain. To do this, click the system and then the room. Click the 📊 icon and set the temperature by moving the white circle. Click “Apply” to confirm and wait for the thermostat to update.


BOOST
This mode enables you to set a temperature from 20^ C to 30^ C to be maintained for a selectable time span ranging from 1 minute to 44 days. Select the mode by clicking the icon. Set the temperature and duration, then click “Apply” to enable it.

When the mode is enabled, the display alternates between the temperature measured in the room and the time left. Once the time has elapsed, the thermostat goes back to the last mode used.

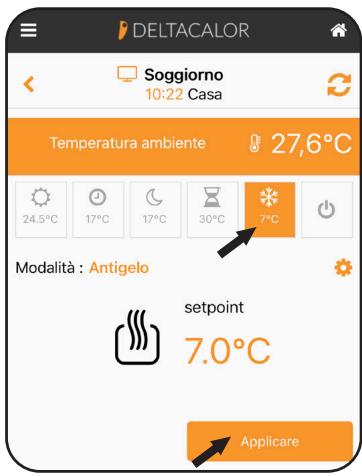
ANTI-FREEZE

This mode enables you to set the thermostat to a non-modifiable temperature that protects the installation against freezing (7°C). To enable this mode, click the ✿ icon and then click “Apply”.
ON/OFF

This mode enables you to switch the thermostat off. To do this, click the 🔊 icon and then click “Apply”.
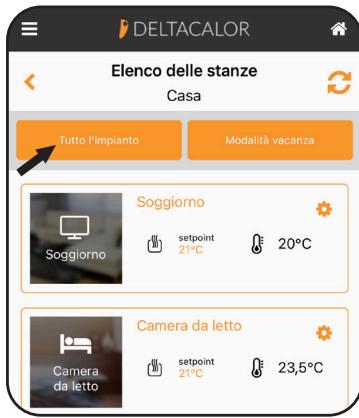
WHOLE SYSTEM MANAGEMENT
If a system has been set up with multiple thermostats, you can select the operating mode you want to apply to all of them simultaneously.
Open the list of rooms and click "Whole system".
Click the toggle button next to "Manage system".
Select the mode by clicking the respective icons, then click "Confirm".
HOLIDAY MODE (not available for this model)
Indice

RESET WIFI
FABBRICA
Dati disponibili:
ANTIGELO

RESET WIFI
ANTIHIELO


- STONE INERTIA ELECTRIC RADIATOR
- INSTALLATION MANUAL
- RADIATORE ELETTRICO CON PIETRA
- EMISOR TÈRMICO CON PIEDRA
- CONSIGNES DE SÉCURITÉ
- UTILISATION CORRECTE
- Do not cover
- WARNINGS FOR PEOPLE WITH DISABILITIES AND CHILDREN
- WARNING
- WARNING FOR WIFI THERMOSTAT
- INSTALLING THE DEVICE
- Before connecting the heater, turn off the electricity at the general circuit breaker.
- POWER SUPPLY AND ELECTRICAL CONNECTIONS
- DIAGRAMM FOR THE CORRECT USE OF THE PILOT WIRE
- CORRECT USE
- UTILIZZO CORRETTO
- USO CORRECTO
- DIGITAL THERMOSTAT
- INSTRUCTION MANUAL
- Sommaire
- PREMIÈRE CONFIGURATION 3
- RÉINITIALISATION DU WI-FI
- USINE
- HORS-GEL
- OPERATING MODES 38
- Settings 40
- OPTIONS 45
- Wi-fi settings 48
- FACTORY 50
- CONSUMPTION MENU 51
- USING THE SMARTPHONE APP 52
- CONFIGURING THE DEVICE FOR THE FIRST TIME
- SMARTPHONE APP AND WI-FI CONNECTION
- CONFIGURATION WITH QR CODE
- ADDING A SYSTEM
- CONFIGURATION WITHOUT WI-FI
- OPERATING MODES
- COMFORT MODE
- ECO MODE
- AUTOMATIC MODE
- IMPORTANT
- ANTI-FREEZE MODE
- BOOST MODE
- SETTINGS
- USER SETTINGS
- UNIT OF MEASUREMENT
- DATE AND TIME
- WI-FI ON
- WI-FI OFF
- NIGHT MODE
- PROGRAMME
- Description of integrated programmes:
- LANGUAGE
- OPTIONS
- TEMPERATURE SENSOR CALIBRATION
- ADAPTIVE START CONTROL
- ENABLING
- DESCRIPTION
- OPEN WINDOW DETECTION
- HEATING POWER
- POWER LIMIT
- BOOST SETPOINT
- LIMIT VALUE
- WI-FI SETTINGS
- WI-FI INFORMATION
- CONNECTION
- AD HOC
- WI-FI OFF/ON
- RESET WI-FI
- FACTORY
- RESTORING THE FACTORY SETTINGS
- CONSUMPTION MENU
- Available data:
- USING THE SMARTPHONE APP
- CONFIGURING MULTIPLE THERMOSTATS IN A SINGLE SYSTEM
- COMFORT
- CUSTOMISING THE WEEKLY PROGRAMME
- ECO/REDUCED
- BOOST
- ANTI-FREEZE
- ON/OFF
- WHOLE SYSTEM MANAGEMENT
- Indice
- RESET WIFI
- FABBRICA
- ANTIGELO
- ANTIHIELO
Brand : DELTACALOR
Model : CUBO WI PLUS
Category : Electric heater