
KH 2400 STEAM AND DRY IRON - Iron LERVIA - Free user manual and instructions
Find the device manual for free KH 2400 STEAM AND DRY IRON LERVIA in PDF.

User questions about KH 2400 STEAM AND DRY IRON LERVIA
0 question about this device. Answer the ones you know or ask your own.
Ask a new question about this device
Download the instructions for your Iron in PDF format for free! Find your manual KH 2400 STEAM AND DRY IRON - LERVIA and take your electronic device back in hand. On this page are published all the documents necessary for the use of your device. KH 2400 STEAM AND DRY IRON by LERVIA.
USER MANUAL KH 2400 STEAM AND DRY IRON LERVIA
Steam and dry iron KH 2400
Operating instructions

| Content | Page |
| Proper use | 4 |
| Package Contents | 4 |
| Technical Data | 4 |
| Safety Instructions | 4 |
| Parts Identification | 6 |
| Before first use | 6 |
| Controlling the temperature | 6 |
| Ironing tips | 7 |
| How to fill with water | 7 |
| Auto shut-off safety feature | 7 |
| Steam ironing | 8 |
| Using the steam burst button | 8 |
| Using the spray-button | 9 |
| Anti-scale system | 9 |
| Using the calc clean button | 9 |
| Drip-stop feature | 10 |
| Using as a dry iron | 10 |
| Care and cleaning instructions | 10 |
| Emptying and storing the iron | 10 |
| Disposal | 11 |
| Warranty and customer service | 11 |
| Importer | 11 |
Read the operating instructions carefully before using the appliance for the first time and preserve this booklet for later reference. Hand over the manual to anyone you pass on the appliance to.
Steam and dry iron KH 2400
Proper use
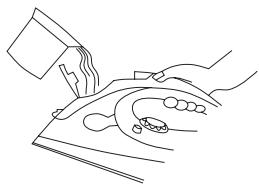
The steam and dry iron is intended purely for ironing clothes in private households. In addition, creases in hanging clothes, curtains, etc. can be removed using the vertical steam burst function. Do not use the appliance for any other than its intended use.
Package Contents
Steam iron
Measuring cup
Storage cover
Operating instructions
Warranty card
Technical Data
Nominal voltage:
230 V~50Hz
Nominal output:
2200 W
Safety Instructions
Danger of Burns!
- Keep the steam iron out of reach of children. Never permit children to use the steam iron.
- Never touch the sole-plate of the iron when it is hot. Take hold of the steam iron with the handle only.
- Never hold your hand over the steam spray or on hot metal parts.
- Never direct the steam blast at people or other living creatures.
- You should not open the filler opening of the water reservoir while the iron is in use. First remove the plug from the power socket and allow the steam iron to cool down before refilling it.
Fire hazard!
- Never leave the steam iron unattended when it is hot or switched on. You and others can be easily injured through a still hot iron.
- Never place the steam iron in the close vicinity of inflammable materials, such as curtains and drapes. They could catch fire.
-
Use only the ironing temperatures given in the care instructions for the material and those suitable for it. Otherwise, you could damage the textiles. Should care instructions for the item be neither known nor available, begin ironing with the lowest temperature setting.
-
Put the steam iron into storage only when it has cooled down completely.
- Never place the steam iron on edges, for example table edges. It could tip and fall down.
- Stand the steam iron only on its back end, or lay it in the support tray provided on the ironing board. Never lean the hot iron against walls or other objects. There could be a risk of fire breaking out.

Danger of electrical shock!
- Connect the steam iron only to correctly installed wall power sockets.
- To avoid possible dangers, arrange for a defective appliance to be checked and possibly repaired by qualified technicians, or contact our Customer Service Department.
- Arrange for defective power cables to be replaced immediately by qualified technicians, or contact our Customer Service Department.
- To disconnect from the power source, pull only on the plug itself, not on the cable.
- Never direct the steam jets or the waterspray jets at electrical appliances or at objects sensitive to heat or moisture.
- Never bend (kink) or crush the power cable. Arrange it in such a way that it can not come into contact with hot surfaces and such that no-one can step on it or trip over it.
After every use, before cleaning and when refilling with water, remove the plug from the power socket.
Always unroll the power cable fully before switching on and do not use an extension cord.
- Never touch the power cable or the power plug with wet hands.
- Under no circumstances should you submerge the steam iron in any liquid or permit liquids to penetrate into the housing of the steam iron. You should never expose the appliance to moisture or use the device outdoors. Should liquids penetrate into the appliance housing, immediately remove the plug from the power source and arrange for the appliance to be repaired by a qualified specialist workshop or by the Customer Service Department.
- Never use the steam iron adjacent to water contained in a bath, shower, wash basin or other vessels. The proximity of moisture presents a danger, even when the appliance is switched off.
- You may not open the housing of the steam iron. Arrange for a defective steam iron to be repaired only by a qualified specialist workshop or by the Customer Service Department.
- Should the steam iron fall to the floor, become otherwise damaged, or the power plug or cable becomes defective, it may no longer be taken into use. In such cases, arrange for the appliance to be checked and possibly repaired by a qualified workshop or our Customer Service Department.
- Do not allow individuals (including children) to use the appliance whose physical, sensorial or mental abilities or lack of experience and knowledge hinder their safe usage of it if they have not previously been supervised or instructed in its correct usage.
Tell children about the appliance and its potential dangers so that they do not play with it.
Important!
- Should the clothing care instructions forbid ironing, (Symbol), the clothing item may not be ironed. If you ignore this warning, the item could be damaged.
- Do not fill the water tank with a liquid other than water. You will otherwise damage the steam iron.
- You may not clean the steam iron with solvents, alcohol or abrasive cleaning agents. You could otherwise cause damages.
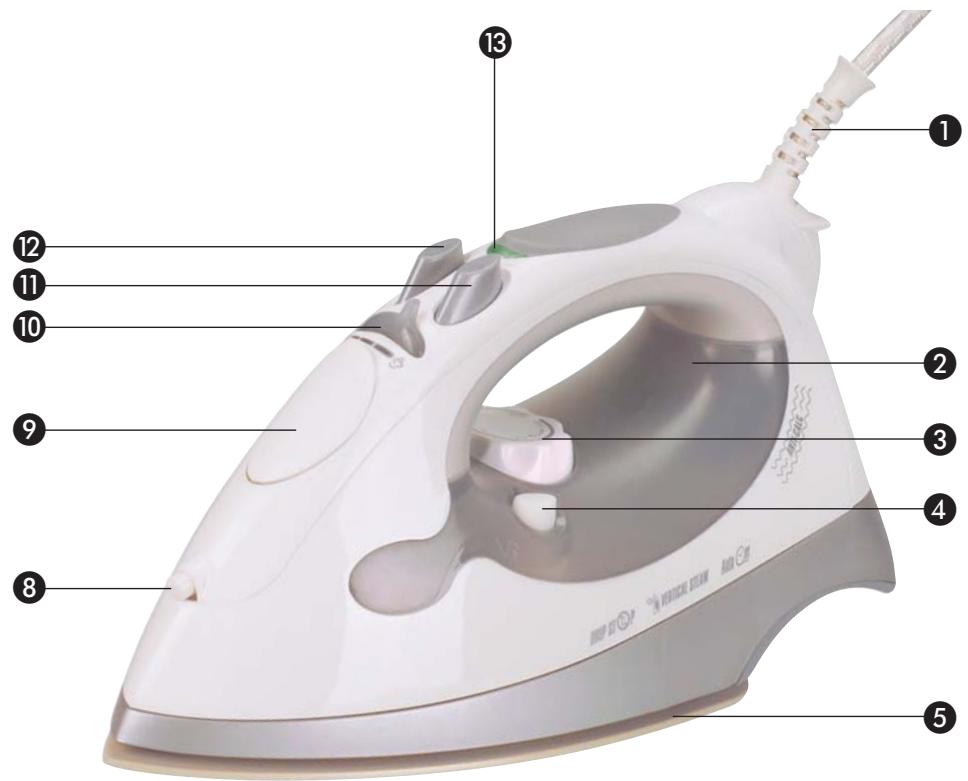
Parts Identification
Cable protector / mains lead
2 Water tank with integrated blue switch-off control lamp
3 Temperature control knob
4 Calc-Clean button
5 Sole plate
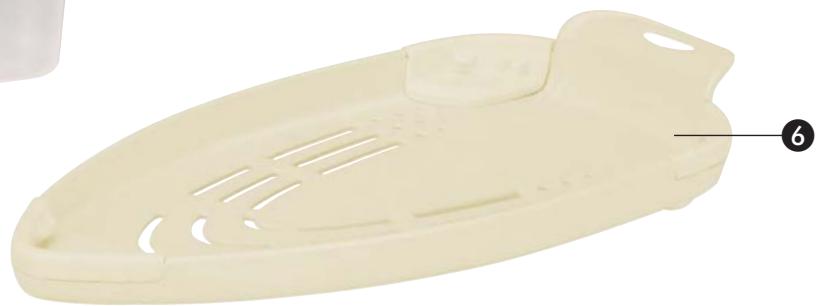
Storage cover
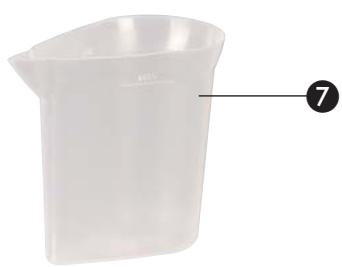
7 Measuring cup
Spray nozzle
Water tank lid
Steam regulator
Spray button
Steam burst button
13 Heater monitor light (green)
Before first use
-
Before using the iron for the first time, check if the voltage rating on the base plate corresponds to the mains voltage in your home.
-
Remove the storage cover, sticker or any protective items from the soleplate ⑤.
- It is important to remove any residues of the polishing compound, used on the soleplate ⑤, which may have lodged in the steam vents. Using the measuring cup ⑦ supplied, pour water into the iron up to the MAX line. Clean the steam vents by using "Calc Clean" system. (See using the Calc Clean Button ④). When finished, wipe the soleplate ⑤ with an old cloth. Cotton swabs may be used to clean and dry the steam vents.
- Some parts of the iron have been slightly greased and as a result the iron may smoke slightly when switched on for the first time. After a short while, however, this will cease. Open a window.
- Normal tap water can usually be used for ironing. But if you live in a hard water area we recommend to use distilled water to insure optimum performance of your iron.
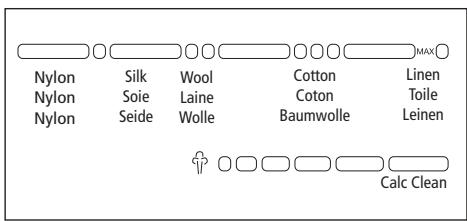
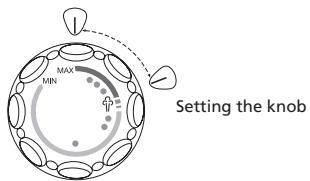
Controlling the temperature
Turn your temperature control knob 3 to the position you desire according to the following fabric indications:
Ironing tips
Sort the articles to be ironed according to the fabric. Ironing instructions are usually stitched onto an inside seam of a garment and these should be followed at all times. Start your ironing with the fabrics requiring the lowest heat setting. If you are unsure of the fibre content of a garment, test a small area (a seam or inside hem) before ironing. When in doubt, start with low heat. If wrinkles remain, gradually increase the heat to find the best setting for good results without damaging the fabric.
How to fill with water
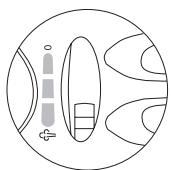
Check that the steam control gear 10 is in the dry position (position 0) when filling the water tank 2.
Pull back the water tank lid 9 and fill the tank to the "MAX" line. Do not overfill. Check the water level in the tank in the position shown.
Use only clean mains water, without any form of additive. Other fluids damage the appliance. To extend the optimal steam blast function, mix mains water with distilled water according to the table.
| Water hardness | Ratios - distilled water to mains water |
| very soft / soft | 0 |
| medium | 1 : 1 |
| hard | 2 : 1 |
| very hard | 3 : 1 |
The water hardness level can be queried at your local water works.
Auto shut-off safety feature
The automatic shut-off function ensures that the iron is automatically shut off after a standstill of 30 seconds in horizontal position or 8 minutes in vertical position.
When the iron is automatically shut off, the blue shut-off indicator light in water tank 2 starts to flash.
If you move the iron gently back and forth, it switches on again. The green heater monitor light 13 comes on again when the temperature at the sole plate 5 drops below the set ironing temperature. Wait until the green heater monitor light 13 goes out.
The iron has then reached the set ironing temperature and can now be used.
Steam ironing
Unwind the mains lead. Ensure that the iron is disconnected from the power supply before you fill it with water. Turn steam regulator to the dry position (0 position) and the temperature control knob to MIN.
Fill the iron with water. Ensure that the MAX marking line is not exceeded. Connect the appliance to the mains power supply again. The blue shut-off indicator light in water tank 2 comes on.
Set the temperature control knob 3 to the steam position and the heating light 18 will illuminate. In this setting, the iron can be used as a steam iron once the heating light 18 goes out. The heating light 18 will illuminate and go out regularly during ironing as an indication that the temperature control is working properly.
Turn the steam control gear to the steam position and the iron will create steam. Turn the steam control gear to the position 0, and the steam will cease.
Steam adjustable
You can adjust the steam easily with the 7 positions of the steam control gear. Put the iron on the heel rest when rearranging clothing or while not in use. Steaming stops when the iron is placed on the heel rest.
Using the steam burst button
Be sure there is water in the tank 2 and the temperature control knob 3 is on steam.
Using the iron horizontally
Lift the iron and press the steam burst button 12. You may need to press this button 12 a few times after filling the iron with water to activate the pump. The burst steam facility can be used only when ironing at temperature of at least 150^ , this means form III to MAX.
Using the iron vertically
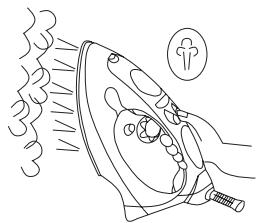
The burst function can be also used when the iron is held in vertical position to remove creases from hanging clothes, curtains, etc.
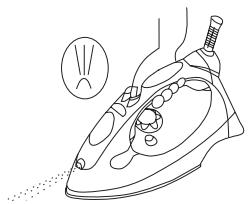
Using the spray-button
Provided there is sufficient water in the tank 2, you can use the spray button 1 at any temperature setting and when steam or dry ironing. While ironing, press the button 1 several times to activate the pump.
Anti-scale system
The integrated anti-scale system reduces the build up of lime scale and increases the user life of your iron
Using the calc clean button
It is important to use the Calc-Clean function before putting the iron into operation for the first time and then at regular intervals in order to remove lime particles and other impurities. We recommend that the Calc-Clean function is used at least twice a month. In areas with very hard water, the iron should be cleaned with the Calc-Clean function after every use, or use distilled water.
- Fill the water up to "MAX" line in water tank ②.
- Insert the plug into the wall socket.
- Set the temperature control ③ to MAX.
- Allow the iron to heat up until the heating light 13 goes out and then lights again.
- Remove the plug from the wall socket.
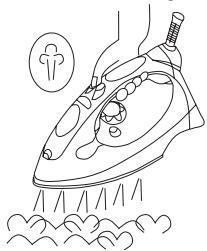
- Hold the iron horizontally over the sink.
- Set the steam control gear to calc clean position (0) then press and hold the calc clean button. The boiling water and steam will drain from the vents in the soleplate. Impurities and scale will be drained away with the water.
- Move the iron backwards and forwards while draining the water.
- Release the calc clean button ④ once all water has been drained out.
- Place the iron in the upright position, plug it and then allow it to heat up.
- Carefully dry soleplate ⑤ by ironing over a towel or old cloth to ensure there is no remainder of the water inside the steam chamber.
- Let the iron cool down completely before storing it.
Drip-stop feature
As indicated on the temperature control knob 3, steam ironing is only possible at higher ironing temperatures. With conventional steam irons, water may drip from the soleplate if an extremely low temperature has been selected. However, a new feature has been added to this iron - 'DRIP STOP' steam shut-off. This means that the iron will automatically stop steaming at low temperatures. When this happens, you will hear a "CLICK". Then set the temperature control 3 to the required temperature. Steaming will recommence as soon as the required temperature has been reached.
Using as a dry iron
The iron can be used as a dry iron, even if there is water in the water tank ②. Do not put water in the water tank ② when the iron is to be used as a dry iron for many hours.
- Put the iron on the heel rest and then plug the iron into the mains.
- Turn the steam control gear 10 to "O".
- Set the temperature control knob ③ to the required temperature.
- When the heating light 13 goes out, it indicates that the iron has reached the required temperature.
Care and cleaning instructions
- Ensure that the soleplate remains smooth and unscratched by ironing around on not over zippers, rivets or any other objects which may scratch the soleplate.
- The hardness of the water and its minerals differs widely from region to region. If the water in your area is very hard, we recommend the use of distilled water that is available in retail stores in order to ensure the optimum function of the iron. If you do not use distilled water, clean the iron regularly using the Calc-Clean function (see section "Calc-Clean Function").
- Do not disassemble or repair your iron yourself.
After each use, remove the plug and let the iron cool down. Wipe the soleplate with a damp cloth and non-abrasive (liquid) cleaner. Clean the iron body with a damp cloth.
Emptying and storing the iron
- Slide the steam control gear 10 several times from 0 to the steam position and back again (self-cleaning).
- Be sure the iron is unplugged first.
- Pour out any remaining water by shaking the iron.
- Make it a habit to empty the iron after each use.
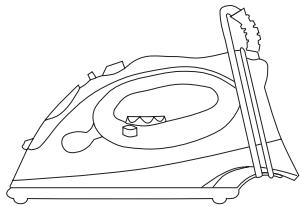
- Put the iron on the storage cover. Do not use the storage cover while ironing.
-
Wind the power cord around the cord winder. Do not wrap the power cable too tightly!
-
On a stable surface, store the iron with storage cover in the horizontal position.
- Let the iron cool down completely before storing.
Importer
KOMPERNASS GMBH
BURGSTRASSE 21
D-44867 BOCHUM
www.kompernass.com
Disposal

Do not dispose of the device in normal domestic waste.
Dispose of the device over a registered waste disposal firm or through your communal waste disposal facility. Observe the currently valid regulations. In case of doubt, consult your waste disposal facility.

Dispose of the packaging materials in an environmentally responsible manner.
Warranty and customer service
The warranty conditions and service centre address can be found in the enclosed warranty slip.