
DIGITAL CAMERA MD 7466 - Digital Camera MEDION - Free user manual and instructions
Find the device manual for free DIGITAL CAMERA MD 7466 MEDION in PDF.

| Brand | MEDION |
| Model | DIGITAL CAMERA MD 7466 |
| Product type | Compact digital camera |
| Maximum resolution | 2048 x 1536 pixels |
| Available resolutions | 2048x1536, 1600x1200, 1024x768 |
| Digital zoom | 1.0x - 4.0x (in steps) |
| Viewfinder | Built-in, optical |
| LCD screen | Yes, with backlight |
| Built-in flash | Yes (Auto/Off) |
| Self-timer | 10 seconds |
| Video recording | AVI 320 x 240 pixels |
| Power supply | 2 AAA 1.5V batteries (alkaline recommended) |
| Battery life (with LCD) | Approximately 60-70 minutes (650 photos without flash) |
| Battery life (without LCD) | Approximately 100-120 minutes (950 photos without flash) |
| Connection | USB (mini-B) |
| Included software | Slim 3000 (album management, PC camera) |
| File formats | JPEG (photo), AVI (video) |
| Weight (estimated) | Approximately 100 g (without batteries) |
| Dimensions (estimated) | 9 x 6 x 3 cm |
| Maintenance and cleaning | Clean the lens with a soft cloth; protect from moisture |
| Safety | Avoid exposure to extreme temperatures; remove batteries if not used for a long time |
Frequently Asked Questions - DIGITAL CAMERA MD 7466 MEDION
User questions about DIGITAL CAMERA MD 7466 MEDION
0 question about this device. Answer the ones you know or ask your own.
Ask a new question about this device
Download the instructions for your Digital Camera in PDF format for free! Find your manual DIGITAL CAMERA MD 7466 - MEDION and take your electronic device back in hand. On this page are published all the documents necessary for the use of your device. DIGITAL CAMERA MD 7466 by MEDION.
USER MANUAL DIGITAL CAMERA MD 7466 MEDION
How to use mode button 4
How to use control button 4
Snapshot 5
Taking Still Pictures 5
Viewfinder 6
Zoom 6
Self-Timer 7
Recording AVI Movies 8
Play 9
Play the still pictures and AVI Movies 9
Delete the still pictures and AVI Movies 10
View the pictures on PC 11
Install the driver and camera program (Slim 3000) 11
View the pictures saved in Camera through 15
Windows 15
Picture's positions and picture files 16
Use PC camera to capture pictures on Windows 16
Advanced operation 17
Change setup 17
Camera program (Slim 3000) 18
Activate Slim 3000 18
Mode selection 19
Album mode 20
PC camera mode 25
Troubleshooting 28
The parts
For detailed operation information, please refer to the page number in the bracket.
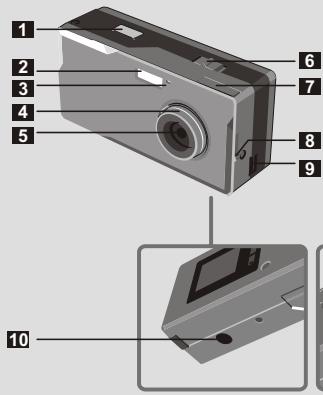
1 Shutter
2 Flash strobe
3 LED Indicator
4 Focus (5)
5 Lens
6 Power switch (5)
Viewfinder
Viewfinder (Eject button)
9 USB port (13, 15)
10 Stand hole
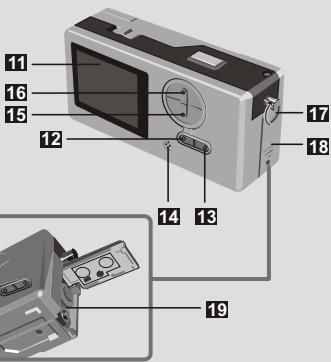
LCD display
12 LCD status and backlight button (6)
18 Mode button MODE(6)
14 Built-in microphone
13 Control button (Zoom-in) ZOOM (4,6)
16 Control button (Zoom-out)
17 Strip hookStrap holder
18 Battery cover (3)
19 Battery compartment (3)
Hook up the power
Please use two AAA 1.5V batteries
We recommend you use alkaline batteries
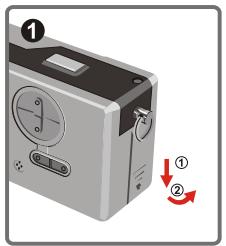
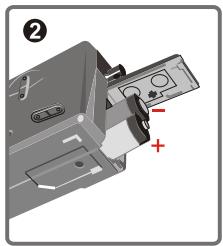
1 Open the battery cover
Insert two AAA batteries
Follow the battery installation as shown.
3 Close the battery cover
Battery Life
| Taking Still Pictures | Battery Life (minutes) | Number of pictures (without flash) |
| Use LCD ON | Approximately 60-70 | Approximately 650 |
| Use viewfinder (LCD OFF) | Approximately 100-120 | Approximately 950 |
*Above data is for using alkaline batteries and in 25^ C ,pictures are taken every four seconds.
! Notes:
- Battery life will be shorter in the following conditions.
Taking snapshot at low temperature.
Turn on/off power repeatedly.
The above table is for reference only. - Using flash light will decrease the number of pictures to be taken.
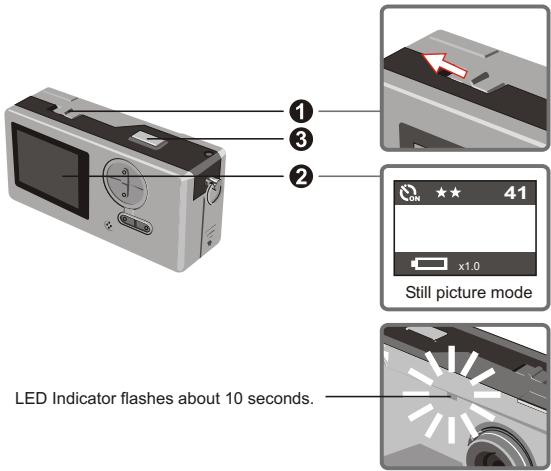
How to use MODE button
You can use the MODE button to take and playback pictures or shift between all modes.
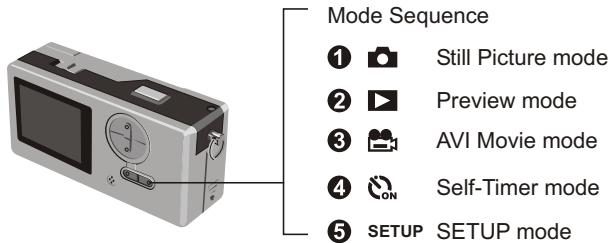
Press and hold the mode button for two seconds in any mode. Your camera will automatically change to Still Picture mode.
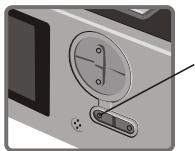
How to use CONTROL button
Still Picture mode or Self-Timer mode
You can use the CONTROL button to focus the picture. Press the upper button to zoom in and press the lower button to zoom out.
Please see [Focus] in [Taking Sill Picture] for details.
- SETUP Mode Setup
Use CONTROL buttons
Taking Still Pictures

1 1 icon stands for 1600× 1200 pixels. For detailed information on setting, please refer to SETUP mode.
Before you take still pictures, please power on your camera.
2 Make sure your camera is in Still Picture mode.
3 Press the shutter button.
The sound generated by the shutter tells you that the screen has been closed and opened. You can take the next snapshot.
Focus for snapshot of near objects ( 30 - 100cm)
Before you take snapshot of objects less than 100cm to you, please adjust the focus to 业 and return to before you take snapshot normally.

Automatic power shutoff
If your camera is motionless for 60 seconds when you take snapshot or play the pictures, the camera will be turned off to save energy.
Please turn on power when you use your camera again.
The automatic power shutoff works only when you use batteries. If you plug connector into USB hole, the automatic power shutoff does not work.
Viewfinder
To save the energy of batteries, you can turn off the backlight of LCD and take snapshot through viewfinder.
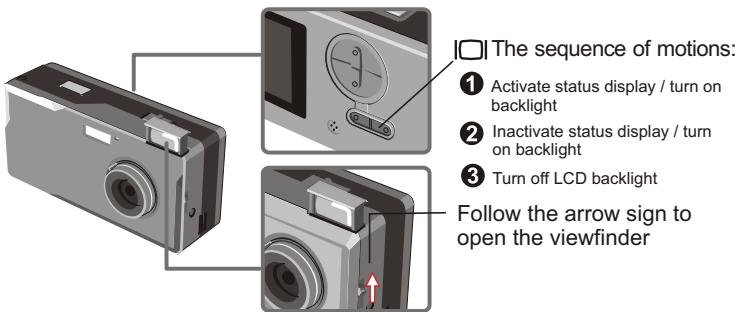
1 Your viewfinder is designed in a special manner. To watch the viewfinder, you should keep your eyes 30 - 45cm to the viewfinder.
Zoom
You can use the zoom when you take still pictures and self-timer ON .s

1 You can adjust the zoom digitally in 5 sections ranging from 1.0X -4.0X.
Self-timer
When you use self-timer, you can take the snapshot of the objects 10 seconds after you press the shutter.
1 Turn on power.
Press the MODE button on and switch to self-timer mode.
3 Press shutter.
The LED indicator flashes for about 10 seconds. The snapshot is taken as soon as the LED indicator goes out.
Please remember, you cannot cancel the self-timer after the shutter is pressed.
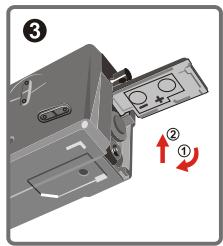
Recording AVI movies
Movies with sound are stored in AVI format.
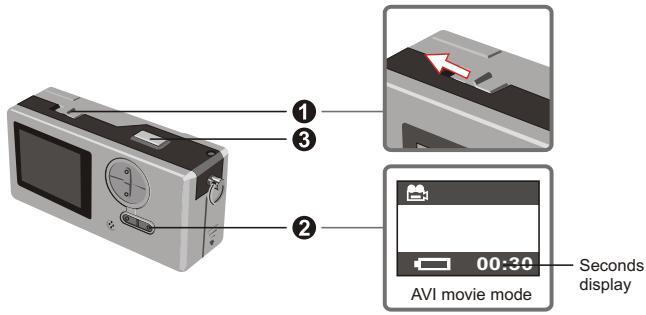
1 Please follow the arrow sign to turn on power before recording AVI movie.
Switch to AVI movie mode.
Press shutter to start the recording:
The AVI movies will be taken when the shutter key is pressed and will be saved every 30 seconds. The length of the movie depends on camera memory capacity.
4 Press shutter again to stop the recording:
Press the shutter key again will stop the recording.
The resolution of AVI movie is 320 × 240 .
Play the still pictures and AVI Movies
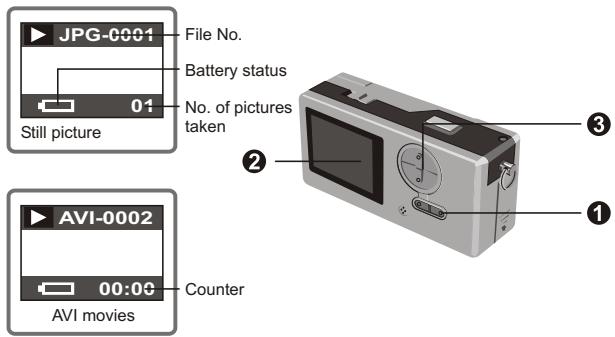
1 Switch from preview to AVI movies, your camera starts playing if you do not press other button in 1 second.
Switch to preview mode.
The last taken still picture or AVI movie appears on the screen.
Press Up (Down) button to preview the still picture or AVI Movies forwardly (or reversibly).
1 You can turn off the status display to increase the size of visible area on the LCD.
Sequence of motions:
1 Activate status display / turn on backlight
2 Inactivate status display / turn on backlight
3 Turn off LCD backlight
-
- When AVI Movies are downloaded to PC, the sounds of the movie will be played.
- When AVI Movies are played on the camera, the sound will not be played.
Delete the still pictures and AVI movies
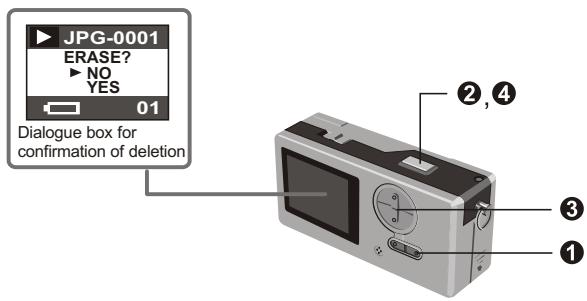

Switch to the preview mode
The last taken still picture or AVI movie appears on the screen.
Press Up (Down) button to preview the still picture or dynamic picture forwardly (or reversibly).
Press shutter, you will see the dialogue box for confirmation of deletion on the screen.
Press Down (Up) button to select YES or NO.
4 Press shutter again to confirm and the picture will be deleted.
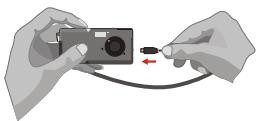
View the pictures on PC
You can view the pictures and films taken by your camera on your PC. You can use the applied software for modification. You can also attach the pictures to e-mails.

Caution: be sure you have installed the driver before you connect your camera to your PC. If you connect USB cable first, you will not be able to install the driver.
Install the driver and camera programs for Slim 3000.
1 Turn on PC.
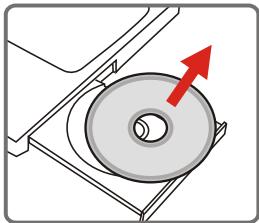
2 Place the CD in the CD-ROM.
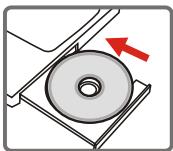

The title appears on the screen in a few seconds.
If no title appears on screen
① Double-click the icon "My computer".
② Double-click the icon CD-ROM ("Slim 3000 (E:)"")
*The drive of CD varies, depending on how your PC is set up.
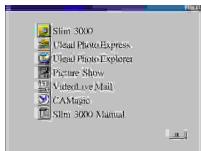
Move mouse to "Slim 3000" and single-click left key of mouse.
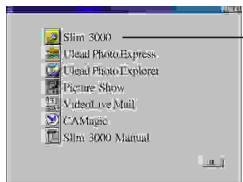
Single-click the left key of mouse at "Slim 3000".

Start installing driver and camera program. The "InstallShield Wizard" picture appears.
4 Click the left key of mouse at "NEXT"

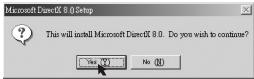
Installation begins. Follow the instructions shown on the picture to install DirectX8.0 driver step by step.
⑤ Follow the instructions shown on the screen to quit the installation program.
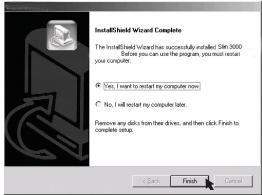
Installation begins. You will see the picture of completion as soon as installation is completed.
The album driver is available for use after your PC is restarted.
CD-ROM pops out from your PC.Take the CD out.
7 Connect USB cable to the USB receptacle of PC.
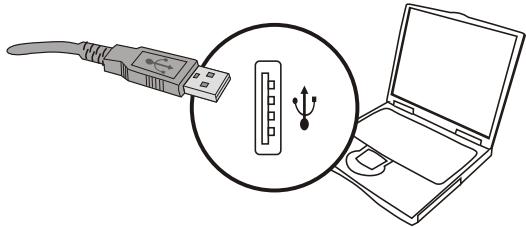
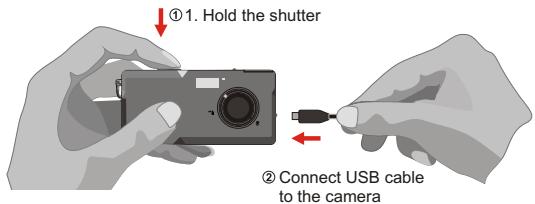
3 Connect the other end of USB cable to camera to complete the installation of "Removable Disk".

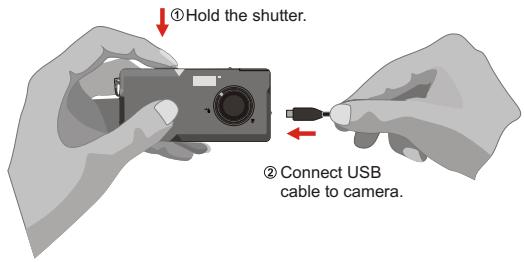
Hold the shutter and connect USB cable to camera again to complete the installation of PC camera driver.
NOTICE:
Please follow the steps to reinstall Slim 3000 if you connect the camera and PC via USB cable without installing Slim 3000 first.
- Please click Start -> Setting -> Control Panel -> System.
- Select Hardware tab under System list -> Device Manager.
A. For Windows XP / 2000 User:

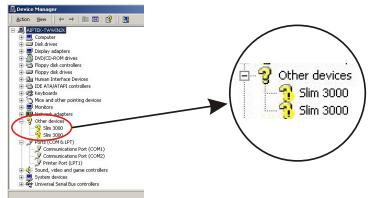
Please select the icon Slim 3000 and remove it.
B. For Windows 98SE / ME User:

Please select ?! Slim 3000 and remove.
- Unplug the USB cable from PC.
- Place the Slim 3000 drive disk into your CD-ROM to install Slim 3000.
- After the installation is completed, connect the USB cable to PC again and start to use the camera.
View the pictures saved in Camera through Windows
1 Turn on PC and activate Windows.
Connect USB cable to the USB receptacle of PC. Connect the other end of USB cable to the camera.
3 Double-click the icon of "My computer".
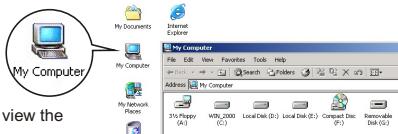
You can also use Cam Manager to view the pictures saved in PC.
4 Double-click mouse to identify the new "Removable Disk".
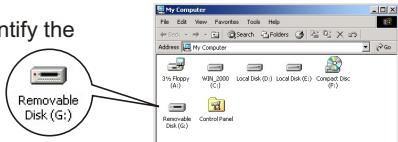
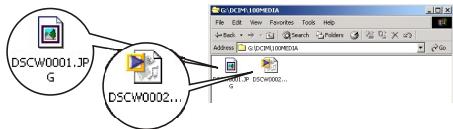
Double-click "DCIM" file holder.

Double-click "100MEDIA" file holder.
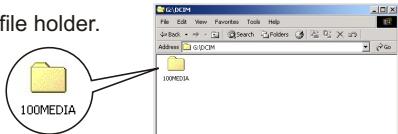
7 Double-click picture or AVI.
To play AVI dynamic picture, you need to install Windows Media Player (recommended) and DirectX8 driver.
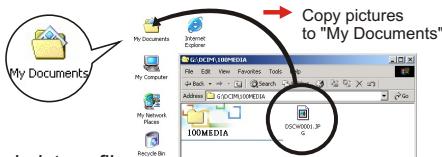
Copy pictures to your PC
Drag the picture to "My Documents"
Picture's positions and picture files

Use PC camera to capture pictures on Windows
1 Turn on PC and activate Windows.
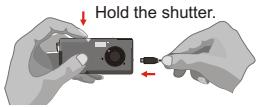
Connect USB cable to the USB receptacle of PC. Hold the shutter and connect the other end of USB cable to the camera and enter into PC Camera mode.
3 Activate Slim 3000 or other visual software to view Live Video.
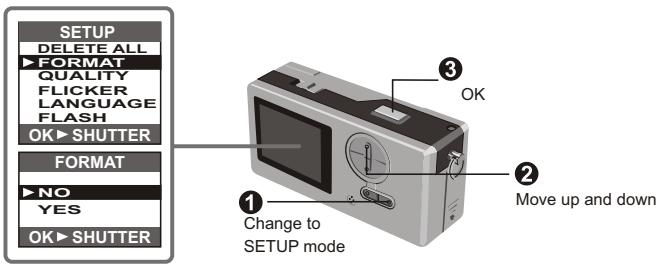
Change the setup
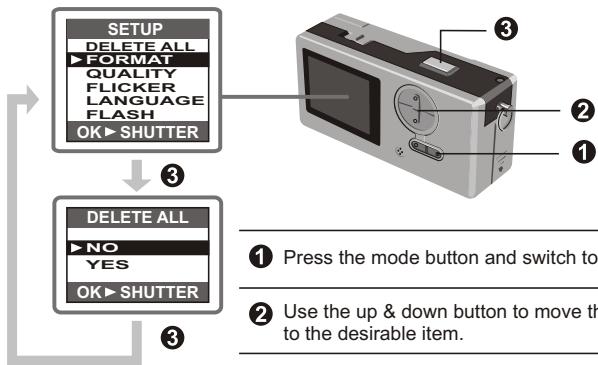
1 Press the mode button and switch to Setup mode.
Use the up & down button to move the mouse to the desirable item.
3 Press shutter to confirm your choice.
| Item | Setup | Description |
| DELETE ALL | NO | Delete all still and dynamic pictures from your camera. |
| YES | ||
| FORMAT | NO | Format the memory of camera and clear all data from the memory. |
| YES | ||
| QUALITY | 2048x1536 | The camera supports 3 resolutions 2048x1536 is enhanced mode. |
| 1600x1200 | ||
| 1024x768 | ||
| FLICKER | 50HZ | Set up AC frequency and synchronize with fluorescent. |
| 60HZ | ||
| LANGUAGE | ENGLISH | Multi-lingual LCD supports English, French, Spanish, German, Dutch, Italian and Portuguese. |
| FRANCIAS | ||
| ESPANOL | ||
| DEUTSCH | ||
| NEDERLANDS | ||
| ITALIANO | ||
| PORTUGUES | ||
| FLASH | OFF (Default) | Charging the flash requires 3-5 seconds. The LCD preview will be temporarily shut off during charging |
| AUTO |
Camera program (Slim 3000)
Activate Slim 3000
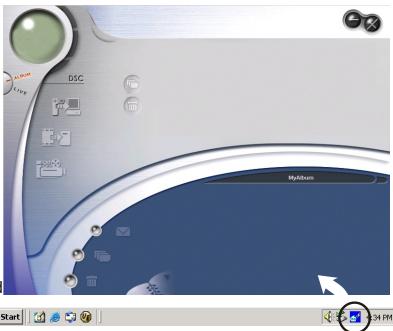
When USB is connected to the camera, the Monitor icon shown on Windows row automatically activates the camera program according to the types of modes.
Album Mode
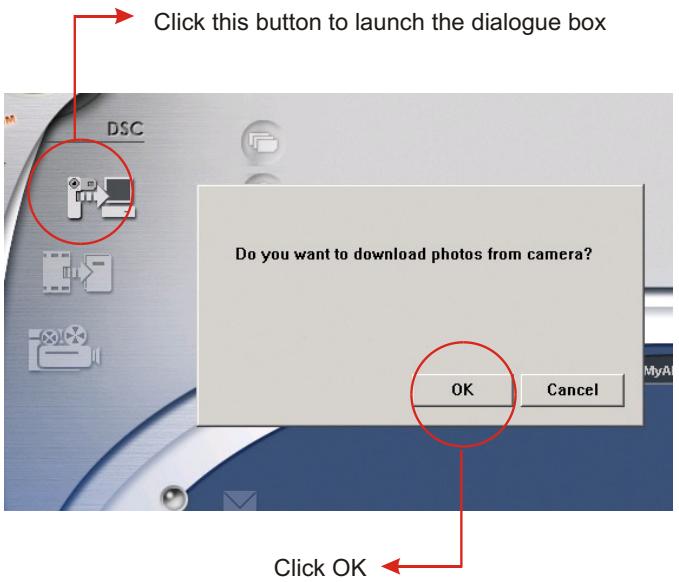
1 Connect USB to camera.
Slim 3000 appears on the center of the screen and asks you if you want to download the pictures saved in the camera.
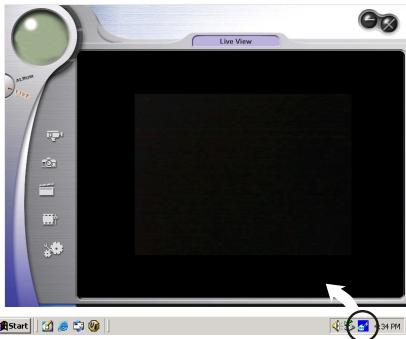
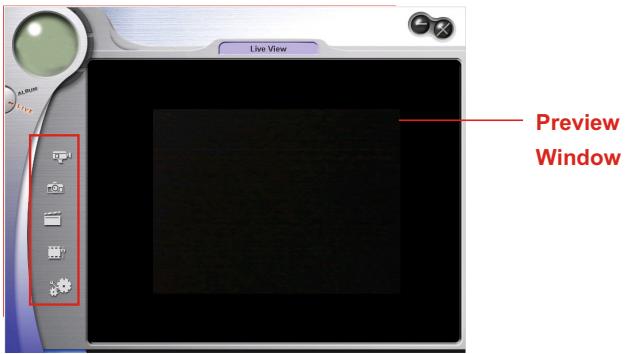
PC Camera mode
Hold the shutter and connect USB to camera.
The Live View program of Slim 3000 appears on the center of the screen.
If not activated
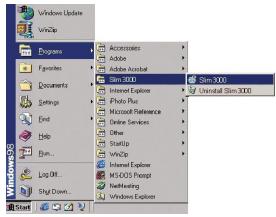
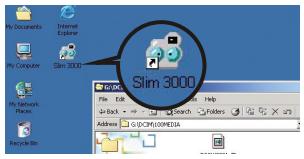
① Click the Slim 3000 icon on the Desktop to execute the program where you can begin to use your camera.

② Click on the "Start" menu and go up to "Programs". Then go to the folder named "Slim 3000" and select it.
Mode Selection
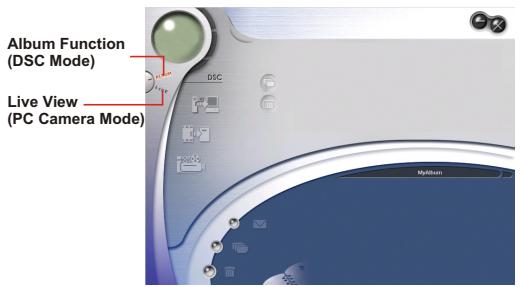
Press the "Live View" button to change the camera to PC Camera mode.
Press the "Album Function" button to change the camera to DSC mode.
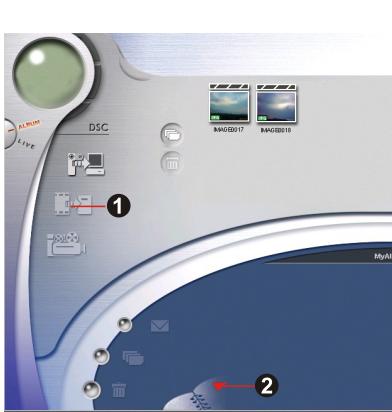
Album Mode
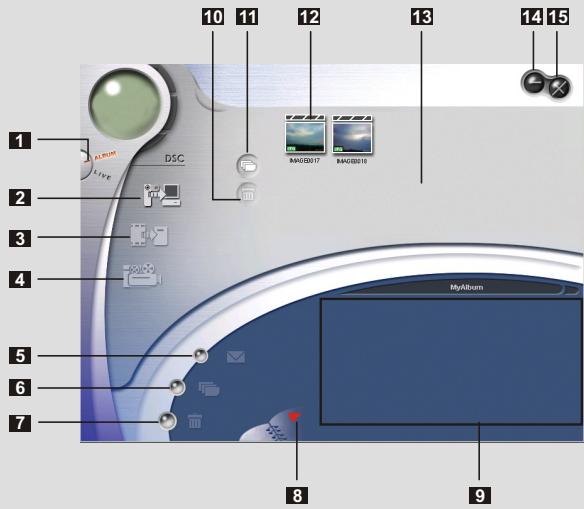
1 DSC Function (DSC Mode)
2 Transfer images to the work area
3 Transfer images to the album
4 Create AVI file
5 Send Mail
6 Select All
7 Delete
3 Album Manager
9 Album
0 Delete
11 Select All
Image
13 Work area
14 Minimize
15 Exit
Downloading pictures and movies
① Make sure your camera is connected to your PC via the USB cable.
② Set the Slim 3000 to Ablum mode.
③ A dialogue box will pop up and ask if you want to download photos from your camera.
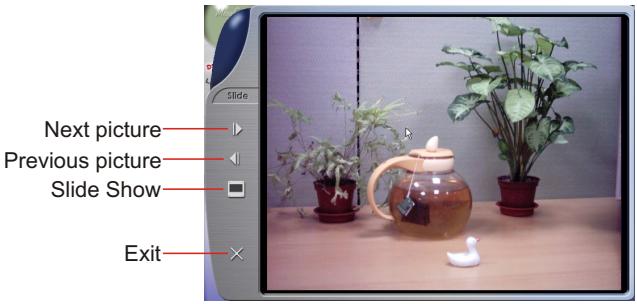
Viewing pictures
Double-click any picture or movie to launch the viewer.
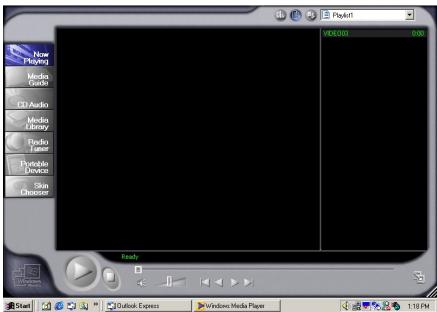
Viewing movies
Double-click any AVI movie to automatically launch the movie in your default media player.
Album Manager
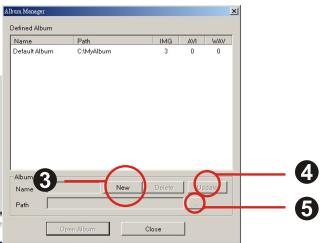
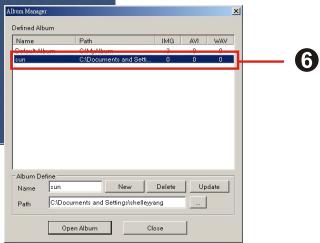
1 Highlight a picture on the work area and click to the Photo Album.

to transfer
2 Click the Album Manager

to create a new Photo Album.
Key in a new album name.
4 Click "new" to designate a path where the album will be stored.
Click "Update" to confirm the new album is created.
Click " " to enter the new created album.

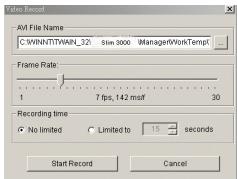
Creating AVI files
1 Select jpg / bmp images from the work area.
Click to load the images to the AVI File Manager.
3 Order the image sequence, and adjust the frame rate.
PC Camera Mode

Record live video

Steps
- Press

- Adjust recording speed and time.
- Press "Start to Record"

Capture live still image

Set image size

Advanced settings (default settings recommended)

Select video source
(if you have more than one image import device installed)
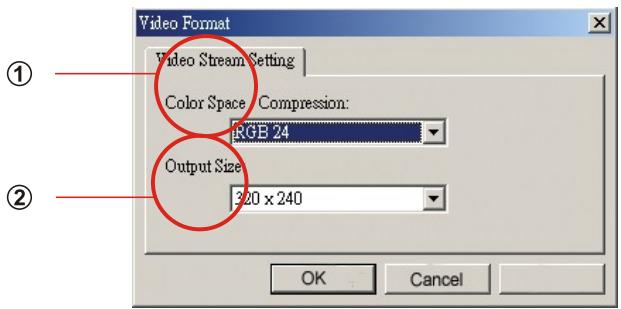
Set Image Size

① Color Space
Select one of the following functions when you have different needs.
-
RGB 24: better image quality
-
1420: faster speed
② Output Size
Setting output size can change the size of the preview window. The default size is 320x240. Choose larger pixels when you need a larger preview window.
320 × 240
640× 480
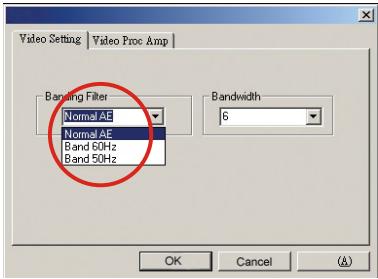
Video Setting
- Banding Filter:
When your PC screen flickers, please change the banding filter in Video Setting. The refresh rate (the number of times the screen is redrawn per second) is the most likely cause of flicker. Select 50Hz or 60Hz until your PC screen stops flickering.
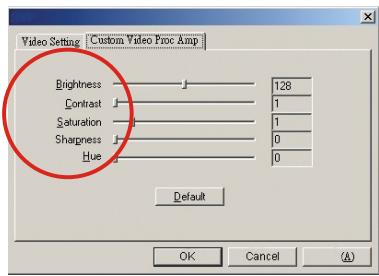
Custom Video Pro Amp
You can use the default setting or change settings (brightness, contrast, saturation, sharpness, and hue) on your own.
| Symptom | Actions |
| 1. When installation step missed: | Please remove the camera driver and other related software and follow each installation step to reinstall the camera. |
| 2. When conflict with another camera driver capture device: | If you have any other camera installed on your computer, completely remove the camera and it's driver from your system to avoid a driver conflict with another camera or capture device. |
| 3. When unable to install driver: | When installing camera driver under Windows 98SE, you'll be asked to insert a 98SE CD-ROM. Please follow the command to complete the installation. |
| 4. When unable to download images: | Please re Plug the camera to download images. |
| 5. Adjust VGA card when image color is not fully saturated: | Please follow the operation steps:Go to control panel. Double - click "Display". Click on "Settings". Click on "Colors". Choose "High Color" or "True Color". |
| 6. Please adjust the acceleration function of VGA card when unable to play images in Video Conferencing mode or in AVI mode. | Please follow the operation steps:Go to control panel. Double - click "Display". Click on " Settings". Click on "Advanced". Click on "Performance" or "Troubleshooting" Set the "Hardware acceleration" from "Full" to "None". |
| 7. Noise appears on PC screen while camera used as a video conferencing camera. | Change Band Filter to 50 Hz or 60 Hz. |
| 8. Images are blurred. | Adjust focus. |
| 9. Images are too dark. | Take pictures while there is adequate light. Use editing tools such as Photoshop or Photolpact to adjust image brightness. |
| 10. AVI files can't be played back. | Install Direct X 8.0 or above. |
① Click the Slim 3000 icon on the Desktop to execute the program where you can begin to use your camera.
② Click on the "Start" menu and go up to "Programs". Then go to the folder named "Slim 3000" and select it.

Mode Selection

Press the "Live View" button to change the camera to PC Camera mode.
Press the "Album Function" button to change the camera to DSC mode.
Mode Album

A. Para Windows XP / 2000 Opcode:


- Prima " Start to Record "
