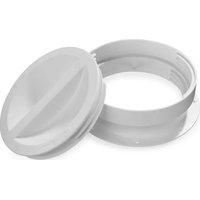
Universal Exhaust Hose Wall Mount - Air Conditioning DUUX - Free user manual and instructions
Find the device manual for free Universal Exhaust Hose Wall Mount DUUX in PDF.


| Product type | Universal wall mount for air conditioner exhaust hose |
| Brand | Duux |
| Model | Universal Exhaust Hose Wall Mount |
| Material | UV-resistant ABS plastic |
| Color | White |
| Compatible hose diameter | 120 mm to 150 mm |
| Installation type | Wall mounting with screws and anchors included |
| Dimensions (L x W x H) | 20 x 15 x 10 cm |
| Weight | 0.3 kg |
| Main functions | Stable holding of exhaust hose, reduction of hot air leakage, tool-free installation |
| Maintenance and cleaning | Clean with a damp cloth, avoid abrasive products |
| Safety | Secure fastening to prevent hose dislodgement, heat resistance up to 60°C |
| Spare parts and repairability | Not applicable (single piece, non-removable) |
| Included accessories | Mounting kit (screws, anchors), adapter for hose diameters |
| Warranty | 2 years |
Frequently Asked Questions - Universal Exhaust Hose Wall Mount DUUX
User questions about Universal Exhaust Hose Wall Mount DUUX
0 question about this device. Answer the ones you know or ask your own.
Ask a new question about this device
Download the instructions for your Air Conditioning in PDF format for free! Find your manual Universal Exhaust Hose Wall Mount - DUUX and take your electronic device back in hand. On this page are published all the documents necessary for the use of your device. Universal Exhaust Hose Wall Mount by DUUX.
USER MANUAL Universal Exhaust Hose Wall Mount DUUX

Universal Exhaust Hose Wall Mount
for mobile air conditioner
user manual | gebruikershandleiding | Bedienungsanleitung Mode d'emploi | manual de instrucciones
duux®
Contents

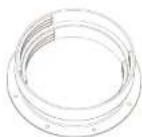
Well connector

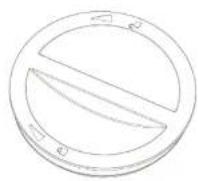
Cover

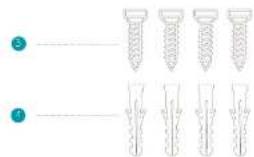
4x wall-mounted plug (6mm)

Manua
4x9/1 mount screw with 50 (5t. 4x30mm)
Table of contents
- Product overview 03
- Safety warnings 04
- installation
-
Usage and maintenance 07
-
Productoverview

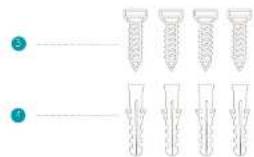

Note: After unpacking, check if the parts mentioned above are included and check their purpose throughout this user manual.
1× wall connection
1x cover
3. 4x wall mount screw with cap (5t, 4×30mm)
4x wall mount plug (6mm)
2. Safetywarnings
Read this manual carefully before installing the product.
• After installing the product by following the instructions in this manual, make sure that, the user also reads the manual carefully.
• Make sure to save the instructions for future references.
• The supplier or manufacturer will not offer any guarantee for the consequences and damages derived from an inadequate installation or misuse of this accessory.
△ Warning
• The product should be installed by trained and experienced personnel. Installing the product without the help of a professional installer can be dangerous and could cause damage. In case of performing the installation yourself, please pay special attention to the general security measures when installing such product.
- The product should be installed in a place that can withstand its weight. If the product is installed on an under resistant surface, it may fall off when the exhaust hose is installed
- To move or remove the product after installation, contacts a professional installer, if an unqualified person moves or remove the product, it could cause a safety risk.
Do not hang on the product or allow it to suffer any impact after installation. The product could fall off and cause damage to the mounting surface.
Caution
• To successfully install the product, follow the instructions in this installation manual. If you do not follow the instructions, the product may not install properly or cause product damage.
- Wear protective gloves when installing the product, do not do so with bare hands. Otherwise, physical injuries may occur.
- Check that the wall provides the proper consistency to support the product before installing it, and use the plugs and screws supplied during installation. If you use plugs and screws not specified by the manufacturer, they may not support the weight of the product, which could cause a safety risk.
- When making holes in the wall, be sure to always use a drill bit of the specified diameter. Be sure to also follow the instructions regarding the depth of the borcholes. Otherwise, the product may not be installed correctly, which can cause a security risk.
3. Installation
Read before installation
- Do not use the product for any other purpose other than specified.
- Use caution when performing and using wall mounting to avoid product damage and safety risks.
• To easily perform wall assembly, follow the instructions in this user manual.
- If the instructions in this manual are not clear, do not install the product and contact a professional installer to perform the installation
- It is recommended to install this product only on walls where you can have the total security that the weight of the product can withstand along with the exhaust nose.
- Be especially careful when making holes in the wall that no cable or pipe can be damaged.
• Install the product only on vertical walls - Do not install the product on walls with angles that are out of the ordinary, on very sloping walls or on the ceiling.
• Verify that you have all the accessories
s ucoled with the product before installing it. - Be sure to keep accessories out of the reach of children to avoid safety risks such as a child drowning when swallowing a small piec
• Make sure all screws are tights. Over tightening the screws could damage the wall and could
affect the product performance or damage the product
- Ensure that the installation does not exceed excessive loan and that no external force is applied to it.
• To avoid dangerous situations, be careful when handling tools during installation.
Tools required

Philipsxcrewdriver (PH2)
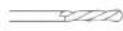
Stone drill bit (Gram) for screw notes

Rubber hammer

Hole-saw bit. In case you need to make the hole in the wall (diameter 150 mm)

Electric drill
or hammer drill
Instructions
Note: The illustrations may differ from the actual product.
A Note: If necessary, consult a professional when making the hole in the wall.
A Important: Check that the wall has sufficiently strength and that there is no electrical cable or water pipe in the chosen place. Make the hole in the wall (if necessary) by using the hole-saw bit of diameter equal to 150 mm.
Drill the holes in the wall for the fixed plugs by using a 6mm drill bit. The depth of the holes should be approx. 30mm. Clean the drilled hole before inserting the plugs.

Fully insert the fixed plugs into the wall. If necessary, use a rubber hammer to insert the plugs.

Insert she wall mount screws into the hole and tighten them with a Phillips screwdriver (manual or electric)
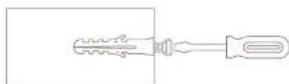
- Make sure that the installation is correct and that the wall connector is fixed.
4. Usage and maintenance
- This wall mount connector can only be used for exhaust hoses with a diameter of 150mm and 165mm.
- When your mobile air conditioner will not be used for a long time, disconnect the hose and close the wall connector using the provided cover.
- Use a soft cloth with water to clean the surfaces of the product (in case of a lot of dirt, it should be cleaned with a clamp cloth with warm water and neutral liquid detergent).
Disposal
This product must not be disposed in the normal unsorted municipal waste stream. If you want to dispose this product it must be separately collected.

Doosinhoud
M. 1945

Dekeel

4x plug (5 mm)
4. school method (50:4 x 30min)

Handling
Inhouds opgave




Designed in The Netherlands bij Duux BV. Made in P.R.C. Duux BV, P.O. Box 145, 5400 AC Uden Netherlands, www.duux.com
© 2022 Duux. All rights reserved.
DUUX® is a trademark of Duux BV,
registered in the EU and other countries.
The brand cited belongs exclusively to the respective owners.
Specifications are subject to modification without notice.
duux
Version: IMDXMAWM01_V1
Brand : DUUX
Model : Universal Exhaust Hose Wall Mount
Category : Air Conditioning