
NRB32SG2SF & NR-B32SG2 - Fridge PANASONIC - Free user manual and instructions
Find the device manual for free NRB32SG2SF & NR-B32SG2 PANASONIC in PDF.

| Product type | Frost-free refrigerator-freezer |
| Compatible models | NR-B32SG2-SE, NR-B32SG2-SF, NR-B32SG2-SB, NR-B32SW2-WB |
| Total net volume | 324 L |
| Net refrigerator volume | 224 L |
| Net freezer volume | 72 L |
| Net chill compartment volume | 28 L |
| Dimensions (W x D x H) | 600 mm x 652 mm x 2044 mm |
| Net weight | 80 kg |
| Power supply | 220-240 V ~ 50 Hz |
| Annual energy consumption | 250 kWh/year |
| Freezing capacity | 12 kg/24h |
| Autonomy without electricity | 18 hours |
| Refrigerant | R600a (60 g) |
| Blowing agent | Cyclopentane |
| Climate class | Tropical (T): 16 °C to 43 °C |
| Noise level | 42 dB(A) |
| Refrigerator temperature range | 2 °C to 8 °C (adjustable) |
| Freezer temperature range | -24 °C to -16 °C (adjustable) |
| Special features | Super Freeze, Super Cool, Eco, Holiday, Drink Cool, Screen saver, Child lock |
| Interior lighting | LED (class 1M) |
| Number of vegetable drawers | 2 |
| Number of freezer drawers | 3 (including one lower drawer) |
| Parts supplied for door reversal | Yes (contact customer service for installation) |
| Recommended cleaning | Soft cloth and warm water; avoid abrasive products |
| Warranty and repairability | Spare parts available from the manufacturer; do not disassemble yourself |
Frequently Asked Questions - NRB32SG2SF & NR-B32SG2 PANASONIC
User questions about NRB32SG2SF & NR-B32SG2 PANASONIC
0 question about this device. Answer the ones you know or ask your own.
Ask a new question about this device
Download the instructions for your Fridge in PDF format for free! Find your manual NRB32SG2SF & NR-B32SG2 - PANASONIC and take your electronic device back in hand. On this page are published all the documents necessary for the use of your device. NRB32SG2SF & NR-B32SG2 by PANASONIC.
USER MANUAL NRB32SG2SF & NR-B32SG2 PANASONIC
Operating Instructions
Refrigerator-Freezer
(Household use)
Model No. NR-B29SG2
NR-B29SW2
NR-B32SG2
NR-B32SW2
English 2-21
Thank you for purchasing this Panasonic product. Please read these instructions carefully before using this product. Please keep this manual for future reference. Included installation Instructions.
Deutsch 22-39
Caring for the environment 2
Safety instructions 3
Installation 6
Parts. 8
Control panel 9
Setting the temperature 10
Using the handy functions 11
User alert functions 14
Making ice cubes. 14
Removing and attaching shelves. 14
Care and Cleaning instructions 15
Troubleshooting 17
FAQs 18
Specifications 20

Caring for the environment

Disposing of the packaging
Please recycle where possible (e.g. cardboard, plastic bags, adhesive tape and polystyrene) and make sure you dispose of all other packing materials safely.
Keep the packaging out of the reach of babies and young children, to avoid injury or suffocation.
Information on Disposal for Users of Waste Electrical & Electronic Equipment (private households)
This symbol on the products and/or accompanying documents means that used electrical and electronic products should not be mixed with general household waste.
For proper treatment, recovery and recycling, please take these products to designated collection points, where they will be accepted on a free of charge basis. Alternatively, in some countries you may be able to return your products to your local retailer upon the purchase of an equivalent new product.
Disposing of this product correctly will help to save valuable resources and prevent any potential negative effects on human health and the environment which could otherwise arise from inappropriate waste handling. Please contact your local authority for further details of your nearest designated collection point.
Penalties may be applicable for incorrect disposal of this waste, in accordance with national legislation.
For business users in the European Union
If you wish to discard electrical and electronic equipment, please contact your dealer or supplier for further information.
Information on Disposal in other Countries outside the European Union
This symbol is only valid in the European Union.
If you wish to discard this product, please contact your local authorities or dealer and ask for the correct method of disposal.
Before disposing of your old appliance
Please follow either the disposal instructions from the manufacturer of the old appliance, or local disposal regulations for the appliance. Where this is not available, please follow the three step instructions below.
- Remove the mains plug from the socket.
- Cut the mains lead off, and safely dispose of it with the mains plug still attached.
-
Until the old appliance is collected, or you take it to a Recycling Centre, make sure it's out the reach of small children.
-
Remove all sealing materials from the door and leave all the shelves and drawers in place. This way, children are less likely to climb in and become trapped.
This appliance is intended to be used in household and similar applications such as
- staff kitchen areas in shops, offices and other working environments;
- farm houses and by clients in hotels, motels and other residential type environments;
- bed and breakfast type environments;
- catering and similar non-retail applications.
For your safety, please read the following text carefully.
This appliance is supplied with a molded three pin mains plug for your safety and convenience.
A 13 ampere fuse is fitted in this plug.
Should the fuse need to be replaced please ensure that the replacement fuse has a rating of 13 ampere and that it is approved by ASTA or BSI to BS1362.
Check for the ASTA mark or the BSI mark on the body of the fuse.
If the plug contains a removable fuse cover you must ensure that it is refitted when the fuse is replaced.
If you lose the fuse cover the plug must not be used until a replacement cover is obtained. A replacement fuse cover can be purchased from your local Panasonic dealer.
If the fitted molded plug is unsuitable for the socket outlet in your home then the fuse should be removed and the plug cut off and disposed of safely.
There is a danger of severe electrical shock if the cut off plug is inserted into any 13-ampere socket.
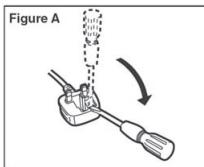
How to replace the fuse
The location of the fuse differs according to the type of AC mains plug (figures A and B).
Confirm the AC mains plug fitted and follow the instructions below. Illustrations may differ from actual AC mains plug.
Open the fuse cover with a screwdriver and replace the fuse and close or attach the fuse cover.

What the symbols mean:

Do not

Make sure you do this

Indicates the appliance must be earthed to prevent electric shock

Do not take apart

Indicates risk of death or serious injury.
This appliance is not intended for use by persons (including children) with reduced physical, sensory or mental capabilities, or lack of experience and knowledge, unless they have been given supervision or instruction concerning use of the appliance by a person responsible for their safety.
Children should be supervised to ensure that they do not play with the appliance.

Do not use a multiple socket adaptor and plug several appliances into the same socket adaptor.
- This can cause overheating, fire or short circuit.
Do not pinch, knot, or bend the mains lead, or place heavy objects on it.
- This increases the risk of fire or electric shock. If the mains lead or plug of the appliance is damaged, it must be replaced by the manufacturer, its service agent or similarly qualified person in order to avoid a hazard.
Do not unplug the refrigerator by pulling on the mains lead.
- This can damage to the mains lead. Always grip the mains plug and pull firmly from the socket.
Do not place any water container on the top of the refrigerator.
- Water can damage insulation of electrical components and cause short circuit, fire or electric shock.
Do not spray inflammable gas near the refrigerator.
- This can cause explosion or fire.
Do not spray water onto or into the refrigerator.
This can cause fire or electric shock.
Do not touch the mains plug with wet hands.
This can cause electric shock.

Safety instructions (continued)
| Do not store the refrigerator in a damp place, or where it may come into contact with water. • Deteriorated insulation of electrical parts can cause short circuit, electric shock or fire. Do not store volatile or flammable substances in the refrigerator. • Flammable substances such as benzene, thinners, alcohol, ether and Liquid Petroleum Gas (LPG) can cause explosions. Do not store pharmaceuticals or other temperature-sensitive products in the refrigerator. • You should not store products that require strict temperature controls in the refrigerator. Do not let children climb, swing or hang on the refrigerator door. • This can cause serious injury, as well as damaging the refrigerator. Do not operate the refrigerator in the presence of explosive fumes or flammable gas. • This can cause explosion or fire. Do not store petrol or other flammable liquids and vapours in the refrigerator, or use them near the appliance. • This can cause explosion or fire. |
| -WARNING: Do not use mechanical devices or other means to accelerate the defrosting process, other than those recommended by the manufacturer. • This can cause damage to the interior of the refrigerator or cause an explosion. |
| -WARNING: Do not use electrical appliances inside the food storage compartments of the appliance, unless they are of the type recommended by the manufacturer. • This can cause explosion or fire. |
| -WARNING: Do not damage the refrigerant circuit. • This can cause explosion or fire. |
| Do not try to disassemble, repair or modify the refrigerator yourself. • You may injure yourself – or others – with burns or electric shock, or damage the refrigerator. If your appliance needs alterations or repair, please consult authorized service centre. |
| Ensure that the refrigerator is plugged into an earthed mains socket. DO NOT plug into an unearthed mains socket. • A short circuit could cause an electrical shock. |
| Make sure the mains lead and plug are not squashed or damaged. • A damaged mains plug or lead can cause short-circuit, fire or electric shock. • If the mains lead is damaged, it must be replaced by the manufacturer, its service agent or similarly qualified persons in order to avoid a hazard. • DO NOT ATTEMPT TO REPLACE IT YOURSELF. |
| Remove any dirt or dust from the mains plug's pins before connecting to the power supply. • Dust build-up on the mains plug can cause insulation failure, especially in humid conditions. This can cause short circuit, fire or electric shock. Unplug the mains lead and wipe it with a dry cloth. Never use a wet or damp cloth. |
| Plug your appliance into the socket, making sure the connection is secure. • A loosely connected mains plug can cause fire or electric shock. Install the refrigerator in a well-ventilated area. • The more refrigerant there is in an appliance, the larger the room it should be installed in. If there's a refrigerant fluid leak, and the appliance is in a small room, the build up of combustible gases is more likely. This can cause fire or explosion. As a guide, for every 8 g of coolant, you'll need at least 1 cubic metre of space in the room. The data plate inside the appliance tells you how much refrigerant your refrigerator contains. |
| The refrigerant (R600a) used in the refrigerator and the gases in the insulation material (cyclopentane) are both flammable. They also require special disposal procedures. • Before you dispose of the appliance, make sure none of the pipes on the back are damaged. Refrigerant or gas leaks can cause fire or explosion. Unplug the refrigerator before cleaning and servicing. • Failure to do this can cause electric shock. If you smell burning or see smoke coming from the refrigerator, disconnect the power immediately and please consult authorized service centre. • Failure to do this can cause fire or electric shock. |
-WARNING:
Keep ventilation openings, in the appliance enclosure or in the built-in structure, clear of obstruction.
- Failure to do this could result in fire or explosion because refrigerant cannot disperse if it leaks.

LED RADIATION
DO NOT VIEW DIRECTLY WITH OPTICAL INSTRUMENTS CLASS 1M LED PRODUCT.

Indicates risk of injury or damage to property.

Do not put glass bottles or containers in the freezer.
- When the contents freeze, the glass may break.
Do not touch the inside walls of the freezer or items stored in the freezer with wet hands. - Your skin can become frozen onto the interior wall, or items stored in the freezer.
Do not open or close the doors by taking hold of the door handles with both hands.
- This may cause personal injury.

If there's a power cut, avoid opening the refrigerator frequently or putting unchilled food in it.
- This can cause the temperature in the refrigerator to rise and spoil food stored inside.
If you're not going to use the refrigerator for a long time, unplug it from the mains.
Also, be careful of the gap between the fridge and freezer doors, especially if they are both open at the same time.
- This may cause personal injury.
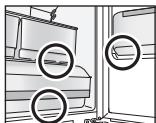
When opening the refrigerator, be careful not to pinch your fingers at the "pinch point" areas. In particular, when opening the fridge door, be careful to avoid the potential pinch point between the fridge and freezer doors.
- This can cause personal injury.
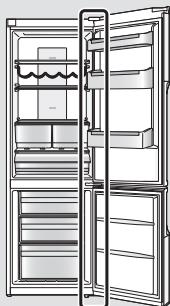
Potential pinch point
This section explains how to install your appliance for the most energy-efficient, safe and quiet operation.
Dimensions
NR-B29SG2/NR-B29SW2: W600 x D652 x H1898 (mm)
NR-B32SG2/NR-B32SW2: W600 x D652 x H2044 (mm)
Unpacking your appliance
Remove all packaging and tape.
Choosing the right location
Ventilation
As the appliance gives off heat during operation, it should be installed in a well-ventilated, dry room with plenty of space above and behind it, as shown in Figure 1.
If you can hear it vibrating, it needs more space.
Temperature
The room temperature affects the refrigerator's energy-efficiency, i.e. how much electricity it uses to chill and freeze foods.
For the best results, install your refrigerator:
away from direct sunlight
away from radiators, cookers or other heat sources
- where the room temperature corresponds to the climate classification for which the appliance is designed. Refer to the Specifications Section for your appliance's climate classification.
Level
Install on a level floor that's strong enough to support a fully loaded refrigerator.
You can adjust the level of the refrigerator by screwing or unscrewing the two adjustable front legs as shown in Figure 2.
This prevents vibration and noise.
If the appliance is to stand on a carpeted or vinyl floor, put a solid board underneath it first. This will protect your floor against possible colour change due to heat given off by the appliance.
Refrigerator door

The refrigerator's door hinges can be swapped over, from the right side to the left, so that the doors open in the opposite direction. If this is more convenient in your home, please contact our service centre listed on the attached sheet or access to our Web site (http://panasonic.net).
We could not be held responsible if you replace the hinges by yourself.
Parts for switching door opening direction are included in the unit packaging.
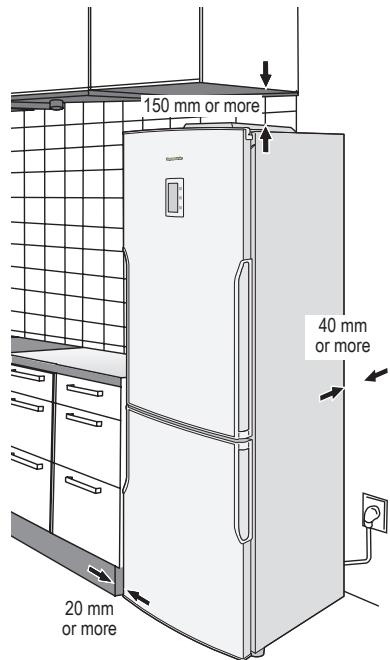
Figure 1
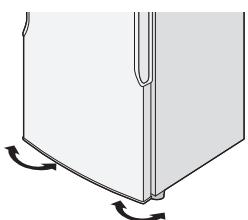
Figure 2
Installing the distance guides
To prevent the condenser (the black backside component with fins) from touching the wall, put on two plastic distance guides in its place rotating 90^ .
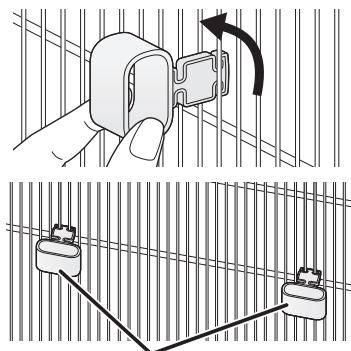
Distance guides (accessories)
Cleaning
After installation, wipe the appliance clean with warm water.
Connecting the mains plug to the household mains socket
You can connect the mains plug immediately after installation.
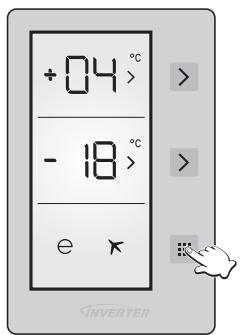
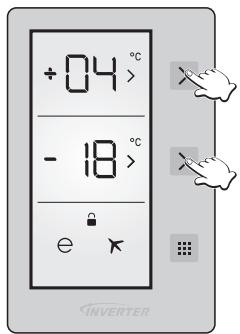
After the appliance is plugged, all symbols will appear for a moment, and then the startup values will appear as -18 °C on freezer temperature display and 4 °C on fridge temperature display.
All buttons on the control panel are touch-operated. (Only press to activate the button you want to operate.)
Notes:
Cooling may take longer in the summer months or at other times when the room temperature is higher.
- If you need to unplug the refrigerator, wait at least 10 minutes before you plug it back in again. If not, you might damage the compressor.
Ambient room temperature
You'll find your refrigerator's climate classification on the rating plate in the left side of the fridge compartment. It shows the room temperature the appliance is designed to work in.
| Climate classification | Permitted ambient temperature | |
| SN | (Extended Temperate) | +10 °C to 32 °C |
| N | (Temperate) | +16 °C to 32 °C |
| ST | (Subtropical) | +16 °C to 38 °C |
| T | (Tropical) | +16 °C to 43 °C |
For saving energy
- Install the refrigerator in a dry, cool and well-ventilated location. The colder the ambient temperature, the better the efficiency. (Please refer to Page 6 for dimensions and clearance.)
-
The combination of drawers and shelves that result in the largest in volume and the most efficient use of energy for the refrigerator.
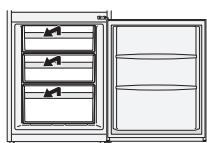
-
Remove the top two freezer drawers. (Leave the lowest freezer drawer.)
- Attach the drawers and shelves in the refrigerator to the positions illustrated on the section of "Parts" (P.8).
-
Removing the chill compartment drawer improves the cold air circulation. Also, larger amount of food can be stored.
-
Set the Screen Saver Mode.
- Do not over fill the refrigerator to allow the air to circulate.
- Open the doors only when necessary and as briefly as possible.
- Occasionally clean the ventilation openings at the bottom of the refrigerator with a vacuum cleaner, etc. (Take care not to damage the refrigerant pipe inside the cover.)
- When setting to Super Freeze Mode or Super Cool Mode, power consumption will be increased.
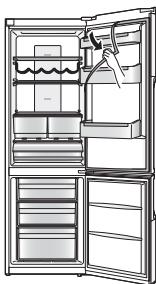
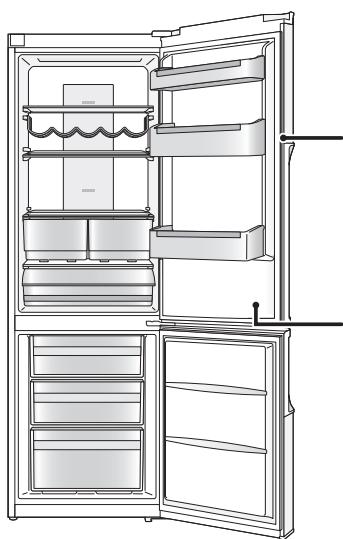
The illustration below is based on model NR-B29SG2, and may be slightly different to your refrigerator.
Fridge compartment
The temperature can be set in a range from 2^ to 8^

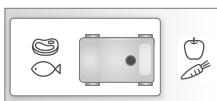
Cooked food, drinks, eggs, cakes, dairy products
Chill compartment
The temperature is lower by 1^ to 2^ than that set for the fridge compartment.
The details on how to use the chill compartment, see page 10.
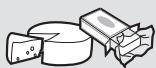
Cheese, butter, sausage
Freezer compartment
The temperature can be set in a range from -24^ to -16^
Frozen meat, poultry, fish, ice cream

1 Wine Rack
2 Glass shelves*
3 Crisers
4 Chill compartment drawer
5 2 Ice trays
6 Freezer drawers
7 Kickplate
Adjustable legs
2 Egg trays
10 Door shelf
1 Bottle shelves
12 Sliding part
*Following parts are added to NR-B32SG2/NR-B32SW2.
Glass shelf
- Door shelf
Note:
- You can change the positions where the door and bottle shelves are installed. Please use caution, however, because stored food and beverages could fall out when the door is opened and closed depending on the shelf positions.
Closing the door with the drawers (Crispers/Chill/Freezer drawers) open may cause the drawers to break.
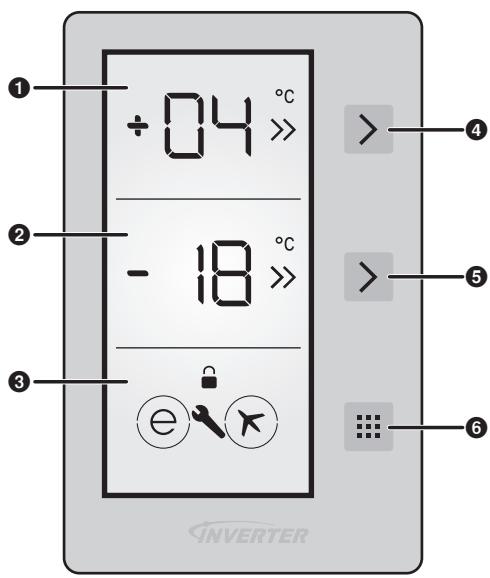
Display area
1 Fridge temperature display
- The set temperature is displayed.
- While Super Cool Mode is activated, flashes alternately.
2 Freezer temperature display
- The set temperature is displayed.
- While Super Freeze Mode is activated, >> flashes alternately.
3 Function display
- When Eco Mode and Holiday Mode are set, circles are displayed around the marks.
- When the Child Lock and alarm functions are activated, the marks for those functions are displayed.
Control area
Fridge selection button
Freezer selection button
Mode button
Notes:
- This refrigerator uses a microprocessor to control the temperature. The temperature inside the refrigerator varies depending on such factors as changes in the room temperature, how frequently the doors are opened and closed, and how much food is stored inside and how it is stored.

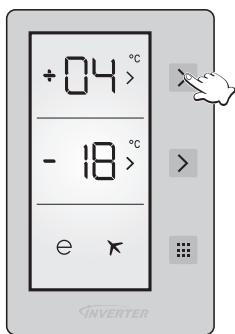
Setting the temperature
Fridge compartment
At the time of purchase, the temperature is set to 4^ .
1 Press (upper) once and then press it again within 1 second.
The temperature can be set.
Press the button repeatedly until the desired temperature is set.
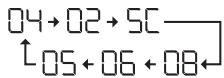
- If no operation is performed for 1 second during the setting process, the set value will flash and a beep will be heard indicating that the temperature is now set.
Note:
- When Super Cool Mode, Super Freeze Mode, Eco Mode, or Holiday Mode ends or is cancelled, the unit returns to its previous settings.
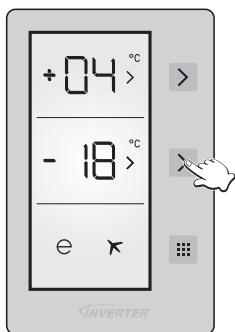
Freezer compartment
At the time of purchase, the temperature is set to -18^ .
Press (lower) once and then press it again within 1 second.
The temperature can be set.
Press the button repeatedly until the desired temperature is set.
- If no operation is performed for 1 second during the setting process, the set value will flash and a beep will be heard indicating that the temperature is now set.
Note:
- When Super Cool Mode, Super Freeze Mode, Eco Mode, or Holiday Mode ends or is cancelled, the unit returns to its previous settings.
Chill compartment
You can adjust the temperature of the chill compartment by opening and closing the sliding part which is located inside the compartment.
Open
Turn the sliding part to the opening position to set the compartment temperature lower by 1^ to 2^ than that set for the fridge compartment, and make the compartment work as the chill compartment.

Closed
Turn the sliding part to the closing position to set the compartment temperature same as that set for the fridge compartment, and make the compartment work as a part of the fridge compartment.
- When this compartment is used as 0^ compartment, keeping food in the chill compartment instead of the freezer or refrigerator compartment allows food retain freshness and flavour longer, while preserving its fresh appearance. When chill compartment drawer becomes dirty, remove it and wash it with water. (Water freezes at 0^ , but foods containing salt or sugar freeze at temperature lower than that) Normally people use the chill compartment for raw fish, lightly pickled and rice, etc...
- Pull the chill compartment drawer out toward you. the cover will open automatically.
Note:
- Do not put foods you want to freeze or ice trays in order to make ice.
Super Freeze Mode
Features:
- In this mode, the freezer can be cooled rapidly, enabling the fresh foods, etc. which are placed there to be frozen.
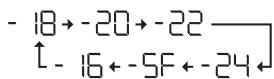
- Super Freeze Mode will automatically end after 24 hours or when the freezer sensor temperature becomes lower than -32^ .
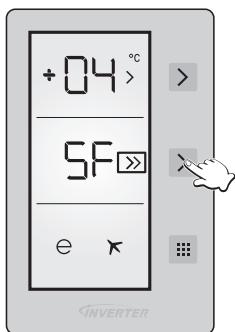
Settings:
- Press > (lower) until "SF" is shown.
- If no operation is performed for 1 second during the setting process, "SF" will flash and a beep will be heard indicating that Super Freeze Mode is set.
- During this mode, "SF" is displayed, and >> flashes alternately.
To release the mode, press (lower).
Notes:
During this mode:
-By pressing (lower), Super Freeze Mode will be cancelled and the desired temperature can be set.
-Eco Mode and Holiday Mode cannot be selected.
-
The fridge temperature can be adjusted.
-
The effect on the stored food can be reduced if setting Super Freeze Mode several hours before storing the food in the freezer compartment.
- The alarm sounds 3 hours after setting Super Freeze Mode. You can then store a small amount of food.
- The following items are recommended in order to exert the maximum freezing capacity.
① Set the freezer temperature to -24^ C and the fridge temperature to 2^ C 24 hours before storing the food.
② Set Super Freeze Mode 10 hours before storing the food.
(3) If you wish to store a large amount of food, remove the two top drawers from the freezer and place the food directly on the glass shelf or put it in the lowest drawer of the freezer.
(A bigger freezing capacity can be exerted if placing the food directly on the top glass shelf.)
- The maximum freezing capacity within 24 hours is written in the rating label.
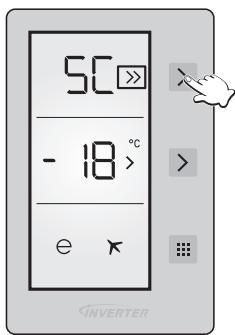
Super Cool Mode
Features:
- In this mode, fast food can be cooled before eating, a large amount of food can be cooled and stored, and drinks can be cooled quickly.
- Super Cool Mode will automatically end after 8 hours or when the fridge sensor temperature becomes lower than 0^ .
Settings:
- Press (upper) until "SC" is shown.
- If no operation is performed for 1 second during the setting process, "SC" will flash and a beep will be heard indicating that Super Cool Mode is set.
- During this mode, "SC" is displayed, and >> flashes alternately.
To release the mode, press (upper).
Notes:
During this mode:
-By pressing (upper), Super Cool Mode will be cancelled and the desired temperature can be set.
-Eco Mode and Holiday Mode cannot be selected.
- The freezer temperature can be adjusted.

Using the handy functions (continued)
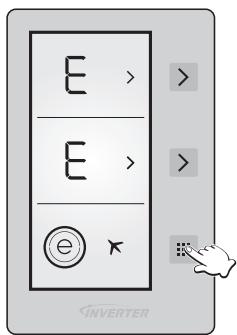
Eco Mode
Features:
- In this mode, the control unit operates the freezer and fridge economically.
- In this mode, the fridge temperature is automatically set to 4^ and the freezer temperature is automatically set to -18^ .
Settings:
- Press repeatedly until a circle appears around .
- If no operation is performed for 1 second during the setting process, the circle around e flashes and a beep will be heard, indicating that Eco Mode is set.
- During this mode, "E" is displayed on the Fridge/Freezer temperature display, and a circle is displayed around .
To release the mode, press
Notes:
During this mode:
-Freezer and fridge can be adjusted. When Eco Mode is released, the adjustment will be maintained.
-Super Cool Mode and Super Freeze Mode can be selected. Eco mode is released automatically, and the selected mode is activated.
-After releasing Eco Mode, Holiday Mode can be selected, and the selected mode is activated.
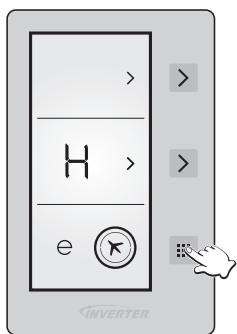
Holiday Mode
Features:
- Set this mode when the fridge is not going to be used for a prolonged period such as during a long vacation.
- In this mode, the fridge temperature is automatically set to 8^ and the freezer temperature is automatically set to -18^ .
Settings:
- Press repeatedly until a circle appears around ×
- If no operation is performed for 1 second during the setting process, the circle around × flashes and a beep will be heard, indicating that Holiday Mode is set.
- "H" is displayed on the Freezer temperature display. No indication appears on the Fridge temperature display.
- During this mode, "H" is displayed on the Freezer temperature display, and a circle is displayed around × .
Notes:
- Before using this mode, empty out the fridge, and close its door.
- When this mode is ended, the fridge will resume operation with its previous settings.
-Freeze and fridge can be adjusted. When Holiday Mode is released, the adjustment will be maintained.
-Super Cool Mode and Super Freeze Mode can be selected. Holiday mode is released automatically, and the selected mode is activated.
-After releasing Holiday Mode, Eco Mode can be selected, and the selected mode is activated.
Drink Cool Mode
Features:
- Drinks can be cooled quickly in the freezer.
- This mode has a timer function, and can be set to beep when the timer reaches 5, 10, 15, 20, 25 or 30 minutes.
- Remove the bottles when the beep is heard. If bottles are left in the freezer for a long time, their contents could freeze and the bottles might break.
Settings:
- Press (lower) button for 5 seconds.
- "dc" is displayed on the Freezer temperature display and "05" flashes on the Fridge temperature display.
- Press (upper) to adjust the time (05-10-15-20-25-30 minutes).
- The selected time flashes on the display 3 times and a beep will be heard.
- Countdown by minutes starts from the set time, and the remaining time flashes on the display.
- To release Drink Cool Mode, press × (lower) button for 5 seconds.
- When the set time comes, a beep will be heard, and both of the display indication (Example: "00" and "dc") flash until you press (lower).
Notes:
- When using this mode, check the temperature of the bottles regularly.
- When the bottles have cooled sufficiently, remove them from the freezer.
Screen Saver Mode
Features:
- While setting this mode, the backlight of the display can be turned off to save energy.
Settings:
- Press for 3 seconds to set the automatic Screen Saver function.
- If no operation is performed for 5 seconds and any door is not opened, the backlight of the display is turned off with all other marks and characters remaining on the display.
- The selected modes and functions are maintained.
- To set the automatic Screen Saver to off and keep the backlight of the display on, press for 3 seconds.
Notes:
- When the automatic Screen Saver function is set to on and the display backlight is turned off for a while, the display backlight will be turned on again and the set functions are indicated on the display, if any button is pressed or any door is opened.
- When the Screen Saver and Child Lock are set to on, the Screen Saver is activated. Therefore, while both of the functions are activated, the display backlight will be turned on again when any button is pressed or any door is opened.
Child Lock function
Features:
- Setting Child Lock can keep children from changing the settings while playing with the buttons.
Settings:
- Press (upper) and (lower) for 5 seconds to set Child Lock.
- While Child Lock is set, is lit.
- To release the mode, press (upper) and (lower) for 5 seconds. You cannot change the mode that is currently set until Child Lock is released.
Notes:
- If electricity is interrupted or the power plug is removed, Child Lock is released.


User alert functions
User alert functions become active in the following situations.
| Situation | Details | Alarm | How to stop the alarm |
| Mode has ended. | ·The set time has been reached in Drink Cool Mode. | Beeps continuously | Press ☐. |
| Door ajar. | ·The fridge and/or freezer door has been left ajar for more than 2 minutes. | Beeps every 5 seconds | Close the door(s). |

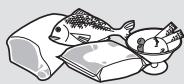
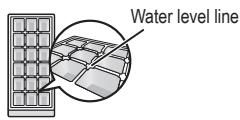
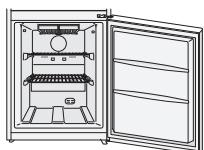
Making ice cubes
Open the freezer, pull out the upper drawer and take out the ice tray on the ceiling. Fill water in the ice tray to the water level line and then place back the ice tray.
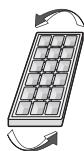
When ice cubes are ready, pull out the upper drawer and take out the ice tray. Slightly twist the ice tray by holding its two sides, the ice cubes will drop from the ice tray. Then, put the ice tray back into its place.

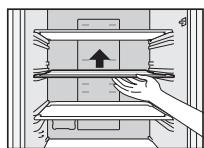
Removing and attaching shelves
Fridge
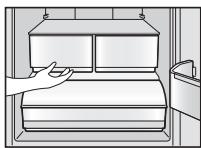
Glass shelves
Lift the inner side of the shelf slightly and pull it out.
When removing the glass shelves, before pulling them out, remove the door and bottle shelves first if they are in the way.
When you remove the glass tray, open the door until it touches the stopper.
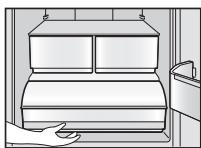
Crispers
Pull the crispers towards you and pull it out.
Door shelves and bottle shelves
Lift it slightly and then remove it.
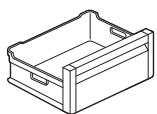
Chill compartment drawer
Pull out the drawer, hold the front part and lift it up diagonally, and remove it.
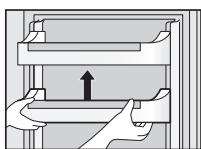
Freezer
Pull the drawer towards you, lift the front slightly, and pull it out.
Having removed the drawer, you can store food in the empty compartment.
Care and Cleaning instructions


Daily cleaning
Wipe regularly with a dry cloth.
Places to pay particular attention to:
Door opening seal

If the seal gets dirty and damaged, cold air is more likely to leak.
Bottle shelf
Wipe away any dirt and liquid before it builds up.
Each year, unplug your refrigerator, remove the shelves and give them a thorough clean.
Parts you can wash with water
Fridge
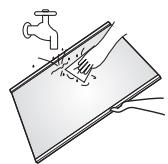
Glass shelves
- Door shelves
- Bottle shelves
- Egg trays
- Crisers
- Chill compartment drawer
Freezer
Freezer drawers
- Ice trays
Note:
- Do not use abrasive cleaners such as Bicarbonate of Soda, as they can damage the plastic.
Cleaning the control panel
The refrigerator's control panel is made of delicate materials. To protect its surfaces, do not clean it with solvent based chemicals. Simply wipe it with a dry or slightly damp cloth.
Cleaning the outside of the refrigerator
Use a warm, damp, soft cloth to clean the outside of your refrigerator. For more stubborn marks, use a mild kitchen detergent and wipe away with a soft damp cloth. Remove any remaining surface water with a dry cloth.
Notes for cleaning
When cleaning inside or outside your refrigerator, do not use:
- alkaline detergents - they can crack plastic parts.
- grinding dust, soap powder, oil-based cleaners, hot water, brushes, acids, benzenes, solvents or alcohol-based solutions - all can damage the refrigerator's surfaces and plastic parts.
Make sure you wipe off any stains from edible oils, which can also damage plastic parts.

Care and Cleaning instructions (continued)

Maintenance check
Is the mains lead damaged?
- Does the mains plug get hot?
- Is the mains plug firmly in the mains socket?
If the mains lead or LED lamp is damaged, please consult an authorized service centre. DO NOT attempt to replace these items yourself.

Extended disuse
If you're not going to use the refrigerator for a long time, unplug it and clean the mains plug as described above. Then leave the doors open for 2-3 days. This lets the interior dry out properly, and prevents odour and the build up of mould.
Do not switch the refrigerator on and off repeatedly. It will last longer if you leave it switched on during normal use.
Before moving or transporting your refrigerator
① Remove all items.
② Unplug it.
③ Raise the adjustable leg.
④ Pull, or 'walk' the refrigerator towards you.
⑤ Use a cloth, for example, to absorb the water in the evaporation pan.
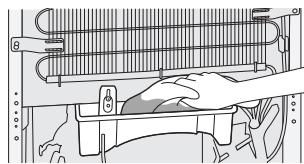
(Lower back of the refrigerator)
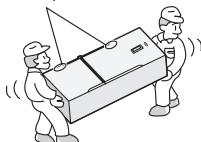
Moving and transporting your refrigerator
At least two people are needed to carry the refrigerator safely.
① Tighten the adjustable legs.
② Hold the adjustable legs at one end, and corners at the other, as shown.
Note:
- Do not carry the refrigerator by holding its doors. Always transport the refrigerator in its normal upright position.
Secure the doors with adhesive tape
Your fridge warns you if the temperatures for cooler and freezer are in improper levels or when a problem occurs in the appliance. Warning codes are displayed in the Fridge/ Freezer temperature display.
| Warning codes | Meaning | Details and countermeasures |
| Sr | Failure/Warning | There is/are some part(s) out of order or there is a failure in cooling process. • Call Service for assistance as soon as possible. |
| LF | Freezer compartment is not cold enough. | This caution will be seen especially after long term of power failure. 1. Do not freeze the foods that are thaw and use in short time period. 2. Set the freezer temperature to colder values or set the super freeze, until the compartment gets to normal temperature. 3. Do not put fresh food until this failure is off. |
| LC | Refrigerator compartment is not cold enough. | Ideal temperature for refrigerator compartment is +4°C. If you see this warning your foods have risk of spoiling. 1. Set the refrigerator temperature to colder values or set the super cooling mode until the compartment gets to normal temperature. 2. Do not open the door often until this failure is off. |
| LF and LC | Not cold enough. | It is the combination of LF and LC error type. • You will see this failure when first starting the appliance. It will be off after the compartments get normal temperature. |
| HC | Refrigerator compartment is too cold. | The foods start to freeze because of the too much cold temperature. 1. Check if the super cooling mode is on. 2. Decrease the refrigerator temperature values. |
| LOPO | Low voltage | When the power supply gets lower than 170 V, the appliance gets to steady position. • This is not a failure. This prevents any damages on the compressor. This warning will be off after the voltage gets required level. |
If you feel that the refrigerator is not working properly, check out the following points first.
If the trouble persists, disconnect the mains plug and contact your dealer or an authorized service centre.
General
| You hear unusual sounds from the refrigerator. | ·Has the refrigerator been installed on a sturdy and level floor? ·Have sufficient clearances been provided around the refrigerator? ·Is anything vibrating on the top of the refrigerator? ·It's normal to hear some noises when the refrigerator starts or stops operation. |
| You hear a sound after the compressor has shut down. | ·This is normal, and is often caused by refrigerant flowing back to the compressor. |
| You hear a sound after you have opened or closed the door. | ·This is normal, and is due to the difference in air pressure between the inside and outside of the refrigerator. |
| You hear the sound of air or water flowing after you have opened the door. | ·This is caused by refrigerant flowing the internal pipework. |
| You hear a continuous whining sound. | ·This sound is heard while the fan for circulating the cold air is operating. ·Has the food been packed too tightly together or is the room temperature high? In cases like these, the fan for circulating the cold air runs at high speed so it makes a loud noise. |
| The compressor is quite loud. | ·Has the food been packed too tightly together or is the room temperature high? In cases like these, the compressor runs at high speed so it's normal for the compressor to be louder. |
| The compressor has been running for a long time. | ·When the mains plug has been connected for the first time, the compressor runs longer than usual in order to cool down the inside of the refrigerator until the set temperatures are reached. ·Has Super Freeze Mode or Super Cool Mode been set? ·Have the doors been opened and closed frequently? Are the doors completely shut? ·Have the food items been packed too tightly together or is the room temperature high? ·When many food items are placed in the refrigerator at one time, the compressor will need to run for a longer period. |
| Condensation forms on the outside of the refrigerator. | ·Condensation may form when the humidity in the room is high and is normal. Wipe it off using a dry cloth. |
| The outside of the refrigerator feels hot to the touch. | ·After the power of the refrigerator is turned on, the refrigerator may become warm until the interior of the compartment is sufficiently cooled down. The refrigerator may become warm even after the compartments have been cooled down. This is due to the operation of the heat radiation pipe equipped on the refrigerator for the purpose of preventing condensation, and is not malfunction. |
| The controls on the control panel cannot be operated. | ·Is the power to the refrigerator on? |
| The alarm sounds. | ·The fridge and/or freezer door has been left ajar. Close the doors. |
| The LED light does not come on. | ·Has Holiday Mode been set? In Holiday Mode, the LED light of the fridge does not come on. ·Is the power to the refrigerator on? ·If you need to change the LED, contact your dealer or an authorized service centre. |
Fridge and freezer
| The fridge is not chilling (and the freezer is not freezing). | ·Is the power to the refrigerator on? |
| The fridge is not chilling (and the freezer is not freezing) satisfactorily. | ·Is the set temperature too high? ·Is the refrigerator exposed to direct sunlight or positioned near a heating appliance? ·Have sufficient clearances been provided around the refrigerator? ·Have the food items been packed too tightly together or is the room temperature high? ·Have the doors been opened and closed frequently? Are the doors completely shut? ·Has Holiday Mode been set? ·When warm food is put inside the refrigerator, the temperature will rise temporarily. ·During the cold season or when the room temperature is low, it may feel as if the refrigerator is not chilling. |
| There is a difference between the set temperature and actual temperature. | ·When warm food is put inside the refrigerator, the temperature will rise temporarily. |
| Food in the fridge freezes. | ·Is the set temperature for the fridge too low? ·Has the food been placed at the back of the fridge? The area near the back wall is where the temperatures are coldest so avoid placing food which may freeze easily here. |
| Condensation forms in the fridge and drawers. | ·Condensation may form when the door has been opened and closed frequently or when it has not been shut completely, or when the room humidity is high. Wipe off the condensation using a dry cloth. |
| It is hard to open the freezer door. | ·The door is sometimes difficult to open just after it has been closed. ·The difference in air pressure between the inside and outside of the freezer may sometimes make it hard to open the freezer door. Wait a few moments, and then try opening the door. |
| It smells inside the refrigerator. | ·Were any food items with strong odours sealed before they were placed in the fridge? Place the items inside a sealed container and store them. ·Odours may stick to the surfaces inside the refrigerator. Wipe the surfaces using a soft cloth which has been dipped in lukewarm water. |

Specifications
| MODEL | NR-B29SG2-SE NR-B29SW2-WENR-B29SG2-SF NR-B29SW2-WFNR-B29SG2-SB NR-B29SW2-WB | NR-B32SG2-SENR-B32SG2-SFNR-B32SG2-SBNR-B32SW2-WFBNR-B32SW2-WB |
| CATEGORY | Refrigerator-Freezer | |
| NO FROST COMPARTMENTS | ALL COMPARTMENTS | |
| CLIMATE CLASS | T1 | |
| TOTAL GROSS VOLUME | 332 L | 367 L |
| TOTAL NET VOLUME | 289 L | 324 L |
| NET FRIDGE VOLUME | 189 L | 224 L |
| NET CHILL VOLUME | 28 L | |
| NET FREEZER VOLUME | 72 L | |
| OUTSIDE DIMENSIONSWIDTH x DEPTH x HEIGHT | 600 mm x 652 mm x 1898 mm | 600 mm x 652 mm x 2044 mm |
| NET WEIGHT | 77 kg | 80 kg |
| RATED VOLTAGE | 220 V - 240 V | |
| RATED FREQUENCY | 50 Hz | |
| ENERGY CONSUMPTION | 240 kWh/year*2 | 250 kWh/year*2 |
| FREEZING CAPACITY | 12 kg/24 h | |
| NOISE LEVEL | 42 dB | |
| MAX STORAGE WITHOUT ELECTRICITY | 18 hours | |
| REFRIGERANT/CHARGE | R600a/55 g | R600a/60 g |
| BLOWING AGENT | Cyclo-Pentane | |
1 Permitted ambient temperature: 16^ to 43^
*2 The energy consumption per year is based on the standard test results for 24 hours.
Notes:
Actual energy consumption vary depending on how the appliance is used and where it is located.
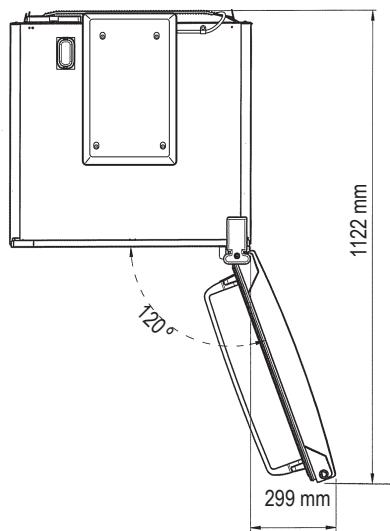
When the doors are completely open
MEMO

Inhaltsverzeichnis
NR-B29SG2/NR-B29SW2: B600 x T652 x H1898 (mm)
NR-B32SG2/NR-B32SW2: B600 x T652 x H2044 (mm)
NR-B29SG2/NR-B29SW2: B600 x D652 x H1898 (mm)
NR-B32SG2/NR-B32SW2: B600 x D652 x H2044 (mm)
Foire aux questions. 73
NR-B29SG2/NR-B29SW2: L600 x P652 x H1898 (mm)
NR-B32SG2/NR-B32SW2: L600 x P652 x H2044 (mm)
Installation (suite)
NR-B29SG2/NR-B29SW2: A600 x F652 x AI.1898 (mm)
NR-B32SG2/NR-B32SW2: A600 x F652 x AI.2044 (mm)
Cóme desembalar su electrodométrico
NR-B29SG2/NR-B29SW2: W600 x D652 x H1898 (mm)
NR-B32SG2/NR-B32SW2: W600 x D652 x H2044 (mm)
Packa uppprodukten
Valknapp for kyl
5 Valknapp for fries
Lagesknapp
Observera:
- Temperaturekan stallas in.
- Temperaturek an stallas in.
NR-B29SG2/NR-B29SW2: B600 x D652 x H1898 (mm)
NR-B32SG2/NR-B32SW2: B600 x D652 x H2044 (mm)
Pakke ut apparatet
Identification of dele. 153
Kontrolpanel 154
Indstilling at temperature 155
Sorg for at gore dette

NR-B29SG2/NR-B29SW2: B600 x D652 x H1898 (mm)
NR-B32SG2/NR-B32SW2: B600 x D652 x H2044 (mm)
Installation (fortsat)
- Placer参加会议,du onsker at fryse erler isbakker for at lave isterninger.

Pursuant to the directive 2004/108/EC, article 9(2)
Panasonic Testing Centre
Panasonic Marketing Europe GmbH
Winsberging 15, 22525 Hamburg, Germany
©Panasonic Corporation 2012
Y0512-0
AK-163090
Printed in Turkey.