DJ053 - Educational Toys LEXIBOOK - Free user manual and instructions
Find the device manual for free DJ053 LEXIBOOK in PDF.
| Product type | Digital camera for children (educational toy) |
| Image sensor | CMOS 5 Megapixels (interpolated) |
| Photo resolution | 2592x1944 (5M), 2048x1536 (3M), 1024x768 (0.8M), 640x480 (VGA) |
| Video resolution | 720x480 (D1), 640x480 (VGA), 320x240 (QVGA) |
| File formats | JPEG (photos), AVI (videos) |
| External memory | SD/MMC card (up to 8 GB, not included) |
| LCD screen | TFT 1.8 inches / 4.6 cm |
| Lens | f=6.5 mm, F3.1 |
| Zoom | Digital (forward/backward) |
| Exposure | -2.0 EV to +2.0 EV |
| White balance | Auto, Daylight, Cloudy, Neon, Indoor |
| Flash | Auto, On, Off |
| Self-timer | 2 or 10 seconds, burst (3 photos) |
| Microphone | Built-in |
| Interface | USB 2.0 (file transfer and webcam mode) |
| Power supply | 3 AAA (LR03) 1.5 V batteries not included |
| Operating temperature | 0 °C to 40 °C |
| Care and cleaning | Soft slightly damp cloth, no detergent, avoid direct sunlight and heat sources |
| Safety | This product is not a toy. Remove packaging for children's safety. Do not disassemble, bend, or expose to water. |
| Spare parts and repairability | Standard AAA batteries, SD card (up to 8 GB). No spare parts provided. 1 year warranty. |
| General information | Reference: DJ053 series. Designed in Europe, made in China. Brand: Lexibook. |
Frequently Asked Questions - DJ053 LEXIBOOK
User questions about DJ053 LEXIBOOK
0 question about this device. Answer the ones you know or ask your own.
Ask a new question about this device
Download the instructions for your Educational Toys in PDF format for free! Find your manual DJ053 - LEXIBOOK and take your electronic device back in hand. On this page are published all the documents necessary for the use of your device. DJ053 by LEXIBOOK.
USER MANUAL DJ053 LEXIBOOK
- Compartment des piles
CONTENU DE L'EMBALLAGE
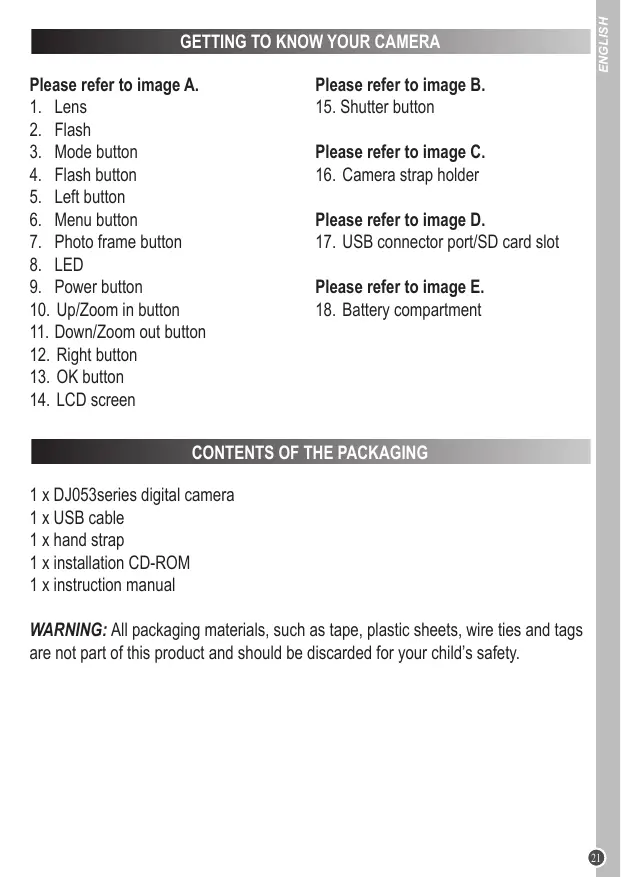
Please refer to image A.
- Lens
- Flash
- Mode button
- Flash button
5.Left button - Menu button
- Photo frame button
- LED
- Power button
- Up/Zoom in button
- Down/Zoom out button
- Right button
- OK button
- LCD screen
Please refer to image B.
15.Shutter button
Please refer to image C.
- Camera strap holder
Please refer to image D.
- USB connector port/SD card slot
Please refer to image E.
- Battery compartment
CONTENTS OF THE PACKAGING
1 x DJ053series digital camera
1xUSB cable
1 x hand strap
1 x installation CD-ROM
1 x instruction manual
WARNING: All packaging materials, such as tape, plastic sheets, wire ties and tags are not part of this product and should be discarded for your child's safety.
Please refer to image E.
- Make sure the camera is off.
- Using a screwdriver, open the battery door located under the unit.
- Insert 3 × LR03/AAA 1,5V type batteries (not included) observing the polarity indicated inside the battery compartment and as per the diagram shown opposite.
- Close the battery compartment and tighten the screw.
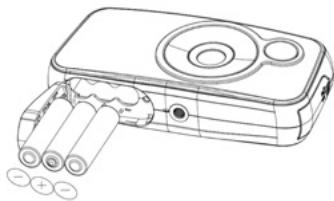
Non-rechargeable batteries are not to be charged. Rechargeable batteries are to be removed from the product before being charged. Rechargeable batteries are only to be charged under adult supervision. Different types of batteries or new and used batteries are not to be mixed. Only batteries of the same or equivalent type as recommended are to be used. Batteries are to be inserted with the correct polarity. Exhausted batteries are to be removed from the product. The supply terminals are not to be short circuited. Do not throw batteries into a fire. Remove the batteries if you are not going to use the product for a long period of time.
WARNING: Malfunction or loss of memory may be caused by strong frequency interference or electrostatic discharge. Should any abnormal function occur, remove the batteries and insert them again.
Please refer to image D.
You need to insert an SD card (8GB maximum, not included) so you can store your files.
- Turn the camera off.
- Pull open the USB/SD card slot door.
- Push the SD card firmly into the SD slot until you hear a 'click' sound. Close the SD card slot door.
- Turn the camera on and the SD card icon should appear on the LCD screen.
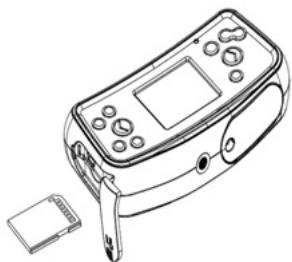
Note:
- To remove the card, push it in slightly to release it from the slot.
Always turn the camera off when you insert or remove an SD card.
We recommend that you purchase a good quality SD card.
INSTALLING THE SOFTWARE AND THE CAMERA DRIVER
Follow these instructions to install the camera driver on your computer system.
- Insert the CD Software (included) in your CD-ROM drive. The CD will auto run, and the main menu will appear.
- Click "Install Driver", and then follow the instructions to install the camera driver.
- You will need to reboot your computer after the driver installation.
- Click 'ArcSoft MedialImpression', and the 'Choose Setup Language' screen will appear. Select your language and click 'OK'. Follow the instructions to install 'ArcSoft MedialImpression' on your computer system. The software offers many applications for photo editing and printing.
- Once you have finished installing, please restart the computer.
Note:
- If the CD does not auto run, click 'Start', 'Run', then type in 'D:\autorun.exe' in the Run dialog text box (where D:\ is your CD-ROM drive) and press Enter.
- You must install the driver before downloading photos/videos from the camera or using it as a webcam.
- Make sure the camera is not connected to your computer before installing the driver and the software.
TURNING THE CAMERA ON AND OFF
Press the POWER button to turn the camera on or off. When you turn the camera on, the LCD screen lights up.
Note: The camera will auto power off after a period of inactivity. See 'Power Save' in the 'Menu Settings (Camera Mode)' section for how to change the power-off time.
CHANGING MODES
When the camera is turned on, press the MODE button to switch between the following modes:

Camera mode - takes photos

Playback mode - reviews and edits files

Video mode - captures video files

Audio mode - records audio files
TAKING PHOTOS (Camera Mode)
Turn the camera on to enter camera mode and take photos.
Taking a photo
Press the SHUTTER button to take a photo. The LED lights up and the number of photos left to shoot at this resolution are displayed on the LCD.
Note: When the SD card inserted in the camera is full, the camera will beep twice if you try to take a photo. Make sure you transfer your photos to your computer.
Zoom
- To zoom in, press the ZOOM IN button.
- To zoom out, press the ZOOM OUT button. appears and the zoom level is shown above this icon.
Photo frame button
Use this function to add 4 different frames to your photos. In camera mode, press the "Photo frame" button repeatedly to change the frame
Flash function
To use the flash, repeatedly press the FLASH button until your desired setting is shown by the icon on the screen:
| Flash is on | |
| Auto flash is on | |
| Flash is off |
Note: the flash will not work when the battery is low.
Self-timer and continuous shots
- Press the Menu button.
- Press the UP or DOWN buttons to select 'Capture Mode' and press the OK button to confirm.
- Press the UP or DOWN buttons to select 'Off', 'Self-timer 2S', 'Self-timer 10S' or 'Continues' (takes three photos in quick succession) and press the OK button to confirm.
- Press the Menu button to return to camera mode and then press the SHUTTERT button to start the countdown and take the photo.
- To turn off the self-timer feature, repeat the steps above and select 'Off' at step 3. If you turn your camera off it will automatically reset to the self-timer off setting.
- To turn on the 'Continues' function and take 3 photos with one press of the shutter button, repeat steps 1-4 but select 'Continues' at step 3.
- To exit at any time, press the Menu button.
Changing the menu settings
- Press the Menu button to access the menus.
- Press LEFT or RIGHT to select the menu.
- Press UP or DOWN to select a setting and press OK to confirm.
- Use UP or DOWN to change a setting and press OK to confirm.
- Press the Menu button to exit the menus.
Setup menu

1. Resolution
Adjusts the resolution. The higher the resolution the more memory is required reducing the total number photos you can store.
2. Quality
Select a lower image quality to decrease the image size in order and be able to take more photos.
3. Metering
Change the metering method to change the brightness of the picture.
4. White balance
Adjusts the colour of your light source.
5. Exposure
Controls the brightness of your photos.
6. Capture mode
Enables self-timer setting or continuous photos (i.e. one press of the SHUTTER button takes three consecutive photos).
7. Effect
Changes the colour balance of the photos i.e. black and white or sepia.
8. Date stamp
This function can be used to add a date to your pictures as you take them.
Tools menu

1. Auto review
When you have taken a photo you can review it for 1 or 3 seconds, or you can turn this feature off.
2. Power frequency
A higher frequency increases the camera shutter speed so the effect of light fluctuations from sources such as fluorescent lamps are reduced. Select '50HZ' or '60HZ'.
3. Power save
Set the camera to automatically turn off when it has been left idle for 1, 3 or 5 minutes.
4. Date and time
Sets the date, time and year/month/day format. When setting the date and time, use UP or DOWN to change the value and LEFT or RIGHT to move to the next set of digits.
5. Language
Selects 1 of the 7 languages available (English, French, German, Italian, Spanish, Portuguese and Dutch).
6.USB
Activates either 'MSDC' mode (USB) for downloading photos and videos or 'PCCAM' for using the webcam function.
7. Format
Formats the memory card so that the file format is compatible with your camera. Caution: Formatting will delete all stored photos and videos even if they have been protected.
8. Reset all
Resetsethe camera to the factory's default settings.
- Switch on the camera and press MODE repeatedly until the video icon appears. The amount of video time you have left displays at the top-right of the screen.
- Press SHUTTER to start videoing. The recording length is displayed on the screen.
- Press RIGHT to pause or continue the recording.
- Press SHUTTER to stop videoing and automatically save it in AVI format.
Note:
The flash function is disabled in video mode.
- You can use Media player and Quick time to play AVI files on your computer.
- The video clip's length may change according to the memory space available on the SD card.
MENUSETTINGS(VideoMode)
Changing the menu settings (same as in Camera mode)
Setup menu
- Movie size
Sets the pixel size of the movie.
- Frame rate
Changes the number of frames taken. For best quality video filming, select 'High'.
- Metering
Change the metering method to change the brightness of the picture.
- White balance
Adjusts the colour of your light source.
Tools menu
Please see the 'Tools Menu in the 'Menu Settings (Camera Mode)' section.
CAPTURING AUDIO CLIPS (Audio Mode)
- Switch on the camera and press MODE repeatedly until the audio icon appears. The amount of audio time you have left displays at the top-right of the screen.
- Press SHUTTER to start recording. The recording length is displayed on the screen.
- Press RIGHT to pause the recording and press it again to start recording.
- Press SHUTTER again to stop recording and automatically save it.
Note: The camera does not have a speaker. You can play audio files on a PC or TV.
PLAYBACK MODE
Viewing your files
- Switch on the camera and press MODE repeatedly until the photo/video playback icon appears.
- Use LEFT or RIGHT to display the previous or next photo or video.
- To view your files as thumbnails, press DOWN. Use LEFT/RIGHT/UP/DOWN to select a thumbnail and press OK to access it.
- To zoom in and out of a photo, press ZOOM IN or ZOOM OUT.
-
To watch your video:
-
Press FLASH to play.
- Press LEFT to rewind.
Press RIGHT to fast forward - Press UP to pause or re-start the video.
-
Press SETTINGS to go back to playback mode.
-
Press MODE at any time to go back to camera mode.
Note: 'No file' appears when there are no stored files.
Protecting files
- To protect a file from accidental deletion, enter playback mode and use LEFT or RIGHT to display the desired photo or video file.
- Press Menu button and use UP or DOWN to select 'Lock'. Press OK to confirm.
-
Use UP or DOWN to select 'Lock/Unlock One', or 'Lock All' and press OK to confirm.
-
Use UP or DOWN to select 'Yes' and press OK to confirm.
- To unlock files follow steps 1-4 above and select 'Lock/Unlock One' or 'Unlock All' at step 3.
Deleting files
- In playback mode, use LEFT or RIGHT to display the desired files. You can also press DOWN to view thumbnails and use UP/DOWN/LEFT/RIGHT to select a photo and press OK to confirm.
- Press Menu button and use UP or DOWN to select 'Delete'. Press OK to confirm.
- Use UP or DOWN to select 'One', or 'All' and press OK to confirm.
- Use UP or DOWN to select 'Yes' or 'No' and press OK to confirm.
Slideshow
- In playback mode, use LEFT or RIGHT to display the desired photo from which to start the slideshow.
- Press Menu button and use UP or DOWN to select 'Slideshow'. Press OK to confirm.
- If you want to change the interval time between photos or repeat photos, use UP or DOWN to select either of these options and then press LEFT or RIGHT to change these settings.
- Use UP or DOWN to select 'Start' and press OK to begin the slideshow.
- Press UP to pause or re-start the slideshow.
Editing files (photos only)
Effect
- In playback mode, use LEFT or RIGHT to display the desired photo.
- Press Menu button and use UP or DOWN to select 'Effect'. Press OK to confirm.
- Use UP or DOWN to select 1 of the 11 available effects and press OK to confirm.
Distortion
- In playback mode, use LEFT or RIGHT to display the desired photo.
- Press Menu button and use UP or DOWN to select 'Distortion'. Press OK to confirm.
- Use UP or DOWN to select 1 of the 12 available distortions and press OK to confirm.
Rotating
- In playback mode, use LEFT or RIGHT to display the desired photo.
- Press Menu button and use UP or DOWN to select 'Rotate'. Press OK to confirm.
- In the Rotate screen, press OK repeatedly to rotate the photo.
- When you have the rotation angle you require, use UP or DOWN to select 'Save' and press OK to confirm.
Resizing
- In playback mode, use LEFT or RIGHT to display the desired photo.
- Press Menu button and use UP or DOWN to select 'Resize'. Press OK to confirm.
- Use UP or DOWN to select your preferred size and press OK to confirm.
DOWNSLOADING YOUR PHOTOS, VIDEOS AND AUDIO FILES
To download your photos and videos, the camera must be in MSDC mode.
Manual downloading
- Turn on the camera and then connect it to your computer via the USB cable provided. If necessary, press the DOWN to select 'MSDC' on the LCD screen.
- A pop-up window will appear: select 'Copy pictures to a folder on my computer' and click 'OK'.
- Follow the computer's onscreen commands until you are notified that downloading is complete.
OR, you can follow step 1 above and then:
- Click on the 'Start' button in Windows.
- Click on 'My computer' icon.
- Click 'Removable Disk', then 'DCIM' to view the files stored on your SD card. Your photos and videos are stored in a subfolder called '101MEDIA'.
- You can copy and paste them into any directory you choose.
Downloading using 'ArcSoft Medialmpression'
- Turn on the camera and then connect it to your computer via the USB cable provided.
-
Launch the 'ArcSoft Medialmpression' program by clicking on the shortcut Media Expression 2.1k . Click the 'Import' button on the main menu screen.
-
In the 'Import' screen, click on the 'Get Media From' dropdown box in the left-hand column and select the 'Removable Disk' driver of the camera.
Note: Make sure you have selected the 'Removable disk' driver or you won't be able to download your photos/videos.audio files.
- Then in the 'Destination Folder' choose the location you want your camera files to be stored. Click on the yellow folder to browse for a new storage location. You can also edit the subfolder name, import option and attach a tag.
- Select the files you want to download. You can click on the button at the bottom of the screen to 'Select All' or 'Deselect All', or you can hold down the computer's 'Ctrl' key and click on various files to select or deselect them.
- Click on 'Import' to start downloading the files.
- Click the 'Done' button to transfer the files from your camera to the destination folder.
Note: Click on the house image in the left-hand corner to return to the main menu page at any time.
WEBCAM MODE
Connected to your PC, your camera can be used as a webcam.
Note: the camera must be in webcam mode.
Webcam mode
- Turn the digital camera on.
- Connect the video camera to your computer using the USB cable provided.
- Press DOWN to select 'PCCAM'.
- Double-click on the icon on your desktop.
- When you first use this function, please select the item 'Preview' as shown opposite.
- Select 'Video Capture Pin' if you want to change the image output size.
Instant messaging (chat)
You can use your camera as a webcam with your instant messaging client (Yahoo Messenger, MSN Messenger, Skype...).
Example:
- Put your camera in webcam mode and connect it to your computer then launch MSN Messenger.
- On the MSN interface, select 'Actions', then 'Start a Video Conversation'.
- Select the person you want to chat with, and press 'OK'.
Q: My camera doesn't turn on when I press the POWER button. What do I do?
A:
- Check that you have installed the batteries correctly.
- Place new batteries or fully recharged batteries in your camera.
Q: I can't see the LCD screen. What do I do?
A:
- Your camera may have gone into power saving mode. Press POWER and see if it turns on.
- Your batteries may be low. Place new batteries or fully recharged batteries in your camera.
- Check that you have installed the batteries correctly.
Q: Why does nothing happen when I press the SHUTTER button?
A:
- The camera may be still be doing a previous action such as recharging the flash, saving, copying or erasing a photo. Wait a few seconds and try again.
- The camera's SD card memory may be full. If this is the case, you need to delete photos from your camera. Make sure you transfer any photos you want to keep to your computer first.
- The timer may be counting down wait a few seconds.
Q: Why are my pictures unclear?
A:
- The lens may be dirty. Gently blow any loose dust from the lens. Then breathe gently on the lens and wipe it with a soft, clean cloth that has no chemicals on it.
- Make sure you hold the camera steady until after the red LED light has gone out.
- You may be too close to your subject. Try moving further away.
Q: Why are my pictures too dark?
A:
-
The flash may be turned off. See the 'Taking Photos' section for how to set the flash.
-
You may need to move closer to your subject or your subject may need to move to a lighter area.
- Your exposure or white balance settings may be incorrect for your environment. See the 'Menu Settings' section for how to change these settings.
Q: Why are my pictures too light?
A:
- You may not need the flash function. See the 'Taking Photos' section for how to change the flash setting.
- Your exposure or white balance may be incorrect for your environment. See the 'Menu Settings' section for how to change these settings.
Q: What do I do when a memory card error message appears?
A:
Check the memory card instruction manual to make sure it is compatible and has been correctly formatted for your camera.
Q: I have taken photos but my computer does not recognize my camera. What do I do?
A:
- Ensure that you have in fact taken photos. Press SHUTTER a few times to take some sample photos and then try downloading them again.
- Always use the USB cable that came with the camera. Make sure it is firmly connected to the camera and the computer.
- Give your computer time to recognize the USB connection device. Try refreshing the device options list until you see the removable device appearing. If the computer does not recognize your device, check the 'Specifications' section to see if your computer meets the system requirements.
SPECIFICATIONS
| Image Sensor | 5M CMOS Sensor |
| Image Resolution | 2592 x 1944 Pixels (5M) 2048 x 1536 Pixels (3M) 1024 x 768 Pixels (0.8M) 640 x 480 Pixels (VGA) |
| Video Resolution | 720 x 480 Pixels (D1) 640 x 480 Pixels (VGA) 320 x 240 Pixels (QVGA) |
| File Format | JPEG / AVI |
| External Memory | SD / MMC Card (up to 8GB) |
| LCD Screen | 1.8 Inch TFT LCD |
| Lens | f=6.5mm, F3.1 |
| Zoom | Yes |
| Exposure | -2.0EV to +2.0EV |
| White Balance | Auto, Daylight, Cloudy, Fluorescent, Bulb |
| Shutter | Electronic Shutter |
| Burst | Included |
| Flash | Auto / Flash On / Flash Off |
| Self-timer | 2 or 10 Second Delay |
| Microphone | Built-in |
| Interface | USB 2.0 |
| System Requirements | Windows 98SE / ME / 2000 / XP / Vista / Win7 (not compatible with the PCCAM function when using Win7) |
| Battery | 3 x AAA |
| Working Temperature | 0-40°C |
MAINTENANCE
Only use a soft, slightly damp cloth to clean the unit. Do not use detergent. Do not expose the unit to direct sunlight or any other heat source. Do not immerse the unit in water. Do not dismantle or drop the unit. Do not try to twist or bend the unit.
WARRANTY
NOTE: Please keep this instruction manual, it contains important information. This product is covered by our 1-year warranty. To make use of the warranty or the after-sales service, please contact your retailer and supply proof of purchase. Our warranty covers material or installation-related defects attributable to the manufacturer, with the exception of wear caused by failure to respect the instructions for use or any unauthorised work on the equipment (such as dismantling, exposure to heat or damp, etc).
Reference: DJ053series
Designed in Europe - Made in China
©2010 Lexibook®
©Disney / Pixar
©Disney
United Kingdom & Ireland
For any further information, please call 0808 100 3015
http://www.lexibook.com

This product is not a toy.

Environmental Protection
Unwanted electrical appliances can be recycled and should not be discarded along with regular household waste! Please actively support the conservation of resources and help protect the environment by returning this appliance to a collection centre (if available).

FAMILIARIZATE CON TU CÁMARA
- Resolution (Resolucao)
- Date and time (Data e hora)
Distortion (Distortion)
Resizing (Redimensionar)
Environmental Protection
Unwanted electrical appliances can be recycled and should not be discarded along with regular household waste! Please actively support the conservation of resources and help protect the environment by returning this appliance to a collection centre (if available).