
AQUALTIS AQGMD 149 - Washing machine HOTPOINT-ARISTON - Free user manual and instructions
Find the device manual for free AQUALTIS AQGMD 149 HOTPOINT-ARISTON in PDF.

| Product type | Washer-dryer |
| Brand | Hotpoint-Ariston |
| Model | AQUALTIS AQGMD 149 |
| Dimensions (W x H x D) | 59.5 cm x 85 cm x 64.5 cm |
| Washing capacity | 8 kg |
| Drying capacity | 6 kg |
| Maximum spin speed | 1400 rpm |
| Drum volume | 62 liters |
| Water pressure | 0.05 - 1 MPa (0.5 - 10 bar) |
| Power supply | 220-240 V ~ 50 Hz |
| Wash programs | White cotton, Colored cotton, Delicate synthetic, Mix 15', Cotton prewash, Resistant synthetic, Shirts, Silk, Wool, Bed and bath 7 days |
| Wash options | Super wash, Easy iron, Extra rinse, Delayed start |
| Drying | Levels: Ready to iron, Ready to hang, Ready to store; or timed (40', 90', 180') |
| Special functions | Memo (custom cycles), Control lock, Load balancing |
| Maintenance | Exterior cleaning, detergent drawer, drum; self-cleaning pump |
| Safety | Door lock, stop in case of fault, child lock |
| Spare parts | Available via authorized after-sales service |
| Repairability | Interventions by authorized technician recommended |
| Energy class | Not specified (estimated: class A) |
| Noise level | Not specified |
Frequently Asked Questions - AQUALTIS AQGMD 149 HOTPOINT-ARISTON
User questions about AQUALTIS AQGMD 149 HOTPOINT-ARISTON
0 question about this device. Answer the ones you know or ask your own.
Ask a new question about this device
Download the instructions for your Washing machine in PDF format for free! Find your manual AQUALTIS AQGMD 149 - HOTPOINT-ARISTON and take your electronic device back in hand. On this page are published all the documents necessary for the use of your device. AQUALTIS AQGMD 149 by HOTPOINT-ARISTON.
USER MANUAL AQUALTIS AQGMD 149 HOTPOINT-ARISTON
Unpacking and levelling
Connecting the cold water and electricity supplies
Technical data
Description of the machine, 18-19
Control panel
Running a wash cycle, 20
Programmes and options, 21-22
Table of Programmes
Wash options
Drying
AQUALTIS
AQGMD 149
Detergents and laundry, 23
Detergent
Preparing the laundry
Washing advice
Load-balancing system
Precautions and tips, 24
General safety
Disposal
Opening the door manually
Care and maintenance, 25
Turning off the water and electricity supplies
Cleaning the machine
Cleaning the detergent dispenser
Drum maintenance
Cleaning the pump
Checking the water inlet hose
Troubleshooting, 26
Assistance, 27

Hotpoint
ARISTON
GB
! Keep this instruction manual in a safe place for future reference. If the appliance is sold, given away or moved, please ensure the manual remains with the machine so that the new owner may benefit from the advice contained within it.
! Please read this instruction manual carefully it contains important information regarding the safe installation, use and maintenance of the appliance.
! You will find the guarantee and other details relating to the installation process in the bag containing this booklet.
Unpacking and levelling
Unpacking
- Once the washer-dryer has been removed from the packaging, check that it has not been damaged during transportation.
If it has been damaged, contact the retailer and do not proceed any further with the installation process.
-
Remove the 4 protective screws used during transportation and the corresponding spacers on the back of the machine (see figure).
-
Close the holes using the plastic covers provided in the bag.
- Keep all the pieces; if the washer-dryer is transported in future, the screws and spacers will have to be replaced in order to avoid damaging the inside of the machine.
! Packaging materials should not be used as toys by children.
Levelling
- Position the washer-dryer on a level and sturdy floor, without resting it against walls or cabinets.
- If the floor is uneven, the feet of the appliance may be adjusted until it reaches a perfectly horizontal position (the angle of inclination must not exceed 2 degrees).
If the appliance is levelled correctly it will be more stable and much less likely to cause vibrations and noise during the spin cycle.
! If positioned on a fitted carpet or a rug, adjust the feet in such a way as to allow room for air to circulate and provide ventilation beneath the washer-dryer.
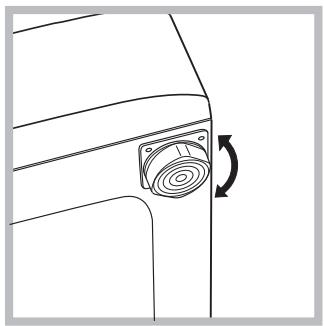
Connecting the water and electricity supplies
Connecting the water inlet hose
Before connecting the inlet hose to the water supply, allow the water to flow from the tap until it runs clear.
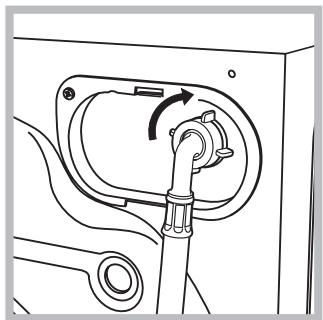
- Connect the inlet hose to the machine, by screwing it into the cold water inlet on the upper right hand side of the back of the machine (see figure).
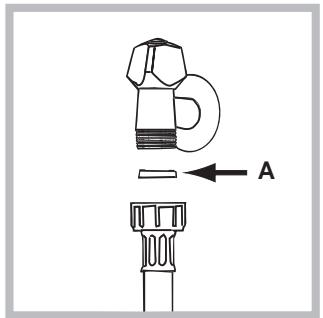
-
Place the seal A (provided in the bag) on the end of the inlet hose and screw it to a cold water tap with a 3/4 gas threaded connection (see figure).
-
The hose should not be bent or compressed.
! The water pressure at the tap must fall within the values indicated in the Technical data table (see next page).
If the inlet hose is not long enough, contact a specialist store or an authorised technician.
! Always use the new inlet hoses supplied with the machine.
Connecting the outlet hose
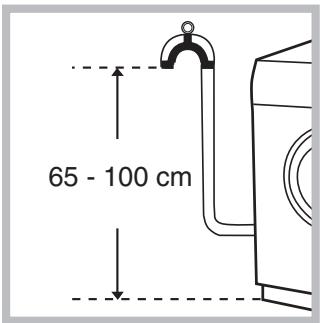
Connect the outlet hose to a draining duct or a wall drain at a height between 65 and 100~cm from the floor. Do not bend it under any circumstances.
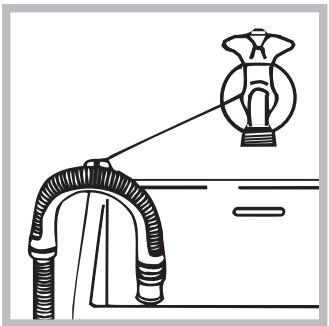
Alternatively, place the end of the hose over the edge of a washbasin or tub, fastening the hose supplied to the tap (see figure).
The free end of the hose should not remain immersed in water.
! We advise against the use of hose extensions; if absolutely necessary, the length of the extension must not exceed 150 cm and its diameter must be the same as the original hose.
Electrical connection
Before inserting the plug into the electrical socket, make sure that:
- the socket is earthed and complies with current regulations;
- the socket can withstand the maximum load of the appliance, which is indicated in the Technical data table (see opposite);
- the power supply voltage falls within the values indicated in the Technical data table (see opposite);
- the socket is compatible with the plug of the appliance. If this is not the case, either the socket or the plug must be replaced.
! The machine must not be installed outdoors, even in covered areas. It is extremely dangerous to leave the appliance exposed to rain, storms and other weather conditions.
! Once the machine has been installed, the electricity socket should be easily accessible.
! Do not use extension cables or multiple sockets.
The cable should not be bent or compressed.
The cable should be replaced only by authorised technicians.
Warning! The company shall not be held responsible for any incidents that occur if these regulations are not observed.
| Technical data | |
| Model | AQGMD 149 |
| Dimensions | width 59.5 cm height 85 cm depth 64.5 cm |
| Capacity | from 1to 8 kg for wash programme from 1 to 6 kg for the drying programme |
| Electrical connections | please refer to the technical data plate fixed to the machine |
| Water connections | maximum pressure 1 MPa (10 bar) minimum pressure 0.05 MPa (0.5 bar) drum capacity 62 litres |
| Spin speed | up to 1400 rotations per minute |
| Energy rated programmes according to regulation EN 50229 | Wash: COTTON WHITES programme; temperature 60°C; using a load of 8 kg. Drying: first drying cycle performed with a 2 kg load, by selecting the drying level "IRON"; Second drying cycle performed with a 6 kg load, selecting the maximum drying level "CUPBOARD". |
| CE | This appliance conforms to the following EC Directives: - 89/336/EEC dated 03/05/89 (Electromagnetic Compatibility) and subsequent modifications - 2002/96/EC - 2006/95/EC (Low Voltage) |
Description of the machine
GB
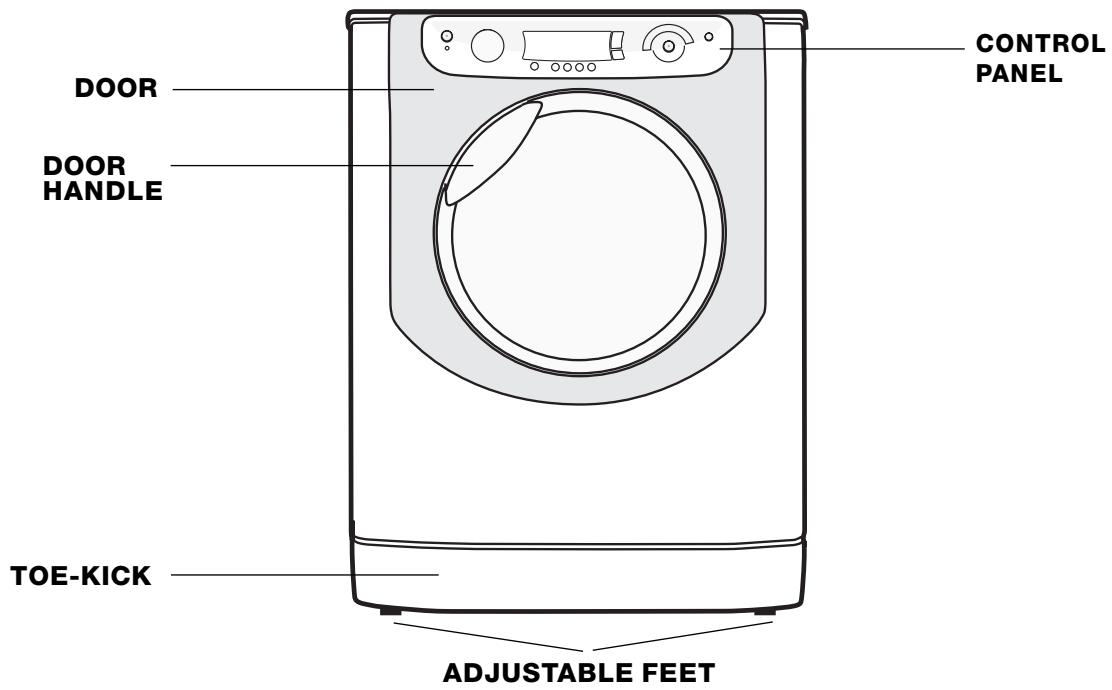
DOOR
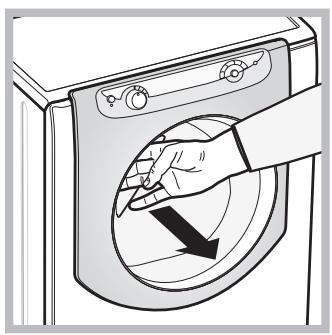
Always use the handle to open the door (see figure).
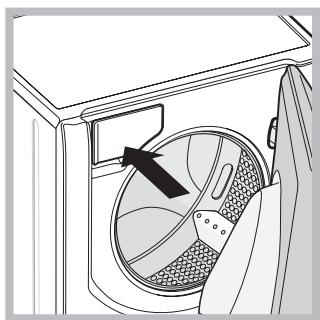
DETERGENT DISPENSER
This is inside the machine and may be accessed by opening the door.
For information relating to detergents, please refer to the chapter entitled "Detergents and laundry".
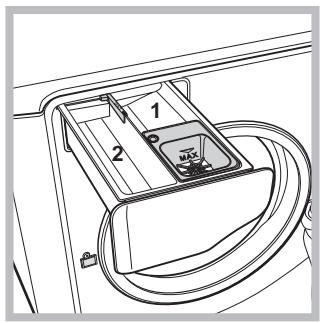
- pre-wash
compartment: use powder detergent.
- main wash
compartment: use powder or liquid detergent. If you intend to use liquid detergent, we recommend that it is poured into the
compartment immediately before the wash cycle is started.
compartment for additives: for fabric softener or other liquid washing additives. Do not exceed the maximum level indicated by the grille, and dilute concentrated fabric softeners.
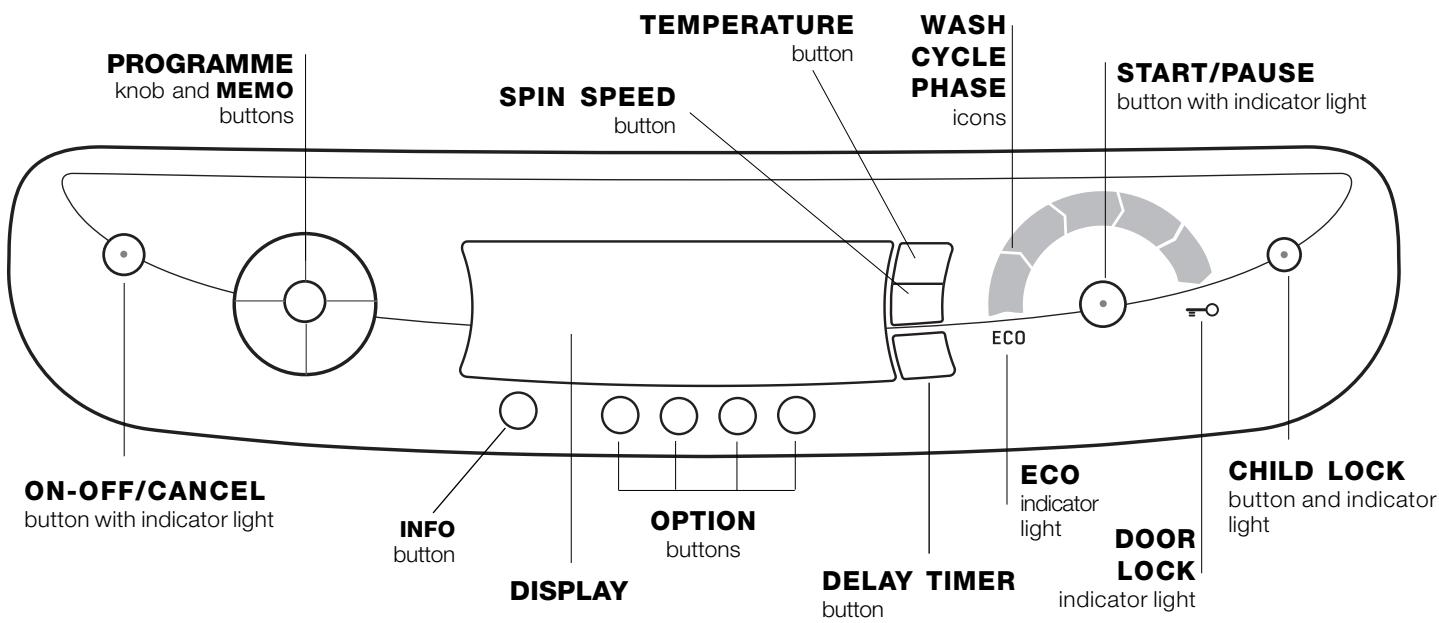
Control panel
ON-OFF/CANCEL button with indicator light: press the button briefly to switch the machine on or off. The green indicator light shows that the machine is switched on. To switch the washer-dryer off during a wash cycle, press and hold the button for approximately 2 seconds; pressing the button quickly or accidentally will not switch the machine off. If the machine is switched off during a wash cycle, the programme will be cancelled.
PROGRAMME knob: this can be rotated in both directions. To set a more suitable programme, please refer to the "Table of Programmes". The knob is locked into position during the wash cycle.
MEMO buttons: press and hold one of the buttons to store a cycle with your own set preferences in the memory of the machine. To recall a previously-stored cycle, press the corresponding button.
TEMPERATURE (按钮: press to decrease the temperature: the value will be shown on the display.
SPIN CYCLE button: press to reduce the r.p.m. value or to exclude the spin cycle completely: the value will be shown on the display.
DELAYED START button: press to set a delayed start time for the selected programme. The delay time will be shown on the display.
OPTION buttons: the name of the option will be shown on the display when the corresponding button is pressed. When the relevant indicator light illuminates, this shows that the option has been selected.
INFO button: press the button to display information relating to the selected wash cycle and options.
WASH CYCLE PHASE icons: these light up to provide an indication of the progress of the wash cycle (Wash - Rinse - Spin - Drying). The text END lights up when the cycle has finished.
START/PAUSE button with indicator light: when the green indicator light flashes slowly, press the button to start the wash cycle. When the cycle has started, the indicator light is illuminated in a fixed manner. To pause the wash cycle, press the button again; the indicator light will turn orange and begin to flash again. If the “Door Locked” indicator light is off, the porthole door may be opened. To restart the wash cycle from the point at which it was interrupted, press the button again.
DOOR LOCKED =0 indicator light: this indicates that the porthole door is locked. To open the door, pause the wash cycle (see following page).
CHILD LOCK button and indicator light: this is used to enable or disable the "Child lock" function, by pressing the button for approximately 2 seconds. When the indicator light is illuminated, the control panel is locked. This avoids accidental changes being made to the wash cycles, especially where children are at home.
ECO indicator light: the Eco icon lights up when the electricity saving reaches at least 10% (this can be achieved by adjusting the wash cycle settings).
! When the machine is first switched on, you will be asked to choose a language (Select Language appears on the display): press the INFO button repeatedly until the required language appears on the display. After 5 seconds the language selection will be stored in the memory of the machine. If the wrong language is selected by mistake, press and hold the INFO and DELAYED START buttons simultaneously; this will return the language selection menu to the display.
NOTE: the first time you use the washer-dryer, add detergent and run an empty 90^ cotton wash cycle without the pre-wash phase.
- SWITCH THE MACHINE ON. Press the button. All the indicator lights will illuminate for 1 second and the text OK will appear on the display; the indicator light corresponding to the button will then remain lit in a constant manner and the START/PAUSE indicator light will flash.
- LOAD THE LAUNDRY. Open the porthole door. Load the laundry, making sure you do not exceed the maximum load value indicated by the display and in the programme table on the following page.
- MEASURE OUT THE DETERGENT. Pull out the detergent dispenser drawer and pour the detergent into the relevant compartments as described in "Description of the machine". For advice as to the type of detergent to use for each cycle, press the button.
4. CLOSE THE PORTHOLE DOOR.
- SELECT THE PROGRAMME. Turn the PROGRAMME KNOB left or right, until the required programme has been selected; the name of the programme will appear on the display. A temperature and spin speed is set for each programme; these may be adjusted. The recommended drum load level and the cycle duration will also appear on the display.
- PERSONALISE THE WASH CYCLE. Use the relevant buttons on the control panel:
Modify the temperature and/or the spin speed. The machine automatically selects the temperature and the maximum spin speed for the programme set and these values may not be increased. By pressing the button, the temperature can be progressively reduced or even set to cold wash "OFF". By pressing the button, the spin speed can be progressively reduced or even eliminated altogether "OFF". If the buttons are pressed again the maximum values are restored.
! Exception: if the COTTON WHITES programme is selected, the temperature can be increased up to a value of 90^ .
Setting a delayed start.
To set a delayed start for the selected programme, press the corresponding button repeatedly until the required delay period has been reached. When this option has been activated, the symbol appears on the display. To remove the delayed start option, press the button until the display shows the text OFF; the symbol will disappear.
Modifying the cycle settings.
- Press the button to activate the option; the name of the option will then appear on the display and the corresponding indicator light will illuminate.
- Press the button again to deactivate the option; the name of the option will then appear on the display followed by the text OFF, and the corresponding indicator light will switch off.
If the selected option is not compatible with the set programme, the indicator light will flash and the option will not be activated.
If the selected option is not compatible with another option that has been selected previously, the indicator light corresponding to the first option selected will flash and only the second option will be activated; the indicator light corresponding to the active option will remain lit in a constant manner.
The options may affect the recommended load value and/or the duration of the cycle.
- START THE PROGRAMME. Press the START/ PAUSE button. The corresponding indicator light remains lit in a fixed manner and the porthole door locks (the DOOR LOCKED indicator light illuminates). During the wash cycle, the display will show which stage is currently in progress and the icon corresponding to each stage will illuminate. To change a programme while a cycle is in progress, pause the washer-dryer by pressing the START/ PAUSE button; then select the desired cycle and press the START/PAUSE button again.
To open the door while a cycle is in progress press the START/PAUSE button; if the DOOR LOCK indicator light switches off it is possible to open the door. Press the START/PAUSE button again to resatrt the programme from the point at which it was interrupted.
- PROGRAMME END. The text END lights up to indicate that the programme has ended. The porthole door may be opened immediately. If the START/PAUSE button flashes, press the button to end the cycle. Open the door, unload the laundry and switch off the machine.
If you wish to cancel a cycle that has already begun, press and hold the button. The cycle will be stopped and the machine will switch off.
Table of Programmes
| Icon | Programme description | Max. temperature (°C) | Max. spin speed (r.p.m.) | Drying | Detergent | Maximum load (kg) | Cycle duration | |
| Washing | Fabric softener | |||||||
| Everyday programmes | The wash cycle duration can be viewed on the display. | |||||||
| COTTON WHITES | 60° (Max 90°) | 1400 | ● | ● | ● | 8 | ||
| COTTON WHITES: Heavily soiled whites and delicate colours. | 40° | 1400 | ● | ● | ● | 8 | ||
| COTTON COLOURFAST | 40° | 1400 | ● | ● | ● | 8 | ||
| SYNTHETICS DELICATE | 40° | 800 | ● | ● | ● | 4 | ||
| 15 | FASTWASH: Refreshes lightly soiled garments quickly (not recommended for wool, silk or clothes that should be washed by hand). | 30° | 800 | ● | ● | ● | 3.5 | |
| Vigorous programmes | ||||||||
| P | COTTON PREWASH: Removes stubborn stains. (Add detergent to the relevant compartment). | 90° | 1400 | ● | ● | ● | 8 | |
| SYNTHETICS NON-DELICATES | 60° | 800 | ● | ● | ● | 4 | ||
| Special programmes | ||||||||
| SHIRTS | 40° | 600 | ● | ● | ● | 2 | ||
| SILK: Washes silk and garments and lingerie. | 30° | 0 | - | ● | ● | 2 | ||
| WOOL: Washes wool, cashmere, etc. | 40° | 800 | ● | ● | ● | 2 | ||
| BED&BATH 7 DAYS: Washes bathroom laundry and bedlinen. | 60° | 1400 | ● | ● | ● | 8 | ||
| Drying programmes | ||||||||
| Drying cycle for cottons | - | - | ● | - | - | 6 | ||
| Drying cycle for synthetics | - | - | ● | - | - | 4 | ||
| Drying cycle for wool | - | - | ● | - | - | 1,5 | ||
| Partial programmes | ||||||||
| Rinse cycle | - | 1400 | ● | - | ● | 8 | ||
| Fast Spin cycle | - | 1400 | ● | - | - | 8 | ||
| Pump out | - | 0 | - | - | - | 8 | ||
The information contained in the table is purely indicative.
Wash options

Super Wash
This option guarantees a high-performance wash, thanks to the use of a greater quantity of water during the initial phase of the cycle and a longer overall duration of the programme.
! It is not compatible with the Fastwash, Silk, Wool, "Partial programmes" and "Drying programmes".

Reduce creases
If this option is selected, the wash and spin phases will be adjusted accordingly so that fabric creasing is reduced. At the end of the cycle the drum of the washer-dryer will spin slowly; the "Reduce creases" and START/PAUSE indicator lights will flash. To end the cycle, press the START/PAUSE button or the "Reduce creases" button. When using the Silk programme, the machine will end the cycle while the laundry is soaking and the "Reduce creases" and START/PAUSE indicator lights will flash. To drain the water so that the laundry can be removed, press the START/PAUSE button or the "Reduce creases" button.
This option is not compatible with the Fastwash, Wool, Fast Spin, Pump out and "Drying programmes".

Extra Rinse
This programme increases the efficiency of the rinse phase and ensures that a greater amount of detergent is removed. It is particularly recommended for skin types that are sensitive to detergents. We recommend this programme is used when the washer-dryer is full or when a large amount of detergent has been used.
This option is not compatible with the Fastwash, Fast Spin, Pump out and "Drying programmes".
Drying
Table of drying times (guideline values)
| Fabric type | Load type | Max. load (kg) | Cupbprad | Hanger | Iron |
| Cotton | Clothing of different sizes, Terry towels | 6 | 180 | 170 | 160 |
| Synthetics | Sheets, Shirts, Pyjamas, socks, etc. | 4 | 180 | 170 | 160 |
| Wool | Knitwear, Pullovers, etc. | 1,5 | 165 | 155 | 145 |
Set the drying cycle
Press the button to set the desired drying type. Two options are available:
A - Based on the damp level of the dry clothes:
Iron: slightly damp clothes, easy to iron.
Hanger: ry clothes to put away.
Cupboard: very dry clothes, recommended for towelling and bathrobes.
B - Based on time: 40^ - 90^ - 180^ (max. 5kg ).
To remove the drying cycle, press the button until the display shows the text OFF.
If your laundry load to wash and dry is exceptionally in excess of the maximum load foreseen (see table of drying times), perform the wash cycle, and when the programme is complete, divide up the garments and put part of them back in the drum. Now follow the instructions provided for a "Dry only" cycle. Repeat this procedure for the remainder of the load.
N.B.: a cooling-down period is always added to the end of each drying cycle.
Dry only
Turn the PROGRAMME knob to one of the drying settings (L) depending on the type of fabric, then select the desired drying type using the DRYING button.
Detergent
The type and quantity of detergent used depends on the type of fabric (cotton, wool, silk...), its colour, the temperature of the wash, the level of soiling and the hardness of the water in the area.
Measuring out the detergent carefully will avoid accidental spills and help to protect the environment: although they may be biodegradable, detergents contain elements that alter the balance of nature.
We recommend:
- the use of powder detergents for white cotton garments and for pre-wash phases;
- the use of liquid detergents for delicate cotton garments and for all programmes which run at a low temperature;
- the use of liquid detergents for wool and silk.
! Do not use detergents when washing garments by hand, because they create too much foam.
The detergent must be measured out into the relevant compartment, or into the detergent dosing ball which will be placed directly into the drum of the machine. In this case the Cotton cycle with pre-wash phase may not be selected.
Preparing the laundry
! Unfold all items of laundry before placing them in the machine.
- Divide the laundry according to type of material (the symbol on the garment label) and colour, making sure that whites are separated from coloured garments.
- Empty all pockets and check for loose buttons.
- Do not exceed the values indicated in the "Table of Programmes", which refer to the weight of the laundry items when they are dry.
How much does your laundry weigh?
| 1 sheet | 400 - 500 g |
| 1 pillowcase | 150 - 200 g |
| 1 tablecloth | 400 - 500 g |
| 1 bathrobe | 900 - 1200 g |
| 1 towel | 150 - 250 g |
| 1 pair of jeans | 400 - 500 g |
| 1 shirt | 150 - 200 g |
Washing advice
Shirts: use a suitable programme to wash shirts made from different fabrics and in different colours. This will guarantee that these garments are looked after properly.
Silk: use the relevant programme designed for all silk garments. We recommend the use of a special detergent for delicate garments.
Curtains: these should be folded and placed inside the bag provided. Use the "Silk" programme.
Wool: Hotpoint/Ariston is the only washer-dryer to have obtained the prestigious Woolmark Platinum Care mark of recognition (M.0508) from The Woolmark Company, which certifies the machine washing of all woollen garments, even those whose label states "hand wash only". The "Wool" programme therefore offers you complete peace of mind when washing all woollen garments, with great performance guaranteed every time.
Bathroom laundry and bedlinen: this washer-dryer can be used to wash any domestic laundry in a single cycle called “BED&BATH 7 DAYS” that optimises the use of fabric softener while saving both time and electricity. We recommend that you use a powder detergent.
Stubborn stains: stubborn stains should be treated with solid soap before the garment is washed (use the Cotton programme with pre-wash phase).
Load-balancing system
Before every spin cycle, to avoid excessive vibrations and to distribute the load in a uniform manner, the drum rotates continuously at a speed which is slightly faster than the normal washing speed. If, after several attempts, the load is still not evenly distributed, the machine spins at a lower speed than the set frequency.
If the load is excessively unbalanced, the washer-dryer continues at distribution speed only instead of the full spin speed.
In order to achieve better load distribution and balance, we recommend that large and small garments are mixed when placing the laundry in the machine.
! This machine was designed and manufactured in compliance with current international safety standards. The following advice is provided for safety reasons and should be read carefully.
General safety
- This appliance was designed for domestic use inside the home and is not intended for commercial or industrial use.
- The washer-dryer must be used by adults only, in accordance with the instructions provided in this booklet.
- Do not touch the machine when barefoot or with wet or damp hands or feet.
- When unplugging the appliance, always pull the plug from the mains socket; do not pull on the cable.
- Do not touch the drained water as it may reach extremely high temperatures.
- Never force the porthole door: doing so may damage the safety lock mechanism designed to prevent the door being opened accidentally.
- If the appliance breaks down, under no circumstances must you attempt to carry out the repairs yourself.
- Keep children well away from the machine while it is in operation.
- If the machine must be moved, work in a group of two or three people and handle it very carefully. Never attempt to move the appliance without the help of another person, because it is extremely heavy.
- Make sure that the drum is empty before loading laundry into the appliance.
- During the drying phase, the door tends to get quite hot.
- Do not use the appliance to dry clothes that have been washed with flammable solvents (e.g. trichlorethylene).
- Do not use the appliance to dry foam rubber or similar elastomers.
- Make sure that the water tap is turned on during the drying cycles.
Disposal
- When disposing of the packaging material: observe local legislation so that the packaging may be reused.
- The European Directive 2002/96/EC relating to Waste Electrical and Electronic Equipment states that household appliances should not be disposed of using the normal solid urban waste cycle. Exhausted appliances should be collected separately in order to optimise the cost of re-using and recycling the materials inside the machine, while preventing potential damage to the atmosphere and to public health. The crossed-out dustbin is marked on all products to remind the
owner of their obligations regarding separated waste collection.
For more information relating to the correct disposal of household appliances, owners should contact their local authorities or appliance dealer.
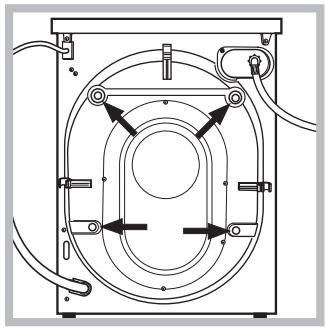
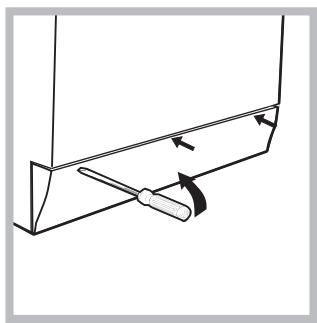
Opening the door manually
If it is not possible to open the porthole door due to a powercut and you wish to hang out the laundry, proceed as follows:
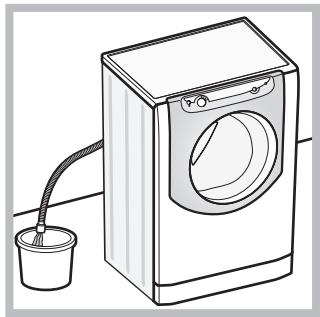
- Remove the plug from the electricity socket;
- Make sure that the water level inside the machine is lower than the door opening; if this is not the case remove excess water using the water outlet hose, collecting it in a bucket as shown in the figure;
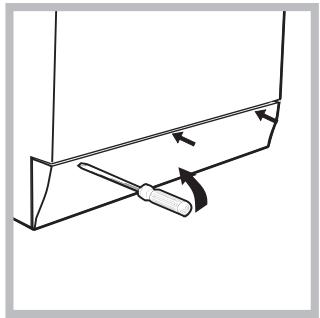
- Remove the covering panel on the front of the washer-dryer using a screwdriver (see figure);
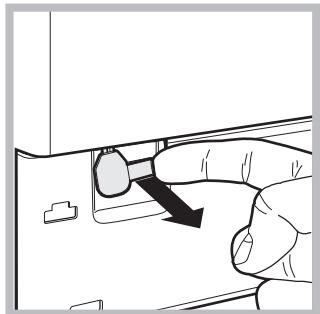
- Using the tab shown in the figure, pull outwards until the plastic brace comes away; pull it downwards until you hear a "click", which indicates that the door is unlocked;
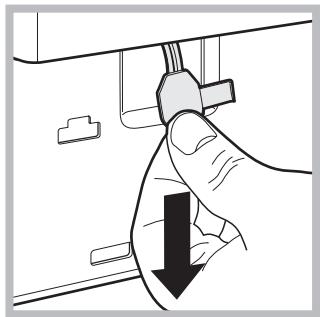
-
Open the door; if this is still not possible, repeat the process;
-
Replace the kick strip, making sure that the hooks are positioned in the right slots before pushing the panel towards the machine.
Turning off the water and electricity supplies
- Turn off the water tap after every wash. This limits wear and tear on the machine's water supply and prevents leaks.
- Disconnect the appliance from the electricity supply before cleaning it and before performing any maintenance work on it.
Cleaning the machine
The exterior of the appliance and all rubber parts may be cleaned using a cloth soaked in warm soapy water. Do not use solvents or abrasive products.
Cleaning the detergent dispenser drawer
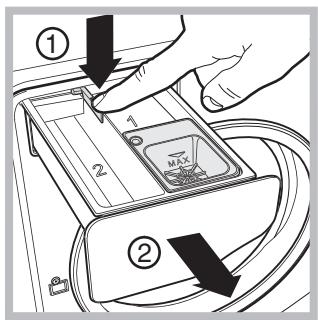
To remove the drawer, press the lever (1) and pull it outwards (2) (see figure).
Wash the drawer under running water; this should be done regularly.
Drum maintenance
- Always leave the porthole door ajar to prevent unpleasant odours from forming.
Cleaning the pump
The washer-dryer is fitted with a self-cleaning pump which does not require regular maintenance. However, it may be that small objects (coins, buttons, etc.) fall into the pre-chamber that protects the pump (the pump is located in the lower part of this pre-chamber).
! Make sure that the wash cycle has finished and remove the plug from the socket.
To access the pre-chamber:
- Remove the kick strip on the front of the machine using a screwdriver (see figure);
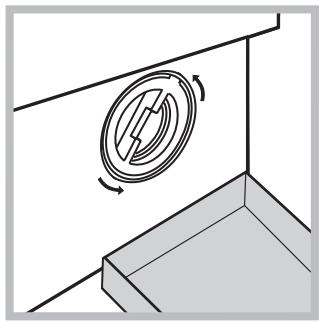
-
Position a container collecting the drained water (approximately 1.5 l) correctly (see figure);
-
Unscrew the cover, turning it in an anticlockwise direction (see figure);
-
Clean the inside thoroughly;
- Screw the cover back on;
- Replace the kick strip, making sure that the hooks are positioned in the right slots before pushing the panel towards the machine.
Checking the water inlet hose
Check the water inlet hose at least once a year. If there are any cracks, replace it immediately: the high water pressure used by the wash cycles could cause a cracked hose to split open.
From time to time your machine may not operate as it should. Before calling for Assistance (see "Assistance"), make sure that the problem cannot be resolved easily using the following list.
| Malfunction: | Possible causes / Solutions: |
| The washer-dryer will not switch on. | · The plug has not been inserted into the electrical socket, or it has not been inserted far enough to make contact. · There is no power in the house. |
| The wash cycle does not begin. | · The porthole door has not been shut properly. · The START/PAUSE button has not been pressed. · The water tap has not been turned on. |
| The washer-dryer fails to fill with water. | · The water inlet hose is not connected to the tap. · The hose is kinked. · The water tap has not been turned on. · There is no water in the house. · The water pressure is insufficient. · The START/PAUSE button has not been pressed. |
| The machine continuously fills and drains water. | · The end of the outlet hose has not been fitted at a height between 65 and 100 cm from the floor (see “Installation”). · The free end of the hose is underwater (see “Installation”). · If the dwelling is on one of the upper floors of a building, there may be problems relating to water drainage, causing the washer-dryer to load and drain water continuously. Special anti-draining valves are available in shops and help to avoid this inconvenience. · The water drainage systemis not fitted with a breather pipe. |
| The washer-dryer does not drain or spin. | · The programme does not include a draining phase: some programmes require manual draining (see “Programmes and options”). · The “Easy Iron” option is enabled: to complete the programme, press the START/PAUSE button (see “Programmes and options”). · The outlet hose is bent (see “Installation”). · The drainage duct is clogged. |
| The washer-dryer vibrates too much during the spin cycle. | · The drum was not unlocked properly when the appliance was installed (see “Installation”). · The washer-dryer is not level (see “Installation”). · The washer-dryer is trapped between cabinets and a wall (see “Installation”). · The load is not balanced properly (see “Description of the machine”). |
| The washer-dryer leaks. | · The water inlet hose is not screwed on to the tap correctly (see “Installation”). · The detergent dispenser drawer is blocked (for instructions on how to clean it, see “Care and maintenance”). · The outlet hose has not been secured properly (see “Installation”). |
| The icons corresponding to the “Phase in progress” flash rapidly at the same time as the ON/OFF indicator light. | · Switch off the machine and unplug the appliance; wait for approximately 1 minute then switch it on again. If the problem persists, contact Assistance. |
| There is too much foam. | · The detergent is not designed for machine washing (the packaging should state that the product is “for washing by machine”, “for washing by hand or machine” or similar). · Too much detergent was used. |
| The washer-dryer door remains locked. | · Follow the manual unlocking procedure (see “Precautions and tips”). |
| The washer-dryer does not dry. | · The appliance is not plugged into the socket, or not enough to make contact. · There has been a power failure. · The appliance door is not shut properly. · A delayed start has been set. · The DRYING cycle is on the OFF setting. |
Before contacting Assistance:
- Check whether you can resolve the problem on your own (see "Troubleshooting");
- Restart the programme to check whether the problem has been overcome;
- If this is not the case, contact the Authorised Technical Assistance Centre.
If the machine has been installed or used incorrectly, you may be charged for the maintenance callout service.
! Never use the services of an unauthorised technician.
Have the following information ready:
The type of problem experienced;
- The appliance model (Mod.);
- The serial number (S/N).
This information can be found on the appliance data plate.
GB

Français
Sommaire
Installation, 30-31
Causes / Solutions possibles:
- AQUALTIS
- AQGMD 149
- Unpacking and levelling
- Unpacking
- Levelling
- Connecting the water and electricity supplies
- Connecting the water inlet hose
- Connecting the outlet hose
- Electrical connection
- Description of the machine
- CLOSE THE PORTHOLE DOOR.
- Setting a delayed start.
- Modifying the cycle settings.
- Wash options
- Super Wash
- Reduce creases
- Extra Rinse
- Drying
- Set the drying cycle
- Dry only
- Detergent
- Preparing the laundry
- Washing advice
- Load-balancing system
- General safety
- Disposal
- Opening the door manually
- Turning off the water and electricity supplies
- Cleaning the machine
- Cleaning the detergent dispenser drawer
- Drum maintenance
- Cleaning the pump
- Checking the water inlet hose
- Before contacting Assistance:
- Have the following information ready:
- Sommaire
- Causes / Solutions possibles:
Brand : HOTPOINT-ARISTON
Model : AQUALTIS AQGMD 149
Category : Washing machine