
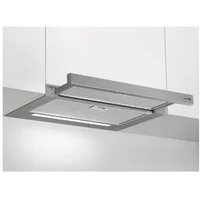
DAK6036CN - Range hood ELECTROLUX - Free user manual and instructions
Find the device manual for free DAK6036CN ELECTROLUX in PDF.

 FR
FR
 BG
BG
 CS
CS
 DA
DA
 DE
DE
 EL
EL
 EN
EN
 ES
ES
 ET
ET
 FI
FI
 HU
HU
 IT
IT
 KK
KK
 LT
LT
 LV
LV
 MK
MK
 NL
NL
 NO
NO
 PL
PL
 PT
PT
 RO
RO
 RU
RU
 SK
SK
 SL
SL
 SQ
SQ
 SR
SR
 SV
SV
 TR
TR
 UK
UK
| Brand | Electrolux |
| Model | DAK6036CN |
| Product type | Wall-mounted extractor hood |
| Dimensions (W x D x H) | 90 x 50 x 31 cm |
| Net weight | 15 kg |
| Power supply | 220-240 V ~ 50 Hz |
| Connected power | 280 W |
| Number of speeds | 3 speeds + intensive |
| Maximum airflow | 650 m³/h |
| Maximum noise level | 65 dB(A) |
| Lighting | 2 x LED 3 W |
| Filter type | Washable metal grease filter + charcoal filter (optional) |
| Filter saturation indicator | Yes |
| Extraction function | Yes (external evacuation) |
| Recirculation function | Yes (with charcoal filter) |
| Control | Touch electronic |
| Delayed shut-off | Yes (timer function) |
| Safety level | Automatic shut-off in case of overheating |
| Maintenance | Regular cleaning of grease filter in dishwasher |
| Repairability | Spare parts available (motor, lighting, filters) |
Frequently Asked Questions - DAK6036CN ELECTROLUX
User questions about DAK6036CN ELECTROLUX
0 question about this device. Answer the ones you know or ask your own.
Ask a new question about this device
Download the instructions for your Range hood in PDF format for free! Find your manual DAK6036CN - ELECTROLUX and take your electronic device back in hand. On this page are published all the documents necessary for the use of your device. DAK6036CN by ELECTROLUX.
USER MANUAL DAK6036CN ELECTROLUX
DAL5536WE
DAL5536SW
DAL5536CN
DAL6036WE
DAL6036SW
DAL6036CN
DAK5536WE
DAK5536SW
DAK5536CN
DAK6036WE
DAK6036SW
DAK6036CN
WE'RE THINKING OF YOU
Thank you for purchasing an Electrolux appliance. You've chosen a product that brings with it decades of professional experience and innovation. Ingenious and stylish, it has been designed with you in mind. So whenever you use it, you can be safe in the knowledge that you'll get great results every time.
Welcome to Electrolux.
Visit our website to:

Get usage advice, brochures, trouble shooter, service and repair information: www.electrolux.com/support

Register your product for better service: www.registerelectrolux.com

Buy Accessories, Consumables and Original spare parts for your appliance: www.electrolux.com/shop
CUSTOMER CARE AND SERVICE
Always use original spare parts.
When contacting our Authorised Service Centre, ensure that you have the following data available: Model, PNC, Serial Number.
The information can be found on the rating plate.
⚠ Warning / Caution-Safety information
i General information and tips
Environmental information
Subject to change without notice.
CONTENTS
- SAFETY INFORMATION......48
- SAFETY INSTRUCTIONS.... 51
- INSTALLATION....52
- PRODUCT DESCRIPTION....53
- DAILY USE....53
- CARE AND CLEANING....54
- TROUBLESHOOTING....55
- GUARANTEE 56
- ENVIRONMENTAL CONCERNS....56
1. ⚠ SAFETY INFORMATION
Before the installation and use of the appliance, carefully read the supplied instructions. The manufacturer is not responsible for any injuries or damage that are the result of incorrect installation or usage. Always keep the instructions in a safe and accessible location for future reference.
installation or usage. Always keep the instructions in a safe and accessible location for future reference.
This appliance can be used by children aged from 8 years and above and persons with reduced physical, sensory or mental capabilities or lack of experience and knowledge if they have been given supervision or instruction concerning the use of the appliance in a safe way and understand the hazards involved. Children of less than 8 years of age and persons with very extensive and complex disabilities shall be kept away from the appliance unless continuously supervised.
- This appliance can be used by children aged 8 years and above and by persons with reduced physical, sensory, or mental capabilities, or lack of experience and knowledge, if they have been given supervision or instruction concerning the use of the appliance in a safe way and understand the hazards involved. Children under 8 years of age and persons with very extensive and complex disabilities shall be kept away from the appliance unless continuously supervised.
- Children should be supervised to ensure that they do not play with the appliance.
- Keep all packaging away from children and dispose of it appropriately.
- Keep children and pets away from the appliance when it operates.
- Children shall not carry out cleaning and user maintenance of the appliance without supervision.
1.2 General Safety
- This appliance is intended for domestic use above hobs, cookers and similar cooking devices.
- This appliance is designed for single household domestic use in an indoor environment.
- This appliance may be used in offices, hotel guest rooms, bed & breakfast guest rooms, farm guest houses and other similar accommodation where such use does not exceed (average) domestic usage levels.
- Before carrying out any maintenance, disconnect the appliance from the power supply.
- CAUTION: Accessible parts may become hot during use with cooking appliances.
- Use only the fixing screws supplied with the appliance; if not supplied, use the screws recommended in the installation instructions. Install the appliance in a safe and suitable place that meets installation requirements.
- WARNING: Failure to install the screws or fixing device in accordance with these instructions may result in electrical hazards.
- Do not use adhesives to fix the appliance.
- The minimum distance between the hob surface on which the pans stand and the lower part of the appliance shall be at least 65 cm, unless otherwise specified in the installation instructions for the appliance or hob.
- The discharge of air must comply with local authorities regulations.
- Ensure good air ventilation in the room where the appliance is installed to avoid the backflow of gases into the room from appliances burning gas or other fuels, including open fires.
- Make sure that the ventilation openings are not blocked and the air collected by the appliance is not conveyed into a duct used to exhaust smoke and steam from other appliances (central heating systems, thermosiphons, water-heaters, etc.).
- When the appliance operates with other appliances the maximum vacuum generated in the room should not exceed 0.04 mbar.
- If the supply cord is damaged, it must be replaced by the manufacturer, its Authorised Service Centre or similarly qualified persons to avoid an electrical hazard.
- If the cord set is damaged, it must be replaced by a special cord set available from the manufacturer or its Authorised Service Centre.
- If the appliance is connected directly to the power supply, the electrical installation must be equipped with an isolating device that allows to disconnect the appliance from the mains at all poles. Complete disconnection must comply
with conditions specified in the overvoltage category III. The means for disconnection must be incorporated in the fixed wiring in accordance with the wiring rules.
- Do not flambé under the appliance.
- Do not use to exhaust hazardous or explosive materials and vapours.
- Clean the appliance regularly with a soft cloth to prevent the deterioration of the surface material.
- Do not use a steam cleaner, water spray, harsh abrasive cleaners or sharp metal scrapers to clean the surface of the appliance. Use only neutral detergents.
- Clean grease filters regularly (at least every 2 months) and remove grease deposits from the appliance to prevent the risk of fire.
- Use a cloth to clean the interior of the appliance.
2. SAFETY INSTRUCTIONS
2.1 Installation

WARNING!
Risk of injury, electric shock, fire, burns or damage to the appliance.
- Only a qualified person must install this appliance.
- Do not install or use a damaged appliance.
- Follow the installation instructions supplied with the appliance. Always take care when moving the appliance as it is heavy. Always use safety gloves and enclosed footwear.
- Before installing the appliance, remove all packaging, labeling, and protective film.
- Do not exhaust air into a wall cavity unless the cavity is designed for that purpose.
2.2 Electrical connection

WARNING!
Risk of fire and electric shock.
- All electrical connections should be made by a qualified electrician.
- Make sure that the parameters on the rating plate are compatible with the electrical ratings of the mains power supply.
- If the symbol ( ) is not printed on the rating plate, the appliance must be earthed. Always use a correctly installed shockproof socket.
- Do not let the mains cable tangle.
- Do not use multi-plug adapters or extension cables.
- If the mains socket is loose, do not connect the mains plug.
- Do not pull the mains cable to disconnect the appliance. Always pull the mains plug.
- The shock protection of live and insulated parts must be fastened in such a way that it cannot be removed without tools.
- Make sure the appliance is installed correctly. A loose or incorrect electricity mains cable can cause the terminal to become too hot.
- Connect the appliance at the end of the installation. Make sure that there is access to the mains after the installation.
2.3 Use

WARNING!
Risk of injury, burns and electric shock.
- This appliance is for cooking purposes only. Do not use the appliance for other purposes.
- Do not change the specification of this appliance.
- Do not operate the appliance with wet hands or when it has contact with water.
- Use only the accessories supplied with the appliance.
- Keep flames or heated objects away from fats and oils during cooking and frying.
- Do not use uncovered electric grills.
- Do not use the appliance as a storage surface.
- Do not use magnifying glasses, binoculars or similar optical devices to look directly at the lighting of the appliance.
- If the appliance works with other devices, the maximum developed pressure must not exceed 4 Pa (4x10⁻⁵ bar).
2.4 Service
• To repair the appliance, contact the Authorised Service Centre. Use only original spare parts. - Concerning the lamp(s) inside this product and spare part lamps sold separately: These lamps are intended to withstand extreme physical conditions in household appliances, such as temperature, vibration, humidity, or are intended to signal information about the operational status of the appliance. They are not intended for use in other applications and are not suitable for room illumination in households.
2.5 Disposal

WARNING!
Risk of injury or suffocation.
- Contact your municipal authority for information on how to dispose of the appliance.
- Disconnect the appliance from the mains supply.
- Cut off the mains electrical cable close to the appliance and dispose of it.
3. INSTALLATION

WARNING!
Refer to Safety chapters.
3.1 Installation instructions

For complete information about the installation of the appliance, refer to a separate installation booklet.
4. PRODUCT DESCRIPTION
4.1 Control panel overview
![graph TD A["1"] --> B["0|1"] C["2"] --> D["3"] E["4"] --> F["2"] G["3"] --> H["3"]](/content/2026/07/1419877/images/2c0c106491a7ee408624144c8045cd6fb6df4a003eec7dfe2f548bc28d2f9bf1.jpg)
| Function Description | |
| 1 | First Speed The fan switches to first speed level. |
| 2 | Lamp Turns the lights on and off. |
| 3 | Third Speed The fan switches to third speed level. |
| 4 | Second Speed The fan switches to second speed level. |
5. DAILY USE
5.1 Using the hood
Check the recommended speed according to the table below.
| 0|1 | While heating up food, cooking with covered pots. |
| 2 | While cooking with covered pots on multiple cooking zones or burners, gentle frying. |
| 3 | While boiling and frying big quantities of food without a lid, cooking on multiple cooking zones or burners. |

It is recommended to leave the hood operating for approximately 15 minutes after cooking.
To operate the hood:
- Pull out the drawer of the hood more than 5 cm.

The control panel is exposed.
- To activate the function press the button.
0|1
- If needed, change the speed by pressing the desired button.

The hood's light works independently of other hood functions. To illuminate the cooking surface press the light button. Closing the drawer has no effect on the hood light.
To turn off the fan press or close the hood drawer.

The hood remembers the last setting of fan speed on closing the drawer. The hood will operate on this fan speed level when the drawer is pulled out again.
6. CARE AND CLEANING
6.1 Notes on cleaning
Cleaning Agents
Do not use abrasive detergents and brushes.
Clean the surface of the appliance with a soft cloth with warm water and a mild detergent.
After cooking, some parts of the appliance can get hot. To avoid stains, the appliance must be cooled down and dried with a clean cloth or paper towels.
Clean stains with a mild detergent.
Keep the hood clean.
Clean the appliance and grease filters each month. Clean the interior and grease filters carefully from fat. Fat accumulation or other residue may cause fire.
Grease filters can be washed in a dishwasher.
The dishwasher must be set to a low temperature and a short cycle. The grease filter may discolour, but this has no influence on the performance of the appliance.
Charcoal filter
The time of saturation of the charcoal filter varies depending on the type of cooking and the regularity of cleaning the grease filter.
6.2 Cleaning the grease filter
Filters are mounted with the use of clips and pins on the opposite side.
To clean the filter:
- Press the handle of the mounting clip on the filter panel underneath the hood.

- Slightly tilt the front of the filter downwards, then pull.
Repeat the first two steps for all filters.
- Clean the filters using a sponge with non-abrasive detergents or in a dishwasher.

The dishwasher must be set to a low temperature and a short cycle. The grease filter may discolor, but this does not affect the performance of the appliance.
- To mount the filters back, follow the first two steps in reverse order.
Repeat the steps for all filters if applicable.
6.3 Replacing the charcoal filter - optional

WARNING!
Depending on the type, the filter can or cannot be regenerated. Refer to the leaflet provided with the filter.
To replace the filter:
- Remove the grease filters from the appliance.
Refer to "Cleaning the grease filter" in this chapter.
- Pull the tabs towards the bottom part of the filter.

- Slightly tilt the front of the filter downwards, then pull.
- To install a new filter, perform the same steps in reverse order.
In any case, it is necessary to replace the filters at least every four months.
6.4 Replacing the lamp
This appliance is supplied with a LED lamp. This part can be replaced by a technician only. In case of any malfunction refer to "Service" in the "Safety Instructions" chapter.
7. TROUBLESHOOTING

WARNING!
Refer to Safety chapters.
7.1 What to do if...
| Problem Possible cause Remedy | ||
| You cannot activate the appliance. The appliance is not connected to a power supply or it is connected incorrectly. | Check if the appliance is correctly connected to the electrical supply. | |
| You cannot activate the appliance. The fuse is blown. Make sure that the fuse is the cause of the malfunction. If the fuse is blown again and again, contact a qualified electrician. | ||
| You cannot activate the appliance. Cabinet doors are not aligned with the cabinet frame. | Align the cabinet doors. | |
| The lamp does not operate. The lamp is defective. Replace the lamp. Refer to the "Care and Cleaning" chapter. | ||
| The appliance does not absorb enough vapours. | The motor speed is not adequate to the appearing vapours. | Change the speed of the motor. |
8. CH GUARANTEE
Customer Service Centres
| Point of Service | ||
| Industriestrasse 105506 Mägenwil | Le Trési 61028 Préverenges | Via Violino 116928 Manno |
| Morgenstrasse 1313018 Bern | ||
| Langgasse 109008 St. Gallen | ||
| Am Mattenhof 4a/b6010 Kriens |  | |
| Schlossstrasse 14133 Pratteln | ||
| Comercialstrasse 197000 Chur | ||
Spare parts service Industriestrasse 10, 5506 Mägenwil, Tel. 0848 848 111
Specialist advice/Sale Badenerstrasse 587, 8048 Zürich, Tel. 044 405 81 11
Warranty For each product we provide a two-year guarantee from the date of purchase or delivery to the consumer (with a guarantee certificate, invoice or sales receipt serving as
proof). The guarantee covers the costs of materials, labour and travel. The guarantee will lapse if the operating instructions and conditions of use are not adhered to, if the product is incorrectly installed, or in the event of damage caused by external influences, force majeure, intervention by third parties or the use of non-genuine components.
9. ENVIRONMENTAL CONCERNS
Recycle materials with the symbol .Put the packaging in relevant containers to recycle it. Help protect the environment and human health by recycling waste of electrical and electronic appliances. Do not dispose of appliances marked with the symbol with the household waste. Return the product to your local recycling facility or contact your municipal office.

For Switzerland:
Where should you take your old equipment?
Anywhere that sells new equipment or hand it in to official SENS collection points or official SENS recycling firms. The list of official SENS collection points can be found at www.erecycling.ch
WE THINK OF YOU
5. DAILY USE
5.1 Using the hood
- Gently tilt the front part of the filter downwards, then pull it.
- To install a new filter, perform the same steps in reverse order.
In any case, it is necessary to replace the filters at least every four months.
6.4 Replacing the bulb
This appliance is equipped with an LED bulb. This part can only be replaced by a technician. In case of any malfunction, refer to "Service" in the "Safety Instructions" chapter.
7. TROUBLESHOOTING

WARNING!
7. TROUBLESHOOTING

WARNING!
The control panel is exposed.
- Tilt the front part of the filter slightly downward, then pull.
- To install the new filter, repeat the same steps in reverse order.
In any case, the filters must be replaced at least every four months.
6.4 Replacing the bulb
4. PRODUCT DESCRIPTION
The control panel is exposed.
- WE'RE THINKING OF YOU
- VISIT OUR WEBSITE TO
- CUSTOMER CARE AND SERVICE
- CONTENTS
- ⚠ SAFETY INFORMATION
- THIS APPLIANCE CAN BE USED BY CHILDREN AGED FROM 8 YEARS AND ABOVE AND PERSONS WITH REDUCED PHYSICAL, SENSORY OR MENTAL CAPABILITIES OR LACK OF EXPERIENCE AND KNOWLEDGE IF THEY HAVE BEEN GIVEN SUPERVISION OR INSTRUCTION CONCERNING THE USE OF THE APPLIANCE IN A SAFE WAY AND UNDERSTAND THE HAZARDS INVOLVED. CHILDREN OF LESS THAN 8 YEARS OF AGE AND PERSONS WITH VERY EXTENSIVE AND COMPLEX DISABILITIES SHALL BE KEPT AWAY FROM THE APPLIANCE UNLESS CONTINUOUSLY SUPERVISED
- GENERAL SAFETY
- SAFETY INSTRUCTIONS
- INSTALLATION
- WARNING
- ELECTRICAL CONNECTION
- USE
- SERVICE
- DISPOSAL
- INSTALLATION INSTRUCTIONS
- PRODUCT DESCRIPTION
- CONTROL PANEL OVERVIEW
- DAILY USE
- USING THE HOOD
- TO OPERATE THE HOOD
- CARE AND CLEANING
- NOTES ON CLEANING
- CLEANING THE GREASE FILTER
- TO CLEAN THE FILTER
- REPLACING THE CHARCOAL FILTER - OPTIONAL
- REPLACING THE LAMP
- TROUBLESHOOTING
- WHAT TO DO IF
- CH GUARANTEE
- ENVIRONMENTAL CONCERNS
- FOR SWITZERLAND
- WE THINK OF YOU
- REPLACING THE BULB
Brand : ELECTROLUX
Model : DAK6036CN
Category : Range hood