
DB1R - Roller blind DOMETIC - Free user manual and instructions
Find the device manual for free DB1R DOMETIC in PDF.
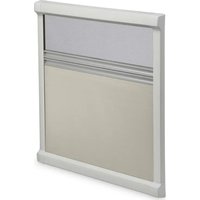


| Product type | Roller blind for motorhomes and boats |
| Brand | Dometic |
| Model | DB1R |
| Dimensions (W x H) | Up to 300 cm x 150 cm depending on configuration |
| Weight | Approximately 2 to 4 kg depending on size |
| Material | Coated polyester fabric, UV resistant |
| Color | Gray, cream or white depending on version |
| Mechanism | Manual by strap or cord |
| Main functions | Sun protection, light dimming, privacy |
| Usage | Indoor or sheltered outdoor |
| Care and cleaning | Clean with a soft cloth and soapy water, rinse with clean water |
| Safety | Locking system to prevent accidental unrolling |
| Installation | Wall or ceiling mounting with supplied brackets |
| Spare parts | Available: straps, springs, mounting brackets |
| Repairability | Repairability index estimated at 7/10 (standard parts) |
| Power supply | None (manual) |
| Operating temperature | -10 °C to +50 °C |
| Warranty | 2 years (depending on retailer) |
| Standards | Complies with European directives |
Frequently Asked Questions - DB1R DOMETIC
User questions about DB1R DOMETIC
0 question about this device. Answer the ones you know or ask your own.
Ask a new question about this device
Download the instructions for your Roller blind in PDF format for free! Find your manual DB1R - DOMETIC and take your electronic device back in hand. On this page are published all the documents necessary for the use of your device. DB1R by DOMETIC.
USER MANUAL DB1R DOMETIC
DB1R
EN Mini-double cassette roller blind
Installation and Operating Manual.....11
DF Mini-Doppel-Kassettenrollo
3
4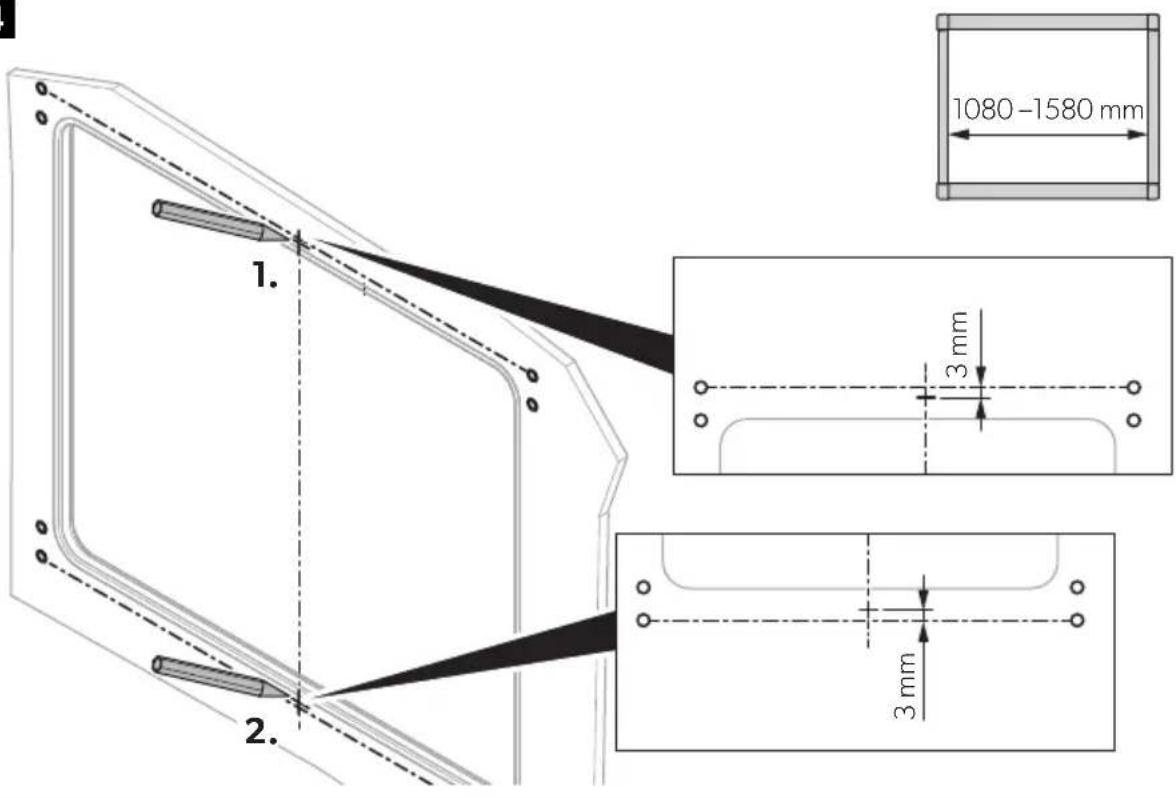





13

14

15
16
Please read this instruction manual carefully before installation and first use, and store it in a safe place. If you pass on the product to another person, hand over this instruction manual along with it.
Content
1 Scope of delivery ..... 11 2 Intended use .... 11 3 Fitting the roller blind ....12 4 Using the roller blind....13 5 Troubleshooting....14 6 Cleaning and care....14 7 Warranty ....15 8 Technical data....15
1 Scope of delivery
Item in fig. 1, page 3
Quantity Description
11 Double cassette roller blind 21 Covers for the corners 3 2 Brackets for the cassettes (only for widths over 1 m) 4 2 Countersunk screws 3.5 mm x 16 mm (only for widths over 1 m) 5 8 Oval-head screws 3.5 mm x 20 mm
2 Intended use
The mini double cassette roller blind is suitable for windows in mobile homes or camper vans. It has an insect screen and a blackout roller blind.
3 Fitting the roller blind
3.1 Fixing the roller blind
The fastening of the roller blind is different for roller blinds that are under 1 m in width and those that are 1 m in width or wider. Wide roller blinds must have an additional bracket for the cassettes fixed at the top and the bottom in the center.

NOTE
You can attach the insect screen at the top and the blackout roller blind at the bottom, as well as vice versa.
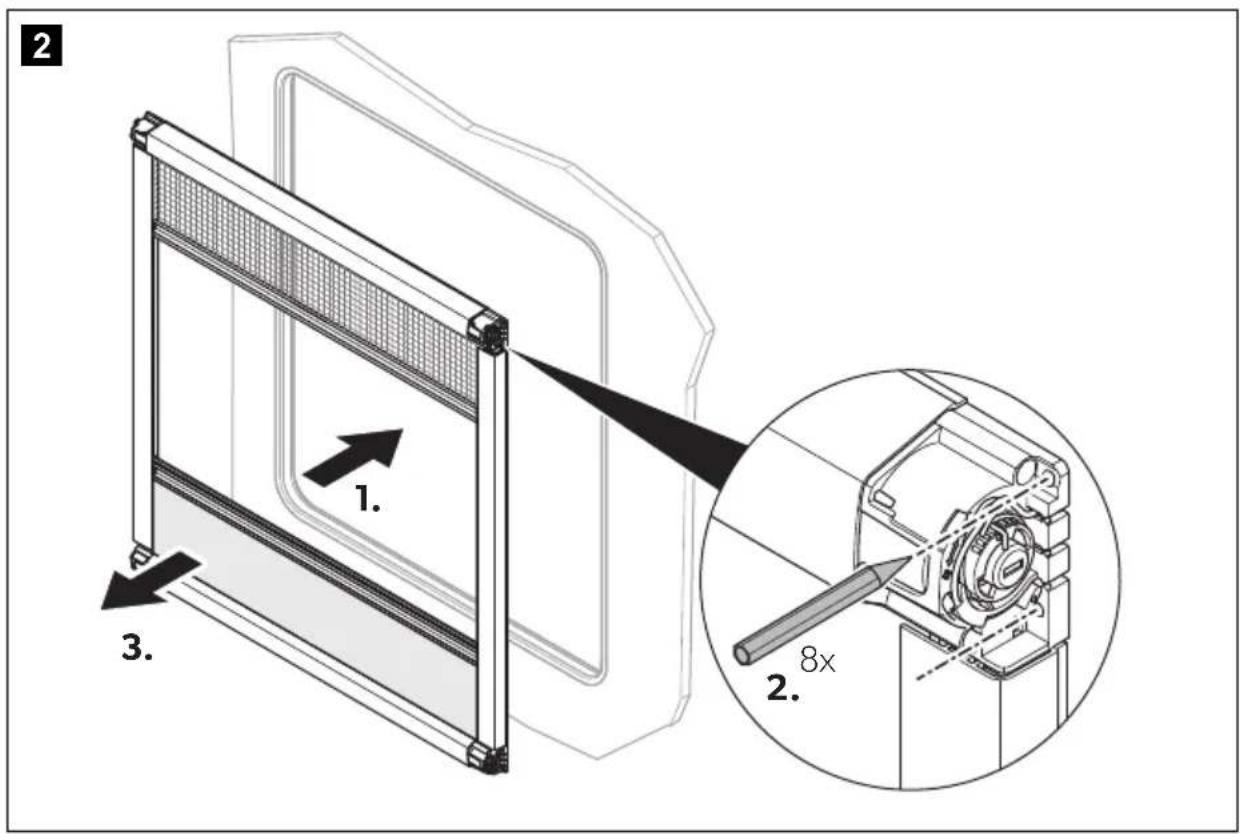
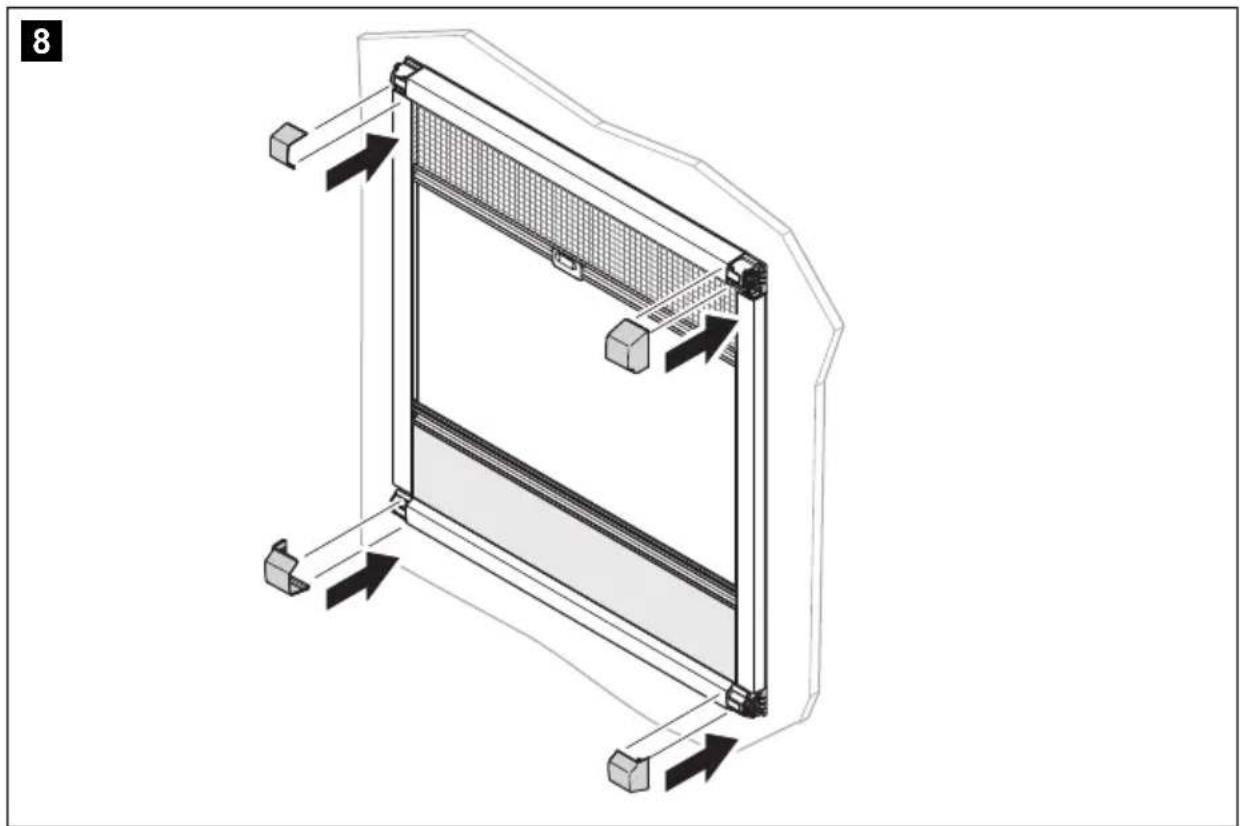
Proceed as illustrated (fig. 2, page 3 to fig. 8, page 6).
All steps with width specifications must only be performed for roller blinds with the corresponding width of over 1 m or under 1 m. For roller blinds with a width over 1 m, the top and the bottom cassette must both be fixed with an additional bracket. Determine the position for fastening the bracket as illustrated (fig. 4, page 4).
3.2 Adjusting the tension of the roller blinds

NOTICE!
Always adjust the tension on the right and left in parallel. Otherwise, damage may be caused to the roller blind in the long term.
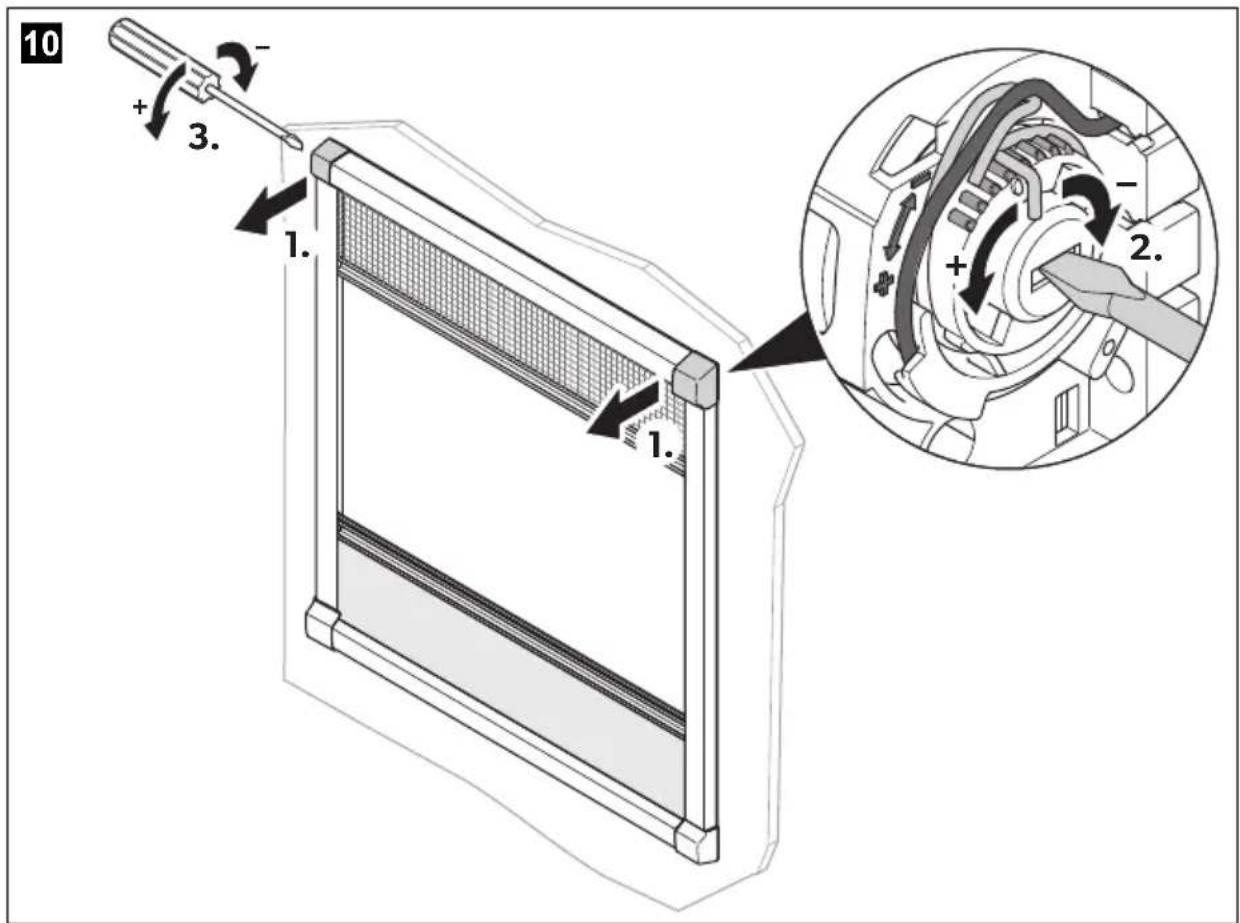
The roller blinds are tensioned using two cords (fig. 9 1, page 7) with springs (fig. 9 2, page 7), that are located on the right and left of the two cassettes. To increase or decrease the tension of the cord, the central part of the tensioning fitting is rotated, (fig. 9 3, page 7) making the spring move into another notch (fig. 9 4, page 7).
Proceed as illustrated (fig. 10 and fig. 11, page 8).
4 Using the roller blind
4.1 Closing the roller blind

NOTICE! Risk of damage due to a build-up of heat between the roller blind and the window!
In strong sunlight, only close the blackout roller blind two thirds of the way.
Roller blinds with a width of less than one meter (fig. 12, page 8)
▶ Pull the blackout roller blind by the handle strip to the desired position. ▶ Pull the handle strip of the insect screen directly to the handle strip of the blackout roller blind. √ When the tension has been set correctly the roller blinds stay in the closed position.
Roller blinds with a width of over one meter (fig. 13, page 9)
▶ Pull the blackout roller blind by the handle strip to the desired position. ▶ Pull the handle strip of the insect screen directly to the handle strip of the blackout roller blind. ▶ Press the handle strips together so that the handle notches into place on the handle strip of the insect screen. √ The handle keeps the roller blinds closed.
4.2 Opening the roller blind

NOTICE! Risk of damage
Never let the blackout roller blind spring back.
Roller blinds with a width of less than one meter (fig. 14, page 9)
▶ Pull the blackout roller blind and the insect screen by the handle strip to the desired, open position. √ The handle strips of the roller blinds hold firm in every position.
Roller blinds with a width of over one meter (fig. 15, page 10)
Press on the handle of the roller blind. The insect screen quickly moves upwards or downwards. Pull the blackout roller blind to the desired position.
5 Troubleshooting
The insect screen or blackout roller blind cannot be moved.
Check the guide rails for dirt. Clean the guide rails if necessary.
The tension of the roller blind is insufficient.
Tension the spring cord in each corner.
6 Cleaning and care

NOTICE!
Do not use sharp or hard objects or cleaning agents for cleaning as these may damage the product.
Occasionally clean the product with a damp cloth. To prevent material fatigue, do not keep the blind closed for long periods of time. If the vehicle is stationary for long periods of time, move the upper roller blind into the top position and the lower roller blind into the bottom position. This is to prevent the formation of mildew.
7 Warranty
The statutory warranty period applies. If the product is defective, please contact your retailer or the manufacturer's branch in your country (see the back of the instruction manual for the addresses).
For repair and warranty processing, please include the following documents when you send in the device:
• A copy of the receipt with purchasing date • A reason for the claim or description of the fault
8 Technical data
| Item in fig. 11, page 8 | Description |
| A | Order dimension, width (length of cassette): E - 20 mm |
| B | Order dimension, height (length of guide rail): F + 30 mm |
| C Width above everything: A + 74 mm | |
| D Height above everything: B + 106 mm | |
| E Width of window cut-out (clearance dimensions) | |
| F Height of window cut-out (clearance dimensions) | |
8.1 Order dimensions
The product is available in the following order dimensions:
Order dimensions (width x height in mm):
4.2 Opening the blinds

4.2 Opening the roller blinds

CAUTION! Risk of injury
Never let the blind snap back.
Roller blinds with a width of less than one meter (fig. 14, page 9)
dometic.com/sales-offices


- DB1R
- PLEASE READ THIS INSTRUCTION MANUAL CAREFULLY BEFORE INSTALLATION AND FIRST USE, AND STORE IT IN A SAFE PLACE. IF YOU PASS ON THE PRODUCT TO ANOTHER PERSON, HAND OVER THIS INSTRUCTION MANUAL ALONG WITH IT
- CONTENT
- SCOPE OF DELIVERY
- ITEM IN FIG. 1, PAGE
- QUANTITY DESCRIPTION
- INTENDED USE
- FITTING THE ROLLER BLIND
- FIXING THE ROLLER BLIND
- NOTE
- ADJUSTING THE TENSION OF THE ROLLER BLINDS
- NOTICE
- USING THE ROLLER BLIND
- CLOSING THE ROLLER BLIND
- NOTICE! RISK OF DAMAGE DUE TO A BUILD-UP OF HEAT BETWEEN THE ROLLER BLIND AND THE WINDOW
- ROLLER BLINDS WITH A WIDTH OF LESS THAN ONE METER (FIG. 12, PAGE 8)
- ROLLER BLINDS WITH A WIDTH OF OVER ONE METER (FIG. 13, PAGE 9)
- OPENING THE ROLLER BLIND
- NOTICE! RISK OF DAMAGE
- ROLLER BLINDS WITH A WIDTH OF LESS THAN ONE METER (FIG. 14, PAGE 9)
- ROLLER BLINDS WITH A WIDTH OF OVER ONE METER (FIG. 15, PAGE 10)
- TROUBLESHOOTING
- THE INSECT SCREEN OR BLACKOUT ROLLER BLIND CANNOT BE MOVED
- THE TENSION OF THE ROLLER BLIND IS INSUFFICIENT
- CLEANING AND CARE
- WARRANTY
- TECHNICAL DATA
- ORDER DIMENSIONS
- OPENING THE BLINDS
- OPENING THE ROLLER BLINDS
- CAUTION! RISK OF INJURY
Brand : DOMETIC
Model : DB1R
Category : Roller blind