MCT2303A - Tondeuse à gazon MCCULLOCH - Free user manual and instructions
Find the device manual for free MCT2303A MCCULLOCH in PDF.
Download the instructions for your Tondeuse à gazon in PDF format for free! Find your manual MCT2303A - MCCULLOCH and take your electronic device back in hand. On this page are published all the documents necessary for the use of your device. MCT2303A by MCCULLOCH.
USER MANUAL MCT2303A MCCULLOCH
STOP ARRÊT ALTO Electric Grass Trimmer For problems or questions, DO NOT return this product to the store. Contact your Customer Service Agent .
WARNING • PLEASE READ
For your own safety please read this manual before attempting to operate your new unit. Failure to follow instructions can result in serious personal injury. Spend a few moments to familiarize yourself with your trimmer before each use. PN 6096-230305 Printed in China INTRODUCTION
1 - GENERAL INFORMATION
PLEASE READ MOTOR HOUSING CORD RETAINER Dear Customer, Thank you for purchasing a McCulloch product. With proper operation and maintenance, it will provide you with years of service. REAR HANDLE In order to make the best use of your investment, be CERTAIN to familiarize yourself with the contents of the ENTIRE user manual before attempting to operate and maintain your unit.
ON/OFF TRIGGER
AIR OPENINGS Be sure to carefully follow the step-by-step instructions in this manual to start, operate and maintain your new product. In the manual there will be the following call-outs: NOTE:, WARNING / CAUTION and WARRANTY. A NOTE: is used to convey additional information, to highlight a particular explanation, or to expand a step description. ASSIST HANDLE A WARNING or CAUTION identifies a procedure which, if not undertaken or if improperly done, can result in serious personal injury and/or damage to the unit. (WARRANTY SYMBOL) serves notice that unless instructions or procedures are followed, any damage caused will The void the warranty and repairs will be at owner’s expense. Pay particular attention to the safety precautions. They are written for your protection and contain important information you must know to safely operate your trimmer. FOR WARRANTY OR SERVICE CONTACT THE NEAREST McCULLOCH AUTHORIZED SERVICE CENTER - LOCATE YOUR NEAREST SERVICE CENTER BY CALLING THE TOLL FREE NUMBER IN THIS MANUAL. SHAFT ATTACHMENT COUPLER DEBRIS SHIELD
PLEASE READ - SAVE THESE
INSTRUCTIONS VOLTS When using an electrical trimmer, basic precautions should always be followed to assure maximum safety and optimum performance. Read this manual before assembling and operating this trimmer. Failure to comply with instructions may result in electrical shock, burns, fire, or personal injury.
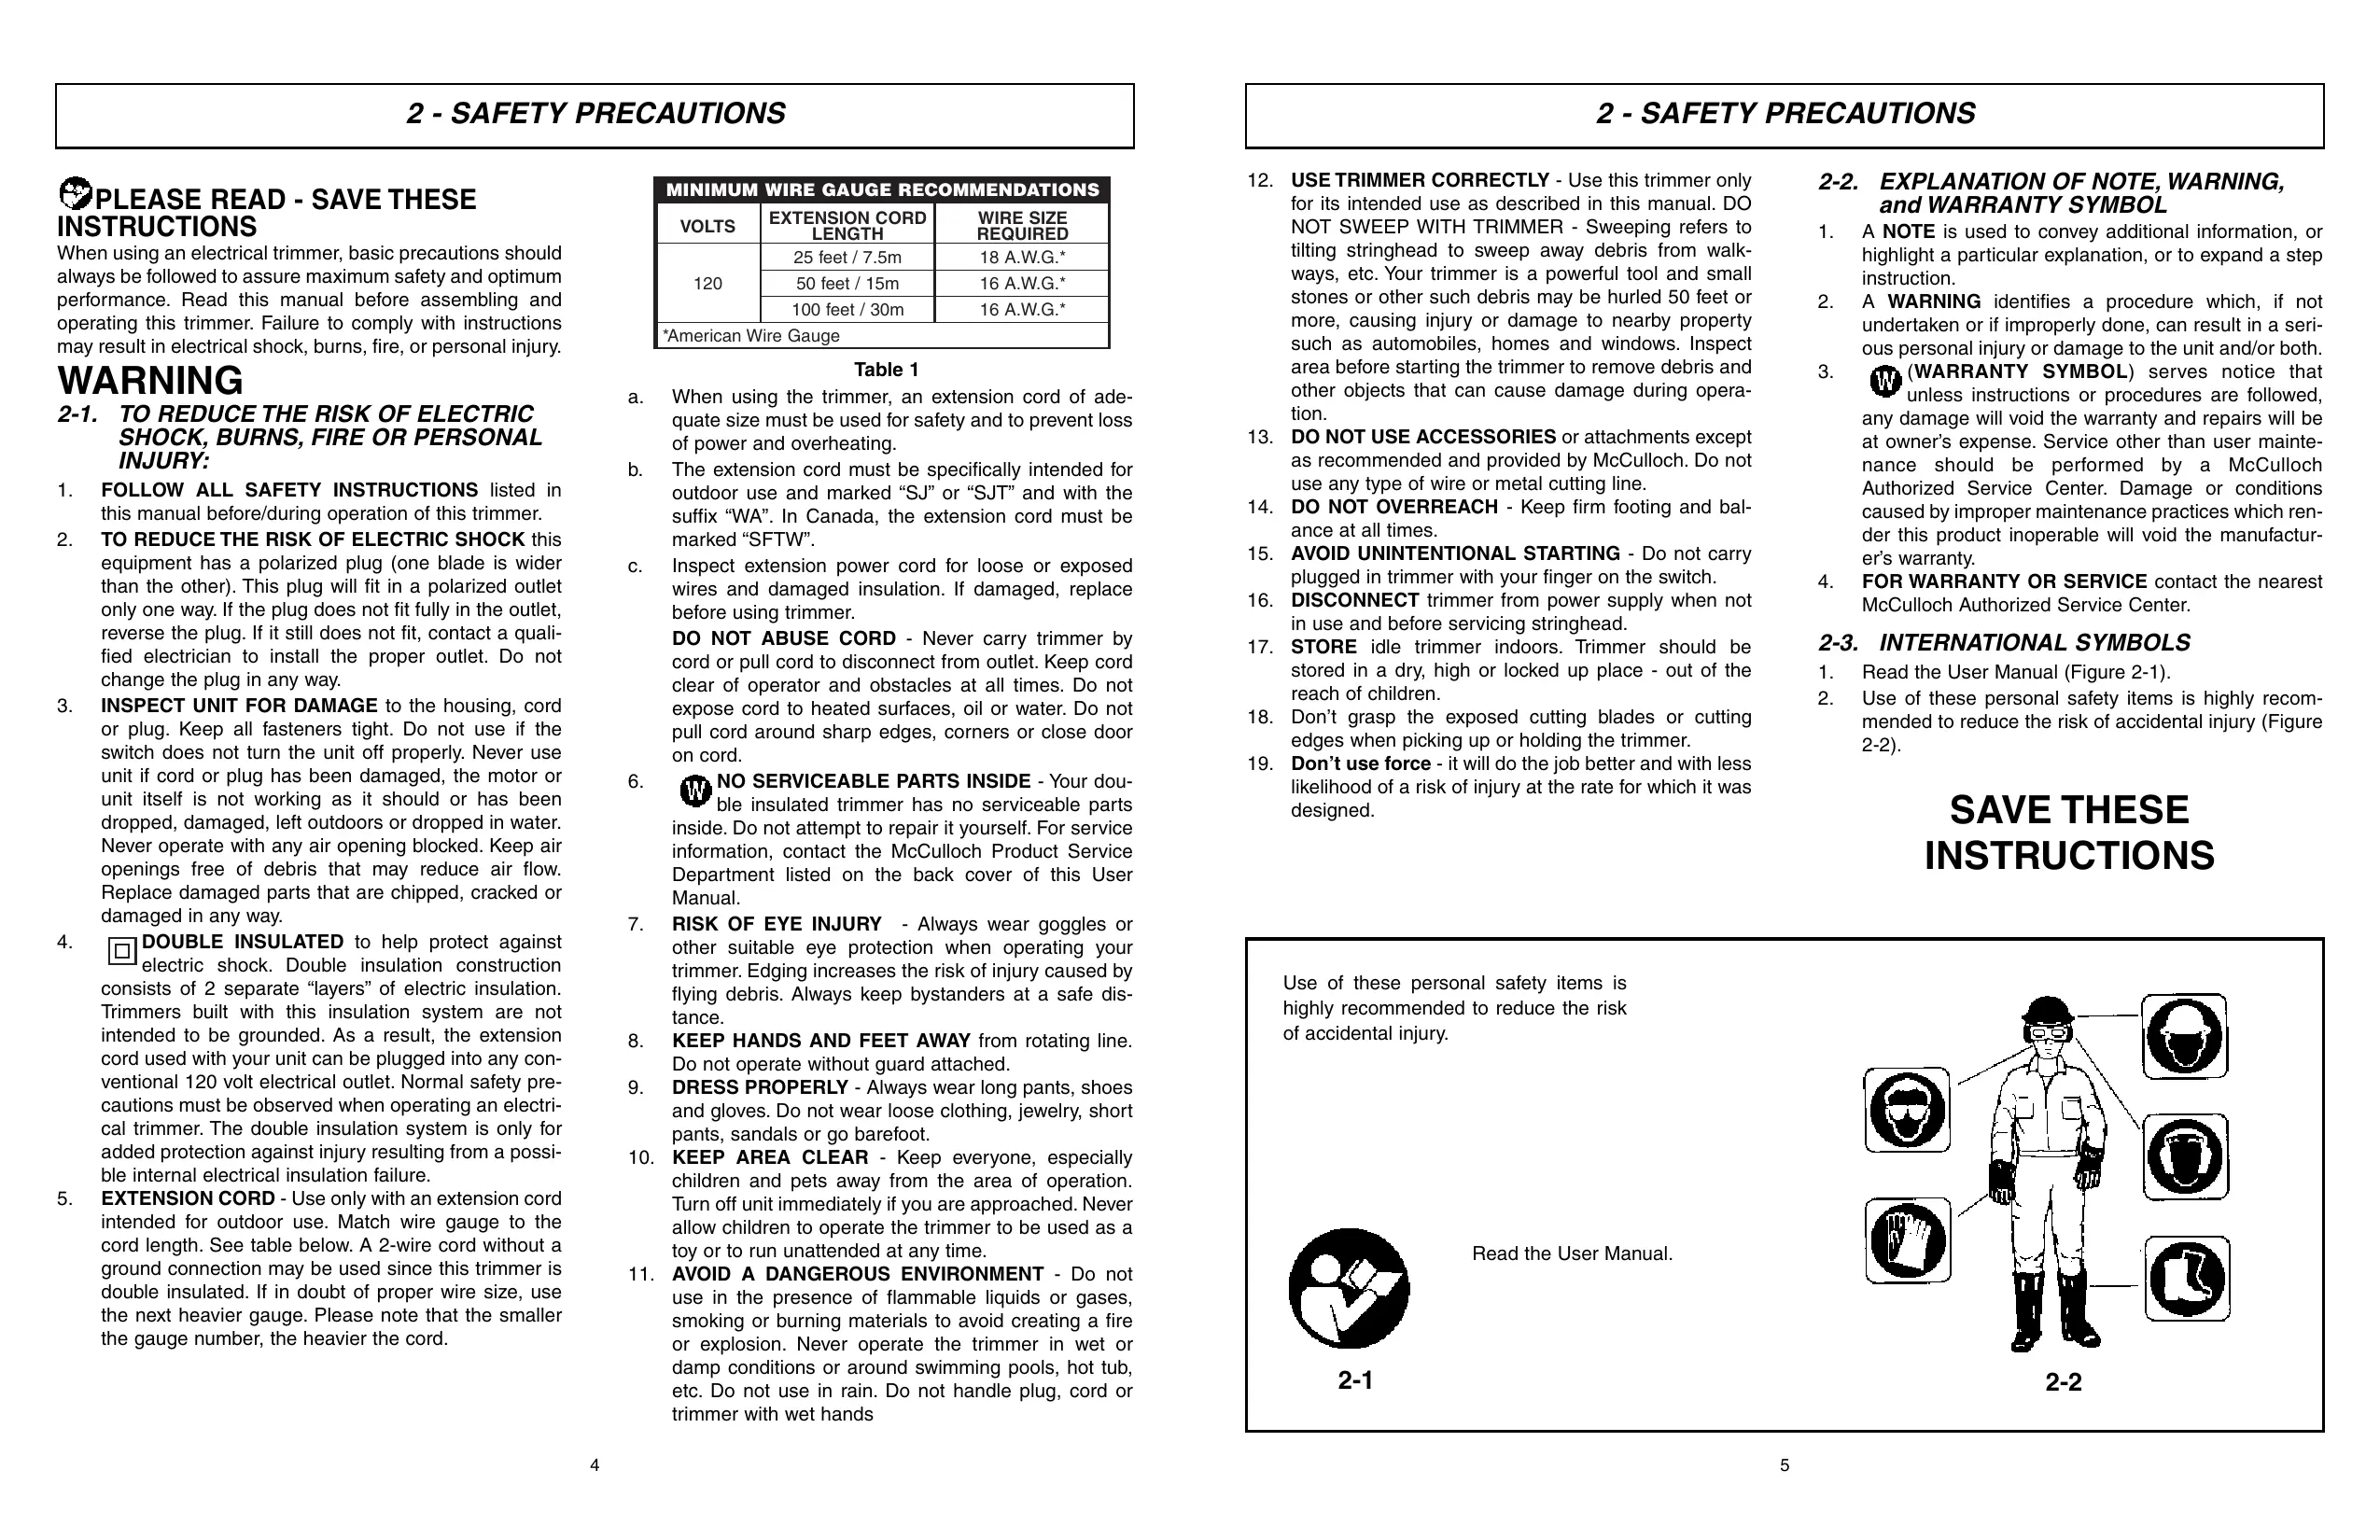
WIRE SIZE REQUIRED 18 A.W.G.* 16 A.W.G.* 16 A.W.G.* Table 1 When using the trimmer, an extension cord of adequate size must be used for safety and to prevent loss of power and overheating. b. The extension cord must be specifically intended for outdoor use and marked “SJ” or “SJT” and with the suffix “WA”. In Canada, the extension cord must be marked “SFTW”. c. Inspect extension power cord for loose or exposed wires and damaged insulation. If damaged, replace before using trimmer. DO NOT ABUSE CORD - Never carry trimmer by cord or pull cord to disconnect from outlet. Keep cord clear of operator and obstacles at all times. Do not expose cord to heated surfaces, oil or water. Do not pull cord around sharp edges, corners or close door on cord. NO SERVICEABLE PARTS INSIDE - Your dou6. ble insulated trimmer has no serviceable parts inside. Do not attempt to repair it yourself. For service information, contact the McCulloch Product Service Department listed on the back cover of this User Manual.
7. RISK OF EYE INJURY - Always wear goggles or
other suitable eye protection when operating your trimmer. Edging increases the risk of injury caused by flying debris. Always keep bystanders at a safe distance.
8. KEEP HANDS AND FEET AWAY from rotating line.
Do not operate without guard attached.
9. DRESS PROPERLY - Always wear long pants, shoes
and gloves. Do not wear loose clothing, jewelry, short pants, sandals or go barefoot.
10. KEEP AREA CLEAR - Keep everyone, especially
children and pets away from the area of operation. Turn off unit immediately if you are approached. Never allow children to operate the trimmer to be used as a toy or to run unattended at any time.
11. AVOID A DANGEROUS ENVIRONMENT - Do not
use in the presence of flammable liquids or gases, smoking or burning materials to avoid creating a fire or explosion. Never operate the trimmer in wet or damp conditions or around swimming pools, hot tub, etc. Do not use in rain. Do not handle plug, cord or trimmer with wet hands
2-1. TO REDUCE THE RISK OF ELECTRIC
SHOCK, BURNS, FIRE OR PERSONAL
EXTENSION CORD LENGTH 25 feet / 7.5m 50 feet / 15m 100 feet / 30m *American Wire Gauge WARNING
2 - SAFETY PRECAUTIONS
FOLLOW ALL SAFETY INSTRUCTIONS listed in this manual before/during operation of this trimmer. TO REDUCE THE RISK OF ELECTRIC SHOCK this equipment has a polarized plug (one blade is wider than the other). This plug will fit in a polarized outlet only one way. If the plug does not fit fully in the outlet, reverse the plug. If it still does not fit, contact a qualified electrician to install the proper outlet. Do not change the plug in any way. INSPECT UNIT FOR DAMAGE to the housing, cord or plug. Keep all fasteners tight. Do not use if the switch does not turn the unit off properly. Never use unit if cord or plug has been damaged, the motor or unit itself is not working as it should or has been dropped, damaged, left outdoors or dropped in water. Never operate with any air opening blocked. Keep air openings free of debris that may reduce air flow. Replace damaged parts that are chipped, cracked or damaged in any way. DOUBLE INSULATED to help protect against electric shock. Double insulation construction consists of 2 separate “layers” of electric insulation. Trimmers built with this insulation system are not intended to be grounded. As a result, the extension cord used with your unit can be plugged into any conventional 120 volt electrical outlet. Normal safety precautions must be observed when operating an electrical trimmer. The double insulation system is only for added protection against injury resulting from a possible internal electrical insulation failure. EXTENSION CORD - Use only with an extension cord intended for outdoor use. Match wire gauge to the cord length. See table below. A 2-wire cord without a ground connection may be used since this trimmer is double insulated. If in doubt of proper wire size, use the next heavier gauge. Please note that the smaller the gauge number, the heavier the cord.
12. USE TRIMMER CORRECTLY - Use this trimmer only
for its intended use as described in this manual. DO NOT SWEEP WITH TRIMMER - Sweeping refers to tilting stringhead to sweep away debris from walkways, etc. Your trimmer is a powerful tool and small stones or other such debris may be hurled 50 feet or more, causing injury or damage to nearby property such as automobiles, homes and windows. Inspect area before starting the trimmer to remove debris and other objects that can cause damage during operation.
13. DO NOT USE ACCESSORIES or attachments except
as recommended and provided by McCulloch. Do not use any type of wire or metal cutting line.
14. DO NOT OVERREACH - Keep firm footing and balance at all times.
15. AVOID UNINTENTIONAL STARTING - Do not carry
plugged in trimmer with your finger on the switch.
16. DISCONNECT trimmer from power supply when not
in use and before servicing stringhead.
17. STORE idle trimmer indoors. Trimmer should be
stored in a dry, high or locked up place - out of the reach of children.
18. Don’t grasp the exposed cutting blades or cutting
edges when picking up or holding the trimmer.
19. Don’t use force - it will do the job better and with less
likelihood of a risk of injury at the rate for which it was designed.
A NOTE is used to convey additional information, or highlight a particular explanation, or to expand a step instruction. A WARNING identifies a procedure which, if not undertaken or if improperly done, can result in a serious personal injury or damage to the unit and/or both. (WARRANTY SYMBOL) serves notice that unless instructions or procedures are followed, any damage will void the warranty and repairs will be at owner’s expense. Service other than user maintenance should be performed by a McCulloch Authorized Service Center. Damage or conditions caused by improper maintenance practices which render this product inoperable will void the manufacturer’s warranty. FOR WARRANTY OR SERVICE contact the nearest McCulloch Authorized Service Center. Read the User Manual (Figure 2-1). Use of these personal safety items is highly recommended to reduce the risk of accidental injury (Figure 2-2). SAVE THESE INSTRUCTIONS Use of these personal safety items is highly recommended to reduce the risk of accidental injury. Read the User Manual. 2-1 2-2
3 - ASSEMBLY INSTRUCTIONS
3 - ASSEMBLY INSTRUCTIONS
NOTE: The only assembly required for your trimmer is to install the edge guide wheel, debris shield and adjust the assist handle.
3-2. REX DISPOSABLE CUTTING HEAD
INSTALLATION AND REMOVAL
Position the motor housing with string head carrier facing up (Figure 3-1A). Place the debris shield (A) on the tube so the holes align with the slots on the bracket (B)(Figure 3-1B). Install the Shield knob and nut (C) and tighten securely.
Unplug unit. Position the unit with the string head carrier facing up Align disposable string head locking tabs with corresponding slots in carrier as shown (Figure 3-2A). With firm pressure push disposable string head onto carrier until an audible click is heard. REMOVAL
Unplug unit. Press yellow button on side of string head to eject used REX disposable string head (Figure 3-2B). WARNING To avoid serious personal injury, shut unit off before removing or installing attachment. NOTE: To make installing or removing the attachment easier, place the unit on the ground or on a work bench.
1. Turn the knob counterclockwise to loosen (Fig. 3-3A).
2. While firmly holding the attachment, push it straight
into the coupler until the release button appears in the primary hole of the coupler. (Fig.3-3B)
3. Turn the knob clockwise to tighten. (Fig. 3-3C)
Knob 3-3C CAUTION The release button must be in the primary hole and the knob securely tightened before operating this unit. All attachments are designed to be used in the primary hole unless otherwise indicated in the specific attachments operators manual. If the incorrect hole is used, it could result in injury, or damage to the unit. NOTE: Turn attachment rotating parts by hand to and fro to have the attachment shaft connect to the powerhead drive shaft slot more easily.
3-1A 3-2A Coupler Knob
3-3A Release Button 3-1B 3-2B Primary Hole Attachment Upper Shaft Housing 3-3B
4 - OPERATING INSTRUCTIONS
4 - OPERATING INSTRUCTIONS
Ensure the cord is NOT plugged into a receptacle before this procedure. Make a loop with 8”- 10” (20 - 25cm) of the end of the extension cord. Place the loop into the slots (A) under the motor housing and lock into place as shown in Figure 4-1. Connect the extension cord to the trimmer. Plug the extension cord into a receptacle ONLY when you are ready to operate the trimmer.
TRIMMING / MOWING (Figure 4-3A). Swing trimmer with a sickle-like motion from side to side. Do not tilt the stringhead during the procedure. Test area to be trimmed for proper cutting height. Keep stringhead at same level for even depth of cut.
FENCE/FOUNDATION TRIMMING. Approach trimming around chain link fences, picket fences, rock walls and foundations slowly to cut close without whipping string against the barrier. If the string comes in contact with rock, brick walls, or foundations, it will break or fray. If string snags fencing, it will snap off. TRIMMING AROUND TREES. Trim around tree trunks with a slow approach so string does not contact bark. Walk around the tree trimming from left to right. Approach grass or weeds with the tip of the string and tilt stringhead slightly forward. SCALPING Scalping refers to removal of all vegetation down to the ground. To do this, tilt the stringhead to about a 30 degree angle to the left. By adjusting the handle you will have better control during this operation. Always keep a distance of 50 feet (15 meters) from other people and animals when scalping. Do not attempt this procedure if there is any chance flying debris could injure operator, other people or cause damage to property. SWEEPING - DO NOT SWEEP WITH TRIMMER (Figure 4-3C) 4-3A 4-1
4-2. ADJUST THE ASSIST HANDLE
NOTE: The assist handle is attached to the shaft but has been turned under for packing
1. Loosen adjustment knob and rotate handle to the top
of shaft (Figure 4-2).
2. Tighten adjustment knob securely.
CLOSER TRIMMING (Figure 4-3B). Position trimmer straight ahead with a slight tilt so bottom of stringhead is above ground level and string contact occurs at proper cutting point. Always cut away from operator. Do not pull trimmer in toward operator. 4-3C 4-2 4-3B
5 - MAINTENANCE INSTRUCTIONS
1. DURATION
The duration of the warranty for this McCulloch product is as follows: ONE (1) YEAR from date of original purchase only when used for personal, family, household, farm or ranch, purposes, provided the unit is not used for rental purposes; NINETY (90) DAYS from date of original purchase when used for commercial, professional, institutional or rental purposes. This warranty gives you specific legal rights. You may also have other rights which vary from state to state. MCCULLOCH CORPORATION HEREBY DISCLAIMS ALL IMPLIED WARRANTIES AFTER THE APPLICABLE EXPIRATION DATES OF THIS EXPRESS LIMITED WARRANTY. (Some states do not allow limitations on how long an implied warranty lasts, so the above limitations may not apply to you.) Use only appropriate REX replacement accessories. Always clean dirt and debris from the spool and hub prior to, when the unit is idle, and after performing any type of maintenance.
6 - ONE YEAR LIMITED WARRNATY
2. WHO GIVES THIS WARRANTY
McCulloch U.S.A 1-800-521-8559 10715 Springdale Avenue, Unit 2, Santa Fe Springs, CA 90670 USA This has no internal serviceable parts. Do not attempt any repairs. Doing so could create a hazard and void the manufacturer’s warranty. Unplug the power cord before cleaning or performing maintenance or removing or installing REX string head. Never douse trimmer with liquid or squirt with a garden hose. Clean with a damp sponge. Keep air openings on the motor housing free from any debris to avoid overheating.
3. WHO RECEIVES THIS WARRANTY
A. The buyer (other than for purposes of resale) of the McCulloch Product. B. Any person to whom such product is lawfully transferred within the duration of the implied or written warranty applicable to the product. C. Any other person who is entitled by the terms of the warranty or under applicable state law to enforce against the Warrantor the obligation of the warranty. (The above mentioned parties are hereinafter referred to as “User.”)
4. WHAT IS COVERED UNDER THIS WARRANTY
Any failure that occurs within the applicable duration of the warranty period that is the result of defects in materials or workmanship.
5. WHAT IS NOT COVERED UNDER THIS WARRANTY
A. Any incidental or consequential damages that may result from the failure or malfunction of the McCulloch product. (Some states do not allow the exclusion or limitation of incidental or consequential damages, so these limitations may not apply to you.) B. Any failure that results from an accident, User abuse, neglect or failure to operate the product in accordance with the instructions provided in the User Manual(s) supplied with the product, or that results from improper servicing by an unauthorized repair facility. C. Normal adjustments which are explained in the User Manual(s) provided with the product. D. Any component(s) or accessories not sold or manufactured by the Warrantor. E. Predelivery setup or assembly of units. F. This warranty does not apply to accessories, normal maintenance or adjustment(s) of the product set forth in the User Manual(s).
6. RESPONSIBILITIES OF THE WARRANTOR UNDER THIS WARRANTY
A. Repair or replace components which have failed within the duration of the applicable warranty period at no cost to the User. B. Ensure that the authorized repair station is reimbursed for parts and labor costs incurred due to performance of a warranty repair in accordance with established warranty policies and procedures.
7. RESPONSIBILITIES OF THE USER UNDER THIS WARRANTY
A. The User must deliver or ship the McCulloch product covered under this warranty to the dealer from whom it was originally purchased or to the nearest Authorized Service Center. Proof of purchase is required. B. Freight costs, if any, will be borne by the user. C. Use reasonable care in maintenance, operations and storage of the product as explained in the User Manual(s).
8. WHEN WARRANTOR WILL PERFORM OBLIGATION UNDER THIS WARRANTY
A. Repair of warrantable products will be scheduled according to the normal work flow at the servicing location, depending on the availability of replacement parts. B. Repair time which exceeds ten (10) days from the time the product was delivered to the servicing agent will extend the warranty coverage by the number of days the product remains inoperable. C. If User does not receive satisfactory results from local servicing outlet, User must contact McCulloch Corporation, by calling our toll-free telephone number.
3 - INSTRUCTIONS POUR MONTAGE
3 - INSTRUCTIONS POUR MONTAGE
ENGANCHE DE ACOPLAMIENTO
BAG BEHIND ASS'Y
18-1 9081-332101 CONNECTOR
18-2 6SDAB-05-08 SCREW
CONNECTING HEAD ASS'Y
18-3 9056-332101 KNOB
6038-230302 HOUSING (L)
18-4 6228-230312 BAG BEHIND
18-5 6SXDB-06-16 SCREW
BACK SHAFT FLEX
18-7 9042-332101 CONNECTOR
9228-330336 HANDLE ASS'Y
18-8 6SDAB-05-12 SCREW 11-1 9068-330305 HANDLE
18-9 9189-332101 GEAR SPRING
11-2 9SKKBY10/24-1 SCREW
BAG FRONT ASS'Y
11-3 9068-330306 HANDLE
19-1 6035-230301 LOCK NUT
19-2 6SXDB-06-30 SCREW
19-3 6RZ04-08S RIVET
19-5 6005-230301 KEEPER
19-6 9228-A10102 BAG FRONT
SHAFT FLEX ASS'Y
CUTTING LINE ASS'Y
19-8 6131-230302 STEEL RING
17-1 6064-230301 CUP
19-9 9148-230301 BEARING
17-2 6079-230302 SPRING
19-10 6157-230301 FELT
17-3 6079-230301 SPRING
19-11 9087-A10101 SOCKET
17-4 6056-230301 PUSH BUTTON
19-12 6014-633501 WASHER
REX HEAD COVER
19-13 6124-230303 CONNECTING HEAD
17-6 6SDABB04-16 SCREW
Stocking Codes are: A - Dealer stocked B - Distributor stocked C - Factory stocked