
MCM2013 - Manual lawn mower MCCULLOCH - Free user manual and instructions
Find the device manual for free MCM2013 MCCULLOCH in PDF.
| Product type | Manual reel lawn mower |
| Brand | McCulloch |
| Model | MCM2013 |
| Power source | Manual (motorless) |
| Adjustable cutting height | Yes, from 2/3 in (1.7 cm) to 1-1/3 in (3.4 cm) |
| Cutting mechanism | Helical reel with fixed cutting bar |
| Height adjustment | Roller repositioning on 3 positions via bolts and nuts |
| Blade adjustment | Through pressure screws on the cutting bar (loosening/tightening) |
| Blade sharpening | Possible with abrasive compound (grit 100-240) applied to the blade edge |
| Assembly required | Yes, handle attachment in 3 sections with bolts and Nyloc nuts |
| Included accessories | Foam handle, upper handle, 2 middle handles, 2 lower handles, bolts, nuts, C-clips |
| Safety | Do not use barefoot or in sandals; avoid wet ground; keep hands and feet away from blades |
| Routine maintenance | Lubrication of axles and gears with light grease; cleaning after use |
| Warranty | 1 year for personal/domestic use; 90 days for commercial use or rental |
| Customer service | 1-800-521-8559 (USA and Canada) |
| Manufacturing | China |
| User manual | 13 pages, PDF format available for download |
Frequently Asked Questions - MCM2013 MCCULLOCH
User questions about MCM2013 MCCULLOCH
0 question about this device. Answer the ones you know or ask your own.
Ask a new question about this device
Download the instructions for your Manual lawn mower in PDF format for free! Find your manual MCM2013 - MCCULLOCH and take your electronic device back in hand. On this page are published all the documents necessary for the use of your device. MCM2013 by MCCULLOCH.
USER MANUAL MCM2013 MCCULLOCH
For problems or questions, DO NOT return this product to the store. Contact your Customer Service Agent.
10715 Springdale Avenue, Unit 2
Santa Fe Springs, CA 90670
USA
Thank you for purchasing a McCulloch product. With proper operation and maintenance, it will provide you with years of service.
In order to make the best use of your investment, be CERTAIN to familiarize yourself with the contents of the ENTIRE user manual before attempting to operate and maintain your unit.
Be sure to carefully follow the step-by-step instructions in this manual to start, operate and maintain your new product.
In the manual there will be the following call-outs: NOTE:, WARNING / CAUTION and WARRANTY.
A NOTE: is used to convey additional information, to highlight a particular explanation, or to expand a step description.
A WARNING or CAUTION identifies a procedure which, if not undertaken or if improperly done, can result in serious personal injury and/or damage to the unit.
The W
(WARRANTY SYMBOL) serves notice that unless instructions or procedures are followed, any damage caused will warranty and repairs will be at owner's expense.
Pay particular attention to the safety precautions. They are written for your protection and contain important information you must know to safely operate your reel mower.
FOR WARRANTY OR SERVICE CONTACT THE NEAREST McCULLOCH AUTHORIZATION SERVICE CENTER - LOCATE YOUR NEAREST SERVICE CENTER BY CALLING THE TOLL FREE NUMBER IN THIS MANUAL.
1 - SAFETY PRECAUTIONS
Thanks for choosing our McCulloch garden tool, we are convinced that you will be satisfied with this low cost, no noise and no pollution lawn mower. Please read all instructions in this manual carefully before using the mower.
- Inspect your lawn for any debris or foreign objects and remove them before mowing.
- Never place your hands, fingers or feet inside the cutting reel.
Although not powered by a motor, the cutting reel is extremely sharp and can turn unexpectedly, causing serious damage.
- Never mow when the grass is wet.
- Don't place your hands or feet near a moving part of the mower.
- Don't operate the mower while barefoot or wearing sandals.
- Walk slowly, never run. Always be sure of your footing when operating the mower.
- Never intentionally strike or ram trees, fences, etc. This can cause injuries or severely damage the mower.
- Remember that this mower is a precision piece of lawn care equipment. Treat it as such by exercising caution when using it.
Make sure your mower is in safe operating condition. Don't attempt to operate the mower if it is damaged. have it repaired first.
2 - ASSEMBLY INSTRUCTIONS
2-1. HANDLE ASSEMBLY
- Enclosed in carton are the : mower handle parts (1 foam grip, 1 top handle piece, 2 center handle pieces and 2 lower handle pieces ) and hardware package.
- Insert the top handle piece into the from grip, (for easier application, you can lubricate the inside of the from handle grip with dishwashing or liquid hand soap).
- Insert the 2 center handle piece into the left and right side of the top handle piece.
- Connect the right lower section with the left lower section and secure with two of the 1-3/8" long bolts and Nyloc nuts provided.
- Fasten the upper handle subassembly that your assembled in the preceding step to the lower handle subassembly using the four remaining 1-3/8" long bolts and Nyloc nuts provided.
- Be sure to tighten all hex nuts on the joints of the handle assembly so that none of the handle pieces are loose.
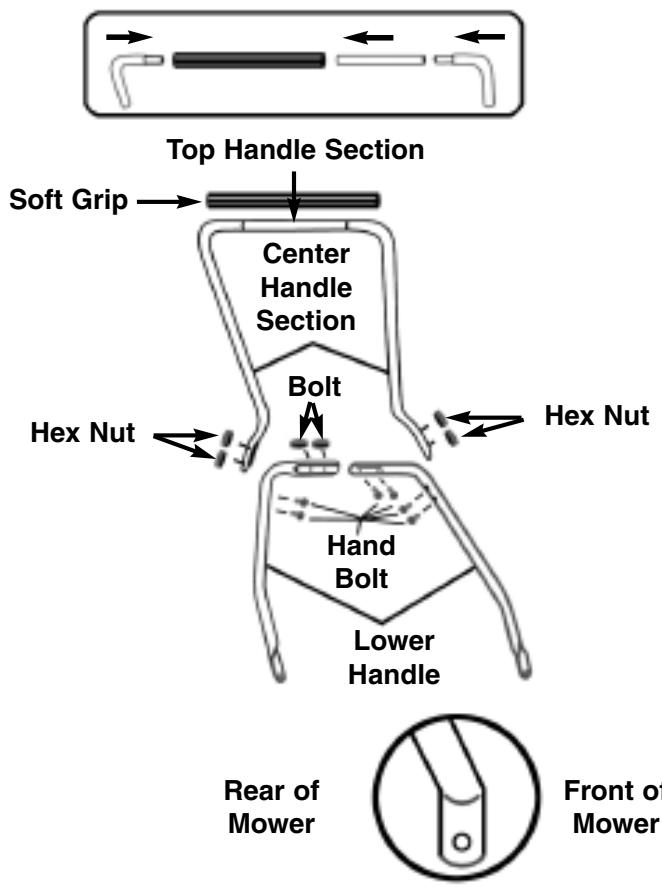
2-1
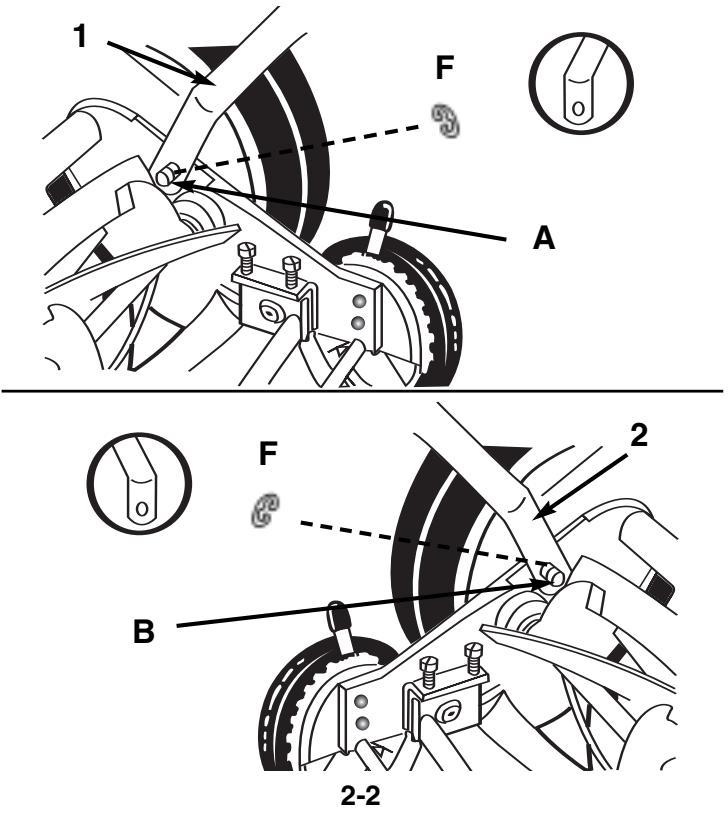
2-2. ATTACHING THE HANDLE TO THE MOWER
- As you follow the instructions below, refer to fig. 2-2 for more information.
- After assembling the handle, fit the holes at the end of the lower portion of the handle on the left and right side, over the short posts extending out from the side plates.
- When the handle is in place over the posts, snap the "C clips" (F) onto the slotted posts (A & B) on both sides to prevent the handle from coming off.
3 - OPERATING INSTRUCTIONS
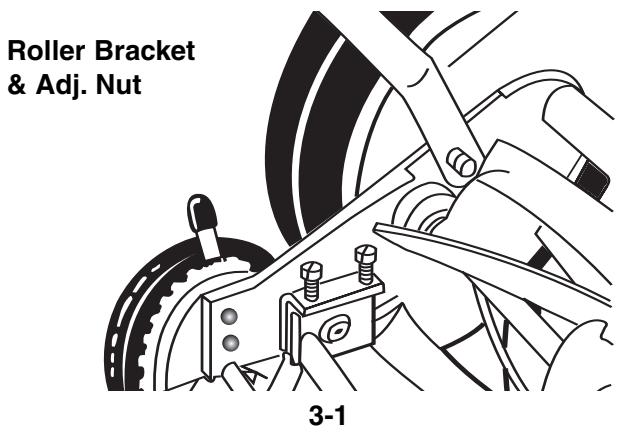
3-1. MINOR CUTTING HEIGHT ADJUSTMENTS
- These units can be adjusted to offer a cutting height range from 2/3 to 1-1/3 simply by adjusting the roller assembly.
- As you follow the instructions below, refer to fig. 3-1 for more information.
- To achieve the lowest cutting position, loosen and remove the nuts on both sides of the roller assembly. Position the bolt through the bottom hole of the plastic roller bracket and top hole of the mower side plate.
- To achieve the highest cutting position, loosen and remove the nuts on both sides of the roller assembly. Position the bolt through the top hole of the plastic roller bracket and bottom hole of the mower side plate.
- Other cutting heights can be obtained by positioning the bolts through other hole locations.
3-2. MOWER BLADE ADJUSTMENT
- The blades have been preadjusted before leaving the factory.
- Misalignment can occur resulting in blades that are too loose or too tight. If this happens, you will notice a rough, uneven cut or the mower will become hard to push.
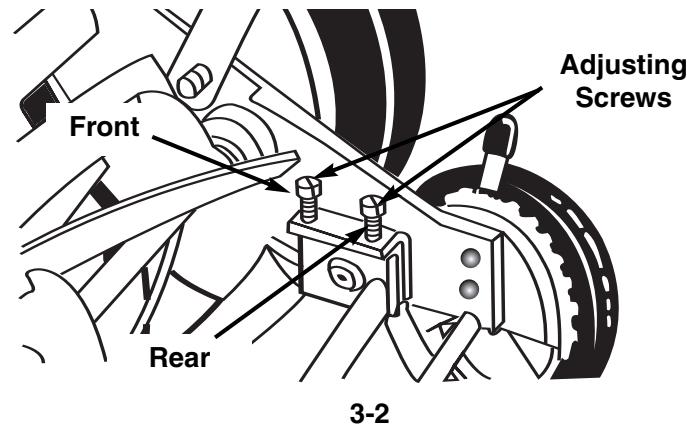
- All adjustments are made from the rear of the mower (opposite from the bar with the logo decal). Each end of the cutting bar can be adjusted separately.
- As you follow the instructions below, refer to Fig.3-2 for more information.
- The cutting bar blade (located under the reel) pivots. The front screws move the cutter bar away from the blades, while the rear screws move the cutter bar toward the blades.
- Adjusting the screws is a very sensitive procedure. 1-16th of a turn is considered a major adjustment.
- Before tightening one adjusting screw, be sure to loosen the opposing screw an equal amount.
4 - MAINTENANCE INSTRUCTIONS
4-1. LOOSENING THE BLADES
- The cutter bar blade must be moved further from the cutting reel.
- Loosen both back screws equally by turning them counter-clockwise.
- Tighten both front screws equally by turning them clockwise.
4-2. TIGHTENING THE BLADES
- The cutter bar must be moved closer to the cutting reel.
- Loosen both front screws equally by turning them counter-clockwise.
- Tighten both back screws equally by turning them clockwise.
4-3. CHECKING ADJUSTMENTS
- Turn mower upside down.
- Insert a piece of paper (i.e., writing or newspaper between the cutter bar and the reel blades, and carefully turn the reel blades using the handle of a screwdriver or another blunt object.
- All blades should slice the paper evenly the entire length of the cutter bar while the reel turns smoothly.
- If the mower has an intermittent cut, adjustment should be made to the appropriate side of the blades to attain proper cutting action.
4-4 SHARPENING THE CUTTING BLADES
- When the mower is properly lubricated and adjusted, sharpening should not be necessary for several years. However, the following steps will allow you to do the procedure yourself at relatively little expense.
- Spread a thin layer of lapping compound on the front edge of the reel blades.
- Adjust the cutter bar so that the cutter bar blade has light but firm contact with the reel blades across the full width of the cutter bar.
WARNING
Do not overtighten the adjusting screws, as this could damage the cutter bar. Both screws must be tight on the final adjustment.
- Turning the reel blades backward, until the reel blades rotate retativety free and the front edge of the cutter bar blade is polished.
- Remove wheels; reverse pinions and pawls so that the beveled edge of the pawl is on the right.
WARNING
Clean any grinding compound or debris from the cutter bar blade, reel blades, pinions and pawls. Lubricate axle and pinion with a light film of wheel bearing grease and replace wheels and "C" clips.
NOTE : It is recommended to use and industrial or valve lapping compound between 100-240 grit. This is usually available at an industrial or automotive supply store. If professional sharpening is required, consult your local yellow pages for lawn mower repair services.
5 - ONE YEAR LIMITED WARRANTY
1. DURATION
The duration of the warranty for this McCulloch product is as follows: ONE (1) YEAR from date of original purchase only when used for personal, family, household, farm or ranch, purposes, provided the unit is not used for rental purposes; NINETY (90) DAYS from date of original purchase when used for commercial, professional, institutional or rental purposes. This warranty gives you specific legal rights. You may also have other rights which vary from state to state. MCCulloCH CORPORATION HEREBY DISCLAIMS ALL IMPLIED WARRANTY AFTER THE APPLICABLE EXPIRATION DATES OF THIS EXPRESS LIMITED WARRANTY. (Some states do not allow limitations on how long an implied warranty lasts, so the above limitations may not apply to you.)
2. WHO GIVES THIS WARRANTY
McCulloch U.S.A 1-800-521-8559
10715 Springdale Avenue, Unit 2, Santa Fe Springs, CA 90670 USA
3. WHO RECEIVES THIS WARRANTY
A. The buyer (other than for purposes of resale) of the McCulloch Product.
B. Any person to whom such product is lawfully transferred within the duration of the implied or written warranty applicable to the product.
C. Any other person who is entitled by the terms of the warranty or under applicable state law to enforce against the Warrantor the obligation of the warranty. (The above mentioned parties are hereinafter referred to as "User.")
4. WHAT IS COVERED UNDER THIS WARRANTY
Any failure that occurs within the applicable duration of the warranty period that is the result of defects in materials or workmanship.
5. WHAT IS NOT COVERED UNDER THIS WARRANTY
A. Any incidental or consequential damages that may result from the failure or malfunction of the McCulloch product. (Some states do not allow the exclusion or limitation of incidental or consequential damages, so these limitations may not apply to you.)
B. Any failure that results from an accident, User abuse, neglect or failure to operate the product in accordance with the instructions provided in the User Manual(s) supplied with the product, or that results from improper servicing by an unauthorized repair facility.
C. Normal adjustments which are explained in the User Manual(s) provided with the product.
D. Any component(s) or accessories not sold or manufactured by the Warrantor.
E. Predelivery setup or assembly of units.
F. This warranty does not apply to accessories, normal maintenance or adjustment(s) of the product set forth in the User Manual(s).
6. RESPONSIBILITIES OF THE WARRANTY UNDER THIS WARRANTY
A. Repair or replace components which have failed within the duration of the applicable warranty period at no cost to the User.
B. Ensure that the authorized repair station is reimbursed for parts and labor costs incurred due to performance of a warranty repair in accordance with established warranty policies and procedures.
7. RESPONSIBILITIES OF THE USER UNDER THIS WARRANTY
A. The User must deliver or ship the McCulloch product covered under this warranty to the dealer from whom it was originally purchased or to the nearest Authorized Service Center. Proof of purchase is required.
B. Freight costs, if any, will be borne by the user.
C. Use reasonable care in maintenance, operations and storage of the product as explained in the User Manual(s).
8. WHEN WARRANTYOR WILL PERFORM OBLIGATION UNDER THIS WARRANTY
A. Repair of warrantable products will be scheduled according to the normal work flow at the servicing location, depending on the availability of replacement parts.
B. Repair time which exceeds ten (10) days from the time the product was delivered to the servicing agent will extend the warranty coverage by the number of days the product remains inoperable.
C. If User does not receive satisfactory results from local servicing outlet, User must contact McCulloch Corporation, by calling our toll-free telephone number.
McCulloch
10715 Springdale Avenue, Unit 2, Santa Fe Springs, CA 90670 USA
3. QUI EST COUVERT PAR CETTE GARANTIE
10715 Springdale Avenue, Unit 2, Santa Fe Springs, CA 90670 USA