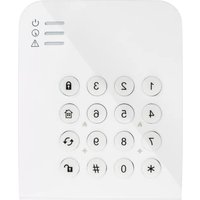
FKP 100 - Antenna KATHREIN - Free user manual and instructions
Find the device manual for free FKP 100 KATHREIN in PDF.


| Product Type | Outdoor Antenna |
| Brand | Kathrein |
| Model | FKP 100 |
| Frequency Range | VHF (174-230 MHz) / UHF (470-862 MHz) |
| Gain | Approx. 10-14 dBi (typical) |
| Impedance | 75 Ohm |
| Polarization | Horizontal |
| Dimensions (approx.) | Length: 1.2 m, Width: 0.4 m, Depth: 0.15 m |
| Weight (approx.) | 1.5 kg |
| Mounting | Mast mount (diameter 25-50 mm) |
| Connector Type | F-type female |
| Wind Load | Up to 120 km/h |
| Operating Temperature | -20°C to +50°C |
| Power Supply | Passive (no external power required) |
| Main Functions | Receives DVB-T/T2/H.264 signals; supports HD and SD channels |
| Maintenance | Check connections annually; clean with dry cloth; avoid water ingress |
| Safety | Install away from power lines; ground mast if required; follow local regulations |
| Spare Parts / Repairability | Replacement elements available; compatible with standard F-connectors |
| General Information | Designed for optimal reception in moderate signal areas; made of corrosion-resistant materials |
Frequently Asked Questions - FKP 100 KATHREIN
User questions about FKP 100 KATHREIN
0 question about this device. Answer the ones you know or ask your own.
Ask a new question about this device
Download the instructions for your Antenna in PDF format for free! Find your manual FKP 100 - KATHREIN and take your electronic device back in hand. On this page are published all the documents necessary for the use of your device. FKP 100 by KATHREIN.
USER MANUAL FKP 100 KATHREIN
Introduction
Thank you for purchasing the KATHREIN Digital Systems GmbH keypad. Please take the time to read the following safety and installation information carefully and attentively before using the keypad. It is imperative to comply with these instructions in order to ensure the safe operation of the device. If you have any further questions, please contact your local retailer or KATHREIN Digital Systems GmbH directly. Your keypad FKP 100 was developed and built with state-of-the-art technology and complies with European and German standards.
Please keep this manual safe to be able to answer possible questions in the future. The manual is an integral part of the product even in case it is resold to a third party.
Disclaimer
All technical details and descriptions in this manual were compiled with the greatest care. However, KATHREIN Digital Systems GmbH cannot entirely exclude mistakes in this manual. Therefore, we do not assume any legal responsibility or liability resulting from wrong information in this manual. Descriptions, technical illustrations and technical data are subject to change without notice according to technical progress. In addition, KATHREIN Digital Systems GmbH reserves the right to change the product and the manual without prior notice. We do not assume any guarantee with regard to the content of this document. We appreciate any comments on mistakes or inaccuracies which may help us to improve this product and this manual.


This symbol is intended to attract the user's attention to the potential risk of dangerous unprotected voltage inside the housing. This may lead to electric shock.

This symbol is intended to attract the user's attention to user and maintenance instructions in the manual and documents enclosed with the product.
WARNING:
TO MINIMISE THE RISK OF ELECTRIC SHOCK, YOU MUST NOT EXPOSE THIS PRODUCT TO WET AND MOIST CONDITIONS AT ANY TIME.
RoHS
All KATHREIN Digital Systems GmbH products are lead-free and meet the requirements stated under the European Directive on the Restriction of Hazardous Substances (RoHS). This guarantees that the entire production process and the product itself are free of lead and of all listed hazardous substances.
FC
This product was tested and complies with the regularities for a class of digital devices stated under FCC part 15. These limits were specified to provide reasonable protection against harmful exposure when operating the device in a commercial environment. This product generates, uses and may emit radio energy. It may in addition interfere with other radio communication systems if not installed or used according to this manual. Using the device in residential areas may cause disturbances to be possibly remedied at the user's expense.
CE
Hereby KATHREIN Digital Systems GmbH declares that the keypad FKP 100 (order number 2220000007, EAN 4021121548840) is in conformity with the relevant provisions of Directive 1999/5/EG.
Conformity:
The declaration of conformity is available at http://www.kathrein-ds.com in the download section of the respective product. Alternatively, you can request the declaration of conformity directly from us:
KATHREIN Digital Systems GmbH
Anton-Kathrein-Str. 1–3
83022 Rosenheim, Germany

WARNING
The warranty claim will expire in case of damages resulting from the non-observance of this manual.
We do not assume any liability for consequential damages.
We do not assume any liability for damages to persons and/or material whatsoever which result from improper handling or noncompliance with the safety instructions. The warranty claim will expire in such cases!
The keypad FKP 100 is equipped with a high-quality housing. However, please observe the following safety instructions:
- Operate the keypad only with the provided batteries.
- Handle the keypad with care, heavy vibration or bumps may damage the device.
- Do not expose the keypad to direct sunlight or strong heat, e.g. heaters.
- Do not install the keypad close to strong electric power lines or magnetic fields, as this may impair the transmission quality significantly.
- Do not install the keypad directly on iron or aluminium surfaces, as this may impair the wireless transmission significantly. Use a non-conducting material to insulate the device from the installation surface.
- Do not install the keypad in moist, very cold or very hot environments.
- Persons (including children) with limited physical, sensory or mental abilities and/or lacking experience and/or knowledge must not use this product.
- Keep children away from the product and other connected electrical appliances at all times. The keypad includes small parts they can swallow. Lay cables expertly so that they are neither bent nor otherwise damaged. Install the keypad out of children's reach. Do not leave packaging materials unattended, as they may be dangerous for playing children.
- Use a damp cloth to clean the keypad's surface, then dry it. Cleaning agents will damage the surface.
If you notice any kind of defect, remove the batteries from the keypad FKP 100 and contact your retailer or KATHREIN Digital Systems GmbH directly. Any further usage of the system may lead to fire or electric shock!
Intended Use
The KATHREIN Digital Systems GmbH keypad is designed to alert you acoustically in case of alarm. Use the keypad FKP 100 indoors only. Any other use than that described in this manual is not permitted and will void any warranty or guarantee as well as liability claims. The same applies if the device is modified or retrofitted.
Disposal

Do not dispose of the device with domestic waste!
This product complies with the EU Directive on waste electrical and electronic equipment (WEEE) and therefore must not be disposed of with domestic waste. Dispose of the device via your local collection point for waste electronic equipment!
This product contains software programs subject to the GPL free software license.
This product contains software that was developed by third parties and/or software subject to the GNU General Public License (GPL) and/or the GNU Lesser General Public License (LGPL). We will send you the source code of these programs on request. The GPL and/or LGPL code used and offered in this product is EXCLUSIVE OF ANY GUARANTEE WHATSOEVER and is subject to the copyright of one or several authors. For further details, please refer to the GPL and/or LGPL code of this product and to the terms of use of GPL and LGPL.
You can read the complete license text at http://www.gnu.org/licenses/gpl-2.0.html. For an unofficial German translation, please go to
http://www.gnu.de/documents/gpl.de.html.
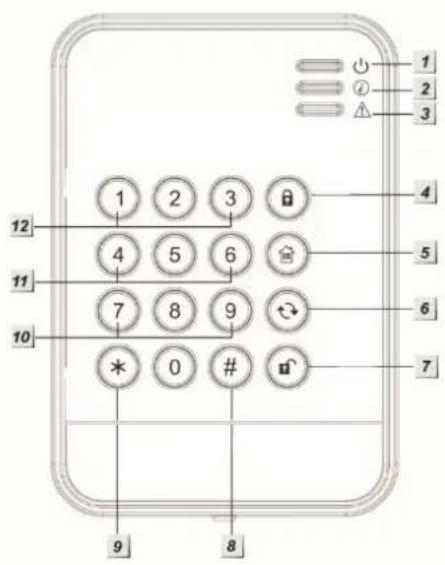
Product description:
-
Power LED
-
Status LED
-
Error LED
-
Arm
-
Home
-
System status
-
Disarm
-
Pound key #
-
Star key * Installation mode = Installation PIN + *
-
Emergency alarm: 7 + 9 (simultaneously)
-
Fire alarm: 4 + 6 (simultaneously)
-
Panic alarm: 1 + 3 (simultaneously)
-
Battery insulation tab (delivery status)
-
Mounting holes
-
Tamper contact
Please note:
- The dual-key commands 1+3 (12.), 4+6 (11.), 7+9 (10.) are disabled by default.
- To use dual key functions, only press the two corresponding buttons on the keypad. Do not press any other buttons.
LED indicators:
- Power LED:
o LED lights up orange: test mode is active
○ LED flashes orange: test mode is active + low battery
- LED lights up blue for approx. five seconds: System status is normal
o LED flashes blue: Low battery

Notes:
• Normally all LEDs are off.
- If you press any key, the power LED will light up blue for five seconds. This signals that the keypad is operational.
- Status LED
(allows you to check the status of the alarm panel):
If you press the status button ↩ of the keypad, the status LED will display the current status of the alarm panel:
LED lights up red: alarm panel is in arm mode
LED flashes red: alarm panel is in home mode
LED lights up blue: alarm panel is in disarm mode
LED flashes blue: an error occurred, e.g.:
- Alarm panel does not respond
○ Incorrect PIN code - Attempted to switch to home mode while the alarm panel is in arm mode
- Forced activation of arm mode while alarm panel or sensors report an error
- Error LED:
LED flashes orange: system error, e.g.:
○ No SIM card
- GSM not ready
- Tamper contact is open
- Power failure
- Sensor is out of range
- Sensor is open
○ Battery of a sensor is low
- When disarming, there is still an alarm in the alarm memory.
- Battery:
The keypad requires a CR123A 3V lithium battery. The average battery life is two years. If the battery is low, the orange status LED flashes.
Connecting the keypad and putting it into operation
Installation of the keypad:
- Remove the front cover of the keypad by unscrewing the screw at the bottom.
- At the back cover you find two cavities. They are intended to be pierced – thus, you can mark the locations for required drill holes for a wall installation.
- Use screws to install the keypad on a wall.
- Attach the front cover again.
Connecting the keypad to the alarm panel:
- Enter the installation mode of the keypad by entering the installation PIN (default: 0000) and pressing the * button. The power LED will light up orange.
- Open the web interface of the alarm panel, go to the menu "Sensors" → "Add" and press "Start".
-
Press * and then 7 on the keypad. The keypad emits a signal and will be listed in the alarm panel.
-
If you do not hear a signal, the alarm panel did not receive the connection request of the keypad.
- If the connection request was received by the alarm panel, you will hear three short signal sounds.
- Add the keypad to the alarm panel by pressing "Add" next to the keypad in the menu "Sensors" → "Add".
- To exit the installation mode, press the disarm button ⏻ two times. The keypad emits a signal sound and the power LED is switched off.
- Now you can arm and disarm the alarm panel by means of the keypad.
Range test:
To test the signal strength at the desired installation location, perform a range test.
- Enter the installation mode of the keypad (default: 0000 + *)
- Open the alarm panel menu "Sensors" → "Range" and press "Start."
- Press the * + 7 .
- The sensor and the signal strength should be indicated. The higher the indicated number the better the reception (1-9).
- To exit the installation mode, press the disarm button 📋 two times.
Please note:
If there is no signal at the installation location or the signal strength is below 4 or frequently falls below this level (signal fluctuations of 2 to 3 are normal), we recommend using a repeater to improve the signal.
Changing the PIN code to switch between the different modes of the alarm panel: You can change the PIN code in the web interface of the alarm panel. Open the menu "Home" → "Pin codes" and change the existing PIN code or enter a new one.
Controlling the alarm panel by means of the keypad:
- Arm the alarm panel:
PIN code (default 1234) + arm button ⏻ (a long signal is emitted + the status LED lights up).
- Disarm the alarm panel:
PIN code (default 1234) + disarm button 📋 (two signals are emitted + the status LED lights up blue).
- Switch to home mode:
PIN code (default 1234) + home button ⏻ and press 1, 2, or 3 to select the corresponding home mode (three signals are emitted + the status LED flashes red). If you do not press any number key after pressing the home button, the alarm panel will switch to home mode 1.
Dual key functions:
The keypad features pre-defined dual key commands that allow you to trigger a fire, panic, or medical alarm without entering a PIN code. To activate the dual key functions, please proceed as follows:
Enter the installation mode of the keypad (default 0000 + *). The power LED lights up orange. To activate the dual key function, you need to enter the following commands for the corresponding functions:
* + 2 = Activate dual key 1 + 3 panic alarm
* + 3 = Activate dual key 4 + 6 fire alarm
* + 4 = Activate dual key 7 + 9 medical alarm
* + 5 = Deactivate all dual key functions
Notes:
- For using the dual key function it is necessary to press the commands at least for three seconds.
- To execute the dual commands press always only two keys on the keypad and no other keys!
Additional functions of the installation mode:
* + 7 = Adding the keypad to the alarm panel / range test
* + 6 = Changing the installation PIN
- Enter the current installation PIN (default 0000).
- Press the status button ↩. A long signal is emitted.
- Enter your new installation PIN code (4-digits).
- Press the pound button (#). The new installation PIN code is now saved.
* + 8 = Enable switching to arm / home mode without entering a PIN code
* + 9 = Disable switching to arm / home mode without entering a PIN code
To exit the installation mode, press the disarm button 📋 two times.
Reset / factory default:
If you have forgotten your installation PIN code, you can restore the factory default of the keypad in the following way:
- Open the keypad. Be aware that the tamper protection will be triggered!
- Remove the batteries.
- Press and hold the button "3" while you are inserting the batteries again.
- Release the button "3".
- After the reset, the installation PIN code will again be 0000.
Notes:
- In the menu "Settings" → "Panel" → "Area Settings" → "Arming with failure" you can allow that the alarm panel will always switch the mode irrespective of errors.
- If an error is displayed by a flashing error LED, it can be ignored by entering the PIN code and the mode command again within ten seconds.
- Current errors are displayed and can be ignored in the menu "Home" → "Status".
- The keypad transmits its status "only" during input. Although it can be transmitted that the batteries are getting weak but not that they are empty.
- Depending on the used PIN code, the keypad can control both areas.
- In the menu "Settings" → "Panel" → "General settings" a "PIN code protection" can be activated. After five incorrect PIN code inputs, the keypad is locked for 15 minutes.

Change the standard PIN code (1234) as well as the installation PIN code (0000) of the keypad to ensure that no one else can control your alarm panel!
You can change the PIN code in the menu "Home" → "PIN codes" of the alarm panel. To change the installation PIN code, see above.
For your notes
For your notes


- Introduction
- Disclaimer
- WARNING:
- RoHS
- FC
- CE
- Conformity:
- WARNING
- Intended Use
- Disposal
- Product description:
- Please note:
- LED indicators:
- Notes:
- - Status LED
- - Error LED:
- - Battery:
- Connecting the keypad and putting it into operation
- Installation of the keypad:
- Connecting the keypad to the alarm panel:
- Range test:
- Controlling the alarm panel by means of the keypad:
- Dual key functions:
- Reset / factory default:
- For your notes
Brand : KATHREIN
Model : FKP 100
Category : Antenna