
KH 601 ELECTRIC TEA MAKER - Home Appliance BIFINETT - Free user manual and instructions
Find the device manual for free KH 601 ELECTRIC TEA MAKER BIFINETT in PDF.

User questions about KH 601 ELECTRIC TEA MAKER BIFINETT
0 question about this device. Answer the ones you know or ask your own.
Ask a new question about this device
Download the instructions for your Home Appliance in PDF format for free! Find your manual KH 601 ELECTRIC TEA MAKER - BIFINETT and take your electronic device back in hand. On this page are published all the documents necessary for the use of your device. KH 601 ELECTRIC TEA MAKER by BIFINETT.
USER MANUAL KH 601 ELECTRIC TEA MAKER BIFINETT
natural_image
Blue glass coffee maker with lid and open lid, accompanied by a white saucer and a small white spoon on a wooden table (no text or symbols on main objects)GB ELECTRIC TEA MAKER
IE
CY
Operating instructions
FI SÄHKÖINEN TEEKEITIN
Käyttöohje
ELEKTRISK TEKOKARE
FI Bruksanvisning
DK ELEKTRISK TEKOGER
Betjeningsvejledning
GR
ΗΛΕΚΤΡΕΚΟΣ ΒΡΑΣΤΗΡΑΣ ΤΣΑΓΕΟΥ
©CY
Οδηγίες χρήσης
DE ELEKTRISCHER TEEKOCHER
AT Bedienungsanleitung
CONTENT
PAGE
Correct Usage 2
Safety information 2
Items supplied 2
Technical data 3
Appliance description 3
Before the First Use 3
Operation 3
Cleaning and care 4
Disposal 5
Warranty and Service 5
Importer 6
Read the operating instructions carefully before using the appliance for the first time and preserve this booklet for later reference. Pass the manual on to whomsoever might acquire the appliance at a later date.
ELECTRIC TEA MAKER KH 601
Correct Usage
This appliance is intended for brewing tea and then keeping it warm. The appliance is intended for domestic use only, it is not suitable for commercial or industrial applications.
Safety information
To avoid potentially fatal injury through electric shock:
- Ensure that the base with the electrical connections does not come into contact with water! Ensure that the base is completely dry before use, especially if it has accidentally become wet.
- Use the appliance only with the supplied base.
- Ensure that the power cable never becomes wet or damp during operation. Lay the cable so that it cannot be trapped or otherwise damaged.
- To avoid potentially fatal risks, arrange for a defective power plug and/or cable to be replaced at once by qualified technicians or our Customer Service Department.
- Always remove the plug from the power socket after use. Simply switching the appliance off is not sufficient, as the appliance is under power for as long as the plug is connected to the socket.
⚠️ To avoid burns and other injuries:
- Always heat the water with a closed lid, otherwise the automatic cut-out may not work. Boiling water can then spray out over the edge.
- Hot steam clouds may be released. The glass pot also becomes very hot during use. Wear oven mitts.
- Make certain that the appliance stands firmly and vertically before switching it on.
Boiling water can cause an unstabile kettle to fall over. - Exercise caution with the glass pot. Broken glass can cause serious cut wounds.
- This appliance is not intended for use by individuals (including children) with restricted physical, physiological or intellectual abilities or deficiencies in experience and/or knowledge unless they are supervised by a person responsible for their safety or receive from this person instruction in how the appliance is to be used.
- Children should be supervised to ensure that they do not play with the appliance.
You can thus prevent the appliance from being damaged:
- Under no circumstances should you fill the appliance with cold water immediately after a brewing process. It could form stresses in the glass, causing it to break!
Items supplied
Tea maker KH601
Cleaning brush
Operating instructions
Technical data
Power consumption : 550-650 W
Mains voltage: 220-240 V\~50 Hz
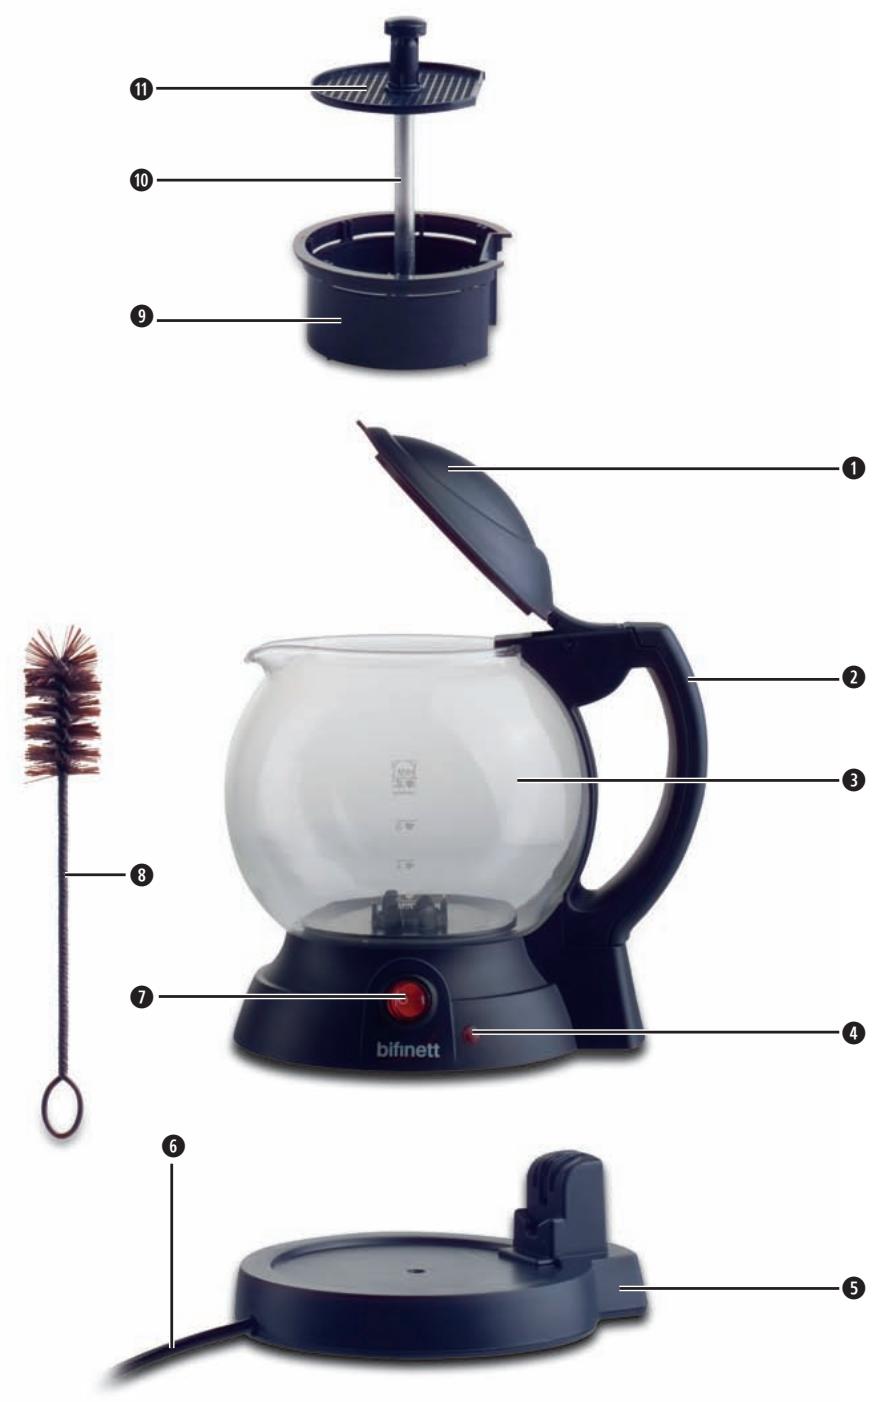
Appliance description
① Lid
② Grip
③ Glass pot
4 Control lamp
5 Base
6 Power cable
⑦ On/Off switch
⑧ Cleaning brush
⑨ Brew chamber
10 Water riser pipe
11 Sieve
Before the First Use
- Remove all packaging materials from the appliance.
- Carefully rinse all parts of the brewing system (Brew chamber 9, water riser pipe 10, sieve 11) and the glass pot 3 (see chapter "Cleaning and Care").
Proceed as follows before the first usage:
- Take the glass pot ③ from the base ⑤ and remove the brew system from the glass pot ③.
- Fill the glass pot ③ up to the MAX marking with water, then add a teaspoon of lemon juice (or lemon concentrate) to it. If lemon juice is not available, you could add a teabag (or a teaspoon of loose tea) directly into the water.
-
Close the lid ① and replace the glass pot ③ onto the base auf ⑤.
-
Switch the appliance on with the On/Off switch ⑦. The control lamp ④ and the On/Off switch ⑦ light up. Wait until the control lamp ④ goes out.
-
Switch the appliance off with the On/Off switch ⑦ and then clean the appliance as described in "Cleaning and Care".
The Tea Maker is now ready for use.
Operation
Warning:
DO NOT put any sugar into the Tea Maker. DO NOT heat milk in the Tea Maker. This would irreparably damage the appliance.
i Important:
Green tea is not suitable for brewing in the Tea Maker. The ideal brewing temperature for green teas lies at around 70^ C. At higher brewing temperatures, such as those generated in the Tea Maker, tannic acids are released. The tea will taste bitter.
- Remove the glass pot ③ from the base ⑤.
- Open the lid ① and take out the brew system. Place the brew system on a level and even surface.
- Fill the glass pot ③ with the required amount of water. Never fill it beyond the MAX marking, and never less than up to the MIN marking.
Warning:
To avoid scalds/burns and electric shocks, ensure that water does not overflow from the glass pot ③.
- Take hold of the brew system and pull the water riser pipe ⑩ with the sieve ⑪ upwards.
- Place the necessary amount of tea or number of teabags in the brew chamber ⑨.
(i) Note:
Ensure that no labels or teabag strings remain in the appliance.
-
Replace the brew system in the glass pot ③. Ensure that the water riser pipe ⑩ sits firmly in the recess on the bottom of the glass pot ③. The brew chamber ⑨ must be positioned with the flattened side towards the handle ②.
-
Close the appliance lid ①.
- Replace the glass pot ③ back on to the base ⑤.
- Insert the plug into a wall power socket and place the On/Off switch ⑦ at the position "I". The control lamp ④ and the On/Off switch ⑦ light up. The water is now boiled and forced upwards through the water riser pipe ⑩, to flow through the brew chamber ⑨ and then back into the glass pot ③.
After the water has boiled, the appliance automatically switches itself into the keep-warm function. The control lamp ④ goes out, only the On/Off switch ⑦ continues to glow. As soon as the water cools, the Tea Maker warms the water back up. The control lamp ④ lights up again during this rewarming process.
i Important:
As the water is fed back through the brewing system during the rewarming, after the first brewing process you should remove the brew system from the glass pot ③.
⚠️ Risk of personal injury!
The brew system is very hot! There is a risk of being burnt! Use oven gloves when you take hold of the brew system.
i Important:
The longer the brew is kept warm, the greater is the amount of fluid evaporated, and thus the brew becomes stronger.
We therefore recommend that the tea be drunk as soon as possible after brewing.
You can interrupt the brew process at any time: For this, place the On/Off switch ⑦ back into the position "0". The brew process is finished. If you remove the glass pot ③ from the base ⑤, the brew process is interrupted.
Cleaning and care
⚠️ Risk of personal injury!
ALWAYS remove the plug before cleaning the appliance. There is a risk of electric shock! Allow the appliance to cool down. Risk of Burns!

NEVER submerse the appliance in water or other liquids! There is a risk of electric shock! The appliance could also be irreparably damaged!
To obtain an optimal result with every brew process the appliance should be cleaned after every use. This will avoid, that:
- the combination of scale and tannins, caused by boiling the water and the tea brewing, impair the function of the Tea Maker;
- regular use of the Tea Maker could perhaps cause it take on aromas from strongly aromatic teas and pass them to other tea sorts.
Clean the glass pot ③ of the Tea Maker with a moist cloth. For stubborn soiling use a mild detergent on the cloth.

Important
Do not use abrasive cleaners or chemical or caustic detergents. These could irreparably damage the appliance!
Clean the brew system with warm water and a liquid detergent. For this, use the supplied cleaning brush ⑧. After cleaning it, rinse it well with clear water so that no detergent residues remain on it.
Disposal

Do not dispose of the appliance in your normal domestic waste. This product is subject to the European directive 2002/96/EG.
Dispose of the appliance through an approved disposal centre or at your community waste facility. Observe the currently applicable regulations. In case of doubt, please contact your waste disposal centre.

Dispose of all packaging materials in an environmentally friendly manner.
Warranty and Service
The warranty for this appliance is for 3 years from the date of purchase. The appliance has been manufactured with care and meticulously examined before delivery. Please retain your receipt as proof of purchase.
In the case of a warranty claim, please make contact by telephone with our service department. Only in this way can a post-free despatch for your goods be assured.
The warranty covers only claims for material and manufacturing defects, not for wearing parts or for damage to fragile components, e.g. buttons or batteries. The appliance is intended for domestic use only, NOT for commercial purposes.
If this product has been subjected to improper or inappropriate handling, abuse, or modifications not carried out by one of our authorised sales and service outlets, the warranty will be considered void. Your statutory rights are not restricted in any way by this warranty.

DES Ltd
Units 14-15
Bilston Industrial Estate
Oxford Street
Bilston
WV14 7EG
Tel.: 0870/787-6177
Fax: 0870/787-6168
e-mail: support.uk@kompernass.com

Irish Connection
Harbour view
Howth
Co. Dublin
Tel: 00353 (0) 87 99 62 077
Fax: 00353 18398056
e-mail: support.ie@kompernass.com
KOMPERNASS GMBH
BURGSTRASSE 21
44867 BOCHUM, GERMANY
www.kompernass.com
SISÄLLYSLUETTELO
SIVU
INNEHÅLLSFÖRTECKNING
SIDAN
47623 Kevelaer, Germany
Tel.: +49 (0) 180 5 008107