
BD10 - DVD / Blu-ray portable player TAKARA - Free user manual and instructions
Find the device manual for free BD10 TAKARA in PDF.
| Product Type | Portable Blu-ray / DVD Player |
| Brand | TAKARA |
| Model | BD10 |
| Dimensions (L x W x H) | 259 x 41 x 206 mm |
| Net Weight | 1.3 kg |
| Power Supply | DC 12 V power adapter (included); car adapter (included) |
| Built-in Screen | Adjustable LCD Screen |
| Supported Disc Formats | BD, BD-R, BD-RE, DVD±R/RW, DVD-Video, VCD, CD, CD-R/RW |
| Video Formats | H.264, MPEG-1, MPEG-2, MPEG-4, WMV |
| Audio Formats | Dolby Digital, Dolby Digital Plus, Dolby TrueHD, DTS-HD, MP3, WMA |
| Photo Formats | JPEG, PNG, GIF |
| Connections | HDMI (output), AV OUT (composite), AV IN, 3.5mm headphone jack, USB (for media playback and firmware upgrade), memory card (SD/MMC), LAN Ethernet |
| HDMI Resolution | Auto, 480i/576i, 480p/576p, 720p, 1080i, 1080p, 1080p@24Hz |
| Audio Output | 2 analog channels (2 Vrms), optical digital output (via HDMI) |
| Laser Wavelength | BD: 405 nm; DVD: 650 nm; CD: 790 nm |
| Special Features | BD-Live, BonusView (PIP), network playback, firmware upgrade via USB |
| Included Accessories | Remote control, composite audio/video cables, AC adapter, car adapter, earphones, user manual, warranty card |
| Maintenance and Cleaning | Clean the device with a dry cloth; clean discs with a microfiber cloth from the center to the outer edge |
| Safety | Do not expose to moisture; do not obstruct ventilation; have repairs done by qualified personnel; do not open the cover (laser) |
| Repairability | Non-user-serviceable parts; no replacement parts available for the general public |
| General Information | User manual in French available; FAQs online |
Frequently Asked Questions - BD10 TAKARA
User questions about BD10 TAKARA
0 question about this device. Answer the ones you know or ask your own.
Ask a new question about this device
Download the instructions for your DVD / Blu-ray portable player in PDF format for free! Find your manual BD10 - TAKARA and take your electronic device back in hand. On this page are published all the documents necessary for the use of your device. BD10 by TAKARA.
USER MANUAL BD10 TAKARA
PRODUIT LASER CLASSE 1
Commander la lecture video
LECTURE D'UN DIAPORAMA
-MP3: 32 kHz, 44.1 kHz, 48 kHz
- Débit binaire constant :
- MP3:112 kbps - 320 kpbs
ESB
Safety and Maintenance. 2
Security Instructions 2
Location of Controls. 4
Remote Control. 5
Quick Starting Guide 6
Connections 7
- Connect to Earphones 7
- Connect to AV OUT. 7
-Connect to the HDMI. 7
-Connect Network 8
-Connect ESB Device 8
-Connect Memory Card. 8
Basic Operations. 9
-Play Video. 9
-Play a Blu-ray Video Disc. 10
-Playing Music 11
-Play a Photo slideshow. 12
General Settings 14
-Basic Operation for the Menu 14
-General Player Settings. 14
-Display Settings 17
Specifications. 20
Troubleshooting 21
Safety and Maintenance

This symbol indicates "dangerous voltage" inside the product that presents a risk of electric shock or personal injury.

This symbol indicates important instructions accompanying product.
WARNING: To reduce the risk of fire or electric shock, do not expose this product to rain or moisture. Appliance shall not be exposed to dripping or splashing and no objects filled with liquids, such as vases, shall be placed on the appliance.
Security Instructions
Read all of the instruction before using this Blu-ray player and keep this manual in safe place for future reference.
- Read and keep these instructions.
- Heed all warnings and follow all instructions.
- Do not use this player near water.
- Clean only with dry cloth.
- Do not block any ventilation openings and install in accordance with the manufacturer's instructions.
- Do not install near any heat sources such as radiators, heat registers, or the player (including amplifiers) that produce heat.
- The polarized or the grounding type plug has an important safety purpose. A polarized plug has two blades with one wider than the other. A grounding type plug has two blades and a third grounding prong. The wide blade or the third prong is provided for your safety. If the provided plug does not fit into your outlet, consult an electrician for replacement of the obsolete outlet.
- Protect the power cord from being walked on or pinched particularly near the convenience receptacles, and the point where they exit from the player.
- Only use attachments or accessories specified by Pixela.
- Use only with the cart, stand, tripod, bracket, table specified by the manufacturer or sold with the player. When a cart is used, use caution when moving the cart/player combination to avoid injury from tip-over.
- Unplug this player during lightning storms or when unused for long periods of time.
- Refer all servicing to qualified service personnel.
Servicing is required when the player has been

CAUTION
RISK OF ELECTRIC SHOCK. DO NOT OPEN.

CAUTION: To reduce the risk of electric shock, do not remove cover (or back). No user serviceable parts inside. Refer servicing to qualified service personnel.

damaged in any way, such as power-supply cord or plug is damaged, liquid has been spilled or objects have fallen into the player, the player has been exposed to rain or moisture, does not operate normally, or has been dropped.
- Please keep the unit in an environment with good ventilation.
- WARNING: To reduce the risk of the fire or electric shock, do not expose this apparatus to rain or moisture. The apparatus shall not be exposed to dripping or splashing and that no objects filled with liquids, such as vases, shall be placed on apparatus.
- WARNING: Where the mains plug or an appliance coupler is used as the disconnect device, the disconnect device shall remain readily operable.
- Do not expose the batteries to excessive heat such as fire direct sunshine or similar sources.
CLASS 1 LASER PRODUCT
Use of controls, adjustments or performance of procedures other than those specified here in may result in hazardous radiation exposure.
Trademark Notice
DVD Video is a trademark of DVD Format / Logo Licensing Corporation.
Blu-ray Disc and Blu-ray Disc logo are trademarks of the Blu-ray Disc Association.
Manufactured under license from Dolby Laboratories. Dolby and the double-D symbol are trademarks of Dolby Laboratories.
Manufactured under license under U.S. Patent #s: 5,451,942; 5,956,674; 5,974,380; 5,978,762; 6,226,616; 6,487,535; 7,212,872; 7,333,929; 7,392,195; 7,272,567 & other U.S. and worldwide patents issued & pending. DTS and the Symbol are registered trademarks, & DTS-HD, DTS-HD Master Audio, and the DTS logos are trademarks of DTS, Inc. Product includes software. © DTS, Inc. All Rights Reserved.
Java and all other Java trademarks and logo are registered trademarks of Sun Microsystems, Inc.
BD LIVE and BONUSVIEW are trademarks of the Blu-ray Disc Association.

CAUTION: This product utilizes a laser.
Do not open cover and do not repair yourself. Refer servicing to qualified personnel.

VIDEO

Blu-rayDisc

DOLBY.
TRUEHD

dtssHD
Master Audio

Java
POWERED

Location of Controls
The main screen
Front face
- LCD panel
- MODE
- SETUP
- Speaker
-
OPEN button
-
PALY/PAUSE / STOP
- FUNCTION
- OK
- Disc lid
-
CHARGING indicator
-
Remote sensor
- VOLUME +/-
- DIRECTION key
- PUSH CLOSE
- POWER indicator
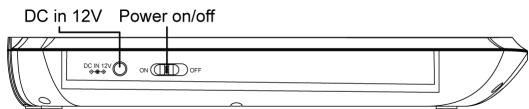
Right side

Left side
Back

- PHONE socket
4.HDMI OUT - DC IN 12V
2.AVOUT
5. MEMORY socket
8. ON/OFF
- AV IN
6.ESB - LAN
Remote Control The remote control

- Function
- Repeat
- Subtitle
- OSC
- Audio
- OK
- Return
- Fast Reverse
- Red / Program
- Mute
- Clear
- Angle
- Volume+
- Stop
- Previous
-
Yellow / Book mark view
-
Mode
- Display
- Goto
- Title/Popup
- Setup
- Direction key
- Fast forward
- Green / Book mark set
- Menu
- Number buttons (0-9)
- 2nd Audio
- PIP
- Volume-
- Play/Pause
- Next
- Blue / Zoom
Operating with the remote control
- The remote control must point at the remote sensor, in order for the DVD player to function correctly.
- The remote works best at a distance less than 5 meters and at an angle of up to +/-30^ toward the front of the unit.
- Obstacles should not remain in between the remote control and the remote sensor on the main unit.
Quick Starting Guide
- Connecting to an External Power Source
Connect the power adapter (supplied with the player) to the side input plug and to a wall outlet. Do not use any other device otherwise specified by your dealer. - Open the screen panel.
The screen panel of the portable DVD opens to a maximum 180^ . And it can rotate 270^ . - Press the open button on the left to open the disc cover.
- Insert a DVD disc with label side facing upward.
Align the center of the DVD disc with the center of the disc guide. Press gently down on the DVD to snap the disc into place, and then close the disc cover.
- Slide the power switch on the left side of the unit to power it on.
- Press the OK or PLAY/PAUSE button on the unit to start playback.
In most cases, when you leave by the PLAY/PAUSE button, continue to be used by PLAY/PAUSE button.
The DVD player will immediately start rendering the DVD program.
When you want to stop, press the STOP button, it will return to the power-on logo.
The player can be recharged while playback.
Connections
1. Connect to Earphones
- Connect the earphones. earphones with a 3.5mm stereo plug can be connected.
- Adjust the volume by pressing the VOL+/VOL- buttons on the remote control.
The right side of the portable
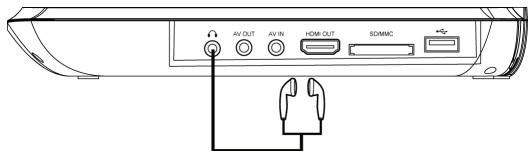

Avoid listening to sound at levels which may be harmful to your ears.
2. Connect to AV OUT
- Turn off the power and unplug both units before setting up any connections.
- Connect the AV cable to AV OUT.
- Connect the yellow cable (Video) to the VIDEO-IN of the TV set.
- Connect the red and white cable to the AUDIO-IN of the TV set.
- Change the resolution to 480P/576P or 480I/576I by setup menu.

Please set the resolution to 720P for the best image effect of the screen after you finished using the the AV jack.
3. Connect to the HDMI
Connect the HDMI cable (not supplied) to the HDMI jack on this product and to the HDMI input jack on the TV.
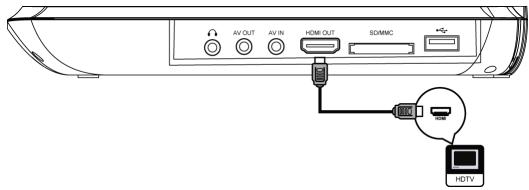
Please change the resolution to 1080P for the best image effect.
Please set the resolution to 720P for the best image effect of the screen after you finished using the HDMI jack.
Tip
- You can optimize the video output by pressing the Resolution button repeatedly to select the best resolution the TV can support.
- To play the digital video images of a BD-video or DVD video via an HDMI connection, it is necessary that both this product and the display device (or an AV receiver/ amplifier) support a copyright protection system called HDCP (high-bandwidth digital content protection system)
- This type of connection provides best picture quality.
4. Connect Network
Connect this product to the network to enjoy software updates and BD-Live bonus content.
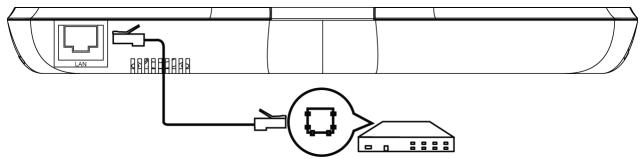
Connect the network cable (not supplied) to the LAN jack on this product and then connect the network cable to the LAN jack on the broadband modem or router.
5. Connect ESB Device
A ESB device card to play multi-media file.
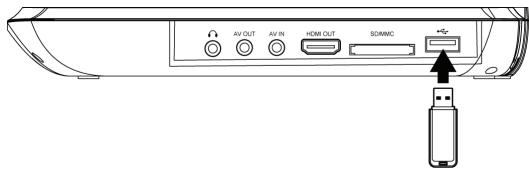
Connect the ESB device to the ESB jack on this product.
Note:
We do not guarantee 100% compatibility with all ESB devices.
6. Connect Memory Card
A Memory card to play multi-media file.
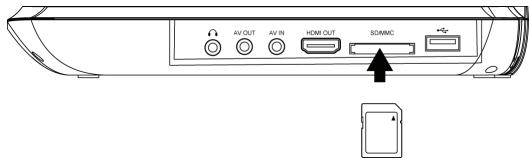
Connect the Memory card to the MEMORY socket on this product.
Note:
We do not guarantee 100% compatibility with all Memory card.
To play the multi-media file on ESB device or Memory card. Press the STOP during playback, then press FUNCTION on the unit or on the remote.
Basic Operations
Turn On
Slide the power switch on the left side of the unit to power it on.
Setup Menu
Press SETUP to display the setup menu on the LCD screen.
Navigate the Menu
When a menu is displayed, press the Navigation Keys on the remote control to navigate through it.
Select Menu Display Language
- Select General Settings in SETUP Menu.
- Press Up/Down buttons to select Language.
- Press Right button to select OSD and press Right button again to enter the select menu, then you can select the language you want.
- Press OK to confirm.
Play a Disc
- Press OPEN button to open the disc compartment.
- Insert a disc with the label facing up.
- Press PUSH CLOSE to close the disc compartment and start disc play.
- To stop a disc play, press
PLAYVIDEO
Control Video Play
- Play a title
- Use the remote to control the play back
| Buttons | Action |
| HI | Start or resume play / Pause play. |
| ■ | Stop play. |
| ←→ | Skip to a previous/next title or chapter. |
| ←→ | Search fast-backward or fast-forward. Press repeatedly to change the search speed. |
Note:
For BD disc with Java application, the resume function is not available.
Display Menu
BD-video Disc:
MENU: Stops the video playing and returns to the disc menu. This feature is
disc-dependent.
POP UP: will access the BD-video disc menu without interrupting disc play.
DVD-video disc:
MENU will display the root menu of a disc.
DISPLAY will display disc information and guide you through the available functions on the disc.
Change Video Play
| Button | Action |
| Audio | Selects an audio language |
| SUBTITLE | Selects an subtitle language on a disc |
| REPEAT | Select or turn off repeat mode.Repeat options may vary from the disc type |
| DISPLAY | Display the current status or disc information |
| ZOOM | Zoom in/out of the video image |
| BOOK MARK SET | Set bookmarks of the currently playing disc |
| BOOK MARK VIEW | View bookmarks of the currently playing disc |
| PROGRAM | Edit the program and play |
| GOTO | Jump to a user specified time during playback |
| 2nd AUDIO | Switch over the audio displaying between the main window PIP window. |
| OSC | Access options relating to the current activity or selection, and control the video playback |
Playing a Blu-ray Video Disc
Blu-ray video discs have larger capacity and support features such as high-definition video, multichannel surround sound, Interactive menus and so on.
- Insert a BD-video disc.
- Playback will automatically start, or select a play option in the menu and press OK.
- During playback, you can press MENU to display additional information, features or content store on the disc.
- During playback, you can press POP UP to display the disc menu without interrupting
disc play.

(A) Primary video (B) Second
- Press PIP to turn on the secondary video window.
- Press 2nd AUDIO to switch over the audio between main Playback window and PIP window.
Enjoy BD-LIVE
You can enjoy the BD-Live functions which enable you to use Interactive functions on the disc when the unit is connected to the Internet.
Example of BD-Live Interactive functions:
- Additional content (such as movie's trailer, subtitles and BD-Java, etc.) can be downloaded to a connected ESB storage device.
- Special video data may be played while being downloaded.
- When a disc supporting BD-Live is played, the product or the disc's ID can be sent to the content provider via the Internet. Service and functions will differ depending on the disc.
Note
- The unit must be connected and set up to access Internet.
-Depending on the connection environment, it may take time to connect to the Internet. - When BD-Live functions are used and the unit is connected to the Internet, your standard Internet service provider charges will apply.
-Follow the instruction given by the disc when using the BD-Live function.
-It is recommended to use a ESB storage device for download the content (at least 1GB free space is recommended).
PLAYING MUSIC
Controlling music playback
Use the remote control to control the playback for audio file.
| BUTTON | ACTION |
| HI | Start or Resume play / Pause Play |
| ■ | Stop Play |
| ←→ | Skip to a previous or next title or chapter |
| ←→ | Search fast-backward or fast-forward. Press repeatedly to change the search speed. |
| 1 2 3 4 5 6 7 8 9 0 | Select an item to play |
| REPEAT | Select or turn off repeat mode |
Play MP3 music
Your player can also playback digital music files. MP3 are types of highly compressed audio file (files with mp3 extensions).
- Insert a disc that contains MP3 file.
- Select a music folder, then press OK.
- Select a file to play, then press OK.
NOTE
-Press FUNCTION to display the file list.
-For discs recorded in multiple sessions, Only the first session will be played.
- This player cannot playback files that are protected by Digital Rights Management (DRM).
-This product does not support the MP3PRO audio format.
-Special characters present in the MP3 track name (ID3) or album name, it might not be displayed correctly on the screen as these characters are not supported by the player.
-Folders/files that exceed the supported limit of this product cannot be displayed or played.
PLAYING A PHOTO SLIDESHOW
You can play JPEG on the player as a slideshow.
- Insert a disc or ESB device that contains JPEG files
- Select a Photo folder, then press OK to open.
-To select a Photo, use the Navigation buttons.
-To enlarge the selected Photo and start slideshow, press OK.
Note:
-It may require longer time to display the disc content on your TV if there are a large number of songs/ photos compiled onto one disc.
- This product can only display digital camera Pictures in the JPEG-EXIF format, typically used by almost all digital cameras. It cannot display Motion JPEG, or Pictures in formats other than JPEG, or sound clips associated with Pictures.
-Folders/files that exceed the supported limit of this product cannot be displayed or played.
Controlling Photo slideshow
- Begin a Photo slideshow.
- Use the remote control to control the play as follows:
| BUTTONS | ACTION |
| ←▶ | Rotate a photo |
| ▲▼ | Flip a photo |
| ■ | Stop play |
Set slideshow interval and animation
- During slideshow playback, press OSC. The options menu will be displayed.
- Navigate the options with the Navigation button.
- Select an option in the menu, then press OK.
- Press OK.
Playing music during a Photo slideshow
Create a musical slideshow to play both MP3 music files and JPEG Photo files simultaneously.
Note:
Create a musical slideshow, you must store the MP3 and JPEG files on the same disc as the photos.
-
Select your MP3 music to play and start play-back.
-
Press Media Center to return to the main menu.
- Navigate to enter a photo folder, then press OK to start slideshow play.
- Slideshow begins and continues till the end of the photo folder.
-Audio continues to play until the end of the disc.
-To stop the slideshow play, Press
-To stop the music play, press again.
General Settings
- Press STOP twice during playback
- Press SETUP, the SETUP MENU display on the screen.
- Select a main menu by LEFT/RIGHT.
- Select the menu you want to setting by UP/DOWN buttons and press RIGHT.
You can press UP to return to main menu.
- Select the option by UP/DOWN and press RIGHT.
You can press LEFT to return to the previous menu. - Select by UP/DOWN buttons and press OK to confirm.
You can press LEFT to return to the previous menu. - To return to the mains menu from any submenu, press RETURN.
- To exit the menu, press SETUP.
GENERAL PLAYER SETTINGS
SYSTEM
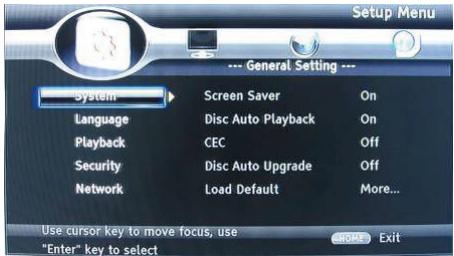
- Screen Saver: Turns the screen saver on/off. The screen saver will display in 3 mins if there is no operation when the unit is turned on.
- Disc Auto Playback: Turns the disc auto playback function on/off.
- CEC: Turns the CEC function on/off.
- Disc Auto Upgrade: Turns the Disc Auto Upgrade function on/off.
- Load Default: Return the player to its default settings.
- Upgrade: select this when you want to upgrade your player software to the latest version.
- Easy setup: Make default settings Fast.
-
BUDA: Define memory for BD-Live.
-
Notice : BUDA Setup has two-submenu of "External" & "On board". If you choose "External", you must connect ESB first.
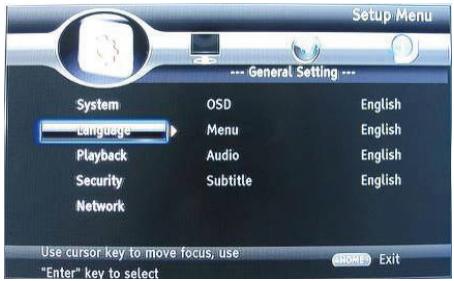
- OSD: Selects the OSD language.
- Menu: Selects the menu language of the disc.
- Audio: Selects the audio language for the program.
- Subtitle: Selects the subtitle language for the program.
Note:
You have to select the audio and subtitle language according to the requirements on the disc.
PLAYBACK
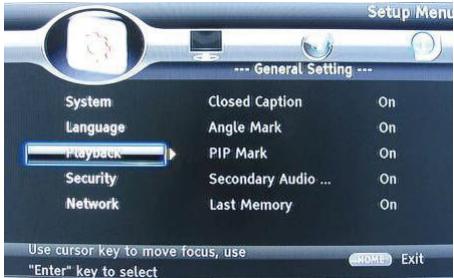
- Closed Caption: Turn on/off the CC function.
- Angle Mark: Turn on/off the Angle mark function.
- PIP Mark: Turn on/off the PIP mark function
- Secondary Audio: Turn on/off Secondary Audio mark function.
- Last Memory: Turn on/off the last memory function
- PBC: Turn the PBC function on/off.
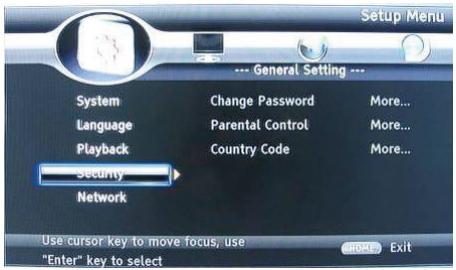
- Change Password: Changes the password for parental control menu.
- Parental Control: to set the parental control.
- Country Code: Select the Country code.
Note:
The original code is 0000. The code can be changed by user.
NETWORK
- Connect this product to a broadband MODEM or router.
- This player will start to detect if there is a connection to the network.
- If the connection test fails, select (Retry) and press OK to try and re-connect to the network again.
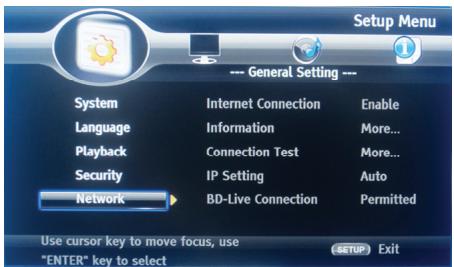
- Internet Connection: Displays the Internet connection state.
- Information:Displays information of the current Network.
- Connection Test: Tests the Internet connection state.
- IP Setting: Sets the IP for the player.
- BD-Live Connection: Connection situation of BD-Live.
- Proxy Setting: Setup Proxy Server.
DISPLAY SETTINGS
TV
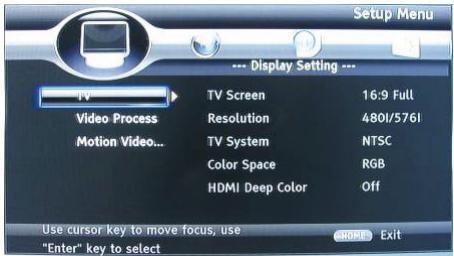
- TV Screen: Selects the display mode for the TV.
- Resolution: Selects the resolution for the TV.
- TV System: Selects the TV system type.
- Color Space: Selects the color space.
- HDMI Deep Color: Selects the color for HDMI.
- HDMI 1080 24Hz: Enable/disable this settings.
VIDEO PROCESSING
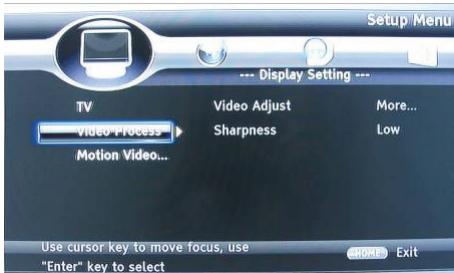
- Video Adjust: Enter the submenu to adjust the video display.
- Sharpness: Select the playback sharpness mode.
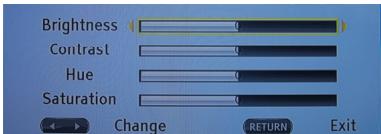
Adjust the Brightness, Contrast, Hue, Saturation of the screen to suit.
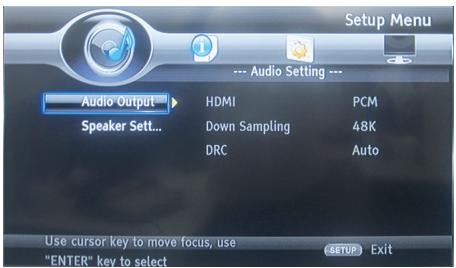
AUDIO SETTING
- HDMI: Selects the HDMI mode.
- Down sampling: Selects down sampling.
(Select this when the Amplifier connected to the placer is not 96KHz compatible) - DRC: Dynamic range compression
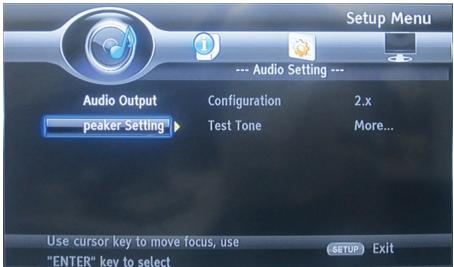
Speaker Setting: Selects speaker output
- configuration: Selects the number of channels 2x
- Test Tone:
SYSTEM INFORMATION
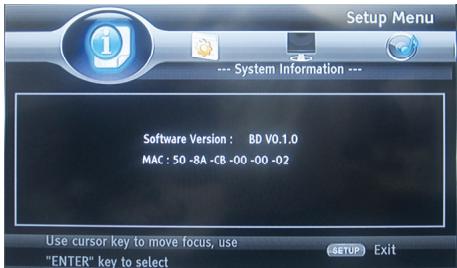
Displays the system information (Information in the picture above is for reference only)
UPDATE SOFTWARE
For software updates that can enhance your players performance, check the current software version of your players with the latest software (if available).
- Press SETUP.
- Select [General Setting], then press RIGHT button.
- Select [System]>[Upgrade], then press OK.
Update software via ESB
-
Download the software onto a ESB flash drive.
-
Insert the ESB flash drive to the ESB jack of the rear panel.
- In the SETUP menu, select [General Setting] >[System] > [Upgrade] > [ESB Storage].
- Follow the instructions on the TV screen to confirm the update operation.
- Once the software update is complete, this product automatically switches into standby mode.
- Disconnect the power cord for a few seconds; reconnect an turn on this player.
CLEAN DISCS
Wipe the disc with a Micro Fibre Cleaning Cloth from the centre to the edge in a straight line movement.
Note
To prevent possible damage of this product do not turn off the power or remove the ESB flash drive while the software update is in progress.
Caution
Never use solvents such as benzene, thinner, cleaners available commercially, or anti-static sprays intended for discs to clean the player.
Specifications
Playback disc formats
BD,BD-R,BD-RE,DVD-R/RW,DVD+R/RW,DVD-Video,VCD,CD,CD-R/RW
Video formats
H.264/MPEG1/MPEG-2/MPEG4/WMV
Audio formats
Dolby Digital, Dolby Digital Plus, Dolby TrueHD, DTS-HD, MP3, WMA
Photos
JPEG, PNG, GIF,
Accessories supplied
- Remote control.
- Composite Audio/Video cables.
- Power adapter
- Car power adapter
- Earphone.
- User manual.
Warranty card
Video
- Signal system: PAL / NTSC
Composite video output: 1 Vp-p (75 ohm) - HDMI video output: Auto, 480i/576i, 480p/576p, 720p, 1080i, 1080p, 1080p@24Hz.
Audio
- 2 Channel analog output.
-Audio Front L&R: 2 Vrms (>1 kohm)
Digital output: 0.5-Vp-p (75 ohm)
HDMI output - Sampling frequency:
-MP3: 32 kHz, 44.1 kHz, 48 kHz
- Constant bit rate:
- MP3: 112 kbps - 320 kpbs
ESB
- As additional ESB memory for software updates are storing BD-Live bonus contents.
Main unit
- Dimensions (w x h x d): 259x41x206(mm)
Net Weight: 1.3kg - Wave length: -BD: 405 + 5nm/-5nm -DVD:650 + 13NM/-10NM
Troubleshooting
WARNING: Before requesting after service please check this possible resolution. Risk of electric shock. Never remove the casing of the product. To keep the warranty valid, never try to repair the product yourself.
| No reaction to the remote control | ·Make sure the player is connected to a power outlet. ·Insert the batteries correctly ·Point the remote control at the IR sensor located on the front panel of this product. ·If the remote still does not function, try putting new batteries into the remote control. |
| No picture/sound | ·Make sure the connection is in good condition; volume is not too low; audio receiver or TV work normally; audio setting is proper. |
| No picture on HDMI connection | ·If this player is connected to an unauthorized display device with an HDMI cable, the audio/video signal may not be displayed ·Check if the HDMI cable is faulty. If faulty or damaged, replace the HDMI cable. ·If this happens when you change the [resolution] setting, press Resolution on the remote control repeatedly until the picture appears. |
| High-definition video signal not playing on the TV | ·Ensure that the audio cables are connected to the audio input of the TV ·Assign the audio input of the TV to the corresponding video input. See the TV user manual for details. |
| No sound on HDMI connection | ·You may not hear any sound from the HDMI output if the connected device is non-HDCP compliant or only DIVI compatible. |
| Disc cannot be played | ·Ensure that the disc is loaded properly ·Ensure that this player supports the disc. See Specifications. ·Ensure that this player supports the region code of the DVD or BD ·For DVD+RW, ensure that the disc is finalized. ·Clean the disc |
| Data Files (JEPG, MP3,) cannot be played or read | ·Ensure that the data file was recorded in the standard UDF, ISO9660 or JOLIET format. ·Ensure that the JPEG file extension.jpg, JPG,JPEG or JPEG ·Ensure that the MP3 file extension is .mp3 or MP3, |
| Not entry sign appears on the TV | ·The requested operation is not possible |
| Unable to access BD-Live feature | ·Check the network internet connection or ensure that the network Internet connection has been set up ·Clear ESB storage ·Ensure that the BD disc supports BD Live Feature. |
Takara
DRAAGBARE BLU-RAY DISK/DVD-SPELER
CLASS 1 LASER PRODUCT
Hereby, TAKARA MULTIMEDIA declares that this BD10 is in compliance with the essential requirements and other relevant provisions of Directive (EMC directive 2004/108/EC / RoHs directive 2011/65/EU / LVD directive 2006/95/EC).
NL
- PRODUIT LASER CLASSE 1
- Commander la lecture video
- LECTURE D'UN DIAPORAMA
- ESB
- Safety and Maintenance
- Security Instructions
- CAUTION
- CLASS 1 LASER PRODUCT
- Trademark Notice
- Location of Controls
- The main screen
- Right side
- Left side
- Back
- Remote Control The remote control
- Operating with the remote control
- Quick Starting Guide
- Connections
- Connect to Earphones
- Connect to AV OUT
- Connect to the HDMI
- Connect Network
- Connect ESB Device
- Note:
- Connect Memory Card
- Basic Operations
- Turn On
- Setup Menu
- Navigate the Menu
- Select Menu Display Language
- Play a Disc
- PLAYVIDEO
- Control Video Play
- Display Menu
- BD-video Disc:
- DVD-video disc:
- Playing a Blu-ray Video Disc
- Enjoy BD-LIVE
- Note
- PLAYING MUSIC
- Play MP3 music
- PLAYING A PHOTO SLIDESHOW
- Controlling Photo slideshow
- Set slideshow interval and animation
- Playing music during a Photo slideshow
- General Settings
- GENERAL PLAYER SETTINGS
- SYSTEM
- PLAYBACK
- NETWORK
- DISPLAY SETTINGS
- TV
- VIDEO PROCESSING
- AUDIO SETTING
- SYSTEM INFORMATION
- UPDATE SOFTWARE
- Update software via ESB
- CLEAN DISCS
- Specifications
- Playback disc formats
- Video formats
- Audio formats
- Photos
- Accessories supplied
- Video
- Audio
- Main unit
- Troubleshooting
- Takara
- DRAAGBARE BLU-RAY DISK/DVD-SPELER
- NL
Brand : TAKARA
Model : BD10
Category : DVD / Blu-ray portable player