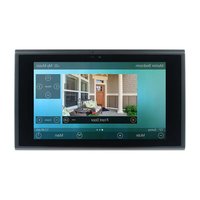
Total Control TKP-7600 - Remote control URC - Free user manual and instructions
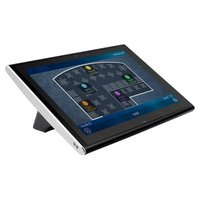
Find the device manual for free Total Control TKP-7600 URC in PDF.


| Product Type | Universal Remote Control |
| Brand | URC (Universal Remote Control) |
| Model | Total Control TKP-7600 |
| Dimensions (approx.) | 200 x 70 x 20 mm |
| Weight (approx.) | 300 g |
| Power Source | Rechargeable Lithium-Ion battery |
| Charging | Micro USB (5V DC) |
| Connectivity | IR, RF (433 MHz), Bluetooth |
| Display | Color touchscreen (3.5 inch) |
| Supported Devices | TV, AV receiver, streaming, lights, shades (up to 15) |
| Programming | Self-learning, database, PC software |
| Macro Commands | Yes, customizable |
| Backlight | Programmable LED |
| Cleaning Instructions | Wipe with a soft, dry cloth |
| Safety Warnings | Keep away from water and extreme temperatures |
| Spare Parts Available | Battery, USB cable, charging dock (sold separately) |
| Repairability | Battery replacement by user; other repairs by authorized service |
| Included Accessories | USB charging cable, user manual (40 pages) |
Frequently Asked Questions - Total Control TKP-7600 URC
User questions about Total Control TKP-7600 URC
0 question about this device. Answer the ones you know or ask your own.
Ask a new question about this device
Download the instructions for your Remote control in PDF format for free! Find your manual Total Control TKP-7600 - URC and take your electronic device back in hand. On this page are published all the documents necessary for the use of your device. Total Control TKP-7600 by URC.
USER MANUAL Total Control TKP-7600 URC
TKP-7600
OWNER'S MANUAL

TOTAL CONTROL
TKP-7600
OWNER'S MANUAL
Introducing the TKP-7600
Thank you for purchasing URC's TKP-7600 In-Wall Network Keypad. Its ease intuitive use helps to simplify your life while adding control of more thin thought possible.
Online Support
Total Control is sold direct only and must installed/program by a certified custom integrator.
End-User Support
Visit the URC Home Page for product information, owner's manuals, and contact information.
Contact Support
Total Control is a URC product sold direct only. For questions or assistant your Custom Installer/Programmer.
My Installer/Programmer

Technical Support
Toll Free: 800-904-0800
Main: 914-835-4484
techsupport@urc-automation.com
Hours: 9:00am - 5:00pm EST M-F
Table of Contents
Features and Benefits.... 1 Intercom .... 17
Updated User Experience...... 1
Audio-Video Interface 1
Proximity Sensor 2
Flexible Orientation 2
Installation.... 4
Limited Warranty Statement...... 37
TOTAL CONTROL
TKP-7600 OWNER'S MANUAL
Features and Benefits
The TKP-7600 In-Wall Network Keypad is one of URC's most advanced devices that is optimized for usage with Total Control.
Enjoy these key features:
Updated User Experience
This device has the capability of using URC's Total Control software suite. Us software provides this device with a modern "look and feel" giving the end-us improved user experience in terms of graphics, performance, and features.
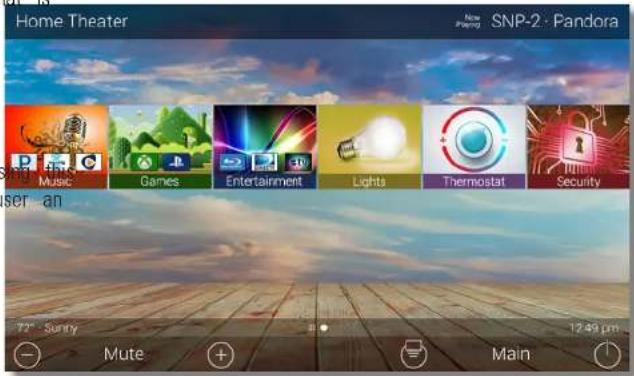
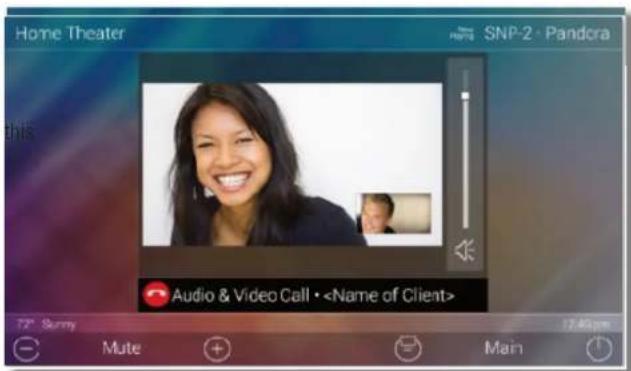
Audio-Video Interface
Communicate with any other URC Intercom-Enabled device in the system with feature. The end-user can make Audio-Video, Audio, or Audio Broadcast calls directly from the TKP-7600.
TOTAL CONTROL
TKP-7600
OWNER'S MANUAL
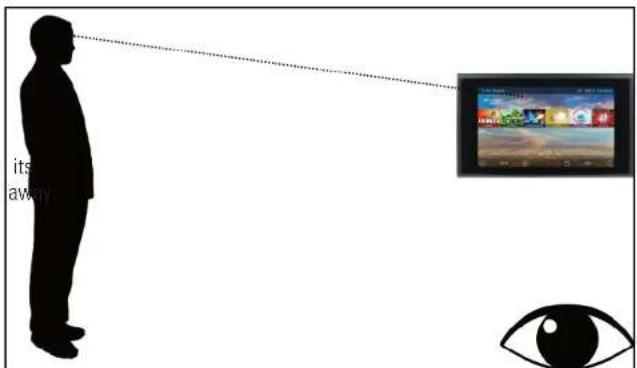
Proximity Sensor
This feature allows the TKP-7600 to spring into action automatically. Utilizing proximity sensor, the keypad can detect distances from up to three (3) feet. This setting can be adjusted in the device's Settings menu.
Flexible Orientation
The TKP-7600 offers the ability to display the device in either portrait or lane mode making it the perfect keypad for almost any room. This feature can be from within the Accelerator software, speak to a custom home professional p installation.

TOTAL CONTROL
TKP-7600
OWNER'S MANUAL
Part List
Included in the TKP-7600:
• 1x - TKP-7600 Network Keypad
- 1x - Mounting Ring
- 4x - Mounting Screws
- 4x - Spacers

natural_image
Simple rectangular frame with rounded corners, no text or symbols inside
natural_image
Simple line drawing of a rectangular component with four circular holes at the corners (no text or symbols)TKP-7600 Mounting Ring

natural_image
Four identical empty circles arranged in a 2x2 grid (no text or symbols)Spacers

Mounting Screws
TOTAL CONTROL
TKP-7600 OWNER'S MANUAL
Installation
The TKP-7600 is wall mountable and fits into a standard dual gang (J-box or Mud Ring) opening. Prior to installation, make sure power is available at the preferred location.
Power can be supplied to the TKP-7600 through an Ethernet (RJ45) cable connected to a PoE (Power over Ethernet) in either of the following ways:
- Router/Switch
- PoE Injector
Power over Ethernet describes a system that passes electrical power safely, with data, along Ethernet cabling. A shielded Ethernet cable is preferred. standard for PoE requires a Category 5 or higher for high power levels.

Mounting Ring

Dual-Gang
Using the Spacers
Use the spacers when installing the mounting ring on to a gang box. are NOT needed when using a p-ring.
Included in the box are four (4) spacers that are to be used at specific installation sites. Most new homes are retrofitted with plaster ring boxes (p-ring) that allow the TKP-7600 to be mounted flat and flushed to the wall without the user of spacers.
However, in some instances, the only boxes that are in the home are dual-gang boxes. In those situation spacers are REQUIRED in order to install the TKP-7600
Use the spacers as a buffer between the mounting ring and the dual-gang box, this can be done by using a screw to secure the mounting ring to the box.
With this the TKP-7600 can sit flush and flat on its mount without the risk of bending or breaking the dual-gang box.
TOTAL CONTROL
TKP-7600
OWNER'S MANUAL
Wall Mounting
Follow the steps below for installation:
- Assure the dual-gang opening is fitted with the standard two-gang retro-box (available at almost any electronic supplier).
- Mount the wall-plate to the two-gang retro-box.
- Connect the Ethernet cable to the rear of the supplied TKP-7600.
- The TKP-7600 easily snaps into the wall-plate. The keypad mount rotates to accommodate landscape or portrait viewing modes. The viewing mode is set from within the Accelerator software.
TKP-7600


natural_image
Pure technical diagram of a device casing with mounting holes and internal compartments (no text or symbols)Portrait

natural_image
Pure diagram of a rectangular frame with internal rectangular cutouts and mounting holes, no text or symbols present.Landscape
TOTAL CONTROL
TKP-7600
OWNER'S MANUAL
Main Menu Navigation
Although specific screen design and certain options are dictated by the integrator that programmed the Total Control system, the general layout remains the same.
Actual navigation is performed via screen swipes:
- Left Swipe: Swipe left to reveal additional Main Menu pages. The amount of pages available on the Main Menu is dictated the custom integrator.
- Right Swipe: Swipe right to reveal the Scenes Menu. The Scenes Menu contains URC Scenes that are created by the custom integrator. Return to the Main Menu by swiping left from the Scenes Menu.
- Button Tapping: On the Main Menu selecting each of these area provide the end-user with control:
A. Category/Device Ribbon: Select a Category button to reveal the associated sub-menu OR select a Device located here to access that devices menu. This is dictated by the custom integrator.
B. Rooms Menu: Select the Room Name to access the Room's Menu. This menu allows the end-user to control another room and more.
C. Volume Control: Tap the minus (Vol-) to lower the volume, plus (Vol+) to increase the volume, and Mute to mute the volume.
D. Shortcuts: Select this button to reveal the Shortcuts Popup menu. The end-user can add up to six (6) items on this menu.

E. Main: Select this to return to the Main Menu regardless of what page the device is currently on. This can be changed to return to the Scenes Menu, with the custom integrator to program the TKP-7600 this way.
F. Room Power Off: Select this button to turn off the current room.
G. Now Playing: Select the Now Playing button at the top to instantly jump that device/activity's menu pages.
TOTAL CONTROL
TKP-7600
OWNER'S MANUAL
Main Menu: View Modes
Total Control features two different view modes for the TKP-7600. Each view mode has its own unique properties that compliment the user experience.
The view mode must be programmed from within the Accele software, speak to a custom home integrator for more detail:
- Ribbon View: This is the default view mode and it contains up to six (6) items per page.
Ribbon View (Landscape & Portrait)


Grid View (Landscape & Portrait)

- Grid View: This view mode contains up to fifteen (15) items per page.
TOTAL CONTROL
TKP-7600 OWNER'S MANUAL
Title Bar
The Title Bar is always present regardless of what menu and/or room the TKP-7600 is currently using.
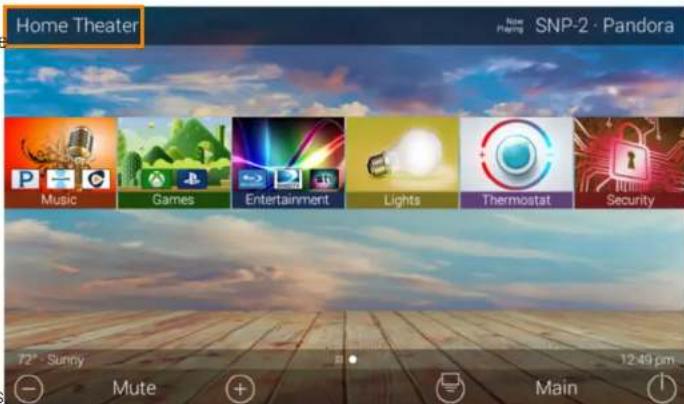
On the left of the Title Bar, the current room the TKP-7600 is controlling is displayed. Selecting it reveals the Rooms Menu.
At the right of the Title Bar is the Now Playing area. This displays which device/activity is currently active. Selecting it returns the interface to the device/activity's menu for control.
The Title Bar is located at the very top of the display. To access its menu, swipe down as depicted on the image to the right. There are three (3) selectable options here:
- Close: Select this to hide the Title Bar Menu.
- Weather Module: Select this to display the Time and Weather Module, this feature requires the home location. This location is set from within the Accelerator software.
-
Intercom: Select this button to display the Intercom Menu. This men displays all available Intercom-Enabled device (clients). Please see this documents Audio-Video Intercom section for more details.
-
Settings: Select this button to access the TKP-7600's Settings Menu. The various parts of the Settings Menu are explained in detail in a later section of this document.

TOTAL CONTROL
TKP-7600 OWNER'S MANUAL
Room's Menu
Tap on the Room Name located on the left in the Title Bar to display the Room's Menu.
The Room's Menu contains every room programmed into the system.
Specific rooms may be hidden from certain interfaces, speak to the custom home integrator for that option.
Each room is given a Room Name and customized image to represent that room. Additionally, the Room's Menu can be used for controlling volume, turning off the lights, or completely powering off a specific room.
Here are the selectable buttons in the Room's Menu:
- Volume Control: Select this button to reveal the Vol +, Vol -, and Mute icons. This button is available on any room with audio sources
- Lights Off Action Command: This button is programmed by the custom integrator and can be set to turn off all the lights in a particular room.
- Room Off: Select this button to turn off all the devices in that particular room. This button can only be used to turn off a room.
- Now Playing: This section displays what device/activity is currently active in that room. Selecting this jumps the TKP-7600 to that device activity's menu for control.
- Room Linking: This feature is only available on DMS Audio device. It is used to link DMS Zones/Areas. This means having one menu t controls volume for multiple zones simultaneously or individually.

TOTAL CONTROL
TKP-7600
OWNER'S MANUAL
Room Linking
Remember, Room Linking can only be used by DMS Zones/Areas. The fol steps take place from within the Room's Menu:
- Select the Room Link button, this displays the Room Linking Men
- Select which rooms in the system to link. Only rooms that are D Zones/Areas appear on the Room Linking Menu.
- Select the Check to confirm.
These rooms are now linked. It is possible to control volume on all of rooms from one menu (see below). Control the volume of each Linked Zone Area individually or simultaneously using the All Linked Rooms volume slide


TOTAL CONTROL
TKP-7600 OWNER'S MANUAL
Now Playing
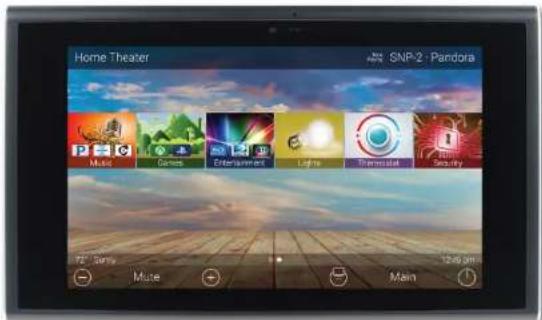
On the right hand side of the Title Bar is the Now Playing area. Playing area always dictates what activity is currently playing in th
In the example at the right, Now Playing reads "SNP-2 Pandora" means that in the Home Theater the SNP-2 is using Pandora curre
Tapping the Now Playing area jumps the TKP-7600 to the menu for the device in that section. In the example this mean that, once tapped, the interface jumps to the SNP-2 device menu for control.

TOTAL CONTROL
TKP-7600 OWNER'S MANUAL
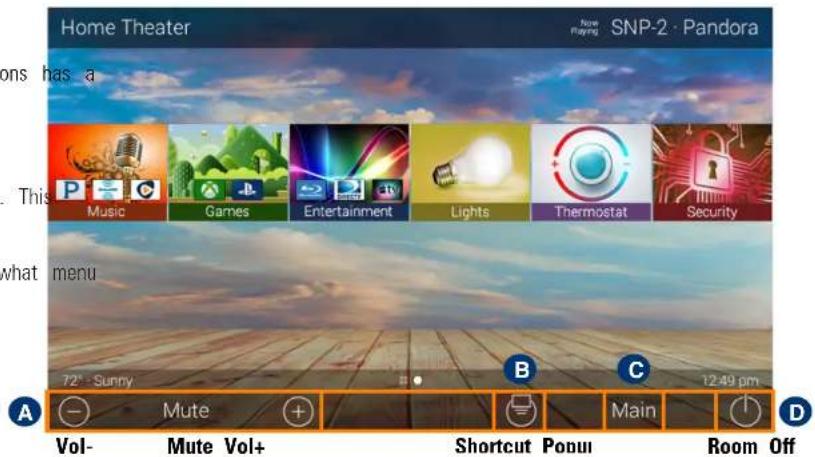
Core Buttons
These buttons are almost always on display. Each one of these buttons specific function:
A. Volume: Used to control an active audio device.
B. Shortcut Popup: Use this to display the Shortcut Popup Menu. This menu contains up to six (6) current room activities.
C. Main: Select this to return to the Main Menu regardless of what the interface is currently in use.
D. Room Off: Use this button to turn off the current room.
TOTAL CONTROL
TKP-7600 OWNER'S MANUAL
Shortcut Popup Menu
The Shortcut Popup Menu holds the end-user's favorite or most frequently used devices/activities and places them in one easy to access location.
Adding Shortcuts
Follow these steps to add a Shortcut:
- Locate an available button and hold it down until the status bar on the top of the display fills. As stated on the bottom of the interface "Press and Hold to Add or Remove". A list of device/activities for that room a presented in the Add a Shortcut Menu.
- Select a device/activity. This adds that item to the Shortcut Popup Menu.

TOTAL CONTROL
TKP-7600 OWNER'S MANUAL
Just tap on a Shortcut button to launch that device/activity. Remember, this menu can only hold up to six (6) items and each item must already be a device/activity programmed into that current room.
Removing Shortcuts
Follow these steps to remove a Shortcut:
- From the Shortcut Popup Menu, press and hold the Shortcut that needs to be deleted.
- Hold the button until the Remove a Shortcut window displays.
- Select Remove.

TOTAL CONTROL
TKP-7600 OWNER'S MANUAL
Status Bar
Located above the Core Buttons, this section of the interface is almost always on display. The Status Bar is designed to inform the end-user of various customization options:
A. Metadata Information: Located to the far left, options selected from the programming software cycle through here. Those selections are the following:
■ Room Linked Status: Whenever the chosen room/area is "linked" to other rooms, it is acknowledged in this sect
■ Room Alarm Clock Status: If the current room has an A that is set to activate, the status bar displays an alarm icon and the next scheduled time/day.
■ Vacation Mode Status: When Vacation Mode is activated, the Status Bar displays "Vacation Mode On". When inactive, the Status Bar displays "Vacation Mode Off".
■ Sunrise: Updated at midnight every day, displays the sunrise time for the next day.
■ Sunset: Updated at midnight every day, displays the sunset time for the next day.
■ RSS Weather Alert: Based on the location entered by the system programmer, the words "Weather Alert" appear if an automatic alert is received via internet.
■ DMS-AV Surround Mode Status: Displays the current sound mode of the DMS-AV Surround Processor.

TOTAL CONTROL
TKP-7600 OWNER'S MANUAL
B. Page Indicator: The icons here represent the current page number the interface is on. However, the icon located to left is the Scenes Menu icon. All icons to the right of represent page numbers.
C. Time: This is always present on the right hand side of the interface. It serves as a quick and convenient place for the end-user to check the time of day.

TOTAL CONTROL
TKP-7600
OWNER'S MANUAL
Intercom
The TKP-7600 has the capability of communicating across the home network to Intercom-Enabled client (interface).
There are three (3) different types of intercom calls that can be made:
- Audio-Video: This type of call uses the camera and microphone of the calling and receiving client to provide auditory and visual feedback.
- Audio Call: This type of call only uses the built in microphone of the and receiving client to create an audio call over the home network.
1

2

TOTAL CONTROL
TKP-7600 OWNER'S MANUAL
- Audio Broadcast Call: This type of call is audio communication between two or more clients. An ideal way to communicated ac multiple Intercom-Enabled interfaces in almost any home.

TOTAL CONTROL
TKP-7600 OWNER'S MANUAL
Navigating the Intercom Menu
As mentioned on page 6 of this document, accessing the Intercom button is performed by swiping down on the Title Bar.
After selecting the Intercom button from the Title Bar Menu, the Intercom displays. This menu presents the end-user with useful information:
- Door Station Integration: In the case where a 3rd party door station been integrated with the Total Control system, those device are located in the top of the Intercom Menu.
- System Clients: The Intercom Menu lists every Intercom-Enabled client the system. There are three (3) possible status modes for each clie


Available: The client is ready to receive any type of call.

Not Available/Busy: Signifies the client is unable to receive a

Do Not Disturb: Signifies the client is currently in Do Not Disturb mode.
TOTAL CONTROL
TKP-7600 OWNER'S MANUAL
Making Calls: Audio-Video
Remember that the Intercom feature must be enabled from with in the Set Menu. The following steps take place from the Intercom Menu, to access refer to page 6:
- Select an available client from the Intercom Menu.
After selecting a client, the three (3) call options are displayed. This almost always displayed after selecting an available client.
- Select Audio & Video Call.


TOTAL CONTROL
TKP-7600 OWNER'S MANUAL
Once the call is accepted, the TKP-7600 provides auditory and visual feedback on the screen.
Use the Volume Slider at the right of the video feedback to raise or slower the volume. Slide the indicator to the top for maximum volume or slide to the bottom to mute the audio.
To end an Audio & Video call, select the End Call button (see image at right). This immediately ends the call and returns the TKP-7600 to the Interco

TOTAL CONTROL
TKP-7600 OWNER'S MANUAL
Making Calls: Audio Calls
Remember that the Intercom feature must be enabled from with in the Set Menu. The following steps take place from the Intercom Menu, to access this menu refer to page 6:
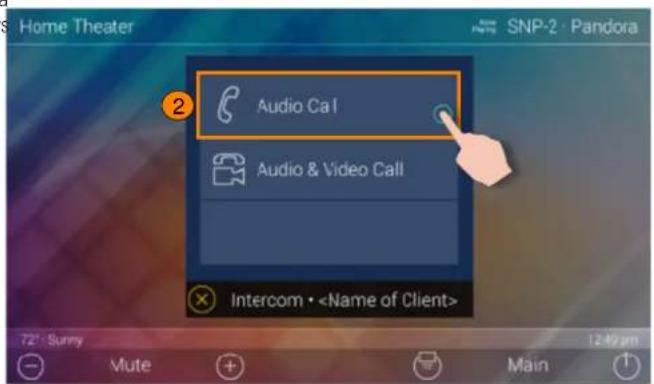
- Select an available client from the Intercom Menu. After selecting a client, the three (3) call options are displayed. This is almost always displayed after selecting an available client.
- Select Audio Call.

TOTAL CONTROL
TKP-7600 OWNER'S MANUAL
Once the call is accepted, the TKP-7600 provides two-way communication between clients via audio only.
Use the Volume Slider at the right of the call icon area to raise or slower the volume. Slide the indicator to the top for maximum volume or slide it the bottom to mute the audio.
To end an Audio Call, select the End Call button (see image at right). This immediately ends the call and returns the TKP-7600 to the Intercom M

TOTAL CONTROL
TKP-7600 OWNER'S MANUAL
Making Calls: Audio Broadcast
Remember that the Intercom feature must be enabled from with in the Settings Menu. The following steps take place from the Intercom Menu, to access this menu refer to page 6:
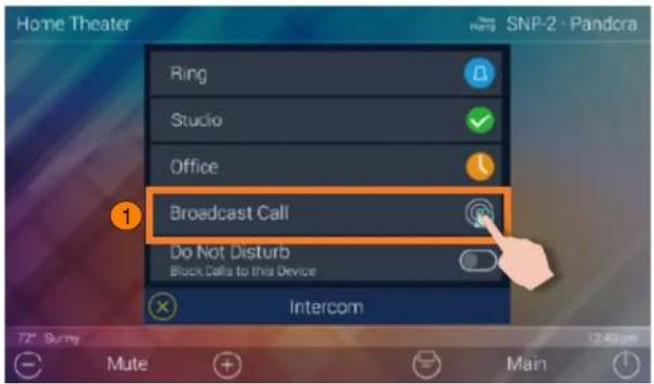
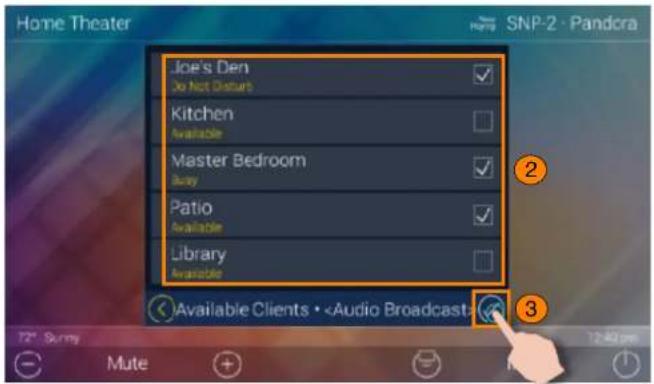
- Select Broadcast Call. A list populates of all available Intercom-Enabled devices.
- Check the boxes of the clients to include in the Audio Broadcast.
- Select the Confirmation button.
TOTAL CONTROL
TKP-7600 OWNER'S MANUAL
Once the call is established, all selected devices communicate via audi
Use the Volume Slider at the right of the call icon area to raise or slower the volume. Slide the indicator to the top for maximum volume or slide the bottom to mute the audio.
To end an Audio Call, select the End Call button (see image at right). This immediately ends the call and returns the TKP-7600 to the Intercom M

TOTAL CONTROL
TKP-7600 OWNER'S MANUAL
Do Not Disturb Mode
Enabling the Do Not Disturb feature sets the current TKP-7600 unavailable. This means that the keypad cannot receive any calls from other interfaces.
To enable this feature, use the slider located at the right of the text Do Not Disturb. These are the possible states:
Do Not Disturb: ON

Do Not Disturb: OFF

This button functions as a toggle. Select it once to enable and tap slider again to disable Do Not Disturb Mode.

TOTAL CONTROL
TKP-7600 OWNER'S MANUAL
Scenes Menu
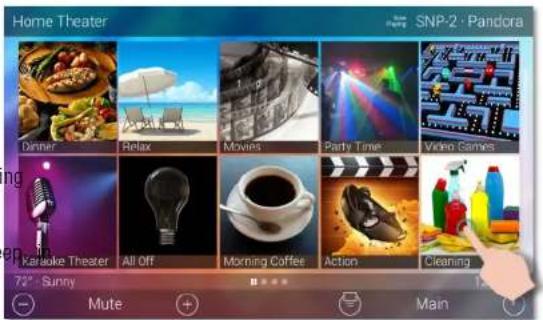
The Scenes Menu is dictated by the system programmer. Access this menu by swiping to the right from the Main Menu.
The Scenes Menu can contain up to a hundred (100) Scenes (buttons) per room. Keep mind that the Scene Menu is unique to each room.
Tap any button on the Scenes Menu to select a particular activity. Additionally the Scenes Menu can be set as the landing page when the Main button is selected.
Scenes can trigger any individual device or multiple devices to perform a particular activity. For example, selecting a Scene like Cleaning (see right), can turn off the television and turn on a music source.
Since each Scene must be programmer through the Accelerator software, be sure to speak with a custom home integrator for Scene idea and/or requests.

TOTAL CONTROL
TKP-7600 OWNER'S MANUAL
Settings Menu
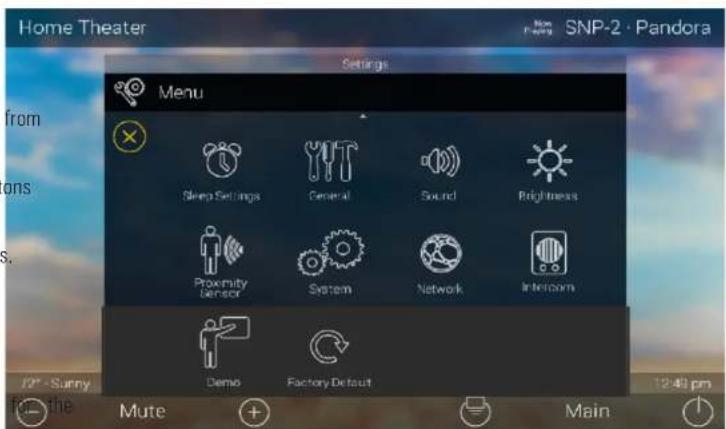
Access the Settings Menu by sliding the Title Bar and selecting the Settings button, refer to page 6 for more details.
Most settings do NOT require interaction with the end-user. Changing some settings could cause issues with the Total Control system, only do so when instructed by URC Technical Support.
These are the available options:
- Sleep Settings: Manage when the LCD screen turns OFF.
- General: Contains all the general settings for the TKP-7600. Allows from the adjustment of Date, Time, and Temperature Scale.
- Sound: Adjust the volume of the audio feedback when pressing buttons on the interface.
- Brightness: Allows for the adjustment of the LCD screen's brightness.
- Proximity Sensor: Allows for the adjustment of the proximity level.
- System: Provides general information such as memory used, current version, and version details.
• Network: Allows for the setting of a Dynamic or Static IP address TKP-7600 and also gives general info about the network. - Intercom: This is used to set up the Intercom of the TKP-7600.
- Demo: Used to create a simulation system that the TKP-7600 can use to show off interface features.
- Factory Reset: Allows the TKP-7600 to be reset to its factory state.
TOTAL CONTROL
TKP-7600 OWNER'S MANUAL
Sleep Settings
Below are the selectable choices available in this menu:
- LCD Screen is Always On: When selected, the TKP-7600's display never turns off.
- LCD Screen will Turn Off: When selected the Turn Off After section selectable. Choose from a 20 second, 30 second, or one (1) minute
-
LCD Screen will Display a Night Mode: When selected the Start A and Duration option become active.
-
Start After: The TKP-7600 times out based on the value entered here and goes into Night Mode.
- Turn Off After: The TKP-7600 turns off Night Mode after the value entered here.


TOTAL CONTROL
TKP-7600
OWNER'S MANUAL
General
Using the left and right arrow keys, enter the of each category:
- Date: The following can have its value changed:
• Month
• Day
• Year
- Time: The following can have its value changed:
• Hour
- Minutes
-Seconds
• AM/PM
• 12 Hour/24 Hour
-
Automatically Adjust Clock for Daylight Savings: Check this box to have the TKP-7600 automatically adjust for daylight savings.
-
Temperature Scale: Set this either to Fahrenheit or Celsius.


TOTAL CONTROL
TKP-7600 OWNER'S MANUAL
Sound
Press the minus (-) button to lower the TKP-7600's audio output or press the (+) button to increase the volume.
Additionally, dragging the slider to the right increase the audio output while dragging it to the left decreases it.
Brightness
Press the minus (-) button to lower the TKP-7600's display brightness or pre plus (+) button to increase the brightness.
e plus
Additionally, dragging the slider to the right increase the display brightness, dragging it to the left decreases it.
- Enable Light Sensor: The TKP-7600 is equipped with an ambient light sensor that can automatically adjust the display brightness. Check the box to enable this feature.


TOTAL CONTROL
TKP-7600 OWNER'S MANUAL
Proximity Sensor
Press the minus (-) button to lower the sensitivity on the TKP-7600's Proximity Sensor or press the plus (+) button to increase the sensitivity.
Additionally, dragging the slider to the right increases the sensitivity while dragging it to the left decreases it. The maximum distance of proximity sensor is about three (3) feet.
- Enable Proximity Sensor: By default this check box is enabled. Uncheck the box to disable the proximity sensor.

TOTAL CONTROL
TKP-7600 OWNER'S MANUAL
System Information
Although none of the information can be modified, These System Pages display important information about the TKP-7600.
These pages are only needed by a custom install professional or by URC Technical Support.


TOTAL CONTROL
TKP-7600
OWNER'S MANUAL
Network
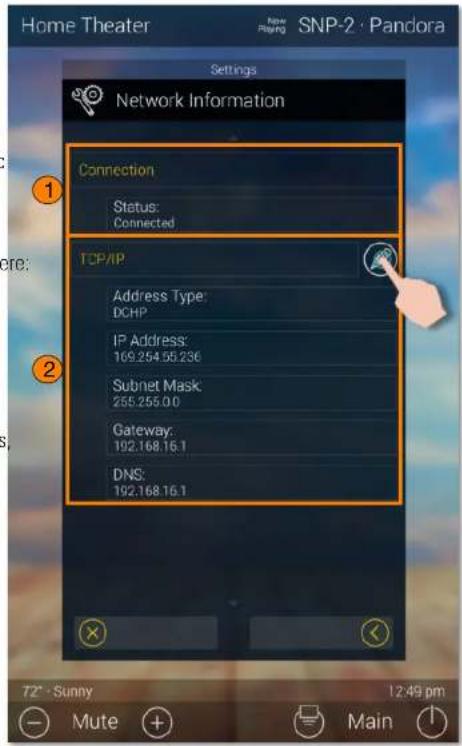
This option displays important information about the current network.
Caution, these settings should ONLY be changed by a professional. Entering values without specific instruction could easily result in the TKP-7600 failing to function correctly.
Here is the information that can be displayed here:
- Connection: Displays the status of the network connection, connected or not connected.
- TCP/IP: Displays information such as Address Type (DHCP or Static), IP Address, Subnet Mask, Gateway, and DNS.
Select the Edit button to reveal additional options.
- For DHCP: Select Obtain an IP Address Automatically.
- For Static: Select Use the Following Address. Fill out the required network settings.

TOTAL CONTROL
TKP-7600 OWNER'S MANUAL
Intercom
The Audio-Video Intercom Settings menu is the location where the Intercom features must be enabled. By default this feature is disabled, it must be in order for the TKP-7600 to communicate with other Intercom-Enabled device
- Enable Intercom: Enables the audio intercom function. Once enabled, the Intercom icon is displayed when dragging down the Title Bar as seen on_page 6.
- Set Intercom Name: The label entered here appears on the Intercom menu of Intercom-Enabled devices in the system.
- Enable Intercom Video: Enables the video intercom function.
- Receive Door Station Calls: If the system is integrating with a 3 party door station (DoorBird), this feature must be enabled for the TKP-7600 to receive door station calls.
- Set Intercom Notification Sound: Allows the user to select a different tone for intercom calls.

TOTAL CONTROL
TKP-7600 OWNER'S MANUAL
Factory Default
This should only be attempted by a custom install professional that is familiar with Total Control or under instruction from URC Technical Support.
Selecting this option resets the TKP-7600 to its factory state and does not until the device is reprogrammed by a custom install professional.
- Press and hold the Factory Reset button for over five (5) seconds.
- Select Yes.


TOTAL CONTROL
TKP-7600
OWNER'S MANUAL
Specifications
These are the technical specifications for the TKP-7600:
Microprocessor: Cortex-A9 Dual 1Ghz
Memory: 4GB eMMC, 1GB RAM
Devices: Supports up to 255 devices
Pages: Supports up to 255 pages on each device
Macro Capability: Up to 255 steps
Network: One 10/100/1000 Ethernet Port (PoE+)
LCD: 7 Inch (1280 x 800)
Weight: 10.51 oz
Size: 7.91" x 5.04" x 1.03"
Power: Standard PoE Injector or PoE Switch (purchased separately)
Limited Warranty Statement
https://www.urc-automation.com/legal/warranty-statement/
End User Agreement
The terms and conditions of the End User Agreement available at https://www.urc-automation.com/legal/end-user-agreement/ shall apply.
Federal Communication Commission Interference Statement
This equipment has been tested and found to comply with the limits for a Class digital device, pursuant to part 15 of the FCC Rules. These limits are designed to provide reasonable protection against harmful interference in a residential installation. This equipment generates, uses and can radiate radio frequency energy and, if not installed and used in accordance with the instructions, may cause harmful interfere to radio communications. However, there is no guarantee that interference will not occur in a particular installation. If this equipment does cause harmful interference radio or television reception, which can be determined by turning the equipment or and on, the user is encouraged to try to correct the interference by one more of following measures:
• Reorient or relocate the receiving antenna.
- Increase the separation between the equipment and receiver.
- Connect the equipment into an outlet on a circuit different from that to with the receiver is connected.
- Consult the dealer or an experienced radio/TV technician for help.
TOTAL CONTROL
TKP-7600
OWNER'S MANUAL

GUMI UNIVERSITY
EMC CENTER
Page: 1 / 23
TEST REPORT
Order Number
: GETEC-C1-18-214
Test Report Number
:GETEC-E2-18-033
Type of Equipment
: Network Keypod
Model Name
:TKP-7600
Applicant
This device has been verified to comply with the requirement of following regulation.
EN 55032(2012)
JN 51024 (2010) A1(2015)
ASINGS CBPR 32 (2013)
(No text)
This test report only contains the result of a specific sample supplied for the examination.
It is not a generally valid assessment of the features of the respective products of the mass-production.
This test report consists of 23 pages
It is not allowed to copy this report even partly without the approval of EMC center.
This test report should not be used to claim quality endorsement by KOLAS.
The test results in this report are traceable to the national or intentional standard.
Tested by:
SoonHoon
Soon Hoon Jeong / Senior Engineer GUMI UNIVERSITY EMC CENTER
Approved by

Hyong-Stop Kim / Technical Manager GUMI UNIVERSITY EMC CENTER
(ETEC-QP-28-005 (Rev.030

EMC CENTER
2.1.1 用友软件
GLAM UNIVERSITY
Warning!
The manufacturer is not responsible for any Radio or TV interference caused by unauthorized modifications to this equipment.
Changes or modifications not expressly approved by the manufacturer could void the user's authority to operate the equipment.
Regulatory Information to the User
- CE conformity Notice Products with "CE" marking comply EMC Directive 2014/30/EU issued by the commission of the European Community.
-
EMC Directive
-
Emission
- Immunity
Power
- Declaration of Conformity
"Hereby, Universal Remote Control Inc. declares that this TKP-7600 is in compliance with the Essential requirements."
- TKP-7600
- OWNER'S MANUAL
- TOTAL CONTROL
- Introducing the TKP-7600
- Online Support
- End-User Support
- Contact Support
- My Installer/Programmer
- Technical Support
- Table of Contents
- TKP-7600 OWNER'S MANUAL
- Features and Benefits
- Updated User Experience
- Audio-Video Interface
- Proximity Sensor
- Flexible Orientation
- Part List
- Installation
- Using the Spacers
- Wall Mounting
- Main Menu Navigation
- Main Menu: View Modes
- Title Bar
- Room's Menu
- Room Linking
- Now Playing
- Core Buttons
- Shortcut Popup Menu
- Adding Shortcuts
- Removing Shortcuts
- Status Bar
- Intercom
- Navigating the Intercom Menu
- Making Calls: Audio-Video
- Making Calls: Audio Calls
- Making Calls: Audio Broadcast
- Do Not Disturb Mode
- Scenes Menu
- Settings Menu
- Sleep Settings
- General
- Sound
- Brightness
- System Information
- Network
- Factory Default
- Specifications
- Limited Warranty Statement
- End User Agreement
- Federal Communication Commission Interference Statement
- TEST REPORT
- Warning!
- Regulatory Information to the User
Brand : URC
Model : Total Control TKP-7600
Category : Remote control