
EP1085 - Photocopier KONICA MINOLTA - Free user manual and instructions
Find the device manual for free EP1085 KONICA MINOLTA in PDF.

| Product type | Analog photocopier |
| Brand | Konica Minolta |
| Model | EP1085 |
| Max copy format | A3 |
| Copy speed | 15 copies/minute (A4) |
| Resolution | 400 x 400 dpi |
| Multiple copies | Up to 99 copies |
| Reduction / Enlargement | From 50% to 200% |
| Paper supply | 250-sheet cassette, 100-sheet multi-purpose tray |
| Paper format | A3, A4, A5, B4, B5, Letter, Legal |
| Paper weight | 60 to 90 g/m² |
| Power supply | 230 V, 50 Hz, 1.2 kW |
| Dimensions (W × D × H) | 580 × 530 × 450 mm |
| Weight | 55 kg |
| Noise level | Less than 60 dB (during operation) |
| Ozone emission | Negligible amount under normal use – ventilate the room well |
| Routine maintenance | Cleaning of the glass and cover, replacement of toner and drum |
| Consumables | Toner TN-110, drum DR-110 |
| Operating temperature | 10°C to 32.5°C |
| Relative humidity | 15% to 85% without condensation |
| Optional peripherals | Document feeder, sorter |
Frequently Asked Questions - EP1085 KONICA MINOLTA
User questions about EP1085 KONICA MINOLTA
0 question about this device. Answer the ones you know or ask your own.
Ask a new question about this device
Download the instructions for your Photocopier in PDF format for free! Find your manual EP1085 - KONICA MINOLTA and take your electronic device back in hand. On this page are published all the documents necessary for the use of your device. EP1085 by KONICA MINOLTA.
USER MANUAL EP1085 KONICA MINOLTA
Using the Copier Properly. X-1
What is an Energy Star Copier? X-3
EP1085 X-4
CE Marking (Declaration of Conformity) X-4
Terms and Symbols for the Type of Originals and Copy Paper..... X-5
Feeding Direction (copy paper path) X-5
"Width" and "Length" X-5
Terms and Symbols Used. X-6
1 Safety Notes
1.1 Installing the Copier 1-1
Installation Site. 1-1
Power Source. 1-1
Grounding 1-2
Space Requirements. 1-3
1.2 Precautions for Use 1-4
Operating Environment 1-4
Using the Copier Properly 1-4
Care of Copier Supplies 1-5
Moving. 1-5
Legal Restrictions on Copying 1-6
Financial Instruments 1-6
Legal Documents 1-6
General 1-6
2 Getting to Know Your Copier
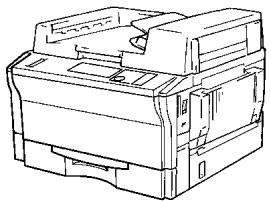
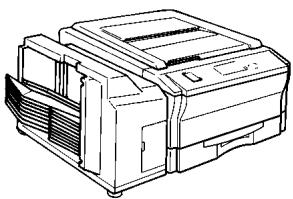
2.1 System Overview 2-1
Automatic Document Feeder AF-5
10-Bin Sorter S-106
Multi Bypass Tray MB-4
EP1085 2-1
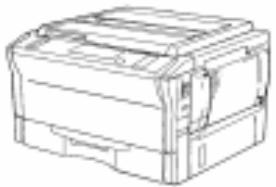
2.2 Copier Parts and Accessories 2-2
Outside Copier 2-2
Inside Copier 2-3
Automatic Document Feeder AF-5. 2-5
10-Bin Sorter S-106 2-6
Multi Bypass Tray MB-4 2-6
2.3 Control Panel Keys and Indicators 2-7
Control Panel. 2-7
Display 2-9
Monitor Display. 2-9
Paper Information Display 2-10
Zoom Ratio Indicator / Multi-Copy Display 2-10
Exposure Information Display 2-11
2.4 Turning ON and OFF, and Resetting the Copier 2-12
Turning ON and OFF 2-12
When the Copier is Turned ON 2-12
Auto Copy Start Function
(Only when Automatic Document Feeder is used) 2-13
Using the Function 2-13
Minimizing the Warm-up Time 2-14
Initial Mode and Panel Resetting. 2-15
Auto Reset Function 2-16
3 Making Copies
3.1 Copying Overview 3-1
3.2 Copying Procedure 3-4
Placing Originals 3-4
Sheet Originals (Standard Size) 3-4
Highly Transparent Originals 3-4
Book Original 3-5
Using the Automatic Document Feeder 3-6
Loading Standard Size Originals 3-7
For Originals Not Suitable for Reliable Operation of the Automatic
Document Feeder 3-8
Single Automatic Document Feeding Mode (SADF Mode) 3-9
Checking the Copy Paper Size and Selecting the Paper Source. 3-10
Selecting the Paper Source
(Only when the Multi Bypass Tray is used) 3-10
3.3 Zoom Ratio 3-11
Fixed Zoom Ratios 3-11
Zoom Ratios 3-11
Selecting the Fixed Zoom Ratios 3-12
Setting a Zoom Ratio 3-13
Auto Size Mode 3-14
Selecting the Auto Size Mode 3-14
3.4 Image Density 3-15
Types of Exposure Modes 3-15
Selecting the Auto Exposure Mode 3-16
Selecting the Manual Exposure Mode 3-16
Selecting the Photo Mode 3-16
3.5 Book Copying 3-17
Selecting the Book Copying Mode 3-17
3.6 Finishing Mode 3-19
Types of Finishing Modes 3-19
Selecting the Finishing Mode 3-20
Auto Dual Function. 3-21
Auto Dual Function in the Sort Mode 3-21
3.7 Manual Bypass Copying 3-22
Using the Manual Bypass Tray 3-23
Using the Multi Bypass Tray (Option) 3-23
4 Auxiliary Functions
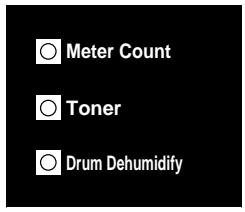
4.1 Checking the Total Number of Copies Mode 4-1
Types of Counters. 4-1
Counter Display. 4-1
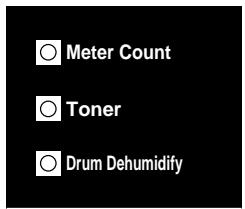
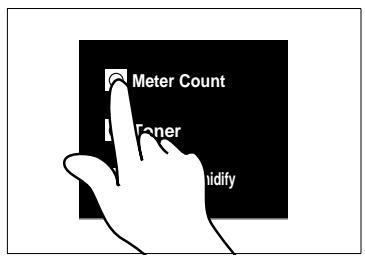
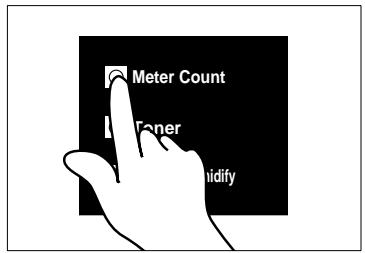
Using the Meter Count Function 4-2
4.2 Toner Replenisher Function (Increasing the Image Density)4-3
4.3 Drum Dehumidifier Function 4-4
4.4 User's Choice 4-6
Functions Available in User's Choice. 4-6
Description of Each User's Choice Function. 4-6
Making the User's Choice Mode Settings 4-12
5 When an Indicator Lights Up
5.1 Quick Reference for Indicator Lights.. 5-1
Warning Indicators 5-1
5.2 Detailed Instructions for Indicator Lights.. 5-2
Add Toner Indicator. 5-2
Replacing the Toner Bottle. 5-2
Add Paper Indicator 5-4
Adding Paper (Drawer) 5-4
Adding Paper (Multi Bypass Tray) 5-5
Closure Failure Indicator 5-6
Misfeed Indicator. 5-7
Misfeed Indicator and Monitor Display. 5-7
Misfeed Clearing Procedure. 5-8
Automatic Document Feeder 5-12
Sorter 5-14
Call-Tech.-Rep. Indicator 5-15
Resetting the Call-Tech.-Rep. Indicator 5-15
I.U. Service Life Indicator Lights Up 5-16
Precautions for Handling 5-17
Removing the I. U. from the copier 5-18
Unpacking the I. U. 5-19
Setting up the I. U. 5-19
Charging the Copier with Starter and Toner 5-21
6 Troubleshooting
6.1 When this Type of Copy is Produced 6-1
6.2 The Copier is not functioning as designed 6-3
7 Specifications
Copier EP1085 7-1
Automatic Document Feeder AF-5 7-2
10 Bin Sorter S-106 7-3
Multi Bypass Tray MB-4 7-3
8 Miscellaneous
8.1 Care of the Copier 8-1
Daily Checks. 8-1
Power Cord, Communications Cable, Ground Cable 8-1
Original Glass 8-1
Original Cover, Automatic Document Feeder 8-1
Copy Paper 8-2
Sound of Copier Operation 8-2
Copier Housing Temperature 8-2
Cleaning 8-2
Housing 8-2
Original Pad 8-2
Original Glass 8-3
Control Panel. 8-3
Front Door 8-3
Corona Units. 8-4
Document Transport Belt. 8-5
8.2 Paper Size and Zoom Ratio Table 8-6
Paper Size 8-6
Zoom Ratio Table (Original Size to Copy Paper Size) 8-7
Using the Copier Properly
To ensure the optimum performance of the copier, follow the precautions listed below.
- Never place a heavy object on the copier.
- Never subject the copier to shocks.
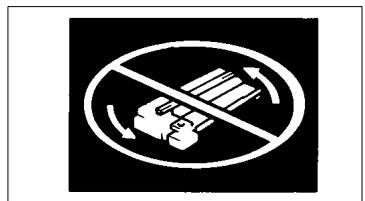
- Never open doors or turn the copier off while he is making copies.
- Never bring any magnetized object near the copier.
- Never use flammable sprays, liquids or gases near the copier.
- Never modify the copier, as a fire or electrical shock could result.
- Never remove any panel or cover which is secured. The copier contains high voltage components which can cause electrical shock.
- Never tamper with the laser mechanism in laser-equipped models, as blindness or other injury may result.
- Never drop paper clips, staples or other small pieces of metal through the vents or other openings in the copier, as a fire or electrical shock can result.
- Never place containers of liquid on the copier. If liquids get inside the copier, they can cause fire or electrical shock. If a piece of metal or any liquid gets inside the copier, immediately turn the copier off, unplug the power cord and call your technical representative. A fire or electrical shock can result if the copier remains plugged in or is operated after metal or liquid gets inside.
- Never leave the copier running if it becomes unusually hot, or if smoke or an unusual odor or noise is detected. Should any of these conditions occur, immediately turn the copier off, unplug the power cord and call your technical representative. A fire or electrical shock can result if the copier remains plugged in under any of these conditions.
Always insert the power plug all the way into the outlet. - Always make sure that the outlet is visible, clear of the copier or copier cabinet.
Always provide good ventilation when making a large number of continuous copies. - Never pull on the power cord, and always hold the plug when unplugging the power cord. A damaged cord could result in a fire or cause an electrical shock.
- Never unplug the power cord with a wet hand, as it could cause an electrical shock.
-
Always unplug the power cord before moving the copier. Moving the copier with the power cord plugged in can damage the cord resulting in a fire or causing an electrical shock.
-
Always unplug the power cord when the copier is not going to be used for a long time.
- Never place a heavy object on the power cord, or pull or bend it, as a fire or electrical shock can result.
- Always ensure that the copier does not sit on or move onto the power cord or communications cable of other electrical equipment, as malfunctioning equipment or a fire could result.
- Always ensure that the power cord or communications cable of other electrical equipment does not become wedged into the copier mechanism, as malfunctioning equipment or a fire could result.
- Always use the correct power voltage, as improper voltage can cause a fire or electrical shock.
- Never use a multiple outlet adapter, as a fire or electrical shock can result.
- Should the power cord become damaged, immediately turn the copier off, unplug the power cord and call your technical representative. A damaged cord can result in a fire or cause an electric shock.
- If an extension cord is needed, use one with a greater rated capacity than the maximum power requirements of the copier. The use of an extension cord that falls short of supporting the maximum power requirements can result in overheating or a fire
- Always unplug the copier whenever anything unusual is observed during operation. Make sure that the outlet is nearby and clear of the copier and furniture.

NOTE
Locate the Copier in a Well Ventilated Room
A negligible amount of ozone is generated during normal operation of this copier. An unpleasant odor may, however, be created in poorly ventilated rooms during extensive copier operations. For a comfortable, healthy and safe operating environment, it is recommended that the room be well ventilated.
As an ENERGY STAR® Partner, we have determined that this copier meets the ENERGY STAR® Guidelines for energy efficiency.

What is an Energy Star Copier?
Energy Star Copiers have a feature that allows them to automatically turn off or "go to sleep" after a period of inactivity, ensuring night and weekend shut off. This auto-feature can reduce a copier's annual electricity costs by over 60 percent. In addition, high speed copiers will be set to automatically make double sided copies. An organization's paper costs can be reduced and the volume of paper sent into the waste stream will decline. It takes 10 times more energy to produce a piece of paper than it does to make a single copy on a copier. Therefore, using less paper also means decreased national energy consumption.
EP1085
Thank you for choosing Minolta.
This operator's manual explains how to operate the copier and replenish its supplies. It also gives some troubleshooting tips as well as general precautions to be observed when operating the copier.
To ensure the best performance and effective use of your copier, read this manual carefully until you familiarize yourself thoroughly with its operation and features. After you have read through the manual, keep it for ready reference.
Please use this manual as a quick and handy reference tool for immediately clarifying any questions which may arise.
CE Marking (Declaration of Conformity)
We declare under our sole responsibility that this copier and options to which this declaration relates is in conformity with the specifications below. This declaration is valid for the area of the European Union (EU) only.
| Product Type | Copying Machine | |
| Product Name | EP1085 | |
| Options | AF-5, S-106, MB-4, Mount kit F | |
| Standards | Safety*2: | EN 60 950 / 1992 (A1 : 1993, A2 : 1993, A3 : 1995, A4 : 1996) (Safety of information technology equipment, including electrical business equipment) |
| EMC*1: | EN55 022 Class B:1994 (A1:1995) (Limits and method for measurement of radio disturbance characteristics of information technology equipment (ITE)) EN 50 082-1 / 1992 (Electromagnetic compatibility-Generic immunity standard Part1 : Residential, commercial and light industry) IEC 801-2 / 1991 (Electrostatic discharge requirement) IEC 801-3 / 1984 (Radiated electromagnetic field requirement) IEC 801-4 / 1988 (Electrical fast transient / burst requirement) | |
| Notes: | *1) EMC performance : This product was designed for operation in a typical office environment *2)First year of labelling according to EC-directive 73/23 / EEC and 93 / 68 / EEC : 98 | |
| EC Directives | Safety: | 73 / 23 / EEC and 93 / 68 / EEC |
| BMC: | 89 / 336 / EEC and 93 / 68 / EEC | |
Terms and Symbols for the Type of Originals and Copy Paper
A few special terms and symbols are used in this manual to designate types of originals and copy paper. This page explains about these terms and symbols.
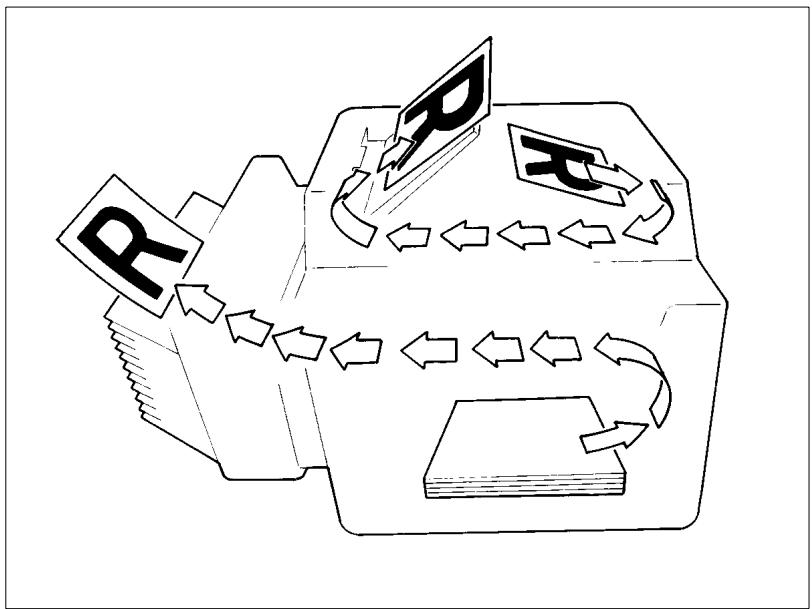
Feeding Direction (copy paper path)
In this copier system, copy paper is taken up from the right-hand side of the copier and fed through the copier toward the left-hand side, face up onto the Copy Tray. In the figure below, the direction in which the copy paper is fed, as indicated by the arrow, is called the "feeding direction."
"Width" and "Length"
When we talk about the size of the original or copy, we call side A "width" and side B "length."
A:Width
B:Length
Terms and Symbols Used
Lengthwise
When the original or copy has a "length" longer than its "width," we call it "lengthwise" and use symbol "L" or "□".
Crosswise
When the original or copy has a "length" shorter than its "width," we call it "crosswise" and use symbol "C" or "□"
1 Safety Notes
1.1 Installing the Copier
Installation Site
To ensure utmost safety and prevent possible malfunctions of the copier, install it in a location which meets the following requirements.
- A place away from a curtain or the like that may catch fire and burn easily.
- An area where there is no possibility of being splashed with water or other types of liquid.
An area free from direct sunlight. - A place out of the direct air stream of an air conditioner, heater, or ventilator.
A well-ventilated place.
A dry place. - A dust-free location.
An area not subject to undue vibration.
A stable and level location.
Power Source
The power source voltage requirements are as follows.
- Use a power source with little voltage fluctuation.
Voltage Fluctuation: Within ±10%
Frequency Fluctuation:50/60 Hz Within ±0.3% - If any other electrical equipment is sourced from the same power outlet, make sure that the capacity of the outlet is not exceeded.
- The outlet should be located near the copier and easily accessible.
- Never connect by means of a multiple socket any other appliances or machines to the outlet being used for the copier.
- If an extension cord is needed, use one with a capacity more than the power consumption of the copier.
- Make sure that no unusual, excessive force is being applied to the power cord or extension cord.
Grounding
To prevent receiving electrical shocks in the case of electrical leakage, always ground the copier.
Connect the grounding wire to:
- The ground terminal of the outlet.
- A grounding contact which complies with the local electrical standards.

NOTE
Never connect the grounding wire to a gas pipe, a grounding wire for a telephone or a water pipe.
Space Requirements
To ensure easy copier operation, supply replacement and service maintenance, adhere to the recommended space requirements detailed below.

NOTE
Be sure to allow a clearance of 150mm . or more at the back of the copier as there is a ventilation duct.
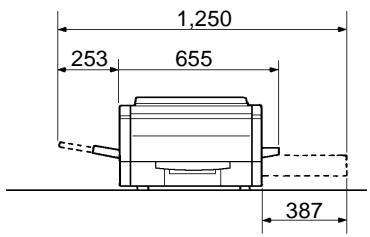
Copier
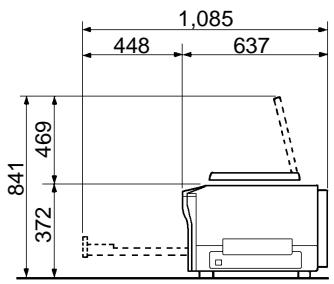
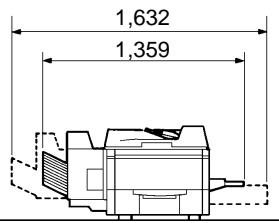
Copier + Option
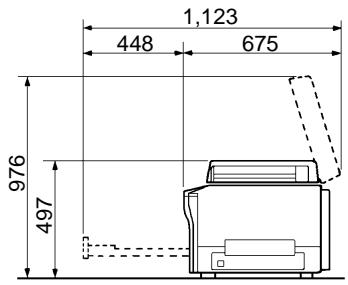
Scale: mm
1.2 Precautions for Use
Operating Environment
The operating environmental requirements of the copier are as follows.
Temperature: 10^ to 30^ (50°F to 86°F) with a fluctuation of 10^ (50°F) per hour
Humidity: 15% to 85% with a fluctuation of 20% per hour
Using the Copier Properly
To ensure the optimum performance of the copier, follow the precautions listed below.
- NEVER place a heavy object on the copier or subject the copier to shocks.
- NEVER open any doors, or turn OFF the copier while the copier is making copies.
- NEVER bring any magnetized object or use flammable sprays near the copier.
- NEVER place a vase or vessel containing water on the copier.
- NEVER drop paper clips, staples, or other small pieces of metal into the copier.
- NEVER attempt to remove any Cover that is secured.
- NEVER remodel the copier, as a fire or electrical shock could result.
- ALWAYS insert the power plug all the way into the outlet.
- ALWAYS make sure that the outlet is visible, clear of the copier or copier cabinet.
- ALWAYS ensure that the copier does not ride on the power cord or communications cable of other electrical equipment, and it does not get such a cord or cable wedged into its own mechanism.
- NEVER leave damage or cracks evident on the copier power cord unattended. If you find any of these conditions, immediately shut down the copier, unplug the power cord, and call your Technical Representative for appropriate action.
- ALWAYS provide good ventilation when making a large number of continuous copies.
- NEVER keep the copier running when it becomes inordinately hot or produces abnormal noise. If that happens, immediately turn OFF the copier, unplug it, and then call your Technical Representative.

NOTE
Locate the Copier in a Well Ventilated Room
A negligible amount of ozone is generated during normal operation of this copier. An unpleasant odor may, however, be created in poorly ventilated rooms during extensive copier operations. For a comfortable, healthy, and safe operating environment, it is recommended that the room be well ventilated.
Care of Copier Supplies
Use the following precautions when handling the copier supplies (toner, paper, etc.).
- Store the paper, toner, and other supplies in a place free from direct sunlight and away from any heating apparatus. Keep them in a dry, clean environment.
- Store paper, which has been removed from its wrapper but not loaded into the drawer, in a sealed plastic bag in a cool, dark place.
- Use the correct toner for the exclusive use by the copier. The applicable copier model name is indicated on the Toner Bottle.
- Keep supplies out of the reach of children.
- If your hands become soiled with toner, wash them with soap and water immediately.
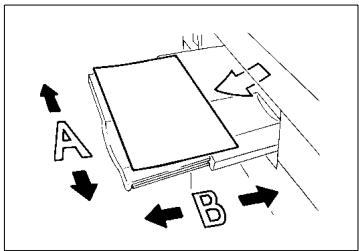
Moving
If you need to transport the copier over a long distance, consult your Technical Representative.
Legal Restrictions on Copying
Certain types of documents must never be copied by the copier for the purpose or with the intent to pass copies of such documents off as the original. The following is not a complete list but is meant to be used as a guide to responsible copying.
Financial Instruments
- Personal Checks
Travelers Checks
Money Orders
Certificates of Deposit - Bonds or other Certificates of Indebtedness
Stock Certificates
Legal Documents
Food Stamps
Postage Stamps (canceled or uncanceled)
- Checks or Drafts drawn by Government Agencies
- Internal Revenue Stamps (canceled or uncanceled)
Passports
- Immigration Papers
- Motor Vehicle Licenses and Titles
House and Property Titles and Deeds
General
- Identification Cards, Badges, or Insignias
Copyrighted Works without permission of the copyright owner
In addition, it is prohibited under any circumstances to copy domestic or foreign currencies or Works of Art without permission of the copyright owner.
When in doubt about the nature of a document, consult with legal counsel.
2 Getting to Know Your Copier
2.1 System Overview
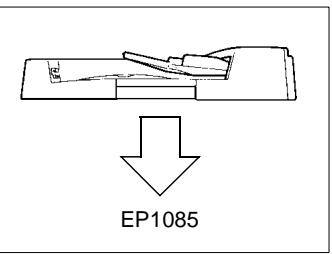
Automatic Document Feeder AF-5
Permits automatic feeding of multiple originals, see page 3-6.
10-Bin Sorter S-106
Permits sorting copies into up to 10 copy sets or stacks, see page 3-19.
Multi Bypass Tray MB-4
Holds up to 50 sheets of standard paper which is not loaded in any of the Drawers, allowing to make copies on them, see page 3-23.
EP1085
The Paper Drawer can hold up to 250 sheets of copy paper (80g / m^2) . The Manual Bypass Tray allows you to make a copy on paper which is not loaded in the Printer and which is fed into the copier manually via this Tray.
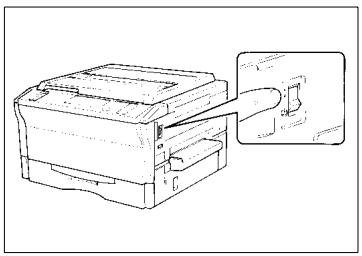
2.2 Copier Parts and Accessories
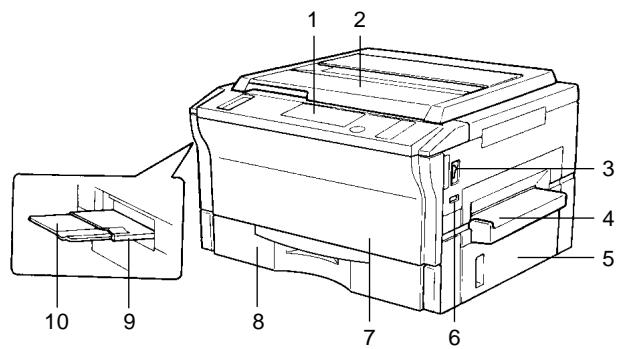
Outside Copier
| Pcs. | Specification | Description |
| 1 | Control Panel | Use to start a copy cycle or to make copying-job settings, see page 2-7. |
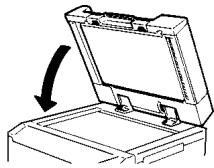
| 2 | Original Cover | Holds the original placed on the Original Glass in position. To place an original, raise the Cover and place it in position on the Original Glass, see page 3-4 |
| 3 | Power Switch | Use to turn the copier ON and OFF, see page 2-12. |
| 4 | Manual Bypass Tray | Use for manual feeding of paper into the copier, see page 3-22. |
| 5 | Right Door | Open to clear a paper misfeed, see page 5-8. |
| 6 | Total Counter | Shows the total number of copies made so far. |
| 7 | Front Door | Open to: • Replace the Toner Bottle, see page 5-2. • Clear a paper misfeed, see page 5-8. • Clean the Corona Units, see page 8-4. Closing the Front Door after a misfeed has been cleared will turn the Misfeed Indicator on the control panel OFF. |
| 8 | Paper Printer | Holds up to 250 sheets of paper. The Edge Guide and Trailing Edge Stop are movable, allowing you to load paper of different sizes, see page 5-4. |
| 9 | Exit Tray | Holds copies fed out of the copier. |
| 10 | Copy Tray Extender | Slide this out when making copies on large-size paper. |
Inside Copier
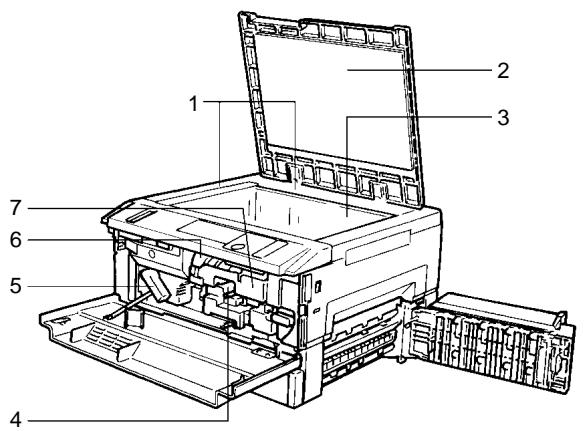
| Pcs. | Specification | Description |
| 1 | Original Width/Length Scale | Place the original along these Scales for correct positioning, see page 3-4. |
| 2 | Original Pad | Holds the original in position on the Original Glass. |
| 3 | Original Glass | Place the original face down on this Glass, see page 3-4. |
| 4 | Corona Unit Cleaning Lever (Upper/Lower) | Operate the Lever to clean the corresponding Corona Unit if unwanted lines are produced on the copy, see page 8-4. |
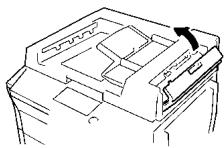
| 5 | Lock Release Lever | Turn counterclockwise to swing up the Upper Half of the copier to clear a paper misfeed, see page 5-8. |
| 6 | Toner Bottle | Contains toner. Replace it with a new one when the Add Toner Indicator lights up, see page 5-2. |
| 7 | Toner Bottle Holder | Swing open to replace the Toner Bottle, see page 5-2. |
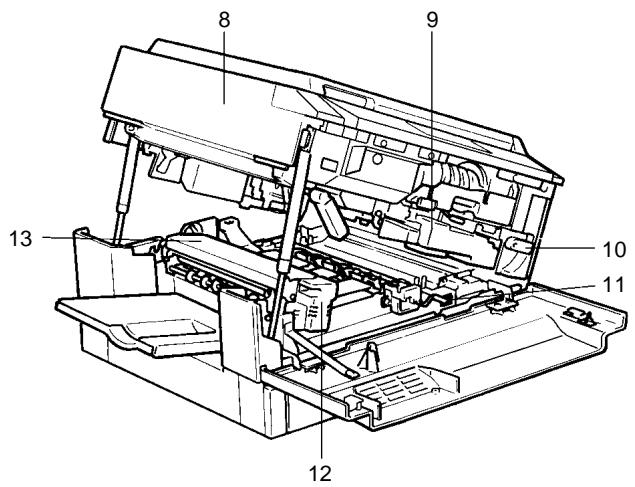
| Pcs. | Specification | Description |
| 8 | Upper Half of Copier | The copier main body can be divided into two parts, the upper and lower. The Upper Half can be swung upward, see page 5-8. |
| 9 | Imaging Unit | Converts the original image to the copy image. |
| 10 | Imaging Unit Lock Release Lever | Operate when replacing the Imaging Unit, see page 5-18. |
| 11 | Dehumidifier Switch | Turn ON to prevent condensation from forming on the PC Drum when power is turned OFF. (For Technical Representative only) |
| 12 | Fusing Unit Handle | Hold onto this Handle when lifting the Upper Half of the Fusing Unit, see page 5-8. |
| 13 | Fusing Unit | Fuses the toner image onto the paper. |
Automatic Document Feeder AF-5
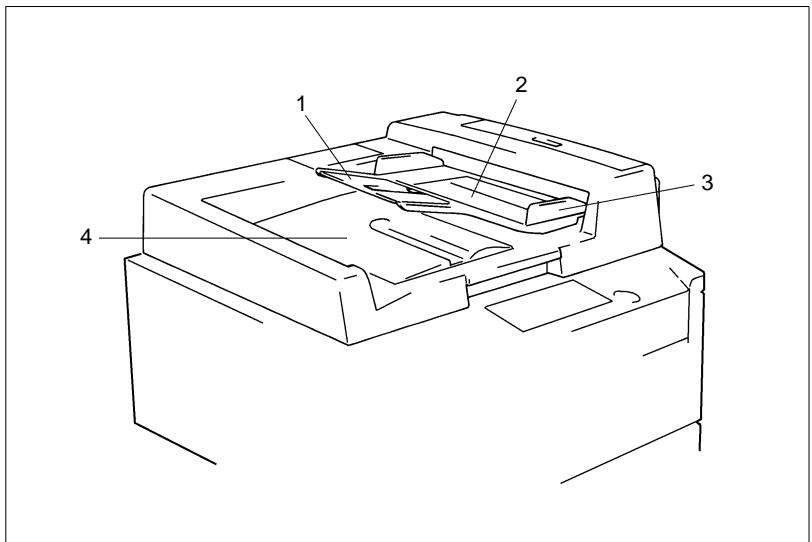
| Pcs. | Specification | Description |
| 1 | Document Feed Tray Extender | Pull out when loading large-size originals, see page 3-7. |
| 2 | Document Feed Tray | Load the originals face up on this tray, see page 3-7. |
| 3 | Document Guide Plate | Slide the plate as necessary to the size of the originals, see page 3-7. |
| 4 | Document Exit Tray | Receives originals that are automatically ejected from the Automatic Document Feeder. |
10-Bin Sorter S-106
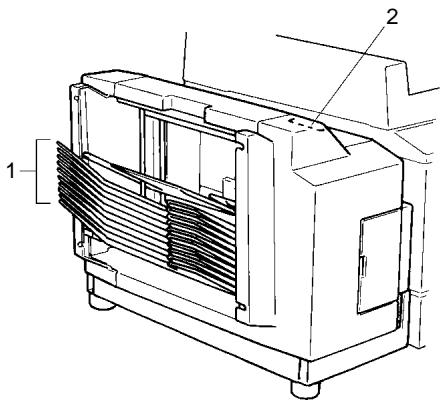
| Pcs. | Specification | Description |
| 1 | Sorter Bins | Hold sorted copies. |
| 2 | Lock Release Lever | Press to unlock the Sorter, see page 5-14. |
Multi Bypass Tray MB-4
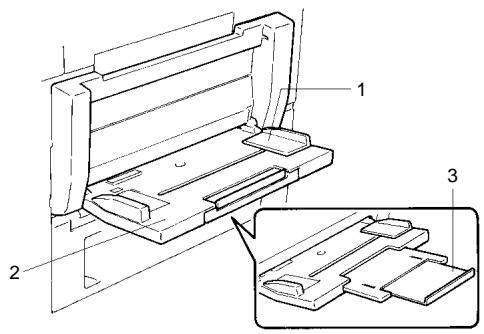
| Pcs. | Specification | Description |
| 1 | Paper Guide Plate | Slide as necessary to the size of the copy paper, see page 3-23. |
| 2 | Multi Bypass Tray | Load your paper on this Tray. It allows you to make copies continuously on paper fed from this Tray, see page 3-23. |
| 3 | Multi Bypass Tray Extender | Slide this out to use large-size copy paper, see page 3-23. |
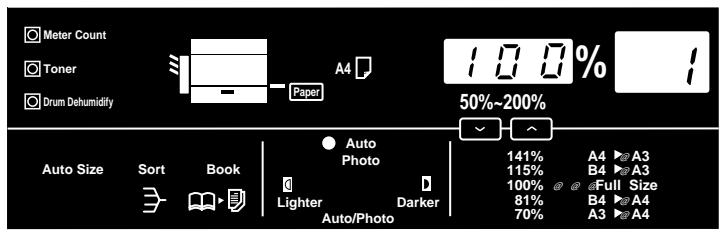
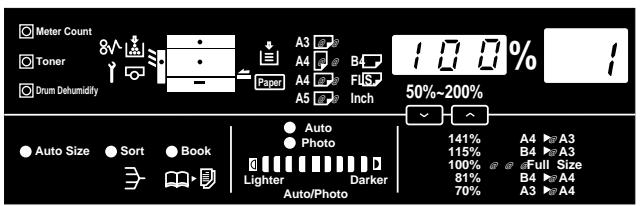
2.3 Control Panel Keys and Indicators
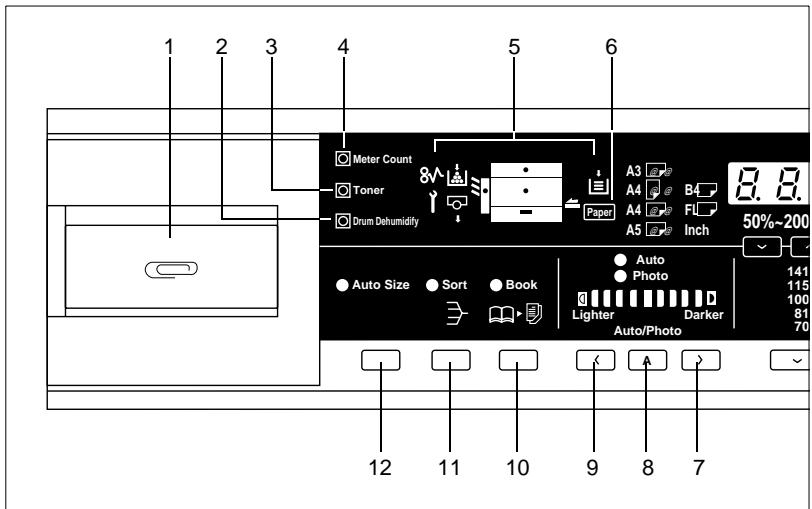
Control Panel
| Pcs. | Specification | Description |
| 1 | Clip Tray | Use this tray to put the paper clips used with the documents. |
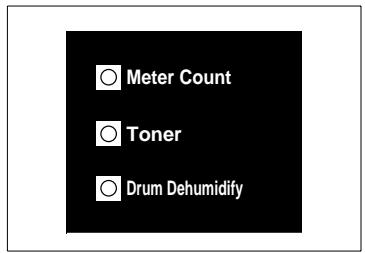
| 2 | Drum Dehumidify Key | Press to remove condensation formed on the surface of the PC Drum, see page 4-4. |
| 3 | Auxiliary Toner Replenishing Key | Press when the image on the copy becomes too light, see page 4-3. |
| 4 | Meter Count Key | Press to check for the current counts of four electronic counters of the copier, see page 4-2. |
| 5 | Display | See the other pages in this manual, see page 2-9. |
| 6 | Paper Select Key | Press to select the paper source, Printer or Multi Bypass Tray (option), when the Multi Bypass Tray is mounted to the copier, see page 3-10. |
| 7 | Exposure Control Key (⊗,Darker) | Press as necessary to make the exposure level higher in the Manual Exposure Mode, see page 3-16. |
| 8 | Auto Exposure Mode Key | Press to select the Auto Exposure, Manual Exposure or Photo Mode, see page 3-16. |
| 9 | Exposure Control Key (⊗,Lighter) | Press as necessary to make the exposure level lower in the Manual Exposure Mode, see page 3-16. |
| 10 | Book Key | Press as necessary to select the Book Copying Mode, see page 3-17. |
| 11 | Finishing Mode Select Key | Press as necessary to select the Sort or Non-Sort Mode, when the sorter(option) ismounted to the copier, see page 3-20. |
| 12 | Auto Size Mode Key | Feeder(option) is mounted to the copier, see page 3-14. |
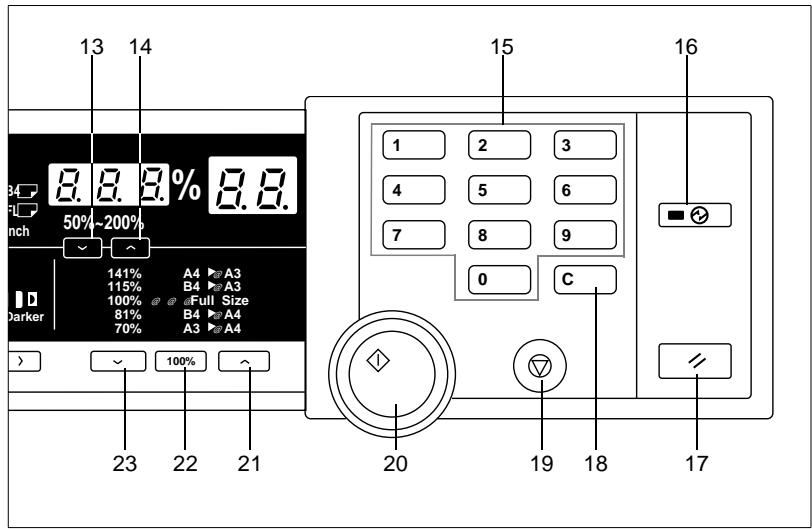
| Pcs. | Specification | Description |
| 13 | Zoom Down Key | Press as necessary to make the zoom smaller in 1% increments, see page 3-13. |
| 14 | Zoom Up Key | Press as necessary to make the zoom larger in 1% increments, see page 3-13. |
| 15 | Key Pad | Use to enter the number of copies to be made and other numeric data. |
| 16 | Energy Saver Key | Press to set the copier into the Energy Saver Mode, see page 2-14. |
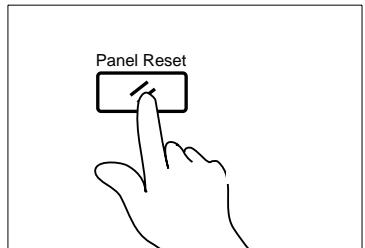
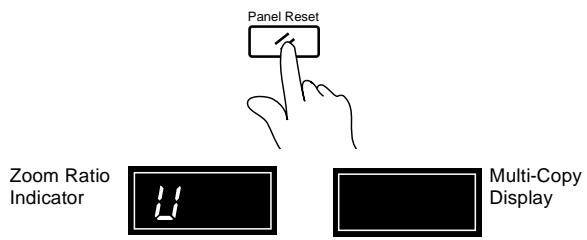
| 17 | Panel Reset Key | Press to set the copier into the initial mode, clearing all settings made previously on the control panel, see page 2-15. • Holding down the Key for 3 seconds will initiate the User's Choice, see page 4-12. |
| 18 | Clear Key | Press to clear the number of copies, zoom and other settings. |
| 19 | Stop Key | Press to stop a multi-copy cycle. |
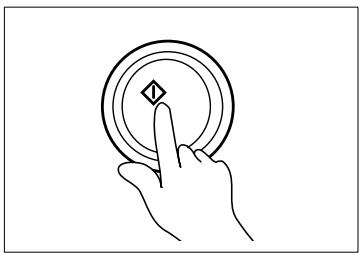
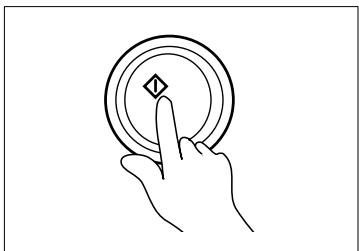
| 20 | Start Key | Press to start a copy cycle. |
| 21 | Enlargement Key | Press to select a desired fixed enlargement ratio, see page 3-12. |
| 22 | Full Size Key | Press to select full size (100%), see page 3-12. |
| 23 | Reduction Key | Press to select a desired fixed reduction ratio, see page 3-12. |
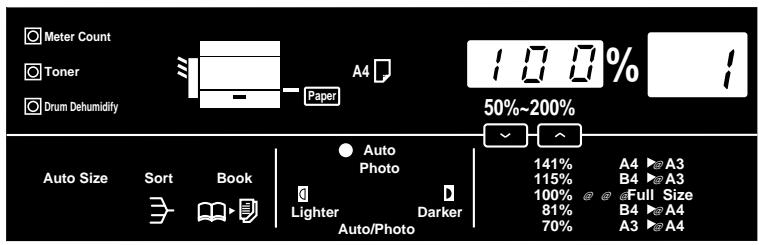
Display
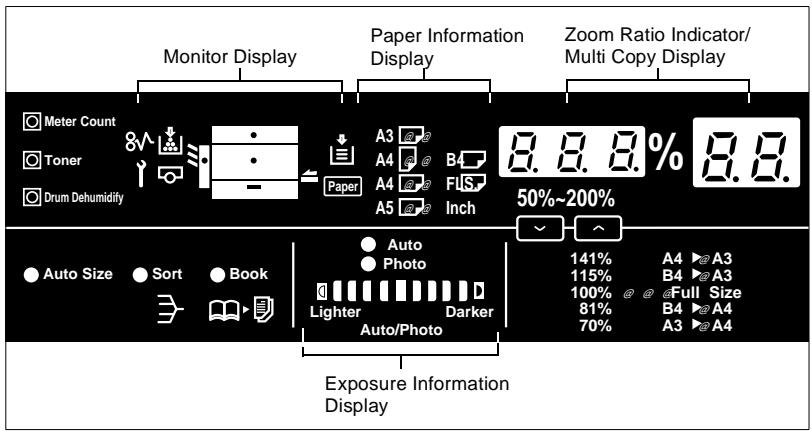
Monitor Display
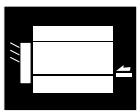
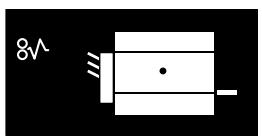
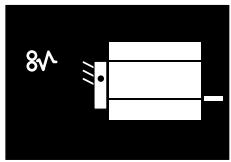
- Paper Source Indicator Shows the paper source which is currently selected for use, see page 3-10.
Example: Shows that the Printer is currently selected for use.
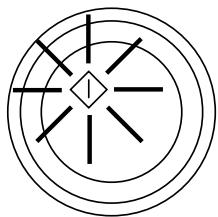
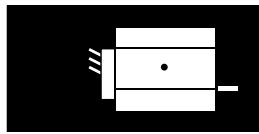
- Closure Failure Indicator
- The location of a Door left open is also indicated by a round marker, see page 5-6.
Example: Indicates that the Front Door or Right Door is left open.
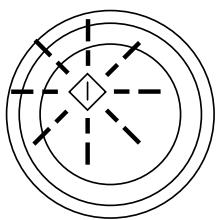
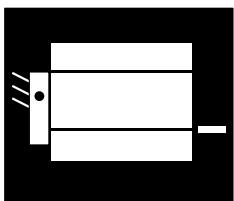
- Misfeed Indicator Indicates that a paper misfeed has occurred. The location of the misfeed is also indicated by a round marker, see page 5-7.
Example: Shows that a misfeed has occurred inside the copier.
- Call-Tech.-Rep. Indicator Indicates that the copier has developed a malfunction. When a malfunction occurs, the corresponding malfunction code is shown across the Zoom Ratio
Indicator and Multi-Copy Display, see page 5-15.

- Add Toner Indicator Indicates that the Toner Bottle is running out of toner. Replace the Toner Bottle as soon as possible, see page 5-2.
I. U. Service Life Indicator Indicates that the Imaging Unit needs replacement. Replace the Imaging Unit, see page 5-16.
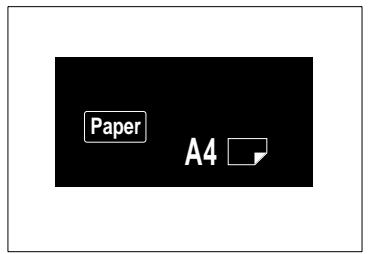
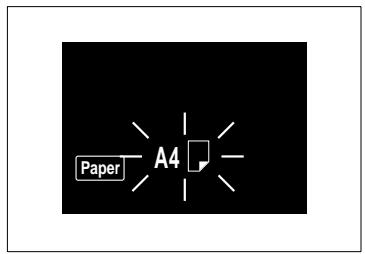
Paper Information Display
- Paper Size Indicators
- Show the size of paper currently loaded in the Printer, see page 3-10.
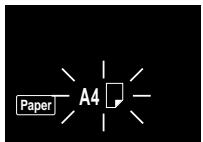
- Add Paper Indicator Lights up when the currently selected Printer has run out of paper. Add paper as necessary, see page 5-4.
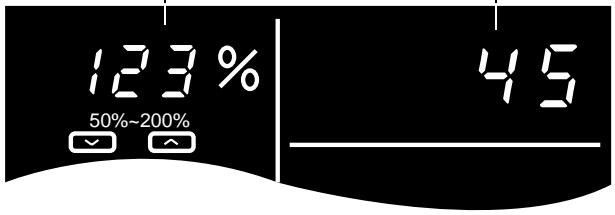
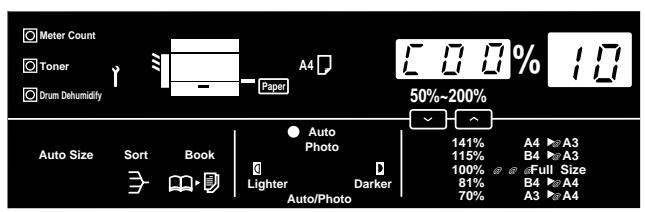
Zoom Ratio Indicator / Multi-Copy Display
Each shows the following data.
- Example Zoom ratio: 100% No. of copies: 1
- Count of the Total Counter Example: 93,930 (copies)
- User's Choice code and setting value Example: Choice code: 14, Setting: 1
- Malfunction code Example: Malfunction code C0F30


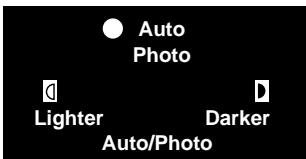
Exposure Information Display
- Auto Exposure Indicator Indicates that the copier is now in the Auto Exposure Mode, see page 3-16.
- Exposure Level Indicator Shows the exposure setting level in the Manual Exposure Mode, see page 3-16. The center LED is normally lit.
- Photo Mode Indicator Indicates that the copier is now in the Photo Mode, see page 3-16.
2.4 Turning ON and OFF, and Resetting the Copier
Turning ON and OFF
Turning the Copier ON: Press the Power Switch to the "1" position.
Turning the Copier OFF: Press the Power Switch to the "... position.

NOTE
The Auto Shut OFF function will automatically shut down the copier a given period of time after the last activity. The initial setting is 30 minutes.

Useful Tip
The period of time can be changed by using the User's Choice, see page 4-11.
When the Copier is Turned ON
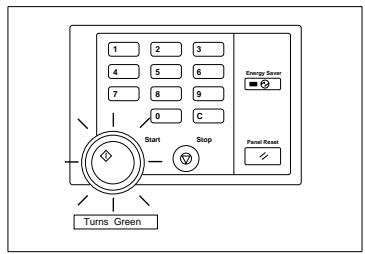
Blinking Orange
Turns Green
- The Start Key blinks orange, indicating that the copier is now warming up.
- In about 30 sec., the Start key turns green. Now the copier is ready to make copies.
Auto Copy Start Function
(Only when Automatic Document Feeder is used)
The Auto Copy Start Function allows a copy process to be started as soon as the copier completes warming up.
Using the Function
1 When you load the originals onto the Automatic Document Feeder while the copier is warming up, the Start Key turns to green and blinks.
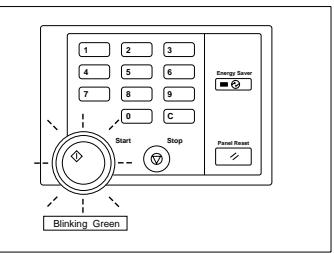
2 When the Start Key is then pressed, the Start Key turns to blinking orange and the Automatic Document Feeder starts feeding the first original onto the Original Glass.
3 As soon as the copier completes warming up, the Start Key turns green and the copy cycle is started.
Minimizing the Warm-up Time
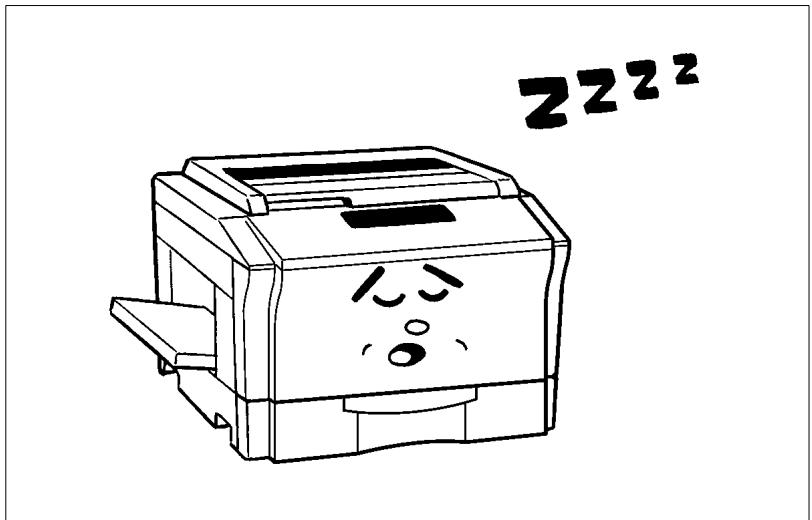
Instead of turning the copier OFF, it's a good idea to use the Energy Saver Mode. This mode will minimize the time for the copier to complete the warm-up cycle to about 20 sec.
The Energy Saver Mode is automatically activated a given period of time after the copier has been used last. The initial is 15 min.

Useful Tip
The time for the copier to enter the Energy Saver Mode can be selected from 1 to 98 min., or for 240 min. by using User's Choice, see page 4-10.

NOTE
The copier is shut down if the Auto Shut OFF function activates while the copier is in the Energy Saver Mode.
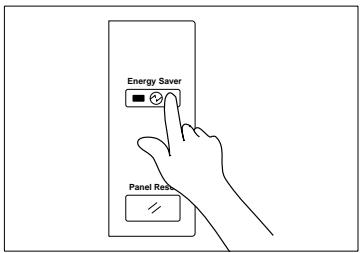
- Entering The Energy Saver Mode Press the Energy Saver Key on the control panel.
All control panel Indicators go out, except that the Start Key and the Energy Saver Key which remain lit green.
- Leaving the Energy Saver Mode Press any Key on the control panel, for instance, the Start Key.
This cancels the Energy Saver Mode, and the copier will be ready to make copies in about 20 seconds.
Initial Mode and Panel Resetting
- Initial Mode
When the Power Switch is turned ON, the initial settings are indicated on the control panel. The initial settings serve as the reference for all control panel settings to be later made.
No. of copies to be made: 1
Zoom ratio: Full size (100%)
Auto Exposure Mode
Non-Sort Mode

Useful Tip
The initial settings can be changed by User's Choice. For details see page 4-6.
- Panel Resetting
The Panel Reset Key resets all control panel settings to default settings including the number of copies to be made and zoom ratio.
If the Automatic Document Feeder is used, the original present on the Original Glass will be ejected out of the unit.

Useful Tip
The Panel Reset Key enables you to cancel all previous settings efficiently. To avoid miscopy, try to press the Panel Reset Key before attempting to make any setting for your own job.
Auto Reset Function
If no Key on the control panel is pressed within about 60 seconds after a copy cycle has been completed or copying settings made, the Auto Reset Function is activated to cause the copier to return to the initial mode automatically.

Useful Tip
The Auto Reset Function can be enabled or disabled by User's Choice. For more details, see page 4-6.
3 Making Copies
3.1 Copying Overview
Place the original in position (step 1), set the number of copies to be made (step 7), and press the Start Key (step 8). This will allow you to make a full-size copy or copies on paper of the same size as the original. The control panel selection ( ) you make will change the magnification ratio and the image density.
1 Placing the Original
Raise the Original Cover and place the original face down on the Original Glass, see page 3-4.
Load the Originals face up in the Automatic Document Feeder, see page 3-7.
2 Checking the Copy Paper Size and Selecting the Paper Source
Check whether the desired paper size is loaded into the Printer or not, see page 3-10.
YES:
Go step 3 or step 7.
NO:
Load the desired paper size or make a copy using a Manual Bypass Tray.
Add Paper Indicator, see page 5-5.
Manual Bypass Copying, see page 3-22.
3 To change the Zoom Ratio
Selecting the Zoom Ratio Select the desired fixed zoom ratio, see page 3-12.
Set the zoom ratio, see page 3-13.
Select the Auto Size Mode, see page 3-14.
4 To change the Exposure Level
Setting the Image Density Set the image density in the Manual Exposure Mode, see page 3-16.
Select the Auto Exposure Mode or Photo Mode, see page 3-16.
5 To copy from a book
Selecting Book Copying Press the Book Key to select the Book Copying Mode, see page 3-17.
6 To sort copies
Selecting the Finishing Mode Select Sort Mode, see page 3-19.
Select Non-Sort Mode, see page 3-19.
7 Setting the Number of Copies
Using the Key Pad, set the number of copies to be made or the number of copy sets.
If you enter a wrong number, press the Clear key c and enter the correct number.
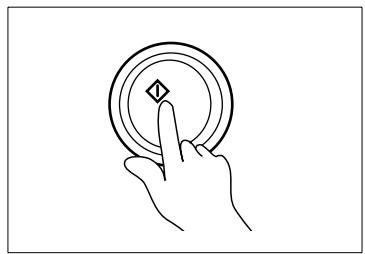
8 Starting the Copy Cycle
Press the Start Key to start the copy cycle.
Press the Stop Key to stop the copy cycle.
3.2 Copying Procedure
Placing Originals
Place the original face down on the Original Glass. Different methods are used to load the originals depending on the type of originals and whether the copier is equipped with an Automatic Document Feeder (option).
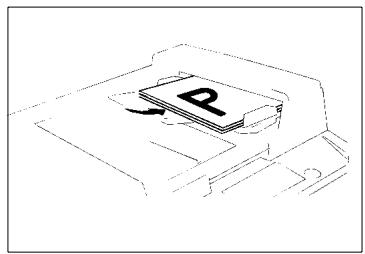
Sheet Originals (Standard Size)
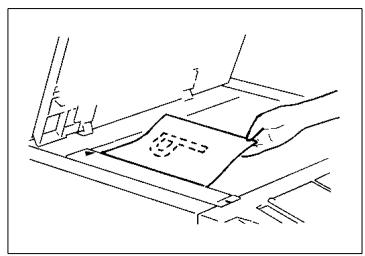
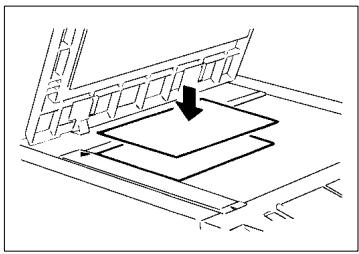
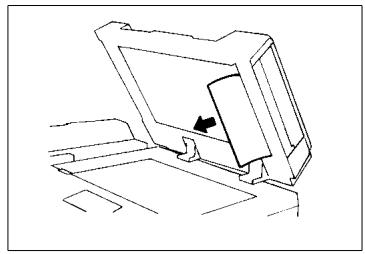
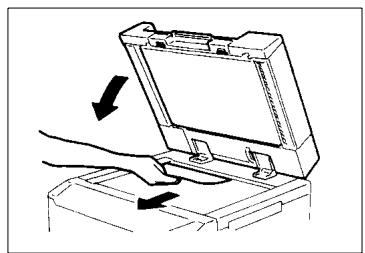
1 Raise the Original Cover.
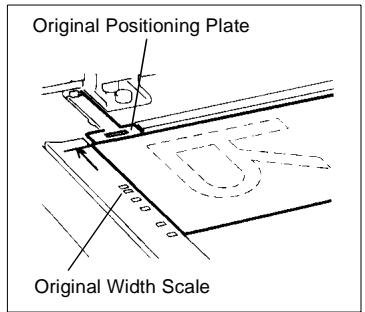
Place the original face down on the Original Glass, and align its rear left corner with the Ö marker on the Original Width Scale on the left side of the platen.
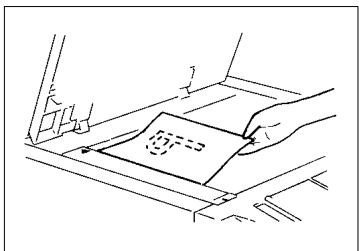
2 Gently lower the Original Cover.
Highly Transparent Originals
1 Place the original in the same way as the sheet originals.
2 Place a blank sheet of paper of the same size as the original over the original. Then, lower the Original Cover.

NOTE
If this is not done, the copy produced may be of very poor quality.
3 Gently lower the Original Cover.
Book Original
"Book original" refers to an open bound original.
Position the higher-numbered page on the Original Width Scale end.
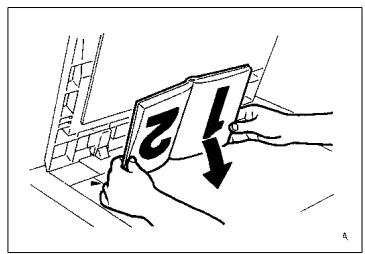

NOTE
Not positioning an open book properly will result in copies with pages in incorrect order.
Do not place an original weighing more than 3kg on the Original Glass, as an image problem could result.
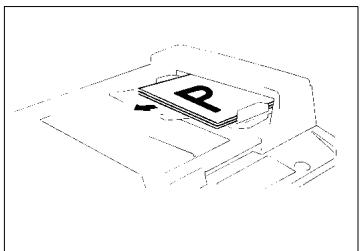
Using the Automatic Document Feeder
The Automatic Document Feeder automatically feeds sheet originals placed on the Document Feed Tray one by one. After the copy cycle has been completed, it automatically ejects the originals onto the Exit Tray. Some originals may not be suitable for reliable operation in the Automatic Document Feeder. Here is a guide.
- Originals Suitable for the Automatic Document Feeder
Type of Original : sheets (Plain paper)
Normal mode
1-Side Original (weighing 50g / m^2 to 110g / m^2 )
Lightweight Original* (40g/m² to 110g/m²)
Mixed Original Detection Mode (weighing 60g / m^2 to 90g / m^2
Original size :
A3L, B4L, A4L, A4C, 210mm x 330mm, A5L
(Except for Mixed Original Detection Mode)
*Lightweight Original
Be sure to use the User's Choice to turn on the Lightweight Original Mode when making copies from the lightweight originals. For lightweight original (40g / m^2 to 50g / m^2) , it is recommended to place it directly onto the Origianl Glass or to make copies using the SADF Mode (Single Automatic Document Feeding Mode), see page 3-9.
- Originals Not suitable for the Automatic Document Feeder
Typing paper, paraffin paper, and other thin paper
Thick paper
Originals greater than A3 or smaller than A5
OHP transparencies, translucent paper
Wrinkled, dog-eared, curled, or torn originals
Clipped or stapled originals
Carbon-backed originals
Typing paper, paraffin paper, and other thin paper
Thick paper
Continuous forms

Wrinkled or dog-eared original
Stapled originals
For any of these types of originals, place the original manually on the Original Glass to make a copy, see page 3-8.
Loading Standard Size Originals
1 Slide the Document Guide Plate to the size of the originals.
Using the large size originals, flap up the Document Feed Tray Extender.
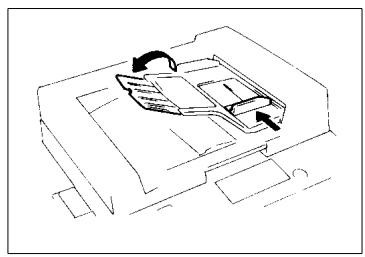
2 Load a neat stack of originalsface up on the Document Feed Tray.

NOTE
The maximum number of originals that can be loaded:
A4 or smaller: Up to 50
A3 or B4: Up to 30
Make sure that the top level of the original stack does not exceed the A marking.
Make sure that the Document Guide Plate is in touch with the edges of the original stack. If it's not prreseed snugly against the original stack, skewed feeding could result.
For Originals Not Suitable for Reliable Operation of the Automatic Document Feeder
1 Raise the Automatic Document Feeder and place the original face down on the Original Glass. Align the rear left corner of the original with the marker on the Original Width Scale. Then press the rear edge of the original up against the Original Positioning Plate.
2 Gently lower the Automatic Document Feeder and start the copy cycle.
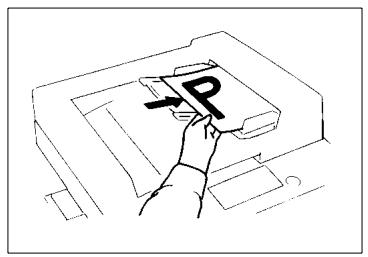
Single Automatic Document Feeding Mode (SADF Mode)
This is the mode in which you insert your originals one by one into the Automatic Document Feeder to make a copy or copies from it. When you insert the original, the copier automatically starts the copy cycle.
Originals available for the SADF Mode:
- Type: Plain paper
- Thickness: 35 ~g / m^2 to 157 ~g / m^2
Size: A3 to A5
1 Open the Document Feed Tray and slide the Guide Plate to the size of the original.
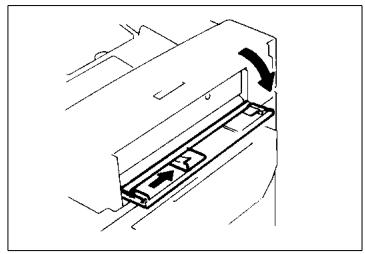
2 Make sure that the Start Key islit green and insert the originalface down into the Document Feed Tray.

NOTES
Be sure to place one original at a time.
Be sure to correct any fold or curl in the original.
3 The original is automatically taken up and the copy cycleis started.
4 Making sure that the Start Key lights up green again, insert the next original.
Checking the Copy Paper Size and Selecting the Paper Source
When the copier is not equipped with the Multi Bypass Tray, it is necessary to check that the desired paper size is loaded into the Printer. If it is not loaded, make a copy using a Manual Bypass Tray or load the desired paper size into the Printer.
- Manual Bypass Copying see page 3-22.
Add Paper Indicator see page 5-4.
When the copier is equipped with the Multi Bypass Tray, the paper source (paper size) can be selected, Drawer or Multi Bypass Tray.
Selecting the Paper Source (Only when the Multi Bypass Tray is used)
Each time the Paper Select Key is pressed, the Paper Source Indicators, Printer Indicator or Multi Bypass Indicator, light up alternately. Also, the Paper Size Indicator corresponding to that of the Printer lights up.
3.3 Zoom Ratio

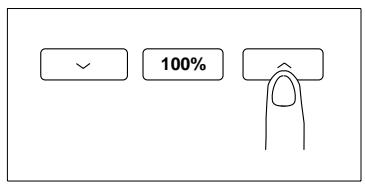
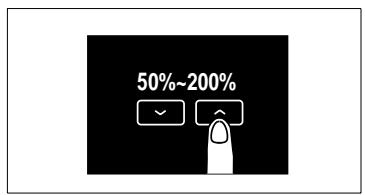
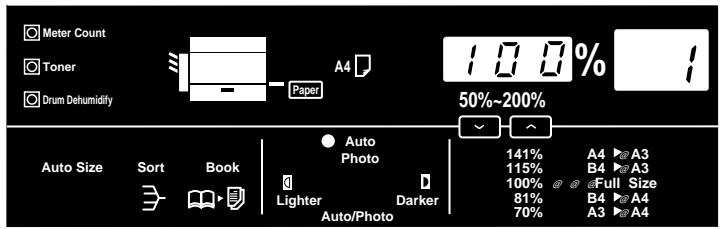
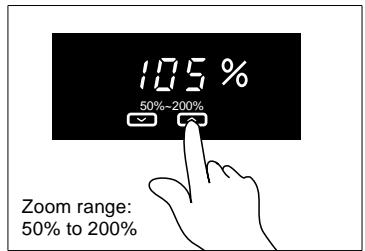
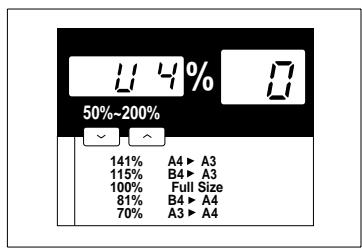
The zoom ratio can be set manually by the operator when in the Manual Mode or will be set automatically by the copier when in the Auto Size Mode. Select the appropriate mode according to your needs. The selected zoom ratio is shown on the Zoom Ratio Indicator.
Fixed Zoom Ratios
- Three reduction ratios ( 50%, 70%, 81%)
- Three enlargement ratios (115%, 141%, 200%)
- And Full Size (100%).
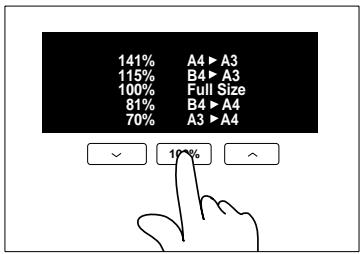
Zoom Ratios
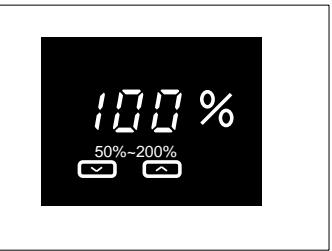
Any ratio from 50% to 200% (in 1% increments) can be selected.
Selecting the Fixed Zoom Ratios
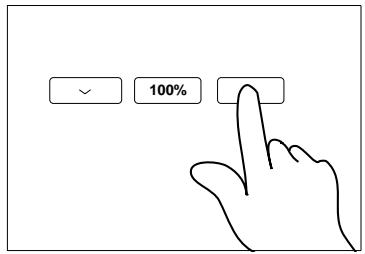
Press the Reduction, Full Size, or Enlargement Key to select a fixed zoom ratio of your choice.
Reduction
Each time the Reduction Key is pressed, it selects a new reduction ratio.
The Zoom Ratio Indicator displays the actual percentage of the selected ratio.
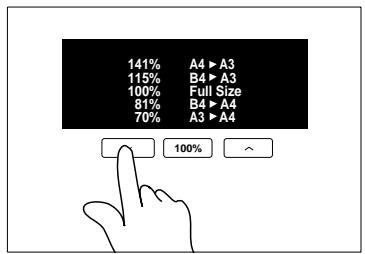
- Enlargement
Each time the Enlargement Key is pressed, it selects a new enlargement ratio.
The Zoom Ratio Indicator displays the actual percentage of the selected ratio.

Full Size
Press the Full Size Key to select full size (100%).
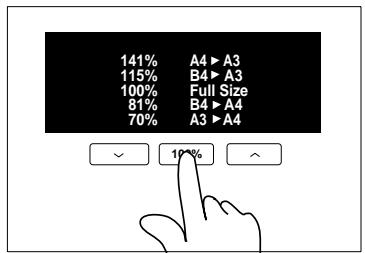
Setting a Zoom Ratio
Hold down the Zoom Down or Up Key until the desired zoom ratio is reached.

Zoom Down Key makes the ratio smaller

Zoom Up Key makes the ratio greater

Useful Tip
To save time, first select the fixed ratio nearest to the target zoom ratio before using the Zoom Up or Down Key.
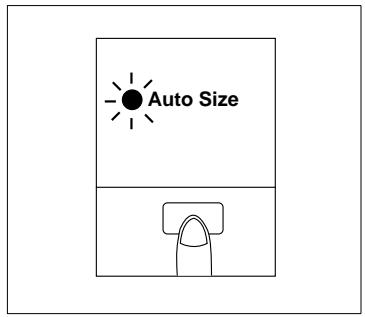
Auto Size Mode
- The Auto Size Mode can be selected only when the copier is equipped with the Automatic Document Feeder.
- In the Auto Size Mode, the copier automatically selects the correct zoom ratio according to the original size and copy paper size.
Selecting the Auto Size Mode
1 Press the Auto Size Mode Key.
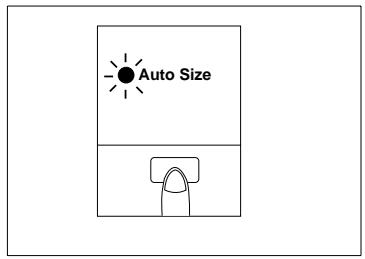
The Zoom Ratio Indicator shows
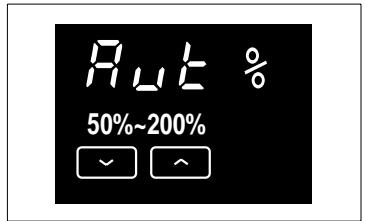
2 Check the copy paper size, see page 3-10.
If the desired paper size is not loaded in the Printer, load it into the Printer. Add Paper Indicator, see page 5-4.

Useful Tip
This mode is very helpful for neat filing when you need to make copies from originals of assorted sozes.

NOTE
The copier has been factory-set to automatically select the Manual Mode. This default setting can be changed to the Auto Size Mode by using the User's Choice, see page 4-7.
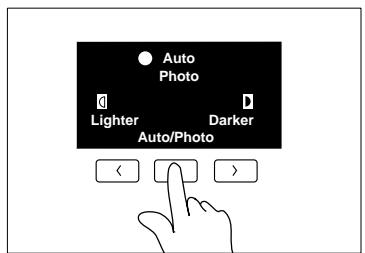
3.4 Image Density
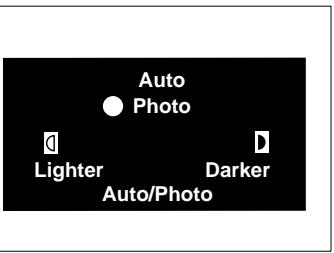
The image density level of copies can be adjusted either in the Auto Exposure Mode, Manual Exposure Mode or Photo Mode. Select the appropriate mode according to your particular needs.
Types of Exposure Modes
- Auto Exposure Mode
- The copier reads the image density of the original and automatically adjusts the exposure level for the optimum copy image density.
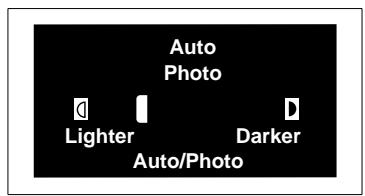
- Manual Exposure Mode In the Manual Exposure Mode, you can vary the exposure level in nine steps.
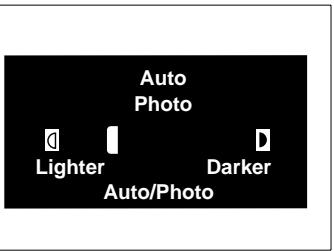
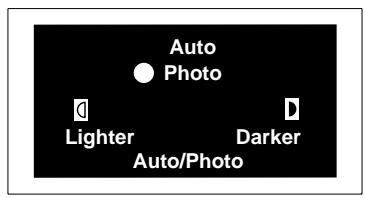
- Photo Mode
- The copier can make a faithful reproduction of an original having halftone images such as photos.
- The image density of the photo may be varied in nine steps.
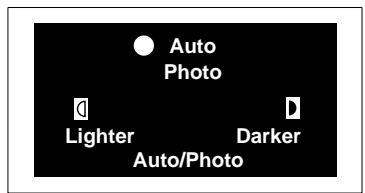
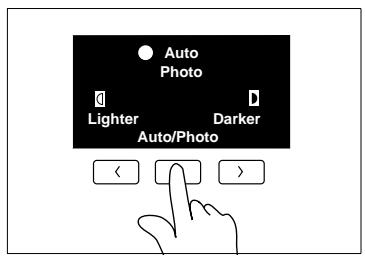
Selecting the Auto Exposure Mode
Press the Auto Exposure Mode Key A as necessary to light up the Auto Exposure Indicator O Auto
Each time the Auto Exposure Mode Key is pressed, the Auto Exposure Mode, Manual Exposure Mode and Photo Mode are selected alternately.
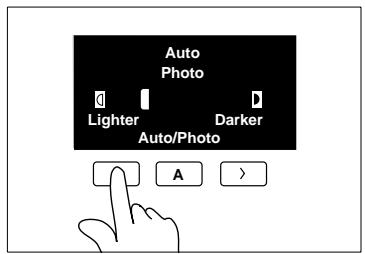
Selecting the Manual Exposure Mode
Hold down the Exposure Control Key or until the desired exposure level is reached.
To make the image darker : Press or hold down the Exposure Control Key
To make the image lighter : Press or hold down the Exposure Control Key
Selecting the Photo Mode
Press the Auto Exposure Mode Key A as necessary to light up the Photo Mode Indicator Photo.
Hold down the Exposure Control Key > or > until the desired exposure level is reached.


Useful Tips
The exposure level in the Auto Exposure Mode can be varied by using the User's Choice, see page 4-7.
The copier has been factory-set to automatically select the Auto Exposure Mode. The User's Choice can be used to change this default setting to the Manual Exposure Mode, see page 4-8.
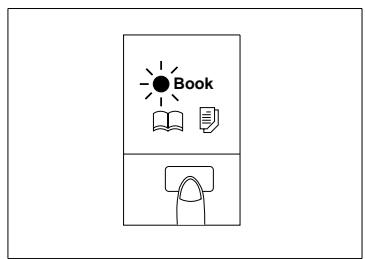
3.5 Book Copying
Select Book Copying when you want to make a 1-sided copy of each page of an open book.
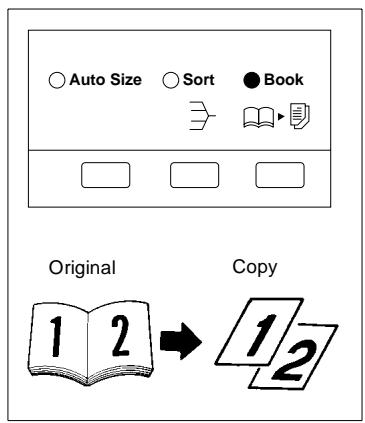
Selecting the Book Copying Mode
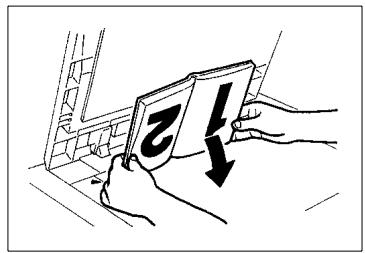
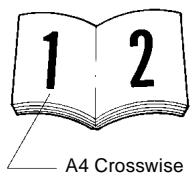
1 Position the higher-numbered page on the Original Width Scale end.
If the book is thick, you can make copies with the Original Cover raised.
"Book original" refers to an open bound original.

NOTES
Not positioning an open book properly will result in copies with pages in incorrect order.
Do not look directly at the Original Glass surface, as a very intense beam of light can be emitted.
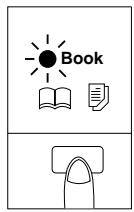
2 Press the Book Key.
The Book Indicator lights up.

NOTES
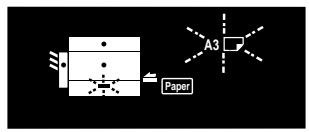
If paper other than A4 crosswise paper is loaded into the Printer when the Book Copying Mode is selected, the Printer Indicator and the corresponding Paper Size Indicator blink on the Control Panel. In such a case, load paper of the same size and in the same direction of each page of a book into the Printer.
3.6 Finishing Mode
There are two different finishing modes: Non-Sort and Sort.
Select the appropriate mode according to your particular needs.
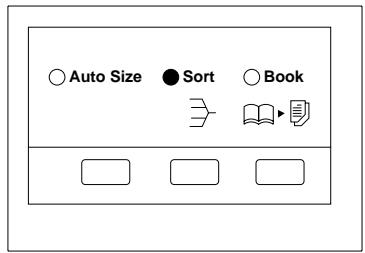
Types of Finishing Modes
Non Sort
In the Non-Sort Mode, all copies are fed out onto the 1st Bin without being sorted.
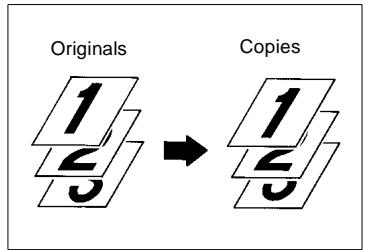
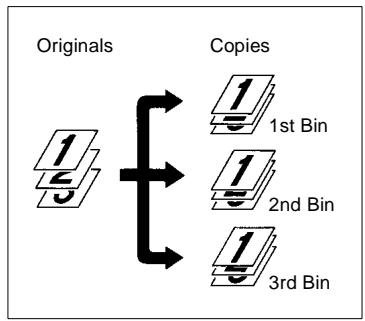
- Sort
In the Sort Mode, copies are sorted into complete sets of the originals. Copies are fed out into Sorter Bins.
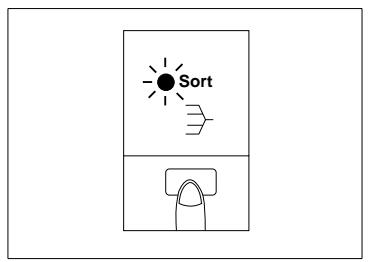
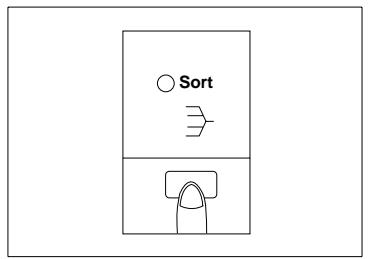
Selecting the Finishing Mode
Press the Finishing Mode Select Key to select the desired mode.
If the Sort Mode is selected, the Sort Indicator lights.

NOTES
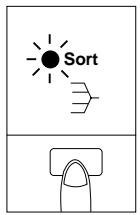
The Sort Mode cannot be selected unless the copier is equipped with the 10-Bin Sorter.
If the Sort Indicator is not lit up, the Non-Sort Mode is selected.
The capacity of each Sorter Bin is 25 copies in Sort-Mode.
If this capacity is exceeded, the Remove Copies Indicator blinks on the Monitor Display and the Start Key turns orange, inhibiting the initiation of a new copy cycle.

Useful Tip
The copier has been factory-set to automatically select Non-Sort. Also, the copier automatically switches between the Sort and Non-Sort mode depending on the number of originals loaded in the Automatic Document Feeder. The User's Choice can, however, be used to change this default setting using the User's Choice, see page 4-9 and see page 4-11.
Auto Dual Function
Each of the Sorter Bins holds up to 25 sheets of paper. However, the Auto Dual Function allows sorting of copies of up to 50 originals under certain conditions.
Auto Dual Function in the Sort Mode
When 5 or less copies are made from an original set consisting of more than 25 originals in the Sort Mode, the Sorter is automatically switched into the Auto Dual Function Mode using the 6th to 10th Bins.
| Copies | Bins used |
| 1st to 25th sorted copies | Top to 5th Bins |
| 26th to 50th sorted copies | 6th to 10th Bins |
If the number of copies selected exceeds 5, the new copy cycle stops at the 25th original.
Example: Making 3 copy sets of a 30-page original set

To have a complete set from the originals, place the copies from the 6th Bin on top of those from the Top Bin. In the same way, place copies from the 7th Bin on top of those from the 2nd Bin, and so on.
3.7 Manual Bypass Copying
Use the Manual Bypass to make copies on paper not loaded in the Printer, or to copy onto OHP transparencies, translucent paper, or any other special paper. When using Multi Bypass Tray, you can load multiple sheets of copy paper.
- Types of Paper
Plain paper (weighing 60g / m^2 to 90g / m^2 )
Thick paper (weighing 91g / m^2 to 157g / m^2 )
OHP transparencies, translucent paper
- Paper Size
Width: 100mm to 297mm
Length: 140mm to 432mm
- Capacity
Plain paper, Thick paper, OHP transparencies, translucent paper ... 1 sheet at a time
- Capacity Multi Bypass Tray
Plain paper: Approx. 50 sheets
Plain paper (once-copied paper) ... Up to 20 sheets
Thick paper, translucent paper: Approx. 20 sheets
OHP transparencies: Up to 5 sheets

IMPORTANT
When making multiple copies using OHP transparencies, set the Copy Tray into the upper position if there is no Sorter or Staple Sorter mounted.
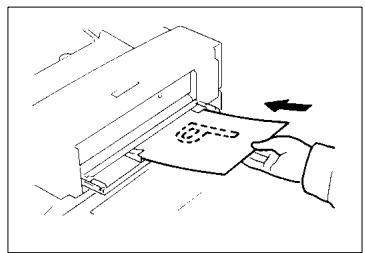
Using the Manual Bypass Tray
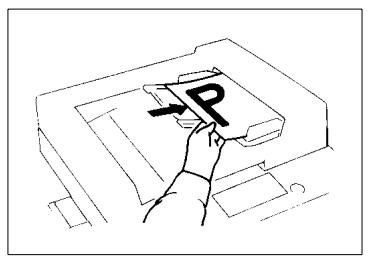
1 Place the original on the Original Glass and make the control panel settings.
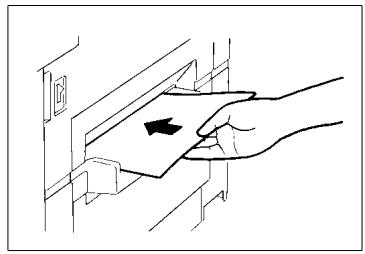
2 Insert the copy paper into the Manual Bypass Tray.
This automatically starts the copy cycle.

NOTES
Insert the copy paper one sheet at a time.
Do not insert a sheet of paper while the copier is warming up or in a multi-copy cycle.
The Auto Size Mode and Book Copying Mode cannot be selected for manual bypass copying.
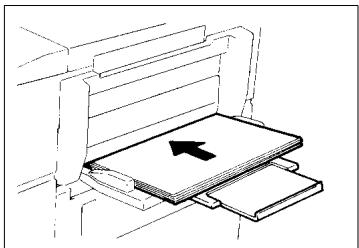
Using the Multi Bypass Tray (Option)
1 Place the original on the Original Glass and make the control panel settings.
2 Swing down the Multi Bypass Tray and slide the Paper Guide Plate to the size of the copy paper.
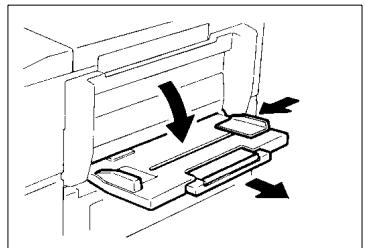

NOTE
Pull out the Multi Bypass Tray Extender if you are using larger paper.
3 Load a neat stack of copy paper on the Tray and insert it into the copier until it stops.

NOTES
The paper should be loaded no higher than the (Max. Level Indicator).
Before inserting, fan the paper stack well if you are using OHP transparencies or translucent paper.
Correct any curl if you are using thick paper.
The paper will be copied on the side facing up.
4 Using the Key Pad, enter the number of copies to be made.
5 Press the Start Key to start the copy cycle.

NOTES
Do not insert the paper while the copier is in the warm-up cycle or a multi-copy cycle.
The Auto Size and Book Copying Mode cannot be selected for manual bypass copying.
4 Auxiliary Functions
4.1 Checking the Total Number of Copies Mode
This function allows you to check the total count of the two counters of the copier.
Types of Counters
Total Counter:
Shows the total number of copies made since the installation of the copier.
Size Counter:
Shows the number of copies made on paper of a size preset by the Technical Representative.
Counter Display
Example: The count is 12,345 (copies).
The Zoom Ratio Indicator shows the upper 3 digits of the count
The Multi-Copy Display shows the lower 2 digits of the count
Using the Meter Count Function
1 Press the Meter Count Key once. The count of the Total Counter is shown across the Zoom Ratio Indicator and Multi-Copy Display.
2 Press the Meter Count Key again. The count of the Size Counter is shown across the Zoom Ratio Indicator and Multi-Copy Display.

3 Press the Meter Count Key once again. This returns the copier to the normal state.
4.2 Toner Replenisher Function (Increasing the Image Density)
The copier tends to exhaust the supply of toner rapidly when making a number of copies from an original with dark solid areas. As a result, the image density of the copy will become lighter. In such a case, you can use the Toner Replenisher function to regain the normal image density quickly.
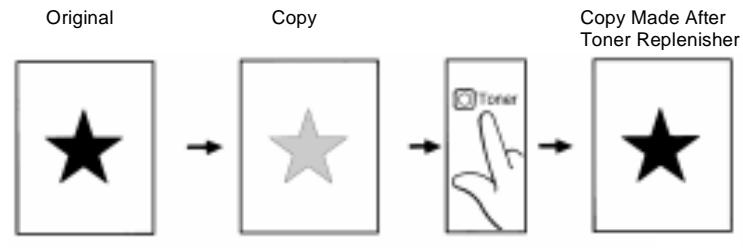
Even if you continue making copies after the image density has become lighter, the copier will gradually recover the normal image density. The Toner Replenisher Mode can, however, be used to obtain the normal image density more quickly.
Press the Auxiliary Toner Replenishing Key.
This causes the copier to initiate toner replenishing, which lasts for 90 seconds at maximum.

NOTES
Do not turn the Power Switch OFF or open the Front or Right Door while the copier is replenishing toner.
Toner is not replenished if the image density is sufficiently high.
4.3 Drum Dehumidifier Function
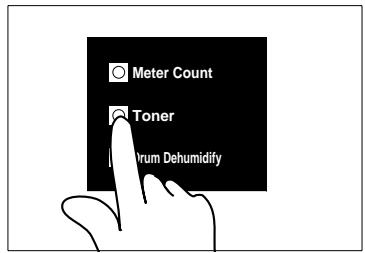
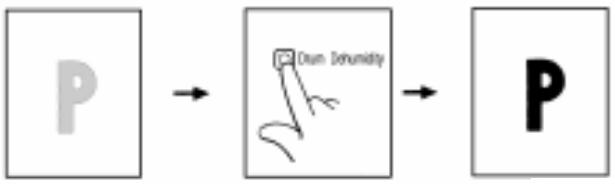
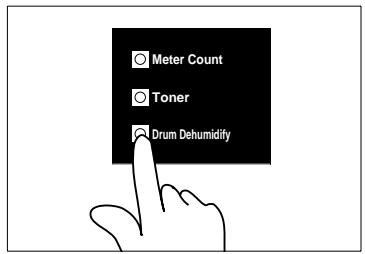
During times of high humidity or when there are sudden rapid changes in humidity (especially when you are using a heater in winter), condensation ^+1 could form on the surface of the PC Drum ^+2 , resulting in blotchy copies. In such instances, use the Drum Dehumidify Key to dry the surface of the PC Drum.
*1: Condensation:
A phenomenon in which small drops of water are formed on cold surfaces, such as the surface of the PC Drum.
*2: PC Drum:
Functions in the copier as film does in a camera.
Before a Drum Dehumidifier Operation
After a Drum Dehumidifier Operation
1 Press the Drum Dehumidify Key.
This sets the copier into the Drum Dehumidifier Mode which lasts for 90 seconds.
2 Make a copy to check that the copy image is clear.
Run the Drum Dehumidifier cycle once again if the copy image is not yet clear.

Useful Tip
A copy cycle can be initiated even while the copier is in the Drum Dehumidifier Mode.

NOTE
The copier cannot be set into the Drum Dehumidifier Mode while it is warming up.
4.4 User's Choice
The copier has been set so that the most frequently used settings are automatically selected in the initial mode. The User's Choice allows you to select the default settings which are automatically selected in the initial mode according to your own needs.
By setting defaults for the paper size, zoom ratio and other settings that are most frequently used, time and effort to make extra settings will be eliminated when the copier is turned ON or when the auto reset function is activated.
For more details, consult your Technical Representative.
Functions Available in User's Choice
| Choice Code | Function | Choice Code | Function |
| U-4 | Lightweight Original Mode | U-20 | Auto Panel Reset ON/OFF |
| U-7 | Non-Auto Shut OFF | U-21 | Energy Saver ON Timing |
| U-12 | Auto Size/Manual priority | U-23 | Auto Panel Reset for Plug-In Counter |
| U-13 | Default auto exposure level | U-24 | Sort/Non-Sort Auto Switching ON/OFF |
| U-14 | Default exposure mode/level | U-28 | Auto Shut OFF Timing |
| U-15 | Default Finishing mode |
Description of Each User's Choice Function
U-4 Lightweight Original Mode
Select either one of the following settings when the copier is equipped with the Automatic Document Feeder.
If "0" is selected:
You can make copies only from originals of standard weight (Normal Mode).
If "1" is selected:
You can make copies from lightweight originals (40g/m² to 50g/m²), as well as originals of the standard weight (Lightweight Original Mode).
| Setting | Description | Initial Setting |
| 0 | Lightweight Original Mode OFF | |
| 1 | Lightweight Original Mode ON |
U-7 Non-Auto Shut OFF
This function can disable the Auto Shut OFF function.
| Setting | Description | Initial Setting |
| 0 | “Non-Auto Shut OFF” disabled (OFF) | |
| 1 | “Non-Auto Shut OFF” enabled (ON) |
U-12 Auto Size/Manual priority
Specifies the default mode automatically selected in the initial mode.
| Setting | Description | Initial Setting |
| 1 | Auto Size (AS) | |
| 2 | Manual |
U-13 Default auto exposure level
Determines the default exposure level in the Auto Exposure Mode.
| Setting | Description | Initial Setting |
| 46 | Low, level 4 | |
| 47 | Low, level 3 | |
| 48 | Low, level 2 | |
| 49 | Low, level 1 | |
| 50 | Standard | |
| 51 | High, level 1 | |
| 52 | High, level 2 |
When the exposure level is "Low," the greater the level number is, the lower the exposure level.
When the exposure level is "High," the greater the level number is, the higher the exposure level.
| Lower | Higher | |||||
| Level 4 | 3 | 2 | 1 | Standard | 1 | 2 |
U-14 Default exposure mode/level
Determines the default exposure mode, either Auto or Manual, selected when the control panel settings are reset.
If Auto is selected, this function also allows you to specify the default exposure level (EXP) in the Manual Exposure Mode, after the Auto Exposure Mode has been canceled.
If Manual is selected, the function also allows you to specify the default exposure level (EXP) in the Manual Exposure Mode.
If any value between "0" and "8" is selected:
The Auto Exposure Mode is selected.
If any value between "10" and "18" is selected:
The Manual Exposure Mode is selected.
Auto Exposure Mode as Default
| Setting | Description | Initial Setting | |
| Default Mode | Exposure Setting in Manual Mode | ||
| 0 | Auto | Manual EXP1 | |
| 1 | Auto | Manual EXP2 | |
| 2 | Auto | Manual EXP3 | |
| 3 | Auto | Manual EXP4 | |
| 4 | Auto | Manual EXP5 | |
| 5 | Auto | Manual EXP6 | |
| 6 | Auto | Manual EXP7 | |
| 7 | Auto | Manual EXP8 | |
| 8 | Auto | Manual EXP9 | |
Refer to the next page for the Manual Exposure Mode.
Manual Exposure Mode as Default
| Setting | Description | Initial Setting |
| 10 | Manual Exposure Mode / EXP1 | |
| 11 | Manual Exposure Mode / EXP2 | |
| 12 | Manual Exposure Mode / EXP3 | |
| 13 | Manual Exposure Mode / EXP4 | |
| 14 | Manual Exposure Mode / EXP5 | |
| 15 | Manual Exposure Mode / EXP6 | |
| 16 | Manual Exposure Mode / EXP7 | |
| 17 | Manual Exposure Mode / EXP8 | |
| 18 | Manual Exposure Mode / EXP9 |
With EXP5 at the central level, the exposure level is lower as the number becomes smaller, and it is higher as the number becomes greater.

U-15 Default Finishing mode
Determines the default finishing mode when the copier is equipped with the Sorter.
| Setting | Description | Initial Setting |
| 0 | Non-Sort | |
| 1 | Sort |
U-20 Auto Panel Reset ON/OFF
Selects whether to activate the Auto Panel Reset function 60 seconds after a copy cycle has been completed or a control panel key has been pressed.
If "0" is selected:
The control panel settings remain valid even after 60 seconds.
If "1" is selected:
The control panel settings are canceled and the copier is reset into the default mode after 30 seconds. (Auto Panel Reset)
If "2" is selected:
The control panel settings are canceled and the copier is reset into the default mode after 60 seconds. (Auto Panel Reset)
| Setting | Description | Initial Setting |
| 0 | Auto Panel Reset is not activated. | |
| 1 | Auto Panel Reset is activated (after 30 sec.) | |
| 2 | Auto Panel Reset is activated (after 60 sec.) |
U-21 Energy Saver ON Timing
Select whether or not to set the copier into the Energy Saver mode after the lapse of a given period of time after a copy cycle has been completed or a key on the control panel has been operated.
The period of time can fall within the range of 1 to 98 min., or be set to 240 min.
The initial setting is 15 min.
| Setting | Description | Initial Setting |
| 1 | Enabled : 1 min. | |
| 2 | Enabled : 2 min. | |
| 3 | Enabled : 3 min. | |
| : | : | |
| : | : | |
| 98 | Enabled : 98 min. | |
| 99 | Enabled : 240 min. |
U-23 Auto Panel Reset for Plug-In Counter
Determines whether the copier is set into the initial mode when the Plug-In Counter is pulled out after a copy cycle has been run using the Plug-In Counter.
| Setting | Description | Initial Setting |
| 0 | Copier is not reset. | |
| 1 | Copier is initialized when the Plug-In Counter is pulled out. |
U-24 Sort/Non-Sort Auto Switching ON/OFF
Specifies whether to enable automatic switching between the Sort and Non-Sort Mode under the following conditions when the copier is equipped with the Sorter and the Automatic Document Feeder.
Conditions
The copy cycle is initiated using a single original in the Sort Mode. The copy cycle is initiated to make two or more copies using two or more originals in the Non-Sort Mode.
| Setting | Description | Initial Setting |
| 0 | Sort/Non-Sort switching OFF | |
| 1 | Sort/Non-Sort switching ON |
U-28 Auto Shut OFF Timing
Select whether or not to enable the Auto Shut OFF Function that turns power off automatically after the lapse of a given period of time after a copy cycle has been completed or a key on the control panel has been operated. In the initial setting, the Auto Shut OFF Function is activated after 30 min.
| Setting | Description | Initial Setting |
| 10 | Disabled* | |
| 1 | Enabled: 1 min. | |
| 2 | Enabled: 2 min. | |
| 3 | Enabled: 3 min. | |
| : | : | |
| 98 | Enabled: 98 min. | |
| 99 | Enabled: 240 min. |
If you want to disable the Auto Shut OFF function, first select "1" in the Non-Auto Shut OFF Mode then select "0" in this Mode, see page 4-7.
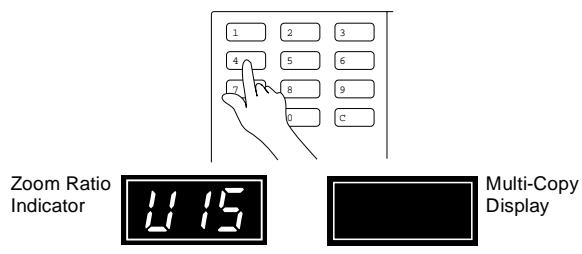
Making the User's Choice Mode Settings
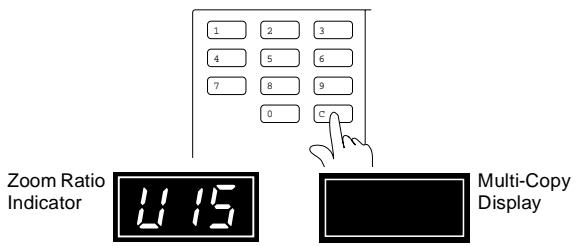
1 Keep pressing the Panel Reset Key for about 3 seconds.
[U] appears on the Zoom Ratio Indicator, and the indicator on the Multi-Copy Display goes out.
2 Using the Key Pad, enter the desired Choice Code number.
If you have pressed an incorrect number, press the Clear Key, then enter the correct number.
Example: Selecting the Default Finishing Mode: Press [15] and the Zoom Ratio Indicator shows [U 15].
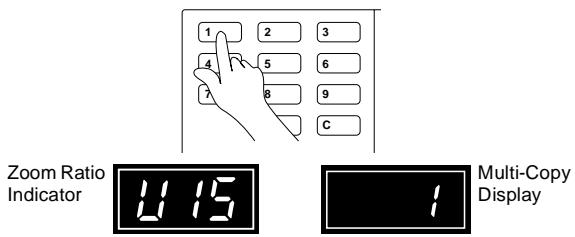
3 Press the Start Key.
This causes the current setting of that particular choice code to be shown on the Multi-Copy Display.
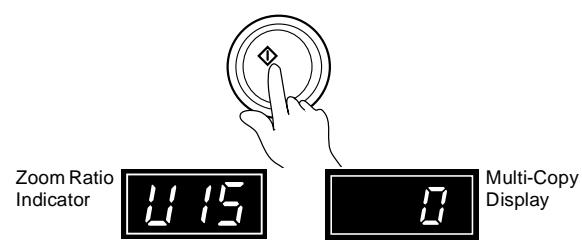
4 Press the Clear Key.
This clears the current setting.
5 Using the Key Pad, enter the new setting.
The Multi-Copy Display shows the new setting.
For the Choice Code see page 4-6.
6 Press the Start Key.
This enters the new setting.
Repeat steps 2 to 6 to make new settings for other User's Choices.
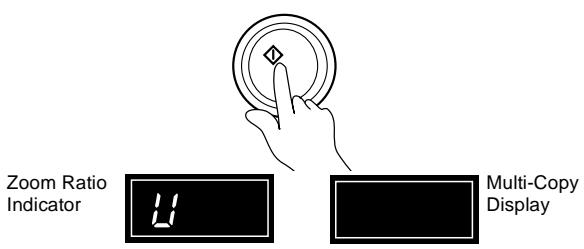
7 Press the Panel Reset Key.
This allows the copier to leave the User's Choice Mode and the control panel shows the default settings again.

NOTE
If the Choice Code number on the Zoom Ratio Indicator or codes on the Multi-Copy Display start blinking when the Start Key is pressed following step 2 or 5, that entry is invalid. Check the correct number. Press the Clear Key and enter the correct one.
5 When an Indicator Lights Up
5.1 Quick Reference for Indicator Lights
When the copier encounters any of the following conditions, a corresponding warning indicator lights up. Some of the warning conditions entail inhibition of the initiation of a copy cycle:
- A control panel key or keys have been incorrectly operated.
- Not all necessary conditions are met to start a copy cycle.
- The copier requires the operator's intervention during a copy cycle.
The following table explains the most important warning conditions. You will find more detailed procedures on the page referenced in the "Action" column.
Warning Indicators
| Indicator | Copier State | Action |
| Add Toner Indicator | The copier has run out of toner. (Warning only and a copy cycle can still be initiated.) | Replace the Toner Bottle following the steps given in the “Add Toner Indicator” section, see page 5-2. |
| Add Paper Indicator | The paper has run out. | Add paper by following the steps given in the “Add Paper Indicator” section, see page 5-4. |
| Misfeed Indicator | There is a misfeed sheet of paper inside the copier or an option. | Check the Monitor Display for the location of the misfeed and clear the misfeed sheet of paper as instructed, see page 5-7. |
| Call-Tech.-Rep. Indicator | The copier has developed a technical malfunction. | If the Call-Tech.-Rep. Indicator remains lit even after you have reset it, call your Technical Representative, see page 5-15. |
| I.U. Service Life Indicator | Indicates that the Toner Bottle is running out of toner. | Replace the Toner Bottle as soon as possible, see page 5-16. |
5.2 Detailed Instructions for Indicator Lights
Add Toner Indicator
The Add Toner Indicator lights up when toner in the Toner Bottle is running out. Once the Indicator lights up, replace the Toner Bottle with a new one as soon as possible by following the procedure given below.

Replacing the Toner Bottle
1 Open the Front Door. Swing open the Toner Bottle Holder and pull out the old Toner Bottle.
2 Tap the new Toner Bottle on a hard surface, such as a desk, several times. Then, turn the Toner Bottle over and tap it several times again in the same manner.
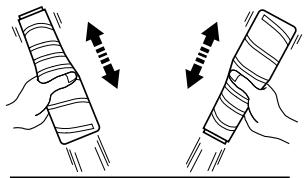
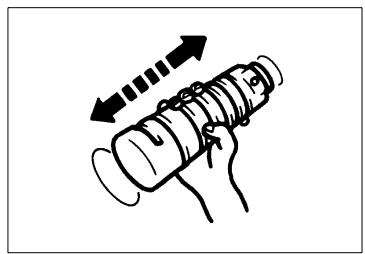
3 Shake the new Toner Bottle well.
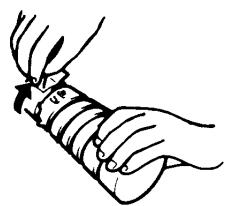
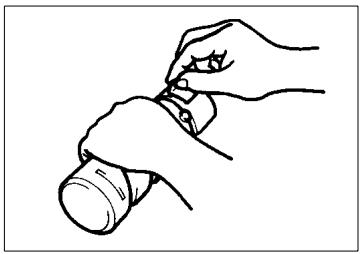
4 With the Seal on the Toner Bottle facing up, slowly peel off the Seal as illustrated.

NOTE
Be careful, some toner may puff out from the bottle.
5 Ensuring that the arrows ( ) on the Toner Bottle are facing you, insert the Bottle into position.
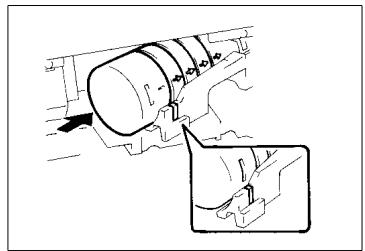

NOTE
Insert the Bottle all the way into the copier until the marking on the Bottle is aligned with the marking on the Toner Bottle Holder.
6 Swing the Toner Bottle Holder closed and close the Front Door.

NOTES
Try to replace the Toner Bottle with a new one as soon as possible once the Add Toner Indicator lights up. Continuing to make copies without changing the Toner Bottle will result in increasingly lighter images.
Use ONLY the specified toner for this copier. Using any other toner could result in image trouble.

Toner Replenisher Function
Use the Toner Replenisher Function if the image is light immediately after replacing the Toner Bottle with a new one, see page 4-3.
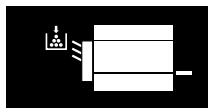
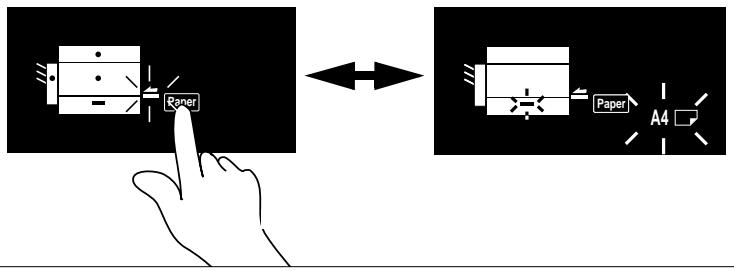
Add Paper Indicator
When the Printer or the Multi Bypass Tray has run out of paper, the Add Paper Indicator lights up. At this time, you cannot start a new copy cycle
Use the following procedure to load paper into theDrawer or the Multi Bypass Tray.
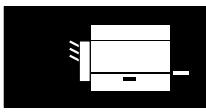
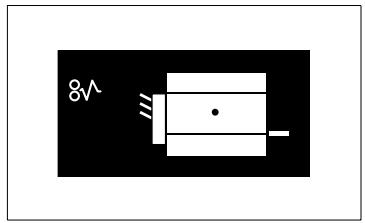
Monitor Display

Add Paper Indicator
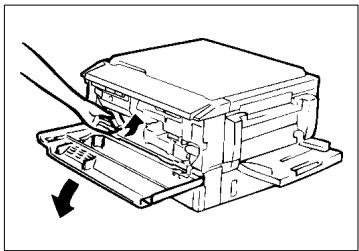
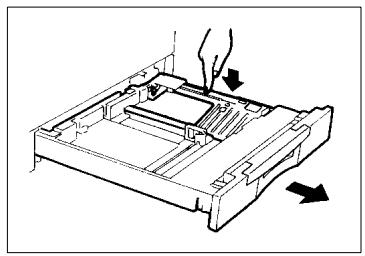
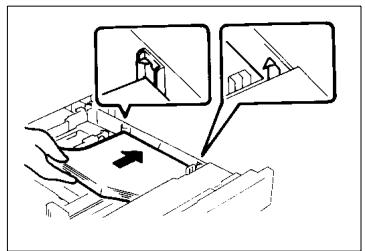
Adding Paper (Drawer)
1 Slide out the Printer and press down the Paper Lifting Plate.
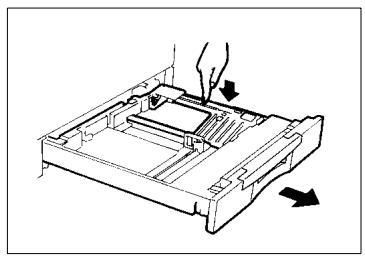
2 Slide out the Edge Guides in the direction of the arrows.
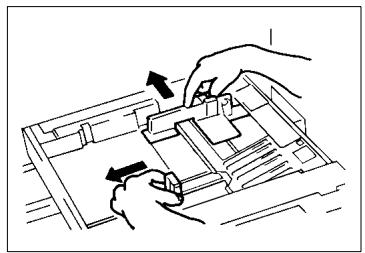
3 Load the paper stack into the.
Drawer so that its front side faces down. Make sure that the paper stack rests under the two catches of theDrawer.

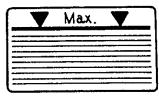
NOTE
The paper should be loaded no higher than the A (Max. Level Indicator) on the Edge Guide.
4 Slide the Edge Guides tightly up against the paper. Gently slide the Printer back in.

NOTE
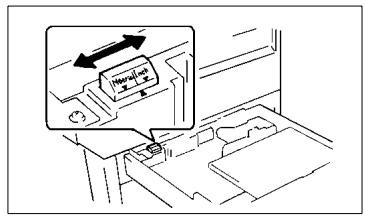
When loading Inch Size paper into the Printer, flip the Marketing Area Switch located in the rear left corner of the Printer to "Inch".
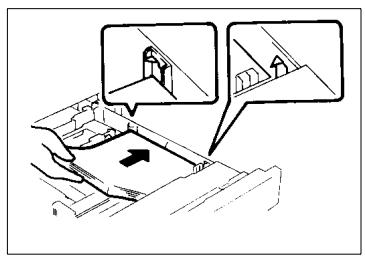
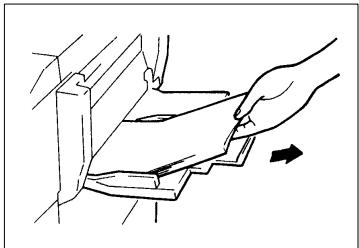
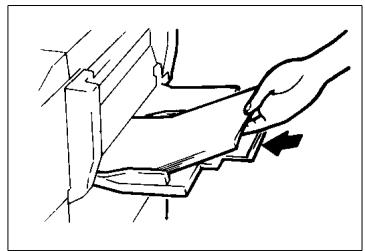
Adding Paper (Multi Bypass Tray)
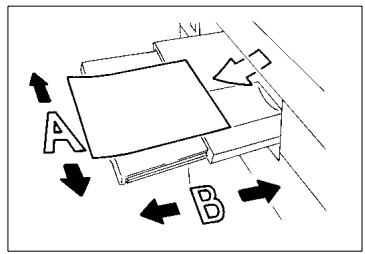
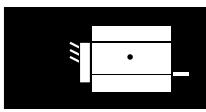
The indications on the left show that the Multi Bypass Tray has run out of paper.
Monitor Display
Add Paper Indicator

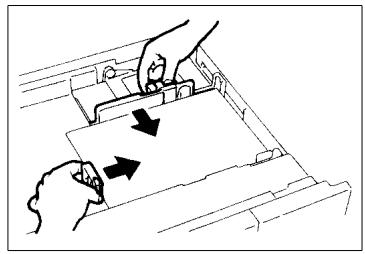
1 Load the paper stack onto the Tray so that its front side faces up and insert it until it stops.


NOTES
The paper should be loaded no higher than (Max. Level Indicator).
Before inserting, fan the paper stack well if you are using transparencies or translucent paper.
Correct any curl if you are using thick paper.
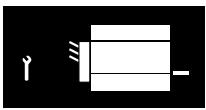
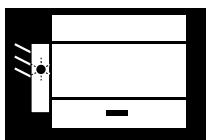
Closure Failure Indicator
The Closure Failure Indicator lights up if a copier door is left open, or an option is not attached properly. The Monitor Display shows the location of the closure failure. At this time, you can no longer start a new copy cycle. Correct the closure failure by following the procedure given below.
Check that the Right Door or Front Door is closed.
Monitor Display
Check Location

Check that the Sorter is in position
Monitor Display
Check Location
Check that the Automatic Document Feeder is lowered.
Check that the Document Turnover/Exit Unit Guide Plate is in position.
Monitor Display
Check Location
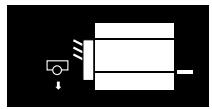
Misfeed Indicator
If a paper misfeed occurs during a copy cycle, that copy cycle stops. The Misfeed Indicator lights up and the Monitor Display shows the location. At this time, you cannot start a new copy cycle.
Misfeed Indicator and Monitor Display
Check the Monitor Display for the location of the misfeed, and clear the misfed sheet of paper according to the procedure given for each location. Misfeed in the copier see page 5-8.
Monitor Display
Misfeed Location
Misfeed in the Automatic Document Feeder see page 5-12.
Monitor Display
Misfeed Location
Misfeed in the Sorter see page 5-14.
Monitor Display
Misfeed Location
Misfeed Clearing Procedure

NOTE
Be careful not to touch the areas marked with High Voltage and Caution: HOT with bare hands.
When the copier is equipped with a Multi Bypass Tray
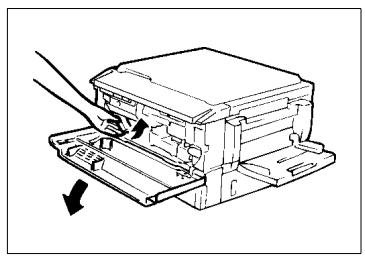
1 Unload the paper stack from the Multi Bypass Tray.
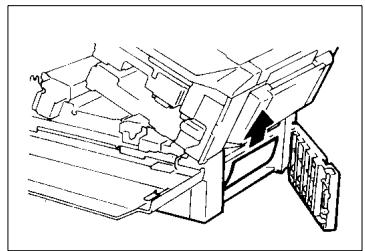
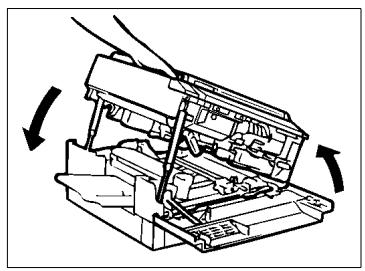
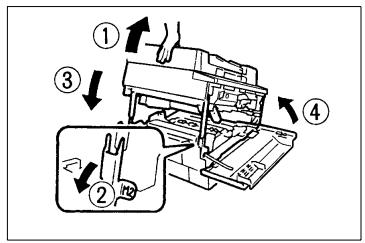
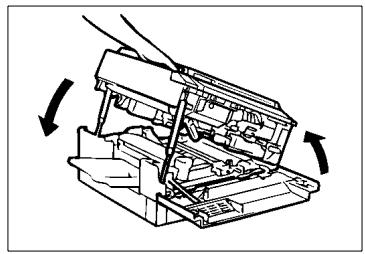
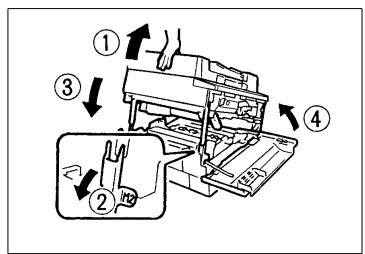
2 Open the Front Door and turn the Lock Release Lever counterclockwise to unlock and swing up the Upper Half of the copier.
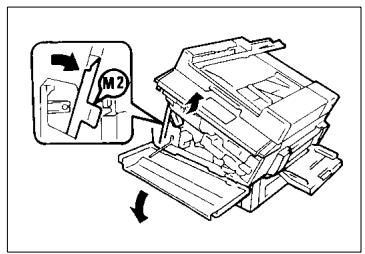
If the copier is equipped with an Automatic Document Feeder
Unlock and swing up the Upper Half of the copier. Then, lock Stopper M2
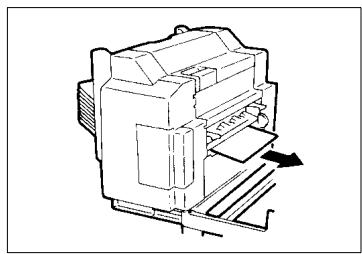
3 Holding up the Fusing Unit, pull out the sheet of paper.

CAUTION: HOT
The Fusing Unit and its surrounding areas may be extremely hot. DO NOT touch any part except the Fusing Unit Handle (yellow).
4 Remove any sheet of paper from the Transport Section.
5 Open the Right Door. Then pull out the sheet of paper from the Manual Bypass Port.
6 Pull out the sheet of paper from the Paper Take-Up Section.
7 Close the Right Door.
8 Gently swing down and lock the Upper Half of the copier. Then close the Front Door.
If the copier is equipped with an Automatic Document Feeder
Slightly lifting up the Upper Half of the copier and unlock Stopper M2. Gently swing down and lock the Upper Half of the copier. Then, close the Front Door.
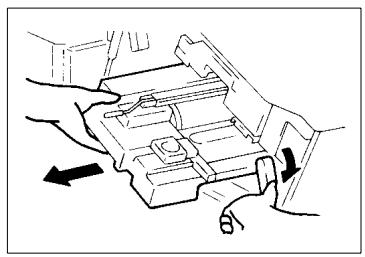
9 Slide out the Printer and unload the paper from the Printer.
Next, push down the Paper Lifting Plate until it is locked into position.
10 Fan the paper and reload it.

NOTE
Make sure that the paper stack rests under the two catches of the Sawyer.
11 Slide the Drawer back in.
When the copier is equipped with a Multi Bypass Tray>
Fan the paper stack and place it back on the Tray.
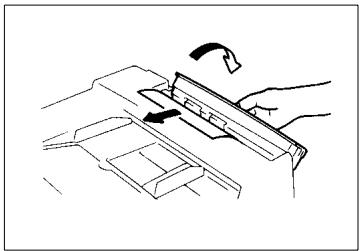
Automatic Document Feeder
There is a misfeed original in the Automatic Document Feeder.
1 Remove the original stack from the Document Feed Tray.
2 Swing open Document Feed Unit Door F1 and gently pull out the original.
3 Close F1.
4 Carefully pull out the original from the Document Exit Unit.
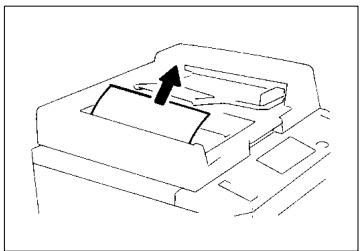
5 Raise the Automatic Document Feeder. Opening the Document Feed Unit Guide Plate, gently pull out the original from the Unit.
6 Remove the original from the Original Glass, and lower the Automatic Document Feeder.
7 Return the number of originals indicated on the Display to the bottom of the original stack removed in step 1 and reload it onto the Document Feed Tray.
Example: ADF -02 = Return two originals.
Sorter
There is a misfeed sheet of paper in the 10-Bin Sorter.
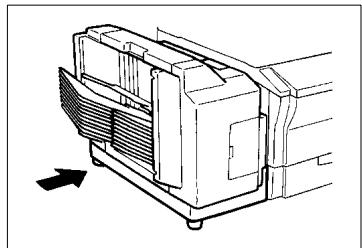
1 Hold the Lock Release Lever of the Sorter and slide the Sorter away from the copier.
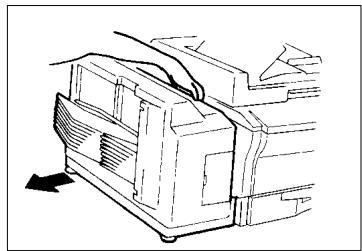
2 Pull out the copy from the Transport Section.
3 Slide the Sorter back to the copier.
Call-Tech.-Rep. Indicator
When a malfunction occurs in the copier, the Call-Tech.-Rep. Indicator lights up and the corresponding malfunction code appears across the Zoom Ratio Indicator and Multi-Copy Display. At this time, you cannot start a new copy cycle.
If this happens, try to clear the Call-Tech.-Rep. Indicator by following the instructions below. If the Call-Tech.-Rep. Indicator lights up again, call your Technical Representative immediately.
Resetting the Call-Tech.-Rep. Indicator
Open the Front Door, then close it. This will reset the Call-Tech.-Rep. Indicator.

NOTE
Carry out this procedure with the Power Switch turned ON.
If the Call-Tech.-Rep. Indicator lights up again, call your Technical Representative immediately.

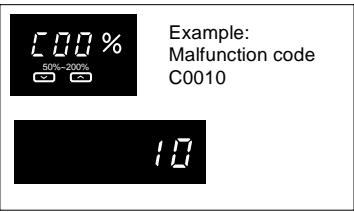
NOTE
When calling your Technical Representative, give him or her the malfunction code shown across the Zoom Ratio Indicator and Multi-Copy Display. Example: This is the malfunction code C0010
I.U. Service Life Indicator Lights Up
When the time is about to come when the Imaging Unit needs replacement, the I.U. Service Life Indicator starts blinking to prompt you to replace it with a new one.
Replace the Imaging Unit by following the procedure given below.
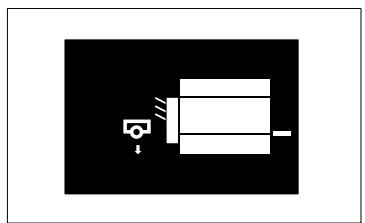
When 2,500 more copies are made with the Add Toner Indicator lighting up, or 7,500 more copies are made after the I.U. Service Life Indicator has started blinking, the I.U. Service Life Indicator lights up steadily and the copier inhibits the initiation of a new copy cycle. See the diagram below.
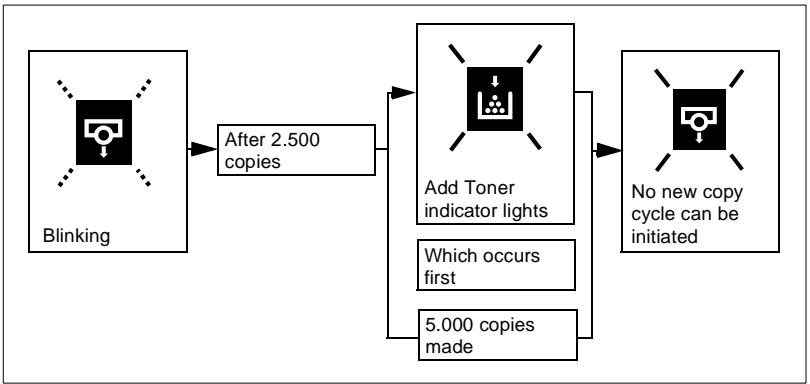

Useful Tip
Replace the Imaging Unit as soon as possible once the I.U. Service Life Indicator has started blinking.
Precautions for Handling
- Do not leave the I. U. in a bright place.
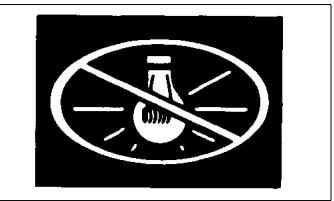
- Do not store the I. U. in a hot place of 40^ C ( 104^ F ) or more.
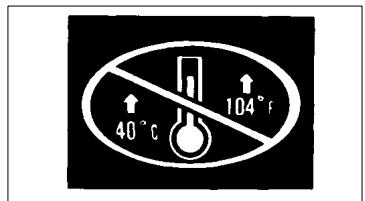
- Do not store the I. U. in a humid place or subject to water splash.

- Do not store the I. U. upside down or titled.
Do not subject the I. U. to vibration.
Removing the I. U. from the copier
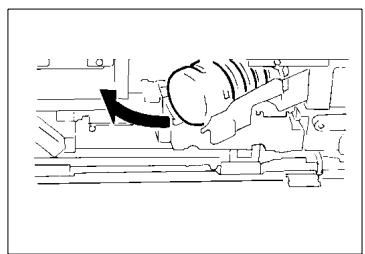
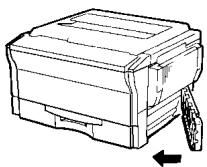
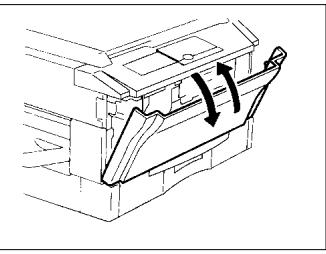
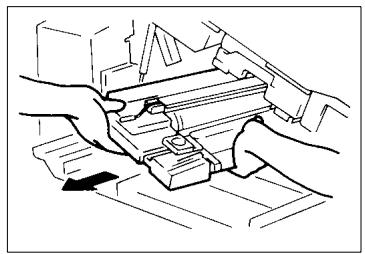
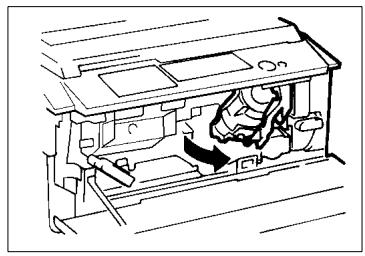
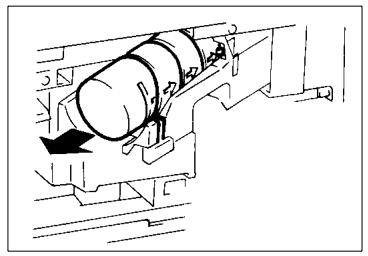
1 Open the Front Door. Turn the Lock Release Lever counterclockwise to swing up the Upper Half of the copier.
If the copier is equipped with an Automatic Document Feeder
Unlock and swing up the Upper Half of the copier. Then lock Stopper 2
2 Turn the I. U. Lock Release Lever and, while holding it down, pull the I. U. halfway out of the copier.
3 Firmly grasp the I. U. with both hands and pull it all the way out of the copier.
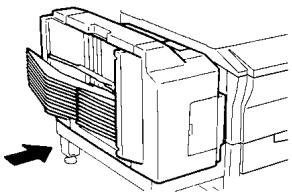
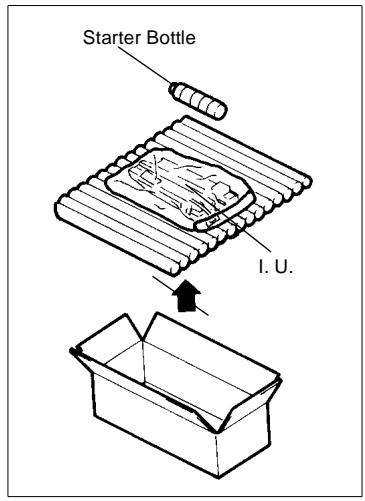
Unpacking the I. U.
1 Peel off the tape and open the Box.
2 Take the Starter Bottle and the I. U. in its bag out of the Box.
Setting up the I. U.
1 Take the I. U. out of the bag.
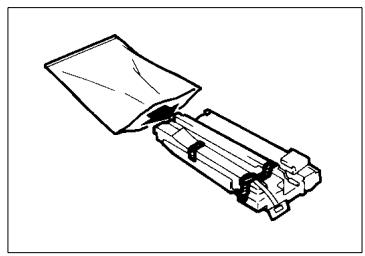
2 Peel off the three pieces of tape and packing materials.
3 Carefully pull the polyester tape from the I. U..
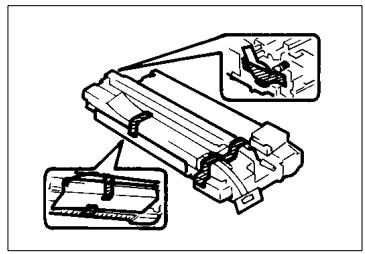
4 Remove the Cap from the I. U. and re-fit it to the used I. U. as shown in the illustration.
5 Align the I. U. with the rails in the copier.
6 Slide the I. U. all the way into the copier.
7 Be sure to push the I. U. into the locked position until a click is heard. Then, check the position of the Lock Release Lever, as shown in the illustration.


An improperly installed I. U. could be a cause of copier malfunction.
8 Lower the Upper Half of the copier and push it into the locked position by pushing down on the portion marked with "Push Down Here Only".
If the copier is equipped with an Automatic Document Feeder
Slightly lifting up the Upper Half of the copier and unlock Stopper M2. Gently Swing down and lock the Upper Half of the copier. Then, close the Front Door.
Charging the Copier with Starter and Toner
1 Swing out the Bottle Holder.
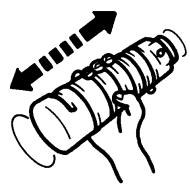
2 Holding the Starter Bottle so that its tab is on the upper side, shake it well.

NOTE
Make sure that "MT starter 104" is printed on the Starter Bottle.
3 Peel off the tape from the Starter Bottle.
4 Align the markings on the Starter Bottle with the upper side of the Bottle Holder and slide the Bottle into position.
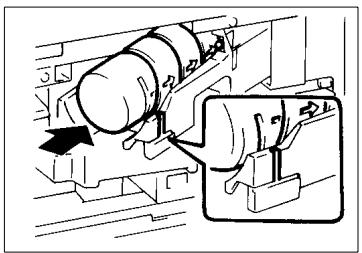

NOTE
Insert the Bottle all the way into the copier until the marking on the Bottle is aligned with the marking on the Bottle Holder.
5 Then, swing in the Bottle Holder until it locks into position. Close the Front Door.
6 Plug the Power Cord into the wall outlet and turn ON the Power Switch. This will cause the wait indicator to be shown on the control panel.

7 The copier automatically starts the charging cycle for approximately 5 minutes.
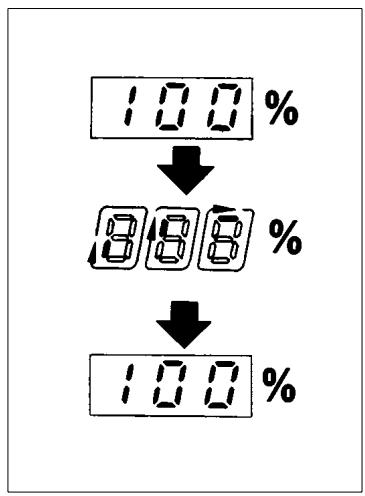
During this cycle, do not open the Front Door.
During this cycle, six segments of the ones digit LED on the Magnification Ratio Indicator forming a "0" light up and go out one after another, indicating that the copier is being charged with starter. When the copier has been completely charged with Starter, the indication on the Magnification Ratio Indicator changes to "100" and the cycle stops.
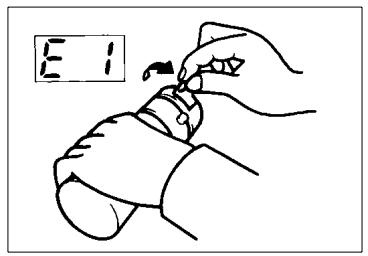
8 If "E1" or "E2" is indicated on the Magnification Ratio Indicator, the tape has not been removed from the Starter Bottle. Swing down the Front Door and remove the tape and perform the starter charging procedure again.
If "E1" or "E2" is indicated again call your Technical Representative.
9 Swing down the Front Door, swing out the Bottle Holder and remove the Starter Bottle.
10 Tap the new Toner Bottle on a hard surface, such as a desk, several times. Then, turn the Toner Bottle over and tap it several times again in the same manner.
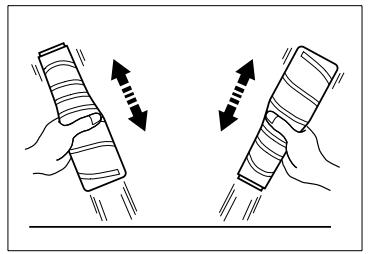
11 Hold the Toner Bottle so that its tab is on the upper side, shake it well and peel off the tape.
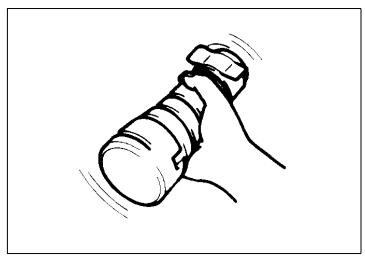
Once the tape has been removed, hold the Bottle so that its toner port faces up.
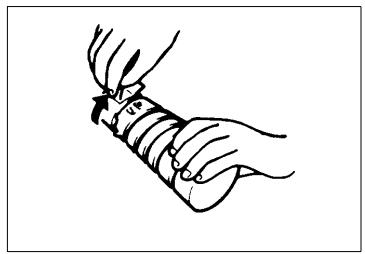
12Align the markings on the Toner Bottle with the upper side of the Bottle Holder and slide the Bottle into position.
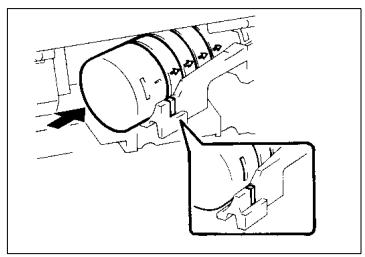

NOTE
Insert the Bottle all the way into the copier until the marking on the Bottle is aligned with the marking on the Bottle Holder.
13Then, swing in the Bottle Holder until it locks into position and close the Front Door.
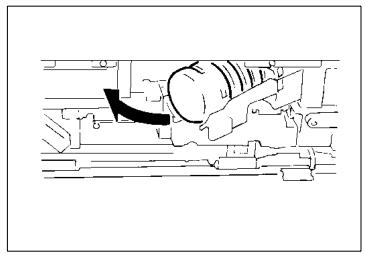
6 Troubleshooting
6.1 When this Type of Copy is Produced
| Symptom | Possible Cause | Action |
| The image is too light. | The exposure level for the Auto Exposure Mode is set at one of the "Light" levels. | Change the setting in the User's Choice Mode U-13 (Default Auto Exposure Level), see page 4-7. Cancel the Auto Exposure Mode and select the Manual Exposure Mode to adjust the exposure level and obtain a darker image, see page 3-16. |
| The manual exposure level is set on the lighter side. | Press the Exposure Control Key (Darker) as necessary to obtain a darker image, see page 3-16. | |
| You have been making copies from a photo or an original with a large dark area. | The copier needs more toner. Press the Auxiliary Toner Replenishing Key as many times as required to obtain the desired image density, see page 4-3. | |
| The Toner Bottle has just been replaced. | The copier needs more toner. Press the Auxiliary Toner Replenishing Key as many times as required to obtain the desired image density, see page 4-3. | |
| The Add Toner Indicator on the Monitor Display is lit up. | Replace the Toner Bottle with a new one, see page 5-2. | |
| The paper is damp. | Replace the paper, see page 5-4. | |
| The image is too dark. | The exposure level for the Auto Exposure Mode is set at one of the "Dark" levels. | Change the setting in the User's Choice Mode U-13 (Default Auto Exposure Level), see page 4-7. Cancel the Auto Exposure Mode and select the Manual Exposure Mode to adjust the exposure level and obtain a lighter image, see page 3-16. |
| The manual exposure level is set on the darker side. | Press the Exposure Control Key (Lighter) as necessary to obtain a lighter image, see page 3-16. | |
| The entire surface of the Original Glass is dirty. | Wipe the Original Glass clean with a soft dry cloth, see page 8-3. | |
| The original is not held tightly on the Original Glass. | Place the original in position so that it is held tightly against the Original Glass, see page 3-4. | |
| The copy is blurry. | The paper is damp. | Replace the paper, see page 5-4. |
| The copy has lines | The Corona Units are dirty. | Using the Corona Unit Cleaning Levers, clean the Corona Units, see page 8-4. |
| The copy has dark specks or spots. | The Original Glass is dirty. | Wipe the Original Glass clean with a soft dry cloth, see page 8-3. |
| The Original Pad or Document Feed Belt is dirty. | Wipe the Original Pad or Document Transport Belt clean with a soft cloth dampened with mild home detergent, see page 8-2 and see page 8-5. | |
| The original is very thin or highly transparent. | Place a blank sheet of paper over the original, see page 3-4. | |
| The original is two-sided. | The information on the back side of a two-sided, thin original may be slightly reproduced on the copy. Set the copier into the Manual Exposure Mode and, using the Exposure Control Key (Lighter), make the exposure level lighter, see page 3-16. | |
| The edge of the copy is dirty. | The Original Pad or Document Feed Belt is dirty. | Wipe the Original Pad or Document Transport Belt clean with a soft cloth dampened with mild home detergent, see page 8-2 and see page 8-5. |
| A paper size larger than the original is loaded in the Printer. (Zoom Ratio is set at full size 100%). | Load the same size copy paper as the original into the Printer, see page 5-4. Load the same size copy paper onto the Manual Bypass Tray or the Multi Bypass Tray, see page 3-22. | |
| The original is not placed in the correct direction. (Zoom Ratio is set at full size 100%.) | Reload the paper in the same direction as the original, see page 3-4. | |
| The reduction ratio selected is not in accordance with the copy paper size. (When doing manual reduction copying.) | Select the zoom ratio according to the copy paper size, see page 3-11. Or, use the Auto Size Mode to reduce the copy to the appropriate size, see page 3-14. | |
| The image on the copy is not aligned properly. | The original is not placed in the correct position. | Place the original correctly on the Original Glass against the Original Width Scale, see page 3-4. Or, load it into the Automatic Document Feeder correctly along the Document Guide Plates, see page 3-8. |
| The originals may not be suitable for use in the Automatic Document Feeder. | Raise the Automatic Document Feeder, and place the originals on the Original Glass, one at a time, instead of using the Automatic Document Feeder, see page 3-4. | |
| The Original Glass is dirty. (When the Automatic Document Feeder is being used.) | Wipe the Original Glass clean with a soft dry cloth, see page 8-3. |
If these procedures do not correct the problem, contact your Technical Representative
6.2 The Copier is not functioning as designed
| Symptom | Check for | Action |
| None of the Control Panel Indicators light up. | Is the Start Key lit up green? | The copier is in the Energy Saver Mode. Press any Key on the Control Panel to cancel the Energy Saver Mode, see page 2-14. |
| The copier is in the Auto Shut OFF Mode. | Turn the Power Switch ON. | |
| Pressing the Start Key does not start the copy cycle. | Is the Start Key blinking Orange? | The copier is now warming up. Please wait, see page 2-12. |
| Is any of the following Indicators lit up? | Take the necessary steps for each Indicator, see page 5-1. | |
| Is the power cord plugged into the power outlet? | Plug the power cord into the power outlet. | |
| Is the room circuit breaker open? | Close the room circuit breaker. |
Turn the copier OFF immediately, unplug the power cord, and call your Technical Representative.
7 Specifications
Copier EP1085
| Specification | |
| Type | Desk Top Copier |
| Platen Type | Stationary |
| Photoconductor | OPC |
| Copying System | Electrostatic Dry Powdered Image Transfer to Plain Paper |
| Developing System | Micro-Toning System |
| Fusing System | Lamp-Heated Roller |
| Types of Original | Sheets, Books, and other three-dimensional objectsMaximum Original Size: A3 LengthwiseMaximum Original Weight: 3kg. |
| Kinds of Paper | Plain paper, Recycled paper: Weighing 60g/m2to 90g/m2Special paper (Manual Bypass Table only)Thick paper weighing: 91g/m2to 157g/m2OHP transparenciesTranslucent paper |
| Copy Paper Size | Drawer:A3L, B4L, A4L, A4C, B5C, A5L, 8" x 13"L, 8-1/2" x 13"L, 8-1/4" x 13"L (When the Marketing Area Switch is flipped to "Inch")11" x 17"L, 5-1/2" x 8-1/2"L, LEGAL L, LETTER LManual Bypass TrayCrosswise: 100mm to 297mmLengthwise: 140mm to 432mmLost image:1-sided copy in the Full size modeLeading edge: 3 mm (approx. 1/8")Trailing edge: 3 mm (approx. 1/8")Front edge: 1 mm (approx. 1/25") |
| Paper Feeding System | Automatic feeding from a drawer and manual feeding via Manual Bypass Tray or Multi Bypass Tray (option)Drawer: 250 sheets of 80g/m2paper |
| Warming-up Time | 30 seconds or less at Ambient temperature of 23°C/73°F(20 seconds or less when the Energy Saver Mode is used) |
| First copy Time | A4C = 7.2 seconds or less(in Full Size Mode using First Copier Drawer) |
| Copying Speed(approx. copies/minute) | DrawerFull size (100%)A3L: 12 B4L: 13A4L: 16 A4Y: 18 |
| Zoom Ratios | Fixed ratiosFull size: 1:1±0.5%Reduction Ratios: 50%, 70%, 81%Enlargement Ratios: 115%, 141%, 200%Zoom ratios: From 50% to 200% in 1% increments |
| Multiple Copy | Up to 99 copies (Count-Down system) |
| Exposure Control | Auto, Manual and Photo Mode |
| Power Requirements | AC 115V, 120V, 127V, AC 220V-240V, 50/60Hz |
| Power Consumption | 1.3 kW (Max.) |
| Dimensions | Width: 610mm (Excluding Exit Tray) Depth: 637mm Height: 401mm (Including Original Cover) |
| Weight | 50 kg (Excluding Copy Tray, Starter, Toner) |
Automatic Document Feeder AF-5
| Specification | |
| Document Feeding System | • Standard Mode: 1-sided original, 2-in-1, Single Feeding • Mixed Original Detection Mode: 1-sided Mixed Original Detection • Lightweight Original Mode |
| Kinds of Original | Plain paper |
| Original Weight | • 1-sided Original Mode, 2-in-1 Mode: 50g/m² to 110g/m² • Mixed Original Detection Mode: 60g/m² to 90g/m² • Single Feeding Mode: 35g/m² to 157g/m² • Lightweight Original Mode: 40g/m² to 110g/m² |
| Original Size | • 1-sided Original Mode: A3L, B4L, A4L, A4C, A5L, 210mm x 330mm • 2-in-1 Mode: A4C |
| Capacity of Document Feed Tray | • A4 or Smaller: 50 sheets (80g/m²) • A3 or B4: 30 sheets (80g/m²) |
| Copy Productivity | 100% |
| First Copy with ADF | A4C = 11 seconds or less |
| Power Source | DC24V supplied from copier |
| Power Consumption | 48W or less |
| Dimensions | Width: 587mm Depth: 505mm Height: 125mm |
| Weight | 12 kg |
10 Bin Sorter S-106
| Specification | |
| No. of Bins | Sort Bins: 10 |
| Modes | Non-Sort Mode, Sort Mode, Group Mode |
| Kinds of Paper | Non-Sort Mode • Plain paper, Recycled paper • Special Paper Thick paper, Transparencies, Translucent paper Sort Mode, Group Mode • Plain paper, Recycled paper |
| Paper Size | Non-Sort Mode, Sort Mode, Group Mode: A5L to A3L |
| Capacity of Bins | Non-Sort Mode • Plain paper, Recycled paper 1st bin: 50 sheets 2nd to 10th bin: 25 sheets / bin • Special Paper 1st bin only: 10 sheets / bin Sort Mode, Group Mode • Plain paper, Recycled paper 1st to 10th bin: 25 sheets / bin |
| Power Source | DC24V supplied from copier |
| Power Consumption | 72W or less |
| Dimensions | Width: 400mm Depth: 562mm Height: 404mm |
| Weight | 15.8 kg |
Multi Bypass Tray MB-4
| Specification | |
| Type | Universal Multi-Sheet Bypass Unit |
| Installation | Attached to copier |
| Registration | Front edge |
| Capacity of Table | • Plain Paper (white): 50 sheets (80g/m2) or less • Plain Paper (once-copied paper): 20 sheets or less • Recycled Paper, Thick paper, translucent paper: 20 sheets or less • OHP transparencies: 5 sheets or less |
| Kinds of Paper | • Plain paper, Recycled paper: weighing 60g/m2to 90g/m2 • Special paper Thick paper: weighing 90g/m2to 157g/m2 OHP Transparencies Translucent paper |
| Paper Size | Standard: A3L to A6L Non-standard: Crosswise: 100mm to 297mm Lengthwise: 140mm to 432mm |
| Power Source | DC24V supplied from copier |
| Power Consumption | 30W or less |
| Weight | 2.7 kg |
8 Miscellaneous
8.1 Care of the Copier
To keep your copier in good shape at all times, make the following daily checks and cleaning.
Daily Checks
Power Cord, Communications Cable, Ground Cable
| Item | Action |
| Is the copier placed on its power cord or other Cables? | It could result in the copier or other electrical equipment malfunctioning. Move the copier immediately. |
| Is the copier placed on cables of other electrical equipment? | |
| Are the cord and cables free of damage or cracks? | Turn the copier OFF immediately, unplug the power cord, and call your Technical Representative. |
| Has the cord or cable jacket frayed to expose the wires? |
Communications Cable: Cable connecting the copier with options
Original Glass
| Item | Action |
| Is the Glass dirty? | Clean the Glass using the procedure given in “Cleaning”, see page 8-3. |
| Is the Glass scratched? | Call your Technical Representative. |
| Is the Glass cracked or chipped? |
Original Cover, Automatic Document Feeder
| Item | Action |
| Is the Original Pad or Document Transport Belt dirty? | Clean the Pad or Belt using the procedure given in “Cleaning”, see page 8-2. |
| Is the Original Pad or Document Transport Belt scratched? | Call your Technical Representative. |
Copy Paper
| Item | Action |
| Is the paper damp and wavy? | Replace the paper, see page 5-4. |
Sound of Copier Operation
| Item | Action |
| Is there any unusual noise heard while the copier is running? | Call your Technical Representative. |
Copier Housing Temperature
| Item | Action |
| Is the housing temperature inordinately high? | Call your Technical Representative. |
Cleaning
Housing
Wipe the surface of the Housing clean with a soft cloth dampened with mild home detergent.
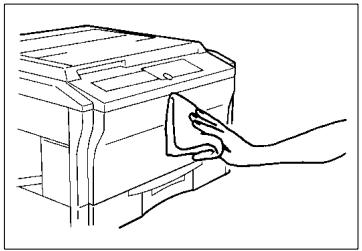
Original Pad
1 Raise the Original Cover.
2 Wipe the surface of the Original Pad clean with a soft cloth dampened with mild home detergent.
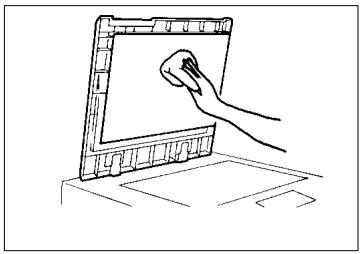
Original Glass
1 Raise the Original Cover.
2 Wipe the surface of the Original Glass clean with a soft, dry cloth.
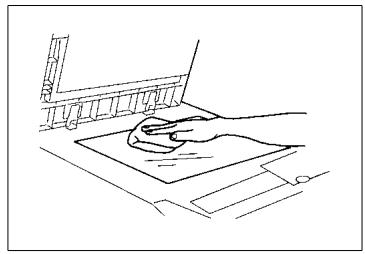
Control Panel
1 Turn the Power Switch OFF.
2 Wipe the surface of the control panel clean with a soft, dry cloth.
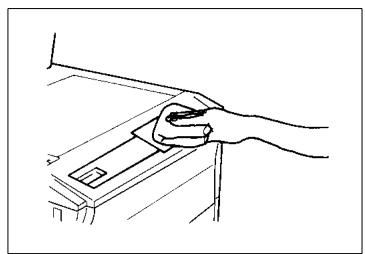

NOTE
NEVER use a glass cleaner or any other detergent to avoid damage to the control panel keys and display.
Front Door
1 Swing down the Front Door.
2 Wipe the inside of the Front Door clean with a soft cloth.
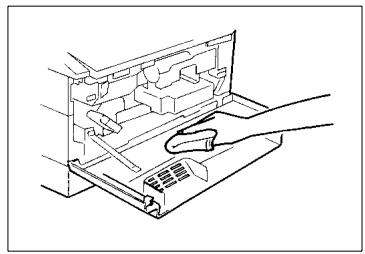
Corona Units
1 Gently slide out the Upper Corona Unit Cleaning Lever as far as it will go.
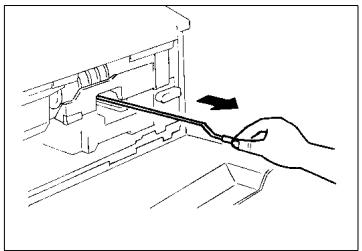
2 Gently slide the Cleaning Lever back into the original position.
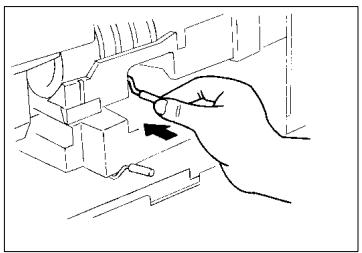
3 Gently slide out the Lower Corona Unit Cleaning Lever as far as it will go.
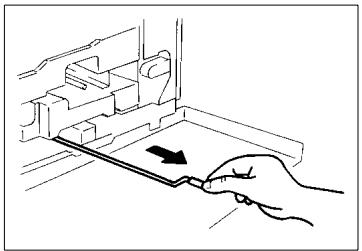
4 Gently slide the Cleaning Lever back into the original position.
5 Repeat steps 1 to 4 two to three times.
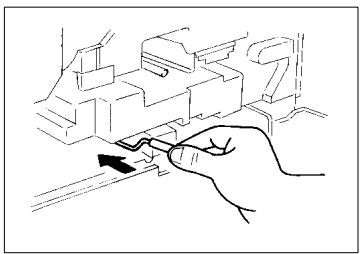
Document Transport Belt
1 Raise the Automatic Document Feeder.
2 Wipe the surface of the Document Transport Belt clean with a soft cloth dampened with mild home detergent.
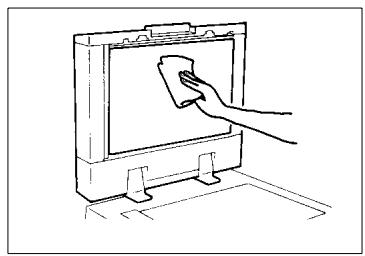
3 Hold the Document Transport Belt on both edges and pull it to the left to expose a fresh surface.

4 Wipe the fresh surface clean with a soft cloth dampened with mild home detergent.
Repeat these steps until the entire surface of the Belt is wiped clean.
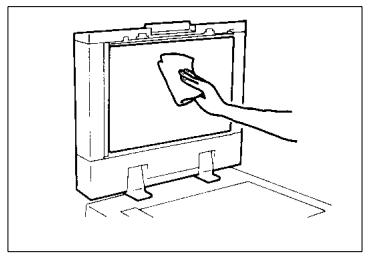
8.2 Paper Size and Zoom Ratio Table
Paper Size
| Name | Size (Metric) | Size (Inch) |
| A 3 | 297mm x 420mm | 11-3/4" x 16-1/2" |
| A 4 | 210mm x 297mm | 8-1/4" x 11-3/4" |
| A 5 | 148mm x 210mm | 5-3/4" x 8-1/4" |
| A 6 | 105mm x 148mm | 4-1/4" x 5-3/4" |
| B 4 | 257mm x 364mm | 10" x 14-1/4" |
| B 5 | 182mm x 257mm | 7-1/4" x 10" |
| B 6 | 128mm x 182mm | 5" x 7-1/4" |
| Post Card | 100mm x 148mm | 4" x 5-3/4" |
| Name | Size (Inch) | Size (Metric) | |
| LEDGER | 11" x 17" | 279mm x 432mm | |
| 11" x 14" | 11" x 14" | 279mm x 356mm | |
| COMPUTER | 10-1/8" x 14" | 257mm x 356mm | |
| 10" x 14" | 10" x 14" | 254mm x 356mm | |
| 9-1/4" x 14" | 9-1/4" x 14" | 236mm x 356mm | |
| LEGAL | 8-1/2" x 14" | 216mm x 356mm | |
| Foolscap | GOVERNMENT LEGAL | 8-1/2" x 13" | 216mm x 330mm |
| Foolscap | 8" x 13" | 203mm x 330mm | |
| Foolscap | 8-2/3" x 13" | 220mm x 330mm | |
| Foolscap | FOLIO | 8-1/4" x 13" | 210mm x 330mm |
| 8-1/4" x 11-3/4" | 8-1/4" x 11-3/4" | 210mm x 301mm | |
| LETTER | 8-1/2" x 11" | 216mm x 279mm | |
| GOVERNMENT LETTER | 8" x 10-1/2" | 203mm x 267mm | |
| QUARTO | 8" x 10" | 203mm x 254mm | |
| STATEMENT | INVOICE | 5-1/2" x 8-1/2" | 140mm x 216mm |
Zoom Ratio Table (Original Size to Copy Paper Size)
Zoom Ratio = Copy Paper Size + Original Size
1" (inch) = 25.4 mm
- 1 mm = 0.0394^ (inch)
| Metric Areas | ||
| Original Size | Copy Paper Size | Zoom Ratio |
| A 3 | A 4 | x 0.707 |
| 297 x 420mm | A 5 | x 0.500 |
| 11-3/4" x 16-1/2" | B 4 | x 0.866 |
| B 5 | x 0.610 | |
| A 4 | A 5 | x 0.707 |
| 210 x 297mm | A 6 | x 0.500 |
| 8-1/4" x 11-3/4" | B 5 | x 0.866 |
| B 6 | x 1.224 | |
| A 3 | x 1.414 | |
| B 4 | x 1.224 | |
| A 5 | A 6 | x 0.707 |
| 148 x 210mm | B 6 | x 0.866 |
| 5-3/4" x 8-1/4" | A 4 | x 1.414 |
| A 3 | x 2.000 | |
| B 4 | x 1.733 | |
| B 5 | x 1.224 | |
| A 6 | A 4 | x 2.000 |
| 105 x 148mm | A 5 | x 1.414 |
| 4-1/4" x 5-3/4" | B 5 | x 1.733 |
| B 6 | x 1.224 | |
| B 4 | A 4 | x 0.816 |
| 257 x 364mm | A 5 | x 0.577 |
| 10" x 14-1/4" | B 5 | x 0.707 |
| B 6 | x 0.500 | |
| A 3 | x 1.154 | |
| Metric Areas Original Size | Copy Paper Size | Zoom Ratio |
| B 5 182 x 257mm 7-1/4" x 10 | A 5 | x 0.816 |
| A 6 | x 0.577 | |
| B 6 | x 0.707 | |
| A 3 | x 1.640 | |
| A 4 | x 1.154 | |
| B 4 | x 1.414 | |
| B 6 128 x 182mm 5" x 7-1/4" | A 6 | x 0.816 |
| A 4 | x 1.640 | |
| A 5 | x 1.154 | |
| B 4 | x 2.000 | |
| B 5 | x 1.414 | |
| Inch Areas | ||
| Original Size | Copy Paper Size | Zoom Ratio |
| 11" x 17"279.4 x 431.8mm | 11" x 14" | x 0.823 |
| Legal | x 0.772 | |
| Foolscap | x 0.764 | |
| Letter | x 0.647 | |
| Invoice | x 0.500 | |
| 11" x 15"279.4 x 381mm | 11" x 14" | x 0.933 |
| Legal | x 0.772 | |
| Foolscap | x 0.722 | |
| Letter | x 0.733 | |
| Invoice | x 0.500 | |
| 11" x 14"279.4 x 355.6mm | Legal | x 0.772 |
| Foolscap | x 0.772 | |
| Letter | x 0.772 | |
| Invoice | x 0.500 | |
| Legal8-1/2" x 14"215.9 x 355.6mm | Legal | x 0.928 |
| Foolscap | x 0.785 | |
| Letter | x 0.607 | |
| Invoice | x 1.214 | |
| Foolscap 8-1/2" x 13" 215.9 x 330.2mm | Foolscap | x 0.846 |
| Letter | x 0.647 | |
| Invoice | x 1.294 | |
| 11" x 17" | x 1.076 | |
| Letter 8-1/2" x 11" 215.9 x 279.4mm | Invoice | x 0.647 |
| 11" x 17" | x 1.294 | |
| 11" x 14" | x 1.272 | |
| Invoice 5-1/2" x 8-1/2" 139.7 x 215.9mm | 11" x 17" | x 2.000 |
| 11" x 14" | x 1.647 | |
| Legal | x 1.545 | |
| Foolscap | x 1.529 | |
| Letter | x 1.294 | |
A
Add Toner 5-2
Adding Paper 5-4
Auto Copy Start Function 2-13
Auto Dual Function 3-21
Auto Exposure Mode 3-15, 3-16
Auto Panel Reset for Plug-In Counter 4-11
Auto Panel Reset ON/OFF 4-10
Auto Reset Function 2-16
Auto Shut OFF Timing 4-11
Auto Size Mode 3-14
Auto Size/Manual priority 4-7
B
Book Copying 3-17
C
Call-Tech.-Rep. Indicator 5-15
Cleaning 8-2
Closure Failure Indicator 5-6
Condensation 4-4
Control Panel 2-7
Corona Unit Cleaning Lever 8-4
D
Daily Checks 8-1
Default auto exposure level 4-7
DefaultFinishingmode 4-9
Description of Copy Paper Size 8-6
Display 2-9
Drum Dehumidifier Function 4-4
E
Energy Saver Mode 2-14
Energy Saver ON Timing 4-10
Enlargement 3-12
Enlargement Ratios 3-12
F
Finishing Modes 3-19
Fixed Zoom Ratios 3-11
Full Size 3-12
Full Size Copy 3-12
I. U. Service Life Indicator 2-10
I.U. Service Life Indicator 5-16
Initial Mode 2-15
L
Lightweight Original Mode 3-6,4-6
M
Manual Bypass Copying 3-22
Manual Exposure Mode 3-15, 3-16, 4-9
Misfeed Indicator 5-7
Multi Bypass Copying 3-23
N
Non Sort 3-19
Non-Auto Shut OFF 4-7
Non-Sort Mode 3-19
0
Original Placement 3-4
P
Panel Resetting 2-15
Paper Size 3-10
Paper, Add 5-4
Photo Mode 3-15, 3-16
Placing Originals 3-4
Power Switch 2-12
R
Reduction ratios 3-11
Remove Copies Indicator 3-20
Replacing the Toner Bottle 5-2
S
Single Automatic Document Feeding Mode 3-9
Size Counter 4-1
Sort 3-19
Sort Mode 3-19
Sort/Non-Sort Auto Switching ON/OFF 4-11
T
Toner Replenisher Function 4-3
Toner, Add 5-2
Total Counter 4-1
Total Number of Copies Mode 4-1
U
User's Choice 4-6
Z
Zoom Ratio Table 8-7
- Safety Notes
- Getting to Know Your Copier
- Control Panel Keys and Indicators 2-7
- Turning ON and OFF, and Resetting the Copier 2-12
- Making Copies
- Copying Overview 3-1
- Copying Procedure 3-4
- Zoom Ratio 3-11
- Image Density 3-15
- Auxiliary Functions
- When an Indicator Lights Up
- Troubleshooting
- Specifications
- Miscellaneous
- Using the Copier Properly
- NOTE
- Locate the Copier in a Well Ventilated Room
- What is an Energy Star Copier?
- EP1085
- CE Marking (Declaration of Conformity)
- Terms and Symbols for the Type of Originals and Copy Paper
- Feeding Direction (copy paper path)
- "Width" and "Length"
- Terms and Symbols Used
- Lengthwise
- Crosswise
- Installing the Copier
- Installation Site
- Power Source
- Grounding
- Space Requirements
- Precautions for Use
- Operating Environment
- Care of Copier Supplies
- Moving
- Legal Restrictions on Copying
- Financial Instruments
- Legal Documents
- General
- System Overview
- Copier Parts and Accessories
- Inside Copier
- Automatic Document Feeder AF-5
- 10-Bin Sorter S-106
- Multi Bypass Tray MB-4
- Control Panel Keys and Indicators
- Display
- Monitor Display
- Paper Information Display
- Zoom Ratio Indicator / Multi-Copy Display
- Exposure Information Display
- Turning ON and OFF, and Resetting the Copier
- Turning ON and OFF
- Useful Tip
- When the Copier is Turned ON
- Auto Copy Start Function
- (Only when Automatic Document Feeder is used)
- Using the Function
- Minimizing the Warm-up Time
- Initial Mode and Panel Resetting
- - Initial Mode
- - Panel Resetting
- Auto Reset Function
- Copying Overview
- Copying Procedure
- Placing Originals
- Sheet Originals (Standard Size)
- Highly Transparent Originals
- Book Original
- Using the Automatic Document Feeder
- Loading Standard Size Originals
- For Originals Not Suitable for Reliable Operation of the Automatic Document Feeder
- Single Automatic Document Feeding Mode (SADF Mode)
- NOTES
- Checking the Copy Paper Size and Selecting the Paper Source
- Selecting the Paper Source (Only when the Multi Bypass Tray is used)
- Zoom Ratio
- Fixed Zoom Ratios
- Zoom Ratios
- Selecting the Fixed Zoom Ratios
- Reduction
- - Enlargement
- Full Size
- Setting a Zoom Ratio
- Auto Size Mode
- Selecting the Auto Size Mode
- Image Density
- Types of Exposure Modes
- Selecting the Auto Exposure Mode
- Selecting the Manual Exposure Mode
- Selecting the Photo Mode
- Useful Tips
- Book Copying
- Selecting the Book Copying Mode
- Finishing Mode
- Types of Finishing Modes
- Non Sort
- - Sort
- Selecting the Finishing Mode
- Auto Dual Function
- Auto Dual Function in the Sort Mode
- Manual Bypass Copying
- IMPORTANT
- Using the Manual Bypass Tray
- Using the Multi Bypass Tray (Option)
- Checking the Total Number of Copies Mode
- Types of Counters
- Counter Display
- Using the Meter Count Function
- Toner Replenisher Function (Increasing the Image Density)
- Drum Dehumidifier Function
- User's Choice
- Description of Each User's Choice Function
- U-4 Lightweight Original Mode
- U-7 Non-Auto Shut OFF
- U-12 Auto Size/Manual priority
- U-13 Default auto exposure level
- U-15 Default Finishing mode
- U-20 Auto Panel Reset ON/OFF
- U-21 Energy Saver ON Timing
- Conditions
- Making the User's Choice Mode Settings
- Press the Clear Key.
- Using the Key Pad, enter the new setting.
- Press the Start Key.
- Quick Reference for Indicator Lights
- Detailed Instructions for Indicator Lights
- Add Toner Indicator
- Replacing the Toner Bottle
- Toner Replenisher Function
- Add Paper Indicator
- Adding Paper (Drawer)
- Adding Paper (Multi Bypass Tray)
- Closure Failure Indicator
- Misfeed Indicator
- Misfeed Indicator and Monitor Display
- Misfeed Clearing Procedure
- CAUTION: HOT
- Automatic Document Feeder
- Sorter
- Call-Tech.-Rep. Indicator
- Resetting the Call-Tech.-Rep. Indicator
- I.U. Service Life Indicator Lights Up
- Precautions for Handling
- Removing the I. U. from the copier
- Unpacking the I. U.
- Setting up the I. U.
- Charging the Copier with Starter and Toner
- When this Type of Copy is Produced
- The Copier is not functioning as designed
- Care of the Copier
- Daily Checks
- Copy Paper
- Sound of Copier Operation
- Copier Housing Temperature
- Cleaning
- Housing
- Original Pad
- Original Glass
- Control Panel
- Front Door
- Corona Units
- Document Transport Belt
- Paper Size and Zoom Ratio Table
- Zoom Ratio Table (Original Size to Copy Paper Size)
- A
- B
- C
- D
- E
- F
- L
- M
- N
- 0
- P
- R
- S
- T
Brand : KONICA MINOLTA
Model : EP1085
Category : Photocopier