
CMSU4303X - Coffee machine SMEG - Free user manual and instructions
Find the device manual for free CMSU4303X SMEG in PDF.
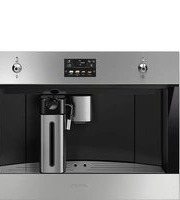


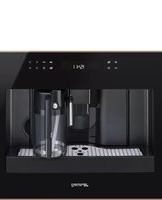
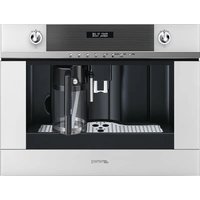
| Product Type | Espresso Coffee Machine |
| Brand | Smeg |
| Model | CMSU4303X |
| Color | Stainless Steel |
| Dimensions (H x W x D) | 33.0 x 14.5 x 41.0 cm |
| Weight | 9.5 kg |
| Power Consumption | 1400 W |
| Voltage / Frequency | 220-240 V / 50-60 Hz |
| Water Tank Capacity | 1.5 L |
| Bean Hopper Capacity | 250 g |
| Pump Pressure | 15 bar |
| Functions | Espresso, Steam, Hot Water |
| Grinder Type | Integrated Ceramic Burr Grinder |
| Grind Settings | Adjustable (Multiple Levels) |
| Removable Drip Tray | Yes |
| Cup Warmer | Yes (Top Surface) |
| Auto Shut-Off | Yes (Programmable) |
| Water Hardness Setting | Yes |
| Descaling Alert | Yes |
| Material | Stainless Steel, Plastic |
| Warranty | 2 Years |
| Repairability Index | 8.5 / 10 |
| Energy Efficiency Class | A |
| Coffee Pod Compatibility | Not Compatible (Bean Only) |
Frequently Asked Questions - CMSU4303X SMEG
User questions about CMSU4303X SMEG
0 question about this device. Answer the ones you know or ask your own.
Ask a new question about this device
Download the instructions for your Coffee machine in PDF format for free! Find your manual CMSU4303X - SMEG and take your electronic device back in hand. On this page are published all the documents necessary for the use of your device. CMSU4303X by SMEG.
USER MANUAL CMSU4303X SMEG




CONTENTS
INTRODUCTION 8
Symbols used in these instructions ....8
Letters in brackets....8
Troubleshooting and repairs 8
Instructions for use 8
DESCRIPTION OF THE APPLIANCE 9
Description of the appliance 9
Description of homepage 10
Description of the accessories ....10
Description of milk container 10
PRELIMINARY OPERATIONS .... 10
Checking the appliance 10
SETTING UP THE APPLIANCE....10
TURNING THE APPLIANCE ON....11
TURNING THE APPLIANCE OFF 11
MENU SETTINGS....11
Rinsing....11
De-scaling....11
Water filter....11
Beverage settings 11
Set time....12
Auto -start 12
Auto-off (standby) 12
Cup warmer 12
Energy saving....12
Coffee temperature....13
Water hardness 13
Selecting the language 13
Sound notification ....13
Light 13
Demo mode....13
Default values....13
Statistics 13
MAKING COFFEE 14
Selecting the coffee aroma 14
Selecting the coffee quantity 14
Making coffee using coffee beans 14
Making coffee using pre-ground coffee 14
Adjusting the coffee mill 15
Tips for a hotter coffee 15
MAKING MILK-BASED HOT DRINKS....15
Filling and attaching the milk container .....15
Adjusting the amount of froth 16
Making milk based hot drinks automatically .....16
Cleaning the milk container after use 16
DELIVERING HOT WATER 16
STEAM DELIVERY....17
Tips for using steam to froth the milk....17
Cleaning the hot water/steam spout after use 17
CUSTOMISING BEVERAGES....17
MEMORISING YOUR PERSONAL PROFILE 18
CLEANING....18
Cleaning the machine ....18
Cleaning the appliance internal circuit....18
Cleaning the coffee grounds container....18
Cleaning the drip tray 18
Cleaning the inside of the coffee machine .....19
Cleaning the water tank....19
Cleaning the coffee spouts 19
Cleaning the pre-ground coffee funnel .....19
Cleaning the infuser....19
Cleaning the milk container 19
Cleaning the hot water/steam connection nozzle ...... 20
DESCALING 20
PROGRAMMING WATER HARDNESS....21
Measuring water hardness....21
Setting water hardness 21
WATER SOFTENER FILTER 21
Installing the filter 21
Replacing the filter 21
Removing the filter 22
TECHNICAL DATA....22
DISPLAYED MESSAGES....23
TROUBLESHOOTING 28
INTRODUCTION
Symbols used in these Instructions
Important warnings are identified by these symbols. Failure to observe the Instructions for Use could result in electric shock, serious injury, burns, fire, or damage to the appliance.

Danger!
Failure to observe the warning may result in life-threatening injury by electric shock.

Important!
Failure to observe the warning could result in injury or damage to the appliance.

Danger of burns!
Failure to observe the warning could result in scalds or burns.

Please note:
This symbol identifies important advice or information for the user.
Letters in brackets
The letters in brackets refer to the key in the Description of the appliance.
Troubleshooting and repairs
In the event of problems, follow the information given in the sections "Displayed messages" and "Troubleshooting". If this does not resolve the problem, you should consult customer services. For repairs, contact customer services only.
IMPORTANT SAFEGUARDS
When using electrical appliances, basic safety precautions should always be followed, including the following.
Read all instructions before installation or use of the coffee system.
Please read these instructions carefully to prevent accidents and machine damage.
This appliance is for household use only, to prepare espresso, cappuccino and coffee. Do not use the appliance for other than its intended use. Any other use could be dangerous. The manufacturer cannot be held responsible for damage caused by improper use of the appliance.
Electrical safety
- Before connecting the appliance to the electrical supply, make sure that the voltage and frequency listed on the data plate correspond with the household electrical supply. If in doubt, consult a qualified technician.
on the data plate correspond with the household electrical supply. If in doubt, consult a qualified technician.
- The appliance must be properly installed before operation to ensure that no electrical components are accessible. Ensure that power is not supplied to the appliance while installation work, repairs, or maintenance is performed.
- Be certain your appliance is properly installed and grounded by a qualified technician. To guarantee the electrical safety of this appliance, continuity must exist between the appliance and an effective grounding system. It is imperative that this basic safety requirement be met. If there is any doubt, have the electrical system of the house checked by a qualified electrician. The manufacturer cannot be held responsible for damages caused by the lack, or inadequacy, of an effective grounding system.
- Do not use an extension cord to connect the appliance to electricity. An extension cord does not guarantee the required safety of the appliance (danger of overheating).
- Before service or maintenance, disconnect the power supply by either switching off the main switch and unplugging the unit.
• Install or locate this appliance only in accordance with the provided installation instructions.
- Installation work and repairs must be performed only by a trained technician in accordance with national and local safety regulations. Repairs and other work by unauthorized persons could be dangerous and may void the warranty.
- Only use original spare parts. Only then can the manufacturer guarantee the safety of this machine.
- Never open the outer casing of the appliance. Tampering with electrical connections or components and mechanical parts is dangerous and may cause machine damage.
- If the machine is installed in combination with other appliances, a protective base should be installed between the appliance and the unit.
- Do not install or use outdoors even if installed in the display cabinet.
• To protect against fire, electric shock and injury to persons do not submerge the cord or plugs in water
or other liquids.
- To reduce the risk of injury, do not drape cord over the counter top or table top where it can be pulled on by children or tripped over unintentionally.
- Do not let the cord hang over the edge of a table or counter, or touch hot surfaces.
- Do not operate any appliance with a damaged cord or plug, or after the appliance malfunctions or has been damaged in any manner.
- Return appliance to an authorized service facility for examination, repair or adjustment.
- To disconnect turn the machine off, switch off the main switch then remove the plug from the wall outlet.
Use
The coffee system must be maintained daily to prevent the growth of harmful bacteria and mold. Please read the Cleaning section of the booklet.

Important! Do not look directly or with an optical
instrument into the lighting.

Danger of burns! Risk of burns when dispensing hot beverages, they are extremely hot.
- Persons who lack physical, sensory, or mental abilities, or who lack experience with the machine, should not use it without supervision or instruction from a responsible person.
- Close supervision is necessary when any appliance is used by or near children.
- Do not touch hot surfaces. Use handles or knobs.
- To avoid injuries, allow the coffee system to cool before cleaning or putting on and taking off parts. Turn the machine off at the main switch when not in use and before cleaning.
- Only fill the water tank with cold, fresh tap water. Warm or hot water, or any other liquids, may damage the machine.
- The water should be changed daily to prevent bacteria or mold growth.
- Do not use mineral water. Mineral water leads to heavy calcium buildup in the machine that can damage the unit.
- Do not fill anything but coffee beans into the beans container.
Do not fill ground coffee in the beans container; it will damage the grinding unit.
- Sugar can damage the appliance! Caramelized or otherwise pre-treated coffee beans or other sugar-containing beverages must not be put in the machine.
- Never place a cup with an alcohol-coffee mixture underneath the coffee dispenser. Plastic parts of the unit could catch fire!
- The hot water and steam dispensed could cause scalding. These functions must be used carefully. Never hold any parts of the body under the steam nozzle or the hot water dispenser. The machine must never be used to clean objects.
- Never use a steam cleaner to clean the appliance. Pressurized steam could damage electrical components and cause a short circuit.
- The appliance must be descaled regularly with the supplied descaling tablets. In areas with very hard water, the machine may need to be descaled more often. The manufacturer cannot be held responsible for damages resulting from insufficient descaling.
- Only use the descaling tablets. Take care to use the correct mixture of water and descaler; otherwise, it may cause damage.
- Never make coffee, hot water or steam when the appliance is extracted. Always make sure the appliance is inactive before extracting it. Failure to observe this precaution could lead to damage to the appliance! The only exception is adjusting the coffee mill which must be done with the machine out (see the section "Adjusting the coffee mill").
- Do not place on or near a hot gas or electric burner, or in a heated oven.
SAVE THESE
INSTRUCTIONS
DESCRIPTION OF THE APPLIANCE
Description of the appliance
(page 3 - A)
A1. Cup holder tray
A2. Service door
A3. Coffee guide
A4. Coffee grounds container
A5. Infuser A6. Lighting to illuminate interior compartment A7. On/stand-by button / knob (only on some models) A8. Control panel A9. Tray for objects A10. Hot water/steam connection nozzle A11. Lighting knob to illuminate the interior compartment (only on some models) A12. Water tank A13. Coffee spouts (adjustable height) A14. Drip tray A15. Beans container lid A16. Beans container A17. Grinding adjustment dial A18. Lights to illuminate cup A19. Main ON/OFF switch A20. Measure holder A21. Ground coffee funnel A22. Power cord A23. Pre-ground door A24. Cup warming ledge
Description of homepage (page 3 - B)
B1. : menu to customise beverages settings B2. : appliance settings menu B3. Selected aroma B4. Clock B5. Selected quantity B6. :roma selection B7. : quantity selection B8. : call arrow B9. Selectable drinks (press on the scrolling arrow to see all the drinks B10. scroll arrow B11. Customisable profiles (see "Memorising your personal profile")
Description of the accessories
(page 3 - C)
C1. "Total Hardness Test" indicator paper C2. Ground coffee measure C3. De-scaler C4. Water softener filter (certain models only) C5. Cleaning brush C6. Hot water/steam spout C7. Connection nozzle cover
Description of the milk container
(page 3 - D)
D1. Froth adjustment and CLEAN function dial
D2 Lid with milk frother D3. Milk container D4. Milk intake tube D5. Adjustable frothed milk spout D6. Thermal casing D7. Lid release buttons
PRELIMINARY OPERATIONS
Checking the appliance
After removing the packaging, make sure the product is complete and undamaged and that all accessories are present. Do not use the appliance if it is visibly damaged. Contact customer services Technical Assistance.
SETTING UP THE APPLIANCE

Please note:
• Coffee has been used to factory test the appliance and it is therefore completely normal to find traces of coffee in the mill. The machine is, however, guaranteed to be new. - You should customise water hardness as soon as possible following the instructions in section "Setting water hardness".
- Connect the appliance to the mains electricity supply (fig. 1) and make sure the main switch (A19) on the side of the appliance is pressed down (fig. 2);
- SELECT LANGUAGE (setting language): press (B10) or (B8) until the flag corresponding to the required language appears on the display (B), then press the flag;
To proceed, follow the instructions indicated on the appliance display:
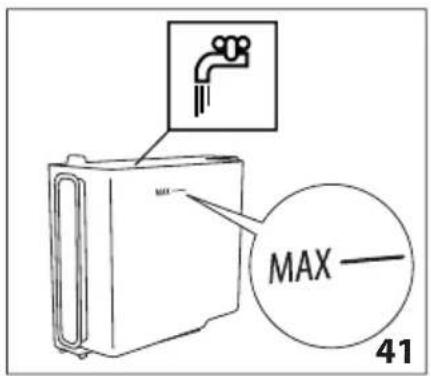
- FILL WATER TANK WITH FRESH WATER: remove the water tank (A12) (fig. 3), open the lid (fig. 4), fill to the MAX line (marked on the inside of the tank) with fresh water (fig. 5); close the lid and put the tank back into the appliance (fig. 6);
- INSERT WATER OUTLET: Check that the hot water/steam spout (C6) is inserted on the connection nozzle (A10) (fig. 7) and place a container with a minimum capacity of 100 ml underneath (fig. 8);
- WATER CIRCUIT EMPTY PRESS OK TO START FILLING PROCESS is shown on the display;
- Press √ok to confirm: the appliance delivers water from the spout (fig. 8) then goes off automatically.
The coffee machine is now ready for normal use.

Please note:
- The first time the appliance is used, it needs to make 4-5 cappuccinos before it starts to give satisfactory results.
- On first use the water circuit is empty, the machine could therefore be very noisy: the noise will lessen as the circuit fills up.
- When making the first 5–6 cappuccinos, it is normal to hear the noise of boiling water: after this the noise will lessen.
- To improve the performance of the appliance, we recommend installing a water softener filter (C4) as described in section "Water softener filter". If your model is not equipped with a filter, it is possible to request one from Authorised Customer Service Centres.
TURNING THE APPLIANCE ON

Please note:
Before turning the appliance on, make sure the main switch (A23) is pressed (fig. 2). Each time the appliance is turned on, it performs an automatic preheat and rinse cycle which cannot be interrupted. The appliance is ready for use only after completion of this cycle.

Danger of burns!
During rinsing, a little hot water comes out of the coffee spouts (A13) and is collected in the drip tray (A14) underneath. Avoid contact with splashes of water.
- To switch the appliance on, press the button (A) (fig. 9): the message "HEATING UP PLEASE WAIT" is shown on the display.
- When heating is complete, the message changes to: "RINSING HOT WATER RUNNING"; As well as heating the boiler, the appliance also allows hot water to run in the internal pipework as they also heat up.
The appliance is at the desired temperature when the main screen (homepage) appears.
TURNING THE APPLIANCE OFF
Every time the appliance is turned off, it automatically carries out a rinse if it has made a coffee.

Danger of burns!
During rinsing, a little hot water flows from the coffee spouts (A13). Avoid contact with splashes of water.
• To turn the appliance off, press the button (A7) (fig. 9). The message "TURNING OFF PLEASE WAIT" is shown on the display: if needed, the appliance performs a rinse cycle and then goes off (standby).

Please note:
If the appliance is not used for long periods, disconnect from the electricity supply as follows:
- first turn the appliance off by pressing the button ⏻ (fig. 9);

- release the main switch (A23) situated on the side of the appliance (fig. 2).
- release the main switch (A23) situated on the side of the appliance (fig. 2).

Important!
Never press the main switch while the appliance is on.
MENU SETTINGS
Rinsing

Use this function to supply hot water from the coffee spouts (A13) to clean and heat the appliance's internal circuit. Place a container with a minimum capacity of 100ml under the coffee and hot water spouts (fig. 8).
To enable the function, proceed as follows:
- Press ⚙️ (B2) to enter the menu;
- Press (B10) or (B8) until the display shows (B) RINSING;
- Press 0a1 to start rinsing.


Danger of burns!
Do not leave the appliance unattended while hot water is being delivered.
- After a few seconds, hot water comes out of the coffee spout which cleans and heats the internal circuit of the appliance: the following message is shown on the display RINSING HOT WATER RUNNING as well as a progress bar which fills up as the preparation progresses;
- To stop the rinsing cycle, press ____ to stop automatically.

Please note:
- If the appliance is not used for more than 3-4 days, when switched on again, we strongly recommend doing 2/3 rinses before use; • After rinsing, it is normal that there is some water in the grounds container (A10).
De-scaling

For instructions on de-scaling, see section "De-scaling".
Water filter

For instructions on how to install the filter (C4), see section "Water softener filter".
Beverages settings

In this section, you can consult your customised settings and, if you wish, reset the default values for each beverage.
- Press ⚙️ (B2) to enter the menu;
- Press ◀ (B10) or ▶ (B8) until "DRINKS SETTINGS"
appears on the display (B);
- Press ⓘ : The values for the first beverage appear on the display;
- The reference user profile is highlighted on the display. The values are shown on the vertical bars: the manufacturer default value is indicated by the symbol ____ while the current set value is highlighted by the filled part of the vertical bar;
- To go back to the settings menu, press ESC. To scroll and display the beverages, press NEXT.
- To return to the default manufacturer values for the beverage shown on the display, press RESET;
- CONFIRM RESET?: to confirm, press ▼ cancel, press || esc
- RETURN TO FACTORY: press . √ ok
The beverage has been reset to the default values. Continue with the other beverages, or go back to the settings menu.
i Please note:
- To change the beverages for another profile, go back to the homepage, select the required profile (B11) and repeat the procedure.
- To reset all the beverages in the profile to the default values, see paragraph "Manufacturer Default values".
Set time
To adjust the time on the display (B), proceed as follows:
- Press (B2) to enter the menu;
- Press (B10) or (B8) until the display (B) shows SET TIME;
- Press ☑ : The time setting panel appears on the screen;
- Press ◀ or > corresponding to the hours and minutes until the current time is displayed;
- To confirm, press √ok (to cancel, press ←esc), then press →go back to the homepage.
The time is now set.
Auto-start

The auto-start time can be set in order to have the appliance ready at a certain time (for example in the morning) so that it can immediately make coffee.

Please note:
To enable this function, the time must already be set correctly, see paragraph "Set time".
To enable auto-start, proceed as follows:
- Press ⚙ (B2) to enter the menu;
- Press (B10) or (B8) until the display (B) shows AUTO-START;
- Select the function by pressing . The time setting panel appears on the screen;
- Press < corresponding to the hours and minutes until the required auto-start time is displayed;
- Press OFF or ON to enable or disable auto-start.
- To confirm, press OK (to cancel and go back to the settings menu press esc), then press esc to go back to the homepage.
The auto-start time is now set and the corresponding symbol is displayed next to the time to indicate that the function has been enabled.
i Please note:
When the appliance is turned off using the main switch (A21), the auto-start setting if enabled, is lost.
Auto-off (standby)
Auto-off can be set so that the appliance goes off after 15 or 30 minutes, or 1, 2 or 3 hours of no use.
To programme Auto-off, proceed as follows:
- Press ⚙ (B2) to enter the menu;
- Press (B10) or (B8) until the display (B) shows AUTO-OFF, together with the current selection (15 or 30 minutes, or 1, 2 or 3 hours);
- Press ⏻ on the display to select the required value;
- Press go back to the homepage.
Auto-off is now programmed.
Cup warmer
To warm the cups before making coffee, it is possible to activate the cup warmer (A24) and put it above the cups.
- Press "" (B2) to enter the menu;
- Press 10) or (B8) until the display (B) shows "CUP WARMER";
- Press to activate-ON or de-activate-OFF the cup warmer.
- Press "" to go back to the homepage.
Energy saving
Use this function to enable or disable energy saving mode. When enabled, the function guarantees reduced energy consumption in compliance with European regulations. When it is disabled, warming time is reduced.
To disable or enable "Energy Saving", proceed as follows:
- Press ⚙ (B2) to enter the menu;
- Press (B10) or (B8) until ENERGY SAVING appears on the display (B);
- Press to enable or disable energy saving. OFF I
- Press ← to go back to the homepage.
Coffee temperature
To modify the temperature of the water supplied to make the coffee, proceed as follows:
- Press ⚙️ (B2) to enter the menu;
- Press (B10) or (B8) until the display (B) shows COFFEE TEMPERATURE together with the current selection (LOW, MEDIUM, HIGH, OR MAX);
- Press to select the required temperature;
- Press ← to go back to the homepage.
Water hardness
For instructions related to setting water hardness, see section "Setting water hardness".
Selecting the language

To modify the language of the display (B), proceed as follows:
- Press ⚙️ (B2) to enter the menu;
- Press (B10) or (B8) until the display shows SET LANGUAGE;
- Press: press until the flag corresponding to the required language is shown and then select it;
- Press 2 times to go back to the homepage.
Sound notification

This enables or disables the beep emitted by the machine each time an icon is pressed or an accessory is inserted/removed. To disable or enable the beep, proceed as follows:
- Press ⚙️ (B2) to enter the menu;
- Press (B10) or (B8) until the display (B) shows BEEP;
- Press to enable or disable the sound notification; OFF!
- Press → to go back to the homepage.
Light

This function enables or disables the lights (A6). The cup lights (A18) come on each time coffee beverages are produced, hot milk is made and during each rinse cycle and turn off after a few seconds.
To disable or enable this function, proceed as follows:
- Press ⚙️ (B2) to enter the menu;
- Press (B8) or (B8) until the display (B) shows LIGHT;

- Press 📷 to enable or disable the cup lighting;
OFFI
- Press ← to go back to the homepage.

Please note: The lighting to illuminate the interior compartment A6 comes on when the appliance is turned on.
Models with knobs: it is possible to enable or disable the lights (A6) by turning the knob (A11).
Demo mode DEMO mode
By enabling this mode, the main functions of the machine are shown on the display:
- Press ⚙️ (B2) to enter the menu;
- Press ◀ (B10) or ▶ (B8) until the display shows DEMO MODE;
- Press " " to start the demo;
- To exit from the DEMO MODE, first turn the appliance off by pressing the button ⏻ (A7). Press again the button ⏻ to go back to the homepage.
Default values

This resets all menu settings and programmed quantities back to the default values (with the exception of the language which remains as set).
To reset the default values, proceed as follows:
- Press ⚙️ (B2) to enter the menu;
- Press (B10) or (B8) until the display (B) shows DEFAULT VALUES. Press ;
- Press 📄 RESET ALL to reset all the profiles to the original parameters, otherwise select the required profile (e.g. USER1);
- RETURN TO FACTORY SETTINGS? RESET ALL: press OK to confirm (or esc to leave parameters unaltered);
- FACTORY SETTINGS SET: press √ok to confirm.
Statistics
This function displays statistical data relating to the machine. To display the statistics, proceed as follows:
- Press ⚙️ (B2) to enter the menu;
- Press (B10) or (B8) until the display (B) shows STATISTICS;
- Press : it is possible to check all the available statistics by pressing;
- Press esc to go back to the homepage.
(see recipes on page 29)
Selecting the coffee aroma
Select the required aroma from the homepage by pressing AROMA (B6):
 | (see “Making coffee using pre-ground coffee”) |
| AROMA EXTRA LIGHT | |
| LIGHT AROMA | |
| MEDIUM AROMA | |
| STRONG AROMA | |
| X-STRONG AROMA | |
| Custom (if programmed) / Standard |
After delivering the beverage, the aroma setting is reset to the value.
Selecting the coffee quantity
From the homepage select the required quantity of coffee in the cup by pressing QUANTITY (B7):
| SMALL SIZE (SMALL) | |
| MEDIUM SIZE (MEDIUM) | |
| LARGE SIZE (LARGE) | |
| X-LARGE SIZE(EXTRA LARGE) | |
| Custom quantity (if programmed) / Standard quantity |
After delivering the beverage, the quantity setting is reset to the value.
Making coffee using coffee beans

Important!
Do not use green, caramelised or candied coffee beans as they could stick to the coffee mill and make it unusable.
- Fill the beans container (A16) (fig. 12) with coffee beans;
- Place a cup under the coffee spout (A13);
- Lower the spout so that it is as near as possible to the cup
(fig. 13): this helps achieve a better cream;
- Press (B10) or B8) until the required coffee is displayed;
- Then select your required coffee from the homepage:
- ESPRESSO
- DOPPIO+ COFFEE
- LONG
- 2 X ESPRESSO • AMERICANO
- Preparation begins and the display (B) shows the image of the selected beverage together with a progress bar which gradually fills as preparation proceeds.

Please note:
- It is possible to prepare 2 cups of ESPRESSO coffee at the same time by also pressing X2 during preparation of 1 ESPRESSO (the image remains shown on the display for a few seconds at the start of preparation).
- While the machine is making coffee, delivery can be interrupted at any time by pressing □stop
- As soon as delivery has ended, to increase the quantity of coffee in the cup, just press 🧐 once the desired quantity is reached, press □ stop
Once the coffee has been made, the appliance is ready to make the next beverage.

Please note:
Various alarm messages may be displayed while using the appliance (FILL TANK, EMPTY GROUNDS CONTAINER, etc.).
Their meaning is explained in section "Displayed messages".
- For hotter coffee, see paragraph "Tips for a hotter coffee".
- If the coffee comes out in drops, too weak and not creamy enough or too cold, read the tips in section "Adjusting the coffee mill" and the "Troubleshooting" chapter.
- Preparation of each coffee can be customised (see sections "Customising beverages" and "Memorising your personal profile").
- If "Energy Saving" mode is active, the first coffee may take a few seconds before it is delivered.
Making coffee using pre-ground coffee

Important!
- Never add pre-ground coffee when the machine is off in order to avoid it spreading through the inside of the machine and making it dirty. This could damage the appliance.
- Never use more than 1 level measure (C2) or it could dirty the inside of the coffee machine or block the funnel (A4).

Please note:
If you use pre-ground coffee, you can only make one cup of coffee at a time.
- Repeat Press AROMA (B6) until the display (B) shows pre-ground.
- Open the cover (A15) and the pre-ground door (A23).
- Make sure the funnel (A21) is not blocked, then add one level measure of pre-ground coffee (fig. 14).
- Place a cup under the coffee spouts (A13) (fig. 13).
- Then select your required coffee (ESPRESSO, COFFEE, LONG etc.) from the homepage;
- Preparation begins and the image of the selected beverage appears on the display, together with a progress bar which gradually fills as preparation progresses.

Please note:
- While the machine is making coffee, delivery can be interrupted at any time by pressing □ stop.
- As soon as delivery has ended, to increase the quantity of coffee in the cup, just press once the desired quantity is reached, press □ stop.
Once the coffee has been made, the appliance is ready to make the next beverage.

Important! Making LONG coffee

Halfway through preparation, the display will show message ADD PRE-GROUND COFFEE, MAXIMUM ONE MEASURING CUP. Add one level measure of pre-ground coffee and press √ ok.
Adjusting the coffee mill
The coffee mill should not require adjusting, at least initially, because it has already been set by default in order to prepare coffee correctly. However, if after making the first few coffees you find that the coffee is either too weak and not creamy enough or delivery is too slow (a drop at a time), this can be corrected by adjusting the grinding adjustment dial (fig. 11).

Please note:
The grinding adjustment dial must only be turned when the coffee mill is in operation during the initial phase of coffee preparation.

If the coffee comes out too slowly or does not come out at all, a message will be shown GROUND TOO FINE. ADJUST GRIND LEVEL, turn the coffee mill dial one or two clicks clockwise.

For fuller bodied creamier coffee, turn one click anticlockwise towards 1 (do not turn more than one click at a time otherwise the coffee could come out one drop at a time).
The effect of these adjustments will only be evident after at least 2 cups of coffee have been delivered. If this adjustment does not obtain the desired result, repeat the correction by turning the dial another click.
Tips for a hotter coffee
For hotter coffee, it is recommended to:
- carry out a rinse cycle by selecting the "Rinsing" function in the settings menu (paragraph "Rinsing")
- warm the cups with hot water (using the hot water function, see section "hot water supply");
- increase the coffee temperature in the settings menu (see section "Coffee temperature")
MAKING MILK-BASED HOT DRINKS
(see recipes on page 30)

Please note:
To avoid milk with little froth or large bubbles, always clean the milk container lid (D2) and hot water connection nozzle (A9) as described in sections "Cleaning the milk container after use", "Cleaning the milk container" and "Cleaning the hot water/steam connection nozzle".
Filling and attaching the milk container
- Remove the lid (D2) (fig. 15);
- Fill the milk container (D3) with a sufficient quantity of milk, not exceeding the MAX level marked on the container (fig. 16). Each mark on the side of the container corresponds to about 100 ml of milk;

Please note:
- For a denser and more even froth, you must use skimmed or partially skimmed milk at refrigerator temperature (about 5°C).
- If "Energy Saving" mode is enabled, there may be a few seconds delay before the beverage is delivered.
- Make sure the milk intake tube (D4) is correctly inserted in the bottom of the milk container lid (fig. 17);
- Place the lid back on the milk container;
- Remove the hot water/steam spout (C6) (fig. 18);
- By pushing the bottom attach the milk container (D) to the
nozzle (A10) (fig.19): the machine will let out a noise signal (if the sound notification function is enabled);
- Place a sufficiently large cup under the coffee spouts (A13) and frothed milk spout (D5); adjust the length of the milk spout, to move it nearer to the cup, simply pulling it downwards (fig. 20).
- Follow the instructions below for each function.
Adjusting the amount of froth
Turn the froth adjustment dial (D1) on the milk container lid, to adjust the amount of froth on the milk delivered while making the drinks. Follow the tips in the table below:
| Dial position | Description Recommended for... | |
 | No froth CAFFE | LATTE /MILK (hot milk) |
 | Min. froth | LATTE MACCHIATO |
 | Max. froth CAPPUCCINO /MILK (frothed milk) | |
Making milk-based drinks automatically
- Fill the milk container (D) and attach it as described above.
- Select the required beverage from the homepage:
- CAPPUCCINO • LATTE MACCHIATO
- CAFFE LATTE • HOT MILK
- CAPPUCCINO+
- ESPRESSO MACCHIATO
- FLAT WHITE
- CAPPUCCINO MIX
- On the display (B) the machine recommends turning the foam adjustment dial (D1) based on the foam requirements for the original recipe: therefore turn the dial on top of the milk container lid (D2) and confirm the selection by pressing √ok
- After a few seconds, preparation begins automatically and an image of the selected beverage appears on the display, together with a progress bar which gradually fills as preparation progresses.

Please note: general indications when preparing all milk based drinks
- : press to interrupt preparation completely and go back to the homepage.
- Press to interrupt milk or coffee delivery and move on to the next delivery (if applicable) to complete the beverage.
- At the end of delivery, to increase the quantity of coffee in the cup, press + extra.
- Preparation of each milk-based drink can be customized (see sections "Customising beverages" and "Memorising your personal profile").
- Do not leave the milk container out of the fridge for a long time: as the temperature increases (5°C ideal), the quality of the foam decreases.
Once the coffee has been made, the appliance is ready to make the next beverage.
Cleaning the milk container after use

Danger of burns!
When cleaning the internal tubes of the milk container, a little hot water and steam leak out of the frothed milk spout (D5). Avoid contact with splashes of water. Each time a milk function is used, TURN MILK FROTH ADJUSTMENT KNOB TO CLEAN TO START CLEANING appears on the display and the milk frother lid must be cleaned:
- Leave the milk container (D) in the machine (you do not need to empty it);
- Place a cup or other recipient under the frothed milk spout (fig. 20);
- Turn the foam adjustment dial (D1) to CLEAN (fig. 21): CLEANING MILK CONTAINER PLACE A CUP UNDER THE MILK OUTLET (FIG. 22) appears on the display (B) together with a bar which gradually fills as cleaning proceeds. Cleaning stops itself automatically;
- Turn the dial back to one of the froth selections;
- Remove the milk container and always clean the steam connection nozzle (A10) with a sponge (fig. 23).

Please note:
- If a number of milk based drinks need to be made, only clean the milk container after preparing the last beverage. To proceed with making the next beverages, when the CLEAN message is displayed, press esc.
- If the milk container does not get cleaned, the symbol 🙏 appears on the display as a reminder that the milk container needs cleaning.
- The milk container can be kept in the refrigerator. • In some cases, to carry out the cleaning the appliance requires a short time to heat up.
DELIVERING HOT WATER

Danger of burns!
Do not leave the appliance unattended while hot water is being delivered.
- Make sure the hot water/steam spout (C6) is attached correctly to the hot water/steam connection nozzle (A10);
- Place a container under the spout (as close as possible to avoid splashes);
- Select HOT WATER from the homepage. The corresponding image appears on the display (B), together with a progress bar which fills gradually as preparation proceeds;
- The machine delivers hot water, then delivery stops automatically. To interrupt hot water delivery manually, press

□stop
Please note:
- If "Energy Saving" mode is active, there may be a few seconds delay before hot water is delivered.
- Preparation of hot water can be customised (see sections "Customising beverages" and "Memorising your personal profile").
STEAM DELIVERY

Danger of burns!
Do not leave the appliance unattended while steam is being delivered.
- Make sure the hot water/steam spout (C6) is attached correctly to the hot water/steam connection nozzle (A10);
- Fill a container with the liquid to be heated or frothed and immerse the hot water/steam spout in the liquid;
- Select "STEAM" from the homepage. The corresponding image appears on the display (B), together with a progress bar which fills gradually as preparation proceeds and after a few seconds, steam to heat the liquid is delivered from the hot water/steam spout;
- When the required temperature or level of froth is reached, interrupt steam delivery by pressing ;□stop

Important!
Always stop steam delivery before extracting the container containing the liquid to avoid burns from splashes.

Please note:
If "Energy saving" mode is active, there may be a few seconds delay before steam is delivered.
Tips for using steam to froth milk
- When choosing the size of the container, bear in mind that the liquid doubles or triples in volume.
- For a richer denser froth, use skimmed or partially skimmed milk at refrigerator temperature (about 5°C).
- For a creamier froth, rotate the container with slow movements in an upward motion.
- To avoid milk with poor froth or large bubbles, always clean the spout (C6) as described in the following paragraph.
Cleaning the hot water/steam spout after use
Always clean the hot water/steam spout (C6) after use to avoid the build-up of milk residues and prevent it from clogging.
- Place a container under the hot water/steam spout and let a little water out (see section "Delivering hot water"). Then stop the delivery of hot water by pressing □stop
- Wait a few minutes for the hot water/steam spout to cool down; then extract it (fig. 18). Hold the spout steady with one hand and with the other, turn and detach the cappuccino maker pulling it downwards (fig. 24).
- Also remove the steam connection nozzle by pulling it downwards (fig. 24).
- Check the hole in the connection nozzle is not blocked. If necessary, clean using a toothpick.
- Wash all parts of the spout thoroughly with a sponge and warm water.
- Attach the connection nozzle and the cappuccino maker onto the spout by pushing it upwards and turning it clockwise until it is secure.
CUSTOMISING BEVERAGES
The aroma (for drinks where required) and length of the drinks can be customised.
- Make sure that the profile for which customising the drink is required is active: it is actually impossible to select the drinks for all 6 profiles;
- From the homepage, press

- Choose the beverage you wish to customise in order to access the customising screens: the relative accessories must be inserted;
- (Beverages with coffee only) CHOOSE COFFEE AROMA LEVEL: Select the required aroma by pressing - or + and press √ok ;
- CUSTOMISING COFFEE (OR WATER) QUANTITY, PRESS STOP TO SAVE: Preparation begins and the appliance displays the quantity customising screen in the form of a vertical bar. The star alongside the bar represents the current quantity set.
- When the amount reaches the minimum quantity you can set, the display shows . □stop
- Press □stop when the required quantity in the cup is reached.
- SAVE NEW SETTINGS?: Press YES or NO.
The appliance confirms if the values have been saved or not (de-
depending on the previous selection): press

The appliance goes back to the homepage.

Please note:
- Milk based drinks: the coffee aroma is saved first, followed by the quantity of first milk, then coffee;
- Hot water: the appliance supplies hot water: press □stop to save the desired quantity. • It is possible to come out of programming by pressing esc th v 11 : II


MEMORISING YOUR PERSONAL PROFILE
The appliance allows you to memorise 6 different profiles, each associated with a different icon.
In every profile the customised beverages aroma and quantity values are saved (see section "Customising beverages" and the order in which all the beverages are displayed is based on the frequency of selection.
To select or enter a profile, press on the profile currently in use (B11), press <10) or > (B8) until the required profile is displayed, then press on the profile.

Please note:
- Profile GUEST: select this profile to deliver beverages with the default settings.
CLEANING
Cleaning the machine
The following parts of the machine must be cleaned regularly:
- appliance internal circuit; • coffee grounds container (A4);
- drip tray (A14);
- water tank (A12);
- coffee spouts (A13); pre-ground coffee funnel (A21);
- infuser (A5), accessible after opening the service door (A2);
- milk container (D);
- hot water/steam connection nozzle (A10); control panel (B).

Important!
- Do not use solvents, abrasive detergents or alcohol to clean the coffee machine. It is not necessary to use chemical products to clean the machine.
- None of the components of the appliance can be washed in a dishwasher with the exception of the milk container (D).
- Do not use metal objects to remove encrustations or coffee deposits as they could scratch metal or plastic surfaces.
Cleaning the appliance internal circuit
If the appliance is not used for more than 3/4 days, before using it again, we strongly recommend switching it on and:
- performing 2/3 rinse cycles by selecting the "Rinse" function (paragraph "Rinsing")
- delivering hot water for a few seconds (section "Delivering hot water").

Please note:
After cleaning, it is normal for the grounds container (A4) to contain water.
Cleaning the coffee grounds container
When the display (B) shows the message EMPTY GROUND CONTAINER (fig. 26) the grounds container must be emptied and cleaned. The appliance cannot be used to make coffee until the grounds container (A4) has been cleaned. Even if not full, the empty grounds container message is displayed 72 hours after the first coffee has been prepared (for the 72 hours to be calculated correctly, the machine must never be turned off with the main switch).
To clean (with the machine on):
- Open the bottom door by rotating it downwards (fig. 25).
- Open the door.
- Remove the drip tray (A14) (fig. 27), empty and clean it.
- Carefully empty and clean the coffee grounds container (A4) taking care to remove all the residue that can be deposited on the bottom: the brush provided (C5) features a spatula especially for this job.

Important!
When removing the drip tray it is obligatory to always empty the grounds container even if it contains few grounds. If this is not done, when you make the next coffees, the grounds container may fill up more than expected and clog the machine.
Cleaning the drip tray

Important!
The drip tray (A14) is fitted with a level indicator (red) showing the level of water it contains (fig. 28).
Before the indicator protrudes from the cup tray (A1), the drip tray must be emptied and cleaned, otherwise the water may flow over the edge and damage the appliance, the surface it rests on or the surrounding area.
To remove the drip tray, proceed as follows:
- Open the door (fig. 25). Remove the drip tray and coffee grounds container (A4) (fig. 27);
- Empty the drip tray and grounds container and wash them;
- Replace the drip tray complete with grounds container.
Cleaning the inside of the coffee machine

Danger!
Before cleaning internal parts, the machine must be turned off (see section "Turning the appliance off") and unplugged from the mains power supply. Never immerse the coffee machine in water.
- Check regularly (about once a month) that the inside of the appliance (accessible after removing the drip tray - A14) is not dirty.
- If necessary, remove coffee deposits with the brush (C5) supplied and a sponge. Remove all the residues with a vacuum cleaner (fig. 29).
Cleaning the water tank
- Clean the water tank (A12) regularly (about once a month) and whenever you replace the water softener filter (C4) (if provided) with a damp cloth and a small amount of mild washing up liquid. Rinse carefully before filling and replacing the tank;
- Remove the filter (if present) and rinse with running water;
- Replace the filter (if provided), fill the tank with fresh water and replace the tank;
- (Models with water softener filter only) Deliver about 100ml of hot water to reactivate the filter.
Cleaning the coffee spouts
- Clean the coffee spouts (A13) regularly with a sponge or cloth (fig. 31);
- Check that the holes in the coffee spouts are not blocked. If necessary, remove coffee deposits with a toothpick (fig. 30).
Cleaning the pre-ground coffee funnel
Check regularly (about once a month) that the pre-ground coffee funnel (A21) is not blocked. If necessary, remove coffee deposits with the brush (C5) supplied.
Cleaning the infuser
The infuser must be cleaned at least once a month.

Important! The infuser (A5) must not be removed when the appliance is on. Do not use force to remove the infuser.
- Make sure the machine is correctly turned off (see "Turning off").
- Open the service door.
- Remove the drip tray and waste coffee container (fig. 27).
- Press the two coloured release buttons inwards and at the same time pull the infuser outwards (fig. 32).

Important! Do not use washing up liquid to clean the lubricant, so avoid removing the lubricant applied to the inside of it.
- Soak the infuser in water for about 5 minutes, then rinse.
- After cleaning, replace the infuser (A5) by sliding it onto the internal support and pin at the bottom, then push the PUSH symbol fully in until it clicks into place (fig. 33).

Please note carefully: If you encounter difficulty inserting the infuser, (before inserting it) you must adapt it to the right dimension by pressing it forcefully from the bottom and top as shown in figure 34.
- Once inserted, make sure the two coloured release buttons have snapped out (fig. 35).
- Replace the drip tray and waste coffee container.
- Close the service door.
Cleaning the milk container (D)
Clean the milk container after each time you prepare milk, as described below:
- Lift and remove the lid (D2);
- Extract the milk container (D3) from the thermal casing (D6), holding it by the two side grips.

Important!
The thermal casing must not be filled or immersed in water: to clean it, wipe with a damp cloth.
- Remove the milk spout (D5) and intake tube (D4).
- Turn the froth adjustment dial clockwise to the "INSERT" position (fig. 36) and pull off.
- Wash all the components of the frother thoroughly with hot water and mild washing-up liquid. All components and the container are dishwasher safe, placing them in the top basket of the dishwasher. Pay particular attention to check in the hollow and groove under the dial (fig. 37) that no milk residues remain: scrape any residue from the groove with a toothpick.
- Rinse inside the froth adjustment dial seat (fig. 38) and the milk frother connector hole using running water.
- Check as well that the intake tube and spout are not clogged with milk residues.
- Replace the dial, lining up the arrow with the word INSERT, the spout and milk intake tube.
- Place the milk container in the thermal casing.
- Place the lid back on the milk container.
Cleaning the hot water/steam connection nozzle
Each time you prepare milk, clean the connection nozzle (A13) with a sponge to remove milk residues deposited on the seals (fig. 23).
DESCALING

Important!
- Before use, read the instructions and the labelling on the de-scaler packaging.
- You should use de-scaler authorised by the manufacturer only. Using unsuitable de-scaler and/or performing de-scaling incorrectly may result in faults not covered by the manufacturer's guarantee.
De-scale the appliance when the display (B) shows message DESCALING NEEDED PRESS OK TO START (\~45 min) in de-scale immediately, press √ok and follow the instructions from point 4.
To postpone de-scaling to another time, press on the display the symbol is a reminder that the appliance needs-to be de-scaled (the message will be re-proposed every time the machine is switched on).
To access the de-scaling menu:
- Press ⚙️ (B2) to enter the menu;
- Press (B1) or (B8) with the display shows DESCALE;

- Press to start the de-scaling cycle then follow the instructions on the display;
- REMOVE WATER FILTER (fig. 39): extract the water tank (A12), remove the water softener filter (C4) (if present), and empty the water tank. Press ➤ next.
- ADD DESCALER (UP TO LEVEL A) AND WATER (UP TO LEVEL B) (fig. 40): Pour the de-scaler into the tank up to the level A marked inside the tank (equal to one 100 ml pack); then add water (one litre) up to level B; and put the water tank back in. Press ➤ next.
- EMPTY GROUND CONTAINER AND DRIP TRAY (fig. 27): remove, empty, and replace the drip tray (A14) and the ground container (A4). Press ➤ next.
- PLACE 2.5L CONTAINER UNDER OUTLET, PRESS OK TO START DESCALING:
Place an empty container with a minimum capacity of 2.5 litres under the hot water/steam spout (C6) and coffee spouts (A13) (fig. 8).

Danger of burns!
Hot water flows out of the hot water/steam spout which contains acid. Take care to avoid contact with splashes of this solution.
- Press √ok to confirm that you have added the de-scaling solution.
The display shows DESCALING PLEASE WAIT: the de-scale programme starts and the de-scaler liquid comes out of the hot water/steam and coffee spouts. A series of rinses and pauses is automatically carried out to remove all the scale residues from the inside of the coffee machine.
After about 25 minutes, de-scaling stops.
- RINSE AND FILL WATER TANK UP TO MAX LEVEL (fig. 41): the appliance is now ready for a fresh water rinsing cycle. Empty the container used to collect the de-scaler solution and extract the water tank, empty, rinse under running water, fill with fresh water up to the MAX level and put back in the appliance;
- PLACE 2.5I CONTAINER UNDER OUTLET PRESS OK TO START RINSING: Place the container used to collect the de-scaler solution empty under the coffee spouts and hot water/steam spout (fig. 8) again and press √ok ;
- Hot water is delivered first from the coffee spouts and the display shows RINSING PLEASE WAIT;
- When the water in the tank has run out, empty the container used to collect the rinsing water;
- (If the filter is installed) INSERT FILTER INTO ITS HOUSING (fig. 42). Press next and extract the water tank, reinsert the water softener filter if removed previously;
- RINSE AND FILL WATER TANK UP TO MAX LEVEL (fig. 41): Fill the tank up to the MAX level with fresh water;
- INSERT WATER TANK (fig. 6): Put the water tank back in the appliance;
- PLACE 2.5I CONTAINER UNDER OUTLET PRESS OK TO START RINSING :
Place the empty container used to collect the de-scaler solution under the hot water/steam spout (fig. 8) and press OK;
- Hot water is delivered from the hot water/steam spout and RINSING PLEASE WAIT is displayed.
- EMPTY DRIP TRAY (fig. 27): At the end of rinsing, remove, empty and replace the drip tray (A14) and grounds container (A4): press ➤ next
- For a few seconds DESCALE COMPLETE will be shown on the display; the appliance turn off.
De-scaling is complete.

Please note:
- If the de-scaling cycle is not completed correctly (e.g. no electricity) we recommend repeating the cycle;
- After de-scaling, it is normal for the grounds container (A4) to contain water.
- If the water tank has not been filled to the max level, at the end of de-scaling, the appliance requests a third rinse to guarantee that the de-scaler solution has been complete-
ly eliminated from the machine's internal circuits. Before starting rinsing, remember to empty the drip tray;
- The appliance may request de-scaling cycles at very short intervals. This is normal and due to the appliance's advanced control system
PROGRAMMING WATER HARDNESS
The message "DESCALING NEEDED - PRESS OK TO START (~45 min)" is displayed after a period of time established according to water hardness.

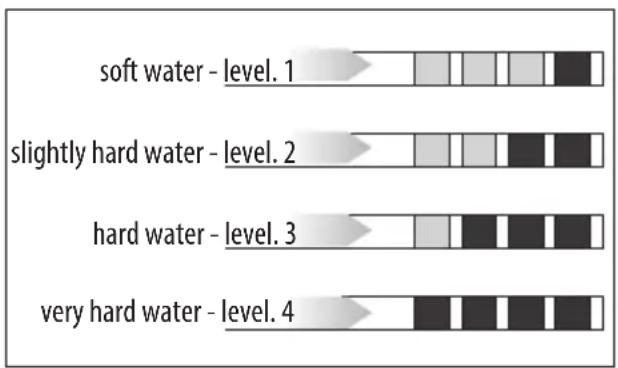
The appliance is pre-set at the factory to "level 4" hardness. The machine can also be programmed according to the hardness of the mains water in different regions, so that the machine needs to be descaled less often.
Measuring water hardness
- Remove the "Total hardness test" indicator paper (C1) provided from its packaging, attached to the instructions.
- Immerse the paper completely in a glass of water for about one second.
- Remove the paper from the water and shake lightly. After about a minute, 1, 2, 3, or 4 red squares form, depending on the hardness of the water. Each square corresponds to one level.
Setting water hardness

- Press ⚙️ (B2) to enter the menu;
- Press (B10) of B8) until the display (B) shows WATER HARDNESS;

- To change the selected level, press the symbol itself until the required level is displayed (Level 1 = soft water; Level 4 = very hard water);
Press to go back to the homepage.
The machine is now reprogrammed with the new water hardness setting.
WATER SOFTENER FILTER
Some models are fitted with a water softener filter (C4): if your model is not equipped with one, we recommend buying one through an authorized customer service center.
To use the filter correctly, follow the instructions below.
Installing the filter
- Remove the filter (C4) from the packaging;
- Press ⚙️ (B2) to enter the menu;
- Press (B10) of B8) until the display shows WATER FILTER;
- Press ;
- TURN THE DATE INDICATOR UNTIL THE NEXT 2 MONTHS ARE DISPLAYED (fig. 43):
turn the date indicator disk until the next two months of use are displayed. Press ➤ next

Please note:
the filter lasts about two months if the appliance is used normally, if the coffee machine is left unused with the filter installed, it will last a maximum of 3 weeks.
- FILL FILTER WITH WATER UNTIL IT'S COMPLETELY FILLED (fig. 44): To activate the filter, run tap water through the hole in the filter as shown in the figure until water comes out of the openings at the side for more than a minute. Press ➤ next
- Extract the tank (A12) from the appliance and fill with water.
- IMMERSE FILTER IN THE WATER TANK LETTING AIR BUBBLES ESCAPE (fig. 45): Insert the filter in the water tank and immerse it completely for about ten seconds, sloping it and pressing it lightly to enable the air bubbles to escape. Press next;
- INSERT FILTER INTO ITS HOUSING AND PUSH IT DOWN TO BOTTOM: Insert the filter in the filter housing (fig. 42) and press as far as it will go. Press ➤ next
- INSERT WATER TANK: Close the tank with the lid (A15), then replace the tank in the machine.
- PLACE 0.5L CONTAINER UNDER OUTLET, PRESS OK TO FILL FILTER (fig. 8): place the container under the hot water/steam spout (C6) and press delivery starts and stops itself automatically.
The symbol appears on the display alongside the time to indicate that the filter has been enabled. The coffee machine can now be used.
Replacing the filter
Replace the filter (C4) when the display (B) shows the message REPLACE WATER FILTER, PRESS OK TO START ⚠️: to replace immediately, press √ok and follow the instructions from
point 4.
To postpone replacing the filter to another time, press 📄esc: on the display the symbol is a reminder that the filter needs to be replaced.
To replace, proceed as follows:
- Extract the water tank (A12) and exhausted filter;
- Remove the new filter from the packaging;
- Press ⚙️ (B2) to enter the menu;
- Press (B10) of B88) until the display shows WATER FILTER;
- Press ;
- The display shows REPLACE FILTER;
- Press ;
- Follow the operations described in the previous paragraph from point 5.
The filter is now active and the coffee machine can be used.

Please note:
After two months (see date indicator) or when the appliance has not been used for 3 weeks, you should replace the filter even if the message has not yet been displayed.
Removing the filter
If you want to use the appliance without the filter (C4), you must remove it and notify the appliance of its removal. Proceed as follows:
- Extract the water tank (A12) and exhausted filter;
- Press (B2) to enter the menu;
- Press (B10) or (B8) until the display shows WATER FILTER;
- Press ;
- On the display REMOVE FILTER appears;
- Press ;
- REMOVE FILTER?: press (or to go back to the settings menu, press esc
- FILTER REMOVED: the appliance has recognised the change. Press is got back to the homepage.

Please note:
After two months (see date indicator) or when the appliance has not been used for 3 weeks, you should remove/replace the filter even if the message has not yet been displayed.
TECHNICAL DATA
Voltage: 120 V\~60 Hz max.
Absorbed power: 1350W
Pressure: 15 bar
Water tank capacity: 84.5 fl. oz / 2.5 litres
Size:LxHxD: 3.5 x 17.7 x 18.5 in / 597x450x470 mm
Net weight: 44 lb / 20 kg
| DISPLAYED MESSAGE POSSIBLE CAUSE REMEDY | ||
FILL WATER TANK WITH FRESH WATER | Water in the tank (A12) is not sufficient. Fill | the tank with water and/or insert it correctly, pushing it as far as it will go until it clicks into place. |
EMPTY GROUND CONTAINER  | The grounds container (A4) is full. | Empty the grounds container and drip tray (A14), clean and then replace them. Important: when removing the drip tray, the grounds container must always be emptied, even if it contains few grounds. If this is not done, when you make the next coffees, the grounds container may fill up more than expected and clog the machine. |
INSERT GROUND CONTAINER A | After cleaning, the grounds container (A4), has not been replaced. | Remove the drip tray (A14) and insert the grounds container. |
ADD PRE-GROUND COFFEE PRE-GROUND MAXIMUM ONE MEASURING CUP  esc esc | The "pre-ground coffee" function has been selected, but without placing any pre-ground coffee in the funnel (A21). | Place pre-ground coffee in the funnel (fig. 14) and repeat delivery |
| The funnel (A21) for pre-ground coffee, is clogged. | Empty the funnel with the help of the brush (C5) as described in par. "Cleaning the pre-ground coffee funnel". | |
ADD PRE-GROUND COFFEEPRE-GROUND MAXIMUMONE MEASURING CUP | A LONG coffee with pre-ground coffeehas been requested | Place pre-ground coffee in the funnel (A21) (fig. 14)and press √okcontinue and completedelivery. |
FILL BEAN CONTAINER The coffe | beans have run out. Fill the beans container | (A16 - fig.12). |
GROUND TOO FINE. ADJUSTGRIND LEVEL 1 CLICK WHILEIN OPERATION | The grinding is too fine and the coffee isdelivered too slowly or not at all. | Repeat coffee delivery and turn the grinding adjustment dial (fig. 11) one click clockwise towards number 7 while the coffee mill is in operation. If aftermaking at least 2 coffees delivery is still too slow,repeat the correction procedure, turning the grinding adjustment dial another click (par. "Adjusting thecoffee mill"). If the problem persists, make sure thewater tank (A12) is fully inserted. |
| If the water softener filter (C4) is present,an air bubble may have been releasedinside the circuit, obstructing delivery. | Insert the hot water/steam spout (C6) in the appliance and deliver a little water until the flow becomesregular. | |
SELECT A MILDER TASTEOR REDUCE PRE-GROUNDCOFFEE QUANTITY  esc esc | Too much coffee has been used. | Select a milder taste by pressing AROMA (B6)or reduce the quantity of pre-ground coffee (maximum 1 measure). |
INSERT WATER OUTLET The hot | water spout (C6) is not inserted or is inserted incorrectly | Insert the water spout as far as it will go. |
INSERT MILK CONTAINER The milk container (D) is not inserted correctly. | milk container (D) is not inserted correctly. | Insert the milk container as far as it will go (fig. 19). |
INSERT BREWING UNIT After cleaning the infuser has not been replaced. | cleaning the infuser has not been replaced. | Insert the infuser as described in par. "Cleaning the infuser". |
WATER CIRCUIT EMPTY PRESS OK TO START FILLING PROCESS | The water circuit is empty | Press 🚗allow water to drain out of the spout (C6): the flow will stop itself automatically. If the problem persists, make sure the water tank (A12) is fully inserted. |
PRESS OK TO START CLEANING PROCESS OR TURN MILK FROTH ADJUSTMENT KNOB 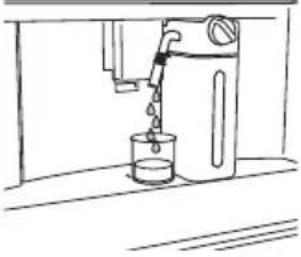 OK OK | The milk container has been inserted with the froth adjustment dial (D1) in the CLEAN position. | To proceed with the CLEAN function, press OK or turn the froth adjustment dial to one of the milk positions. |
TURN THE MILK FROTH ADJUST-MENT KNOB TO START CLEANING  esc esc | Milk has been delivered recently and the tubes inside the milk container must be cleaned (D). | Turn the froth adjustment dial (D1) to CLEAN(fig. 21). |
TURN THE MILK FROTH ADJUSTMENT KNOB TO MILK POSITION  | The milk container has been inserted with the froth adjustment dial (D1) in the CLEAN position. | Turn the dial to the required froth position. |
DESCALING NEEDED PRESS OK TO START (~45MIN)  [7WZT] esc OK [7WZT] esc OK | Indicates that the machine must be de-scaled. | Press take de-scaling or press esc to de-scale later. The de-scaling procedure described in section “De-scale” needs to be performed. |
REPLACE WATER FILTER PRESS OK TO START  [SWTZ] esc OK [SWTZ] esc OK | The water softener filter (C4) is exhausted. | Press replace or remove the filter, or esc to carry out the procedure later. Follow the instructions in section “Water softener filter”. |
GENERAL ALARM: REFER TO USER MANUAL | The inside of the appliance is very dirty. Clean the inside of the appliance thoroughly, as described in section “Cleaning”. If the message is still displayed after cleaning, contact an authorised Customer Service centre. | |
 | Reminder that appliance needs de-scaling and/or the filter (C4) must be replaced. | The de-scaling procedure described in section “De-scale” needs to be performed as soon as possible and/or the filter needs replacing or removing as described in section “Water softener filter”. |
 | Reminder that tubes inside the milk container (D) must be cleaned. | Turn the froth adjustment dial (D1) to CLEAN(fig. 21). |
 | Reminder that filter (C4) must be replaced. | Replace the filter or remove it as described in section “Water softener filter”. |
 | Reminder that machine must be de-scaled. | The de-scaling procedure described in section “De-scale” needs to be carried out as soon as possible. |
 | Indicates that the auto-start function is enabled. | To disable the function, proceed as described in par."Auto-start |
 | Energy saving is enabled. To disable energy saving, proceed as described in par."Energy saving | |
 | Indicates that the filter (C4) has been enabled | To remove the filter, proceed as described in section “Water softener filter”. |
| CLEANING PLEASE WAIT | The appliance has detected impurities in its internal circuits. | Wait for the appliance to be ready for use again and reselect the required beverage. Contact an Authorised Customer Service Centre if the problem persists. |
| MACHINE TOO HOT Using the stirrers continuously for long periods may cause the appliance to overheat | Wait for the appliance to cool down. | |
TROUBLESHOOTING
Below is a list of some of the possible malfunctions.
If the problem cannot be resolved as described, contact Customer Services Technical Assistance.
| PROBLEM POSSIBLE CAUSE REMEDY | ||||
| The coffee is not hot. | The cups were not preheated. | Warm the cups by rinsing them with hot water (Please note! the hot water function can be used). | ||
| The infuser has cooled down because 2/3 minutes have elapsed since the last coffee was made. | Before making the coffee, heat the infuser by rinsing using the rinse function (see par. "Rins-ing" | |||
| A low coffee temperature is set. | Set a hotter coffee temperature in the menu (see par. "Coffee temperature") | |||
| The coffee is weak or not creamy enough. | The coffee is ground too coarsely. | Turn the grinding adjustment dial one click anticlockwise towards number 1 while the coffee mill is in operation (fig. 11). Continue one click at a time until coffee delivery is satisfactory. The effect can only be noticed after delivering 2 coffees (see par. "Adjusting the coffee mill"). | ||
| The coffee is unsuitable. Use coffee for espresso machines. | ||||
| The coffee is delivered too slowly or a drop at a time. | The coffee is ground too finely. Turn the | grinding adjustment dial one click clockwise towards number 7 while the coffee mill is in operation (fig. 11). Continue one click at a time until coffee delivery is satisfactory. The effect can only be noticed after delivering 2 coffees (see par. "Adjusting the coffee mill"). | ||
| Coffee does not come out of one or both of the spouts. | The coffee spouts (A13) are blocked. Clean the spouts with a toothpick (fig. 30). | |||
| The appliance is not producing coffee The appliance detects impurities in its system: the display shows "CLEANING IN PROGRESS". | Wait for the appliance to be ready for use again and reselect the required beverage. Contact an Authorised Customer Service Centre if the problem persists. | |||
| The appliance does not come on It is not plugged into the socket. Plug into the mains socket (fig. 1). | ||||
| The main switch (A21) is not turned on. Press the main switch (fig. 2). | ||||
| The infuser cannot be extracted The appliance has not been turned off correctly | Turn the appliance off by pressing the button (A7) (see section "Turning the appliance off"). | |||
| At the end of de-scaling, the appli-ance requests a third rinse | During the two rinse cycles, the water tank (A12) was not filled to the MAX level | Follow the instructions displayed by the appli-ance, first emptying the drip tray (A14) to avoid the water overflowing. | ||
| PROBLEM POSSIBLE CAUSE REMEDY | ||||
| The milk does not come out of the milk spout (D5) | The lid (D2) of the milk container (D) is dirty | Clean the milk container lid as described in par. "Cleaning the milk container". | ||
| The milk contains large bubbles and squirts out of the milk spout (D5) or there is little froth | The milk is not cold enough or is not semi-skimmed or skimmed. | Use fully skimmed or semi-skimmed milk at refrigerator temperature (about 5°C). If the result is not as you wished, try changing brand of milk. | ||
| The froth adjustment dial (D1) is incorrectly adjusted. | Adjust following the instructions in section "Adjusting the amount of froth". | |||
| The milk container lid (D2) or froth adjustment dial (D1) is dirty | Clean the milk container lid and froth adjustment dial as described in par. "Cleaning the milk container". | |||
| The hot water/steam connection nozzle (A13) is dirty | Clean the connection nozzle as described in par. "Cleaning the hot water/steam connection nozzle". | |||
| The machine emits noises or small puffs of steam while not in use | The machine is ready for use, or has recently been turned off, and condensate is dripping into the vaporiser which is still hot | This is part of normal operation.To limit this, empty the drip tray. | ||
EN
ESPRESSO
| Origin | Italy | |
| PROCESS | Grinding Coffee powder 6-11gr (according to aroma)Brewing Pre-infusion Infusion high pressure (9-12 bar) | |
| RESULT IN CUP Default Quantity ~40mlCream compact and nut-colouredTaste | intense | |
| OCCASION OF USE short-term pleasure, every moment of the day | ||
COFFEE
| Origin | Germany & Central Europe | ||
| PROCESS | Grinding | Coffee powder | 8-14gr (according to aroma) |
| Brewing | Pre-infusion | ||
| Infusion | high pressure (9-12 bar) | ||
| RESULT IN CUP | Default Quantity | 180ml | |
| Cream | thinner than espresso | ||
| Taste | balanced and delicate | ||
| OCCASION OF USE | long-lasting pleasure, every moment of the day | ||
LONG
| Origin | USA, Australia | ||
| PROCESS | Grinding | Coffee powder | 2 grindings of 5-9gr (according to aroma) |
| Brewing | Pre-infusion no pre infusion | ||
| Infusion | impulse mode lower pressure than espresso | ||
| RESULT IN CUP Default Quantity ~ 160ml | |||
| Cream | thinner and lighter than espresso | ||
| Taste | perfect for drip coffee lovers | ||
| OCCASION OF USE | long-lasting pleasure, every moment of the day | ||
DOPPIO+
| Origin | Italy | ||
| PROCESS | Grinding | Coffee powder 15gr | |
| Brewing Pre-infusion | reduced pre infusion | ||
| Infusion | higher pressure than espresso | ||
| RESULT IN CUP | Default Quantity ~ 120ml | ||
| Cream | thicker and darker than espresso | ||
| Taste | stronger than espresso | ||
| OCCASION OF USE | need for energy | ||
AMERICANO
| Origin | USA, UK | |
| PROCESS | Grinding Coffee powder 6-11gr (according to aroma)Brewing | Pre-infusion |
| Infusion | high pressure (9-12 bar) | |
| RESULT IN CUP | Default Quantity ~ 150ml | |
| Cream | thinner and lighter than espresso | |
| Taste | Light and delicate |
ESPRESSO MACCHIATO
| Origin | Italy | |
| PROCESS | Coffee | 6-11gr (according to aroma) (~ 30ml) |
| Milk | few drops (~ 20ml) | |
| Milk foam | maximum level | |
| Delivery order | coffee first, milk afterwards | |
| RESULT IN CUP | Visual | black with one thin layer or milk foam |
| Milk foam | ||
| OCCASION OF USE | every moment of the day, people who want to taste a slightly sweet espresso | |
CAPPUCCINO
Origin Italy
PROCESS Coffee balanced (~ 80ml)
Milk balanced (~ 70ml)
Milk foam maximum level
Delivery order milk first, coffee afterwards
RESULT IN CUP Visual separate layers of foam, coffee and milk
Milk foam white with milky taste
Occasion of use: every moment of the day, people who want to taste coffee and milk separately
CAPPUCCINO+
Origin: Italy
Delivery order: milk first, coffee afterwards
Result in cup: visual darker than cappuccino
Milk foam: separate layers of foam, coffee and milk, with milky taste
Occasion of use: need for energy, people who want a cappuccino with a strong coffee taste
CAPPUCCINOMIX
Origin: Italy
Process: coffee balanced (~80ml)
Milk balanced (~70ml)
Milk foam: maximum level
Delivery order: coffee first, milk afterwards
Result in cup: visual uniformly brown milk drink
Milk foam: light brown with coffee taste
Occasion of use: every moment of the day, for people who love melted milk and coffee tastes.
Latte Macchiato
Origin: Italy
Process: Coffee ~60ml
Milk ~90ml
Milk foam: medium level
Delivery order: milk first, coffee afterwards
Result in cup: Visual separate layers of foam, coffee and milk
Milk foam: white with milky taste
Occasion of use: every moment of the day, for people who want to taste coffee and milk separately
Flat White
Milk foam: medium level
Delivery order: milk first, coffee afterwards
Result in cup: Visual separate layers of foam, coffee and milk
Milk foam served in a ceramic cup: white with milky taste
OCCASION OF USE: any time of day, for those who want to taste coffee and milk separately.
CAFFELATTE
Origin: Italy
PROCESS: Coffee ~60 ml
Milk
~240 ml
Milk foam: medium level
Delivery order: milk first, then coffee
RESULT IN CUP: visually separate layers of coffee and milk
Milk foam: a thin layer of white foam with a milky taste
OCCASION OF USE: any time of day, for those who want to taste coffee and milk separately.
FIG. 1
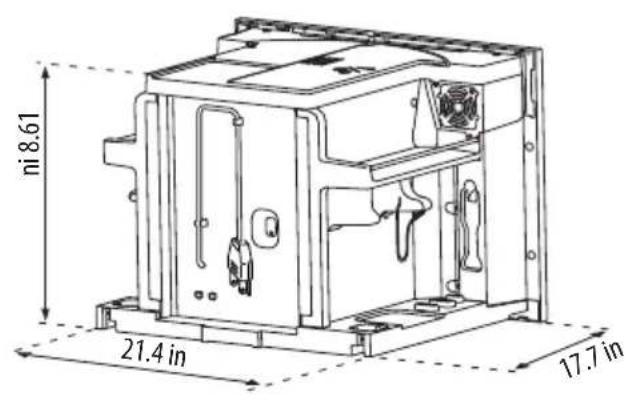

FIG. 2
FIG. 2A
FIG. 3
FIG. 4
FIG. 5
FIG. 6
FIG. 7
The manufacturer reserves the right to make any changes deemed useful for improvement of its products without prior notice. The illustrations and descriptions contained in this manual are therefore not binding and are merely indicative.
SMEG S.p.A.
Via Leonardo Da Vinci, 4
- CONTENTS
- INTRODUCTION
- SYMBOLS USED IN THESE INSTRUCTIONS
- DANGER
- IMPORTANT
- DANGER OF BURNS
- PLEASE NOTE
- LETTERS IN BRACKETS
- TROUBLESHOOTING AND REPAIRS
- IMPORTANT SAFEGUARDS
- ELECTRICAL SAFETY
- USE
- SAVE THESE
- INSTRUCTIONS
- DESCRIPTION OF THE APPLIANCE
- DESCRIPTION OF HOMEPAGE (PAGE 3 - B)
- DESCRIPTION OF THE ACCESSORIES
- DESCRIPTION OF THE MILK CONTAINER
- PRELIMINARY OPERATIONS
- CHECKING THE APPLIANCE
- SETTING UP THE APPLIANCE
- TURNING THE APPLIANCE ON
- TURNING THE APPLIANCE OFF
- MENU SETTINGS
- RINSING
- DE-SCALING
- WATER FILTER
- BEVERAGES SETTINGS
- I PLEASE NOTE
- SET TIME
- AUTO-START
- AUTO-OFF (STANDBY)
- CUP WARMER
- ENERGY SAVING
- COFFEE TEMPERATURE
- WATER HARDNESS
- SELECTING THE LANGUAGE
- SOUND NOTIFICATION
- LIGHT
- DEMO MODE DEMO MODE
- DEFAULT VALUES
- STATISTICS
- SELECTING THE COFFEE AROMA
- SELECTING THE COFFEE QUANTITY
- MAKING COFFEE USING COFFEE BEANS
- MAKING COFFEE USING PRE-GROUND COFFEE
- IMPORTANT! MAKING LONG COFFEE
- ADJUSTING THE COFFEE MILL
- TIPS FOR A HOTTER COFFEE
- MAKING MILK-BASED HOT DRINKS
- FILLING AND ATTACHING THE MILK CONTAINER
- ADJUSTING THE AMOUNT OF FROTH
- MAKING MILK-BASED DRINKS AUTOMATICALLY
- CLEANING THE MILK CONTAINER AFTER USE
- DELIVERING HOT WATER
- STEAM DELIVERY
- TIPS FOR USING STEAM TO FROTH MILK
- CLEANING THE HOT WATER/STEAM SPOUT AFTER USE
- CUSTOMISING BEVERAGES
- MEMORISING YOUR PERSONAL PROFILE
- CLEANING
- CLEANING THE MACHINE
- CLEANING THE APPLIANCE INTERNAL CIRCUIT
- CLEANING THE COFFEE GROUNDS CONTAINER
- CLEANING THE DRIP TRAY
- CLEANING THE INSIDE OF THE COFFEE MACHINE
- CLEANING THE WATER TANK
- CLEANING THE COFFEE SPOUTS
- CLEANING THE PRE-GROUND COFFEE FUNNEL
- CLEANING THE INFUSER
- CLEANING THE MILK CONTAINER (D)
- CLEANING THE HOT WATER/STEAM CONNECTION NOZZLE
- DESCALING
- PROGRAMMING WATER HARDNESS
- MEASURING WATER HARDNESS
- SETTING WATER HARDNESS
- WATER SOFTENER FILTER
- INSTALLING THE FILTER
- REPLACING THE FILTER
- REMOVING THE FILTER
- TECHNICAL DATA
- TROUBLESHOOTING
- CAPPUCCINO
- CAPPUCCINOMIX
- LATTE MACCHIATO
- FLAT WHITE
- CAFFELATTE
Brand : SMEG
Model : CMSU4303X
Category : Coffee machine