
M8000 - Computer Mouse GIGABYTE - Free user manual and instructions
Find the device manual for free M8000 GIGABYTE in PDF.

| Product type | Wired gaming mouse |
| Brand | GIGABYTE |
| Model | GM-M8000 |
| Connectivity | Wired USB |
| Sensor | High precision optical laser |
| Resolution (DPI) | 400 to 4000 DPI adjustable in steps (4 levels by default) |
| USB report rate | 125 / 250 / 500 / 1000 Hz |
| Number of buttons | 7 programmable buttons (including 4-way scroll wheel) |
| Onboard memory | Yes, to store up to 15 configuration profiles |
| Configuration software | GHOST™ Engine (downloadable) |
| Main functions | Button assignment, macro editing, DPI adjustment, scrolling, multiple profiles |
| Dimensions (L x W x H) | Approx. 125 x 70 x 40 mm |
| Weight | Approx. 130 g (adjustable via weight compartment) |
| Power supply | Powered by USB port |
| Maintenance and cleaning | Clean with a soft dry cloth. Avoid moisture and solvents. |
| Safety | Do not open or expose to extreme temperatures. Use in compliance with CE standards. |
| Spare parts and repairability | Replaceable Teflon feet. Standard USB cable. Parts not available separately. |
| Package contents | GM-M8000 mouse, quick installation guide, software CD (optional) |
Frequently Asked Questions - M8000 GIGABYTE
User questions about M8000 GIGABYTE
0 question about this device. Answer the ones you know or ask your own.
Ask a new question about this device
Download the instructions for your Computer Mouse in PDF format for free! Find your manual M8000 - GIGABYTE and take your electronic device back in hand. On this page are published all the documents necessary for the use of your device. M8000 by GIGABYTE.
USER MANUAL M8000 GIGABYTE
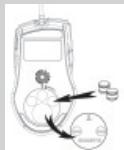
◆ GIGABYTE™ GM-M8000 Gaming Laser Mouse
◆ Installation Driver CD
◆ User's Manual
◆ Teflon Mouse Feet
◆ Weights and Case
1-2 Introduction
Congratulations on purchasing your own powerful weapon- GHOST™ gaming M8000 mouse. GIGABYTE GM-M8000 is a super powerful mouse designed specially for gaming users. It is equipped with the highest performance laser engine in the world: with the most accurate precision, no tracking lag, and highest resolution up to 4000dpi. Another powerful feature of this weapon is to its extra gaming buttons which give gamers the best short-cut to upgrade to the highest rank. Having it, you will be much more pleasure and easily to win every game competition you face.
In addition to hardware design, we also provide the best unique gaming software, GIGABYTE GHOST™ Engine, for gamers to record, to read, and to edit the desired scripts which include complicated keyboard and mouse commands.
With GHOST ^™ Engine integrating capability, your GM-M8000 remembers to save up to 15 onboard macro settings and assigned to any specific gaming buttons of the mouse without the need to reinstall driver software into other computers. Gamers just simply press the gaming button, to allow the mouse starts the function in according to recorded macros. GM-M8000 helps gamers get rid of repeated practice, reducing burdens, and having more funs.

CAUTION
Please DO NOT direct the laser beam to the eye.
1-3 Features
◆ High-performance AVAGO 6090 Laser sensor
◆ Adjustable sensitivity up to 4000 dpi
◆ Support 15 customizable onboard settings with macro editing
◆ 8KB GHOST™ Engine onboard memory
◆ Scroll wheel with 24 individual click positions
◆ 16-bit ultra-wide data path
◆ 5 independent programmable gaming buttons
◆ Easy "Up-down" DPI adjustment button
◆ Sweat-Proof Ergonomic streamline shape
◆ Ultra-Durable™ slick Teflon feet
◆ Gaming-grade USB cable with gold-plated USB connector
◆ Professional GHOST™ Engine software package is included
◆ 38 grams of metal weights are included
1-4 System Requirements
◆ CD-ROM Drive
USB Port
◆ Windows® 98/ ME/ 2000/ XP/ Vista
2 Mouse Introduction

Default button assignments
| A | Mouse button1 | Left Click |
| B | Mouse button2 | Right Click |
| C | Mouse button3 | Vertical & Horizontal scrolling |
| D | Mouse button4 | Forward |
| E | Mouse button5 | Backward |
| F | Mouse button6 | "Up & Down" DPI adjustment |
| G | Mouse button7 | Profile change |
| H | LED Dpi indicator | |
| I | Gaming-grade laser sensor | |
| J | Ultra-DurableTM slick Teflon feet | |
| K | GHOSTTM Engine onboard memory | |
| L | Weight adjustable compartment |

Keep the weight units out of reach of children.
CAUTION

NOTE
Weight-adjusting System
Adjust and balance mouse weight between 6g and 38g. Find the best combination of perfect weights to fit your gaming type.
2-1 Hardware Installation
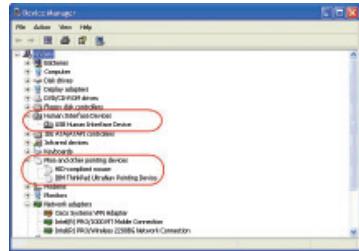
Step 1 Plug Mouse into the USB port of your computer.
Step 2 Open-->"Control Panel"-->"System"-->"Hardware"-->"Devices Manager" and confirm the mouse is working properly.
2-2 Using M8000 Gaming mouse
◆ Switch DPI & Obvious DPI LED indicator
You can increase or decrease the sensitivity (dpi) by pushing or pulling the Easy "Up-Down" DPI Adjustment button on the scroll wheel bar. The 4-degree LED indicator shows the current selected sensitivity. (Users can customize default dpi degree setting with GHOST™ Engine Software tool.)

In the first-person shooter games, programming a smaller dpi tracking sensitivity (e.g., 400 dpi) for sniping and shooting is recommended. An higher setting (e.g., 2000 dpi) for quicker movements.
◆ Switch profiles & three profile-setting-color LED Display
M8000 allows gamers to switch between customizable profiles in two ways:
- By assigning the function to a button via the GHOST ^TM Engine Software.
- By using the Quick-switch Gaming Profile button located on the top of the mouse.
When the active profile is switched, the GIGABYTE LED indicator of the mouse immediately changes the colors (including Red, Blue, and Green) to indicate the profile you selected.
3 Software Installation
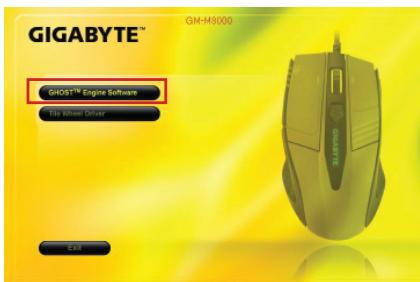
The CD included in the package contains two kinds of software :
the mouse driver and the gaming GHOST™ Engine Software tool. By assume your CD-ROM Drive is Drive D.
Before installing the driver of the mouse, we suggest you check weather there are any other mouse drivers installed in your system. If yes, in order to prevent possible conflict, please un-install or remove those drivers before installing the mouse.
3-1 GHOST™ Engine Software Installation
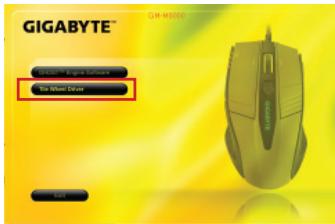
Step1 Please insert the driver CD into CD-ROM, you will see the GIGABYTE CD main menu. (If it does not show up, run "D:\setup.exe")
Step 2 Click the "GHOST™ Engine Software" button, to start installation of GHOST™ Engine Software.
Step 3 Click the "Next" button.
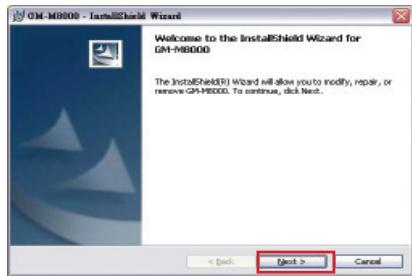
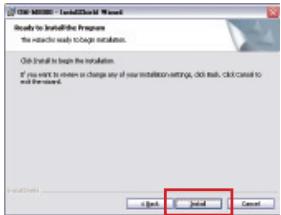
Step 4 Click the "Install" button to begin to install.
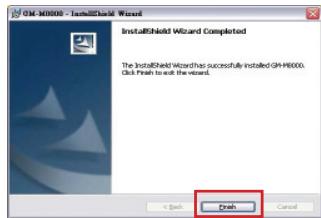
Step 5 Click the "Finish" to exit the wizard.
3-2 Tilt Wheel Software Installation
Since the mouse features plug & play, it is not necessary to install the driver to operate the basic function of mouse. You are required to install the mouse driver to run the tilt scrolling function effectively.
Step1 Click the "Tilt Wheel Driver" button to start installation of Tilt Wheel Driver.
Step2 Follow the instruction on the screen.
Step3 Hold the wheel to left to scroll left, hold the wheel to right to scroll right and confirm the 4-way scrolling is working appropriately after installing the driver.
4 Software Setting
Using GHOST ^™ Engine Mouse software, you can configure and save up to 15 customized gaming settings in our GM-M8000 in profiles for specific games without the need to reinstall driver software in other computer.
What kind of setting can you configure in GHOST ^TM Engine Mouse software?
- Normal function button assignment : Internet, media and some quick keys
- Advanced function button assignment : Macro Editor for both of mouse and keyboard
- Sensitivity setting from 400 to 4000dpi
- USB report rate
- Vertical and horizontal scrolling speed setting

Each setting is saved to the current profile on the current machine only.
4-1 GHOST™ Engine Introduction
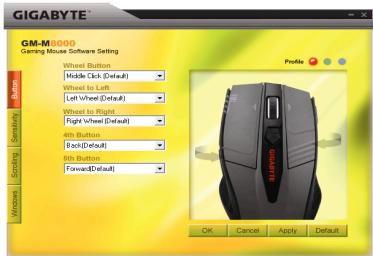
Main Window
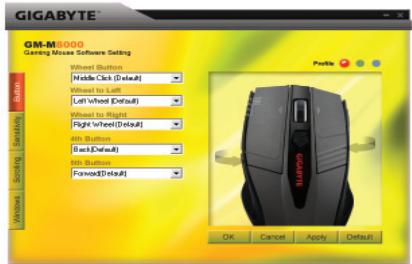
Button Configuration
You can assign various functions to buttons from the dropdown menu. For example, media and internet function. If the button function is not listed or you would like to assign a macro, please select "Macro Edit" from the dropdown menu.
Profile selection

There are three color LED lights on the panel: red, green, and blue, which indicate three profiles set up by the users. Remember that each individual profile can be assigned various functions to the five buttons.
Default - When you click "Default" button, the settings will be back to original factory default settings.
Apply - All current settings will be applied to the mouse
Cancel - All settings would not be applied to the mouse, and the window of GHOST ^TM software will be closed.
OK - All current settings will be applied to the mouse, and the window of GHOST ^TM software will be closed.
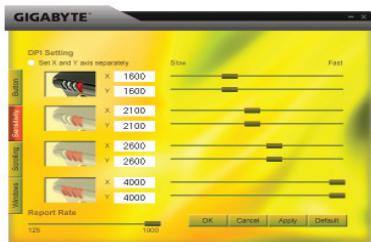
Sensitivity
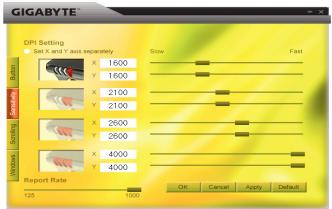
As default settings, there are four DPI level: 800, 1600, 3200, and 4000dpi. You can assign different dpi setting on your own demand by moving the knob on the slider. Check "set X and Y axis separately" option to adjust X-Y sensitivity levels individually.
Report rate
You can set the report rate to 125Hz (8ms), 250Hz (4ms), 500Hz (2ms), or 1000Hz (1ms) by moving the knob on the slider.
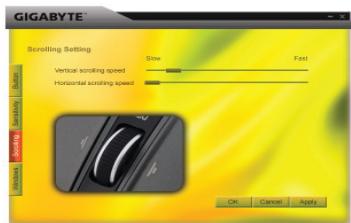
Scrolling
You can adjust vertical & horizontal scroll wheel speed by moving the knob on the slider.
Windows
You can click the "Windows" button. That allows you to link to Window® Mouse Control Panel.
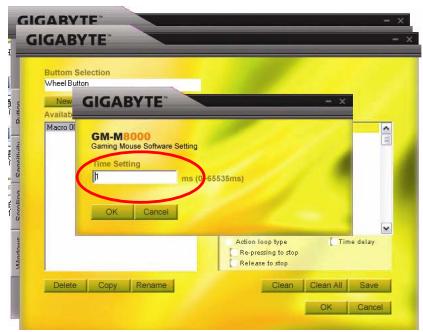
4-2 Macro Editing
The Macro Editor panel helps gamers easily record all keyboard and mouse commands. These steps are as following :
Step 1 Make sure GM-M8000 is connected to the PC.
Step 2 Execute the GHOST ^TM Engine Software.
Step 3 Select "Macro Edit" from the dropdown menu in Button panel.
Step 4 Press "New" to create a macro name automatically.
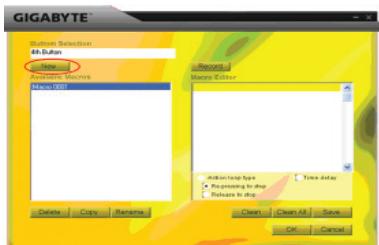
Step 5 Press "Rename" in case you would like to revise the original name.
Step 6 Press "Record" button to start recording all keyboard or mouse functions which you are operating into the Macro Editor.
Step 7 Press "Stop" button to finish recording this macro. If you don't press the "stop" button, the software will continue recording.
Step 8 Press "Save" button to save your commands you recorded in "Available Macros".
Stop 9 Press "OK" to put the macro on the dropdown menu in Button panel.
Step10 If you would like to apply macros you created into GM-M8000, you must to configure the buttons from the dropdown menu of "Button" panel. SEE "4-1 GHOST™ Engine Introduction".

-
Some special function keys such as multimedia function keys may not be recorded.
-
509 bytes recording space is provided to Middle/ 4^th / 5^th customizable button (about 200 scripts) and 253bytes for Wheel to left/right customizable buttons. Any macro command over the limit will not be saved and assigned to the gaming button.
Functions
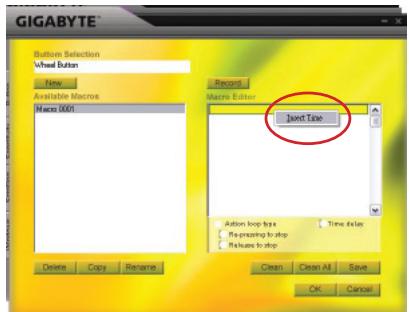
◆ Action loop type:
a. Re-pressing to stop: If this function is marked, the recorded macro will be executed repeatedly as you click the assigned button. Re-pressing the assigned button of the mouse to stop.
b. Release to stop: If this function is marked, the recorded macro will be executed repeatedly as you click the assigned button of the mouse until you release the assigned button.
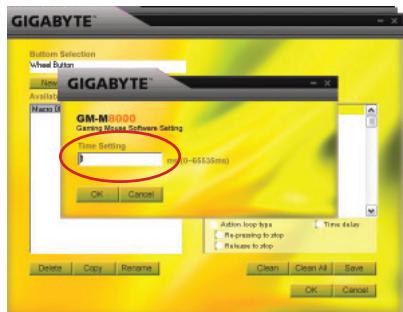
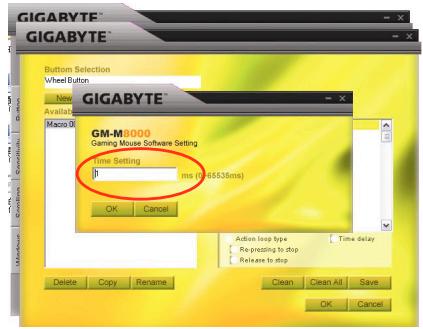
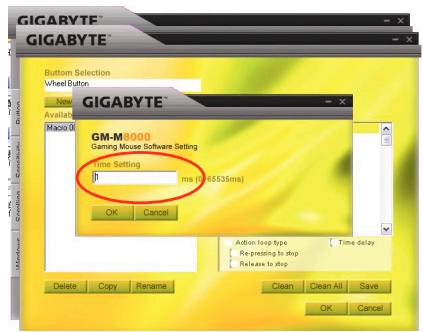
◆ Time delay: If this function is marked, it allows you to record the intervals between two commands. Moreover, double-click the time field option in the "Macro Editor" to modify the interval time.

New : Create an new macro name automatically
Record/Stop: Click "Record" button to start recording; meanwhile, the "Record" button will become the "Stop". After finishing recording, you need to stop re cording before further actions.
Clean : Clear the selected command
Clean all : Clear all commands in Macro Editor
Rename : Modify the original name
Copy : Copy the selected macro
Delete : Delete the selected macro
1. GM-M8000介紹

預設按鍵分配
Windows 視窗
New:自動建立一個新的巨集編輯名稱
natural_image
Technical line drawing of a steam iron with internal components and labeled part G (no text or symbols beyond label)
默认按钮分配
按钮配置
2-2 宏编辑

New: 自动建立一个新的宏编辑名称
ボタン構成
スクロール
Windows

natural_image
Technical line drawing of a mechanical component with no visible text or symbols
Tastenkonfiguration
Scrollen
Windows

natural_image
Technical line drawing of a mechanical component with no visible text or symbols
Configuration des boutons
Windows

natural_image
Technical line drawing of a mechanical component with no visible text or symbols
Windows

natural_image
Technical line drawing of a mechanical component with no visible text or symbols
Windows

natural_image
Technical line drawing of a mechanical component with no visible text or symbols
Windows

natural_image
Technical line drawing of a mechanical component with no visible text or symbols
Конфигурация кнопок
Скорость отклика
Windows
natural_image
Technical line drawing of a mechanical component with no visible text or symbols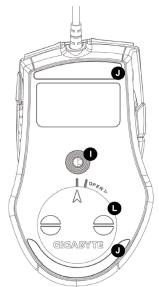
Windows
natural_image
Technical line drawing of a mechanical component with no visible text or symbols
Windows

natural_image
Technical line drawing of a steam iron component (no text or symbols)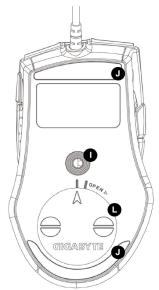
A gombok beállítása
Windows

natural_image
Technical line drawing of a steam iron with internal components and mounting base (no text or symbols)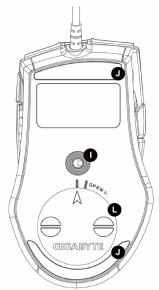
| הכלהה-הכלהה-הכלהה-הכלהה-הכלהה-הכלהה-הכלהה-הכלהה-הכלהה-הכלהה-הכלהה-הכלהה-הכלהה-הכלהה-הכלהה-הכלהה-הכלהה-הכלהה-הכלהה-הכלהה-הכלהה - TMUltra-Durable | A | |
| הכלהה-הכלהה-הכלהה-הכלהה-הכלהה-הכלהה-הכלהה-הכלהה-הכלהה-הכלהה-הכלהה-הכלהה-הכלהה-הכלהה-הכלהה-הכלהה-הכלהה-הכלהה-הכלהה-הכלה | B | |
| הכלהה-הכלהה-הכלהה-הכלהה-הכלהה-הכלהה-הכלהה-הכלהה-הכלהה-הכלהה-הכ. | C | |
| הכ. | D | |
| הכ. | E | |
| "הכ. DPI - DPI - DPI - DPI - DPI - DPI - DPI - DPI - DPI - DPI - DPI - DPI - DPI - DPI - DPI - DPI - DPI - DPI - DPI - DPI - DPI - DPI - DPI - DPI - DPI - DPI - DPI - DPI - DPI - DPI - DPI - DPI - DPI - DPI -DPI - DPI - DPI - DPI - DPI - DPI - DPI - DPI - DPI - DPI - DPI - DPI - DPI - DPI - DPI - DPI - DPI - DPI - DPI - DPI - DPI - DPI - DPI - DPI - DPI - DPI - DPI - DPI - DPI - DPI - DPI - DPI - DPI - DII - DPI - DPI - DPI - DPI - DPI - DPI - DPI - DPI - DPI - DPI - DPI - DPI - DPI - DPI - DPI - DPI - DPI - DPI - DPI - DPI - DPI - DPI - DPI - DPI - DPI - DPI - DPI - DPI - DPI - DPI - DPI - DPI - DPI = DPI - DPI - DPI - DPI - DPI - DPI - DPI - DPI - DPI - DPI - DPI - DPI - DPI - DPI - DPI - DPI - DPI - DPI - DPI - DPI - DPI - DPI - DPI - DPI - DPI - DPI - DPI - DPI - DPI - DPI - DPI - DPI - DPI - N - DPI - DPI - DPI - DPI - DPI - DPI - DPI - DPI - DPI - DPI - DPI - DPI - DPI - DPI - DPI - DPI - DPI - DPI - DPI - DPI - DPI - DPI - DPI - DPI - DPI - DPI - DPI - DPI - DPI - DPI - DPI - DPI - DPI- DPI - DPI - DPI - DPI - DPI - DPI - DPI - DPI - DPI - DPI - DPI - DPI - DPI - DPI - DPI - DPI - DPI - DPI - DPI - DPI - DPI - DPI - DPI - DPI - DPI - DPI - DPI - DPI - DPI - DPI - DPI - DPI - DPI - G - DPI - DPI - DPI - DPI - DPI - DPI - DPI - DPI - DPI - DPI - DPI - DPI - DPI - DPI - DPI - DPI - DPI - DPI - DPI - DPI - DPI - DPI - DPI - DPI - DPI - DPI - DPI - DPI - DPI - DPI - DPI - DPI - DPI | ||
| DPI - DPI - DPI - DPI - DPI - DPI - DPI - DPI - DPI - DPI - DPI - DPI - DPI - DPI - DPI - DPI - DPI - DPI - DPI - DPI - DPI - DPI - DPI - DPI - DPI - DPI - DPI - DPI - DPI - DPI - DPI - DPI - DPI -D P I - D P I - D P I - D P I - D P I - D P I - D P I - D P I - D P I - D P I - D P I - D P I - D P I - D P I - D P I - D P I - D P I - D P I - D P I - D P I - D P I - D P I - D P I - D P I - D P I - D P I -D P I - D P I - D P I - D P I - D P I - D P I - D P I - D P I - D P I - D P I - D P I - D P I - D P I - D P I - D P I - D P I - D P I - D P I - D P I - D P I - D P I - D P I - D P I - D P I - D P II - D P II - D P II - D P II - D P II - D P II - D P II - D P II - D P II - D P II - D P II - D P II - D P II - D P II - D P II - D P II - D P II - D P II - D P II - D P II - D P II - D P II - D P II - D P II - D P II - D P III - D P III - D P III - D P III - D P III - D P III - D P III - D P III - D P III - D P III - D P III - D P III - D P III - D P III - D P III - D P III - D P III - D P III - D P III - D P III - D P III - D P III - D P III - D P III - D P III - D PIII - D P III - D P III - D P III - D P III - D P III - D P III - D P III - D P III - D P III - D P III - D P III - D P III - D P III - D P III - D P III - D P III - D P III - D P III - D P III - D P III - D P III - D P III - D P III - D P III - D P II - D P II - D P II - D P II - D P II - D P II - D P II - D P II - D P II - D P II - D P II - D P II - D P II - D P II - D P II - D P II - D P II - D P II - D P II - D P II - D P II - D P II - D P II - D P II - D PII - D P II - D P II - D P II - D P II - D P II - D P II - D P II - D P II - D P II - D P II - D P II - D P II - D P II - D P II - D P II - D P II - D P II - D P II - D P II - D P II - D P II - D P II - D P II - D P II - D P B - D P B - D P B - D P B - D P B - D P B - D P B - D P B - D P B - D P B - D P B - D P B - D P B - D P B - D P B - D P B - D P B - D P B - D P B - D P B - D P B - D P B - D P B - D P B - D P B - D P C - D P C - D P C - D P C - D P C - D P C - D P C - D P C - D P C - D P C - D P C - D P C - D P C - D P C - D P C - D P C - D P C - D P C - D P C - D P C - D P C - D P C - D P C - D P C - D P C - D P I - D P I - D P I - D P I - D P I - D P I - D P I - D P I - D P I - D P I - D P I - D P I - D P I - D P I - D P I - D P I - D P I - D P I - D P I - D P I - D P I - D P I - D P I - D P I - D P II -D P II -D P II -D P II -D P II -D P II -D P II -D P II -D P II -D P II -D P II -D P II -D P II -D P II -D P II -D P II -D P II -D P II -D P II -D P II -D P II -D P II -D P II -D P II -D P II -D P II - D P II -D P II -D P II -D P II -D P II -D P II -D P II -D P II -D P II -D P II -D P II -D P II -D P II -D P II -D P II -D P II -D P II -D P II -D P II -D P II -D P II -D P II -D P II -D P II -D P III -D P III -D P III -D P III -D P III -D P III -D P III -D P III -D P III -D P III -D P III -D P III -D P III -D P III -D P III -D P III -D P III -D P III -D P III -D P III -D P III -D P III -D P III -D P III -D P III -D PIII -D P III -D P III -D P III -D P III -D P III -D P III -D P III -D P III -D P III -D P III -D P III -D P III -D P III -D P III -D P III -D P III -D P III -D P III -D P III -D P III -D P III -D P III -D P III -D P III -D P II -D P II -D P II -D P II -D P II -D P II -D P II -D P II -D P II -D P II -D P II -D P II -D P II -D P II -D P II -D P II -D P II -D P II -D P II -D P II -D P II -D P II -D P II -D P II -D P III - D P III -D P III -D P III -D P III -D P III -D P III -D P III -D P III -D P III -D P III -D P III -D P III -D P III -D P III -D P III -D P III -D P III -D P III -D P III -D P III -D P III -D P III -D P III -D P III -D P III - D P III -D P III -D P III -D P III -D P III -D P III -D P III -D P III -D P III -D P III -D P III -D P III -D P III -D P III -D P III -D P III -D P III -D P III -D P III -D P III -D P III -D P III -D P III -D P II -D P II - D P II -D P II -D P II -D P II -D P II -D P II -D P II -D P II -D P II -D P II -D P II -D P II -D P II -D P II -D P II -D P II -D P II -D P II -D P II -D P II -D P II -D P II -D P III -D P III -D P III - D P III -D P III -D P III -D P III -D P III -D P III -D P III -D P III -D P III -D P III -D P III -D P III -D P III -D P III -D P III -D P III -D P III -D P III -D P III -D P III -D P III -D PIII -D P III -D P III -D P III - D P III -D P III -D P III -D P III -D P III -D P III -D P III -D P III -D P III -D P III -D P III -D P III -D P III -D P III -D P III -D P III -D P III -D P III -D P III -D P III -D P III -D P II -D P II -D P II -D P II - D P II -D P II -D P II -D P II -D P II -D P II -D P II -D P II -D P II -D P II -D P II -D P II -D P II -D P II -D P II -D P II -D P II -D P II -D P II -D P II -D P III -D P III -D P III -D P III -D P III - D P III -D P III -D P III -D P III -D P III -D P III -D P III -D P III -D P III -D P III -D P III -D P III -D P III -D P III -D P III -D P III -D P III -D P III -D P III -D PIII -D P III -D P III -D P III -D P III -D P III - D P III -D P III -D P III -D P III -D P III -D P III -D P III -D P III -D P III -D P III -D P III -D P III -D P III -D P III -D P III -D P III -D P III -D P III -D P III -D P II -D P II -D P II -D P II -D P II -D P II - D P II -D P II -D P II -D P II -D P II -D P II -D P II -D P II -D P II -D P II -D P II -D P II -D P II -D P II -D P II -D P II -D P II -D P II -D P III -D P III -D P III -D P III -D P III -D P III -D P III - D P III -D P III -D P III -D P III -D P III -D P III -D P III -D P III -D P III -D P III -D P III -D P III -D P III -D P III -D P III -D P III -D P III -D P II -D P II -D P II -D P II -D P II -D P II -D P II -D P II - D P II -D P II -D P II -D P II -D P II -D P II -D P II -D P II -D P II -D P II -D P II -D P II -D P II -D P II -D P II -D P II -D P III -D P III -D P III -D P III -D P III -D P III -D P III -D P III -D P III - D P III -D P III -D P III -D P III -D P III -D P III -D P III -D P III -D P III -D P III -D P III -D P III -D P III -D P III -D P III -D P II -D P II -D P II -D P II -D P II -D P II -D P II -D P II -D P II -D P II - D P II -D P II -D P II -D P II -D P II -D P II -D P II -D P II -D P II -D P II -D P II -D P II -D P II -D P II -D P III -D P III -D P III -D P III -D P III -D P III -D P III -D P III -D P III -D P III -D P III - D P III -D P III -D P III -D P III -D P III -D P III -D P III -D P III -D P III -D P III -D P III -D P III -D P III -D PIII -D P III -D P III -D P III -D P III -D P III -D P III -D P III -D P III -D P III -D P III -D P III - D P III -D P III -D P III -D P III -D P III -D P III -D P III -D P III -D P III -D P III -D P III -D P III -D P III -D P II -D P II -D P II -D P II -D P II -D P II -D P II -D P II -D P II -D P II -D P II -D P II - D P II -D P II -D P II -D P II -D P II -D P II -D P II -D P II -D P II -D P II -D P II -D P II -D P III -D P III -D P III -D P III -D P III -D P III -D P III -D P III -D P III -D P III -D P III -D P III -D P III - D P III -D P III -D P III -D P III -D P III -D P III -D P III -D P III -D P III -D P III -D P III -D PIII -D P III -D P III -D P III -D P III -D P III -D P III -D P III -D P III -D P III -D P III -D P III -D P III -D P III - D P III -D P III -D P III -D P III -D P III -D P III -D P III -D P III -D P III -D P III -D P III -D P II -D P II -D P II -D P II -D P II -D P II -D P II -D P II -D P II -D P II -D P II -D P II -D P II -D P II - D P II -D P II -D P II -D P II -D P II -D P II -D P II -D P II -D P II -D P II -D P III -D P III -D P III -D P III -D P III -D P III -D P III -D P III -D P III -D P III -D P III -D P III -D P III -D P III -D P III - D P III -D P III -D P III -D P III -D P III -D P III -D P III -D P III -D P III -D PIII -D P III -D P III -D P III -D P III -D P III -D P III -D P III -D P III -D P III -D P III -D P III -D P III -D P III -D P III -D P III -H : H : H : H : H : H : H : H : H : H : H : H : H : H : H : H : H : H : H : H : H : H : H : H : H : H : H : H : H : H : H : H : H : H : H : H : H : H : H : H : H : H : H : H : H : H : H : H : H : H : H :H : H : H : H : H : H : H : H : H : H : H : H : H : H : H : H : H : H : H : H : H : H : H : H : H : H : H : H : H : H : H : H : H : H : H : H : H : H : H : H : H : H : H : H : H : H : H : H : H : H:H : H : H : H : H : H : H : H : H : H : H : H : H : H : H : H : H : H : H : H : H : H : H : H : H : H : H : H : H : H : H : H : H : H : H : H : H : H : H : H : H : H : H : H : H : H : H : H : H : H : W : H : H : H : H : H : H : H : H : H : H : H : H : H : H : H : H : H : H : H : H : H : H : H : H : H : H : H : H : H : H : H : H : H : H : H : H : H : H : H : H : H : H : H : H : H : H : H : H : H : F : H : H : H : H : H : H : H : H : H : H : H : H : H : H : H : H : H : H : H : H : H : H : H : H : H : H : H : H : H : H : H : H : H : H : H : H : H : H : H : H : H : H : H : H : H : H : H : H : H : G : H : H : H : H : H : H : H : H : H : H : H : H : H : H : H : H : H : H : H : H : H : H : H : H : H : H : H : H : H : H : H : H : H : H : H : H : H : H : H : H : H : H : H : H : H : H : H : H : H : N : H : H : H : H : H : H : H : H : H : H : H : H : H : H : H : H : H : H : H : H : H : H : H : H : H : H : H : H : H : H : H : H : H : H : H : H : H : H : H : H : H : H : H : H : H : H : H : H : H : 1 : H : H : H : H : H : H : H : H : H : H : H : H : H : H : H : H : H : H : H : H : H : H : H : H : H : H : H : H : H : H : H : H : H : H : H : H : H : H : H : H : H : H : H : H : H : H : H : H : H : M : H : H : H : H : H : H : H : H : H : H : H : H : H : H : H : H : H : H : H : H : H : H : H : H : H : H : H : H : H : H : H : H : H : H : H : H : H : H : H : H : H : H : H : H : H : H : H : H : H : T : H : H : H : H : H : H : H : H : H : H : H : H : H : H : H : H : H : H : H : H : H : H : H : H : H : H : H : H : H : H : H : H : H : H : H : H : H : H : H : H : H : H : H : H : H : H : H : H : H : L : H : H : H : H : H : H : H : H : H : H : H : H : H : H : H : H : H : H : H : H : H : H : H : H : H : H : H : H : H : H : H : H : H : H : H : H : H : H : H : H : H : H : H : H : H : H : H : H : H : |
הכלה - ™GHOST 2
GHOST™ Engine Mouse GHOST™, GHOST™, GM-M8000
?™ GHOST Engine Mouse
בַרְשָׁה בַרְשָׁה
(הכלה) Report rate
(הכלה) Scrolling
.
Windows
| Macro (הכלה) "Stop" "Available Macros" Button (הכלה) "GHOST 4-1" | 5 6 7 8 9 10 |

natural_image
Technical line drawing of a mechanical component with no visible text or symbols
Unapred zadate funkcije tastera
| A | Taster miša 1 | Levi klik |
| B | Taster miša 2 | Desni klik |
| C | Taster miša 3 | Vertikalno i horizontalno pomeranje (skrolovanje) |
| D | Taster miša 4 | Napred |
| E | Taster miša 5 | Nazad |
| F | Taster miša 6 | Podešavanje rezolucije (DPI) «veća & manja» |
| G | Taster miša 7 | Promena profila |
| H | LED indikator rezolucije | |
| I | Laserski senzor gejmerske klase | |
| J | Ultra-DurableTM elegantni teflonski oslonci | |
| K | GHOSTTM Engine ugrađena memorija | |
| L | Odeljak sa podesivom težinom |
2 Prikaz softvera GHOST™
Korišćenjem softvera GHOST™ Engine za miša možete da memorišete do 15 prilagođenih gejming podešenja u našem GM-M8000, u vidu profila za specifične igre, bez potrebe za reinstaliranjem upravljačkog programa na drugom računaru.
Kakva podešenja možete da konfigurišete u softveru za miš GHOST™ Engine?
- Uobičajene funkcije koje se dodeljuju tasterima: Internet, mediji i tasteri-prečice
- Napredne funkcije koje se dodeljuju tasterima: Macro Editor za miš i tastaturu
- Podešavanje osetljivosti od 400 do 4000 dpi
- Brzina USB odziva
- Podešavanje brzine pomeranja po vertikali i horizontali (skrolovanje)

Svako podešenje se čuva samo u trenutnom profilu na datoj mašini.
2-1 Prikaz softvera GHOST™ Engine
Glavni prozor
Konfigurisanje tastera
Tasterima možete da dodelite razne funkcije iz padajućeg menija. Na primer, funkcije medija i interneta. Ako se funkcija tastera ne nalazi na listi ili ako želite da dodelite makro, izaberite «Macro Edit» iz padajućeg menija.
Izbor profila

Na panelu se nalaze tri LED diode: crvena, zelena i plava, koje označavaju tri profila i koje mogu da podese različiti korisnici. Zapamtite da se u svakom profilu mogu dodeliti različite funkcije tasterima (kojih ima pet).
Unapred zadato - Kada kliknete na dugme «Unapred zadato», podešenja će biti vraćena na originalna fabrička unapred zadata podešenja.
Primeni
- Sva trenutna podešenja miša će biti primenjena.
Otkaži
- Sva podešenja miša se neće primeniti, a prozor softvera GHOST™ se zatvara.
OK
- Sva trenutna podešenja miša se primenjuju, a prozor softvera GHOST™ se zatvara.
Osetljivost
Postoje četiri unapred zadata nivoa rezolucije (DPI): 800, 1600, 3200 i 4000 dpi. Drugo dpi podešenje možete sami da zadate pomeranjem dugmeta na klizaču. Izaberite opciju «set X and Y axis separately» (posebno podesiti X i Y osu) da biste posebno podešavali nivoe X-Y osetljivosti.
Brzina odziva
Možete da podesite brzinu odziva od 125Hz (8ms), 250Hz (4ms), 500Hz (2ms) ili 1000Hz (1ms) pomeranjem dugmeta na klizaču.
Windows
Korak 5 Pritisnite dugme «Preimenuj» u slučaju da želite da promenite originalno ime makroa.
Korak 6 Pritisnite dugme «Record» (Snimaj) da započnete snimanje svih funkcija sa tastature ili miša, koje želite da uključite u Macro Editor.
Korak 7 Pritisnite dugme «Stop» da završite snimanje makroa. Ako ne pritisnete dugme «Stop», program će nastaviti da snima.
Korak 8 Pritisnite dugme «Sačuvaj» da biste snimljene komande sačuvali u delu «Dostupni makroi».
Korak 9 Pritisnite «OK» da biste umetnuli makro u padajući meni na panelu «Tasteri».
Korak 10 Ako biste hteli da primenite makroe koje ste kreirali kod miša GM-M8000, morate da konfigurišete tastere iz padajućeg menija kartice «Tasteri». POGLEDAJTE «4-1 Prikaz softvera GHOST™ Engine»

- Neki specijalni funkcijski tasteri, kao što su funkcijski tasteri za multimedije, možda neće moći da se snime.
- Dostupno je 2. 509 bajtova memorije za snimanje za srednji /4-ti/5-ti prilagodljivi taster (oko 200 skriptova) i 253 bajta za taster točkića i levi/desni prilagodljivi taster. Svaka makro komanda koja prekoračuje ove granice neće biti sačuvana ni dodeljena gejming tasteru.
Funkcije

Novi: Automatski kreira novo ime makroa
- 1-2 Introduction
- 1-3 Features
- 1-4 System Requirements
- Mouse Introduction
- Weight-adjusting System
- 2-1 Hardware Installation
- 2-2 Using M8000 Gaming mouse
- ◆ Switch DPI & Obvious DPI LED indicator
- ◆ Switch profiles & three profile-setting-color LED Display
- Software Installation
- 3-1 GHOST™ Engine Software Installation
- 3-2 Tilt Wheel Software Installation
- Software Setting
- 4-1 GHOST™ Engine Introduction
- Button Configuration
- Profile selection
- Sensitivity
- Report rate
- Scrolling
- Windows
- 4-2 Macro Editing
- Functions
- GM-M8000介紹
- Windows 視窗
- 按钮配置
- 2-2 宏编辑
- ボタン構成
- スクロール
- Tastenkonfiguration
- Scrollen
- Configuration des boutons
- Конфигурация кнопок
- Скорость отклика
- A gombok beállítása
- הכלה - ™GHOST 2
- בַרְשָׁה בַרְשָׁה
- (הכלה) Report rate
- (הכלה) Scrolling
- Prikaz softvera GHOST™
- 2-1 Prikaz softvera GHOST™ Engine
- Konfigurisanje tastera
- Izbor profila
- Osetljivost
- Brzina odziva
- Funkcije
Brand : GIGABYTE
Model : M8000
Category : Computer Mouse